SEARCH FINESCALE.COM

Enter keywords or a search phrase below:

251 Halftracks GB 1 October '08 - 8 June '09

129675 views
1459 replies
1 rating 2 rating 3 rating 4 rating 5 rating
  • Member since
    December 2002
  • From: Bury St Edmunds, Suffolk, England
Posted by Bish on Sunday, April 12, 2009 4:40 PM
panzer88 That looks alot better with that new antenna. I don't like any of the kit ones i have seen. And i like the sparten look when it comes to late war 251 markings. The only thing i would add is a set of number plates. I am deffinatly going to try to build one of those generators when i get round to mine.

I am a Norfolk man and i glory in being so


On the bench: Airfix 1/72nd Harrier GR.3/Fujimi 1/72nd Ju 87D-3

  • Member since
    April 2003
  • From: 41 Degrees 52.4 minutes North; 72 Degrees 7.3 minutes West
Posted by bbrowniii on Sunday, April 12, 2009 8:33 PM

 Bish wrote:
Thanks again bbrowniii all these pointers will help alot. These AFV kits, the Ausf C's anyway, sound a bit of a pain in the backside.

Bish

You could definately argue that they have some warts, but I'll also say that couple of my recent problems have been self-induced.  It is my own fault that the tool boxes are giving my a hard time - I should have test fit first, and I didn't.  It was one of those nights that I didn't have a ton of time, but wanted to feel like I had accomplished something so I figured I'd just throw those on before I went to bed...

I am not sure how clear my explanations were the other night, so here are a couple of pics to illustrate what I was talking about - most specifically about the tracks:

First, my trouble cutting the links:

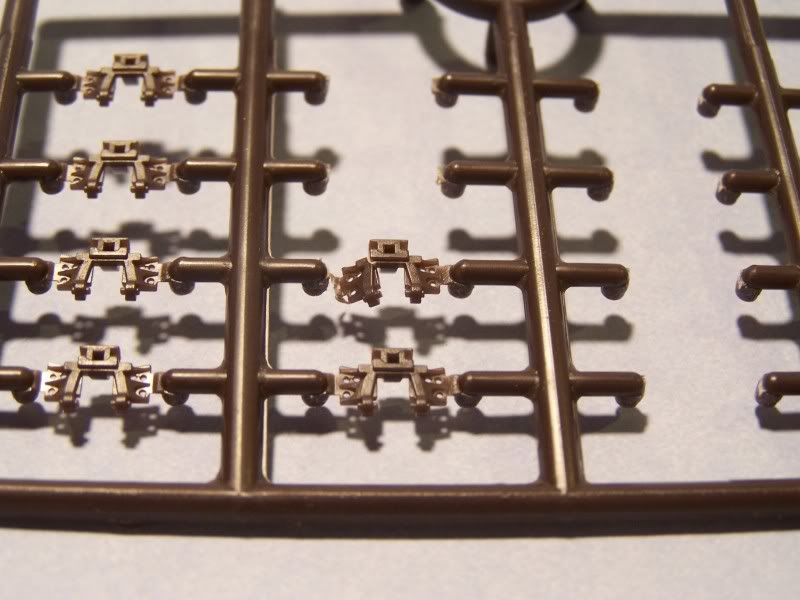
You can see the top link in the middle has broken when I tried to cut it off with my sprue cutters.  I ended up cutting them off with an x-acto, but leaving a good little tab of the sprue on there to be cleaned after cutting.

Second, the way the instructions have you construct the tracks and the jug I made to construct them my 'alternate' way:

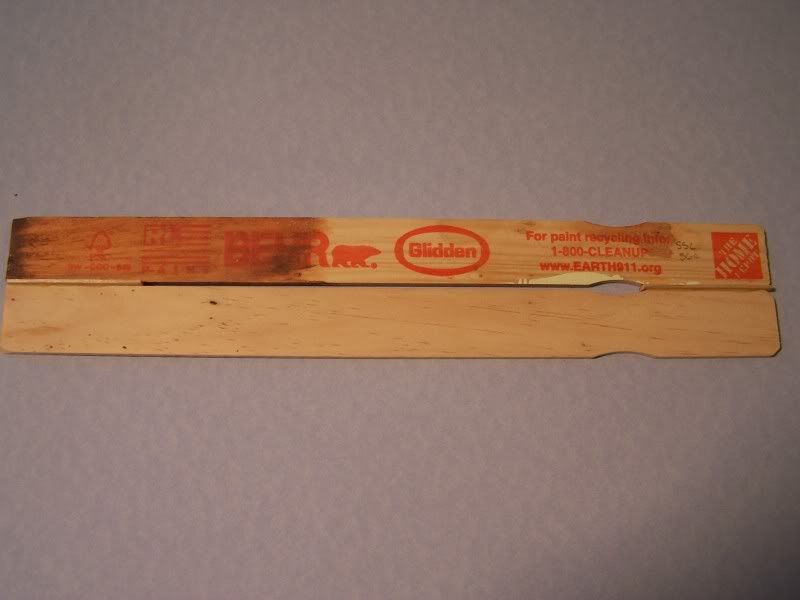
The jig is pretty darn crude, but it got the job done!

Finally, my tool box troubles:

Here you can see how the fender is curved upward at the rear, and the un-natural sit of the boxes.

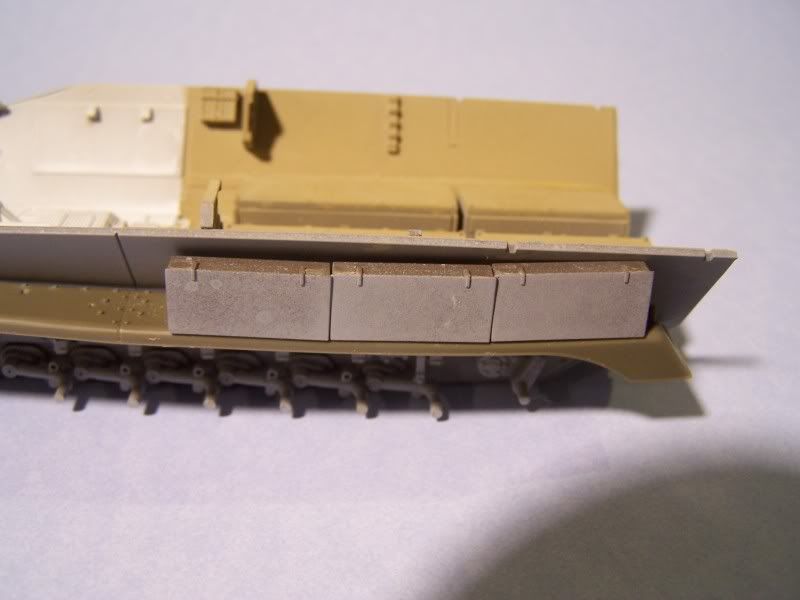
In this second shot you see what happens if I begin to take that bend out - the boxes pull away from the hull, leaving an... inconvenient gap.

Alrighty, I am going to spend an hour or so down at the bench before I hit the sack.  Maybe I'll figure out what to do with those damn fenders...

'All that is necessary for the triumph of evil is for good men to do nothing' - Edmund Burke (1770 ??)


  • Member since
    October 2007
  • From: N.H.
Posted by panzerguy on Sunday, April 12, 2009 10:28 PM
 

     Finished the gun shield last night early this morning. This thing was a kit in itself! There is a total of forty-nine parts for this thing and some of it was the smallest pe I've ever had to deal with.


  Tomorrow I hope to get base coat on the interior and hopefully the gun also.

 Boyd bummer on those tool boxes hope your able to get them straightened out.

  Ran into the same problem with the DML track links trying to get them off the sprues. I ended up snipping them off with most of the sprue still attached and then cutting it off with an x-acto. Had to wrap some duct tape on my thumb to keep from slicing it to ribbons.  

"Happiness is a belt fed weapon"

  • Member since
    November 2006
  • From: Coastal Maine
Posted by dupes on Monday, April 13, 2009 10:17 AM

Looking good, fellas!

Sorry to hear about your storage box woes Boyd. Steve - that gun is pretty impressive.

Got rolling on my /2 over the weekend. Am looking into cool paint schemes, but since it appears that no one else is going with a simple panzer gray I may have to head that route. Thumbs Up [tup]

  • Member since
    April 2003
  • From: 41 Degrees 52.4 minutes North; 72 Degrees 7.3 minutes West
Posted by bbrowniii on Monday, April 13, 2009 10:49 AM
 panzerguy wrote:
 

     Finished the gun shield last night early this morning. This thing was a kit in itself! There is a total of forty-nine parts for this thing and some of it was the smallest pe I've ever had to deal with.

49 parts??!!  Jeepers!  That is... well, it's... I mean... wow, crazy... Bow [bow]


 panzerguy wrote:
 

   Ran into the same problem with the DML track links trying to get them off the sprues. I ended up snipping them off with most of the sprue still attached and then cutting it off with an x-acto. Had to wrap some duct tape on my thumb to keep from slicing it to ribbons.  

Yup, I tried that too (cutting off the whole stub with the sprue cutters) but they still snapped.  That is what led me to my current x-acto fixation.  That idea about the duct tape on the thumb is definately worth a try - I'm donating too much blood to this project.

'All that is necessary for the triumph of evil is for good men to do nothing' - Edmund Burke (1770 ??)


  • Member since
    August 2007
  • From: n/w indiana
Posted by some assembly required on Monday, April 13, 2009 1:46 PM
sorry dupes youre not the only one with grey on the brain! im gonna do my /7 in grey with the 11th pz div markings.thats why im usuing walmart flat black primer. i took some pics but photobucket wouldnt let me upload them?? oh well not much to show but a pile of roadwheels and the lower chasis. i will figure out the photobucket issue soon Banged Head [banghead]

  • Member since
    November 2006
  • From: Coastal Maine
Posted by dupes on Monday, April 13, 2009 2:07 PM

Nice! Someone's gotta represent the old-school panzer gray. Big Smile [:D]

SAR - I know that you and Assurgeant were both going to be doing /7's - did you guys settle on which version each of you were doing so as not to double up?

  • Member since
    May 2006
  • From: Queensbury,NY
Posted by panzer88 on Monday, April 13, 2009 6:27 PM

Panzerguy- your 251/22 is going to be sweet with all that pe. You have a lot more patience than me, 49 parts just on the gun shield, that's nuts. My head is spinning just thinking about it,you are the man.Bow [bow].

Thanks guys for taking the time to look and offer some suggestions, I think that I might take your advice and add some license plate numbers and possibly some other markings.


  • Member since
    August 2007
  • From: n/w indiana
Posted by some assembly required on Tuesday, April 14, 2009 8:22 AM
i talked to assurgent a long time ago but really havent heard anything from him since.he seemed like it wasnt  to important to him about the var. im doing the plain /7 with out the "popgun" made by AFV. since its a "c" i decided to go with panzer gray for somthin a little diff.Big Smile [:D]

  • Member since
    March 2007
  • From: NJ
Posted by JMart on Tuesday, April 14, 2009 3:36 PM

dupes - PM inbound.... the /9 is now available...  :(


  • Member since
    October 2007
  • From: Louisville, KY
Posted by pordoi on Tuesday, April 14, 2009 6:58 PM

Wow, I leave for a couple of weeks to focus on the 1000 road wheel GB and you guys start posting progress photos and completed builds.


Boyd, Espins:  your builds are coming along nicely but sorry to hear about all the little glitches with the AFV Club kits.  How about some recent update photos you guys.


Panzerguy:  impressive detail on your /22.  Like the rear hatch springs.  49 parts for the gun shield?!!   You da Man!!!


Panzer88:  nice work with the generator and IR gear.  Agree that the new antenna is a great improvement.

 Don


  • Member since
    November 2006
  • From: Coastal Maine
Posted by dupes on Wednesday, April 15, 2009 9:17 AM

JMart - very sorry to hear that. 

Everyone else - anyone who's already done willing to bang out a /9? Tamiya or Dragon both make fine kits...it would give you something to do! Laugh [(-D]

Going to throw a post in the armor forum to see if we can pick up any new members to cover that /9, as well as the /23 that met an unfortunate end recently. 

  • Member since
    April 2003
  • From: 41 Degrees 52.4 minutes North; 72 Degrees 7.3 minutes West
Posted by bbrowniii on Thursday, April 16, 2009 10:42 AM
 pordoi wrote:

Boyd, Espins:  your builds are coming along nicely but sorry to hear about all the little glitches with the AFV Club kits.  How about some recent update photos you guys.

Pordoi

Thanks for the encouragement.  Fortunately, most of the glitches are just that, nothing too major to fix, so long as you are aware of it.

I'll be spending some time at the bench tonight and tomorrow - hope to have some pics up tomorrow.

Dupes: check your pm's!  I'm northbound!!

'All that is necessary for the triumph of evil is for good men to do nothing' - Edmund Burke (1770 ??)


  • Member since
    March 2008
  • From: Cheney, WA
Posted by FastasEF on Friday, April 17, 2009 1:34 AM

I've been absent for awhile but am now back. I haven't touched a model since the 48 hour GB but am itching to get going again.

Mine is also going to be Panzer Gray. I've missed a few pages but it looks like someone else is having issues with their AFV kit. I am also having problems. Unfortunatley I am not a very good modeler and am kind of stuck with what to do. I don't want to build a model that looks like crap but at the same time would like to finish by the due date and not work on it 24/7. Pictures from a distance ... lol.

Josh

  • Member since
    November 2006
  • From: Coastal Maine
Posted by dupes on Friday, April 17, 2009 7:40 AM
Josh - I know you can pull it off! Any updates since your last pic at all? I know you were working on getting the whole front end lined up properly the last time you checked in.
  • Member since
    December 2002
  • From: Reno, NV
Posted by espins1 on Saturday, April 18, 2009 7:21 PM
I spent a little time working on the running gear for the 251/1. I'm a little disappointed at the amount of flash on the drive sprockets, was a bit tedious to clean up.

Scott Espin - IPMS Reno High Rollers  Geeked My Reviews 

  • Member since
    October 2004
  • From: League City, Texas
Posted by sfcmac on Sunday, April 19, 2009 2:47 AM

 I'm still hanging around fellows and am awe struck by the great work!  PanzerGuy that has to be some gunshield! Bet your the only one who ever got one together! It looks sweet!

 Lots of good stuff happening! Bow [bow]

 I have been taking a lot of my bench time working on this Killer Fonderie Minatures kit of the 1/48 PV-1 Ventura. Has to be in the running for the most unbuildable kit of all times!  A real time and patience killer! 

 The 251/10 is a most welcome distraction some days. Finished up the vehicle except for a headset and rag hanging from the bent headlight.  Still looks a bit to clean so I will have to dirty dust it up a wee bit more.

The base is fun!  I don't know if I mentioned it but I have collected some dirt from some of my Army travels and used some for this base from a trading post in Egypt called El Alamein. 

Say what you will about my work but I can guarantee accurate dirt!

Ref pic.


The news paper and personal items are all scans of actual items that were taken from German POW's during the battle. Even the Newspaper has the correct date and stories if you had better eyes. LOL! Or a better photographer!

Adding stuff you can't see in the picture is the fun part!  I decided to show a meal in progress along with lots of stowage and personal items for the lived in look! The Utensils , opener and cans of CA (potted meat and Sausages) Are actual rations and have the ink stamps on the cans, Very tiny but I like how the bread turned out. Anyone ever paint model bread?

Probably a good day or two set aside to finish the figures and paint them along with adding some more rocks and vegitation to the scene and I can call her done.  Custom making figures in these poses from aluminite is tough!

You all see anything to add just holler as I hold your opinions in the highest regard!  Getting a complex about my gunshield! 47 parts? Jeeze Panzer Guy!  Wow!


  • Member since
    June 2008
Posted by lewbud on Sunday, April 19, 2009 3:52 AM

Aaron,

It's looking good.  Just one problem while the dirt may be accurate, it's the wrong scale.Mischief [:-,]

Buddy- Those who say there are no stupid questions have never worked in customer service.

  • Member since
    October 2004
  • From: League City, Texas
Posted by sfcmac on Sunday, April 19, 2009 10:24 AM
 lewbud wrote:

Aaron,

It's looking good.  Just one problem while the dirt may be accurate, it's the wrong scale.Mischief [:-,]

Shock [:O]Shock [:O]Shock [:O]Dead [xx(]Black Eye [B)] Oh man! Buddy!  and after all that effort I put into grinding down the dried Camel poo! That stuff gets all over the place think I still got some in between my teeth! Laugh [(-D]

  • Member since
    July 2006
  • From: San Francisco Bay Area
Posted by bufflehead on Monday, April 20, 2009 1:59 AM

I'm checking in fellas!  Been away for another long while due to work responsibilities, which means of course I had very little bench time!  Still I managed to complete a build for another GB so now I can focus on the next 2 GBs ending soon!  In my last post a few weeks ago I mentioned that I was waiting for the Blast Models Uhu Upgrade to arrive, and indeed it did late last month.  So lets take a look at it:

Hmmm....I was expecting a bigger box.

Well, at least the parts are nicely bagged!

OK, I see now why the small box!  Even with the bagged add-ons bits there's not much resin, but I'm sure it will make a difference when complete!  Is that a whole radio set included?  NIIIIIICE!!

Wow!  The resin 8Kw generator is REALLY sweeeeeet!!

Now that I have some time, I'll get this one going again, but I have to give priority to the Tamiya JS-2 that I'm building for Scott's RSotR GB as it ends in 3 weeks! 

Boyd, your AFV problems don't bode well for me!  I'll be doing a LOT of dry fitting on my Uhu!!

Ernest

Last Armor Build - 1/35 Dragon M-26A1, 1/35 Emhar Mk.IV Female


Last Aircraft Builds - Hobby Boss 1/72 F4F Wildcat & FW-190A8


  • Member since
    December 2002
  • From: Bury St Edmunds, Suffolk, England
Posted by Bish on Monday, April 20, 2009 3:01 AM
bufflehead This is another one i am looking forward to seeing come together as i have the same kit. Like  the look of the upgrade, think i might be ordering that next month.

I am a Norfolk man and i glory in being so


On the bench: Airfix 1/72nd Harrier GR.3/Fujimi 1/72nd Ju 87D-3

  • Member since
    November 2006
  • From: Coastal Maine
Posted by dupes on Monday, April 20, 2009 10:30 AM

Ahhh, everyone is coming out of the woodwork for the final 8 week push! I have a feeling this thread is going to get VERY busy here very shortly...Wink [;)]

SFCMac - really like this, especially with the authentic dirt! Laugh [(-D] Probably my only suggestion would be to dull down the actual vehicle finish. Seems a bit shiny to me? Otherwise she looks good.

Ernest - glad that box o' resin finally showed up. You don't have any sort of mold-making apparatus, do you? Sure there are a few peeps here who might enjoy a resin casting of that generator...Whistling [:-^] Get on that JS-2! I want me some Uhu!

  • Member since
    April 2007
  • From: Schroon Lake, NY
Posted by SMJmodeler on Monday, April 20, 2009 10:36 AM

Guys: I finally have some work to share!  Here's the interior with the PE work done:

Unfortunately the PE for the gun rack scewed the seatbacks out of square and it was too late for me too fix it after the CA glue had driedBanged Head [banghead].  Other than that the PE was not too bad...This was my first serious PE attempt...MAN it's slow and tedious!  The results are worth it though.

This is also my first open top AFV so I had to think out the painting and assembly thoroughly.  I painted the interior and the bottomside of the top-half first.  Because I need to camo' this puppy I had to assemble and paint the rocket launcher assemblies separately and leave them off for now.  In order to reach the instrumet panel, the steering wheel is left out and to get the seats right I'll paint them before gluing them in.  I will completely paint and detail the inside, then glue the top on. A good masking...then comes the camo'...then glue the rocket assemblies on.  WOW!...much more brain damage than a tank!  Here's how she looks as of last night:


  • Member since
    November 2006
  • From: Coastal Maine
Posted by dupes on Monday, April 20, 2009 11:14 AM
Shoot Steve, for your first real foray into PE it looks like very solid work to me! Big Smile [:D]Thumbs Up [tup]
  • Member since
    December 2002
  • From: Bury St Edmunds, Suffolk, England
Posted by Bish on Monday, April 20, 2009 11:58 AM

SMJmodelern you could certainly fool me that this is your first serious attempt at PE. It deffinatly slows down a build. I will often be sat at the bench, cutting folding and glueing a few bits, and an hour has gone before i know it. Open topped AFV's certainlt need a different approach when it comes to painting.

Judging by the running gear, am i correct in thinking this is the Tamiya Stuka Zu fuss. I built this a few years ago OOB and i think it was my first opened topped vehicle. Iliked it, went together well.

Is this where we get to see how you weather a vehicle with more than one colour in the scheme. If so i will be keeping glued to this.

I am a Norfolk man and i glory in being so


On the bench: Airfix 1/72nd Harrier GR.3/Fujimi 1/72nd Ju 87D-3

  • Member since
    October 2007
  • From: Louisville, KY
Posted by pordoi on Monday, April 20, 2009 8:43 PM

The pace is picking up here as the end of this GB nears.  Lots of really nice builds going on; it will be fun to watch them take shape in the coming weeks.  My build is already complete; the 251/18 for those that might not remember.  At the time it was finished, I threatened to mount it on a display base, but my efforts were attracted instead to the 1000 road wheel GB.  But since this GB is nearing its end, I came back determined to follow up on the /18.  A simple base was all that was needed.  But then, there was that Custom Dioramics Italian Farmhouse kit at the LHS; and a few additional figure sets that looked interesting.  I came across some Hudson and Allen materials; never worked with them until now.  Before you know it, I'm into a full blown project.  Here is the result.  First, an overview;


Manstein's Revenge commented on the original build that one of the antennas should probably be a star antenna.  He is likely correct, so I added a PE star antenna from a Tasca kit that was initially intended for a command tank.  Added a few more things that might not be very visible in the pics here.  Like a map case and set of binoculars on the map table.  Check out the dio Forum for additional pics.  The setting is supposed to be in Italy; the farmhouse is in ruins as the terrain changed hands from German to British 8th Army and back again.  Artillery bombardment has topped or toppled the trees.  And our boys here are calling in the coordinates for a little payback.  A crew member has just taken some sightings and is breaking down the scissors scope after relaying coordinates to the commander and radio crew.


Ready for a quick escape before the shells start flying....


The radio crew is busy at the moment.


That's all for now.  Some additional comments on the construction and some more pics will be posted shortly to the Dio forum.

 Don


  • Member since
    December 2002
  • From: Bury St Edmunds, Suffolk, England
Posted by Bish on Tuesday, April 21, 2009 2:44 AM

pordoi I absoloutly love this, this is an amazing Dio Thumbs Up [tup]Thumbs Up [tup]Thumbs Up [tup]. I think you have got everything spot on, from the look of the building, the ground cover, and that ivy crawlinf up the wall is brillant.

Might just inspire me to get on with my Dio's. So far i have 3 completed kits sitting lonely on a shelf.


I am a Norfolk man and i glory in being so


On the bench: Airfix 1/72nd Harrier GR.3/Fujimi 1/72nd Ju 87D-3

  • Member since
    April 2007
  • From: Schroon Lake, NY
Posted by SMJmodeler on Tuesday, April 21, 2009 9:07 AM
 Bish wrote:

SMJmodeler: Judging by the running gear, am i correct in thinking this is the Tamiya Stuka Zu fuss...

YEP, she's the Tamiya Stuka Zu Fuss!

 Bish wrote:

Is this where you show how you weather a vehicle with more than one colour in the scheme. If so i will be keeping glued to this.

This will be a two-color camo' scheme, and yes I will show how I weather it.  Three color camo' weathering will be tackled on my next build...a Tiger I-Mid

  • Member since
    November 2006
  • From: Coastal Maine
Posted by dupes on Tuesday, April 21, 2009 9:43 AM

Let's try this again (third post attempt):

Don - you took a great build and made it even better with this dio, IMHO. Both the setting and story add even more to your 251! Heading over to the dio's forum to see what info I can glean about how you pulled all of this off...Wink [;)]

  • Member since
    December 2002
  • From: Bury St Edmunds, Suffolk, England
Posted by Bish on Tuesday, April 21, 2009 11:08 AM
SMJmodeler Now you have got my attention. When i did my kugel i just followed your steps for a single colour scheme as it only had small patches of green and brown. So i will be really looking forward to this, thanks.

I am a Norfolk man and i glory in being so


On the bench: Airfix 1/72nd Harrier GR.3/Fujimi 1/72nd Ju 87D-3

JOIN OUR COMMUNITY!

Our community is FREE to join. To participate you must either login or register for an account.

SEARCH FORUMS
FREE NEWSLETTER
By signing up you may also receive reader surveys and occasional special offers. We do not sell, rent or trade our email lists. View our Privacy Policy.