SEARCH FINESCALE.COM

Enter keywords or a search phrase below:

M119 105mm Howitzer, 25ID in Afghanistan, *Complete w/o figs* Aug 30, 2008

34996 views
59 replies
1 rating 2 rating 3 rating 4 rating 5 rating
  • Member since
    September 2007
  • From: Relocating
Posted by Mobious on Saturday, August 16, 2008 6:37 PM

 Hello redleg12,

 The M119 camo is looking good. Curious to see how the barrier wall turns out. That styrofoam looks like it has many possibilities. I'll have to add it to my bench supplies. 

 Keep up the good work and...

 Best Regards, 


"It's a problem of applied physics" Roy Brown

  • Member since
    June 2005
  • From: Massachusetts
Posted by minimortar on Saturday, August 16, 2008 6:39 PM

It's a beauty Mike! Happy to see the third color in there as well. Lookin' forward to more!

Thanks,
Kevin Keefe

Mortars in Miniature
A Scale Model (Plus!) Collection of the Infantryman's Artillery

  • Member since
    July 2006
  • From: New Jersey
Posted by redleg12 on Saturday, August 16, 2008 6:41 PM

Mobius - Michael's has the sheets in different thicknesses for flower potting. Works great for a lot of different scratch ideas.

Thanks for looking and your comments.

Rounds Complete!!


"The Moral High Ground....A Great Place to Emplace Artillery."

  • Member since
    January 2007
Posted by the doog on Saturday, August 16, 2008 9:02 PM
Nice little boomer there, Mike! Smile [:)]
  • Member since
    December 2002
  • From: Valrico, FL
Posted by HeavyArty on Saturday, August 16, 2008 10:42 PM
That looks great Bro.  Excellent job so far.  Can't wait to see it done.

Gino P. Quintiliani - Field Artillery - The KING of BATTLE!!!

Check out my Gallery: https://app.photobucket.com/u/HeavyArty

"People sleep peaceably in their beds at night only because rough men stand ready to do violence on their behalf." -- George Orwell

  • Member since
    July 2006
  • From: New Jersey
Posted by redleg12 on Sunday, August 17, 2008 1:06 PM

Kevin - Ok...so I'm slow on the last color of the 3 color camo...Thanks

Karl - Thanks for looking in and your comments.

Gino - Nice to have your "brother" stop by. Thanks again.

Rounds Complete!! 

"The Moral High Ground....A Great Place to Emplace Artillery."

  • Member since
    July 2003
  • From: Toronto, Ontario, Canada
Posted by zokissima on Monday, August 18, 2008 6:34 AM
Having heard this kit discussed on and off for the last few years, it is good to finally see one being put together. And you are certainly performing a fantastic job with it. Definitely one of my various annoyances is fixing sub-par resin parts.
  • Member since
    November 2005
Posted by Anonymous on Monday, August 18, 2008 2:06 PM
Wow, you've really tamed this beast...from what I saw earlier in your thread you have done a great job with a mediocre resin kit...very nice...what does the texturizing on the green recoil housings represent?
  • Member since
    October 2007
Posted by White_R34 on Monday, August 18, 2008 2:38 PM
Awesome job manThumbs Up [tup]Thumbs Up [tup]Thumbs Up [tup]Thumbs Up [tup]
Building the Impossible Is my main goal!!
  • Member since
    March 2007
  • From: NJ
Posted by JMart on Monday, August 18, 2008 4:04 PM
I just read this WIP from the begining.. and WOW what a difference! from that resin "puddle" of parts, to a nice WIP... my hats off to you! cheers


  • Member since
    July 2006
  • From: New Jersey
Posted by redleg12 on Monday, August 18, 2008 8:36 PM

zokissima - Thanks for the comments. It can build out nice but the parts need work. mouse House is a small operation so the quality is not like Hobby Fan or Verlinden. But once you get past the parts problem, it can be nice. Thanks again.

Wayne - Thanks for looking

Manny - Thanks for looking. Keen eye for the texture but they are not for recoil. Those are the equalibrators....big springs on either side that equalize the weight of the tube when elevating. On the M119, the springs have a canvas cover over them. The part is molded with the canvas texture. The ride rods I replaced the resin with styrene coated wire.

FYI, the recoil system is on top of the barrel. The small tank perpendicular to the barrel and the connecteted cylinder on top of the barrel. The smaal tank is a hydraulic reseviour and the connecting cylinder is the recuptor piston, which extends during recoil.

Thanks for looking and your comments  

White - Thanks for looking and your comments

JMart - Its been an adventure. But I think I am getting close to a happy ending!! Thanks for your comments

Again, thanks to all the comments are appreciated.

Rounds Complete!!

"The Moral High Ground....A Great Place to Emplace Artillery."

  • Member since
    July 2006
  • From: New Jersey
Posted by redleg12 on Sunday, August 24, 2008 5:10 PM

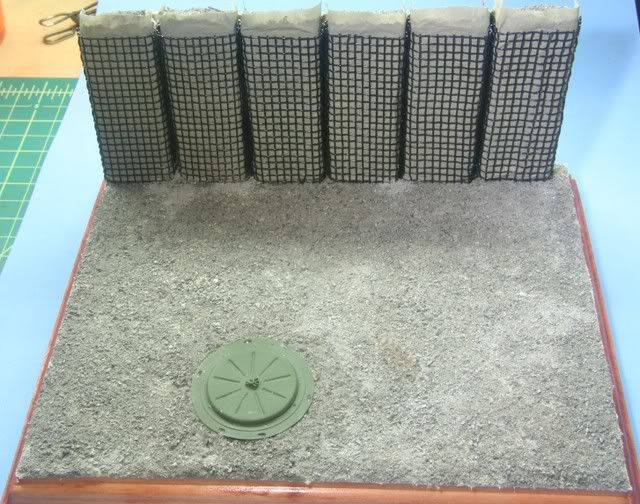
With the base made, stained and coated, I put down a thin coat of Celluclay for a base. After a trip to my local garden shop, I picked up some rock dust which is used as a bed for paving stones. I strained the big chunks using window screen material and used the screened dust for the ground base.

Going back to the barrier wall, I covered each section with airplane tissue and landscape cement, leaving some excess at the top to form the open top bag. After drying, the back walls (tall bags) were painted a light grey while the short bags for the ammo storage were painted Olive Green.

While I was out getting dust, I stopped at Michael's and picked up some mesh material which was close to the proper opening space. The wire is slightly thicker than desired but I was more interested in the proper grid sizing the wire thickness.

The mesh was cut and bent around each section to form the bag cage. To hold the wall sections together, I glued each section to popsicle sticks to form the wall. Once the assembly was dry, I drilled three wire pins into the base then fit and glued the wall to the base.

Lastly, I filled the top of the bag with the same screened material used for the ground. Note the M119 base fitted into the groundwork.

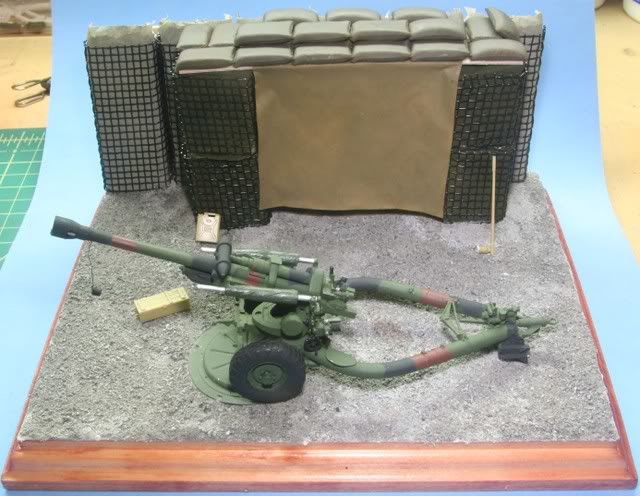
After the wall set up in place I glued the short bags in a stack of two. Once they set up using wire pins, I pinned them to the back wall and glued them to the base.

Over the top of the ammo area, I used some 1/64 basswood to span the bags and a sprue of Tamiya sandbags to cover the basswood.. The cover is made from airplane tissue painted and glued to the basswood before the sandbags were installed.

Now it was time to do a fit check. Some detail items just laid in, water can, crow bar, chest.

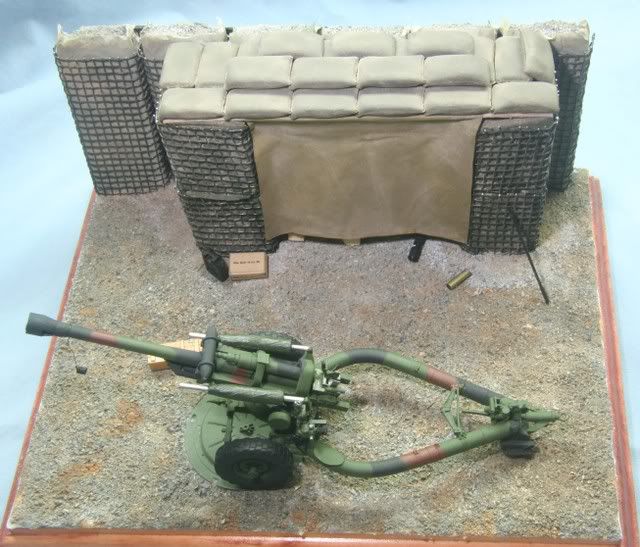
I weathered the bags, sandbags and cover with a mix of MIG pigments, both dried mud and city rubble. The ground work was washed with some burnt sienna oil to give the look of soil and rock mixed.

With the little details painted, I also added a pallet made from balsa wood and some crates, ammo fiber and empty casing as dunnage, a box of MREs and a water can, the crow bar and the finished section crate.

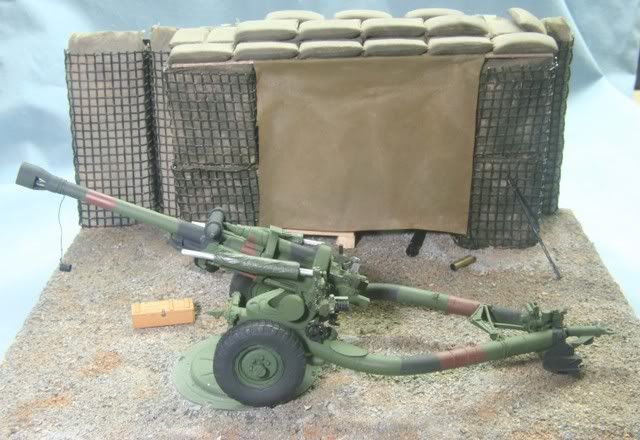
Well that's where I am at. The howitzer needs some barrel art and marking numbers after which it needs to be weathered. Then I can attaché it to the base permanently. That should go quickly this week.

At this point let me give a big thanks to Gino (Heavy Arty) who gave me the information on the barrier walls used in Iraq and Afghanistan....Thanks little brother!

The last question is figures or no figures. I kept the overall base small and the howitzer is closer to the wall than scale so I am thinking no figures. What do you think.

That's it for now. Thanks for looking. All comments welcome.

Rounds Complete!!


"The Moral High Ground....A Great Place to Emplace Artillery."

  • Member since
    November 2003
  • From: savannah ga.
Posted by GA.modelmaker on Sunday, August 24, 2008 6:48 PM
now thats some talent and a great llooking build you've got thier.
  • Member since
    September 2007
  • From: Relocating
Posted by Mobious on Sunday, August 24, 2008 7:00 PM

 Hello redleg12,

 Looks like your arty is ready for action. A very nice build on a difficult resin kit. Looks well worth the efforts!

 As far as adding figures, I would say that it would really depend on how much room is available and the number of figures in the crew. With the muzzle "Unplugged" I would guess the gun is in use and needing a crew. Just my My 2 cents [2c].

 I noticed in the pics that the tires look deflated just a little bit. Is that due to recoil of the gun?

 The barrier wall turned out very good. Waiting to see the weathering, It should really make the 105 Howi bark! Thanks for posting your WIP and Keep posting the updates.

 Best Regards,

"It's a problem of applied physics" Roy Brown

  • Member since
    August 2006
  • From: Cygnus X-1
Posted by ogrejohn on Sunday, August 24, 2008 7:26 PM
Wow Redleg, that looks very nice!
  • Member since
    June 2005
  • From: Massachusetts
Posted by minimortar on Sunday, August 24, 2008 9:14 PM

Great idea and great execution Mike!! This will be a unique display for sure! The only thing that I'm not all that thrilled about is the usage of the Tamiya plastic sand bags. They look to 'chicklet' to me. I'd opt for making some hand-pressed bags out of a self-hardening modeling clay and using a piece of cotton t-shirt for texture instead. This stuff is found at most hobby shops and art supply places. I've made a million of them, they will shrink some (use very little water to keep moist... work FAST!) but dry hard as rock, paint and hold up really well. Add the tied (sewing thread) ends to 'turn 'em up a notch' too.

This is probably the most I've seen of the M119 and I'm (like always) enjoying the hell out of your build(s)!

Thanks,
Kevin Keefe

Mortars in Miniature
A Scale Model (Plus!) Collection of the Infantryman's Artillery

  • Member since
    January 2007
Posted by the doog on Sunday, August 24, 2008 9:33 PM

That looks geat Mike! That barrier wall is pretty cool too! A really good looking little project. Gonna put some dudes in there too?


  • Member since
    December 2002
  • From: Valrico, FL
Posted by HeavyArty on Sunday, August 24, 2008 11:39 PM
Looking great.  The Hesco Barrier walls came out looking great.  The whole sceen looks awesome.  I agree with Keith though, th esandbags neeed to be replaced.  I would put a figure or to to give it some sense of size as well. 

Gino P. Quintiliani - Field Artillery - The KING of BATTLE!!!

Check out my Gallery: https://app.photobucket.com/u/HeavyArty

"People sleep peaceably in their beds at night only because rough men stand ready to do violence on their behalf." -- George Orwell

  • Member since
    June 2005
  • From: Massachusetts
Posted by minimortar on Monday, August 25, 2008 7:31 AM

 HeavyArty wrote:
I agree with Keith... 

Well, you can call me "Keefe" (rymes with beef... it's what's for dinner... the beef, not the Keefe),

you can call me "Kevin",

you can call me "Sarge",

you can call me "me up",

you can call me "for dinner"

You can call me "out to lunch"

You can call me "ugly"

or what ever else "fits"...

But ya can't be callin' me "Keith". Laugh [(-D]  (You've called me that a couplel of times in the past.) Laugh [(-D]

Big salute out to you Gino... Hope that all is well!

Thanks,
Kevin Keefe

Mortars in Miniature
A Scale Model (Plus!) Collection of the Infantryman's Artillery

  • Member since
    July 2006
  • From: New Jersey
Posted by redleg12 on Monday, August 25, 2008 8:22 AM

GA, Mobious and Ogrejohn - Thanks for looking and your comments

Karl - Been going through my little dudes (I prefer scale redlegs) pile. Going to give it a try

Kevin and Gino - OK.....I know I do a lot of scratch building and I try to take one short cut and you catch me Shock [:O]. Gino may be too young but Kevin, they are not chicklets....at our age they are feen-o-mints!!

I will finish up the weathering on the M119, then I am going to try to take the top pile off and make up some clay bags.....I will use the chicklets as the covered base. Hopefully that will look better.

Then I will try some figs. Not my strong suit but I have to start somewhere.

As always, thanks for looking and your honest comments.

Rounds Complete!!

"The Moral High Ground....A Great Place to Emplace Artillery."

  • Member since
    December 2002
  • From: Valrico, FL
Posted by HeavyArty on Monday, August 25, 2008 10:13 AM

Sign - Oops [#oops]Sorry Kevin.  I am bad with names.


Mike, you didn't think you could slip by with sub par work with us did you?  Big Smile [:D]

Gino P. Quintiliani - Field Artillery - The KING of BATTLE!!!

Check out my Gallery: https://app.photobucket.com/u/HeavyArty

"People sleep peaceably in their beds at night only because rough men stand ready to do violence on their behalf." -- George Orwell

  • Member since
    July 2006
  • From: New Jersey
Posted by redleg12 on Monday, August 25, 2008 10:58 AM

Gino......My bad, I'll punch that round and reload a new lot Whistling [:-^]

Kevin.....You have to excuse my younger brother, he is still in the mode of reading the right side and last name only....Smile,Wink, & Grin [swg].....It could be worse....wait until he reachs the age of no names due to senior moments....then everyone is "hey you...Mr. K???"

Thanks Guys

Rounds Complete!!


"The Moral High Ground....A Great Place to Emplace Artillery."

  • Member since
    July 2006
  • From: New Jersey
Posted by redleg12 on Saturday, August 30, 2008 3:43 PM

For your comments:

First....for those sandbag fans who hate feen-a-mint bags..here is the re-done sand bag pile

After finishing details, washing and weathering...here we are

Close up of the one thing I could not really make look better, the sights...they still have that blob of resin look....

I gave a little barrel art to the weapon

The rear area with the markings of the 2nd battalion 377th Parachute Field Artillery from the 25th ID....gun A2

Breech area

Well that's it for this one for now. I thought I had the figs I wanted on the shelf but not quite right. I'll look for some figs at AMPSEAST in a few weeks and add them later. For now....that's it on this one (unless some finds an OOPS I missed).

As always, your comments positive or negitive, are always welcome. Next build...Italeri M113 built with NASA markings used as the Space Shuttle Escape Vehicle.

Thanks as always for looking.

Rounds Complete!! 

"The Moral High Ground....A Great Place to Emplace Artillery."

  • Member since
    December 2002
  • From: Valrico, FL
Posted by HeavyArty on Sunday, August 31, 2008 1:55 AM
Looks great Mike.   I like it a lot.  The sandbags look much better.  Great job.

Gino P. Quintiliani - Field Artillery - The KING of BATTLE!!!

Check out my Gallery: https://app.photobucket.com/u/HeavyArty

"People sleep peaceably in their beds at night only because rough men stand ready to do violence on their behalf." -- George Orwell

  • Member since
    September 2007
  • From: Relocating
Posted by Mobious on Sunday, August 31, 2008 2:55 AM

Shalom redleg12,

 Very nice work. The sandbags look tons better! The barrel graffiti shows attention to detail. The weathering IMO brings everything together. A very nice display of our active equipment. Thanks for sharing it!

 Enjoy AMPSEAST!

 Will be looking for the m113 rescue vehicle.

 Best Regards,


"It's a problem of applied physics" Roy Brown

  • Member since
    July 2006
  • From: New Jersey
Posted by redleg12 on Monday, September 1, 2008 6:49 AM

Gino & Mobius - Thanks for your comments.

Rounds Complete!!

"The Moral High Ground....A Great Place to Emplace Artillery."

  • Member since
    June 2005
  • From: Massachusetts
Posted by minimortar on Monday, September 1, 2008 9:48 AM

I have to agree here as well XO... much, much better!! The Tamiya sandbags just don't cut it in today's world of scale modeling. Ok for a 'base coat' but even then... if I'm gonna be breaking out the clay, then I'm gonna be making a ton of 'em.

An added figure would give this a sense of scale and add a little 'life' but I know that you don't feel all that confident (YET!) with figures. Even if you added say... a rifle leaning up against the wall or something... box of MRE's or something in relation to a 'human presence'. Now, I know that you wouldn't be having loose items laying around in a firing pit but, this doesn't appear to me to be gearing up for a fire mission.

One thing Mike... and I say this because I like your builds (and you're a nice guy as well!) is to keep an eye on your 'parallelisms'. I've noticed in your recent builds (since I've become more 'vocal' here anyway) is that you tend to place your subject on a base parallel to the edges of that base. I know that in some cases it can not not be helped and I certainly have been guilty of this in the past myself but, turning the main focus just a couple of degrees off centerline really makes for a more pleasing viewing experience where the subject is not related to the edges of the scene. Maybe something to think about in the future.

I'll shut up and go away now. :-)

Another great build Mike!

Thanks,
Kevin Keefe

Mortars in Miniature
A Scale Model (Plus!) Collection of the Infantryman's Artillery

  • Member since
    July 2006
  • From: New Jersey
Posted by redleg12 on Monday, September 1, 2008 10:35 AM

Kevin -

As far as the sandbags, I think we all agree. I have already beat myself like the old monks for showing the chicklets. They work for the bottom of the pile but the top needs the clay bags. For that I thank you for pushing me to see the error in my ways. "I am saved!!! I swear off the chicklet bags!"

The figures were coming...I thought...until I went through my pile and did not have enough of what I need for the modern digital uniform. I have one I am working on to be the #1 man holding a round but I need a gunner and Ag and possibly a chief. After I hit AMPSEAST I will see what I can pick up...if not I will order some and come back. Either way, the build is not on the shelf as I agree and don't consider it fully complete. Once I do the figs, I'll give you guys one last look.

I think the items around could be more...but its hard to jam a lot into a small space. Even looking at the actual photo at the start of the thread, there is not too much around...but point taken.

Parallelisms....maybe I'm too much of an engineer!!!. I try not to yet agree. But sometimes I am space constrained. I try with the bases not do exceed a shelf depth. My last build...the M8 I put on an angle. This one, with the background, it did not leave me a lot of space. It really needs to be deeper, then I could have more of an angle. But...yes, I presume I as many others are guilty of "parallelisms"....again another good point. (More penance at the church of armor modelers...Laugh [(-D])

Lastly, never feel you should be quiet. All the points you make are good points and help not only me but all who read these forums. A master like you could write a book of good ideas, I'm always happy to get a page now and then.Thumbs Up [tup]

As always....Thanks

Rounds Complete!!

"The Moral High Ground....A Great Place to Emplace Artillery."

JOIN OUR COMMUNITY!

Our community is FREE to join. To participate you must either login or register for an account.

SEARCH FORUMS
FREE NEWSLETTER
By signing up you may also receive reader surveys and occasional special offers. We do not sell, rent or trade our email lists. View our Privacy Policy.