SEARCH FINESCALE.COM

Enter keywords or a search phrase below:

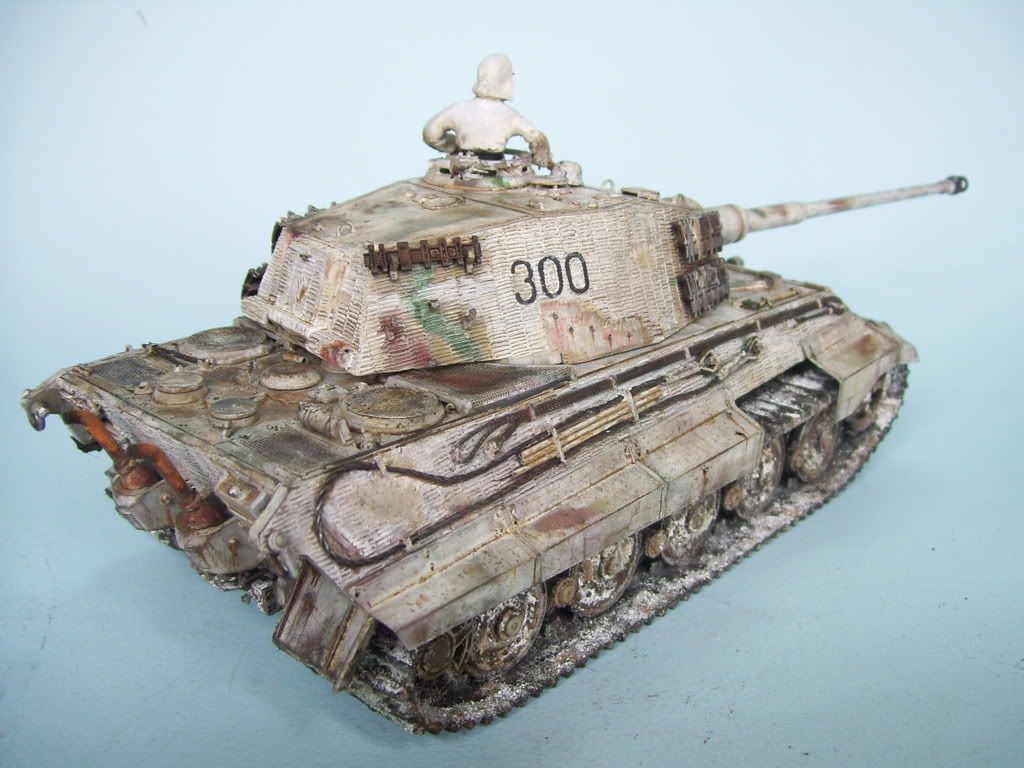
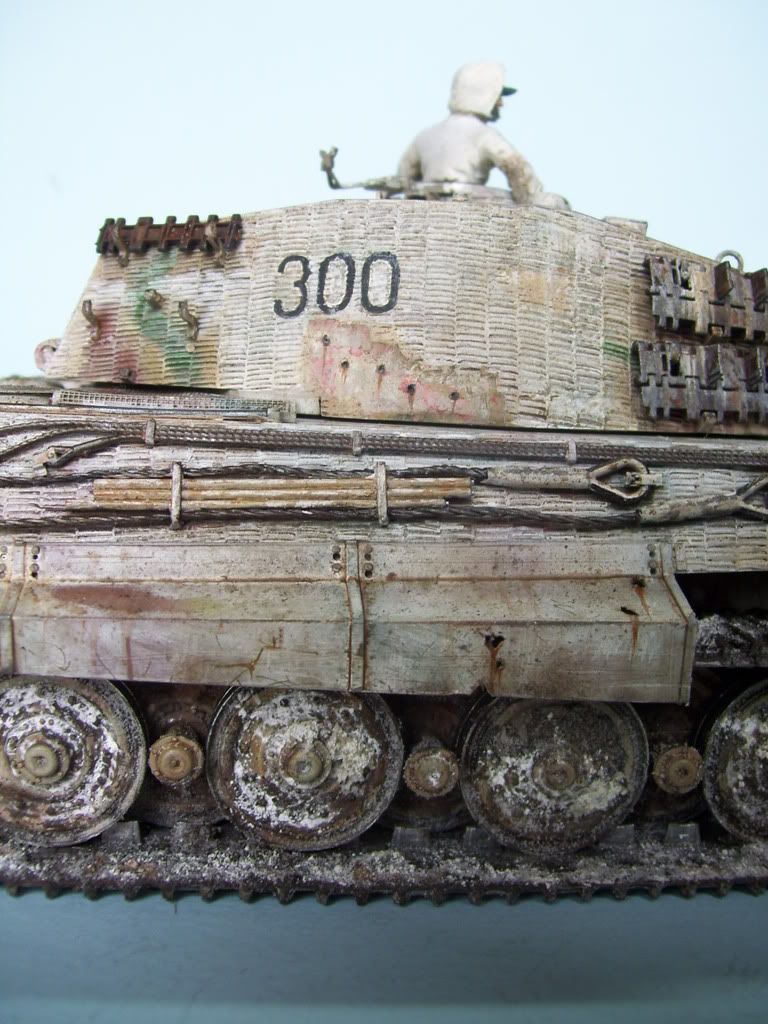
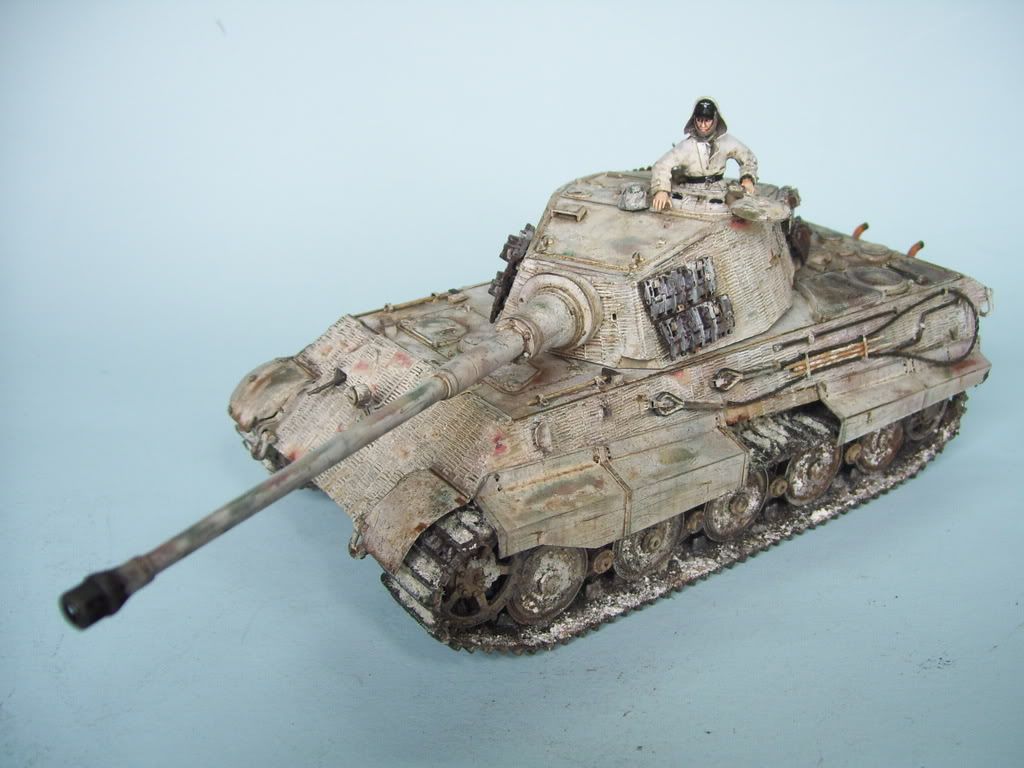
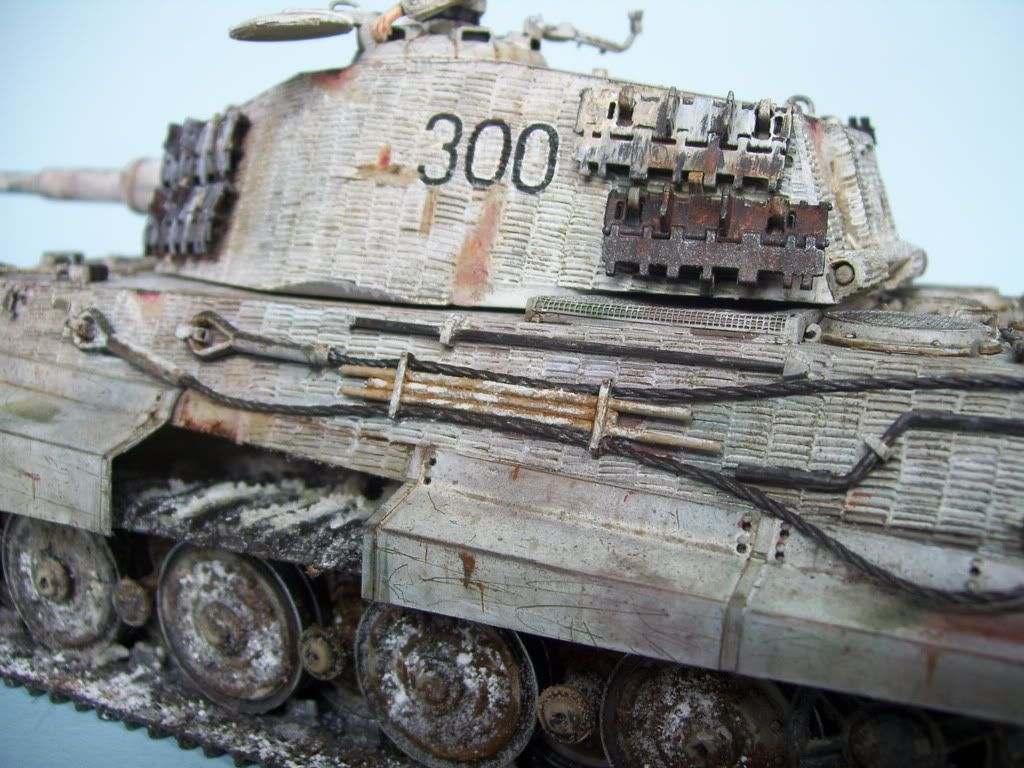
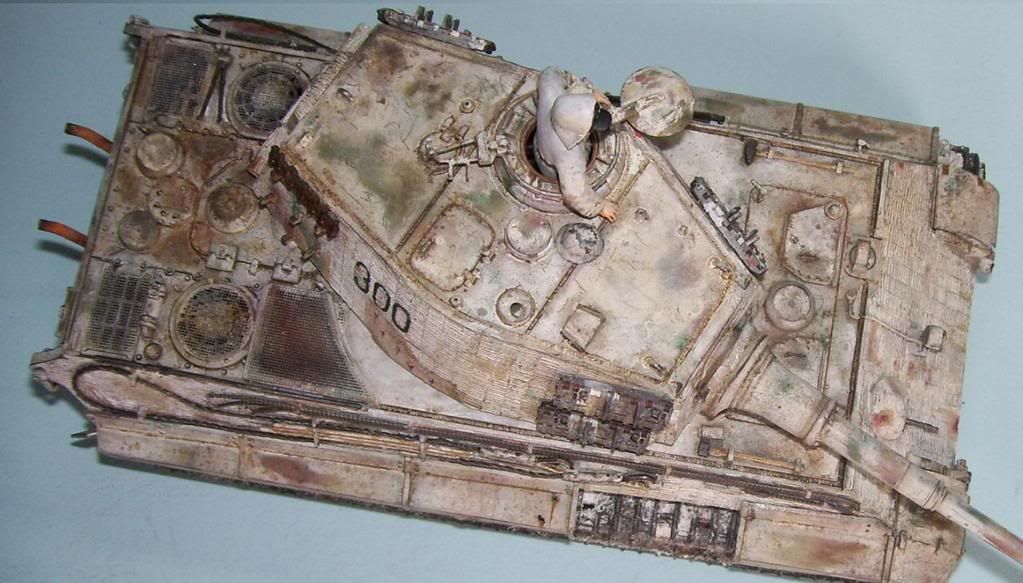
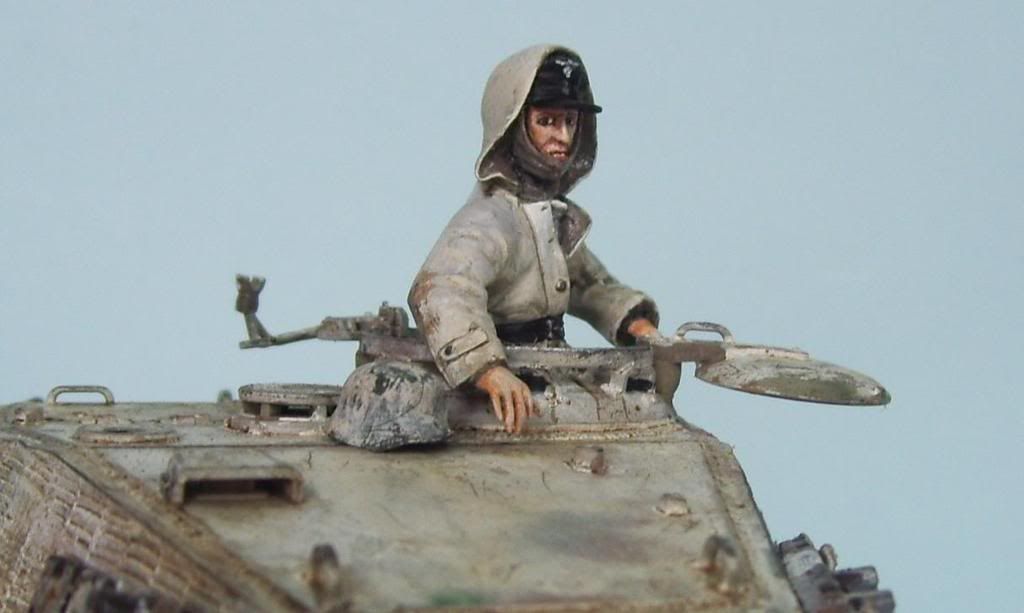
PAGE 5-FINISHED PICS! The "MIG-nificent" DML King Tiger!

33644 views
133 replies
1 rating 2 rating 3 rating 4 rating 5 rating
  • Member since
    April 2008
  • From: Kristiansund, Norway
Posted by Huxy on Friday, December 12, 2008 4:18 PM

The Idool himself on yet another project?  Can't wait on seeing the result on this!!  Looking very proffesional so far.. no wait.. You are proffesional Smile [:)]


Now I wish there were a subscribe button for this thread.. Black Eye [B)]


Can't wait to see more! Cool [8D] 

"Every War Starts And Ends With An Invasion".

  • Member since
    June 2006
  • From: Michigan
Posted by ps1scw on Friday, December 12, 2008 4:24 PM
Regardless it looks very nice.  I do agree that how Dragon and their kits are touted, the issues you brought up should never have happened.  The kit itself may have been rushed into production and sale, but there is no excuse for thier directions.  They have had long enough to get proper staffing to correct them. 
  • Member since
    July 2004
  • From: Texas
Posted by wbill76 on Friday, December 12, 2008 4:39 PM

Doog,

You're encountering similar problems that often crop-up on the "Premium" kits...cases where parts are taken from generic or upgraded sets (like the tow cable ends) and just thrown in as opposed to being specifically engineered for that kit. It's unfortunate to see that happening with these pre-zim kits...but I guess that just means DML needs to leave some room so they can keep "improving on perfection", eh? Wink [;)]

Looks like you're beating this one into submission despite the issues encountered. If you're looking for alternative clamps, try the Griffon line, I've been impressed with them in terms of ease of assembly and solid detail without resorting to the Aber "shrink an actual metal worker down to 1/35" approach.

  • Member since
    February 2005
  • From: California
Posted by rabbiteatsnake on Friday, December 12, 2008 5:43 PM
It looks like you have things well in hand despite the kits shortfalls. I have complete faith in you.   Just a small correction. In image 6 the features in question are grinder marks to the seams left by the forgeing process, and should look a strip of irregular verticle grooves.  By the way is that a scratchbuilt flash supressor on the hull mg, looks nice.
The devil is in the details...and somtimes he's in my sock drawer. On the bench. Airfix 1/24 bf109E scratch conv to 109 G14AS MPC1/24 ju87B conv to 87G Rev 1/48 B17G toF Trump 1/32 f4u-1D and staying a1D Scratch 1/16 TigerII.
  • Member since
    November 2008
  • From: Central Florida
Posted by plasticjunkie on Friday, December 12, 2008 6:01 PM

Doog

Really excellent work you are doing with this cat. You figure the price that these kits run, you expect better. Have you shot DML an email about the lack of instructions with the PE parts? It probably won't go anywhere but I think it won't hurt to give them some feedback. Who knows, they may listen and improve the model and the instructions.

 GIFMaker.org_jy_Ayj_O


Too many models to build, not enough time in a lifetime!!

  • Member since
    March 2003
  • From: Rain USA, Vancouver WA
Posted by tigerman on Friday, December 12, 2008 7:17 PM
Looks pretty nice from here Karl. Your zim work sure paid off. I'll have to keep your observations in mind if I ever pick one up, but I'm leaning to the BoB version myself.

   http://i7.photobucket.com/albums/y269/wing_nut_5o/PANZERJAGERGB.jpg

 Eric 

  • Member since
    July 2003
  • From: On my kitchen counter top somewhere in central North Carolina.
Posted by disastermaster on Friday, December 12, 2008 8:14 PM
 Huxy wrote:

The Idool himself on yet another project?  .......... Black Eye [B)]


Hmmm...

'Ya might have something there....."American Idoog"......

 Comin' along well doog. Did you see this?... The commander is lookin' at it I believe.

http://www.thelastsuperman.com/disastermaster/pinmark-1.gif

http://www.thelastsuperman.com/disastermaster/%23t1-4.jpg

 https://i.imgur.com/LjRRaV1.png


  • Member since
    February 2008
  • From: ladner BC Canada
Posted by stick man on Friday, December 12, 2008 8:21 PM

Looks great Doog!!!!

Smile [:)]

I'm 15 and I model I sk8board and I drum what could be better.
  • Member since
    January 2007
Posted by the doog on Friday, December 12, 2008 9:55 PM

Thanks, guys, for the comments and compliments!

Bill, --thanks for the heads up on that Griffon line. I'm going to be in the market for some more generic clamps, and I'll check those out. The Aber ones are just sadistic!

I didn't really realize that the Premium kits were plagued with the same problems. I never bought into them--I guess I have been vindicated, in a way? Big Smile [:D]

rabbiteatssnake, --thanks for that info! I'll make some cuts in there to properly simulate the correct appearance.

plasticjunkie, --Hmmmm...I may do that, but I doubt it would bear fruit. I imagine every company is in economic bunker-mode, with the coming Depression. Luckily, the Nashorn I'm eyeing next has line-drawing instructions, I believe!

tigerman, --I want the "Babes on Board" version too! Whistling [:-^]....Laugh [(-D]. I want a final version!

Steve, --that pin mark--I didn't see a "mark" so I either got it, or I'm looking at that hole and not recognizing it for what it is--that hole in the back of the mantlet is supposed to be there though, is it not?

Thanks, stick man, ps1scw, and Huxy! 

I forgot to mention too, that the dimensions for the side of the hull are actually incorrect too--if you look at a KT's sides, theside skirt hanger brackets are actually spaced quite a bt above the edge of the hull sides. On the model, the hanger brackets are almost flush with the edge.There's no real way to fix that without destroying the molded zimm!

I'll be trying to get a base coat tommorrow if all goes well--stay tuned! 

  • Member since
    August 2005
  • From: Sydney, Australia
Posted by Phil_H on Friday, December 12, 2008 11:06 PM

Looking good Karl. Thumbs Up [tup]

Just to expand a little - the Griffon clamps look a lot easier to use - they're two-piece. The base and strap are one piece and the flip-latch another. The set also comes with some very nice looking toolbox latches. They are very nicely priced too, at under $4.00. Luckymodel is asking $3.11 (inc shipping) at the moment.

Looking forward to seeing paint on this baby.

  • Member since
    July 2003
  • From: On my kitchen counter top somewhere in central North Carolina.
Posted by disastermaster on Friday, December 12, 2008 11:37 PM
 the doog wrote:

Steve, --that pin mark-- that hole in the back of the mantlet is supposed to be there though, is it not?

 Well, not too sure since I don't have this particular kit, but it looks suspiciously like a ejector pin mark.

http://www.thelastsuperman.com/disastermaster/%23t1-4.jpg

 https://i.imgur.com/LjRRaV1.png


  • Member since
    January 2012
Posted by I make stuff on Friday, December 12, 2008 11:49 PM

Looking good, Karl, I can't wait to see some paint on this bad boy.

A question, I know that's unlike me, but indulge me, whay have you attached all the tools, cable, cleaning rods, etc prior to painting.  Is it just to properly place the workable clamps, then they will be pulled off and the clamps painted, or what? 


  • Member since
    April 2005
  • From: Piscataway, NJ!
Posted by wing_nut on Saturday, December 13, 2008 6:09 AM
Doog, it aint fun if you don't have to tweak it a bit...OK... a lot.  Looks like oyu got a good handle on everything and when all is said and done it will be a fine looking kitty.

Marc  

  • Member since
    June 2005
  • From: Indiana U.S.A.
Posted by Panther F on Saturday, December 13, 2008 9:12 AM
Aaah.  And they scratch building is a lost art!
  • Member since
    January 2007
Posted by the doog on Saturday, December 13, 2008 9:49 AM
 disastermaster wrote:
 the doog wrote:

Steve, --that pin mark-- that hole in the back of the mantlet is supposed to be there though, is it not?

 Well, not too sure since I don't have this particular kit, but it looks suspiciously like a ejector pin mark.

http://www.thelastsuperman.com/disastermaster/%23t1-4.jpg

Oh, OK; I think I see it as you were looking at it--no, that's supposed to be there. I found a great shot in the Ryton book "Schwere Panzers in Detail" by Culver and Feist which I'm using for reference. There is a weird little hole behind the mantlet; that's what you're seeing.

Phil_H --thanks for that info on those clamps; I'm going to try them when I need more.

Bill -- I used to paint everything off the model, but in this case, with all the PE it's just "safer" to attach them all, and then worry about painting them afterward. Besides, I'm going for a winter camo on this, so I won't really have to worry too much about the painting so much in detail, because much of it will be whitewashed.

Marc -- thanks for looking in!

Jeff -- "Scratchbuilding is dead"? Shock [:O] EEEK! Who said that?!

Actually, I just think that these days there's a lot less need for it! But it's always satisfying to put a little personal touch that you yourself have created on a model! 


  • Member since
    May 2005
  • From: Dublin Rep Of Ireland
Posted by terry35 on Saturday, December 13, 2008 9:50 AM

nice one. looking forward to seeing this one progress.

Terry. 

  • Member since
    November 2008
Posted by Satori on Saturday, December 13, 2008 11:49 AM

Seemed to me this kit is not worth buying. Shape of the zimmerit pattern isn't very accurate but that's debatable, since not all shared the same patterns. However, the result of chipping the plastic zimmerit doesn;t look good, in my honest opinion. I know it probably took you lots of work, but it doesn't look like layer of material shedded, more like the result of a chisel used on wood..

I think what these kits should include are photo etched mudguards and fenders. Not many places on a model where thickness is clearly visible, and for one of the crucial pieces in this regard, plastic mudguards are much too thick.

  • Member since
    January 2007
Posted by the doog on Saturday, December 13, 2008 1:28 PM
 Satori wrote:

Seemed to me this kit is not worth buying. Shape of the zimmerit pattern isn't very accurate but that's debatable, since not all shared the same patterns. However, the result of chipping the plastic zimmerit doesn;t look good, in my honest opinion. I know it probably took you lots of work, but it doesn't look like layer of material shedded, more like the result of a chisel used on wood..

I think what these kits should include are photo etched mudguards and fenders. Not many places on a model where thickness is clearly visible, and for one of the crucial pieces in this regard, plastic mudguards are much too thick.

Thank you, Satori, for your honesty. I have to agree that the zimmerit depth-of-molding does preclude one from maiking a strictly "accurate"-looking chipping process. In place where I have thought that the depth went too far, I have tried to fill it in with putty. The best I could do. However, as zimmerit was a plaster-like material, it would not have "shredded", but instead broken off in chipped pieces of various sizes. This is what I have tried to simulate here.I'm curious as to what you think would have been a more proper way to simulate this effect? No scarcasm intended; I'm sincerely curious--how would you have handled it?

Ideally, the will refine the zimmerit molding to where it is a finer texture and shallower depth. In this case, however, I have to "dance with what brung me"--I can only put lipstick on this pig, not make it a princess...Smile,Wink, & Grin [swg]

  • Member since
    June 2005
  • From: Indiana U.S.A.
Posted by Panther F on Saturday, December 13, 2008 3:19 PM
 the doog wrote:
 disastermaster wrote:
 the doog wrote:

Steve, --that pin mark-- that hole in the back of the mantlet is supposed to be there though, is it not?

 Well, not too sure since I don't have this particular kit, but it looks suspiciously like a ejector pin mark.

http://www.thelastsuperman.com/disastermaster/%23t1-4.jpg

Oh, OK; I think I see it as you were looking at it--no, that's supposed to be there. I found a great shot in the Ryton book "Schwere Panzers in Detail" by Culver and Feist which I'm using for reference. There is a weird little hole behind the mantlet; that's what you're seeing.

Phil_H --thanks for that info on those clamps; I'm going to try them when I need more.

Bill -- I used to paint everything off the model, but in this case, with all the PE it's just "safer" to attach them all, and then worry about painting them afterward. Besides, I'm going for a winter camo on this, so I won't really have to worry too much about the painting so much in detail, because much of it will be whitewashed.

Marc -- thanks for looking in!

Jeff -- "Scratchbuilding is dead"? Shock [:O] EEEK! Who said that?!

Actually, I just think that these days there's a lot less need for it! But it's always satisfying to put a little personal touch that you yourself have created on a model! 


Hey Karl!  No one said that, just implied that with all the new fangled process used in manufacturing today, all of the available PE with aluminum and resin pieces now out that one is surprised you would even have to alter a kit that is sold these days.  Wink [;)]

You'd think it would have some of the zimm chipped off and not factory fresh looking.  Nice work!

  • Member since
    July 2006
  • From: San Francisco Bay Area
Posted by bufflehead on Saturday, December 13, 2008 5:36 PM
 the doog wrote:

 Jeff -- "Scratchbuilding is dead"? Shock [:O] EEEK! Who said that?!

Actually, I just think that these days there's a lot less need for it! But it's always satisfying to put a little personal touch that you yourself have created on a model! 

doog, you just made my day!! Big Smile [:D] Your statement about "a little personal touch" provides an answer as to why I spend so much time trying to "improve" or "perfect" my builds!  I really never thought about it that way before!  I just thought I was being anal or a rivet counter.  Thanks dude!!  This little nugget will be with me for a long time!Bow [bow]

As for your KT!  I'm keeping an eye on this thread because I've got the kit in the stash.  I luv the work you're doing so far and kudos to you for trying to chip the zim.  I'm sure we're all waiting to see how it looks after one of your spectacular paint jobs!  BTW, how will the oil dot method work with all the zim?

Ernest

Last Armor Build - 1/35 Dragon M-26A1, 1/35 Emhar Mk.IV Female


Last Aircraft Builds - Hobby Boss 1/72 F4F Wildcat & FW-190A8


  • Member since
    January 2012
Posted by I make stuff on Saturday, December 13, 2008 6:16 PM
 the doog wrote:
 Satori wrote:

Seemed to me this kit is not worth buying. Shape of the zimmerit pattern isn't very accurate but that's debatable, since not all shared the same patterns. However, the result of chipping the plastic zimmerit doesn;t look good, in my honest opinion. I know it probably took you lots of work, but it doesn't look like layer of material shedded, more like the result of a chisel used on wood..

I think what these kits should include are photo etched mudguards and fenders. Not many places on a model where thickness is clearly visible, and for one of the crucial pieces in this regard, plastic mudguards are much too thick.

Thank you, Satori, for your honesty. I have to agree that the zimmerit depth-of-molding does preclude one from maiking a strictly "accurate"-looking chipping process. In place where I have thought that the depth went too far, I have tried to fill it in with putty. The best I could do. However, as zimmerit was a plaster-like material, it would not have "shredded", but instead broken off in chipped pieces of various sizes. This is what I have tried to simulate here.I'm curious as to what you think would have been a more proper way to simulate this effect? No scarcasm intended; I'm sincerely curious--how would you have handled it?

Ideally, the will refine the zimmerit molding to where it is a finer texture and shallower depth. In this case, however, I have to "dance with what brung me"--I can only put lipstick on this pig, not make it a princess...Smile,Wink, & Grin [swg]


I've never studied this, but I understand what zimmerit is, I think if you defined the edges of the chipped areas, si it looks like a veneer came off and there's a definite end to the armor plate and beginning to the zimm, it might look "better,"although this did not even occur to me until I saw this exchange.

How hard would it be to crisp up the definintion lines where teh armor ends and the zimm begins? 

  • Member since
    January 2007
Posted by the doog on Saturday, December 13, 2008 7:09 PM

Thanks, Jeff--I agree with you about the "hi-tech" aspect of the kits nowadays. It's getting easier and easier to make a "masterpiece" straight out-of-the-box!

Ernest--I'm not sure how the dot method will work, but I don;t know if I will use it here. I plan to do a winter camo scheme, and I'm not sure that the oil dot thing will be applicable over white.

Bill, I'm not really worried about "perfecting" the zimm-look, honestly. I'm pretty satisfied that with some attentive, creative finishing, it will look just fine! I've already started painting it, and I really don't want to go scraping more plastic, but we'll have to see what happens. This build is realy an "experimental" build, as far as both building and finishing techniques. I'm going to be doing something different with it......Whistling [:-^]......Smile,Wink, & Grin [swg]

  • Member since
    January 2012
Posted by I make stuff on Saturday, December 13, 2008 7:18 PM

Gotcha, Karl,like I said it never even occurred to me until I saw you two discussing it. I figured if anyone was going to detail something like what the edge of a zim pock would look like, it would probably be you.

I like the IDEA of damaged simm you had, and I like your execution.   


  • Member since
    July 2006
  • From: New Jersey
Posted by redleg12 on Saturday, December 13, 2008 7:41 PM

Karl - Glad to see you back in the saddle again. As far as the scratch building.....as Bill has said in another thread, it's what separates the assemblers from the modelers. Even a super kit is not  super enough that it does not need a modelers touch to personalize it.

If it ever get to the point of being just an assembler, you just as well go off and buy diecast. Why bother at that point.

We all need to remember the name of the forum.....FINE SCALE MODELER

Everything else is just an assembler.

As far as a new finishing tech.......hummmm, what is going on in the Doog laboratory Shock [:O]

Rounds Complete!!


"The Moral High Ground....A Great Place to Emplace Artillery."

  • Member since
    November 2008
Posted by Satori on Saturday, December 13, 2008 9:00 PM

I'm not an expert on the anti magnetic paste, but because it's a paste smeared onto flat surfaces, I think they would cure into a thin, in relative terms, hardened layer. What underneath was armor steel, which would not be damaged by the scratching and light hitting that would be catastrophic for the zimmerit coating. So when zimmerit chipped off, from a more macro perspective, it should be an even and thin layer that went missing, leaving smooth surfaces below and show uniformed thickness around the edges.

Yes the depth of chipping on zimmerit will vary, and depth of the coating isn't uniformed by any means. However, because the layer was so thin, and then the thickness would be divided by 35 in this case, the variation probably will not be very noticable. So vise versa, when the edges shown gradule depth changes, or slopped if you will, to me it doesn't look real.

I don't know if you can make it appeared any better or "real" than it is now. That is percisely why I said this kit doesn't seemed worth purchasing to me, because I don't think I can make looked any more realistic either. 

  • Member since
    November 2008
Posted by Satori on Saturday, December 13, 2008 9:24 PM

In regarding what redleg12 had said, I'd like to give my 2 cents too.

I've been using photo etched upgrades for a while. To me, the companies avaliable have not been very satisfying. I'll make some example to clearify my reasons in a sec. What I want to say is, because the pre fabricated upgrades lacked accuracy, scratch building is still a necessary skill even when building the most common and popular injection plastic kits, if one is a pursuer of accuracy of course.

So my examples.
All the Panther mudguards from Ausf D to F, have the width indicators. And with those, a set of clamps to hold the width indicator when it's detached. This set of clamps have not been accurately produced by any company so far. Not only injection plastic manufactors, but also every single aftermarket photo etched maker out there. Voyager Models, Aber, Lion Roar, ACE, Eduard and Part have all attempted to produce the panther mudguards, none of them made the clamps correctly. Also worth mentioning, none of them positioned the groves correctly either.

Another little thing on the Panthers no photo etched company had made right is the side skirt mounting, less visible in this case. Aber's mouting is missing 2 holes, and Voyager's fixing pin doesn't diplict the steel reinforcement in the middle.

Nobody makes the Panzer IV storage bin cover correctly.

Even more common things like the German tool clamp, no one even makes a corret set for a poplular vehicle such as Tiger, Panther or King Tiger.

The list goes on. One 35th is a scale where everything can be presented correctly, at least in appearance. They don't have to function, but when something looked obviously wrong, it makes me wonder why I had spent the 20 bucks to get the upgrades. Sractch building abilities will always have its places to shine, as there's always space for improvements. 


  • Member since
    January 2007
Posted by the doog on Saturday, December 13, 2008 10:25 PM
 Satori wrote:

I'm not an expert on the anti magnetic paste, but because it's a paste smeared onto flat surfaces, I think they would cure into a thin, in relative terms, hardened layer. What underneath was armor steel, which would not be damaged by the scratching and light hitting that would be catastrophic for the zimmerit coating. So when zimmerit chipped off, from a more macro perspective, it should be an even and thin layer that went missing, leaving smooth surfaces below and show uniformed thickness around the edges.


Well see, that's the problem with trying to do this to this kit--the zimmerit molding is rather "deep", so you're kinda stuck with what you've got to do if you're going to try to modify it.

Having said that, I just couldn't see myself being content with a factory-fresh, undamaged coat of zimm, so if I must accept the deep molding of the kit's zimm, then I must also accept the inaccuracy of the chipping method.

Havig read your post, you're much more of a stickler about perceived accuracy than I'll ever be--no disrespect intended, I assure you! I'm more of an "Art" guy, with accuracy coming in a close second. But I don't really get so worked up about what I consider to be "small details" like scale thickness, zimmerit width, "correct" shapes and angles to within microns of inches. To me, "modeling" is that--building a reasonably accurate impression of something. I'm not a "Miniaturist"; I'm a "Modeler"--and that leaves a lot of "wiggle room" in my artist's eye.

But thank you for your perspective--it's always nice to hear the dissenting voice, and the fresh perspective! Big Smile [:D]

  • Member since
    December 2005
  • From: Syracuse, NY
Posted by lexesbenz on Saturday, December 13, 2008 11:09 PM
LOL Karl Thanks for the photo tutorial, I finally got those grills on the KV!!!! Looking great as usual.
The flying hamster of doom rains coconuts on your pitiful city!!!!
  • Member since
    November 2008
  • From: Oklahoma City
Posted by Mixael on Saturday, December 13, 2008 11:57 PM

Well, Doog and Satori, I find myself somewhat in flux between what you two have talked about.  I am a (beginning/returning) modeller that would like to work towards more "miniturist" work.  I'm not good at scratch building, but I'm doing more as I learn HOW and WHAT to do.  I've not used PE as, frankly, it scares me a bit Smile [:)]  I've never used AM stuff, but do have some in the wings that have a bit of it.  One of those that is waiting has AM PE and RESIN! 

All this to say that this is a great place to learn, and post, as there are so many differing ideas and philosophies.  I read these threads in the deepest hope of either learning something or being inspired, and it hasn't failed yet!  In fact, in the "old days" I would skip the interior if the vehicle was going to be closed up and you wouldn't see stuff.  Now, I not only install it, I even PAINT it, even if I'm the only one that knows it's there.  So, while there are "artist" builders and "rivet counter" builders, I feel I fit comfortably in the middle somewhere.

Just my thoughts, now back to building!

Michael 

We could change the world, but God won't give us the source code!
  • Member since
    July 2006
  • From: New Jersey
Posted by redleg12 on Sunday, December 14, 2008 6:51 AM
 Mixael wrote:

Well, Doog and Satori, I find myself somewhat in flux between what you two have talked about.  I am a (beginning/returning) modeller that would like to work towards more "miniturist" work.  I'm not good at scratch building, but I'm doing more as I learn HOW and WHAT to do.  I've not used PE as, frankly, it scares me a bit Smile [:)]  I've never used AM stuff, but do have some in the wings that have a bit of it.  One of those that is waiting has AM PE and RESIN! 

All this to say that this is a great place to learn, and post, as there are so many differing ideas and philosophies.  I read these threads in the deepest hope of either learning something or being inspired, and it hasn't failed yet!  In fact, in the "old days" I would skip the interior if the vehicle was going to be closed up and you wouldn't see stuff.  Now, I not only install it, I even PAINT it, even if I'm the only one that knows it's there.  So, while there are "artist" builders and "rivet counter" builders, I feel I fit comfortably in the middle somewhere.

Just my thoughts, now back to building!

Michael 

Mike - As you hang around here what you find, using a Doog's words, we are all artists..modelers yes, some miniturists...but all artists. But in art there are many different styles. The same here. Hell, I'm half way to the lepor colony since I only build US armor. But thats my thing. Doog is a Germaholic Smile,Wink, & Grin [swg]....into German WWII armor. Manny build dios and great figures.

Anyway...we all learn tricks and concepts from each other yet we all forward our own style. As far AM items, using PE or resin....."you have nothing to fear but fear itself". Try everything, it will expand your mind.

Lasyly have fun.  

Doog....sorry to hijack the thread.....we now return to your regular Doog program!

Rounds Complete!!

"The Moral High Ground....A Great Place to Emplace Artillery."

  • Member since
    January 2007
Posted by the doog on Wednesday, December 17, 2008 2:52 PM

Hi Guys,

Well, I'm at the painting stage. First, I painted the whole thing in a mix of Tamiya Flat Brown+Black. I'm not worried too much about getting an opaque coat--this is going to be followed by two or three more coats anyway.

And then a coat of Tamiya UN-lightened Dark Yellow. I actualy painted it without the spare tracks on it. The wheels all got a coating on the insides.


And then a lightened coat of nearly-white Dark Yellow...I also painted the highlighted coat WITH the spare tracks on the turret, so that the fresh base coat underneath would be visible when I model some of the tracks missing.

ANd then a camo coat of the Tamiya Red Brown and Tamiya Khahki Drab+Dark Green applied freehand...this was painted without the spare links, so that the missing links would show that the tank was painted without them on it, as one would expect.

Now, I really don't really consider this to be a start to the "weathering" yet, but I gave the top of the model a coat of AQUA NET Super Extra Heavy Duty Hold, and then started to apply the winter whitewash, using standard Apple Barrel White craft paint, thinned about 40%, and just slopped on, as it would have been.

Here it is, still drying...

Notice how the spare tracks areas are now showing the regular paint underneath...

Now, I started attacking the paint with a stiff-bristle brush, dissolving the hair spray underneath which carries off the paint on top of it....

...which is then dabbed away with a tissue...

The turret got the same treatment...

Then I used this pick to scrape and poke, and chip away some of the whitewash...

I also used an emery board to scrape the whitewash away from the top ridges of the zimmerit...

Here's what it looks like...

I then applied some decals -- I screwed up the first set of standard "300" when I got a phone call just after aplying the Solvaset, which crumpled them in my inattentiveness! So I applied some red ones, and then painted them over. I also have applied the tracks here, and they are solidifying. I have NOT attached the wheels yet, as I need to remove them to start the weathering.


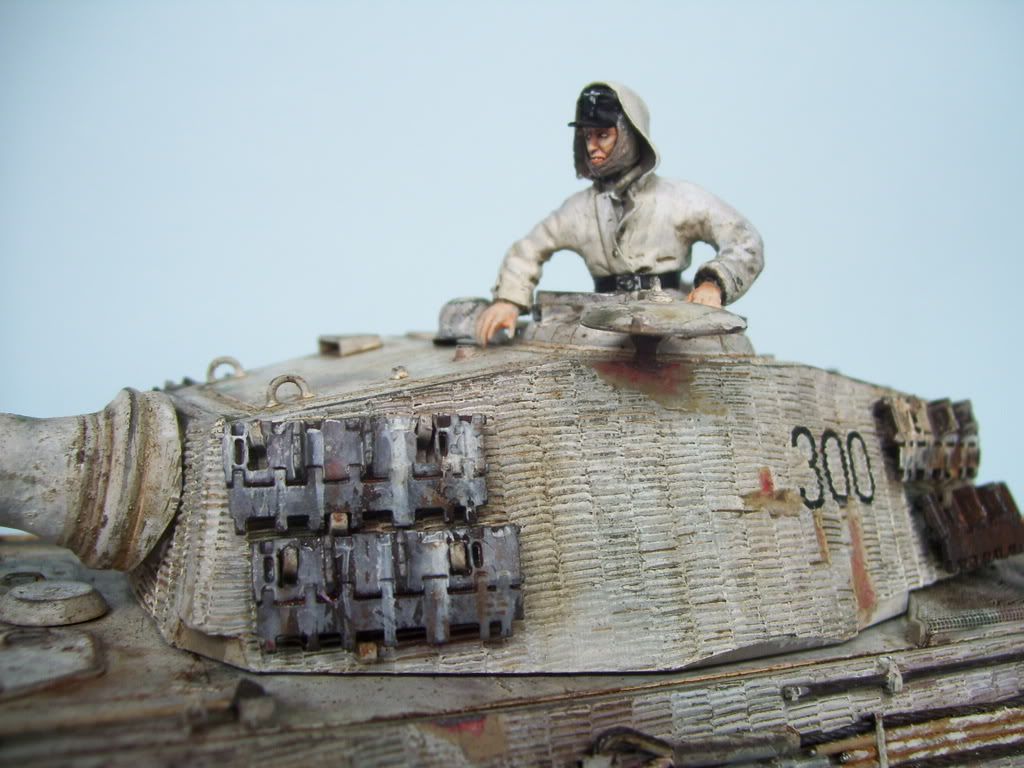
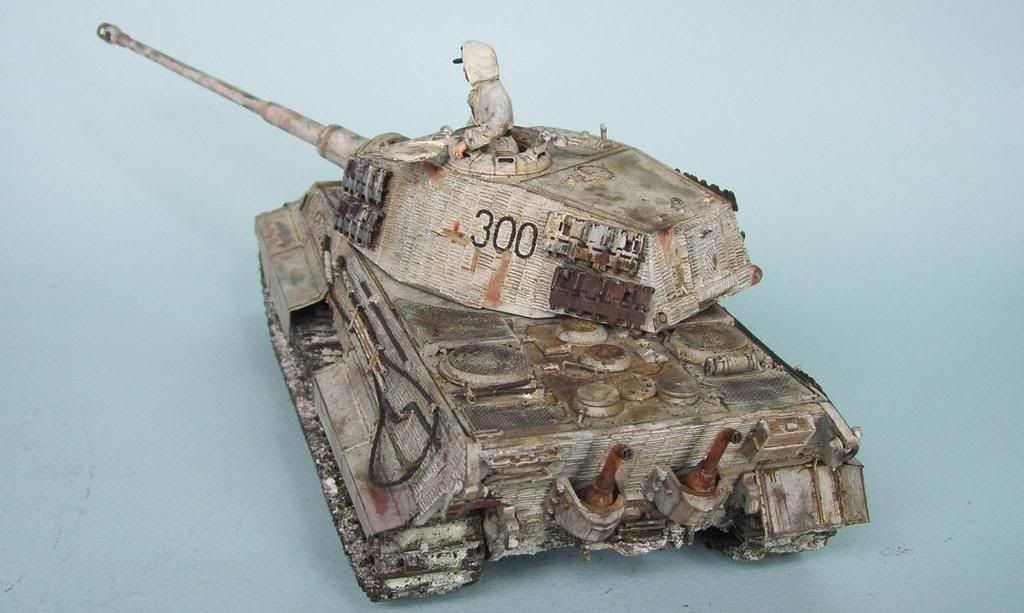
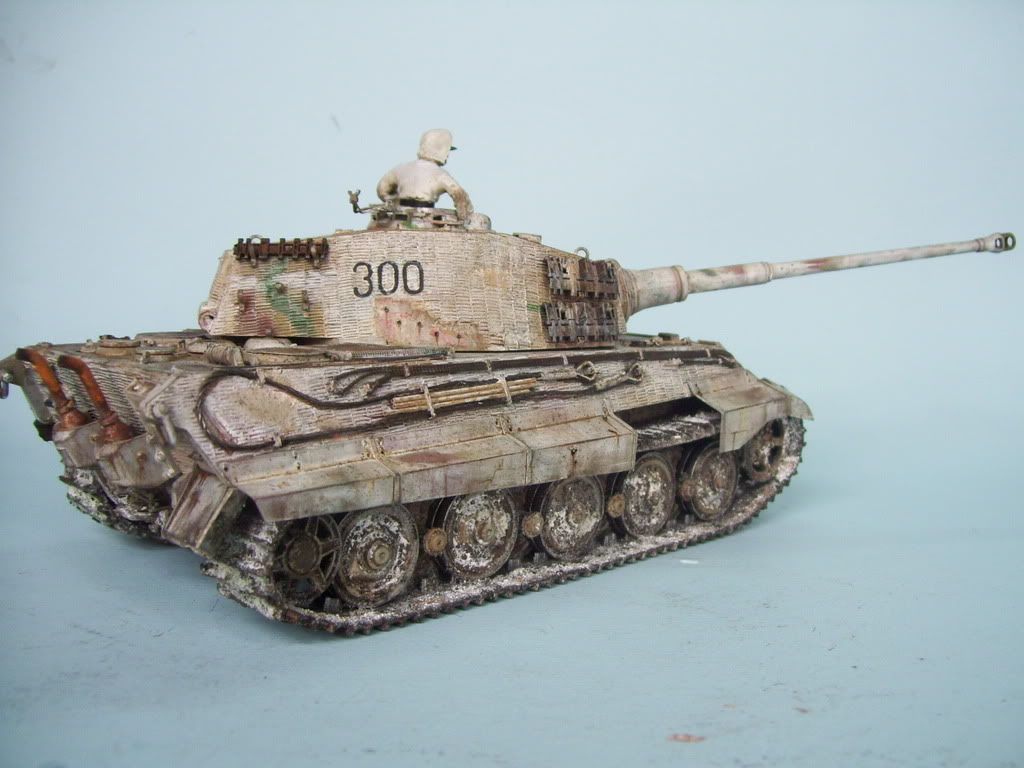
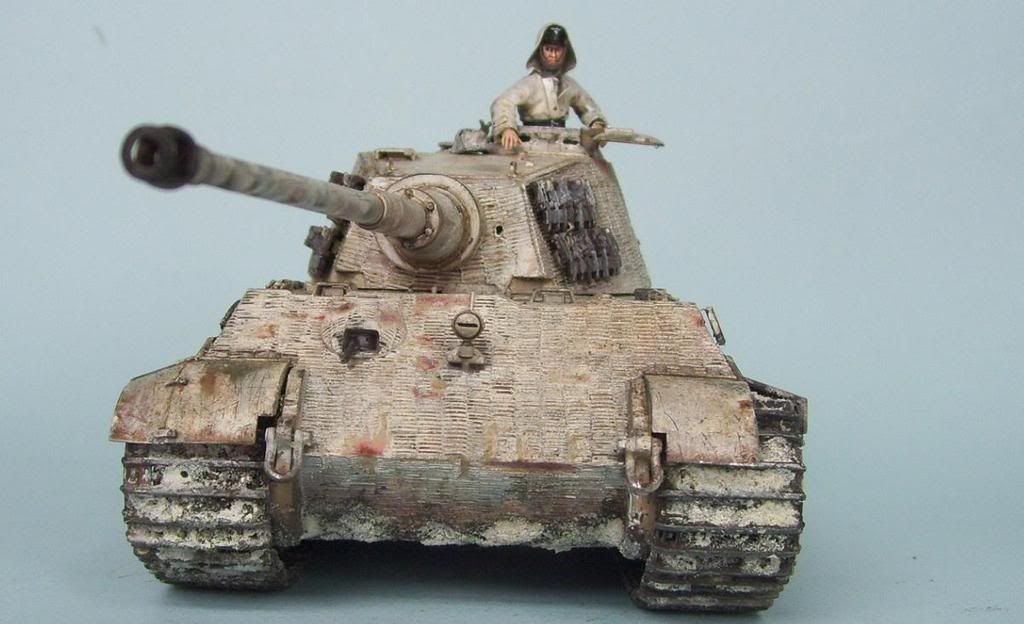
King Tiger # 300 was part of "Operation South Wind"--the attack on the Soviet bridgehead on the western flank of the Gran RIver in Hungary. Jochen Peiper's 1st SS PanzerKorps led the attack. Here it was photographed 45 miles from Budapest.This photo is from the excellent J. Fedorowicz book "SS Armor on the Eastern Front" by Velimir Vuksic. You can see that it still has the AA ring around the commander's cupola--surprising, as I would have thought it to have been a "final model" KT. You can also see the base coat where the missing links are on the turret.


                           A WORD OF THANKS TO MIG PRODUCTIONS


A few weeks ago, we had a thread going here about MIG pre-mixed washes and weathering products . It got strong opinions on both sides, and I had asked Adam Wilder and Rick Lawler exactly what would make a modeler buy their pre-mixed products when most people would  mix their own. 

To make a long story short, Adam Wilder contacted me a little later, and said that MIG Productions would like to send me some of their products to test out. So for the rest of this model's weatherin, I will be forgoing my "usual" routine of weathering products, and instead using the supplied MIG products exclusively. I am eager to see what results I can achieve here! A big "THANKS!!!" to Adam, RIck, and all at MIG Productions!

Stay tuned for some more updates after I make a little progress here! Now the fun begins!

Questions and comments welcomed!


  • Member since
    June 2005
  • From: San Tan Valley,AZ
Posted by smokinguns3 on Wednesday, December 17, 2008 3:19 PM
you lucky dog you, shes looking good.
Rob I think i can I think i can
  • Member since
    December 2002
  • From: Reno, NV
Posted by espins1 on Wednesday, December 17, 2008 3:32 PM
Nicely done!  I especially like your well thought out, layered approach to building up the layers of paint, whitewash and wear and tear.   Cool [8D]

Scott Espin - IPMS Reno High Rollers  Geeked My Reviews 

  • Member since
    January 2012
Posted by I make stuff on Wednesday, December 17, 2008 4:34 PM

Doog, you are really, REALLY good at this.  Not just the flawless and inventive builds, but you have a knack for teaching how you do what you do.  

I bought some Mig dark wash, and used it on the running gear of the E-100, but I found it to be VERY dark, and it seemed easier to use "your" Windsor and Newton washes on the top surfaces.  I will be watching this thread very carefully, as I have some Mig products that I would like to use.

Really a very nice build.  This coming from someone who is just starting to grasp how difficult it is to do what you make look so easy.  


  • Member since
    October 2008
  • From: Portland, Oregon
Posted by RickLawler on Wednesday, December 17, 2008 5:19 PM
 the doog wrote:

                           A WORD OF THANKS TO MIG PRODUCTIONS


A few weeks ago, we had a thread going here about MIG pre-mixed washes and weathering products . It got strong opinions on both sides, and I had asked Adam Wilder and Rick Lawler exactly what would make a modeler buy their pre-mixed products when most people would  mix their own. 

To make a long story short, Adam Wilder contacted me a little later, and said that MIG Productions would like to send me some of their products to test out. So for the rest of this model's weatherin, I will be forgoing my "usual" routine of weathering products, and instead using the supplied MIG products exclusively. I am eager to see what results I can achieve here! A big "THANKS!!!" to Adam, RIck, and all at MIG Productions!

Stay tuned for some more updates after I make a little progress here! Now the fun begins!

Questions and comments welcomed!

Hey Karl,

I missed the build updates, sorry...but you seem to have matter well in hand.  I really like the reference vehicle that you've chosen to portray. 

On behalf of Mig, Adam, and MIG Productions I would like to say that you are very welcome, we hope that you enjoy the goodies.

".....using the supplied MIG products exclusively"

You're hard core, Doog, I don't even do that!  This will be fun, I'm looking forward to your updates.


Best,

Rick


http://ricklawler.blogspot.com/


  • Member since
    April 2005
  • From: Piscataway, NJ!
Posted by wing_nut on Wednesday, December 17, 2008 5:55 PM
Very methodical in the applictaion of all the layers and it is paying off.  Looks good.  I particularly like the little scratches here and there.

Marc  

  • Member since
    July 2004
  • From: Texas
Posted by wbill76 on Wednesday, December 17, 2008 6:28 PM
Looking good so far doog, the experiment seems to be working! Thumbs Up [tup]
  • Member since
    May 2006
  • From: Queensbury,NY
Posted by panzer88 on Wednesday, December 17, 2008 6:53 PM
Doog-Looking beautiful. Thanks for the mini step by step with the hairspray technique and painting. I love the three tone camo that you laid down before the whitewash. I can't wait to see the final steps.


  • Member since
    October 2007
  • From: N.H.
Posted by panzerguy on Wednesday, December 17, 2008 8:50 PM

    Doog, it's always a pleasure to watch you workBow [bow].

        Kind of irks me that Dragon would get the mounting brackets in the wrong place.     Especially with all the documentation on this vehicle.       


"Happiness is a belt fed weapon"

  • Member since
    November 2005
Posted by Anonymous on Wednesday, December 17, 2008 9:19 PM

She's looking good!!!

LOL...just ribbin' 'ya, but the MiG thing made me think of "selling out"...sorta like a rock band doing an American Express commercial... lol...tell me it 'aint so, doog!

  • Member since
    January 2007
Posted by the doog on Thursday, December 18, 2008 8:56 AM

 Thanks, Robert! Lucky, indeed! I'll havea review soon here for you!

Thanks too, Scott--planning the painting of this taken as much thought as the build! 

Blll, glad you're learning from this as well. I'm using the "Neutral Wash" over the white camo, and it's pretty convincingly grimy! Watch for the review soon!

Rick, again; Thank You! I'm in the middle of using the products as I write this, and I have to say I am impressed! I'll be posting a review here really soon. I want to get a little bit of experience with them here before I post--and the idea of using them exclusively is a bit of a challenge, but I think it will be a great benefit to the former debate, to give a balanced review of them from someone who is normally a "heavy" weatherer! 

Thanks too, for commenting, Marc, Bill, and David

Steve--yeah, it's a bummer about the brackets--they apparently completely discounted the idea that someone might build the model without side skirts. In that case, it would be an impossible fix to make! 

 Mansteins revenge wrote:

She's looking good!!!

LOL...just ribbin' 'ya, but the MiG thing made me think of "selling out"...sorta like a rock band doing an American Express commercial... lol...tell me it 'aint so, doog!

Manny, LOL! Don't worry, I won't be doing any credit card commercials any time soon, LOL!--but think of it this way. For MIG Productions, it was a smart business move. I'm a three-time published author, and a prominent poster here on the site. It was a smart move to send me some eamples to test and try--especislly when their products really are some darned good  products!

Besides, I've already used MIG Powders to a great degree--one my Hetzer, my E-100, my other builds. So these are just another product which I might have purchased anyway in time.I see it as no differently than a guitar cable or string company giving me something to use for free--it's a benefit to both parties--unless the product is really lousy. But I have to say, the products in this case are really surprisingly good!

I'll be posting a review and update soon! Thanks again, all, for posting! 

  • Member since
    November 2005
Posted by Anonymous on Thursday, December 18, 2008 9:23 AM
 the doog wrote:

 Thanks, Robert! Lucky, indeed! I'll havea review soon here for you!

Thanks too, Scott--planning the painting of this taken as much thought as the build! 

Blll, glad you're learning from this as well. I'm using the "Neutral Wash" over the white camo, and it's pretty convincingly grimy! Watch for the review soon!

Rick, again; Thank You! I'm in the middle of using the products as I write this, and I have to say I am impressed! I'll be posting a review here really soon. I want to get a little bit of experience with them here before I post--and the idea of using them exclusively is a bit of a challenge, but I think it will be a great benefit to the former debate, to give a balanced review of them from someone who is normally a "heavy" weatherer! 

Thanks too, for commenting, Marc, Bill, and David

Steve--yeah, it's a bummer about the brackets--they apparently completely discounted the idea that someone might build the model without side skirts. In that case, it would be an impossible fix to make! 

 Mansteins revenge wrote:

She's looking good!!!

LOL...just ribbin' 'ya, but the MiG thing made me think of "selling out"...sorta like a rock band doing an American Express commercial... lol...tell me it 'aint so, doog!

Manny, LOL! Don't worry, I won't be doing any credit card commercials any time soon, LOL!--but think of it this way. For MIG Productions, it was a smart business move. I'm a three-time published author, and a prominent poster here on the site. It was a smart move to send me some eamples to test and try--especislly when their products really are some darned good  products!

Besides, I've already used MIG Powders to a great degree--one my Hetzer, my E-100, my other builds. So these are just another product which I might have purchased anyway in time.I see it as no differently than a guitar cable or string company giving me something to use for free--it's a benefit to both parties--unless the product is really lousy. But I have to say, the products in this case are really surprisingly good!

I'll be posting a review and update soon! Thanks again, all, for posting! 

Doog, I totally get it, and it is a "win-win" for both you and MiG...just givin 'ya a little bit 'a jazz, that's all...Wink [;)]

In fact, I'm begining to wonder when the big announcement is gonna come that you don't start doing this full-time and start you own "Verlinden" or MiG" company. I have had the pleasure of seen you evolve in a very short time from a prolific poster to an on-line mentor, with all the creds to back you up (published, etc.) ..of course your biggest product would be your techniques and your ability (and willingness) to document and explain them.

In the '80's it was the "Verlinden Way'; maybe next it will be "Doog's Way"...I don't think it is too far-fetched an idea...I have bought modeling "how to" books from Kalmbach Publishing in the past that featured guys with a fraction of the talent you have demonstrated (no exagerration)...

  • Member since
    January 2007
Posted by the doog on Thursday, December 18, 2008 4:18 PM
I hear ya, Manny! Wink [;)] I'd love to consider that a possibility for the future! I think that my exposure here on the forums, and in FSM is a good springboard to something like that in the future! I think I just have to log a little more time, and builds, and get my name around a bit, but my loyalty willalways be right here, to this great forum, and the friends I have here! Smile,Wink, & Grin [swg]
  • Member since
    April 2003
  • From: 41 Degrees 52.4 minutes North; 72 Degrees 7.3 minutes West
Posted by bbrowniii on Thursday, December 18, 2008 4:26 PM

 the doog wrote:
but my loyalty willalways be right here, to this great forum, and the friends I have here! Smile,Wink, & Grin [swg]


doog,

You say the nicest things... gonna make me Boohoo [BH] just a little.... Smile,Wink, & Grin [swg]

'All that is necessary for the triumph of evil is for good men to do nothing' - Edmund Burke (1770 ??)


  • Member since
    September 2006
  • From: Dripping Springs, TX, USA
Posted by RBaer on Thursday, December 18, 2008 4:39 PM

This thread is a gas! Huge info, lots of fun....doog, you gotta do the Monty Python captions for the rest of it, please!

BTW, I always knew you'd make the "show".....Bow [bow]

Apprentice rivet counter.

  • Member since
    January 2007
Posted by the doog on Thursday, December 18, 2008 4:46 PM

OK, guys-here we go with a weathering update.

As I stated before, I'm committed to using MIG Products exclusively for the weathering of this beast, where applicable. But for the first step, of bringing out some detail here on the whels, I've mixed up a blend of craft paints to drybrush the wheels--Folk Art Clay Beige, and Craft SmartMustard Yellow. I drybrushed this over the wheels, to bring out a little detail. 

I then applied some washes of MIG's "502 Abteilung" oils, of 093 Basic Earth, 080 Wash Brown, and 001 Snow White, and set them aside to dry.


I also used some thinned white craft paint with a dab of dishwashing liquid to thin it and help it flow over the sprayed-on Tamiya mixture that I used on the hull.


OK, now turning to the hull. I first washes the whole hull in MIG's "Neutral Wash". This actually is an enamel wash, and goes on somewhat dark, but it's a perfect, grimy gray-brown color for white finishes. It flows perfectly, and is easily thinned by either regular mineral spirits or MIG's own "Thinner for Washes". I then painted the hull chippped zimm sections in 502 oil color # 120 Primer Red. This is a somewhat brighter color than I'm used to, but pretty close to what I've seen in person in the unrestored Fort Knox StuG IIIG interior, of which I had the pleasure to crawl around inside.

I then took some of the 502 oils--the Wash Brown, Basic Earth, 010 Luftwaffe Yellow, 040 Faded Green, White, and 035 Buff, and started "Color Modulating". I admit; I stole some of this idea from Adam Wilder--if you haven't seen some of his finishes using this subtle technique, you're really missing out!

I applied small "spot filters" here and there, in different shades of white, tan, green, etc--just going for different shades of the basic colors, adding subtle layers on top of the basic base coat. The difficulty of this technique was magnified, I believe, by the desire to NOT cover up some of the effects of the "Hairspray" technique. OH well--this build is an experiment and a learning experience for me, so I fearlessly soldier on!

To tone down the bright red primer, I applied some powder--037 Gulf War Sand--to the still-wet oil, and then drybrushed--no; more "stippled" a always-varying combination of acrylic craft paint in tan/yellow/white, just going for various shades. I just kept monkeying with it, adding some, stepping back, looking at it again....

Here's where I am so far...long way to go yet...

I applied some of the Basic Earth oil to the rear to simulate mud on the hull.

And I wish I could change this--I chipped too much here. Before I decided to actually model #300, I chipped this big chip; I wish I could change it back. I'm thinking that I will whitewash it, over the bulletholes which I put un there to justify the chipping in this area. That way it will look like it was a pre-winter wound, and not be so glaring. Notice how the paint shows through where the track links were; I like this effect! 

An overall side view so far...

Well, I stil have a long way to go. A lot of detail painting, and I still haven't even started pin washes. The tracks and wheels will be a powdering challenge--lots of mud to be mixed up! 

By the way--anyone doubting the "accuracy" of the primer red showing through like that, check out these two color photos-one of a PZ IV in Italy, and the other a Panther recovered from the Demyansk pocket...posted here for reference only; thanks to Nico Frenzel for use of this photo.


So let's hear it with the critiques or questions!All opinions welcomed! Big Smile [:D]


  • Member since
    April 2008
  • From: Kristiansund, Norway
Posted by Huxy on Thursday, December 18, 2008 4:54 PM

You are so good it's sick.. Yuck [yuck]


Looking VERY good.. Very, very good.. way better than what  could get off with anything...   You are so good I'm speechless... Cool [8D] 

"Every War Starts And Ends With An Invasion".

  • Member since
    April 2003
  • From: 41 Degrees 52.4 minutes North; 72 Degrees 7.3 minutes West
Posted by bbrowniii on Thursday, December 18, 2008 4:59 PM

Truly impressive, doog.  I was a little nervous when I first saw that red, but you toned it down nicely.  The stuff you did on the wheels is really great as well.

As a suggestion: maybe in the pics that you have specifically used the Mig stuff, you could include the 'stuff' you used in the pic, like you did with the folkart acrylics in the first pic.  I know you write what you used, but some of us are visual learners... Whistling [:-^]

'All that is necessary for the triumph of evil is for good men to do nothing' - Edmund Burke (1770 ??)


  • Member since
    July 2004
  • From: Texas
Posted by wbill76 on Thursday, December 18, 2008 6:19 PM
Looks like the wheels are definitely turning doog, the multi-layered approach is producing a nice effect so far, looking forward to the next round. Thumbs Up [tup]
  • Member since
    June 2005
  • From: San Tan Valley,AZ
Posted by smokinguns3 on Thursday, December 18, 2008 6:20 PM
Are these the powderd MIG pigments or are they some new kind?
Rob I think i can I think i can
  • Member since
    July 2006
  • From: New Jersey
Posted by redleg12 on Thursday, December 18, 2008 6:38 PM

I don't think your filters were a cover up of the hairspray tech. As the whitwash would fade these "filters would show. Nice.

I have used the MIG powders and live them. I have not used their washes and have stayed with oils. I am interested if you eloborate more on the washes. Your feelings pro and con compared to the oils.

The work no matter who's stuff you are using is your usual top shelf.

Hey.....if you open up your own Verdooglin, I'm willing to partner to keep you honest. I'll work on the decals and US offerings. This way it's not pronounced only in German!Whistling [:-^]

Rounds Complete!!

"The Moral High Ground....A Great Place to Emplace Artillery."

  • Member since
    January 2007
Posted by the doog on Thursday, December 18, 2008 8:29 PM

 smokinguns3 wrote:
Are these the powderd MIG pigments or are they some new kind?
Rob, the pigments are just normal MIG pigments--however, don't get the "502" reference confused--the 502 liine is OIL PAINTS.

Thanks, Bill, and  Huxy (you flatter me! Blush [:I])

Boyd, I will try to remember to paste a photo of the materials I'm using. When I'm "in my mode" weathering, I'm almost possessed, and I almost forget to even snap a picture of what I'm doing, so, I think that way at least you'll be able to see what I'm using! 

Mike, --"Verdooglin"--LOL! it sounds like something I've been doing to Jenn in the dark, but I can't get into that here...Whistling [:-^]Wink [;)]Big Smile [:D] LOL!

The washes by MIG are in a bottle, and you should shake them up before using them. They have a label warning "When using this wash, your model MUST (MIG's emphasis) be painted with acrylic paints. We recommend Tamiya or Vallejo colored acrylics".

The instruct you to use the wash in the "holes and details", let sit for 15 minutes, and then to clean off the excess with a paint brush "humidified with MIG thinner". (gotta love the Spanish/English transliterations! Wink [;)] ) I just used mine like an overall wash, as a deliberate partof the process I was going fo--I wanted to tint the finish darker, and then add some brighter whites to layer the color. But the wash really does lay down very similar to oils; it's also pretty consistent color, and easy to manipulate.I have et to try the actual "filters"--I probably should have used those first, come to think of it. Oh well; I'll get to trying some of them soon, I'm sure. Hope this help you out! 


  • Member since
    August 2006
  • From: Arkansas
Posted by K-dawg on Thursday, December 18, 2008 9:55 PM

Looking good Doog..

The unrestored Stug at Knox has red primer showing all over it where the zim has been knocked off... 


KC

Kenneth Childres, Central Arkansas Scale Modelers

  • Member since
    February 2008
  • From: ladner BC Canada
Posted by stick man on Thursday, December 18, 2008 10:05 PM

WOW Great work Doog!!!!

Smile [:)]

I'm 15 and I model I sk8board and I drum what could be better.
Rob
  • Member since
    April 2005
  • From: netherlands
Posted by Rob on Friday, December 19, 2008 4:05 AM

damn doog, that is lookin mighty awesome. really love what ya do with those kits, and so many.. so fast.

great is all i can say..

but something springs to mind, when i starter to post here,  you where an all 1/72 builder.. what happend?? got sucked up by all the greater detail of 1/35? 

cheers

my family calls me "ARMOR FREAK"... i don't know why. My AFV pic site --> www.rob_tas84.mijnalbums.nl My nature pic site -> www.robbioo.mijnalbums.nl
  • Member since
    April 2005
  • From: Piscataway, NJ!
Posted by wing_nut on Friday, December 19, 2008 7:33 AM

I have the name for your line of pre-mixed washes..."Doog Dew"   Just make sure it smells goodWink [;)]  I'll try'em.  

I really like the way the weathering is builing up.  The color photos of the primer surely must have stopped any typing a comments in their tracks.

Only one thing if I may point out.  The pattern of the machine gun fire wouldn't be in a line like that.  This is something discussed in aircraft forums on and off. Maybe because their battle damage is more often machine gun fire than the heavy stuff that knocks out tanks.  I like the look of the dmage, maybe a bit more of a pock mark around the hole,  but it should be more random.  if you look at a plane that is ripped up there isn't a line of holes like in the movies.

This will look killer when it's done.

Marc  

  • Member since
    November 2005
Posted by Anonymous on Friday, December 19, 2008 7:38 AM
Great stuff, doog. Your two ref pics are cool, but IMO the red in the destroyed MkIV pic is heat oxidation from fire (orange-red rust)...as far as the Panther, however, it surely does appear to be red primer peeking through!
  • Member since
    January 2007
Posted by the doog on Friday, December 19, 2008 8:04 AM

Thanks, K-dawg and stick man

Thanks, too, Rob! I stil do 1/72, but I used to use the smaller kits as a diversion from the "full commitment" of a dedicated 1/35 build; recenetly, I had diverged inot some car models as a break from Armor, and so I'm just itching toget back to the "big" tanks. I started a 1/72 just before this build--an "ACE" Waffentrager--and the whole kit was such a piece of crap that I just trashed it--UGH! So there went my 1/72 itch for the month!I do have more 1/35th planned though, so it'll be a while before I get back to the little tanks!

 wing_nut wrote:
 

Only one thing if I may point out.  The pattern of the machine gun fire wouldn't be in a line like that. 

Thanks, Marc--I wasn't aware of the discussion, and wish I knew beforehand; like I said, it was just a reason to "excuse" the big zimm chip there which I wish now that I hadn't done. But at least if geeks like me think that the MG fire would look like that, so would a casual observer, so it'll get the point across, you know? (I hope!)

Manny--thanks, too! If you look at the picture of the PzIV, that primer red extends all the way down to even the sprockets, so I would argue that that is a primer red coat, which has been partially revealed by sand wear against the paint, or simply sloppy base coat painting. Also, there absolutey no evidence of fire, or ash, or soot, or anything to indicate a fire, IMO. Take a look at it again--by the way, over on Armorama, there was a huge discussion going on about this; well worth the look!
Hey you never answered my question--did you have any of the problems with your KT build that I had in the construction phase?
  • Member since
    November 2005
Posted by Anonymous on Friday, December 19, 2008 9:34 AM

Doog, I looked again and it COULD be primer, but to me it still looks more like heat-oxidation---who knows for sure? Point is, you found one, possibly two pics, that back up your assertion. Very cool pics indeed. It may even be possible that the front bolt-on armor and sprockets were replacements that were added to a repaired Mk IV and not properly painted w/ camo...it is obvious that the tank is knocked out...

Also, some good views of what the three primary late-war colors should look like---as I have always suspected (as do you), German dark yellow is more khaki in shade than most people model it.

As far as build issues with the KT, yes there were the same as you encountered and the remedy was to either eyeball some of the tool placements or do some rouch calculation for the spare track hangers--the Tamiya KT is a good ref for this since it already has the marks (as you pointed out)...all in all, however, it wan't too bad a build... 

  • Member since
    July 2004
  • From: Texas
Posted by wbill76 on Friday, December 19, 2008 11:10 AM

 the doog wrote:


Manny--thanks, too! If you look at the picture of the PzIV, that primer red extends all the way down to even the sprockets, so I would argue that that is a primer red coat, which has been partially revealed by sand wear against the paint, or simply sloppy base coat painting. Also, there absolutey no evidence of fire, or ash, or soot, or anything to indicate a fire, IMO. Take a look at it again--by the way, over on Armorama, there was a huge discussion going on about this; well worth the look!

MR/Doog, look even closer. Wink [;)]The Pz IV exposed primer on the front plate is due to the loss of the bolt-on applique plate that should be there but has been knocked off. Look around the tow pintles and you will see that there's an outline of Dunkelgelb there where the plate doesn't cover. This particular vehicle is a IV-G and you can see the intact applique plates on the front superstructure but the hull front plate is gone. There are even visible bolt holes where the applique bolts would attach that are now empty. The armor was added at the factory as part of the up-armoring process and the vehicle most likely given its dunkelgelb finish after the up-armored plate was added...no sense in painting the original plate in dunkelgelb, then attaching the applique plate, and then painting it again in dunkelgelb to match. When the applique plate was knocked off/removed, the primer was exposed.

  • Member since
    January 2012
Posted by I make stuff on Friday, December 19, 2008 11:12 AM

Karl,

Although you have committed to an exclusive Mig elements on this build, it's your...determination that "craft paints" could be effectivley, and I don't mean passably, but EFFECTIVELY be used to achieve something like winter weathering that is what is different about you.

Particularly since I now have some scratch not available to me in my earlier modeling attempts, there is a tendency, at least in me, to run to a prepackaged solution for an effect, Rustall, etc, rather then experiment and craft something that works, maybe better.

To me, your first time using white craft paint to simulate winter white wash is as brave an event as the first human who ate a raw oyster, or an egg.  It's no so stunnning that white craft paint will work, it's that you had the guts to slap it on that first model.  It's nothing for me to copy you and pester you for "how to's". Its the innovations that you bring to the table, and your wilingness to allow us a good look at how you do it rather than hoarding it and hiding it with vague responses and using it to win trophies without passing on your hard earned knowledge.

This sounds like an award show or a eulogy, and I'm not a kiss-butt, but your assistance has really made my foray back into modeling something where I feel I have advanced far beyond what I could have achieved by simply trying things in the dark, it never would have occurred to me to even experiment with some of these items.

I'll stop now.  

Bill        


  • Member since
    December 2005
  • From: Syracuse, NY
Posted by lexesbenz on Friday, December 19, 2008 5:20 PM
Mmmmmm Looking good Buddy!!! Lol I lost the machine gun for mine, so I am at a standstill, how do you like those mig oils, I have a couple of them and they work great!!
The flying hamster of doom rains coconuts on your pitiful city!!!!
  • Member since
    November 2005
Posted by Anonymous on Friday, December 19, 2008 6:22 PM
 wbill76 wrote:

 the doog wrote:


Manny--thanks, too! If you look at the picture of the PzIV, that primer red extends all the way down to even the sprockets, so I would argue that that is a primer red coat, which has been partially revealed by sand wear against the paint, or simply sloppy base coat painting. Also, there absolutey no evidence of fire, or ash, or soot, or anything to indicate a fire, IMO. Take a look at it again--by the way, over on Armorama, there was a huge discussion going on about this; well worth the look!

MR/Doog, look even closer. Wink [;)]The Pz IV exposed primer on the front plate is due to the loss of the bolt-on applique plate that should be there but has been knocked off. Look around the tow pintles and you will see that there's an outline of Dunkelgelb there where the plate doesn't cover. This particular vehicle is a IV-G and you can see the intact applique plates on the front superstructure but the hull front plate is gone. There are even visible bolt holes where the applique bolts would attach that are now empty. The armor was added at the factory as part of the up-armoring process and the vehicle most likely given its dunkelgelb finish after the up-armored plate was added...no sense in painting the original plate in dunkelgelb, then attaching the applique plate, and then painting it again in dunkelgelb to match. When the applique plate was knocked off/removed, the primer was exposed.

Bill, I think you are right!  Still doesn't explain the red drive-sprockets???
  • Member since
    July 2004
  • From: Texas
Posted by wbill76 on Friday, December 19, 2008 6:32 PM

MR,

The red sprockets are more of a mystery but perhaps only partly so...the exposed faces are the inner faces where the tracks would normally run and could either a) be replacements that weren't painted or b) weren't accessible for painting on the vehicle once mounted and so were left in red primer.

The fact that the final drive housings are also in red oxide would lead me to believe these may be replacement parts and/or fire-damaged...there's some indications that whatever knocked off the front plate also did some additional damage along the way...this particular tank isn't in very good condition overall but it's still speculation as to the why...this kind of photo is what makes things "interesting" in general. Wink [;)]

  • Member since
    April 2003
  • From: 41 Degrees 52.4 minutes North; 72 Degrees 7.3 minutes West
Posted by bbrowniii on Friday, December 19, 2008 8:42 PM
 wing_nut wrote:

Only one thing if I may point out.  The pattern of the machine gun fire wouldn't be in a line like that.  This is something discussed in aircraft forums on and off. Maybe because their battle damage is more often machine gun fire than the heavy stuff that knocks out tanks.  I like the look of the dmage, maybe a bit more of a pock mark around the hole,  but it should be more random.  if you look at a plane that is ripped up there isn't a line of holes like in the movies.

This is a really good point.  Trained machine gunners learn to fire their weapons in a burst, typically 5 - 7 rounds (to make sure you get a tracer in each burst).  The bullets, though fired virtually simultaneously will each follow its own trajectory due to the movement of the gun on its mount and the differences in the bullets themselves, and a whole bunch of other stuff.  The result is, at typical burst of MG fire is more of a circular pattern (the rounds form a 'cone of fire' as they pass through the air, and impact in a 'beaten zone'.  Both of these are roughly circular to oval 'groups' of bullets moving through the air to the target...

There can obviously be a lot of variation, depending on the size of the burst and the motion of the gun or gunner and/or the target, but still, you'll tend to see oblong patterns of impacts (more cigar shaped) rather than linear ones.

'All that is necessary for the triumph of evil is for good men to do nothing' - Edmund Burke (1770 ??)


  • Member since
    April 2003
  • From: 41 Degrees 52.4 minutes North; 72 Degrees 7.3 minutes West
Posted by bbrowniii on Friday, December 19, 2008 8:51 PM

 the doog wrote:

Thanks, Marc--I wasn't aware of the discussion, and wish I knew beforehand; like I said, it was just a reason to "excuse" the big zimm chip there which I wish now that I hadn't done. But at least if geeks like me think that the MG fire would look like that, so would a casual observer, so it'll get the point across, you know? (I hope!)

Doog,

Yeah, I think you are 'safe' there.  It definately gets the point across - 'tells the story' as it were.

'All that is necessary for the triumph of evil is for good men to do nothing' - Edmund Burke (1770 ??)


  • Member since
    January 2007
Posted by the doog on Friday, December 19, 2008 9:51 PM
 wbill76 wrote:

MR/Doog, look even closer. Wink [;)]The Pz IV exposed primer on the front plate is due to the loss of the bolt-on applique plate that should be there but has been knocked off. Look around the tow pintles and you will see that there's an outline of Dunkelgelb there where the plate doesn't cover.

WOW, great observation there, Bill!

And an interesting discussion ensuing as well! Shall we just invite everyone from Armorama over? LOL!

Bill, (Citaldelgrad) thanks for your kind words! It sincerely gives me pleasure to "teach" and to inspire others with my work, so your words are much appreciated! I'm happy to have thus inspired your work!

Tony--the MIG stuff is great! I have noticed however, that if you use the MIG thinner to cut the oils, they take forever to drt. I'm curious as to what the composition of the thinner is? Linseed oil? Enamel thinner? I have noticed that if I use regular mineral spirits to thin them, they behave the same way as my usual oils.

Thanks again for that info, Boyd--I'll use that info in the future, I'm sure!

I have to go to Pennsylvania tomorrow to get some emergency dental work done (had a bonding blow out!) so I'll be back later tomotrrow, and I have a new update coming...see you guys then!


  • Member since
    December 2005
  • From: Syracuse, NY
Posted by lexesbenz on Saturday, December 20, 2008 12:04 AM
I used turpenoid and didn't have any problem, be catious of their green though, its really strong, found that out the hard way lol, I had a Stug III with a green haze. I think their thinner is just regular old linseed oil, but hey I could be wrong.
The flying hamster of doom rains coconuts on your pitiful city!!!!
  • Member since
    July 2004
  • From: Texas
Posted by wbill76 on Saturday, December 20, 2008 12:48 PM
 the doog wrote:
WOW, great observation there, Bill!

And an interesting discussion ensuing as well! Shall we just invite everyone from Armorama over? LOL!

I'm sure it would make for some interesting conversation! Laugh [(-D] (For the curous, Karl and I are talking about this thread: http://www.armorama.com/modules.php?op=modload&name=SquawkBox&file=index&req=viewtopic&topic_id=129487&page=1 ). It was a fascinating exchange with a lot of things thrown around...and it obviously inspired you as well with this project so it's all good! Wink [;)]

  • Member since
    November 2005
Posted by Anonymous on Saturday, December 20, 2008 4:25 PM
 the doog wrote:

King Tiger # 300 was part of "Operation South Wind"--the attack on the Soviet bridgehead on the western flank of the Gran RIver in Hungary. Jochen Peiper's 1st SS PanzerKorps led the attack. Here it was photographed 45 miles from Budapest.This photo is from the excellent J. Fedorowicz book "SS Armor on the Eastern Front" by Velimir Vuksic. You can see that it still has the AA ring around the commander's cupola--surprising, as I would have thought it to have been a "final model" KT. You can also see the base coat where the missing links are on the turret.


I have that ref but have really never paid much notice to that pic---ya know, that looks like Peiper, himself!, in the turret...pics of him in '44 and '45 are extremely rare...cool...
  • Member since
    January 2007
Posted by the doog on Saturday, December 20, 2008 4:38 PM

OK, guys--here's a weathering update. I took my Tigger out to brap around in some mud and snow!

Here's the stuff I used to make a mud mixture. What I'm going to do is to go for a two-layer look to the mud--a lighter "dried" mud first, then a "wet" darker mud. First I used a combination of MIG Powders "Light Dust" and "Dried Mud", and mixed in about 30% powders, with 30% plaster (in the cup lower right), and 30% MIG Acrylic Resin. The other 10% was added real dirt and leaf litter for texture.


The Acrylic Resin is interesting stuff. It's white, thick, and "oozy", and looks like the glazing sugar icing that you would get in a package of Apple Turnovers or something. Alternately, it kinda looks like, well...."baby batter"! Whistling [:-^]. When I mixed everything up, I added a little drop of water slightly thin it, and here's what it looked like....


Taking an mid-sized paint brush, I start slopping it on....Now, you mightnotice that I'm working on a hull that is already somewhat "dirty"--this was my layer of "painted dirt". I used acrylic craft paints to stipple on a coating of "paint-only" dirt, in a two-color random layer. I used like, a dark brown, and a lighter tan-colored brown, and just mixed them "on the brush", stabbing at, and stippling the bottom of the model to provide a chromatic base. In retrospect, I'm not even sure if this was necessary, but it's still a "remnant" of my "old" weathering method.

Here;s what it looks like after a bit of work...I have to say; this is some cool stuff! What's nice about it is that it dries fast! No having to wait overnight for the celuclay mix to dry!

I even put a little in the sprockets, where you'd expect it...

The tracks have been given a wash of 502 Abteilung #060 Light Rust Brown, and then an application of metallic grey over the tops, and also in the middle of the teeth where the wheels would be rolling. Then a final light drybrushing of pure silver.

One thing to know is that I have been experimenting with the MIG Thinner vs regular mineral spirits. If you use the MIG thinner, it seems to be of a linseed-oil quality, or perhaps some sort of enamel base? It takes a much longer time to dry. This could be very advantageous for applying certain techniques, perhaps like the oil dot method? Or for using filters? But I have found that for a quick, perfunctory wash, I prefer the standard mineral spiritssimply for the faster drying time.

The sprockets were goven the same treatment.

Now, to do the "wet" mud, I added i some MIG "Russian Earth" powders, which darkened the olor considerably, and then I also added some acrylic gloss from Model Master, to give it a "wet" look when it dries. 

Patiently, I start applying it in between the links...

...and then, in order to show the track faces and the highlights of metallic grey, I simply brushed my thumb across the faces, wiping away the mud mixture. Simple. Easy. Effective. I'm turning into Private Pyle! Shock [:O]

Here it is mudded on th etop of the track...(I'll do the bottom after I get all the wheels on...)

I slap....sorry--"brap" some of it on the hull--note how it now sets itself off from the "dry" mud...

And finally, since my Tigger was brappin' in the snow, I'll add some Woodland Sceneics Snow, shaken from a cup, on the hull and tracks...

Now, I'm curious to see if that WS Snow will show up on the mud, or will it sink in, and need some other application? I also hit a small section of it with MIG Pigment Fixer, to see if that will affect it? If it does, I'll try using MIG Snow powder--I think I have an "Ashes White" in the stash here....right now I'm waiting on it drying, so I'll post an update tomorrow if I can!

To be continued....! Big Smile [:D]


  • Member since
    January 2007
Posted by the doog on Saturday, December 20, 2008 4:51 PM
 Mansteins revenge wrote:
 the doog wrote:

King Tiger # 300 was part of "Operation South Wind"--the attack on the Soviet bridgehead on the western flank of the Gran RIver in Hungary. Jochen Peiper's 1st SS PanzerKorps led the attack. Here it was photographed 45 miles from Budapest.This photo is from the excellent J. Fedorowicz book "SS Armor on the Eastern Front" by Velimir Vuksic. You can see that it still has the AA ring around the commander's cupola--surprising, as I would have thought it to have been a "final model" KT. You can also see the base coat where the missing links are on the turret.


I have that ref but have really never paid much notice to that pic---ya know, that looks like Peiper, himself!, in the turret...pics of him in '44 and '45 are extremely rare...cool...
It is pretty cool, huh, Manny? Wouldn't that be cool to think it was? This was a part of his Kampfgruppe, so I guess technically it IS possible?
  • Member since
    November 2006
  • From: Massachusetts
Posted by jadgpanther302 on Saturday, December 20, 2008 4:55 PM

looks good, is the mud set worth it? I checked internet hobbies and it is 42 bucks.

It looks really cool though.Thumbs Up [tup]Thumbs Up [tup]

  • Member since
    July 2007
  • From: Ohio
Posted by Geist on Saturday, December 20, 2008 4:56 PM

Wow Doog, that looks sweat. Very realistic Thumbs Up [tup]. I'm going to have to try out MIG products. I've always made mud with spuadron putty, but it is very tideous. I'm going to have to try your way. What colors would you reccomend getting to start out?


Erik

On the bench: Italeri Leopard 1A2 correction build with Perfect Scale turret and Eduard PE

  • Member since
    June 2005
  • From: Indiana U.S.A.
Posted by Panther F on Saturday, December 20, 2008 5:29 PM
Like a chemist in his lab!  Nice work doog.  Wink [;)]
  • Member since
    July 2004
  • From: Texas
Posted by wbill76 on Saturday, December 20, 2008 5:30 PM
Coming along nicely Karl, how big of a base are you planning for this one? Thumbs Up [tup]
  • Member since
    October 2008
  • From: Portland, Oregon
Posted by RickLawler on Saturday, December 20, 2008 6:24 PM

Hey Karl,

It looks like you are getting the hang of using the MIG's just fine.  As you've noted, they have their idosycracies (sp?) and can take some getting used to.  Your results look good so far. 


Take care,

Rick

http://ricklawler.blogspot.com/


Rob
  • Member since
    April 2005
  • From: netherlands
Posted by Rob on Sunday, December 21, 2008 6:13 AM

hej doog, that is looking mighty awesome. with your permission i'll print it and use it for one of my future projects as guideline.

cheers

my family calls me "ARMOR FREAK"... i don't know why. My AFV pic site --> www.rob_tas84.mijnalbums.nl My nature pic site -> www.robbioo.mijnalbums.nl
  • Member since
    July 2006
  • From: New Jersey
Posted by redleg12 on Sunday, December 21, 2008 8:01 AM

Karl - since this is a MIGnanomus finish....I am further curious. What do you see as the major advantage of using the MIG acrylic resin as the binder vs white glue vs celluclay. Is it just drying time!!.

As I have said, I am a big MIG fan of the powders. Looking for good resons to look at their other products.

Nice work thus far. Keeping my sights on the MIG.....no, that from the wingy side....eye on the Tiger.....thats better.

Rounds Complete!!

"The Moral High Ground....A Great Place to Emplace Artillery."

  • Member since
    November 2005
Posted by Anonymous on Sunday, December 21, 2008 10:25 AM
That mud looks good enough to eat...can I lick the bowl?  That KT is really starting to vie for my affections!
  • Member since
    January 2007
Posted by the doog on Sunday, December 21, 2008 10:43 AM
 jadgpanther302 wrote:

looks good, is the mud set worth it? I checked internet hobbies and it is 42 bucks.

It looks really cool though.Thumbs Up [tup]Thumbs Up [tup]

Well, that's a decisioin you would have to make based on your pocketbook--same as anything in this hobby! In the previous thread, MIG said that the prices here are jacked up by US retailers, and that the better way to go would be to buy directly from the MIG website--I would check there first!

Geist--I would recommend, in order of progressive "darkening" coor:

  • 232 Dry Mud
  • 234 Rubbel Dust
  • 033 Dark Mud
  • 039 Industrial City Dirt
  • 034 Russian Earth

The first is a light mud color; the last is a near raw-umber-ish dark brown.

Thanks, Jeff, Bill, Rob, and Rick!  There is a learning curve to the pigments and products, but it's not steep. Mostly, you just have to be willing to experiment!

Mike,the acrylic resin stuff dries wicked-fast, and it's tough-as-nails when it's cured. I got the tracks on this morning. It's a shame much of this will be hidden by the side skirts! Look at hpw nice the dirt and snow look behind the tracks in the next couple photos!

Here's something I found very interesting! Here are the two spots where I actuallly used drops of MIG Pigment Fixer to fix the Woodland Scenics snow--notice how the rest ofthe Snow just kinda suck in and disappeared into the drying tracks' color. I don't know if this was becaose of the little bit of water that I added to "re-wet" the acrylic mixture again afterit sitting in a cup for about 6 hours? I had sealed the cup with both clear plastic wrap and tin foil, and to my delight, it stayed relatively "fresh". But I may have put too much water in it, and allowed the snow powder to sink into it as it dried?

Look at the other side--see how the snow "disappeared"?

Also, the acrylic resin seems more amenable to heavy/thick application without gravity pulling it off the model like it does with white glue--look at the front here, how nicely a thick application stayed.

I'll be working on the rest of it today, and then getting back to final weathering on the uppper hull. I still have some detail painting and pin washes to do. Watch this space! Cool [8D]


  • Member since
    April 2008
  • From: Canadian Prairies
Posted by caSSius on Sunday, December 21, 2008 11:37 AM

Great looking build Karl! And thank you for taking the time to put together a tutorial once again. Smile [:)]

This one is particularly helpful for someone like myself, who's local area doesn't have much exposure to these products (I enquired about MIG products this summer at my LHS and the fellow behind the counter screwed up his face and said, "huh?...do you mean a plane?"...Sigh [sigh]...they mostly carry RC stuff these days).  So, your efforts are appreciated in helping me to evaluate if they're worth ordering online. Kudo's to the boys from MIG for providing you with some products to play with and tell us about.

As a self-professed "heavy weatherer", you've taken this a notch or two above where I'd dare to tread with my own stuff...but it's a joy to watch you beat this kit up. I'm looking forward to seeing it all come together.

Cheers

Brad

"Only those who will risk going too far can possibly find out how far one can go."

- T.S. Eliot


  • Member since
    July 2006
  • From: New Jersey
Posted by redleg12 on Sunday, December 21, 2008 12:41 PM

Karl

Great answers and observations. It would appear the MIG acrylic is a good deal for making that nice thick mud. It is also great to know you can keep it fresh by sealing it.

I wonder if you let the mud start to set up a little if the snow would keep from sinking. In any case it seems like something that could be worked out.

Your MIG festival is a good learning experience on all their products. Thank Rick and Allan for all of us.

Of course thank you for the time and patience to bring us the info.

Rounds Complete!! 


"The Moral High Ground....A Great Place to Emplace Artillery."

  • Member since
    July 2003
  • From: On my kitchen counter top somewhere in central North Carolina.
Posted by disastermaster on Sunday, December 21, 2008 4:25 PM

 And, once again doog has come across with an outstandin' build. http://i10.photobucket.com/albums/a144/parisienne-moonlight/emoticon/asdcattivo.gif (Outstandin' in the snow apparently....    He HEH)

 I've been watching this ride since you started. It looks to me like everything has tied together nicely to represent a super rendition of Pieper's ride.

Nasty man, just nasty.

Here's my favorite shot....

http://www.innovationbyinstinct.com/services/hosting/clients/accountyp/status/DisasterMaster/%23t1-4.jpg


 https://i.imgur.com/LjRRaV1.png


  • Member since
    January 2012
Posted by I make stuff on Sunday, December 21, 2008 4:50 PM
 Rob wrote:

hej doog, that is looking mighty awesome. with your permission i'll print it and use it for one of my future projects as guideline.

cheers


Oh, MAN!  Is this protocol?  I'm using basically every one else's work as a guide, one way or another.Whistling [:-^]

  • Member since
    January 2007
Posted by the doog on Sunday, December 21, 2008 9:30 PM

caSSius, Mike, and Steve -- thanks for looking in, and for commenting! 

I'm glad that you guys like the work here and the little review/toot. I'm working away here; just taking a break to look in. I'll have a new update tomorrow!


mmc
  • Member since
    February 2007
  • From: Newcastle upon Tyne, England
Posted by mmc on Monday, December 22, 2008 10:10 AM

Wow fantastic Kingtiger, everything about it is superb.

I use the same method for mud, if I can pluck up the courage I might post my Sherman Dozer, which has a very generous coating. Haven't tried WS snow yet, going to give it a go on my SdKfz 7/2, going to bookmark this for reference.

Looking forward to seeing the Tigger all done.

Mark

  • Member since
    September 2006
  • From: Dripping Springs, TX, USA
Posted by RBaer on Monday, December 22, 2008 4:17 PM
Doog, simply awesome!

Apprentice rivet counter.

  • Member since
    December 2008
  • From: Philadelphia
Posted by Byrne0ut on Monday, December 22, 2008 4:30 PM
That is iincredible.  I know im new here, but that is wonderful work.  I have a panther ausf a on my bench right now and that is the exact paint scheme i was going to go for, this post is going to be extremely valuable, although I can pretty much guarantee it wont look as good as this, but with time I will hope to give doog a run for his money.
ON The Bench: Tristar 1/35 Panzer 38(t) Ausf. B Glencoe 1/400 SS United States Tamiya 1/35 Panther Ausf. A Early On The Shelf Tamiya 1/35 King Tiger Tamiya 1/48 F4U-1D Corsair
  • Member since
    January 2007
Posted by the doog on Tuesday, December 23, 2008 1:20 PM

Mark, Russ, and John, thanks for your kind compliments! I'm glad you guys are enjoying the build! Big Smile [:D]

So here it is--the final installment in the finishing my "MIG-nificent" King Tiger. First, a litle more how-to; first I want to show a little more of how I got the snow on the tracks. The Woodland Sceneics snow just didnt want to stay opaque-white; it kept changing to a semi-translucent-looking powwder, so I gave the MIG powder #022 "Ashes White" a try--and it worked beautifully!

I set it down on the tracks with a brush...
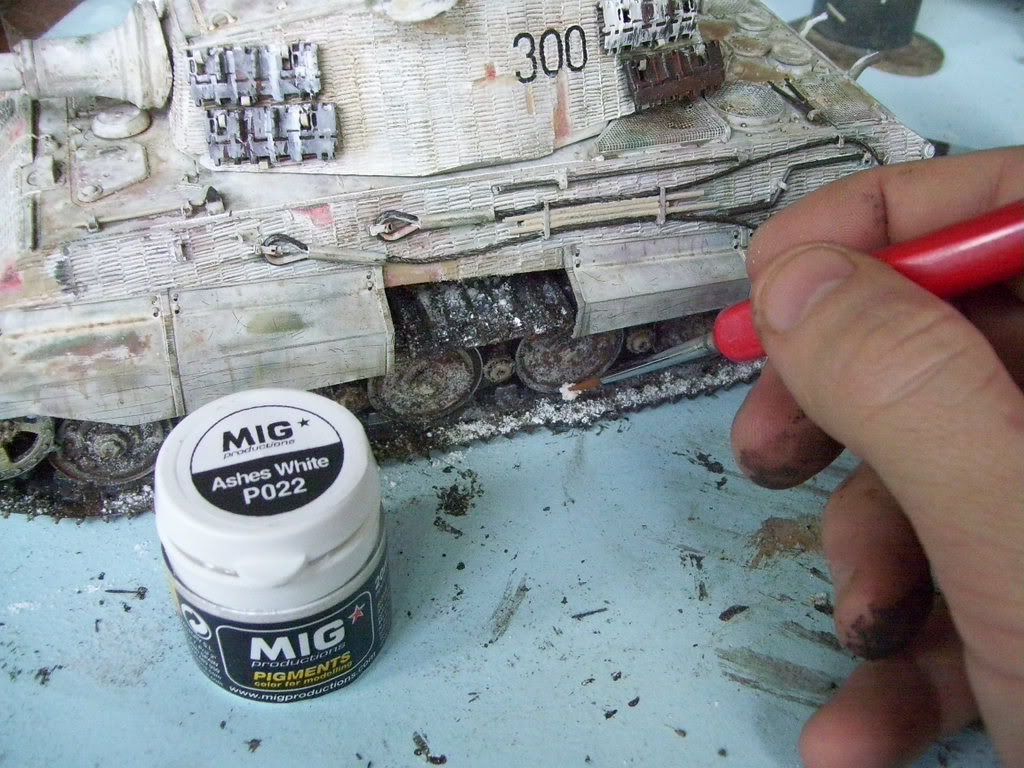
Hit it with some MIG Pigment Fixer, and it dries perfectly white!
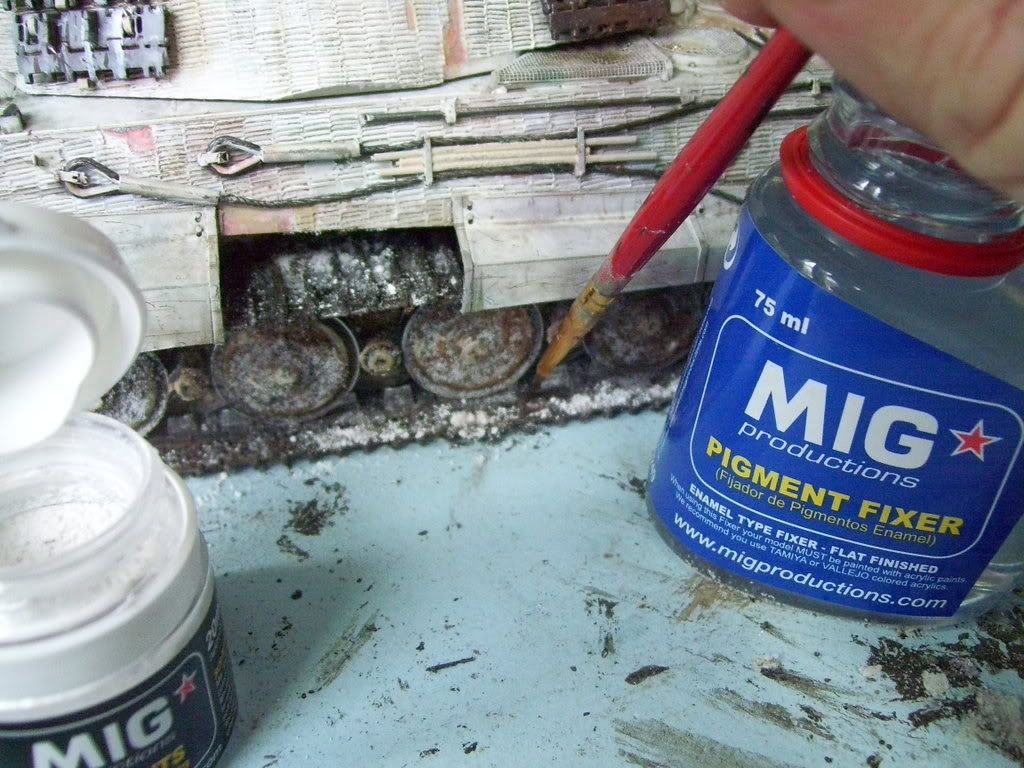
 

Voila! It really keeps it's color! I also went over a lot if the tracks and other areas with this powder, and got similar results, so I'm very pleased with this use for what is touted as a burnt ash color for roadwheels, eyc--yes, you can also use it for snow! Tongue [:P]

Next, I also used pigments on the mufflers. First, here'stwo of the three powders I used.
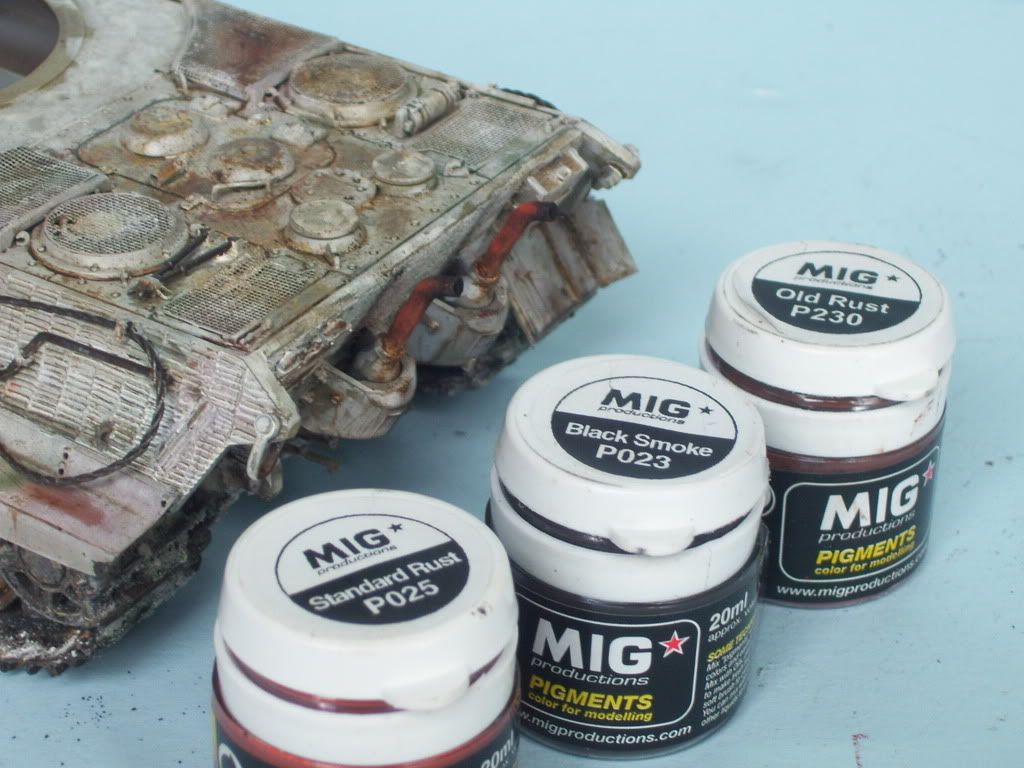
First, I take the "Old Rust" with some of the 502 Oils color #060 Light Rust Brown, and after getting some of it on the brush, I dip the paint brush into the pigment jar so that I have both oil and pigments on the brush, and then I apply it to the muffler.
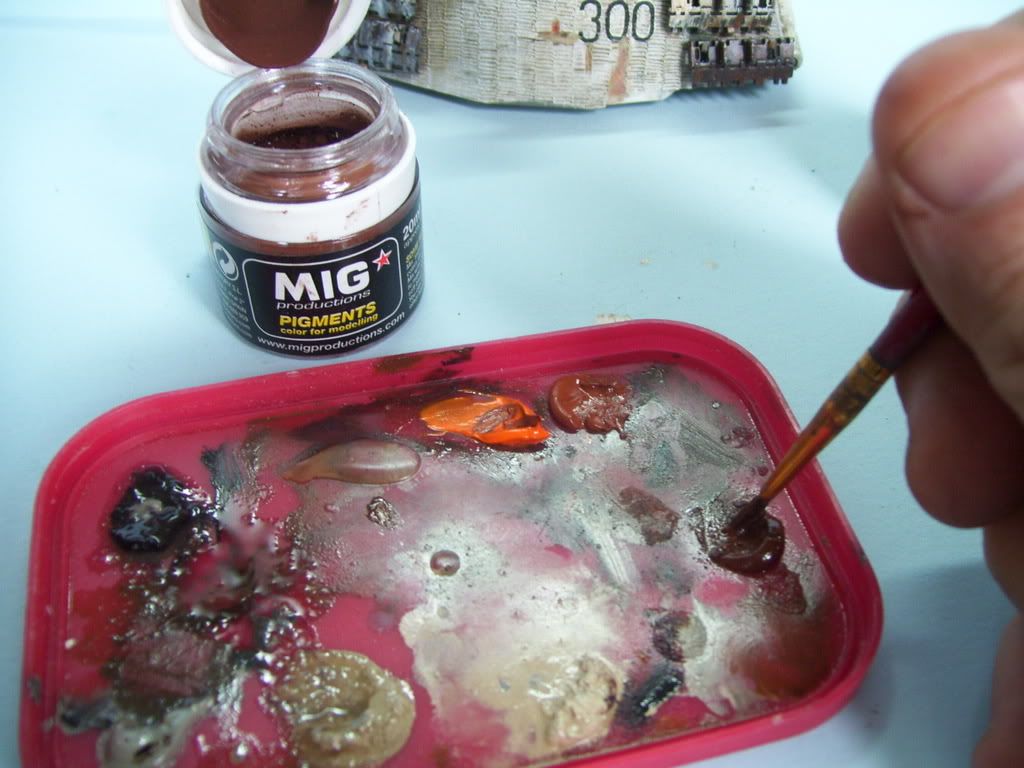
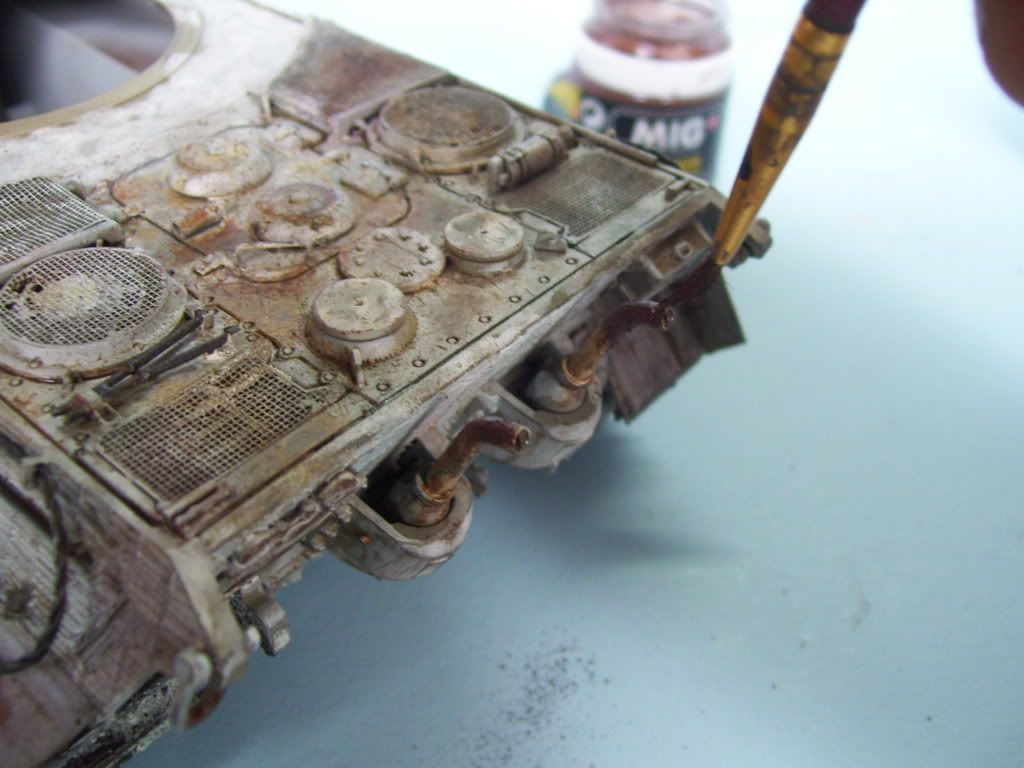
Then, with a CLEAN, short-bristled brush, I scrap away some of the excessive color. I do thisto graduate the color from top to bottom. I figure the tops would be more discolored than the bottoms.
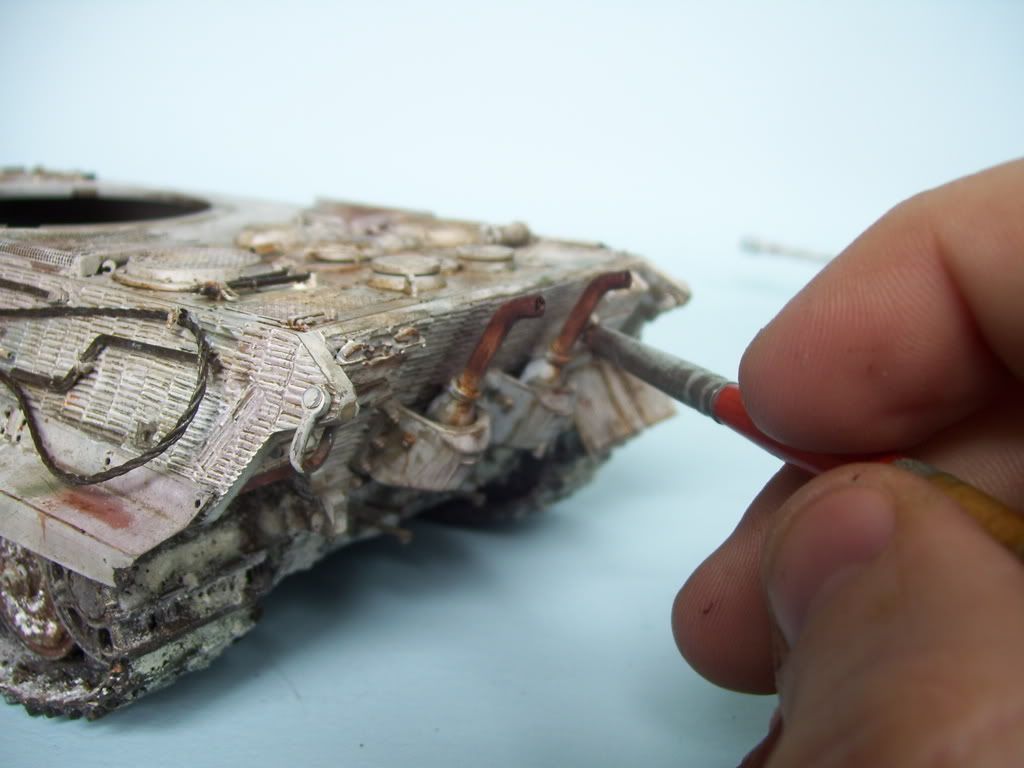
Now what I have is a still "sticky" mix of oil+pigments on the tops and side. SO I then apply the "Medium" rust powder (POWDER ONLY!) to the top of the muffler.
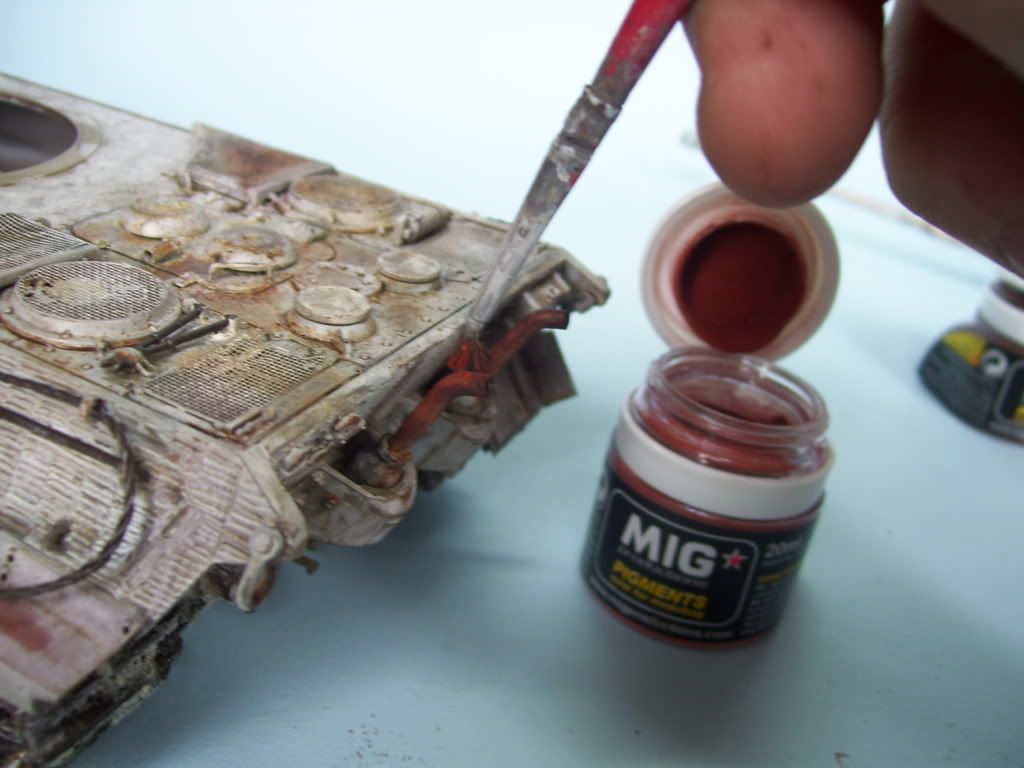
And finally some Black Smoke to the tops...
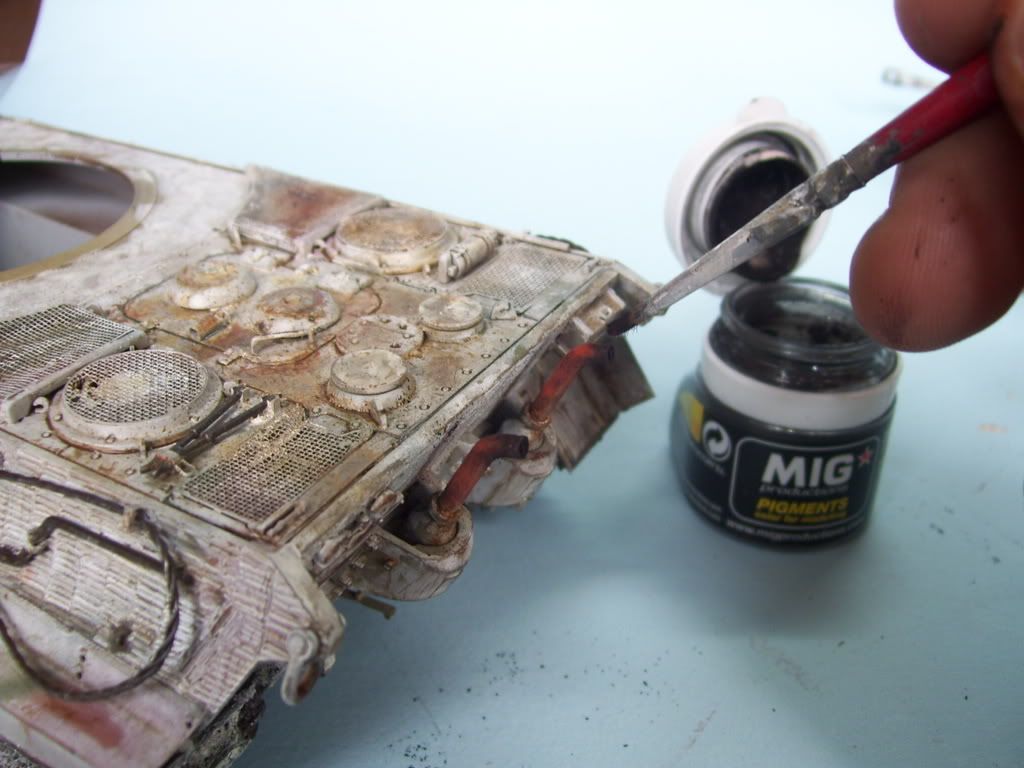
Here's what they eventuallly look like after adding the last color--"Light Rust" to the top for a little more contrast.
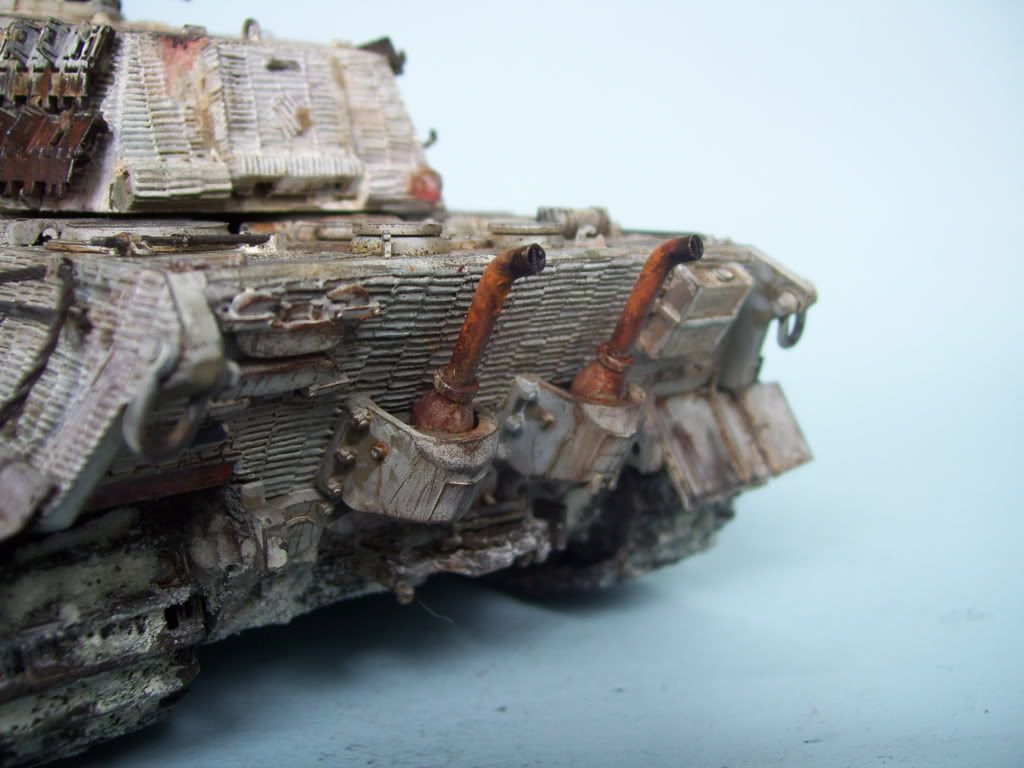
And here's the final product with the Warriors figure painted up, in Tamiya acrylics and oils..again, alll the weathering was accomplished using 99% of MIG "502 Abteilung" oils, MIG pre-mixed washes and filters, and MIG powders, kindly and generously provided by MIG Productions . I used the "Neutral Wash" for all the pin washes, and 502 oils for the rust streaks and discolorations. There are MIG pigments on the upper hull surfaces to show dirt/discoloration--several different shades. And finally, a light application was made of MIG "Gunmetal" powder on the edges--it's like a graphite powder, and relaly gives a nice 'metallic" edge to some of the parts that really need it. I applied it by putting some on my finger and rubbing it where I could. I'm sorry I couldn't document these parts more--a lot of it is done at night, when the lighting from my flash was too harsh to capture it.
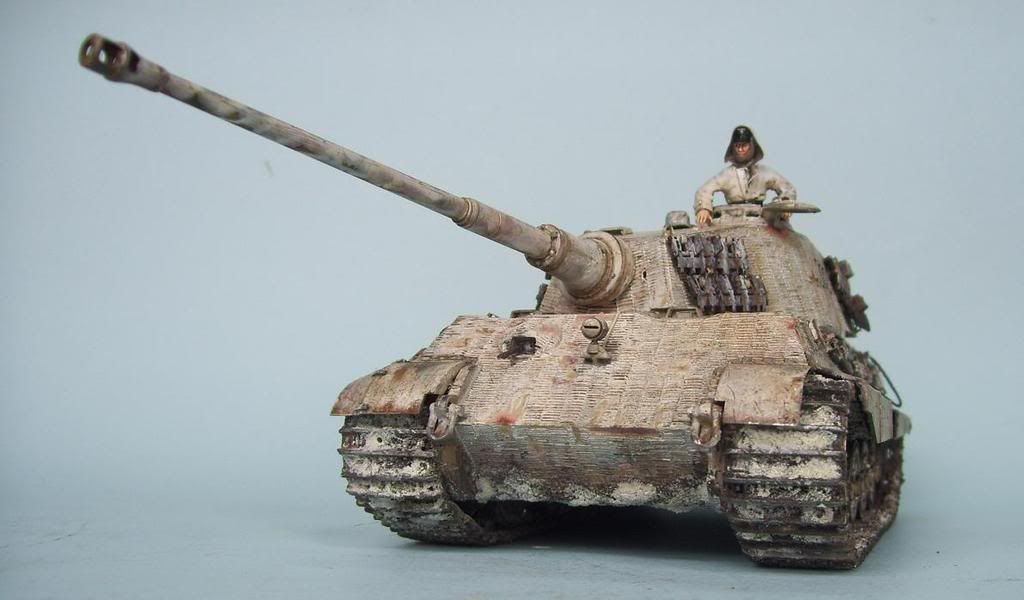
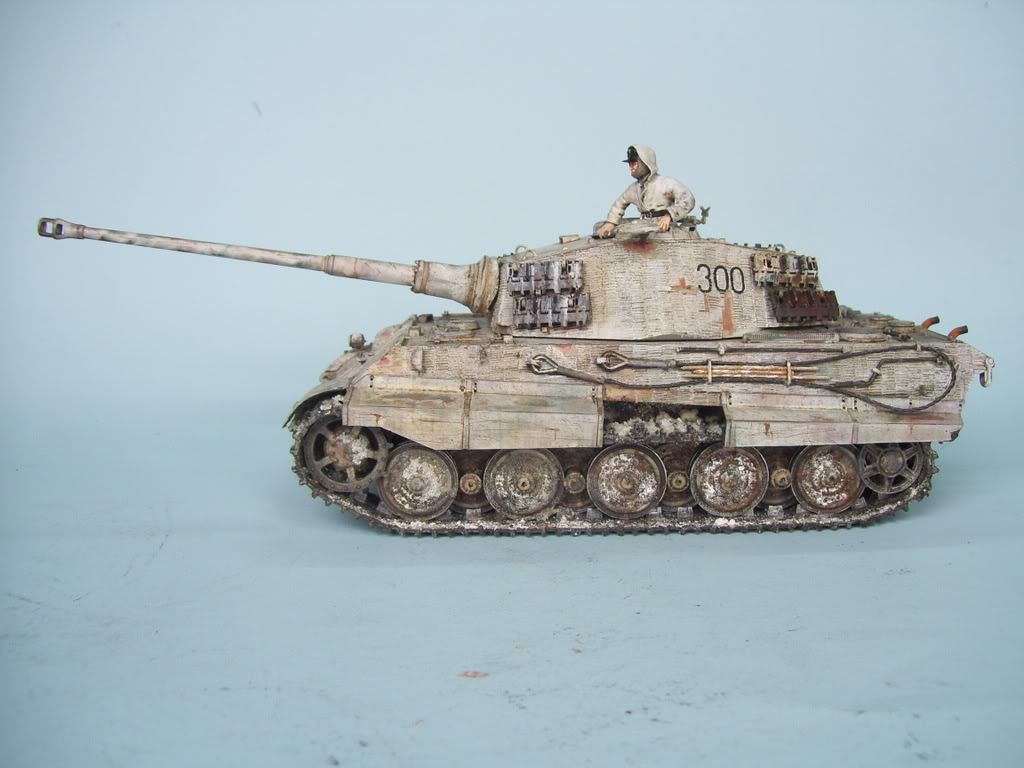
I thinned out the side skirts from behind with a Dremel tool, and poked some more bullet holes IN A RANDOM PATTERN! Whistling [:-^]...Smile,Wink, & Grin [swg]

"That's 'Herr' Peiper to you!" 

Lastly--why I can never work on more than one project at a time--here's the bench during the weathering phase--where would I possibly fit anything else?!!
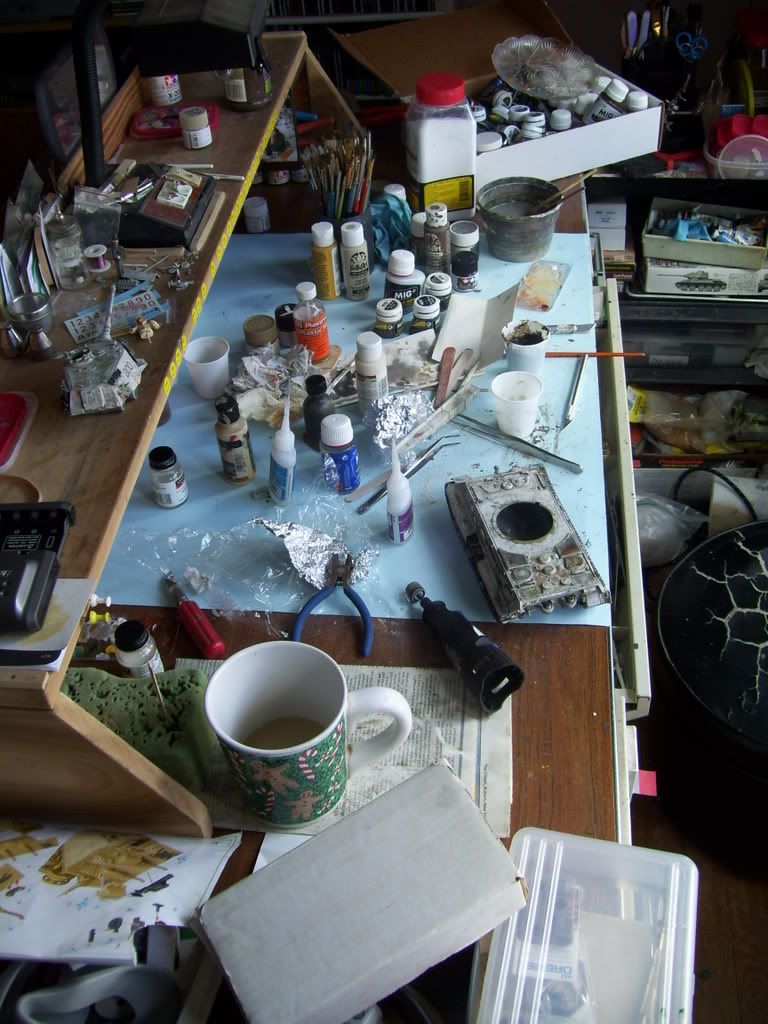
                                                                                                                               

So. in closing,my review "verdict" of the MIG Products are as folllows--

I have nothing but good to report about the 502 Oils line. They are all high-quality oils, and the color range is very broad, and pefectly adequate for armor finishing. The only color I questioned was the #020 "Faded Dark Yellow" which is. in fact, a bright, rust-orange. I can only assume that this is a mis-labelling of this tube. The inclusion of colors such as "Fresh Mud" and "Buff" are a nice convenience for colors that I used to have to mix alone.

The only thing I didn;t care for was the looooong drying time of the MIG "Thinner for Washes"--I'm not sure if I used it right, but when I used it to thin the oil paints, it took a long time for them to dry. I must assume that perhaps it's an enamel or even similar to linseed oil product? I much preferred just plain mineral spirits for use with the 502 oils. I also believe that they have enamel properties because the white oil spot-washing I did on top f the turret dried semi-glossy, and very hard.However, there may be benefits to this product that I have yet to ascertain, or which I will learn of in the future. Anyone who has experience with it, and who would like to leave some hints aout it would be most welcomed!

The pre-mixd washes and filters were, IMO. spot-on as far as being great weathering shades. They are consistent in their application, spread very easily, and dry quickly as well. They flow as well or better than my regular mineral spirit washes, and a little bit actually does go a long way. I was afraid of using the whole bottle up at first, but for this one build, I used less than 5% of the "Neutral Wash", so IMO, I have to say that they actually ARE a good deal for the money, if you want consistent colored washes EVERY time. My favorite is that "Neutral" color--it just screams "DIRTY BOY!!!" LOL! Blush [:I]

I have not had the opportunity to try the liquid mask yet.

The Pigments are something that I have used quite a bit before this build of course, THEY ROCK!!!--but I have to say that the Pigment fxer stuff is primo--it just works really well! And it doesn't discolor the pigments. 10/10!

The Acrylic Resin too, is a first-rate product. It dries fast, and rock-hard! It's VERY durable! I actually mixed up waaaay more than I really used or needed in this build, so be frugal with it at first, until you learn its properties. Great stuff!

So, in closing, I must again thank Adam Wilder and Rick Lawler and all at MIG Productions for this enjoyable build and review, and for the nice cache of MIG products which I will continue to use here. And thanks to all of you for your comments and suggestions! Only question is...what's next?! (I'm leaning toward a Nashorn!?)

Comments, and questions welcomed and appreciated! Big Smile [:D]


  • Member since
    December 2008
  • From: Philadelphia
Posted by Byrne0ut on Tuesday, December 23, 2008 1:31 PM

Bow [bow]Bow [bow]Bow [bow]

I am not worthy...

 Incredibly inspirational.  You could easily put that bad boy on ebay and sell the finished product for a couple hundred dollars at least...

ON The Bench: Tristar 1/35 Panzer 38(t) Ausf. B Glencoe 1/400 SS United States Tamiya 1/35 Panther Ausf. A Early On The Shelf Tamiya 1/35 King Tiger Tamiya 1/48 F4U-1D Corsair
  • Member since
    April 2005
  • From: Piscataway, NJ!
Posted by wing_nut on Tuesday, December 23, 2008 1:50 PM

Well doog you have done it again. Turned plastic and some wet and dry ingredients and turned into something awe inspiring.  Hope you don't mind that I keep this short... I wanna go back and look at the pics again.


EDIT   OK I'm abck.  It was like seeing a movie the 2nd time.  Bunch of stuff I did not notice the 1st time.  May have to go back for a 3rd Big Smile [:D]

Marc  

  • Member since
    January 2008
  • From: Tulsa, OK
Posted by acmodeler01 on Tuesday, December 23, 2008 2:00 PM

It looks awesome, I'm very impressed, but I think we've all come to expect this caliber of work from you, Doog!

The MIG pigments look like they should be a worthwhile purchase... How long would they last or how many kits do you think they would cover? And what is the price you can expect to pay for them?

  • Member since
    July 2004
  • From: Texas
Posted by wbill76 on Tuesday, December 23, 2008 2:44 PM
You've done a great job detailing this one (and relating the "how" of the details as well) doog, enjoyed watching you experiment with the MIG stuff along the way. Herr Peiper would be pleased with the results I'm sure! Thumbs Up [tup]
  • Member since
    November 2005
Posted by Anonymous on Tuesday, December 23, 2008 3:09 PM

One of your better efforts, IMO...great "how to" as well...top shelf work...

Peiper would be pleased, and I should know; we were at Kharkov together...Big Smile [:D]

  • Member since
    June 2005
  • From: San Tan Valley,AZ
Posted by smokinguns3 on Tuesday, December 23, 2008 3:13 PM
That is  just friggin awsome man just awsome.
Rob I think i can I think i can
  • Member since
    December 2005
  • From: Syracuse, NY
Posted by lexesbenz on Tuesday, December 23, 2008 3:24 PM
Nice job Karl!! are you taking this to Buffcon or Noreastcon this year?
The flying hamster of doom rains coconuts on your pitiful city!!!!
  • Member since
    September 2008
  • From: North Carolina
Posted by WarHammer25 on Tuesday, December 23, 2008 4:12 PM
Awesome job Karl. It looks so real. The paint and weathering really make it look good. Looks like you took Herr Peiper and his tank and shrunk them. Great job!
The only easy day was yesterday - U.S. Navy Seals
  • Member since
    July 2006
  • From: New Jersey
Posted by redleg12 on Tuesday, December 23, 2008 5:04 PM

Your work as usual ia awe inspiring. Another museum item for the collection.

The work on reviewing the MIG line is great. It is a benifit to all of us at all levels. Good to know they are worth the money and time to use (besides the pigments which I am also already a big fan).

Thanks again

Rounds Complete!!

"The Moral High Ground....A Great Place to Emplace Artillery."

  • Member since
    November 2008
  • From: Oklahoma City
Posted by Mixael on Tuesday, December 23, 2008 6:08 PM

Doog, I don't even feel worthy to SEE this KT!  Absolutely wonderful job of messing it up!

I may just have to get some of the Mig stuff to try out.  (I'll work towards that, as I've never weathered anything before!)

I have bookmarked the thread so as to have a ready access to the awesome-ness of this WIP!


Doog the man!  Doog the man!


Michael 

We could change the world, but God won't give us the source code!
  • Member since
    January 2007
Posted by the doog on Tuesday, December 23, 2008 6:14 PM
 Byrne0ut wrote:

Bow [bow]Bow [bow]Bow [bow]

I am not worthy...

 Incredibly inspirational.  You could easily put that bad boy on ebay and sell the finished product for a couple hundred dollars at least...

Sign - Welcome [#welcome]John, to the forums! I see you're a new member? Thanks for your kind compliment, and for commenting--I think I'll keep this one, though! Wink [;)]

Thanks, too, Marc and Jon! Jon, I'm not sure what you would pay for MIG stuff at various outlets, but Rick and Adam explained on a previous thread that it's best, and cheapest, to order from their website, direct. As far as how long they last--seriously, they could last for literally dozens of models depending on your application of them.The actual price-per-model would be literally pennies!

Thanks too, Bill,  and Manny! (Manny, you crack me up! Laugh [(-D]) Glad you guys liked this one!

Robert and Brendan-- thanks too, for the comments, and the compliments! Smile [:)]

Tony--I'lll probably take this to Buffcon, if I'm able to get there! Thanks for looking in!

Mike, and Michael,  thanks too, for the kind words!

I'm happy to know that I've contributed once again to another "take" on the mysteries and intricacies of heavy weathering. The MIG products are definitely a sure path to success in that regard! Thanks again, all who have taken the time to comment! Big Smile [:D]

  • Member since
    February 2008
  • From: ladner BC Canada
Posted by stick man on Tuesday, December 23, 2008 6:17 PM

Great work Doog! It's atruly inspiring build!

Smile [:)]

I'm 15 and I model I sk8board and I drum what could be better.
  • Member since
    July 2006
  • From: New Jersey
Posted by redleg12 on Tuesday, December 23, 2008 6:28 PM

Karl - Just thought of a quick question......when the MIG pigment fixer dries, is it flat or gloss?? Same for the acrylic resin???

The brain is working slow....too many Xmas cookies!

Rounds Complete!!

"The Moral High Ground....A Great Place to Emplace Artillery."

  • Member since
    October 2007
  • From: Louisville, KY
Posted by pordoi on Tuesday, December 23, 2008 6:32 PM

Doog,


... and to follow up on Redleg's question;  can the fixer be air brushed?

 Don


  • Member since
    January 2007
Posted by the doog on Tuesday, December 23, 2008 6:34 PM
 redleg12 wrote:

Karl - Just thought of a quick question......when the MIG pigment fixer dries, is it flat or gloss?? Same for the acrylic resin???

The brain is working slow....too many Xmas cookies!

Rounds Complete!!

Mike, the pigment fixer is dead flat. The acrylic resin seems to be as well. If it looks at all semi-glossy, it's because for the darker mud, I applied about a 70% additional mixture of gloss acrylic finish from Model Master. Without that, it would be dead flat! Dead [xx(]....Smile [:)]

Don--absolutely! It seals in the pigments fairly securely--but why would you airbrush the pigments?

  • Member since
    May 2006
  • From: Queensbury,NY
Posted by panzer88 on Tuesday, December 23, 2008 7:18 PM
Absolutely stunning Doog!!!!  Goes along perfect with this fine New York State weather we've been having. Thanks doog for the great how-to.


  • Member since
    December 2007
  • From: Bridgeview, Illinois
Posted by mg.mikael on Tuesday, December 23, 2008 8:55 PM

That is one GREAT looking King Tiger, not to mention one great WIP/tutorial!!!Thumbs Up [tup]Bow [bow]Thumbs Up [tup]

Sure turned this one out quick Doog, and it's fantastic! I'm struggling just to finish my SU-76M after working on it for months......but that's probably my fault & the LHS because they still didn't get in the paints I ordered almost two months ago.

"A good plan executed now is better than a perfect plan next week." - George S. Patton

  Photobucket 

  • Member since
    July 2003
  • From: Perth, Western Australia
Posted by madmike on Wednesday, December 24, 2008 12:36 AM

Doog

What can I say, that has been said before, except...

What a bloody beaut build mate!

I use MIG pigments all the time now, they look great applied even on tiny 1:72 builds.

Inspirational work mate.

Cheers

Mike

"I do not feel obliged to believe that the same God who has endowed us with sense, reason, and intellect has intended us to forgo their use." - Galileo Galilei
  • Member since
    April 2008
  • From: Canadian Prairies
Posted by caSSius on Wednesday, December 24, 2008 12:41 AM

It's hard to think up a fresh accolade that hasn't already been used Karl! Truly splendid build with a great toot thrown in as well.

I guess I'll have to order in some of the MIG products after all, it sounds and looks like they are in fact worth chasing down.

Looking forward to the Nashorn adventure!

Cheers

Brad

"Only those who will risk going too far can possibly find out how far one can go."

- T.S. Eliot


  • Member since
    October 2007
  • From: N.H.
Posted by panzerguy on Wednesday, December 24, 2008 8:44 AM


         Outstanding job KarlBow [bow]

          Just what we'd come to expect from a master modelerWink [;)]

      Still not a fan of the molded zimm but I love the way you've modified it.


"Happiness is a belt fed weapon"

  • Member since
    January 2007
Posted by the doog on Wednesday, December 24, 2008 10:22 AM

Thanks, David, Michael, Mike, Brad, and Steve!

I appreciate you all commenting, and thank you for the kind compliments!

Hope you all have a Merry Christmas!  Smile [:)]

  • Member since
    November 2005
Posted by Anonymous on Wednesday, December 24, 2008 10:43 AM
 the doog wrote:

Thanks, David, Michael, Mike, Brad, and Steve!

I appreciate you all commenting, and thank you for the kind compliments!

Hope you all have a Merry Christmas!  Smile [:)]

I just spoke to Jochen, and he said you nailed it pretty close, although he did mention there were a pair of boots on the back engine deck drying out...Thumbs Up [tup]Thumbs Up [tup]

Merry Christmas from me and the Nun... 

  • Member since
    January 2007
Posted by the doog on Wednesday, December 24, 2008 10:47 AM
 Mansteins revenge wrote:
 the doog wrote:

Thanks, David, Michael, Mike, Brad, and Steve!

I appreciate you all commenting, and thank you for the kind compliments!

Hope you all have a Merry Christmas!  Smile [:)]

I just spoke to Jochen, and he said you nailed it pretty close, although he did mention there were a pair of boots on the back engine deck drying out...Thumbs Up [tup]Thumbs Up [tup]

Merry Christmas from me and the Nun... 

LOL! Thanks, Manny! Wink [;)]

Tell Sister Mary that I have a confessional with a hanging misteltoe that I'd like to hear her "confession" in! Evil [}:)] LOL!

Have a Merry Christmas too, my friend! Big Smile [:D]

  • Member since
    May 2005
  • From: Dublin Rep Of Ireland
Posted by terry35 on Thursday, December 25, 2008 11:06 AM

Super work there Karl, just great. Do all modellers do their best work on filthy benches, and is that tea or coffee. Either one is an essential when doing model work. Very interesting to hear your opinions on Mig products.

Again cool work and seasons greetings.

Terry.

  • Member since
    July 2007
  • From: Reseda, California
Posted by BraileScale-Freak on Thursday, December 25, 2008 2:58 PM

Karl (the doog),

Read through your build log.  Excellent execution encompassing a wide verity of techniques, tools, materials and information used to render a very realistic and interesting subject such as the Tiger II of Jochen Peiper's that you chose for your build log.  Many of your techniques and your approach to achiveing a convinceing finish to an overall great build is worthy of being unique and unparalleled to any of the finist modeling that our hobby has to offer on the net, in magazines, CD's, DVD's that are currently available.  A modeler, or rather artist, such as yourself and quit a few others here on Finescale Modeler are what makes our hobby enjoyable, fun, exciting and brings a sense of wonder and fullfillment to those both new and old.  Thanks for sharing your craft with all of us and for taking your time to help in making this hobby better for everyone!

Marry Christmas,
Eddy and Hieu Nevarez Make a Toast [#toast]

  • Member since
    January 2008
  • From: Hickory, NC
Posted by Bushi on Thursday, December 25, 2008 3:51 PM

 Doog after looking over the whole thread I am just blown away by what you are capable of.Bow [bow]Bow [bow]Bow [bow] I sit and look at my second build and really wonder how it will turn out. The skill you have just make me envious, but it is nice to see someone like you passing along the knowledge they have to others such as my self to try new techniques to become better modelers. I thank you very much for this.

Jeff


  • Member since
    December 2008
  • From: Northern Va
Posted by psstoff995's lbro on Saturday, December 27, 2008 4:26 PM

Doog, great to watch a real master at work! Bow [bow]

 I've seen a lot of your work in the magazens. I'm new to the forums and I'm very pleased with all of the great work. Keep it up!

-Will young modeler Test fit master
  • Member since
    April 2003
  • From: 41 Degrees 52.4 minutes North; 72 Degrees 7.3 minutes West
Posted by bbrowniii on Saturday, December 27, 2008 8:09 PM

Doog,

Superb.  Simpy superb.

'All that is necessary for the triumph of evil is for good men to do nothing' - Edmund Burke (1770 ??)


  • Member since
    January 2007
Posted by the doog on Tuesday, December 30, 2008 9:58 AM

Hi guys!

Just getting back from Pennsylvania where I spent Christmas, and just wanted to say thanks to Jeff, Boyd, Bill, Eddy, and Terry

I'm flattered and humbled by the nice comments and sincerity of the replies here; I shall continue trying to impress you guys and share my progress and mistakes with you all! Blush [:I]

Hope you all had a great Christmas! Big Smile [:D]

  • Member since
    November 2008
Posted by Satori on Tuesday, December 30, 2008 1:14 PM
You forgot to paint handles of the wirecutterSmile [:)] and ends of the cleaning tools. The driver and radio operator hatches allow you to choose the periods, you didn't fill the unused holes for the handles. Some other period matching issue with the engine deck too. 
Rob
  • Member since
    April 2005
  • From: netherlands
Posted by Rob on Tuesday, December 30, 2008 1:26 PM

i believe the material of the wirecutter handles is bacelite (dunno about the spelling) wich is supposed to be blackish. so that looks correct to me.

also, the holes you mean, i don't see them, as far as chosing the periods that's not my departement so can't judge that one.

cheers

my family calls me "ARMOR FREAK"... i don't know why. My AFV pic site --> www.rob_tas84.mijnalbums.nl My nature pic site -> www.robbioo.mijnalbums.nl
  • Member since
    December 2002
  • From: Reno, NV
Posted by espins1 on Tuesday, December 30, 2008 1:37 PM

Bakelite is actually a dark reddish brown color.  Here is a picture of the bakelite wire cutters on a StuG III ausf. G.  Bakelite is still used today as it doesn't conduct electricity, making it a good insulator in the event you cut a power line..... Shock [:O]  Laugh [(-D]

Scott Espin - IPMS Reno High Rollers  Geeked My Reviews 

  • Member since
    November 2008
Posted by Satori on Tuesday, December 30, 2008 2:01 PM
Non-conducting should be the key. I think some are made of wood also, or some sort of material from compacting wood shaving. There was one not long ago on ebay that the handle wraping had started peeling off.
Rob
  • Member since
    April 2005
  • From: netherlands
Posted by Rob on Tuesday, December 30, 2008 2:06 PM
mayby it has more color's then, i have a k98 bajonet at home, with a baccelite handel wich is black. Whistling [:-^]
my family calls me "ARMOR FREAK"... i don't know why. My AFV pic site --> www.rob_tas84.mijnalbums.nl My nature pic site -> www.robbioo.mijnalbums.nl
  • Member since
    July 2004
  • From: Texas
Posted by wbill76 on Tuesday, December 30, 2008 2:19 PM

 Satori wrote:
Non-conducting should be the key. I think some are made of wood also, or some sort of material from compacting wood shaving. There was one not long ago on ebay that the handle wraping had started peeling off.

There were three types of materials generally used in wirecutter handles...early war or pre-war cutters sometimes featured wood handles but they weren't very common as wood, while low conducting, is still conducting. Bakelite, which can range from near-black all the way up to a reddish brown color depending on age/exposure/chemical composition was a common material. The third type commonly used was resin-impregnated corrugated paper which was non-conductive and very durable due to the resin treatment. This third type is most likely what you are interpreting as compacted wood shavings. With both the Bakelite and resin-impregnated corrugated paper, the end caps on the handles were made of rubber or synthetic rubber.

  • Member since
    January 2007
Posted by the doog on Tuesday, December 30, 2008 7:18 PM

 Satori wrote:
You forgot to paint handles of the wirecutterSmile [:)] and ends of the cleaning tools. The driver and radio operator hatches allow you to choose the periods, you didn't fill the unused holes for the handles. Some other period matching issue with the engine deck too. 
Well, thank you for the nice compliment ri--ih, I mean, Satori! Big Smile [:D] I was wondering when you were going to pronounce your verdict? Wink [;)]

Anyhoo, I did specifically paint the handles a blackish-brown color--what I have understood the color of bakelite to be? The ends of the cleaning tools are painted as well; the probably don't stand out against the white. See the little "posts" on the edges? They're aluminum/steel-colored. Imight have forgotten the inside caps though?

Roy Chow of AMPS had a thread about "commonly mispainted items" which said that the Bakelite handles were blackish-brown; however, it's hard to argue with Scott Espins photo of a woodgrain-looking one. Very well; I shall paint it reddish brown. I guess the jury's still out on this one for sure?

I'm not really up on the holes in the hatches, nor the engine deck stuff. If you care to point the errors out I would correct them if they are an easy fix.

Thanks for the comments everyone! Smile [:)]


  • Member since
    April 2007
  • From: Schroon Lake, NY
Posted by SMJmodeler on Wednesday, February 4, 2009 2:09 PM

doog: How the heck did I miss this one?!  A winter camo' scheme no less...I LOVE winter camo'sWink [;)]

WOW!!!!...Shock [:O] Another beauty from ya' doog, and good to see flexin' some winter muscle, Hanz and Franz would be proudLaugh [(-D] There is just so much going on I don't know where to start...Confused [%-)]  As always everything is done with top-notch skill and execution, a real, gem to look at. ..Bow [bow]

I'll need to take some more time to review and study, but I think one part where you lost me was the chipped zim' with primer exposed below.  You pulled that off brilliantly on another build, but it seems a bit out of place here, IMO...too strong of red within a white backdrop.  Maybe less would have been "more".  The white on the spare tracks seems a bit too white, I know what you were going for but again, a bit stark, IMO.

I'll get back to this but gotta' run...hope you don't mind some criticism, it's so DARN hard to find anything a miss on your work but I know you like thoughtful reviews. 

  • Member since
    January 2005
  • From: in the tank factory in my basement
Posted by biffa on Wednesday, February 4, 2009 3:36 PM
Almost missed this one Doog super job on a nicely worn whitewash and a fantastic job in blogging it very well illustrated, im sure this one will be used over and over by a lot of folk, well done Thumbs Up [tup]  
Ron g.
  • Member since
    August 2008
  • From: S.W. Missouri
Posted by Pvt Mutt on Wednesday, February 4, 2009 4:04 PM

Sign - Ditto [#ditto]

Looks like a few us did miss this gem. 

My apology "Sorry"

Tony

Shoot Low Boys They're Ridin Ponys

  • Member since
    January 2007
Posted by the doog on Wednesday, February 4, 2009 6:14 PM

Thanks, Steve--yeaih, I agree about the big chipped zimm pattern there; if you read through the thread, you'll see that I "lost me" myself there, LOL! I had wanted to do a bit of experimentation with this build, to illustrate that it was indeed possible to "personalize" these pre-zimmed kits within reason. The red color is pretty close to the crrect shade, however, IMO--there was a huge discussion about it on Armorama, and I posted a few pics showing that it's really a very vibrant shade of red.

Thanks for your thoughtful and honest comments! Always nice to get a bit of a dissenting view! Big Smile [:D]

Thanks, too, Ron; nice of you to look in on this recent build! I appreciate your kind words!

Thanks too, Tony! No apologies necessary! Smile,Wink, & Grin [swg]


  • Member since
    March 2006
Posted by marevic1 on Thursday, February 5, 2009 8:26 AM
Outstanding winterized KT Doog.
Your really nailed the look.

Jurgs
  • Member since
    April 2007
  • From: Schroon Lake, NY
Posted by SMJmodeler on Thursday, February 5, 2009 1:56 PM
doog: I didn't read the thread because I was pressed for time...as I am again right now, but I still plan to do so and study your work a bit more...

  • Member since
    January 2007
Posted by the doog on Thursday, February 5, 2009 2:21 PM

 SMJmodeler wrote:
doog: I didn't read the thread because I was pressed for time...as I am again right now, but I still plan to do so and study your work a bit more...
No problem, Steve! I'm glad to hear that you ARE busy, in this dreadful economy!

Thanks too, marevic1!

JOIN OUR COMMUNITY!

Our community is FREE to join. To participate you must either login or register for an account.

SEARCH FORUMS
FREE NEWSLETTER
By signing up you may also receive reader surveys and occasional special offers. We do not sell, rent or trade our email lists. View our Privacy Policy.