SEARCH FINESCALE.COM

Enter keywords or a search phrase below:

PAGE 5-FINISHED PICS! The "MIG-nificent" DML King Tiger!

33642 views
133 replies
1 rating 2 rating 3 rating 4 rating 5 rating
  • Member since
    July 2004
  • From: Texas
Posted by wbill76 on Friday, December 19, 2008 11:10 AM

 the doog wrote:


Manny--thanks, too! If you look at the picture of the PzIV, that primer red extends all the way down to even the sprockets, so I would argue that that is a primer red coat, which has been partially revealed by sand wear against the paint, or simply sloppy base coat painting. Also, there absolutey no evidence of fire, or ash, or soot, or anything to indicate a fire, IMO. Take a look at it again--by the way, over on Armorama, there was a huge discussion going on about this; well worth the look!

MR/Doog, look even closer. Wink [;)]The Pz IV exposed primer on the front plate is due to the loss of the bolt-on applique plate that should be there but has been knocked off. Look around the tow pintles and you will see that there's an outline of Dunkelgelb there where the plate doesn't cover. This particular vehicle is a IV-G and you can see the intact applique plates on the front superstructure but the hull front plate is gone. There are even visible bolt holes where the applique bolts would attach that are now empty. The armor was added at the factory as part of the up-armoring process and the vehicle most likely given its dunkelgelb finish after the up-armored plate was added...no sense in painting the original plate in dunkelgelb, then attaching the applique plate, and then painting it again in dunkelgelb to match. When the applique plate was knocked off/removed, the primer was exposed.

  • Member since
    January 2012
Posted by I make stuff on Friday, December 19, 2008 11:12 AM

Karl,

Although you have committed to an exclusive Mig elements on this build, it's your...determination that "craft paints" could be effectivley, and I don't mean passably, but EFFECTIVELY be used to achieve something like winter weathering that is what is different about you.

Particularly since I now have some scratch not available to me in my earlier modeling attempts, there is a tendency, at least in me, to run to a prepackaged solution for an effect, Rustall, etc, rather then experiment and craft something that works, maybe better.

To me, your first time using white craft paint to simulate winter white wash is as brave an event as the first human who ate a raw oyster, or an egg.  It's no so stunnning that white craft paint will work, it's that you had the guts to slap it on that first model.  It's nothing for me to copy you and pester you for "how to's". Its the innovations that you bring to the table, and your wilingness to allow us a good look at how you do it rather than hoarding it and hiding it with vague responses and using it to win trophies without passing on your hard earned knowledge.

This sounds like an award show or a eulogy, and I'm not a kiss-butt, but your assistance has really made my foray back into modeling something where I feel I have advanced far beyond what I could have achieved by simply trying things in the dark, it never would have occurred to me to even experiment with some of these items.

I'll stop now.  

Bill        


  • Member since
    December 2005
  • From: Syracuse, NY
Posted by lexesbenz on Friday, December 19, 2008 5:20 PM
Mmmmmm Looking good Buddy!!! Lol I lost the machine gun for mine, so I am at a standstill, how do you like those mig oils, I have a couple of them and they work great!!
The flying hamster of doom rains coconuts on your pitiful city!!!!
  • Member since
    November 2005
Posted by Anonymous on Friday, December 19, 2008 6:22 PM
 wbill76 wrote:

 the doog wrote:


Manny--thanks, too! If you look at the picture of the PzIV, that primer red extends all the way down to even the sprockets, so I would argue that that is a primer red coat, which has been partially revealed by sand wear against the paint, or simply sloppy base coat painting. Also, there absolutey no evidence of fire, or ash, or soot, or anything to indicate a fire, IMO. Take a look at it again--by the way, over on Armorama, there was a huge discussion going on about this; well worth the look!

MR/Doog, look even closer. Wink [;)]The Pz IV exposed primer on the front plate is due to the loss of the bolt-on applique plate that should be there but has been knocked off. Look around the tow pintles and you will see that there's an outline of Dunkelgelb there where the plate doesn't cover. This particular vehicle is a IV-G and you can see the intact applique plates on the front superstructure but the hull front plate is gone. There are even visible bolt holes where the applique bolts would attach that are now empty. The armor was added at the factory as part of the up-armoring process and the vehicle most likely given its dunkelgelb finish after the up-armored plate was added...no sense in painting the original plate in dunkelgelb, then attaching the applique plate, and then painting it again in dunkelgelb to match. When the applique plate was knocked off/removed, the primer was exposed.

Bill, I think you are right!  Still doesn't explain the red drive-sprockets???
  • Member since
    July 2004
  • From: Texas
Posted by wbill76 on Friday, December 19, 2008 6:32 PM

MR,

The red sprockets are more of a mystery but perhaps only partly so...the exposed faces are the inner faces where the tracks would normally run and could either a) be replacements that weren't painted or b) weren't accessible for painting on the vehicle once mounted and so were left in red primer.

The fact that the final drive housings are also in red oxide would lead me to believe these may be replacement parts and/or fire-damaged...there's some indications that whatever knocked off the front plate also did some additional damage along the way...this particular tank isn't in very good condition overall but it's still speculation as to the why...this kind of photo is what makes things "interesting" in general. Wink [;)]

  • Member since
    April 2003
  • From: 41 Degrees 52.4 minutes North; 72 Degrees 7.3 minutes West
Posted by bbrowniii on Friday, December 19, 2008 8:42 PM
 wing_nut wrote:

Only one thing if I may point out.  The pattern of the machine gun fire wouldn't be in a line like that.  This is something discussed in aircraft forums on and off. Maybe because their battle damage is more often machine gun fire than the heavy stuff that knocks out tanks.  I like the look of the dmage, maybe a bit more of a pock mark around the hole,  but it should be more random.  if you look at a plane that is ripped up there isn't a line of holes like in the movies.

This is a really good point.  Trained machine gunners learn to fire their weapons in a burst, typically 5 - 7 rounds (to make sure you get a tracer in each burst).  The bullets, though fired virtually simultaneously will each follow its own trajectory due to the movement of the gun on its mount and the differences in the bullets themselves, and a whole bunch of other stuff.  The result is, at typical burst of MG fire is more of a circular pattern (the rounds form a 'cone of fire' as they pass through the air, and impact in a 'beaten zone'.  Both of these are roughly circular to oval 'groups' of bullets moving through the air to the target...

There can obviously be a lot of variation, depending on the size of the burst and the motion of the gun or gunner and/or the target, but still, you'll tend to see oblong patterns of impacts (more cigar shaped) rather than linear ones.

'All that is necessary for the triumph of evil is for good men to do nothing' - Edmund Burke (1770 ??)


  • Member since
    April 2003
  • From: 41 Degrees 52.4 minutes North; 72 Degrees 7.3 minutes West
Posted by bbrowniii on Friday, December 19, 2008 8:51 PM

 the doog wrote:

Thanks, Marc--I wasn't aware of the discussion, and wish I knew beforehand; like I said, it was just a reason to "excuse" the big zimm chip there which I wish now that I hadn't done. But at least if geeks like me think that the MG fire would look like that, so would a casual observer, so it'll get the point across, you know? (I hope!)

Doog,

Yeah, I think you are 'safe' there.  It definately gets the point across - 'tells the story' as it were.

'All that is necessary for the triumph of evil is for good men to do nothing' - Edmund Burke (1770 ??)


  • Member since
    January 2007
Posted by the doog on Friday, December 19, 2008 9:51 PM
 wbill76 wrote:

MR/Doog, look even closer. Wink [;)]The Pz IV exposed primer on the front plate is due to the loss of the bolt-on applique plate that should be there but has been knocked off. Look around the tow pintles and you will see that there's an outline of Dunkelgelb there where the plate doesn't cover.

WOW, great observation there, Bill!

And an interesting discussion ensuing as well! Shall we just invite everyone from Armorama over? LOL!

Bill, (Citaldelgrad) thanks for your kind words! It sincerely gives me pleasure to "teach" and to inspire others with my work, so your words are much appreciated! I'm happy to have thus inspired your work!

Tony--the MIG stuff is great! I have noticed however, that if you use the MIG thinner to cut the oils, they take forever to drt. I'm curious as to what the composition of the thinner is? Linseed oil? Enamel thinner? I have noticed that if I use regular mineral spirits to thin them, they behave the same way as my usual oils.

Thanks again for that info, Boyd--I'll use that info in the future, I'm sure!

I have to go to Pennsylvania tomorrow to get some emergency dental work done (had a bonding blow out!) so I'll be back later tomotrrow, and I have a new update coming...see you guys then!


  • Member since
    December 2005
  • From: Syracuse, NY
Posted by lexesbenz on Saturday, December 20, 2008 12:04 AM
I used turpenoid and didn't have any problem, be catious of their green though, its really strong, found that out the hard way lol, I had a Stug III with a green haze. I think their thinner is just regular old linseed oil, but hey I could be wrong.
The flying hamster of doom rains coconuts on your pitiful city!!!!
  • Member since
    July 2004
  • From: Texas
Posted by wbill76 on Saturday, December 20, 2008 12:48 PM
 the doog wrote:
WOW, great observation there, Bill!

And an interesting discussion ensuing as well! Shall we just invite everyone from Armorama over? LOL!

I'm sure it would make for some interesting conversation! Laugh [(-D] (For the curous, Karl and I are talking about this thread: http://www.armorama.com/modules.php?op=modload&name=SquawkBox&file=index&req=viewtopic&topic_id=129487&page=1 ). It was a fascinating exchange with a lot of things thrown around...and it obviously inspired you as well with this project so it's all good! Wink [;)]

  • Member since
    November 2005
Posted by Anonymous on Saturday, December 20, 2008 4:25 PM
 the doog wrote:

King Tiger # 300 was part of "Operation South Wind"--the attack on the Soviet bridgehead on the western flank of the Gran RIver in Hungary. Jochen Peiper's 1st SS PanzerKorps led the attack. Here it was photographed 45 miles from Budapest.This photo is from the excellent J. Fedorowicz book "SS Armor on the Eastern Front" by Velimir Vuksic. You can see that it still has the AA ring around the commander's cupola--surprising, as I would have thought it to have been a "final model" KT. You can also see the base coat where the missing links are on the turret.


I have that ref but have really never paid much notice to that pic---ya know, that looks like Peiper, himself!, in the turret...pics of him in '44 and '45 are extremely rare...cool...
  • Member since
    January 2007
Posted by the doog on Saturday, December 20, 2008 4:38 PM

OK, guys--here's a weathering update. I took my Tigger out to brap around in some mud and snow!

Here's the stuff I used to make a mud mixture. What I'm going to do is to go for a two-layer look to the mud--a lighter "dried" mud first, then a "wet" darker mud. First I used a combination of MIG Powders "Light Dust" and "Dried Mud", and mixed in about 30% powders, with 30% plaster (in the cup lower right), and 30% MIG Acrylic Resin. The other 10% was added real dirt and leaf litter for texture.
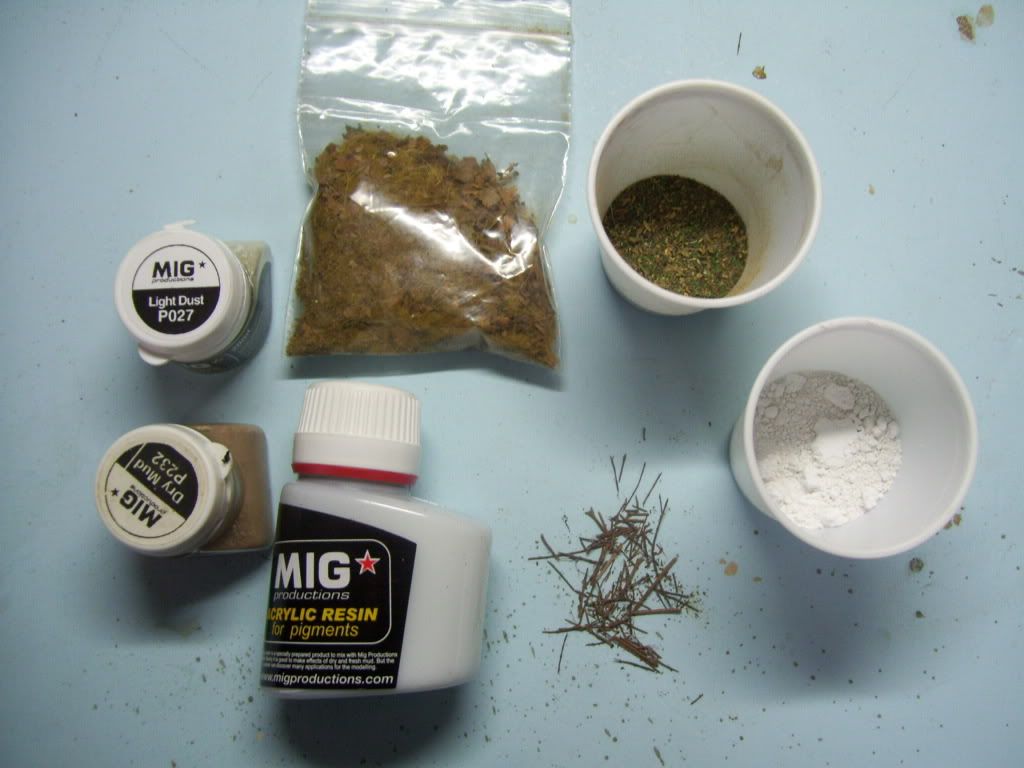
 

The Acrylic Resin is interesting stuff. It's white, thick, and "oozy", and looks like the glazing sugar icing that you would get in a package of Apple Turnovers or something. Alternately, it kinda looks like, well...."baby batter"! Whistling [:-^]. When I mixed everything up, I added a little drop of water slightly thin it, and here's what it looked like....
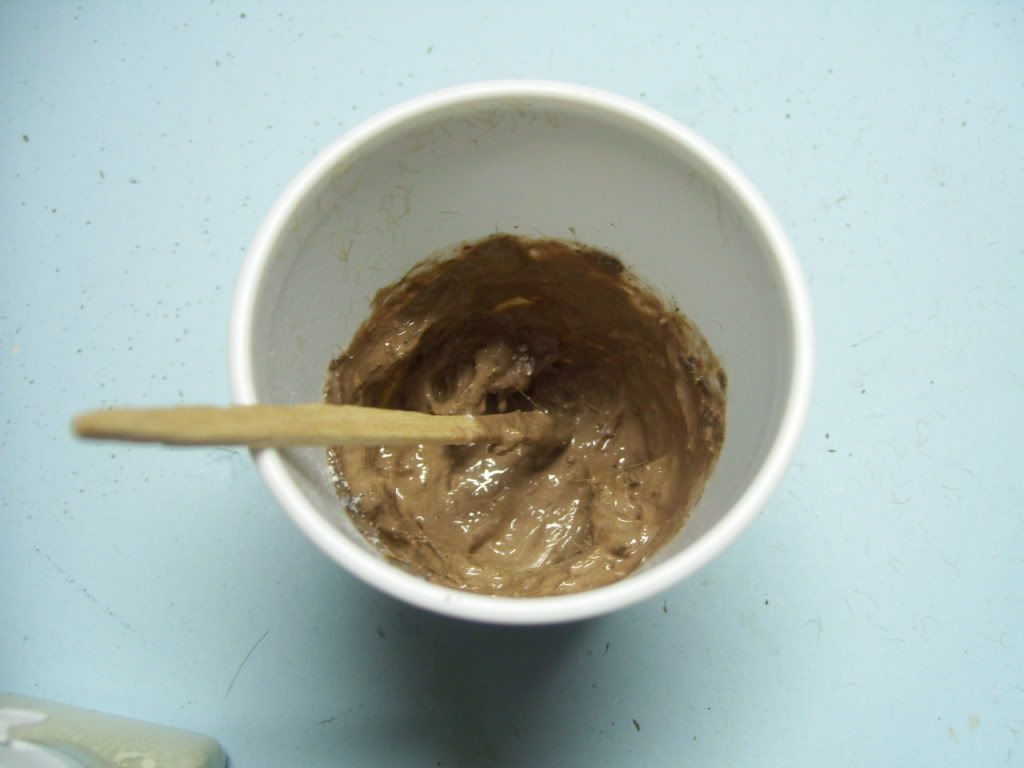
 

Taking an mid-sized paint brush, I start slopping it on....Now, you mightnotice that I'm working on a hull that is already somewhat "dirty"--this was my layer of "painted dirt". I used acrylic craft paints to stipple on a coating of "paint-only" dirt, in a two-color random layer. I used like, a dark brown, and a lighter tan-colored brown, and just mixed them "on the brush", stabbing at, and stippling the bottom of the model to provide a chromatic base. In retrospect, I'm not even sure if this was necessary, but it's still a "remnant" of my "old" weathering method.
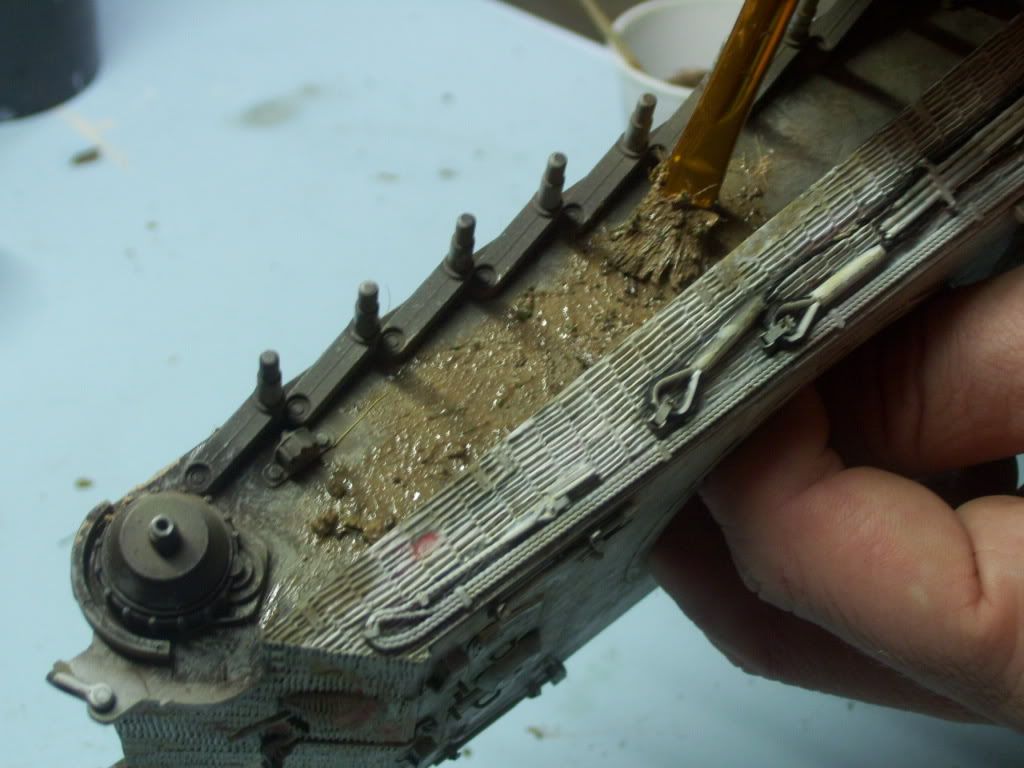
Here;s what it looks like after a bit of work...I have to say; this is some cool stuff! What's nice about it is that it dries fast! No having to wait overnight for the celuclay mix to dry!
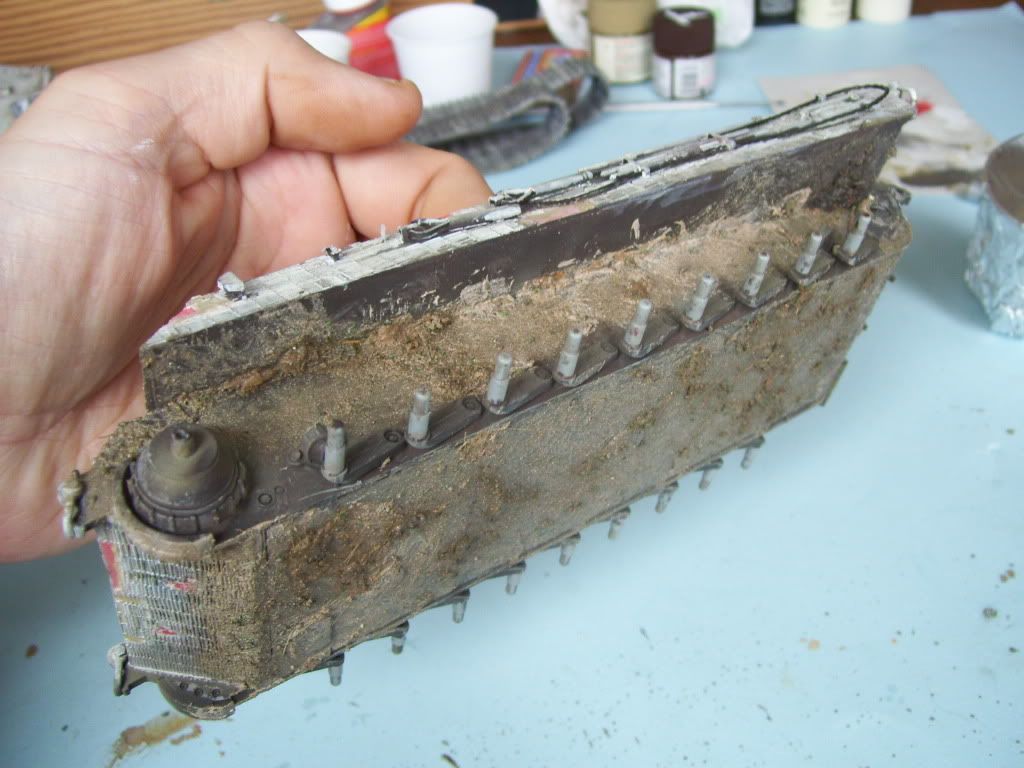
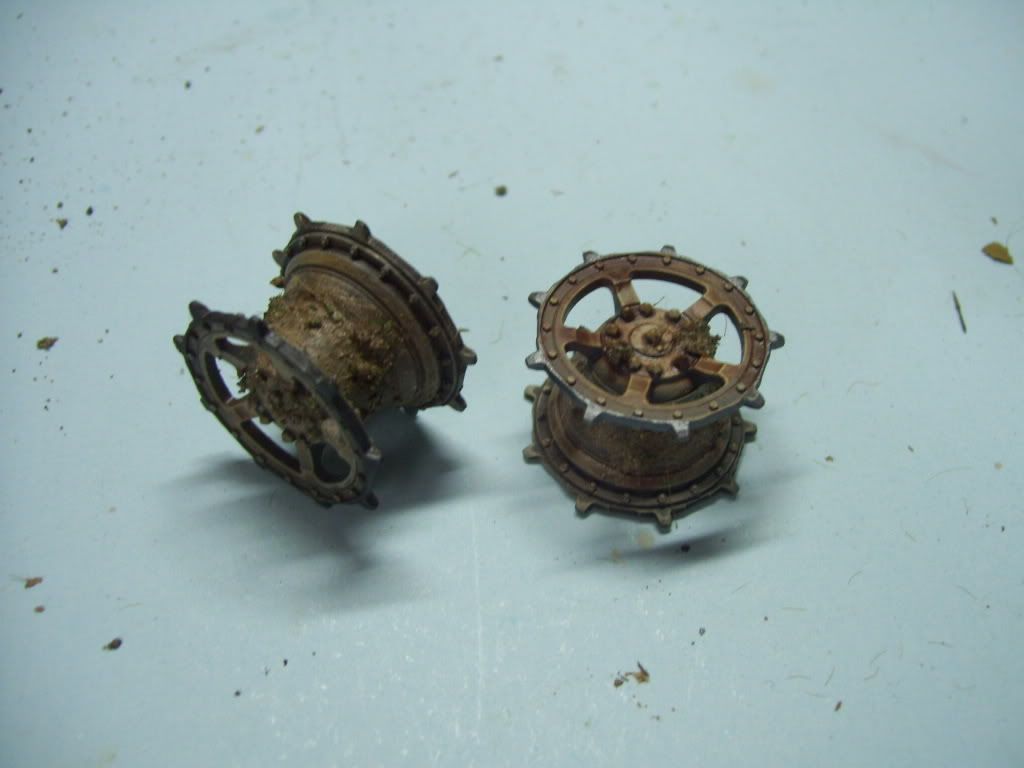
I even put a little in the sprockets, where you'd expect it...
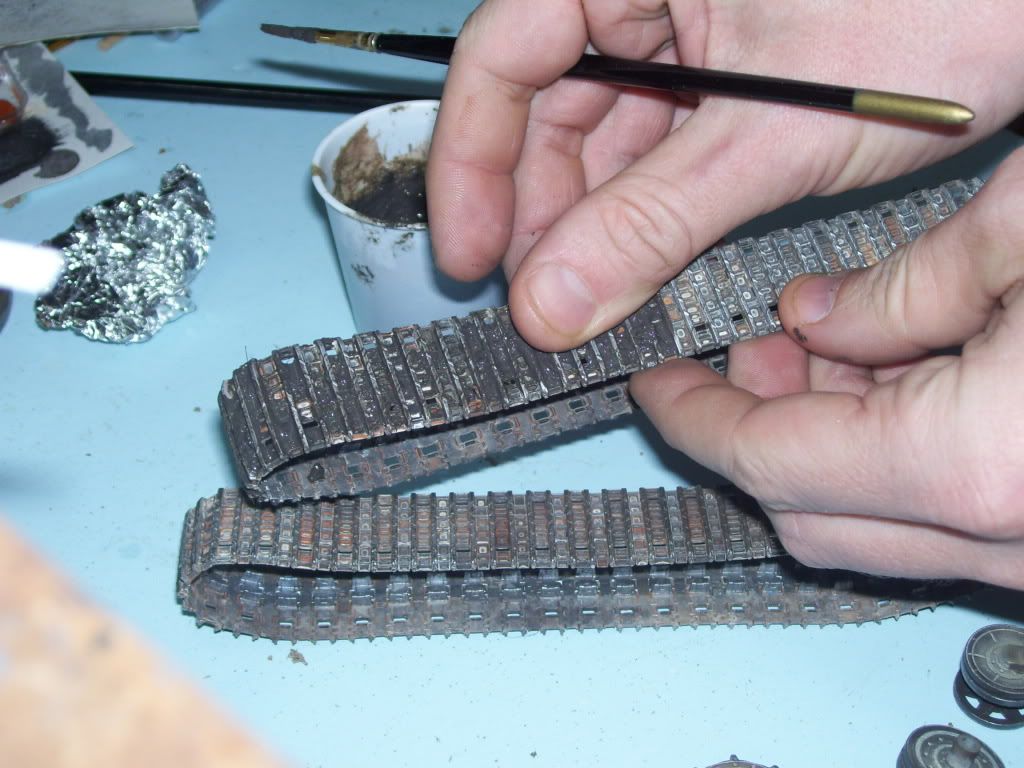
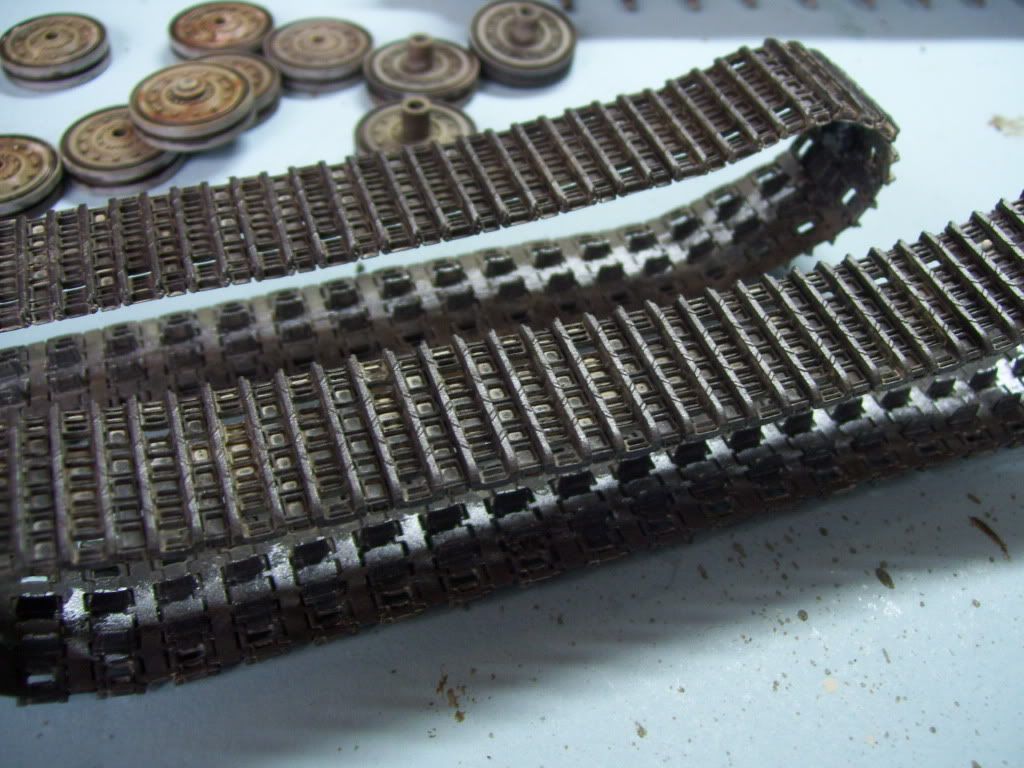
The tracks have been given a wash of 502 Abteilung #060 Light Rust Brown, and then an application of metallic grey over the tops, and also in the middle of the teeth where the wheels would be rolling. Then a final light drybrushing of pure silver.

One thing to know is that I have been experimenting with the MIG Thinner vs regular mineral spirits. If you use the MIG thinner, it seems to be of a linseed-oil quality, or perhaps some sort of enamel base? It takes a much longer time to dry. This could be very advantageous for applying certain techniques, perhaps like the oil dot method? Or for using filters? But I have found that for a quick, perfunctory wash, I prefer the standard mineral spiritssimply for the faster drying time.
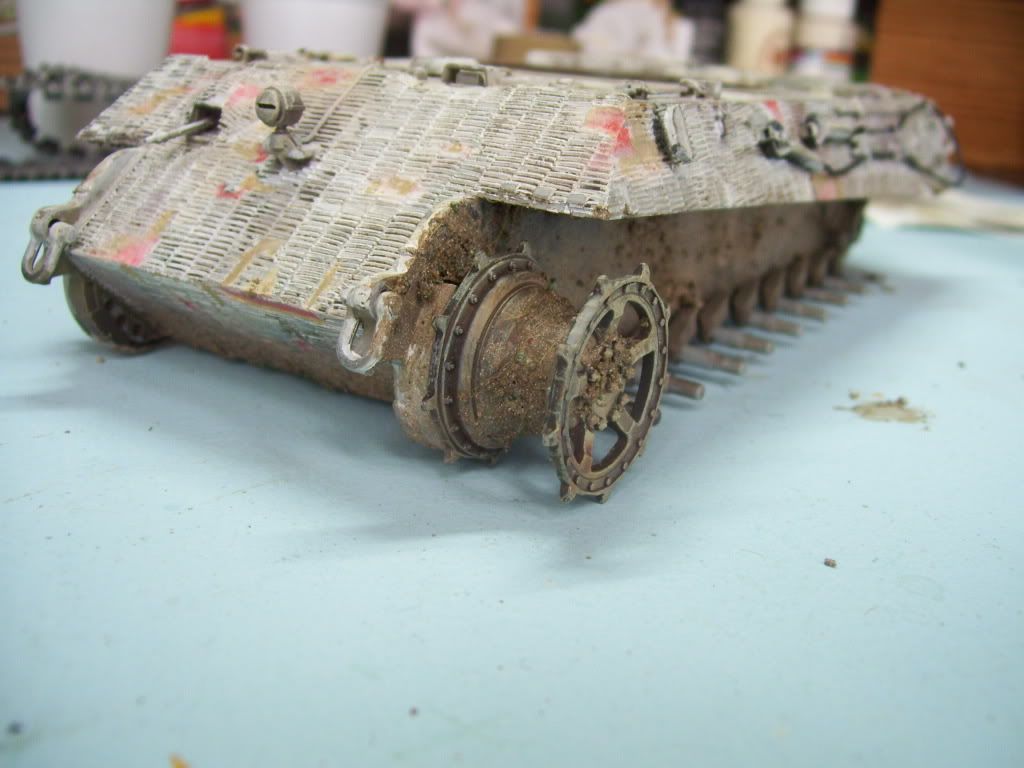
The sprockets were goven the same treatment.
Now, to do the "wet" mud, I added i some MIG "Russian Earth" powders, which darkened the olor considerably, and then I also added some acrylic gloss from Model Master, to give it a "wet" look when it dries. 
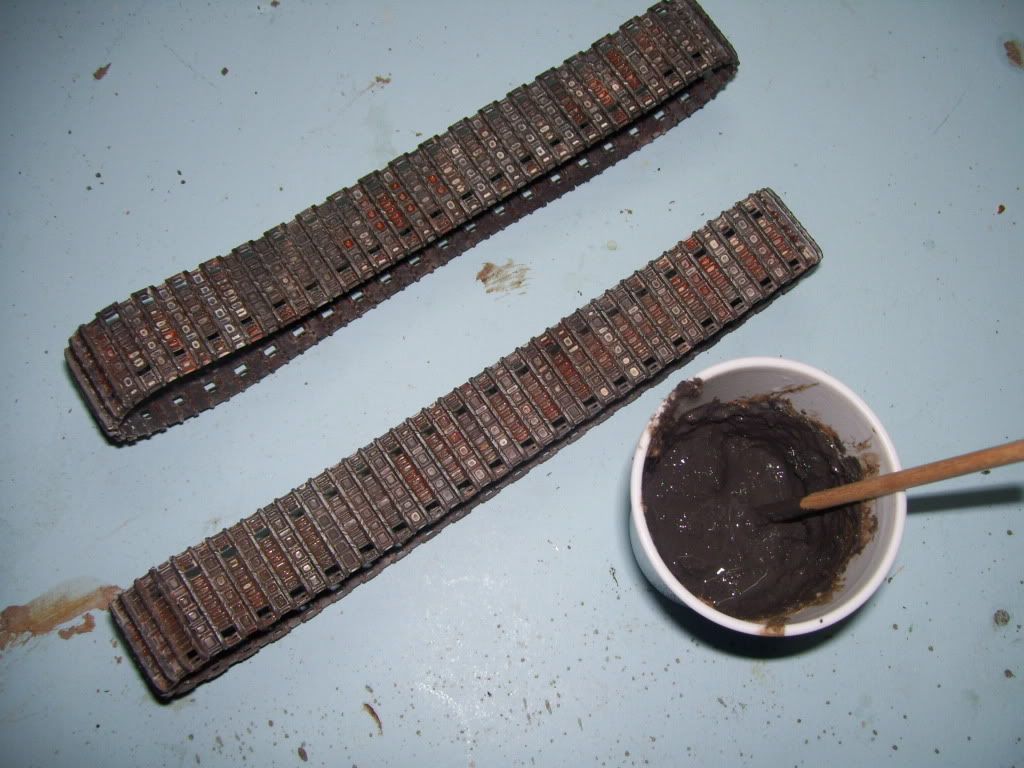
Patiently, I start applying it in between the links...
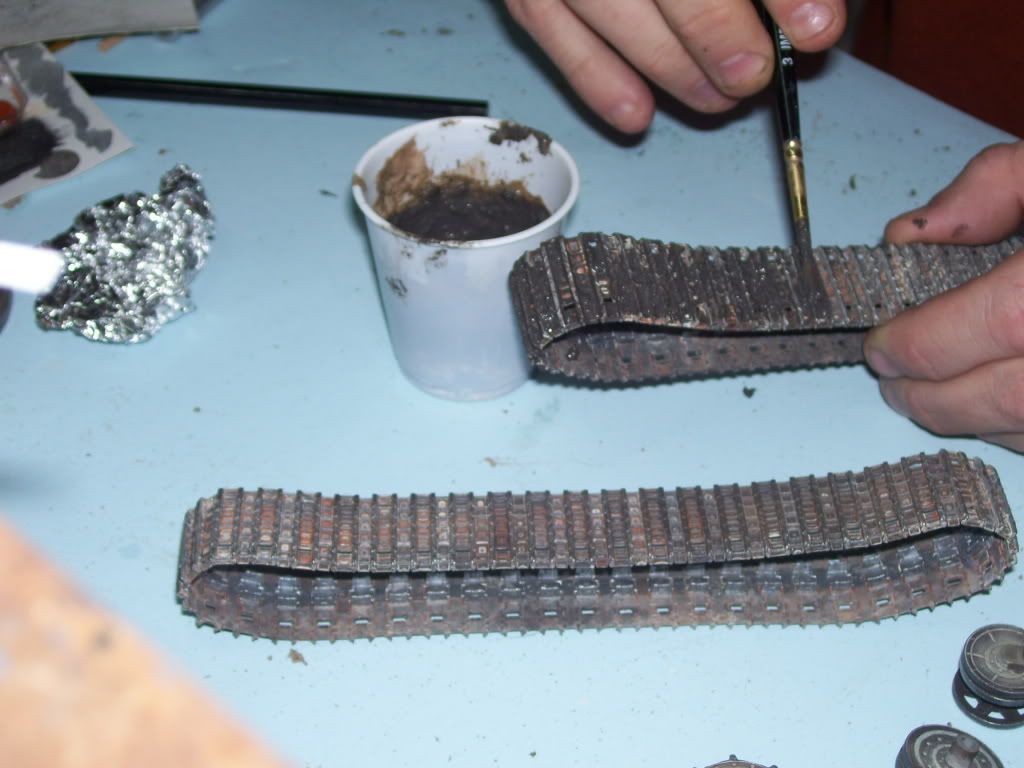
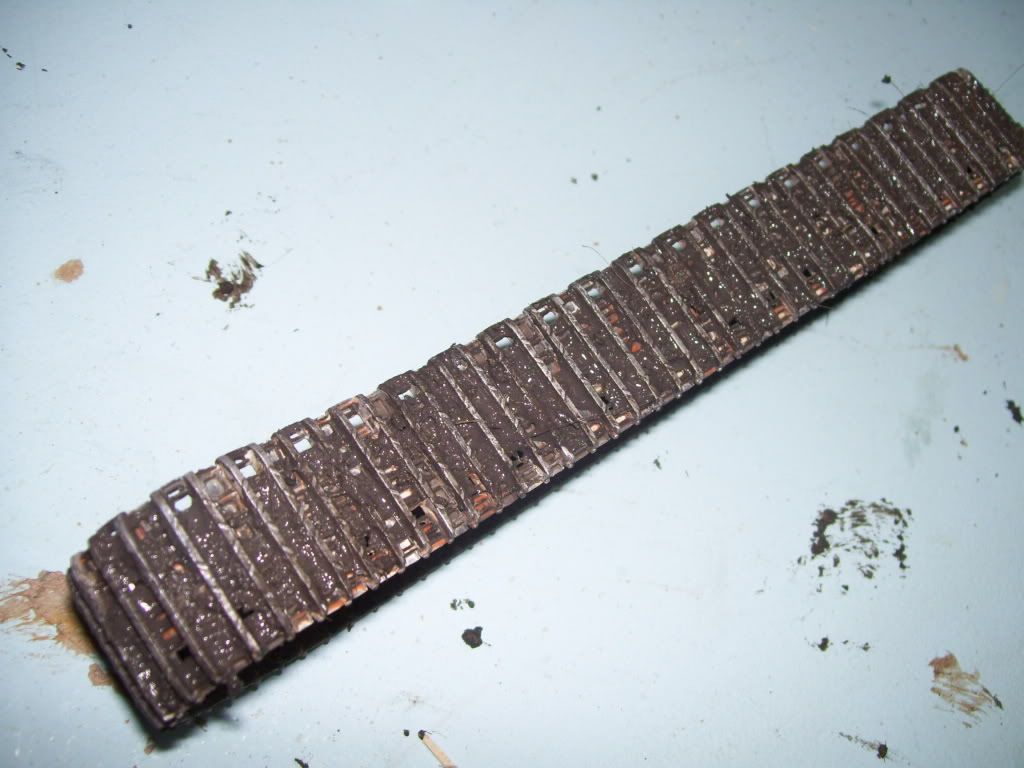
...and then, in order to show the track faces and the highlights of metallic grey, I simply brushed my thumb across the faces, wiping away the mud mixture. Simple. Easy. Effective. I'm turning into Private Pyle! Shock [:O]

Here it is mudded on th etop of the track...(I'll do the bottom after I get all the wheels on...)
I slap....sorry--"brap" some of it on the hull--note how it now sets itself off from the "dry" mud...
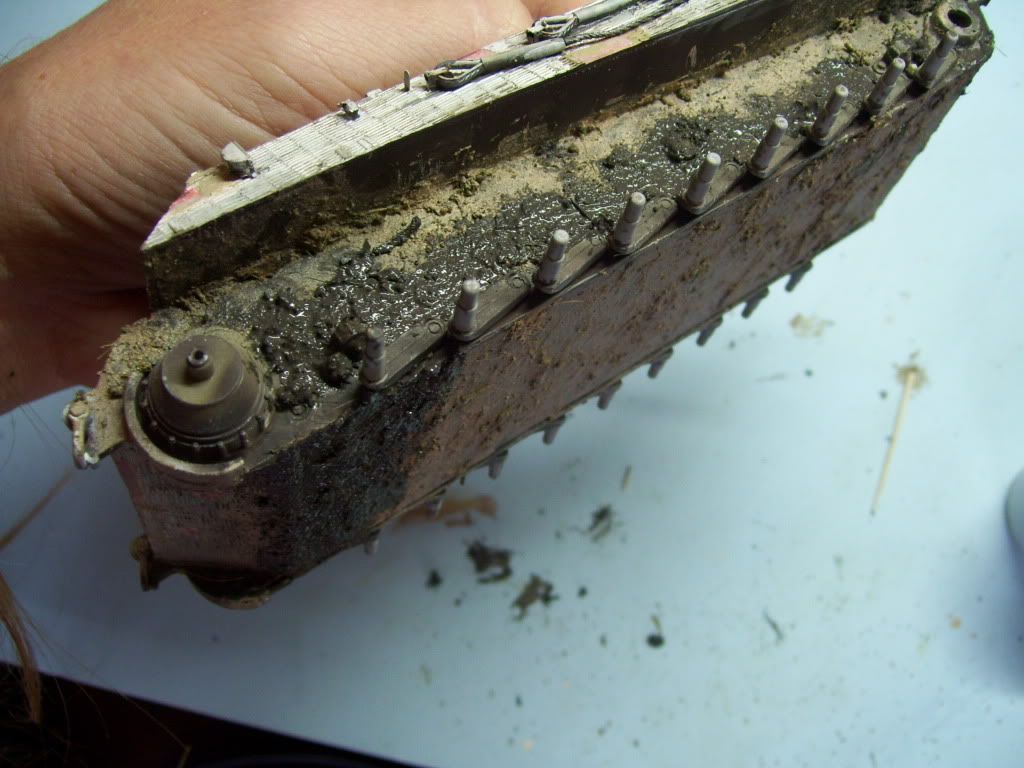
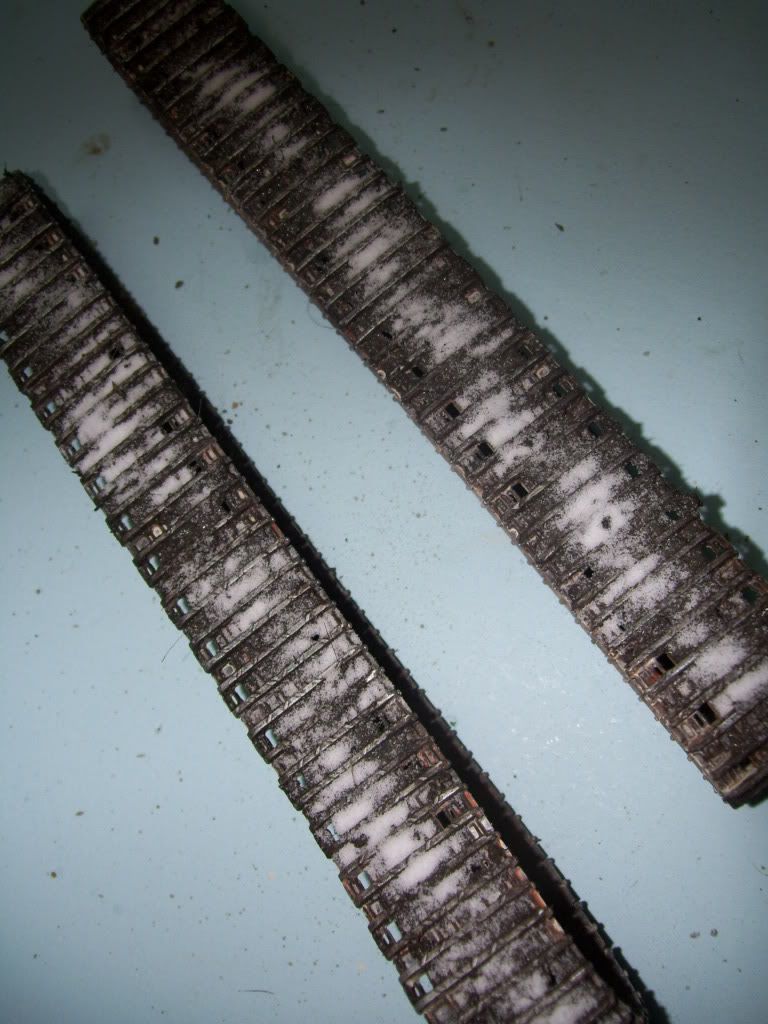
And finally, since my Tigger was brappin' in the snow, I'll add some Woodland Sceneics Snow, shaken from a cup, on the hull and tracks...
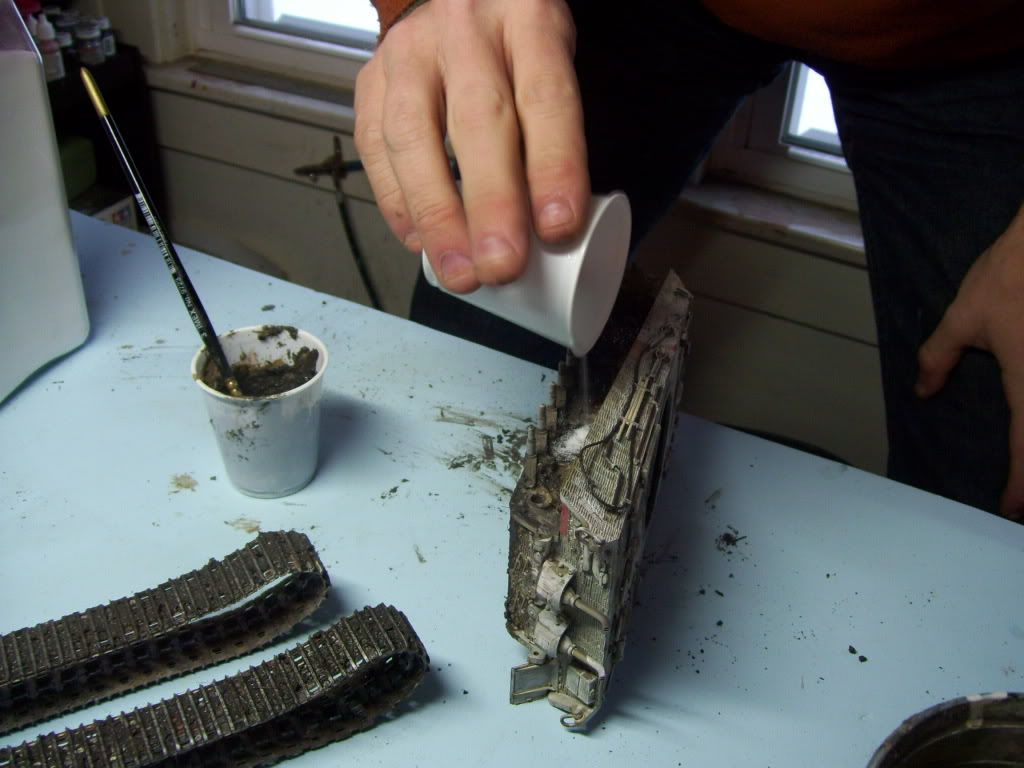
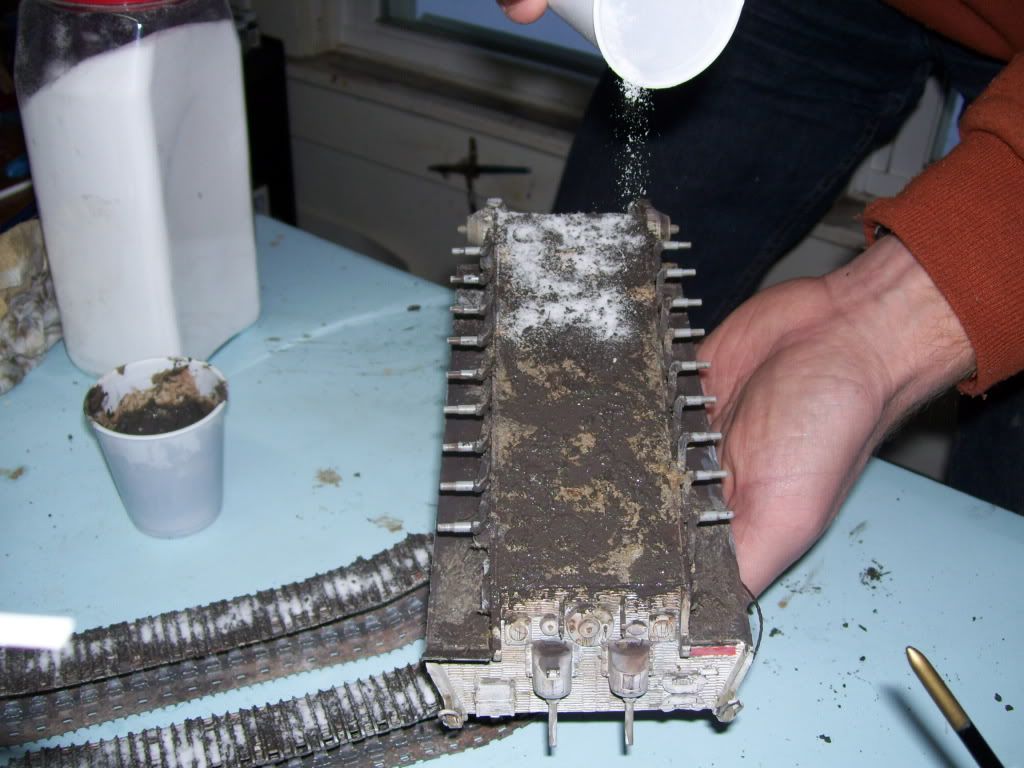
Now, I'm curious to see if that WS Snow will show up on the mud, or will it sink in, and need some other application? I also hit a small section of it with MIG Pigment Fixer, to see if that will affect it? If it does, I'll try using MIG Snow powder--I think I have an "Ashes White" in the stash here....right now I'm waiting on it drying, so I'll post an update tomorrow if I can!

To be continued....! Big Smile [:D]


  • Member since
    January 2007
Posted by the doog on Saturday, December 20, 2008 4:51 PM
 Mansteins revenge wrote:
 the doog wrote:

King Tiger # 300 was part of "Operation South Wind"--the attack on the Soviet bridgehead on the western flank of the Gran RIver in Hungary. Jochen Peiper's 1st SS PanzerKorps led the attack. Here it was photographed 45 miles from Budapest.This photo is from the excellent J. Fedorowicz book "SS Armor on the Eastern Front" by Velimir Vuksic. You can see that it still has the AA ring around the commander's cupola--surprising, as I would have thought it to have been a "final model" KT. You can also see the base coat where the missing links are on the turret.


I have that ref but have really never paid much notice to that pic---ya know, that looks like Peiper, himself!, in the turret...pics of him in '44 and '45 are extremely rare...cool...
It is pretty cool, huh, Manny? Wouldn't that be cool to think it was? This was a part of his Kampfgruppe, so I guess technically it IS possible?
  • Member since
    November 2006
  • From: Massachusetts
Posted by jadgpanther302 on Saturday, December 20, 2008 4:55 PM

looks good, is the mud set worth it? I checked internet hobbies and it is 42 bucks.

It looks really cool though.Thumbs Up [tup]Thumbs Up [tup]

  • Member since
    July 2007
  • From: Ohio
Posted by Geist on Saturday, December 20, 2008 4:56 PM

Wow Doog, that looks sweat. Very realistic Thumbs Up [tup]. I'm going to have to try out MIG products. I've always made mud with spuadron putty, but it is very tideous. I'm going to have to try your way. What colors would you reccomend getting to start out?


Erik

On the bench: Italeri Leopard 1A2 correction build with Perfect Scale turret and Eduard PE

  • Member since
    June 2005
  • From: Indiana U.S.A.
Posted by Panther F on Saturday, December 20, 2008 5:29 PM
Like a chemist in his lab!  Nice work doog.  Wink [;)]
  • Member since
    July 2004
  • From: Texas
Posted by wbill76 on Saturday, December 20, 2008 5:30 PM
Coming along nicely Karl, how big of a base are you planning for this one? Thumbs Up [tup]
  • Member since
    October 2008
  • From: Portland, Oregon
Posted by RickLawler on Saturday, December 20, 2008 6:24 PM

Hey Karl,

It looks like you are getting the hang of using the MIG's just fine.  As you've noted, they have their idosycracies (sp?) and can take some getting used to.  Your results look good so far. 


Take care,

Rick

http://ricklawler.blogspot.com/


Rob
  • Member since
    April 2005
  • From: netherlands
Posted by Rob on Sunday, December 21, 2008 6:13 AM

hej doog, that is looking mighty awesome. with your permission i'll print it and use it for one of my future projects as guideline.

cheers

my family calls me "ARMOR FREAK"... i don't know why. My AFV pic site --> www.rob_tas84.mijnalbums.nl My nature pic site -> www.robbioo.mijnalbums.nl
  • Member since
    July 2006
  • From: New Jersey
Posted by redleg12 on Sunday, December 21, 2008 8:01 AM

Karl - since this is a MIGnanomus finish....I am further curious. What do you see as the major advantage of using the MIG acrylic resin as the binder vs white glue vs celluclay. Is it just drying time!!.

As I have said, I am a big MIG fan of the powders. Looking for good resons to look at their other products.

Nice work thus far. Keeping my sights on the MIG.....no, that from the wingy side....eye on the Tiger.....thats better.

Rounds Complete!!

"The Moral High Ground....A Great Place to Emplace Artillery."

  • Member since
    November 2005
Posted by Anonymous on Sunday, December 21, 2008 10:25 AM
That mud looks good enough to eat...can I lick the bowl?  That KT is really starting to vie for my affections!
  • Member since
    January 2007
Posted by the doog on Sunday, December 21, 2008 10:43 AM
 jadgpanther302 wrote:

looks good, is the mud set worth it? I checked internet hobbies and it is 42 bucks.

It looks really cool though.Thumbs Up [tup]Thumbs Up [tup]

Well, that's a decisioin you would have to make based on your pocketbook--same as anything in this hobby! In the previous thread, MIG said that the prices here are jacked up by US retailers, and that the better way to go would be to buy directly from the MIG website--I would check there first!

Geist--I would recommend, in order of progressive "darkening" coor:

  • 232 Dry Mud
  • 234 Rubbel Dust
  • 033 Dark Mud
  • 039 Industrial City Dirt
  • 034 Russian Earth

The first is a light mud color; the last is a near raw-umber-ish dark brown.

Thanks, Jeff, Bill, Rob, and Rick!  There is a learning curve to the pigments and products, but it's not steep. Mostly, you just have to be willing to experiment!

Mike,the acrylic resin stuff dries wicked-fast, and it's tough-as-nails when it's cured. I got the tracks on this morning. It's a shame much of this will be hidden by the side skirts! Look at hpw nice the dirt and snow look behind the tracks in the next couple photos!

Here's something I found very interesting! Here are the two spots where I actuallly used drops of MIG Pigment Fixer to fix the Woodland Scenics snow--notice how the rest ofthe Snow just kinda suck in and disappeared into the drying tracks' color. I don't know if this was becaose of the little bit of water that I added to "re-wet" the acrylic mixture again afterit sitting in a cup for about 6 hours? I had sealed the cup with both clear plastic wrap and tin foil, and to my delight, it stayed relatively "fresh". But I may have put too much water in it, and allowed the snow powder to sink into it as it dried?

Look at the other side--see how the snow "disappeared"?

Also, the acrylic resin seems more amenable to heavy/thick application without gravity pulling it off the model like it does with white glue--look at the front here, how nicely a thick application stayed.

I'll be working on the rest of it today, and then getting back to final weathering on the uppper hull. I still have some detail painting and pin washes to do. Watch this space! Cool [8D]


  • Member since
    April 2008
  • From: Canadian Prairies
Posted by caSSius on Sunday, December 21, 2008 11:37 AM

Great looking build Karl! And thank you for taking the time to put together a tutorial once again. Smile [:)]

This one is particularly helpful for someone like myself, who's local area doesn't have much exposure to these products (I enquired about MIG products this summer at my LHS and the fellow behind the counter screwed up his face and said, "huh?...do you mean a plane?"...Sigh [sigh]...they mostly carry RC stuff these days).  So, your efforts are appreciated in helping me to evaluate if they're worth ordering online. Kudo's to the boys from MIG for providing you with some products to play with and tell us about.

As a self-professed "heavy weatherer", you've taken this a notch or two above where I'd dare to tread with my own stuff...but it's a joy to watch you beat this kit up. I'm looking forward to seeing it all come together.

Cheers

Brad

"Only those who will risk going too far can possibly find out how far one can go."

- T.S. Eliot


  • Member since
    July 2006
  • From: New Jersey
Posted by redleg12 on Sunday, December 21, 2008 12:41 PM

Karl

Great answers and observations. It would appear the MIG acrylic is a good deal for making that nice thick mud. It is also great to know you can keep it fresh by sealing it.

I wonder if you let the mud start to set up a little if the snow would keep from sinking. In any case it seems like something that could be worked out.

Your MIG festival is a good learning experience on all their products. Thank Rick and Allan for all of us.

Of course thank you for the time and patience to bring us the info.

Rounds Complete!! 


"The Moral High Ground....A Great Place to Emplace Artillery."

  • Member since
    July 2003
  • From: On my kitchen counter top somewhere in central North Carolina.
Posted by disastermaster on Sunday, December 21, 2008 4:25 PM

 And, once again doog has come across with an outstandin' build. http://i10.photobucket.com/albums/a144/parisienne-moonlight/emoticon/asdcattivo.gif (Outstandin' in the snow apparently....    He HEH)

 I've been watching this ride since you started. It looks to me like everything has tied together nicely to represent a super rendition of Pieper's ride.

Nasty man, just nasty.

Here's my favorite shot....

http://www.innovationbyinstinct.com/services/hosting/clients/accountyp/status/DisasterMaster/%23t1-4.jpg


 https://i.imgur.com/LjRRaV1.png


  • Member since
    January 2012
Posted by I make stuff on Sunday, December 21, 2008 4:50 PM
 Rob wrote:

hej doog, that is looking mighty awesome. with your permission i'll print it and use it for one of my future projects as guideline.

cheers


Oh, MAN!  Is this protocol?  I'm using basically every one else's work as a guide, one way or another.Whistling [:-^]

  • Member since
    January 2007
Posted by the doog on Sunday, December 21, 2008 9:30 PM

caSSius, Mike, and Steve -- thanks for looking in, and for commenting! 

I'm glad that you guys like the work here and the little review/toot. I'm working away here; just taking a break to look in. I'll have a new update tomorrow!


mmc
  • Member since
    February 2007
  • From: Newcastle upon Tyne, England
Posted by mmc on Monday, December 22, 2008 10:10 AM

Wow fantastic Kingtiger, everything about it is superb.

I use the same method for mud, if I can pluck up the courage I might post my Sherman Dozer, which has a very generous coating. Haven't tried WS snow yet, going to give it a go on my SdKfz 7/2, going to bookmark this for reference.

Looking forward to seeing the Tigger all done.

Mark

  • Member since
    September 2006
  • From: Dripping Springs, TX, USA
Posted by RBaer on Monday, December 22, 2008 4:17 PM
Doog, simply awesome!

Apprentice rivet counter.

  • Member since
    December 2008
  • From: Philadelphia
Posted by Byrne0ut on Monday, December 22, 2008 4:30 PM
That is iincredible.  I know im new here, but that is wonderful work.  I have a panther ausf a on my bench right now and that is the exact paint scheme i was going to go for, this post is going to be extremely valuable, although I can pretty much guarantee it wont look as good as this, but with time I will hope to give doog a run for his money.
ON The Bench: Tristar 1/35 Panzer 38(t) Ausf. B Glencoe 1/400 SS United States Tamiya 1/35 Panther Ausf. A Early On The Shelf Tamiya 1/35 King Tiger Tamiya 1/48 F4U-1D Corsair
JOIN OUR COMMUNITY!

Our community is FREE to join. To participate you must either login or register for an account.

SEARCH FORUMS
FREE NEWSLETTER
By signing up you may also receive reader surveys and occasional special offers. We do not sell, rent or trade our email lists. View our Privacy Policy.