SEARCH FINESCALE.COM

Enter keywords or a search phrase below:

Hummel Late DML#6321 Smart Kit WIP--Oct 11

17774 views
122 replies
1 rating 2 rating 3 rating 4 rating 5 rating
  • Member since
    November 2005
Posted by Anonymous on Thursday, July 9, 2009 1:53 PM
Very nice...I always like the look of a nicely built-up kit before painting...to me, the multi-media pieces and filler have an aesthetic quality initself...
  • Member since
    July 2004
  • From: Texas
Posted by wbill76 on Thursday, July 9, 2009 1:53 PM
Looking good Tony! I acquired this one not too long ago and was wondering how it looked built-up with the latest and greatest DML upgrades, especially with the sFH18. Looking forward to see it with paint on! Thumbs Up [tup]
  • Member since
    July 2007
  • From: Ohio
Posted by Geist on Thursday, July 9, 2009 1:58 PM

Looking good! What scheme are you going to do? I've always loved the Nashorn/Hummel. I've seen this kit at the LHS and have always considered getting it. I may have to now.


Watch out for the small gap at the top of the join betwen the front and side armor in the first pic. 


Erik

On the bench: Italeri Leopard 1A2 correction build with Perfect Scale turret and Eduard PE

  • Member since
    April 2005
  • From: Piscataway, NJ!
Posted by wing_nut on Thursday, July 9, 2009 2:14 PM
Lookin' really good Tony.  Eith oyu have excellent mending skills or you haven't broken off the sapre wheel racks.  Either preety amazing.  I forget which vehicle I did that had that but after the 3rd snap/glue cycle I made one from wire.

Marc  

  • Member since
    August 2008
  • From: S.W. Missouri
Posted by Pvt Mutt on Thursday, July 9, 2009 2:38 PM

Yeah me too MR. I was going to get a full PE set for it but this kit is so well done I changed my mind. With the aluminum barrel and brass that came with the kit there is enough to dress it up right out the box.

Bill, I think you'll enjoy building this one,the fit has been outstanding. I don't know just how correct it is but i'm sure you'll be all over what isn't. Looking forward to your future build of this one.Approve [^]

And Geist if you do pick one up you'll love it i'm sure. As I was telling Bill there the fit has been great. Most of what you see there is just a friction fit so I can take it apart to paint it. The paint scheme will be of one i've never seen on anything before. Dark yellow base with horizontal brown wavy lines. I would say most won't like it but it will be different.Big Smile [:D]

Angel [angel]That's what my wife of 45 years tells me Wingy "Be Gentle"Laugh [(-D]

Thanks for the comments fellers                                                                                               Tony the Mutt

Shoot Low Boys They're Ridin Ponys

  • Member since
    February 2007
  • From: NOLA
Posted by roosterpelo on Thursday, July 9, 2009 4:09 PM
looks great mutt! i have three different open top vehicles half way built. something about having to paint and weather the inside, put it together, then paint the outside that scares me, Black Eye [B)] i agree that there is just something about an unpainted vehicles with all the goodies showing that is just awesome. what is the red putty your using to fill your seams?
chris d.
  • Member since
    August 2008
  • From: S.W. Missouri
Posted by Pvt Mutt on Thursday, July 9, 2009 5:28 PM

Chris this is my second open top and I know just what you're saying. It seems everybodies eyes are drawn right to the inside and therefore your soul is open to attack.Boohoo [BH] I favor the SPGs and a lot of them are convertibles. I had to redo my first one and I don't expect it to be the last.Big Smile [:D]

That red stuff is automotive painting "Spot Putty". I believe it's just really thick primer and cheap. After you get the inside painted just mask her up real tight and go for the outside work. If WildBill can do it anybody can,that's the way I see it. He's not around here is he?Evil [}:)]

Thanks for coming by                                                                                                                  Tony the Mutt

Shoot Low Boys They're Ridin Ponys

  • Member since
    June 2009
Posted by Guney on Thursday, July 9, 2009 5:34 PM
Looking great...Goog luck with the painting...:)
  • Member since
    March 2003
  • From: Rain USA, Vancouver WA
Posted by tigerman on Thursday, July 9, 2009 5:50 PM
Oh yummy. I've liked the Hummel for a long, long time, but have yet to add one to my collection. I'll be following this one throughout.

   http://i7.photobucket.com/albums/y269/wing_nut_5o/PANZERJAGERGB.jpg

 Eric 

  • Member since
    September 2006
  • From: Central Texas
Posted by NucMedTech on Friday, July 10, 2009 6:33 AM

looking good. I built the old hummel awhile back, it was a nice kit then. I might have to get a new one and try my hand at it again or maybe try the hornise. Anyway, can't wait to see the paint scheme, sounds interesting.

-StephenCowboy [C):-)]

Most barriers to your successes are man made. And most often you are the man who made them. -Frank Tyger

  • Member since
    October 2007
Posted by White_R34 on Friday, July 10, 2009 7:45 AM
WOW that awesome man keep up the top-noch work.Bow [bow]
Building the Impossible Is my main goal!!
  • Member since
    August 2008
  • From: S.W. Missouri
Posted by Pvt Mutt on Friday, July 10, 2009 12:16 PM

Guney, thanks for the luck because i'm thinking my beginners luck is getting in short supply.

Tigerman I recommend it so go for it.

White, i'm glad you like it because I try real hard.

I don't know anything about the older DML kits Stephen but i've read that the Hummel #6321 and the Nashorn #6314 are much much better than the older ones.

Thanks guys cause I appreciate it so much                                                                                Tony the Mutt

Shoot Low Boys They're Ridin Ponys

  • Member since
    May 2005
  • From: Dublin Rep Of Ireland
Posted by terry35 on Saturday, July 11, 2009 12:12 PM

Tony your hummel is comming along great. Lookin gforward to your next update.

Terry.

  • Member since
    August 2008
  • From: S.W. Missouri
Posted by Pvt Mutt on Friday, July 17, 2009 5:29 PM

Well i'm down to where everything i've done is hardly noticeable. Just a bunch of small parts.

The gun is ready for paint now and some of the add on crew gear is made up and ready for color.

Deflectors are wrong in first picture,instructions are very unclear but the real thing don't lie. They should be installed here instead:

                                 Sorry I steered you wrong but at least I caught it before any harm was done.Big Smile [:D]

See Ya Later                                                                                                                          Tony the Mutt

Shoot Low Boys They're Ridin Ponys

  • Member since
    August 2008
  • From: S.W. Missouri
Posted by Pvt Mutt on Tuesday, August 11, 2009 1:51 PM

I assembled some of the interior PE for a future Brummbar project and it's time to give the Hummel a little more TLC don't you think?

I'll be back                                                                                                                             Tony the Mutt

Shoot Low Boys They're Ridin Ponys

  • Member since
    October 2008
Posted by calvin_ng on Tuesday, August 11, 2009 2:29 PM

hey PVT, it looks great,when are we gonna see some paint? i have this kit in the stash and was just looking for a build log type. how were parts? fiddly, fragile? are there any errors other than the one above in the instructions?

great job!

  • Member since
    January 2012
Posted by I make stuff on Tuesday, August 11, 2009 3:42 PM

Tony,

This is really looking good, I agree with others who say they want paint, but I really REALLY want to see paint on the SuperDuper Tiger.

Bill 

  • Member since
    December 2008
  • From: Northern Va
Posted by psstoff995's lbro on Tuesday, August 11, 2009 3:46 PM
Whooo! Looks great. Can't wait to see this one. Then the Brumbars up next? Looks like that'll be a good one too.
-Will young modeler Test fit master
  • Member since
    March 2003
  • From: Western North Carolina
Posted by Tojo72 on Tuesday, August 11, 2009 3:47 PM
 Pvt Mutt wrote:

I assembled some of the interior PE for a future Brummbar project and it's time to give the Hummel a little more TLC don't you think?

I'll be back                                                                                                                             Tony the Mutt


Wow that PE looks impressive,I would never have the patience,looks great though

  • Member since
    August 2008
  • From: S.W. Missouri
Posted by Pvt Mutt on Tuesday, August 11, 2009 3:53 PM

So far Calvin its been a pretty slick build. My plan is to spray the base color inside the fighting compartment so I can finish closing it up tomorrow.

Measure twice and cut once is very good logic                                                                               Tony the Mutt

Shoot Low Boys They're Ridin Ponys

  • Member since
    July 2004
  • From: Texas
Posted by wbill76 on Tuesday, August 11, 2009 3:56 PM

Tony,

Definitely need to give the Hummel some love and attention! If you don't, the Hummel Protective Services will be on your doorstep in no time! Nice work on the Brummy PE. Thumbs Up [tup]

  • Member since
    August 2008
  • From: S.W. Missouri
Posted by Pvt Mutt on Tuesday, August 11, 2009 4:49 PM

Citadel: All I can say about the Super Tiger is, Patience Grass Hopper.Big Smile [:D]

PO: I've had such a good time with the Hummel I had thoughts of doing the Nashorn next but you are so right the Brummbar is tempting.

Anthony:  PE can be a challenge sometimes and patience is a great thing to have but fortitude is worth more to a brass bender.Laugh [(-D]

Tex: The H.P.S. is nothing to tangle with,thanks for the reminder. About the PE, there's a lot more where that came from (Griffon Super Set) and Thanks

Tony the Mutt

Shoot Low Boys They're Ridin Ponys

  • Member since
    March 2003
  • From: Rain USA, Vancouver WA
Posted by tigerman on Tuesday, August 11, 2009 6:03 PM

Looking yummy so far. forgot about this one.

   http://i7.photobucket.com/albums/y269/wing_nut_5o/PANZERJAGERGB.jpg

 Eric 

  • Member since
    April 2005
  • From: Piscataway, NJ!
Posted by wing_nut on Tuesday, August 11, 2009 7:46 PM
 tigerman wrote:

Looking yummy so far. forgot about this one.

Sure does but Ihate when I get one of those little PE strap between my teeth.Big Smile [:D]


Great job on the PE....on the whole thing!

Marc  

  • Member since
    August 2008
  • From: S.W. Missouri
Posted by Pvt Mutt on Monday, August 31, 2009 4:32 PM

This build is about to fall off the edge of the earth and be lost so I better bump it with a short update. I'm going to pre-shade with brown like WildBill does this time instead of black.

That's it for now folks                                                                                                                Tony the Mutt

Shoot Low Boys They're Ridin Ponys

  • Member since
    March 2003
  • From: Rain USA, Vancouver WA
Posted by tigerman on Monday, August 31, 2009 5:42 PM
Good to see more progress on her.

   http://i7.photobucket.com/albums/y269/wing_nut_5o/PANZERJAGERGB.jpg

 Eric 

  • Member since
    January 2004
  • From: Peru, IN
Posted by leadsled on Monday, August 31, 2009 9:56 PM
Cool looking Hummel so far. I have an old one in my stash I got at a swap meet. Keep up the good work.Thumbs Up [tup]
  • Member since
    December 2008
  • From: Northern Va
Posted by psstoff995's lbro on Monday, August 31, 2009 10:01 PM
Great looking Hummel, Can't wait to see the camo job on it! 
-Will young modeler Test fit master
  • Member since
    November 2005
Posted by Anonymous on Monday, August 31, 2009 11:19 PM
Very nice...
  • Member since
    August 2003
  • From: Connecticut, USA
Posted by Nachtflieger on Tuesday, September 1, 2009 6:44 AM

Good looking Hummel Tony, keep up the good work! You must be getting sick of doing roadwheels between this, and your Brummbar! Big Smile [:D]

Nate


  • Member since
    August 2008
  • From: S.W. Missouri
Posted by Pvt Mutt on Saturday, September 19, 2009 4:46 PM

Figured I would put a little time in on the Big Bee before it ran away from home.Big Smile [:D]

See Ya Later                                                                                                                            Tony the Mutt

Shoot Low Boys They're Ridin Ponys

  • Member since
    May 2005
  • From: Dublin Rep Of Ireland
Posted by terry35 on Saturday, September 19, 2009 5:11 PM

Sweet Tony looking brilliant.

Terry.

  • Member since
    January 2007
Posted by the doog on Saturday, September 19, 2009 8:31 PM

Tony, you're just brappin' right through your stash, ain'tcha?

WOW--quite an out put you've got going on lately! This Hummel looks right up there with your Brummbar!

  • Member since
    August 2008
  • From: S.W. Missouri
Posted by Pvt Mutt on Saturday, September 19, 2009 9:31 PM

I'm not as young as you guys and I can't allow no grass to grow under my walker.                        

As they say "A fool with a tube of glue gathers no moss".

Without you folks encouragement I would be soaking my dentures if I had any to soak.

Thanks                                                                                                                                    Tony


Shoot Low Boys They're Ridin Ponys

  • Member since
    July 2004
  • From: Texas
Posted by wbill76 on Sunday, September 20, 2009 9:07 AM
 Pvt Mutt wrote:

I'm not as young as you guys and I can't allow no grass to grow under my walker.                        

As they say "A fool with a tube of glue gathers no moss".

Without you folks encouragement I would be soaking my dentures if I had any to soak.

Thanks                                                                                                                                    Tony

Thanks for putting a smile on my face with this one Tony! And your Bee isn't looking too shabby either...just make sure you don't get any moss in those shell casing cabinets! Wink [;)]

  • Member since
    August 2008
  • From: S.W. Missouri
Posted by Pvt Mutt on Tuesday, September 22, 2009 11:52 AM

It's starting to get busy in there.Smile [:)]

It got just a little damp around here last night with almost 4 inches of rain.                                    Tony the Mutt

Shoot Low Boys They're Ridin Ponys

  • Member since
    August 2007
  • From: The Plains of Kansas
Posted by doc-hm3 on Tuesday, September 22, 2009 4:17 PM
 Tony, Great looking build you've got going on here. And a fast one at that. Really nice texture on the steel plate.Thumbs Up [tup]

All gave some and some gave all.

  • Member since
    December 2008
  • From: Northern Va
Posted by psstoff995's lbro on Tuesday, September 22, 2009 4:21 PM

Great interior, coming together very nicely.

Nice work on those guns in their racks (MG and Kars?) Thumbs Up [tup]

-Will young modeler Test fit master
  • Member since
    August 2008
  • From: S.W. Missouri
Posted by Pvt Mutt on Tuesday, September 22, 2009 4:33 PM

I appreciate it guys but with those close up shots I see several things that need some TLC. Something I did not know that has been pointed out is the spare mg barrel case there under the butt stock should be field gray and not dark yellow.

The other things that need fixing is sloppyness on my part.Blush [:I]

Tony the Mutt

Shoot Low Boys They're Ridin Ponys

  • Member since
    August 2008
  • From: S.W. Missouri
Posted by Pvt Mutt on Saturday, September 26, 2009 6:27 PM

I fixed the over looked niggles and today I tried to make a camo net and stored it in the left rear corner where there was an empty spot. I know the green is really bright but i'm hopeing that a raw umber wash will darken it down. What do you guys think?

This is the other side with the cartidge locker.

Working on the gun.

Thanks for Looking in                                                                                                             Tony the Mutt

Shoot Low Boys They're Ridin Ponys

  • Member since
    March 2003
  • From: Rain USA, Vancouver WA
Posted by tigerman on Saturday, September 26, 2009 6:44 PM
Tony, I don't see the rucipicator (sp) getting so banged up like that. Perhaps that's just me.

   http://i7.photobucket.com/albums/y269/wing_nut_5o/PANZERJAGERGB.jpg

 Eric 

  • Member since
    August 2008
  • From: S.W. Missouri
Posted by Pvt Mutt on Saturday, September 26, 2009 8:09 PM

Nooooo Tigerman I think you're right, i'll fix it and Thanks. Man this cheeping is a thorn in my side.Banged Head [banghead]

Tony the Mutt

Shoot Low Boys They're Ridin Ponys

  • Member since
    August 2009
  • From: Cary, North Carolina
Posted by M1Carbine on Saturday, September 26, 2009 8:28 PM

Looks sweet Mutt.  Looks like that DML kit is going to have to go in the collection next.


Bob

  • Member since
    January 2007
Posted by the doog on Saturday, September 26, 2009 8:31 PM

Looks good, Tony-I for one, don't mind the reciprocator chipping.

Tone down that bright green on the net--respray it if you have to. A wash won't tone that down enough.

ALl the other detail is looking pretty good, to be honest!

  • Member since
    February 2009
  • From: mass,USA
Posted by scratchmod on Sunday, September 27, 2009 7:03 AM

You know me, I love weathering and chipping so this is looking great. I agree with Doog as far as the bright green on the netting goes, mayalso be just the lighting that make it stand out so much. Looks great so far and keep up the nice work.

Rob

  • Member since
    July 2004
  • From: Texas
Posted by wbill76 on Sunday, September 27, 2009 10:43 AM

Agree with the others Tony, the green on my monitor at least is almost flourescent. Try again with a darker green?

All the other details are looking sharp, nice work dressing up that interior. Thumbs Up [tup]

  • Member since
    August 2008
  • From: S.W. Missouri
Posted by Pvt Mutt on Sunday, September 27, 2009 11:46 AM

Oh No it's not the lighting. It didn't look that bright when I put it on. I went that route trying to keep colors lighter to keep them from getting so dark when I did the washes and pigments and it backfired on me.Sign - Oops [#oops]

Bill since the Hummel is such a large machine I wanted to add a lot of window dressing so don't let me cross the line and add too much clutter.

Thanks so much                                                                                                                       Tony the Mutt

Shoot Low Boys They're Ridin Ponys

  • Member since
    August 2008
  • From: S.W. Missouri
Posted by Pvt Mutt on Sunday, September 27, 2009 2:21 PM

OK is this better? I also added another helmet on top of the net and two gas mask up in the corner on that side.

I added a helmet and a small box to the top of the cartridge locker on the right side.

Nothing is glued down so items can be moved around if you guys think they would look better in another location. I've got plenty of gear if it needs more.

Oh btw where do you guys get those little extras like news papers,magazines and maps?

Appreciate your opinions and advice.Thumbs Up [tup]                                                                                 Tony the Mutt

Shoot Low Boys They're Ridin Ponys

  • Member since
    February 2009
  • From: mass,USA
Posted by scratchmod on Sunday, September 27, 2009 7:32 PM

I can't help you with the extras, but the netting does look better. The extra helmets helped liven the fighting comp., very nice.


Rob

  • Member since
    August 2008
  • From: S.W. Missouri
Posted by Pvt Mutt on Sunday, September 27, 2009 7:45 PM

Thank You Rob and so far one place to get those extras is Plus Models.Smile [:)]

Tony the Mutt

Shoot Low Boys They're Ridin Ponys

  • Member since
    July 2004
  • From: Texas
Posted by wbill76 on Sunday, September 27, 2009 8:08 PM

Definitely an improvement on the green Tony. One of the best places to get the maps and such is to look for them online then scale them down using any image editing software and print them off on a color printer. Cheap and easy solution. Wink [;)]

I don't think you've gone overboard with the crew gear at all. Bear in mind these had a gun crew of 5 and they would practically live in their vehicles, so seeing helmets and other bits of kit laying around would make sense IMHO. I did catch one little detail that you may want to fix. The small box on top of the cartridge cabinet and under the gun rammer staff is a First Aid kit. These were usually field gray and not DY as you have it. No biggie to leave it as is but thought you might like to know in case you do want to change it. Smile [:)]

  • Member since
    August 2008
  • From: S.W. Missouri
Posted by Pvt Mutt on Sunday, September 27, 2009 9:27 PM

Ah Ha a first aid kit. There's another one over there on the rear wall behind the net and two more under the gun there on the engine houseing. Are they all for first aidQuestion [?]

Thanks Bill i'll paint it or them in the morning.                                                                                Tony

Shoot Low Boys They're Ridin Ponys

  • Member since
    July 2004
  • From: Texas
Posted by wbill76 on Monday, September 28, 2009 2:40 PM

 Pvt Mutt wrote:
Ah Ha a first aid kit. There's another one over there on the rear wall behind the net and two more under the gun there on the engine houseing. Are they all for first aidQuestion [?]

Not likely...those are probably just storage/tool boxes of different types. If you can take/post a pic of which boxes you're talking about I can confirm for sure though.

  • Member since
    August 2008
  • From: S.W. Missouri
Posted by Pvt Mutt on Monday, September 28, 2009 4:02 PM

As long as the First Aid box is correct that's good enough. I painted the two on the engine housing to just to add a little extra color but I left the one on the rear wall DY for variety.                                

I did some painting this afternoon and after that dries some i'll get a pic to show ya what i'm up to.

Your advice is invaluable sir                                                                                                        Tony

Shoot Low Boys They're Ridin Ponys

  • Member since
    August 2008
  • From: S.W. Missouri
Posted by Pvt Mutt on Monday, September 28, 2009 6:12 PM

Hi Folks

Well once again i'm going to try something new for me. The Hummel will be Dark Yellow with horizontal  Red Brown wavy lines. This is the plan: I sprayed the Red Brown that I lightened up with Tamiya Hemp along the approximate areas that the lines will follow. After this dries overnight i'll mast off the lines with the Blue Tack worms and then spray the Dark Yellow and hopefully when I peel off the Blue Tack i'll have the effect i'm after.Approve [^]

Wish me Luck and keep your fingers crossed                                                                               Tony the Mutt 

Shoot Low Boys They're Ridin Ponys

  • Member since
    August 2008
  • From: S.W. Missouri
Posted by Pvt Mutt on Tuesday, September 29, 2009 11:12 AM

Well brothers and sisters what do you think? It's a little rough around the edges but I think it will be alright once I shot a blend coat and wash her down.

Your opinions, good, bad or indifferent count.                                                                             Tony the Mutt

Shoot Low Boys They're Ridin Ponys

  • Member since
    July 2004
  • From: Texas
Posted by wbill76 on Tuesday, September 29, 2009 1:39 PM
Looks good Tony, a little bit of touch-up here and there and you're in business! The pattern on the barrel in particular is very nice.
  • Member since
    August 2008
  • From: S.W. Missouri
Posted by Pvt Mutt on Tuesday, September 29, 2009 5:46 PM

Thanks Mr Bill. I've got to admit that it did come out better than I thought it would.Big Smile [:D]

Tony the Mutt

Shoot Low Boys They're Ridin Ponys

  • Member since
    February 2008
  • From: ladner BC Canada
Posted by stick man on Tuesday, September 29, 2009 8:20 PM

Cool looking camo Tony!

Smile [:)]

I'm 15 and I model I sk8board and I drum what could be better.
  • Member since
    August 2008
  • From: S.W. Missouri
Posted by Pvt Mutt on Thursday, October 1, 2009 7:17 PM

Glad you like the cam Stickman.

I've been adding some light detail here and there. Think i'll start on the filters and washes tomorrow.

Then finish installing the left over parts like the range poles,tow cable and barrel travel braces.        

Thanks for looking                                                                                                                  Tony the Mutt

Shoot Low Boys They're Ridin Ponys

  • Member since
    December 2003
  • From: Colorado
Posted by psstoff995 on Thursday, October 1, 2009 7:32 PM

Looking really good- I think you did a great job on that unique camo Thumbs Up [tup]

Mask it with tape or a liquid agent? (sorry if I missed it on a previous page)

-Chris

US Army Infantryman

  • Member since
    October 2003
  • From: Crest Hill, Il. U.S.A.
Posted by masonme2 on Thursday, October 1, 2009 7:39 PM
Excellent build! I picked this same kit up this week at my LHS and after seeing yours I really want to start on it. The main gun is a kit itself, very impressive with the aluminum barrel. I have to agree with the rest here in the Armor Forum that this is an outstanding build. Camo is also nice, an unusual scheme.

"Diplomacy is the art of saying 'Nice doggie' until you can find a rock"   Will Rogers

  • Member since
    August 2008
  • From: S.W. Missouri
Posted by Pvt Mutt on Thursday, October 1, 2009 8:15 PM

Oh Mason you'll really like this one I sure have and Thanks.Big Smile [:D]

PO I used Blue Tack sausage rolls,gotem hangin in the smoke house now.Laugh [(-D]

Later folks and Thanks                                                                                                                Tony the Mutt

Shoot Low Boys They're Ridin Ponys

  • Member since
    August 2009
  • From: Cary, North Carolina
Posted by M1Carbine on Thursday, October 1, 2009 10:45 PM

Tony, looks great buddy.


Bob

  • Member since
    December 2003
  • From: Colorado
Posted by psstoff995 on Friday, October 2, 2009 12:07 AM
Laugh [(-D] great plan- looks like it really worked out Thumbs Up [tup] let me know how they taste

-Chris

US Army Infantryman

  • Member since
    January 2009
  • From: Everett, WA
Posted by Schnobs on Friday, October 2, 2009 12:49 AM
Tony I have been watching your progress it is very inspiring.  Awesome paintjob!
"There is a principle which is a bar against all information, which is proof against all arguments and which cannot fail to keep a man in everlasting ignorance. That principle is contempt prior to investigation." Herbert Spencer
  • Member since
    August 2003
  • From: Connecticut, USA
Posted by Nachtflieger on Friday, October 2, 2009 3:50 AM

Love that camo, Tony!Smile [:)]

Nate


  • Member since
    October 2008
  • From: Portland, Oregon
Posted by RickLawler on Friday, October 2, 2009 8:04 AM

Great starting point for the washes and filters, Tony.  It should really sparkle when completted.

Rick

  • Member since
    July 2004
  • From: Texas
Posted by wbill76 on Friday, October 2, 2009 9:58 AM
Getting closer to the finish line Tony...looking forward to seeing it weathered up. Thumbs Up [tup]
  • Member since
    December 2005
  • From: Goteborg / Sverige
Posted by Svenne Duva on Friday, October 2, 2009 11:00 AM
This only becomes better and better, thank you Mr. Tony Big Smile [:D]

The gun is just great!

Looking forward to your next update, way cool that camo pattern Cool [8D]

Svenne

sic transit gloria mundi

  • Member since
    August 2008
  • From: S.W. Missouri
Posted by Pvt Mutt on Friday, October 2, 2009 12:59 PM

GOLLY I had no idea this camo scheme would grab so many people. That's what I like about this site is the folks will let you know if you're doing it right or wrong instead of just turning their backs on you. I've dropped four sites that i've been posting on for lack of feedback.

Oh btw Tex did you notice the first aid box? I put the red cross on it just for you too.Make a Toast [#toast]

It was great to see all the comments from you guys                                                                    Tony

Shoot Low Boys They're Ridin Ponys

  • Member since
    July 2004
  • From: Texas
Posted by wbill76 on Friday, October 2, 2009 1:15 PM
 Pvt Mutt wrote:
GOLLY I had no idea this camo scheme would grab so many people. That's what I like about this site is the folks will let you know if you're doing it right or wrong instead of just turning their backs on you. I've dropped four sites that i've been posting on for lack of feedback.

Oh btw Tex did you notice the first aid box? I put the red cross on it just for you too.

I know how you feel Tony, there are several sites that tend to be more impersonal for a variety of reasons but glad you feel at home here with the FSM bunch! I did indeed notice the markings on the box, very nice detail touch. Thumbs Up [tup]

  • Member since
    August 2008
  • From: S.W. Missouri
Posted by Pvt Mutt on Sunday, October 4, 2009 2:56 PM

Added some grime by using raw umber oil on top of some MIG filter coats.                                      Do you think it's over done and needs some of it thinned out with thinner or leave it alone?

I value your opinions                                                                                                                 Tony the Mutt

Shoot Low Boys They're Ridin Ponys

  • Member since
    February 2009
  • From: mass,USA
Posted by scratchmod on Sunday, October 4, 2009 3:05 PM

Wow thanks one heck of a camo scheme Tony, Looks great and a nice start on the weathering too. What happened to the Brummbaer? I was hoping to see that one painted too.


Rob

  • Member since
    August 2008
  • From: S.W. Missouri
Posted by Pvt Mutt on Sunday, October 4, 2009 4:12 PM

Hi Rob,right now the Grizz is on page #7 headed for parts unknown.Laugh [(-D]                                       

I was getting behind on the Hummel progress so the Brummbar was put aside for now. There seems to be a few more that like that camo scheme than dislike it. I just did it to have something different.

Thanks Rob you're a gracious person.                                                                                         Tony the Mutt

Shoot Low Boys They're Ridin Ponys

  • Member since
    April 2005
  • From: Piscataway, NJ!
Posted by wing_nut on Sunday, October 4, 2009 7:11 PM
That inteiror is kickin' butt and takin' names.  NICE!

Marc  

  • Member since
    January 2012
Posted by I make stuff on Sunday, October 4, 2009 7:25 PM

That looks FINE, TOny, no worries about "over the top," at least not for me, that is.  Nicely toned down the base colors, you've got a way to go to be over the top.

Can you post a bit about the Mig products you used before the oil wash, and what effect they had?  I had a Mig dust coat get away from me once, it got so light, I almost called it a whitewash. 

  • Member since
    August 2008
  • From: S.W. Missouri
Posted by Pvt Mutt on Sunday, October 4, 2009 8:08 PM

Thanks Marc, i'm about to call a halt on the interior with a light coat of dust.

Grad you really think I know what i'm doing, now that's funny. I brushed "Tan for Tritonal Camo" over the Red Brown Ribbons and "Brown for Desert Yellow" plus "Brown for Dark Yellow"here and there on random places over the base color. The little voices said to do it that way and I never ask WHY.Laugh [(-D]

It looked OK after I finished so I let it dry over night and applied the wash. It looks like the wash covers what you did with the filters but what do I know. Until someone tells me i'm doing something wrong I just fumble along like i've got good sense and that's why I always ask you people your opinions.

Unless there's a better way offered i'll just listen to the inner voices.                                             Tony the Mutt

Shoot Low Boys They're Ridin Ponys

  • Member since
    July 2004
  • From: Texas
Posted by wbill76 on Sunday, October 4, 2009 8:30 PM

 Pvt Mutt wrote:
Unless there's a better way offered i'll just listen to the inner voices.

Keep on listening to the voices Tony! That is until they start telling you to try tasting your models, then you should definitely not listen to them after that. Propeller [8-]

I'd say you were well on your way with this one and it doesn't look overdone to me judging by the pics. I typically will do just as you have done and apply a dark wash before I go to work with the dot filters to introduce the fading and subtle variations on top of it. Thumbs Up [tup]

  • Member since
    August 2008
  • From: S.W. Missouri
Posted by Pvt Mutt on Sunday, October 4, 2009 8:40 PM

There's one of those voices,did you hear it? It had a Texas accent too.Bow [bow]Laugh [(-D]

SPOOKY HUH                                                                                                                             Tony

Shoot Low Boys They're Ridin Ponys

  • Member since
    August 2008
  • From: S.W. Missouri
Posted by Pvt Mutt on Tuesday, October 6, 2009 11:58 AM

Just a small up date today.

The tow cable made up and installed also the Friulmodel tracks fitted. Now all i've got to do is remove them, trim off the track pins and color them up. I'm going to try some of "TankRats Track Black" on these instead of "Blacken-It" this time. I'll report on how that works out too.

See Ya Later, i'm busy at the moment.Big Smile [:D]                                                                                   Tony the Mutt

Shoot Low Boys They're Ridin Ponys

  • Member since
    December 2003
  • From: Colorado
Posted by psstoff995 on Tuesday, October 6, 2009 12:50 PM

Lookin real nice, can't wait to see the tracks blackened.

Any reason you're moving away from Blacken-it?

-Chris

US Army Infantryman

  • Member since
    August 2008
  • From: S.W. Missouri
Posted by Pvt Mutt on Tuesday, October 6, 2009 1:09 PM

Chris,man am I happy you've got a name.Big Smile [:D] Only one reason. I like the way it works,I love the color it leaves behind BUT all those dog gone SILVER SPOTS in the low areas drives me up the wall.

Talked to Tank Rat and he sayes his mixture won't do that, we'll see cause i'm from Missouri.Smile,Wink, & Grin [swg]

I'll try most anything onceDinner [dinner]                                                                                              Tony the Mutt

Shoot Low Boys They're Ridin Ponys

  • Member since
    December 2003
  • From: Colorado
Posted by psstoff995 on Tuesday, October 6, 2009 1:29 PM
Ah I see- I had never used either (only have 1 set of Fruils actually- a T72, too rich for my blood) and had never heard of any downsides of Blacken-it, never heard of track black for that matter- sounds like that's what I'll be investing in when it's time- but I'll wait for your final review! Wouldn't want any silver spots!!

-Chris

US Army Infantryman

  • Member since
    August 2008
  • From: S.W. Missouri
Posted by Pvt Mutt on Tuesday, October 6, 2009 1:37 PM

Hey Chris the price is getting better cause some of the shops have dropped the price down to $30.00 bucks a shot and that ain't bad at all.

Tony

Shoot Low Boys They're Ridin Ponys

  • Member since
    December 2003
  • From: Colorado
Posted by psstoff995 on Tuesday, October 6, 2009 2:25 PM
Yeah- after spending twice that on a kit- I usually like to spend 5-10 on replacement tracks Laugh [(-D] maybe after I make it out of college... hope the price stays down till then. Nothing beats em!

-Chris

US Army Infantryman

  • Member since
    July 2003
  • From: On my kitchen counter top somewhere in central North Carolina.
Posted by disastermaster on Wednesday, October 7, 2009 3:15 AM

 Pvt Mutt wrote:

Been watching you. That's interesting camo you got there. This is gonna end up fine.

http://www.innovationbyinstinct.com/services/hosting/clients/accountyp/status/DisasterMaster/%23t1-4.jpg

 https://i.imgur.com/LjRRaV1.png


  • Member since
    May 2005
  • From: Dublin Rep Of Ireland
Posted by terry35 on Wednesday, October 7, 2009 3:48 PM

Hi, Tony I'm with Steve, a very interesting camo. I just gotta wait and see the rest of here comming to life. Looks just great.

Terry.

  • Member since
    August 2008
  • From: S.W. Missouri
Posted by Pvt Mutt on Wednesday, October 7, 2009 5:56 PM

Thanks my brothers its been a lot of fun bringing this one to life.Big Smile [:D]                                      

Worked on the aft end today and did some pin washing too:

Come on back when you can.Sign - Welcome [#welcome]                                                                                    Tony the Mutt

Shoot Low Boys They're Ridin Ponys

  • Member since
    September 2009
  • From: Spring Branch, TX
Posted by satch_ip on Wednesday, October 7, 2009 6:30 PM
Wow that rocks!  It looks so real it could be die cast.  Did you see that pattern in any of your references?
  • Member since
    August 2008
  • From: S.W. Missouri
Posted by Pvt Mutt on Wednesday, October 7, 2009 6:37 PM

Satch I don't really remember just where I did see it because it was a few months back.

Glad you like it sir                                                                                                                     Tony the Mutt

Shoot Low Boys They're Ridin Ponys

  • Member since
    May 2005
  • From: Eugene, Oregon
Posted by hughes2682 on Wednesday, October 7, 2009 8:47 PM
Tony,
I have no idea where I've been or how I hadn't at least taken a gander at your amazing work with this one. Man, am I glad I did now! This beast just keeps getting better. It made a huge jump when you gave it the umber wash. The range poles look great. By the way what exactly are they for? I know very little about artillery. Definitely will be following this one. I was unaware that they had this is a smart kit.
Cheers
Dave

http://img.photobucket.com/albums/v317/Aaronw/Groupbuilds/ClassicAviationGB2010bomb.jpg

With enough thrust, pigs fly just fine.

  • Member since
    July 2004
  • From: Texas
Posted by wbill76 on Wednesday, October 7, 2009 10:15 PM

Nice work on the poles Tony, you've got the pattern down perfect for them!

Dave,

The range poles are used to lay the gun in order for it to fire indirect artillery missions. The arty guys will no doubt drop in and provide a more complete/technical answer but essentially it works on the principle of triangulation. The range poles provide points of reference in relation to the gun vs. where you want the rounds to go...and you use them to sight in the gun in order to be able to hit a target you can't actually see when firing indirect vs. direct for example.

  • Member since
    October 2008
  • From: Portland, Oregon
Posted by RickLawler on Wednesday, October 7, 2009 10:39 PM

Most impressive, Tony.  You've really stepped up your game.


Rick

  • Member since
    July 2003
  • From: On my kitchen counter top somewhere in central North Carolina.
Posted by disastermaster on Thursday, October 8, 2009 5:26 AM
 wbill76 wrote:

Nice work on the poles Tony, you've got the pattern down perfect for them!

http://i70.photobucket.com/albums/i82/OldieLoxx/Smileys/78451349.gif I agree; perfect.

http://www.innovationbyinstinct.com/services/hosting/clients/accountyp/status/DisasterMaster/%23t1-4.jpg

 https://i.imgur.com/LjRRaV1.png


  • Member since
    August 2008
  • From: S.W. Missouri
Posted by Pvt Mutt on Thursday, October 8, 2009 8:53 AM

WOW and Good Morning to all you wonderful people.Smile [:)]

What an unexpected surprise to find all the "At a Boy" post. I was expecting to have someone say the poles shine like a diamond in a goats butt since they are so garish. So you guys don't think they are to bright and need to be toned down any?

Thanks Bill for the explanation because I was not just real sure how they were used. Good ole Redlegs gave me a lesson on their use over on his post and I Thank him for that.

Thanks for those great compliments                                                                                          Tony the Mutt

Shoot Low Boys They're Ridin Ponys

  • Member since
    December 2006
  • From: t.r.f. mn.
Posted by detailfreak on Thursday, October 8, 2009 9:54 AM
looks alright to me Pvt.Mutt.i think there may be a nashorn for sale on the evil-bay with much the same scheme.and i believe the other spot i may have seen it is on a web site from the Dk.i f i can find it i'll share it with you.as stated before,your build is looking great and i'm looking forward to the finished product.Bow [bow]

[View:http://s172.photobucket.com/albums/w1/g-earl828/]  http://i158.photobucket.com/albums/t104/cycledupes/1000Roadwheels4BuildBadge.jpg

  • Member since
    May 2005
  • From: Eugene, Oregon
Posted by hughes2682 on Thursday, October 8, 2009 10:58 AM
Bill,
Thank you for the explanation. It made sense

Tony,
In regards to the range poles, I would think that the crew would take just as good of care of them just as they would their other equipment. Especially, if they want their rounds to go where they are supposed to while utilizing indirect fire.
"Diamond in a goats butt"... LOL

Cheers
Dave

http://img.photobucket.com/albums/v317/Aaronw/Groupbuilds/ClassicAviationGB2010bomb.jpg

With enough thrust, pigs fly just fine.

  • Member since
    August 2008
  • From: S.W. Missouri
Posted by Pvt Mutt on Thursday, October 8, 2009 11:01 AM

Thanks Greg that would be interesting to see.Approve [^]

Going in there and test out that Black4Tracks by Tank Rat,i'll keep you posted.                                Tony the Mutt

Shoot Low Boys They're Ridin Ponys

  • Member since
    August 2008
  • From: S.W. Missouri
Posted by Pvt Mutt on Thursday, October 8, 2009 2:18 PM

OK I told everyone I was going to try "Black4Tracks" from TankRats AFVdepot on my Friuls instead of "Blacken It" this time. I've used Blacken It on five sets of tracks and each time after a long soak,tooth brushing and every degreaser known to me the tracks were always covered with silver spots on the detail side. I would cover these with  heavy applications of umber oil washes. It was no big deal it just took a lot of extra drying time between coats.

Then a new product hits the market and I figured what the heck nothing ventured nothing gained so I ordered a bottle. The tracks for the Hummel would be a good test because of the very small details deep down inbetween the treads. So without farther ado lets do it.Big Smile [:D]

Tank Rat told me to just degrease with a dish washing liquid like Joy,no reason to get exotic so I did just that and I also used my old tooth brush to scrub them down front and back,rinsed and used the wife hair drier until good and dry.
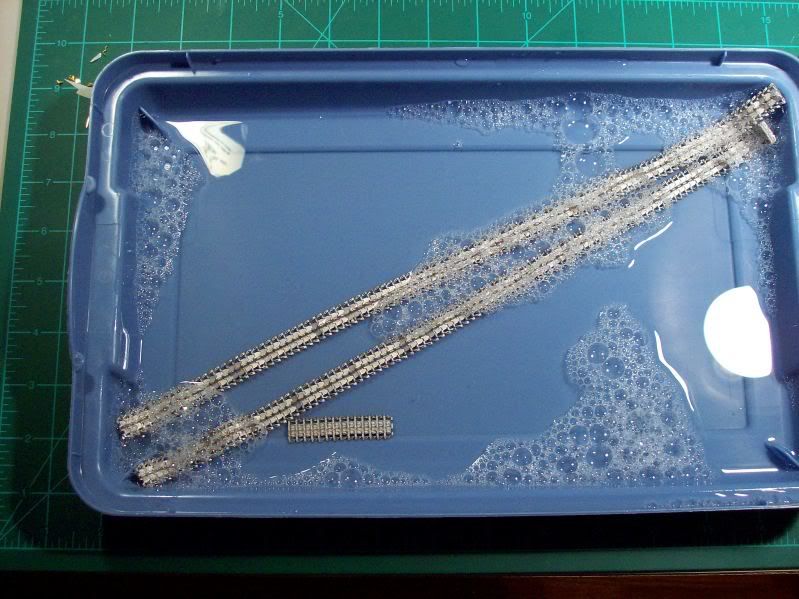
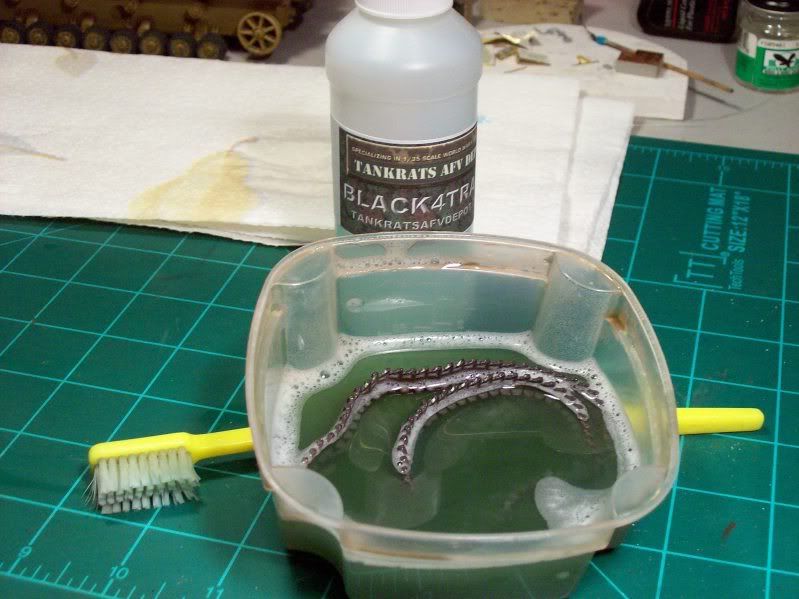
Useing a small container I poured all but about an ounce over the tracks and swished it around a little. After they begain to blacken I took them out and placed them on that blue lid you saw earlier. I dipped my tooth brush in the solution and scrubbed them down again front and back to make sure all the details were exposed to the Black4Track and put them back in the container for an another minute or so.
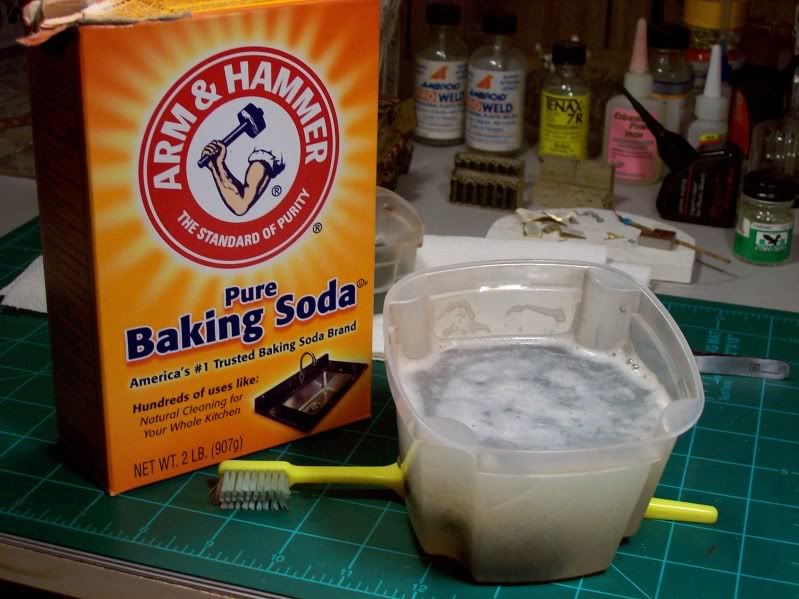
To stop the chemical reaction and neutralize the acid I mixed a teaspoon of baking soda in a glass of water in advance so it would be ready and soaked the tracks in it for a few minutes. Did the tooth brush routine and then rinsed the tracks in running water. Hair drier time again till dry.
And here are the results after maybe thirty to forty five minutes total woking time. There are a few silver spot in the deep and very small detail but nothing that a normal oil wash won't cover with one coat.

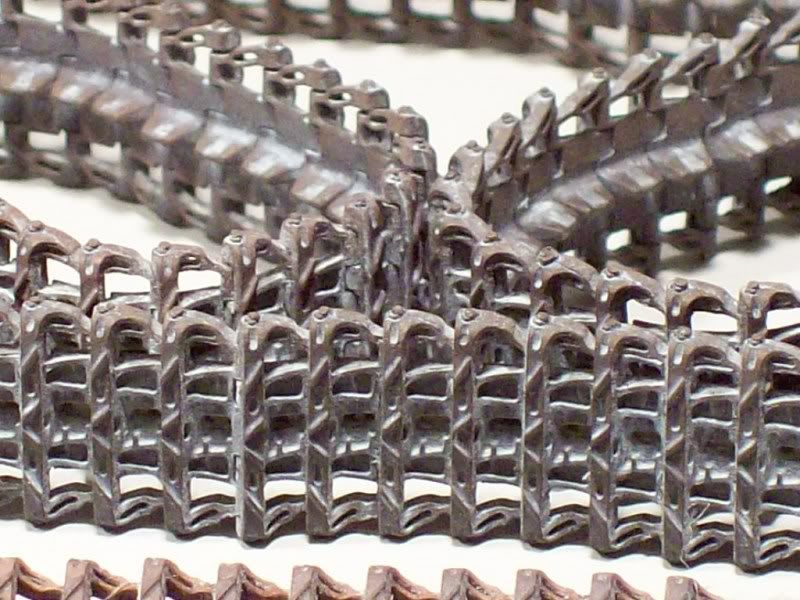
Tank Rat you've made a believer out of me your "Black4Tracks" at least for me,is a much better product for the job it does on FriulModel tracks.

This review or test was not solicited by Tank Rat or his company and i've not received any compensation  nor do I expect any.

Now I can finish in a day what used to take three or four.                                                           Tony the Mutt 

Shoot Low Boys They're Ridin Ponys

  • Member since
    August 2008
  • From: S.W. Missouri
Posted by Pvt Mutt on Friday, October 9, 2009 3:33 PM

Rain Rain go away Please.Big Smile [:D]

How's it going everybody? Got a little something to show you. Here are the tracks after one coat of Burnt Sienna oil wash for the rust effect and a couple of coats of a weaker mix Raw Umber oil wash to take the edge off the Sienna.

After I finish the weathering on the Hummel i'll use my chalks or pigment to match it on the tracks.

Well that's it for today and Thanks                                                                                             Tony the Mutt

Shoot Low Boys They're Ridin Ponys

  • Member since
    April 2009
  • From: Carmel, IN
Posted by deafpanzer on Friday, October 9, 2009 3:39 PM
Very nice job with the tracks! Thumbs Up [tup]  I can not tell the difference if it is real or not.  Thanks for the toot!  I wanted to make sure that I understood this correctly that it has to be metal tracks to make it work? 

Andy

  • Member since
    February 2009
  • From: mass,USA
Posted by scratchmod on Friday, October 9, 2009 3:45 PM

Wow those are awesome looking tracks Tony, I might get me a bottle or two of that stuff. Thanks for posting a step by step on the use of the stuff.


Rob

  • Member since
    July 2004
  • From: Texas
Posted by wbill76 on Friday, October 9, 2009 5:14 PM
Tracks look great Tony! Thumbs Up [tup]
  • Member since
    August 2008
  • From: S.W. Missouri
Posted by Pvt Mutt on Friday, October 9, 2009 5:23 PM

Yeah Andy it is for metal tracks only i'm afraid and I appreciate your comments too.Big Smile [:D]

Rob I think you'll like it if you try it and Thanks again for your "At a Boy" as well.Blush [:I]

Tony the Mutt

PS: Oooops almost missed you Bill and Thanks as always your approval goes a long way.

Shoot Low Boys They're Ridin Ponys

  • Member since
    January 2012
Posted by I make stuff on Friday, October 9, 2009 5:52 PM

Nice shoes, Tony, this is going to be a nice ride.

Thanks for the black-track write up, I wondered how it would compare, seems like it's worth a shot.

Bill 

  • Member since
    March 2003
  • From: El Dorado Hills, CA
Posted by IBuild148 on Friday, October 9, 2009 7:41 PM

mutt,

Great tutorial on the tracks. If I ever use Friuls I will use this process.

Item of note....PLEASE tell me that the toothbrush you used is not in your toothbrush holder?

I definitely like the "Burnt Sienna" oil wash you did on the tracks. I am going do this on my Sturm.

What was the mix that you used? I use Windsor Newton Oils.

As for the rain...sent it my way.

IBuildOne48

Teach modeling to youth!

Scalefinishes.com

http://i712.photobucket.com/albums/ww122/randysmodels/NMF%20Group%20build%20II/Group%20Badge/NMFIIGBbadgesmall.jpg


  • Member since
    June 2009
  • From: Joplin, Mo
Posted by figure freak on Friday, October 9, 2009 8:28 PM
Looking real nice so far, where are you at in S.W Mo, because if your in the joplin area the guys in our model club would be absolutely THRILLED to have you, i think the camo looks awsome too
  • Member since
    August 2008
  • From: S.W. Missouri
Posted by Pvt Mutt on Friday, October 9, 2009 8:32 PM

The toot was my pleasure guys.

I use the same oils IB with Terpenoid(blue label) as thinner. My mix:I'll start out with say a BB size ball of oil to about a teaspoon or so of thinner. If to weak a little more oil and if to strong a little more thinner. Keep it stirred up because this stuff separates quickly.

I can tell you right now I bet that brush is germ free.Laugh [(-D]

As for the rain I would but the jet stream is not in your favor my friend. Besides they would have to change the words to the song and it just wouldn't be the same.Smile [:)]

See You Guys Later                                                                                                               Tony the Mutt

Shoot Low Boys They're Ridin Ponys

  • Member since
    August 2008
  • From: S.W. Missouri
Posted by Pvt Mutt on Saturday, October 10, 2009 12:42 PM

Phase 3 track progress.

Is this any better? Never been around a real tank in my life just heavy tracked construction equipment. So what do you think?

Tony the Mutt

Shoot Low Boys They're Ridin Ponys

  • Member since
    May 2005
  • From: Dublin Rep Of Ireland
Posted by terry35 on Saturday, October 10, 2009 1:45 PM

Briliant work on the tracks there Tony.

Terry.

  • Member since
    December 2003
  • From: Colorado
Posted by psstoff995 on Sunday, October 11, 2009 12:52 AM
That looks awesome! The trackblack worked great- love the rusty look- and the silver really finishes it off (not that I've seen real tracks up close) Can't wait to see these guys mounted up on your Hummerl Bow [bow]

-Chris

US Army Infantryman

  • Member since
    August 2009
  • From: Cary, North Carolina
Posted by M1Carbine on Sunday, October 11, 2009 2:16 AM

Wow Tony, the tracks look AWSOME!.


Bob

  • Member since
    August 2008
  • From: S.W. Missouri
Posted by Pvt Mutt on Sunday, October 11, 2009 9:48 AM

Thanks everyone I kinda thought that I should stop right there.Approve [^]

Thanks for coming by and taking the time to tell me what you think.                                                Tony the Mutt

Shoot Low Boys They're Ridin Ponys

  • Member since
    August 2008
  • From: S.W. Missouri
Posted by Pvt Mutt on Sunday, October 11, 2009 7:51 PM

About ready to head for the finish line. All the hardware is installed and all it needs is to let it dry for another day or two then apply the flat coat and start on the chalks and pigments.

So don't go away just yet.                                                                                                        Tony the Mutt

Shoot Low Boys They're Ridin Ponys

  • Member since
    January 2007
Posted by the doog on Sunday, October 11, 2009 7:57 PM

Tony--really cool unique camo there!

I have to say that, IMO, I think the tracks look way too "new" now. They reallly looked "real" to me in the previous photo before you went all shiny with them. Of course, if the vehicle were traveling in gravel like that base you have there, they might just shine up a bit more than normal, from wear. But I"m not sure if they may be too bright now?

  • Member since
    December 2006
  • From: N. Georgia
Posted by Jester75 on Sunday, October 11, 2009 8:10 PM
Your Hummel looks fantastic Tony! I may try the new track stuff as I used Blackenit on the Friuls for my KT and there was alot of silver places left on them even after a good soaking and scrubbing in vinegar.

Eric


  • Member since
    July 2004
  • From: Texas
Posted by wbill76 on Sunday, October 11, 2009 10:07 PM

Getting closer to the finish line with this one Tony! The choice of gravel for the base is an interesting one, any particular reason for that out of curiosity?

I also noticed (and sorry I didn't catch this before) that you've got the driver's visor posed in the open position but have left the armored glass block in position. These were detachable and when the visor was open the block was removed...otherwise the driver couldn't really see out the opening in the front plate. Not sure if that's something you can address at this stage or not.

  • Member since
    September 2009
  • From: Spring Branch, TX
Posted by satch_ip on Monday, October 12, 2009 8:06 AM

Do you have an historical context for this?  IE unit, location, time frame?  I'm in a hotel so I can't look up your markings but I recognize the divisional insignia.  Just can't put my finger on it.

As for the tracks, the newness can be accounted for in many ways.  Could be a road march, could be hard surface cross country, or could be new tracks for a veteran vehicle.  Who's to say?

  • Member since
    August 2008
  • From: S.W. Missouri
Posted by Pvt Mutt on Monday, October 12, 2009 9:25 AM

Satch the marking and paint scheme are from the 2 Pz.Div. 43-44

I've done five other sets of Friuls, most all would say they are too rusty looking just like you see in the picture. I would alway lightly sand the contact high spots.

So on this set I gave a more used look to just one side, the other side is still rusty looking so i've only got to correct one side. I've worked around a lot of heavy tracked construction equipment over the years laying telephone cable around the country, mostly on the shoulder and right of way of the road or cross country.

Rock free top soil will polish up the tracks just like sand or gravel will over time. I've seen pallets of new tracks brought on the job site that looked just like the rusty ones if they were not painted from the factory.

I've never been any where near a real tank so all i've had to go by is the above experience.

Bill that base is just something I threw together to take pictures on. Made from a wall plaque and kitty litter. You know I was sitting here last night looking at that picture before you posted to see if I needed to make any adjustments and noticed that the driver couldn't see out unless that scope was removed.Confused [%-)] I thought well it's just sitting there and the view port is open to get some ventilationApprove [^]and then along comes eagle eye WildBill.Censored [censored]

That's my story and i'm stickin to it.                                                                                         Tony the Mutt


Shoot Low Boys They're Ridin Ponys

  • Member since
    July 2004
  • From: Texas
Posted by wbill76 on Monday, October 12, 2009 10:43 AM

Sounds like a good enough story from my end Tony! Big Smile [:D]

It's true that it doesn't take much to polish up the track contact points. If you look closely at photos with good lighting, you'll often see the glint of shiny surfaces even in field/cross-country circumstances. Wink [;)]

  • Member since
    May 2006
  • From: Queensbury,NY
Posted by panzer88 on Tuesday, October 13, 2009 6:21 PM
Beautiful Hummel. Those tracks look awesome as well.


JOIN OUR COMMUNITY!

Our community is FREE to join. To participate you must either login or register for an account.

SEARCH FORUMS
FREE NEWSLETTER
By signing up you may also receive reader surveys and occasional special offers. We do not sell, rent or trade our email lists. View our Privacy Policy.