SEARCH FINESCALE.COM

Enter keywords or a search phrase below:

Rolls Royce Armored Car - 1914* FINISHED

32738 views
70 replies
1 rating 2 rating 3 rating 4 rating 5 rating
  • Member since
    January 2009
  • From: Everett, WA
Posted by Schnobs on Monday, October 26, 2009 2:47 PM

Simply Elegantly Beautiful!

Fantastic Rick! Party [party]

"There is a principle which is a bar against all information, which is proof against all arguments and which cannot fail to keep a man in everlasting ignorance. That principle is contempt prior to investigation." Herbert Spencer
  • Member since
    October 2008
  • From: Portland, Oregon
Posted by RickLawler on Monday, October 26, 2009 7:48 AM

Willem,

Sorry for my late reply, I've been a little busy lately.  I'll look through my refererences and be sure to pass along anything of use ASAP.

OK, back to the Rolls....

When it came time to weather this little fellow I really felt that I needed to break from some of my usual habits.  It didn't seem appropriate to do a lot of chipping, nor would this vehicle show a lot of wear-n-tear.  I decided that this would be the perfect opportunity to see what type of finish I could achieve using oils and filters.

I began with oil dot fading, again using the colors of Faded Grey, Faded Navy Blue and Buff....

Pin washes were done along panel lines and raised features.  Rather that use a dark brown for this I decided to mix "shadow" colors to more closely match the base color.  In this case I used a varying mix of MIG Light Mud, Faded Grey, Faded Navy Blue, and Shadow Brown....


Earth colored oils were used on the lower areas of the vehicle such as the running boards and fenders for a dirty appearance.  On the left side of the vehicle I decided to leave off the spare tire so I decided to try and replicate a dirt ring where the tire would have been....

And then finally I used MIG Filters to tie it all together.......

A little more work to do, then final pictures.

Later,
Rick

WPS
  • Member since
    October 2009
  • From: Ridderkerk, the Netherlands
Posted by WPS on Wednesday, October 21, 2009 3:10 PM

Rick, I was made aware of your build by Indy.  I'm currently building the Roden kit of the 1920 pattern Rolls Royce.  This kit is nice but for the build that I'm after I still need some information.  I'm trying to mimic the picture of the car together with E. Rommel and as you can see it will need some inner detailing for a lot is opened up.

 For any pictures or information on these cars being in service during operation Crusader please respond in my topic "RRAC during Crusader", it will be appreciated.

 I've looked through this topic and am stunned by the crisp look of the resin parts.  This car being more expensive clearly shows in the finer detail.  I think you did a marvellous job on this one and I can only hope to get mine as neat.

 Willem    

Can't be done says the fool....that's why he can't.
  • Member since
    July 2004
  • From: Texas
Posted by wbill76 on Wednesday, October 21, 2009 3:01 PM
Coming along nicely Rick, like the others, I admire the wood grain effect you've got going in the bed. Really provides a nice contrast to the gray exterior.
  • Member since
    October 2008
  • From: Portland, Oregon
Posted by RickLawler on Wednesday, October 21, 2009 12:33 AM

Hey guys...thanks a bunch.


Karl, 

I mentioned it briefly above...but here is the longer version

Base color done with Vallejo Iraqi Sand and Buff, moisten surface with mineral spirits, light amount of MIG Shadow Brown and/or Wash Brown on a brush, simply drag across surface in a somewhat wavy manner.


It's that simple.  Of course, better results can be had with a little practice.  I'm really missing some of the outstanding nuances that some of the WWI aircraft guys are achieving.


Rick

  • Member since
    January 2007
Posted by the doog on Wednesday, October 21, 2009 12:02 AM
Nice, RIck--but how'd you get that wood shading?
  • Member since
    July 2006
  • From: New Jersey
Posted by redleg12 on Tuesday, October 20, 2009 9:33 PM

Sweet little guy....very nice so far

Rounds Complete!!

"The Moral High Ground....A Great Place to Emplace Artillery."

  • Member since
    February 2009
  • From: mass,USA
Posted by scratchmod on Tuesday, October 20, 2009 8:21 PM

That's one cool looking buggy Rick, looking forward to the weathering up date.

One question, how do you thin the valejo paints? It just doesn't seem to want to work for me. 


Rob

  • Member since
    January 2009
  • From: Everett, WA
Posted by Schnobs on Tuesday, October 20, 2009 8:15 PM

This is looking great Rick.  I really like the "wood" paint effects.


"There is a principle which is a bar against all information, which is proof against all arguments and which cannot fail to keep a man in everlasting ignorance. That principle is contempt prior to investigation." Herbert Spencer
  • Member since
    June 2009
Posted by Guney on Tuesday, October 20, 2009 6:23 PM
Looking very fine...Good luck for the rest...:)
  • Member since
    May 2005
  • From: Eugene, Oregon
Posted by hughes2682 on Tuesday, October 20, 2009 10:57 AM
Mr Lawler,
That has been very nicely done indeed. The bed looks like wood. Incredible!
Cheers
Dave

http://img.photobucket.com/albums/v317/Aaronw/Groupbuilds/ClassicAviationGB2010bomb.jpg

With enough thrust, pigs fly just fine.

  • Member since
    December 2008
  • From: Northern Va
Posted by psstoff995's lbro on Tuesday, October 20, 2009 8:29 AM

Looks great!

Can't wait to see her all dirtied up! Thumbs Up [tup] 

-Will young modeler Test fit master
  • Member since
    October 2008
  • From: Portland, Oregon
Posted by RickLawler on Tuesday, October 20, 2009 7:56 AM

All Righty,

Time to put some paint on the ole' buggy.

In reading about the RNAS and the Rolls A/C it isn't conclusive if the cars were painted an army green or more of a navy grey.  In addtion there were also some vary vibrant camo schemes to choose from as well.

I decided to play it "classic" with a grey scheme and limited markings. 

Base color is added using Tamiya Light Grey mixing with White....

Over top of the base color I use Vallejo colors to add color and tonal variations.....

A few shots of the finished base colors. 

I gave the model an overall misting of Future then applied the markings.  A special thanks to Tony Roberts for providing me with a nice reference photo.  The decals are small, individual numbers and letters set stolen from another project.

Thanks for looking.  Next up...weathering.

Rick

  • Member since
    October 2009
  • From: Silicon Valley
Posted by Jim McCoin on Wednesday, October 14, 2009 10:20 AM

There is a long lever mounted in the center of the dashboard that opens and closes the armored doors in front of the radiator, I have only seen one photo of the lever and no photos of the linkage through the engine bay.

Jim


  • Member since
    January 2007
Posted by the doog on Wednesday, October 14, 2009 9:06 AM

Rick, full resin, huh? You're a braver man than me, lol! It looks great, seriously!

Man, that bed looks like real wood, no lie! Outstanding!

Care to share? Whistling [:-^] What is the technique--just a simple wash, and then some subtle streaking? You really nailed it, man! Thumbs Up [tup]

  • Member since
    April 2008
  • From: Ventura (at the beach) in California
Posted by *INDY on Wednesday, October 14, 2009 8:47 AM

~Lookin' good Rick ~ Thanks for the update. Man, how clever is this?

And I thought might be the tuff part!

~How did you like Edorc's maintanance account of the ancient British car ? LOL.  Having owned both a Triumph TR6 & an MGB(on wires!) 


I know there's going to be maintanance, even modification of the original design.....but man what a handful  for this old beast.I could really relate to the fuel-jet issue BUT,  I especially liked the tech hanging under the car at speed! How Indiana Jones!

The high-speed jet was adjusted on the road at speed. The fitter used to lie on the front mudguard with legs on running board and lash himself with rope to the armoured body stay. Tools required were hanging from the engine by lengths of string.

And that wasn't even on the "most hated tasks list "!!!

~Indy

"Well...you gunna pull them pistols, or just whistle Dixie?"

  • Member since
    October 2008
  • From: Portland, Oregon
Posted by RickLawler on Wednesday, October 14, 2009 7:52 AM

Hi all,

Time is pretty short for me, so baby steps with the paintwork.  I've spent quite a bit of time recently lurking on some of the WWI aircraft building sites and have really found some of their work and techniques outstanding.  Taking a cue from them, I decided to tackle the wooded flooring first using Vallejo acrylics as the base color, then lightly washing oils over-top to add color and simulate the wood grain.  Although my results are a little weak in comparison, it'll work for this project....I need to practice this more!!!

The entire vehicle was first given a primer coating of Mr. Surfacer 1000, then the paintwork begins. 

I've then masked off the area and given the vehicle a dark "pre-shade" of Tamiya Nato Black....

More painting soon....

Thanks,
Rick

  • Member since
    August 2009
  • From: Dorset
Posted by rangie on Sunday, October 11, 2009 10:48 AM

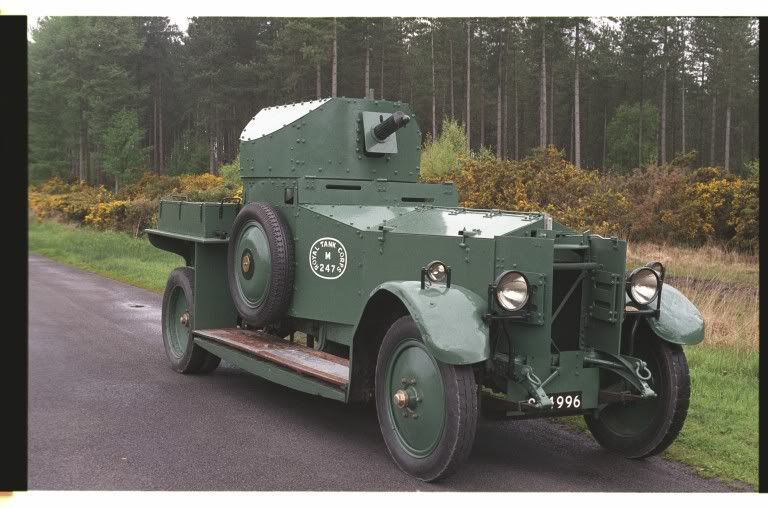
Not so comfortable when you read this account!  Also a pic of the Tank Museum Bovington car

Memories of times spent as a young Lance Corporal (fitter) in a Rolls-Royce armoured car company in India 1929-36

By J R Chapman

All cars were 1911-14 vintage with exception of one named ‘Wedding Bells', which was a 1908 Rolls-Royce.

Armament . One Vickers .303, belt feed, water-cooled, mounted in front face of turret.

Driving position . First and second drivers sat on a cushion on the floor of the car, with supporting back straps. Second drivers' duties included that of being responsible for the air pressure in the petrol tank; in event of mechanical air pump failure he operated the hand air pump.

Lighting . Low-pressure carbide lighting system. Second driver responsible for cleaning carbide container, filling container with fresh carbide and water, pricking of lights, jets, burners holes and serviceability of the lighting system feed hose. As a rule the lighting system worked perfectly when tested in daylight, but became defective as soon as the sun set.

Batteries . Removed from cars and charged in the workshop. No dynamo or starter motor fitted.

Starting . Drivers would complain if the cars would not start by simply turning the switch on top of the steering column to MAG or BATT. All drivers considered the starting handle should only be used for charging the combustion chambers and for maintenance. When priming the combustion chambers, to get a very rich mixture a penny was placed under the control arm which was clamped to the mixture jet. The jet was thus lifted out of its tube by the thickness of the penny, giving the richness required.

The high-speed jet was adjusted on the road at speed. The fitter used to lie on the front mudguard with legs on running board and lash himself with rope to the armoured body stay. Tools required were hanging from the engine by lengths of string.

Clutch . When required the clutch pedal was depressed and propped out with a piece of wood in order to soak the cone clutch lining with castor oil. The clutch pedal was usually left depressed all night.

Piston Rings . Standard type rings were too small. OS rings had to be ordered from UK.

Brakes . Hand brake shoe linings were of cast iron secured to shoes by copper rivets.

Tyres . Inflated by hand pump.

Steering . The steering geometry, or as much as was known about it in those days, had to be really accurate. If not the car developed the most alarming ‘wobble' and I have known the turret to be thrown off due to such wobble. I have known a slight bump on a dumb iron to cause a steering defect.

Jobs most disliked in workshop:

  • When the mass of controls on the bottom of the steering column and on the carburettor and ignition became worn, all holes in the yokes of the joints had to be reamed oversize and new clevis pins made and fitted.
  • Dismantling the rear axle. Bolts were so close it was not possible to use an open-jaw spanner. Sockets had not been thought of, the only thing to use was a tubular box spanner, and were those nuts tight? The unfortunate fitter always ended with no skin on his knuckles.
  • Having to spend hours adjusting the wheel spokes to true the wheel rim. We had a rig made with a dummy mounting using the wheels own mounting and locking device.
Edorc
  • Member since
    August 2008
  • From: S.W. Missouri
Posted by Pvt Mutt on Sunday, October 11, 2009 9:54 AM

Rick that is one more classy ride. Imagine going to war in a Rolls.Approve [^]Killing folks in style.

Tony the Mutt

Shoot Low Boys They're Ridin Ponys

  • Member since
    July 2006
  • From: New Jersey
Posted by redleg12 on Sunday, October 11, 2009 9:45 AM

Rick - I agree a great idea for the spokes and they look great. Overall a very nice build. Can't wait to see the painting.

The interior I thought would be a PIA if not painted first. I will be watching to see how you accomplish that task!!

Rounds Complete!!

"The Moral High Ground....A Great Place to Emplace Artillery."

  • Member since
    June 2009
  • From: Joplin, Mo
Posted by figure freak on Sunday, October 11, 2009 9:35 AM
That is freaking AMAZING work, i cant wait to see her all done!
  • Member since
    October 2008
  • From: Portland, Oregon
Posted by RickLawler on Sunday, October 11, 2009 9:28 AM

Hi everyone,

Well, despite the fairly high parts count the construction goes along fairly quickly.  Time to pull it all together.

The turret -

All of the major assembly components ready to be mated.  As I may have mentioned earlier the kit makes allowances for the bonnet to be in the open or closed position for views into the engine compartment.  In the end I decided to close the bonnet....

The final step is to recreate the spoke wheels.  I must say that I approached this with some apprehension as it looked as though this step would be delicate and complicated.  However, Resicast has provided for the most excellent of solutions!!  Simply press the photo etch spokes between the conical shaped templates...it's that easy!  After, remove the photo etch and place within the wheel along with the various spacers.

And here we are...The Rolls Royce Armored Car circa 1914

Next...the paintwork.

Take care,
Rick

  • Member since
    October 2009
  • From: Silicon Valley
Posted by Jim McCoin on Saturday, October 10, 2009 12:31 PM

Hi guy's, I just stumbled on this forum. I have mixed interests, history and films, I'm also a welder/prototype fabricator in Silicone valley.

A few years ago I did a sheetmetal "impression" of a 1914 RR Silver Ghost armoured car, I spent a lot of time on the internet looking for photos and information. If this kit was out then I wouldn't have wasted so much time.

A few things I learned was, the chassis was a standard Silver Ghost chassis turned over to some boiler maker to armor it with 1/2 and 3/8" plate, the driver did not have a seat, just a pile of grain bags stacked up to sit on, short drivers had a tall stack and tall drivers had a short stack.

A canvas strap connected to the dash board was used to support his back, the gunner had to hang on as best he could while re-loading the Vickers and filling up the radiator for gun. The turret was turned by hand.

Thr cars were sent to Belgium for a few months and then transfered to Egypt and then to Palistine, now you know the trivia I know.

Jim


  • Member since
    October 2008
  • From: Portland, Oregon
Posted by RickLawler on Thursday, October 8, 2009 12:04 AM

Learn something everyday!!!


Thanks guys for the explainations.


rick

  • Member since
    January 2008
  • From: Woodbine, MD
Posted by 666Irish on Wednesday, October 7, 2009 9:24 PM

Inverted springs isn't all that uncommon for vehicles of that era. Especially with trucks and heavier vehicles.


Think of it this way, the leaf springs in a car are designed to return the axle to it's resting position by pushing down on the axle itself. With a much heavier vehicle it is easier to invert the springs and push the chassis UP, thereby returning the axle to it's rest position.

In this instance, it is pretty much a double quarter eliptical setup. The setup here is doing both fucnctions, pushing down on the axle, and pushing up on the chassis.

She was only a whiskey maker, but he loved her still.

  • Member since
    September 2006
  • From: Dripping Springs, TX, USA
Posted by RBaer on Wednesday, October 7, 2009 10:40 AM
Upon closer examinationSign - Oops [#oops] it appears they are mounted so as to be able to bear the weight of the vehicle. Interesting setup, not something used commonly for sure. I think Traitor nailed it.

Apprentice rivet counter.

  • Member since
    September 2009
  • From: Memphis,TN
Posted by Traitor on Wednesday, October 7, 2009 8:46 AM

 RBaer wrote:
Rick, is it me or are the rear springs on up-side down? Not sure about WW1 tech, but in today's world, they look flipped......

They look weird because the center of the leaf spring is not over the axle. It looks kinda like a quarter-elliptical spring set up, but with the whole leaf pack. It was probably the cheapest way to put the axle at the very back of the chassis, there by making the most of a small cabin. But thats just my opinion....

[quote user="RESlusher"] Nothing like seeing "two palm trees humpin' a garbage can"!! That's what we called the heavy lift guys when I was on an EH-60 at Fort Carson back in '91. [/quote] I'll never look at garbage cans the same again.
  • Member since
    October 2008
  • From: Portland, Oregon
Posted by RickLawler on Wednesday, October 7, 2009 8:07 AM

 RBaer wrote:
Rick, is it me or are the rear springs on up-side down? Not sure about WW1 tech, but in today's world, they look flipped......

Hum...I'm not an expert either.  I checked the instructions again and it seems to square with their images, and the fit seems fine....so?????

Continuing, work now begins on the upper body.  The rear cargo bed, drivers area are cast as a single piece.  The flooring has a nice wooden plank texture which should be fun to paint a little later.  The smaller fittings and rear stowage lockers are moulded as seperate items.

The front fenders are a little tricky, and delicate.  If you can notice the fenders basically "float" to the sides of the chassis, as they are not affixed to any hard points.  In real life the fenders are supported by two metal brackets coming from the frame, attaching to the underside of the fenders.  On the kit, these metal brackets are represented by two strips of photo etch.  Although not a complicated affair, it did test my patience to get them lined-up and attached properly.

That's it for now...thanks for looking,

Rick

  • Member since
    September 2006
  • From: Dripping Springs, TX, USA
Posted by RBaer on Tuesday, October 6, 2009 3:16 PM
Rick, is it me or are the rear springs on up-side down? Not sure about WW1 tech, but in today's world, they look flipped......

Apprentice rivet counter.

  • Member since
    April 2008
  • From: Ventura (at the beach) in California
Posted by *INDY on Tuesday, October 6, 2009 11:18 AM

Looks like the the Resicast kit is more than twice the cost (no big suprise), Probably 3 times  with shipping as I couldn't find  it except from Euro sources (anyone know of a dealer in US?) I did find a blog on M.M. of Willem building the Rodan kit but changing the wheels out for other scratchbuilt solids!

An increadable bit of lathe work for sure, but I really want to see the wire wheels of resin kit !


"Well...you gunna pull them pistols, or just whistle Dixie?"

JOIN OUR COMMUNITY!

Our community is FREE to join. To participate you must either login or register for an account.

SEARCH FORUMS
FREE NEWSLETTER
By signing up you may also receive reader surveys and occasional special offers. We do not sell, rent or trade our email lists. View our Privacy Policy.