SEARCH FINESCALE.COM

Enter keywords or a search phrase below:

T-26 / BT-2 "WIP"

23727 views
88 replies
1 rating 2 rating 3 rating 4 rating 5 rating
  • Member since
    October 2009
T-26 / BT-2 "WIP"
Posted by PANZERWAFFE on Tuesday, December 7, 2010 9:16 PM

After about 20 kits passing over my bench trying to decide what to build figured would give this one a try, Mirage T-26 / BT 2.  These are by no means the best kits out there but it is an intresting subject.  I have read many debates that this was not a real version of the T-26 but I have found some pictures in one of my reference books with some reading to go along with it and the kit looks to be this variant.  The kit itself comes with 4 main sprues and a bag of 5 sprues of indie tracks.  The parts have poor detail, sink marks, the bottom of the hull is badly warped and the kit needs many corrections.  Here is the lay out of parts

Decided to start with the turret.  Had fit problems which lead to filling with squadron putty.  After sanding / smoothing out, all of the rivet heads had ben sanded off so went to work on new rivets. First put on the hole lay out,  drilled holes then inserted .020 styrene rod and attached with CA.  After dry cut of excess and sanded to shape.

Kit had two small hatches on the overhead, sanded those off and scibed in one large hatch on the right side.  Then put on hinges and handle.  After that built and installed the 37mm main gun and MG to the right of main gun.

With the turret done for now went to work on the hull.  Once again there was quite a bit of sanding to do.  There were some square things on the hull sides, they were right behide the fighting compartment.  After they were removed and hull sanded, all of what little detail there was had been removed.  Now begining work on rivets on the hull and replacing details.

Thats it for now, thanks for looking

Rob


Rob

  • Member since
    October 2009
  • From: Fort Collins, Colorado, USA
Posted by Njal Thorgeirsson on Tuesday, December 7, 2010 9:45 PM

I love the unique subject matter- and that you're scratchbuilding when the kit doesn't fit correctly, instead of just making it work... You gonna whitewash it?

FACEBOOK: Ryan Olson Thorgeirsson for pics of all my builds.

"There are two kinds of people in this world; those who put fries/chips on their sandwiches, and those who don't enjoy life."

PhotobucketPhotobucket

  • Member since
    October 2009
Posted by PANZERWAFFE on Tuesday, December 7, 2010 10:08 PM

Nijal - Belive it will be whitewashed, still have not decided for sure though.

Looks as if this was posted twice, please disregard the other.

Rob

  • Member since
    October 2009
  • From: South Carolina
Posted by jetmodeler on Wednesday, December 8, 2010 6:06 AM

Looks like your off to a good start.

Keep the progress coming.Big Smile


  • Member since
    April 2005
  • From: Piscataway, NJ!
Posted by wing_nut on Wednesday, December 8, 2010 7:34 AM

Looks really great.  Nice work on the rivets.  And being white plastic it looks like the whole thing is scratched.

If you add a figure, this should be your tank commander.

Marc  

  • Member since
    October 2009
Posted by PANZERWAFFE on Wednesday, December 8, 2010 6:24 PM

Steve - Thanks for stopping by.  Yes, it may be quite a project.  The intention when starting was to have an easy quick build but that will not be the case.  This one will take a little imagination and figuring what and how things need be added.

Bill - I too am happy with the rivets.  Was an easy thing to pull off.  It's good to still have you around even on a well deserved break.

Jetmodeler - Thanks for stopping in.

Marc - Now I understand why one may think that all was scratched built, did not mean to be missleading.  I so far have only added to the original kit but no real scratchbuilding.  Pinhead would make a great commander for this one.

Rob

Rob

  • Member since
    March 2003
  • From: Rain USA, Vancouver WA
Posted by tigerman on Wednesday, December 8, 2010 11:26 PM

Wow, ambitious project. Off to a great job on those rivets. After seeing your Marder, this should be great.

   http://i7.photobucket.com/albums/y269/wing_nut_5o/PANZERJAGERGB.jpg

 Eric 

  • Member since
    July 2003
  • From: On my kitchen counter top somewhere in central North Carolina.
Posted by disastermaster on Thursday, December 9, 2010 4:22 PM

http://th38.photobucket.com/albums/e121/OSOKILL/Smileys/th_th655249229c7d3a478c41a1932247b2098.gifNice spin on the rivets.

                                     http://i20.photobucket.com/albums/b232/gluetank/Decorated%20images/th_T1-4-copy.jpg

 https://i.imgur.com/LjRRaV1.png


  • Member since
    August 2009
  • From: Montreal, Quebec, Canada
Posted by total american patriot on Thursday, December 9, 2010 4:47 PM

Nice indeed on the rivets!


THE BIG CHEESE!!! - Monty Python

Photobucket


  • Member since
    August 2008
  • From: S.W. Missouri
Posted by Pvt Mutt on Thursday, December 9, 2010 5:15 PM

Oh my goodness you're building a turtle top.Crying

Tony LeeSmile

Shoot Low Boys They're Ridin Ponys

  • Member since
    November 2004
  • From: Cat Central, NC
Posted by Bronto on Thursday, December 9, 2010 6:13 PM

Good work!  Keep going at it.

  • Member since
    May 2009
Posted by F Matthews on Friday, December 10, 2010 8:29 AM

Looking good-you're right...these are not simple "shake and bake" kits, but they're kind of fun in a way.  I've build quite a few of this series, although I prefer the Zvezda/Italeri T-26 for T-26 variants.  I like your take on the rivets and am definitely going to steal that for one of the ones I have in progress!


  • Member since
    October 2009
Posted by PANZERWAFFE on Tuesday, December 14, 2010 9:08 PM

Hey, Thanks to you all for the comments.  The holidays always increase my work load, so lot of hours at work and what time I have had has been keeping an eye out for Santa.  Not muc been happening on the build.  The "want to" is there but the time has not been.  Little bit done here and there.  Here it is

Rear engine deck.  Had to grind off the original intake and exhaust vents.  This is what it did look like.

After removing those went to work on the replacements.  First a shot of the exhaust with added mesh screen and put frame around with some strip styrene.

This is the new intake also with added screen.

This last shot is the parts in place (not glued yet).  Have also scribed new panel lines in engine deck and drilled out holes all the way around the hull and engine deck in preperation for rivets.

Still a long way to go on this one.  Hope to find some more time but it may be on and off until everything gets more to normal, after the holidays.  As always, Thanks for looking.

RobSmile

Rob

  • Member since
    January 2005
  • From: in the tank factory in my basement
Posted by biffa on Tuesday, December 14, 2010 9:26 PM

Looking good, i have built a couple of kits based on the same molds (they have been reboxed a couple of times i believe) and they definitely are not shake and bake but the subjects are pretty much the only game in town this was one i always looked for but never managed to get i love what you have done so far and will be watching for more.

Ron g.
  • Member since
    July 2003
  • From: On my kitchen counter top somewhere in central North Carolina.
Posted by disastermaster on Wednesday, December 15, 2010 10:50 AM

Love it!

Love it!
http://i20.photobucket.com/albums/b232/gluetank/Decorated%20images/th_T1-4-copy.jpg

 https://i.imgur.com/LjRRaV1.png


  • Member since
    July 2004
  • From: Texas
Posted by wbill76 on Wednesday, December 15, 2010 10:55 AM

Outstanding re-work effort on the intakes Rob, definitely an improvement over the kit parts. Yes Yes

  • Member since
    October 2009
Posted by PANZERWAFFE on Wednesday, December 15, 2010 6:53 PM

Ron - Thanks for the good comments.  Your right about not having much on this subject.  I have been hopeing a new re-tooled kit by one of the better known companies would put this series out, guess I'll keep waiting for that to happen.  One pluse about these unknown companies is that they do have very intresting subjects.  Think I finally picked this one up on Ebay.

DM - Nice to have you stop by.  Thanks and glade you like.

Bill - Thanks for the encouraging words.  The main work was removing what was molded on the engine deck.  The intake used was actually an optional part but it to needed clean up some reshaping and the intake holes enlarged with screen added.  The exhaust, added the screen and a styrene frame to hold and fit the screen into place.

Rob

Rob

  • Member since
    October 2009
Posted by PANZERWAFFE on Sunday, December 19, 2010 12:47 AM

Finally getting back to the bench and able to get some work done.  Was able to get the hull togther and that alone was more labor intensive then first thought to be.  Nothing lined up correctly.  I must have put something out of alignment somewhere.  I have built another version of this same kit, T-26 A-5, and do not remember having such trouble.  As a result think there is almost as much putty as there is plastic.  The front glacis plate did not fit at all and it had many incorrect moldings so I simply removed it and made a new one.  Once puttyed and sanded marked out all of the rivet holes and went to drilling.  Now in the process of putting in the styrene rod (rivets).  This may be an extreme way to achieve this but wanted to try it.  Not sure if this will be good or bad yet until I get a little further in.  Will find out soon.  Here it is, still many more rivets to go.

Will find out within the next day if it was a sucess.

Hope everyone has a Merry Christmas!

Rob

Rob

  • Member since
    October 2009
Posted by PANZERWAFFE on Sunday, December 19, 2010 6:23 PM

Well finished up the rivets on the right side hull and I am pleased with them so riveting continues.  Now it seems as if it will not end with the rivets, too many.

One other thing that had to be corrected was the armor plate that holds the turret, the roof.  The kit came with the plate that should be used with the twin turret T-26A variant and had a piece that would fill in the right turret ring.  It should have a solid plate with the one turret ring on the left.  Searched my spare part box found the new piece, slight modification and put in place. 

Can't claim that everything is correct on this build but trying to fix what I can and so far think it is comeing out much better.

Rob

Rob

  • Member since
    July 2004
  • From: Texas
Posted by wbill76 on Sunday, December 19, 2010 7:39 PM

The hard work you're putting in on this one with the rivets is going to pay off for sure in the end once painted and weathered Rob. Keep the updates coming! Beer

  • Member since
    October 2009
Posted by PANZERWAFFE on Sunday, December 19, 2010 9:25 PM

Wild Bill, Thanks for stopping by and for the confidence in the build.  Work continues and hope to have the hull done soon.

RobBig Smile

Rob

  • Member since
    April 2009
  • From: Carmel, IN
Posted by deafpanzer on Sunday, December 19, 2010 10:44 PM

Wow  It has been fun following your WIP.  Looking forward to see more of this.  Merry Christmas friend!

Andy

  • Member since
    April 2005
  • From: Piscataway, NJ!
Posted by wing_nut on Monday, December 20, 2010 7:34 AM

That is some effort you are putting into this.  It looks like it will all pay off in the end though.

Just watch out for horny critters.

(Photo for discussions purposes only)

Marc  

  • Member since
    October 2009
Posted by PANZERWAFFE on Monday, December 20, 2010 8:15 PM

Andy - MERRY CHRISTMAS Gift  Very happy to have you and glad you like.

Marc - Censored critters Yes, think the rivets might work.

Now have all rivets in and sanded down.  Got the drivers hatch on, both vents, fenders and toolbox cleaned up and ready to go on just have to finish the bogies then it will be time to put on first coat of primer.  Comeing soon.

Thanks for stopping in

Rob

Rob

  • Member since
    March 2003
  • From: Rain USA, Vancouver WA
Posted by tigerman on Tuesday, December 21, 2010 12:08 AM

Dude that is insane stuff.

   http://i7.photobucket.com/albums/y269/wing_nut_5o/PANZERJAGERGB.jpg

 Eric 

  • Member since
    February 2009
  • From: mass,USA
Posted by scratchmod on Tuesday, December 21, 2010 11:16 AM

Holy crap Bob. Looks great so far with all the rivets added. I did the same to a model about 15 years ago, and that was it for, too much work. This baby is sure to look awesome when done.


Rob

www.scratchmod.com

  • Member since
    October 2009
Posted by PANZERWAFFE on Tuesday, December 21, 2010 11:52 PM

Tigerman - Yes, insane in the membrane Propeller

Rob - Thanks for stopping by and thanks for the great comment.  Very inspireing coming from the scratch master.

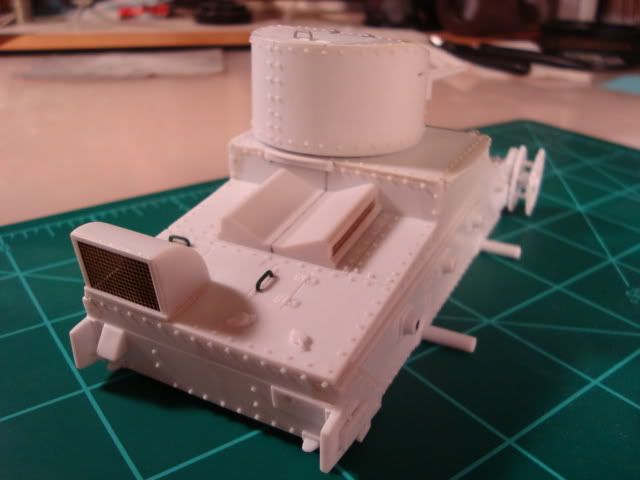
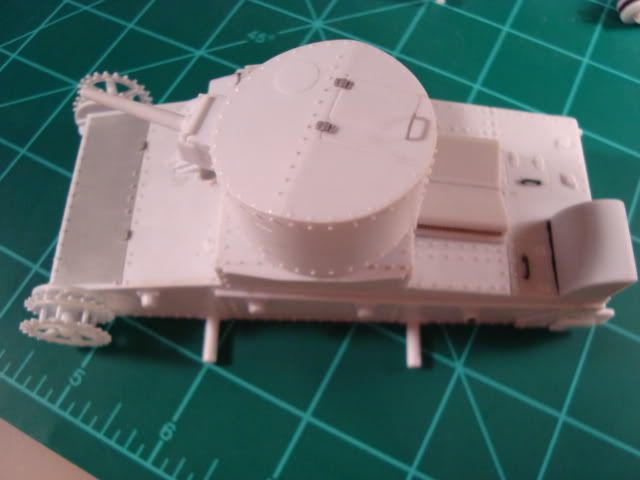
This may be the last post for a few days.  I have to go back to full work days and with the holidays dont know if I am going to be able to get back on here for a while.  Here is the update.  All rivets in and sanded with the main part of the hull complete.
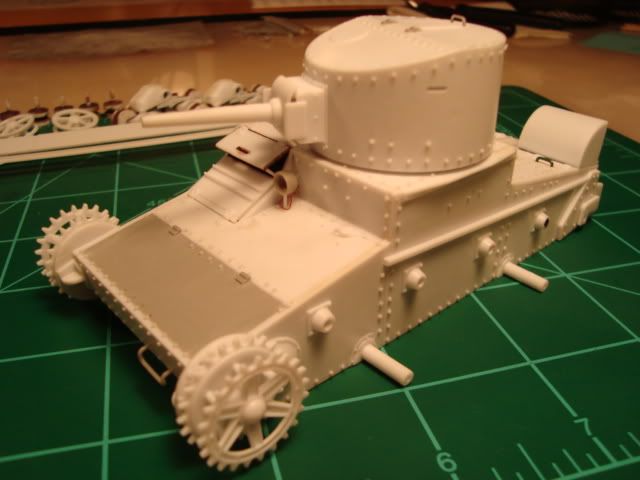
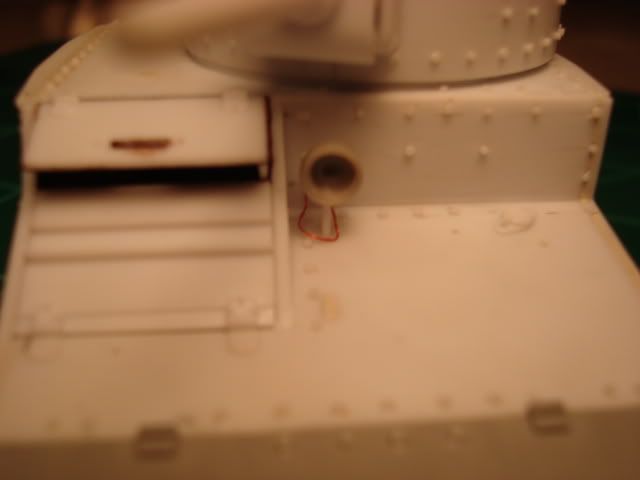
Had to shape the drivers hatch a bit to fit correctly and scratched a light.  Shaped down a piece of sprue, drilled out, drilled in a small styrene rod for a stand and finally used some copper wire from an old battery clock motor to wire up the light.  Have not made up my mind if want to fill with clear cement window maker or use MV product lens?  If I use the clear cement will try to but a bulb inside the lens.
More shots of the T-26, also now known as the "Horny Critter", thanks Marc Big Smile

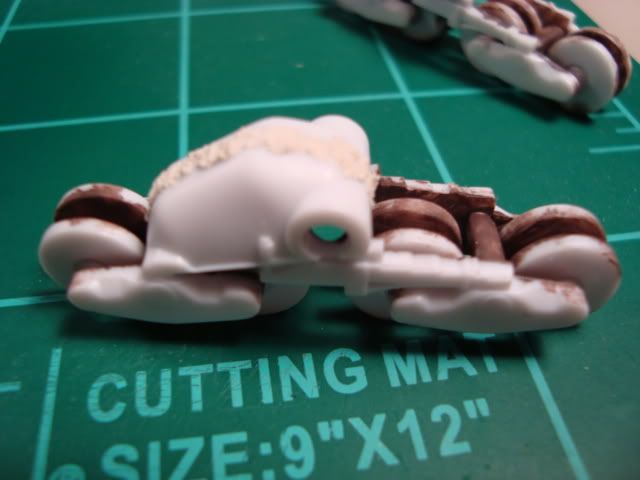
Got the bogies together but the are going to require a lot more work.
Still will have to detail the fenders, tool box and exhaust.  Still much to do.  You can see all parts in this shot not many that came with the kit so that means there are going to be some more to make. 
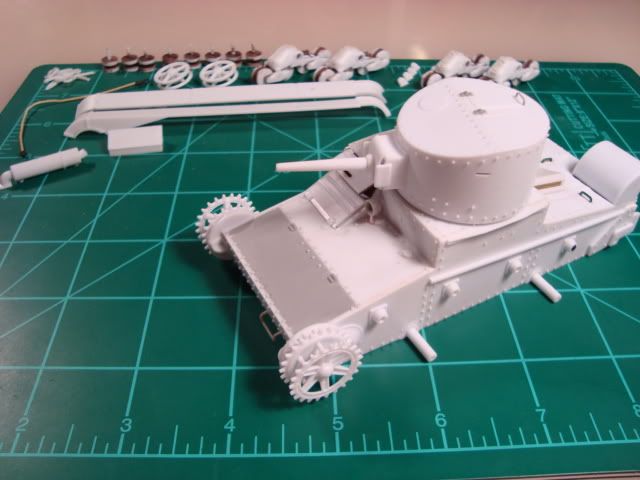
Does anyone have any good pics of any detail items?

Thanks to all for stopping in and everyone have a MERRY CHRISTMAS Gift

Rob


Rob

  • Member since
    March 2010
Posted by shoot&scoot on Wednesday, December 22, 2010 10:55 AM

Truly inspirational work!  The rivet job is a work of art and love the somewhat obscure subject matter.  Didn't know about these little guys until seeing your WIPs.  Keep up the great work and Merry Xmas!

                                                                    Pat.

  • Member since
    February 2007
  • From: Brunswick, Ohio
Posted by Buckeye on Wednesday, December 22, 2010 11:23 AM

That's some very nice work there!Yes  Wish I had your patience. 

Mike

  • Member since
    July 2003
  • From: On my kitchen counter top somewhere in central North Carolina.
Posted by disastermaster on Thursday, December 23, 2010 12:40 AM

Absolutely riveting...................

http://th224.photobucket.com/albums/dd5/lilmissmontana/smileys/th_smiley-dream.jpgA rivet counters perfect dream.

 https://i.imgur.com/LjRRaV1.png


JOIN OUR COMMUNITY!

Our community is FREE to join. To participate you must either login or register for an account.

SEARCH FORUMS
FREE NEWSLETTER
By signing up you may also receive reader surveys and occasional special offers. We do not sell, rent or trade our email lists. View our Privacy Policy.