SEARCH FINESCALE.COM

Enter keywords or a search phrase below:

I know,I know not another TIGER !!!!

25784 views
155 replies
1 rating 2 rating 3 rating 4 rating 5 rating
  • Member since
    December 2006
  • From: t.r.f. mn.
Posted by detailfreak on Saturday, June 11, 2011 10:05 AM

                            As I sit here looking at all the rivet detail on this stowage bin from ET Model I realize that they to have boogered it. Please note the rivet detali has been placed on the same side as the fold lines.

                                If you can see it in the pics you will also note the slight step along the edges to help locate the parts for soldering or glueing . I am no rocket scientist but if the pe is bent in a way so as to reveal the rivets then the fold line will be exposed on the outside and will require filling.Maybe it is just me!

                                 The rivet detail is a small divet or recess so I was thinking that I will fold this thing and solder it with the rivet detail to the inside and use some of those arcer rivets to replace them.Anyone built one of these,any suggestions? Thanks for looking.

                                                        Greg"Detailfreak"RowleyYes

[View:http://s172.photobucket.com/albums/w1/g-earl828/]  http://i158.photobucket.com/albums/t104/cycledupes/1000Roadwheels4BuildBadge.jpg

  • Member since
    October 2009
Posted by Kentucky Colonel on Sunday, June 12, 2011 7:22 AM

I don't know if this will help but here are some pictures of my Aber turret stowage bin.

  • Member since
    December 2006
  • From: t.r.f. mn.
Posted by detailfreak on Sunday, June 12, 2011 10:06 AM

                              Looks pretty good Kentucky Col. can you tell me where you scored that bin? I may need one of those also,just so I can see the differences.

                                                Greg"Detailfreak"RowleyYes

[View:http://s172.photobucket.com/albums/w1/g-earl828/]  http://i158.photobucket.com/albums/t104/cycledupes/1000Roadwheels4BuildBadge.jpg

  • Member since
    April 2009
  • From: Carmel, IN
Posted by deafpanzer on Sunday, June 12, 2011 11:36 AM

Another one?  Please check with your wife first... Big Smile

Andy

  • Member since
    October 2009
Posted by Kentucky Colonel on Sunday, June 12, 2011 1:06 PM

Pacific Coast Models but I've had it for a while so I don't know if they still have any in stock.

  • Member since
    December 2006
  • From: t.r.f. mn.
Posted by detailfreak on Monday, June 13, 2011 9:33 AM

                                   Found one of those ABER stowage bins at GREATMODELS for about ten dollars on sale.I have to get one so that I can do a comparison.Geeked

                                                 Greg"Detailfreak"RowleyYes

[View:http://s172.photobucket.com/albums/w1/g-earl828/]  http://i158.photobucket.com/albums/t104/cycledupes/1000Roadwheels4BuildBadge.jpg

  • Member since
    December 2006
  • From: t.r.f. mn.
Posted by detailfreak on Saturday, June 25, 2011 3:59 PM

                       The tale of two storage bins. This is the voyager bin(in primer) as compared to the ET Model bin in raw brass.

                    The ET bin is smaller and looks like the bin on my old Tamiya Tiger. Here it hangs on the rear of the turret.

                           Also spent a bit of time on the radio racks. In the Haynes manual it appears that three individual racks are fastened together with strap material and hung from the cieling fo the vehicle.

                        Work on the Tiger has taken a backseat so to speak as work continues on my kitchen project. Thanks for all the comments and support.Wink

                                                         Greg"Detailfreak"RowleyYes


[View:http://s172.photobucket.com/albums/w1/g-earl828/]  http://i158.photobucket.com/albums/t104/cycledupes/1000Roadwheels4BuildBadge.jpg

  • Member since
    July 2004
  • From: Texas
Posted by wbill76 on Saturday, June 25, 2011 4:48 PM

Nice to see you're able to get in some bench time here and there Greg! I'm in the middle of a month-long "repaint the house interior" summer exercise (forum regulars may recall that last year was teh outside along with expansion/remodeling) which has made it impossible to get to the bench for a while, so I envy you what you've been able to get squeezed in, the PE and soldering work is sharp! Stick out tongue

  • Member since
    December 2006
  • From: t.r.f. mn.
Posted by detailfreak on Monday, July 4, 2011 4:26 PM

                             Well ladies and gentleman,its not alot of progress but I figured any progress is worth showing. Been dividing my time between the Tigers internal bits and a Bergepanzer III for the up and running Panzer III and Variants G.B.. .As always any comments are welcome.


                               Thanks for looking all.

                                                            Greg"Detailfreak"RowleyYes

[View:http://s172.photobucket.com/albums/w1/g-earl828/]  http://i158.photobucket.com/albums/t104/cycledupes/1000Roadwheels4BuildBadge.jpg

  • Member since
    April 2009
  • From: Carmel, IN
Posted by deafpanzer on Monday, July 4, 2011 5:07 PM

The radio set looks great!  I bet they even work now... Happy July 4th buddy! Toast

Andy

  • Member since
    December 2002
  • From: Bury St Edmunds, Suffolk, England
Posted by Bish on Monday, July 4, 2011 5:17 PM

Some lovely work there. definitely putting a lot into this build. Interesting comparison of the turret bins. I have a Voyager set for one of my Tigers.

I got the Tiger Haynes Manuel last week, but have only had a quick flick through. Have you found it useful for this build.

I am a Norfolk man and i glory in being so


On the bench: Airfix 1/72nd Harrier GR.3/Fujimi 1/72nd Ju 87D-3

  • Member since
    December 2006
  • From: t.r.f. mn.
Posted by detailfreak on Monday, July 4, 2011 5:58 PM

                              Thanks Andy,and Bish as to your question,I have found the Haynes book invaluble,I do not regret that purchase one bit. Thanks for checking me out all.

                                                            Greg"Detailfreak"RowleyYes

[View:http://s172.photobucket.com/albums/w1/g-earl828/]  http://i158.photobucket.com/albums/t104/cycledupes/1000Roadwheels4BuildBadge.jpg

  • Member since
    December 2006
  • From: t.r.f. mn.
Posted by detailfreak on Thursday, August 11, 2011 10:46 AM

                         Greetings all,not much progress on the Tiger but I do have a Question about an item I picked up.TWS Tiger roadwheel hubs for removing the outer roadwheels. Anyone ever use em before? They have no instructions.It appears I will have to remove/saw a short section of the hub extension from the roadwheel and the attach the hub and the extension to the spindle.So as I mentioned,I was just checking to see if anyone had used this item before.


                                                               Greg"Detailfreak"RowleyYes

[View:http://s172.photobucket.com/albums/w1/g-earl828/]  http://i158.photobucket.com/albums/t104/cycledupes/1000Roadwheels4BuildBadge.jpg

  • Member since
    September 2006
  • From: Dripping Springs, TX, USA
Posted by RBaer on Friday, August 12, 2011 5:35 AM

I think there's an old MMiR that showed these being used, but it was a Tamiya kit, and I seem to remember the roadwheels being a little different in the way they mounted. I think your deduction is correct, based on what the DML roadwheel looks like.

I guess that wasn't any help, was it?

Apprentice rivet counter.

  • Member since
    December 2006
  • From: t.r.f. mn.
Posted by detailfreak on Friday, August 12, 2011 10:17 AM

                         RBaer,thanks for the tip.I shall definately check it out.I also compared the Tamiya roadwheel to the Dragon wheel and it would seem some surgey is inevitable.Thanks again.

                                                              Greg"Detailfreak"RowleyYes


'

[View:http://s172.photobucket.com/albums/w1/g-earl828/]  http://i158.photobucket.com/albums/t104/cycledupes/1000Roadwheels4BuildBadge.jpg

  • Member since
    December 2006
  • From: t.r.f. mn.
Posted by detailfreak on Sunday, October 9, 2011 2:20 PM

                               Wow,haven't updated this thread since aug..At the moment the only change is that I have fitted the rear plate and dry fitted the radios and transmission into place. Other than that I have all my irons in the fire and spreading the bench time pretty thin.So on to the pics.


                               Thats a close fit between the radio rack and the roof.Thanks for looking and any questions or comments are welcome.


                                                    Greg"Detailfreak"RowleyYes

[View:http://s172.photobucket.com/albums/w1/g-earl828/]  http://i158.photobucket.com/albums/t104/cycledupes/1000Roadwheels4BuildBadge.jpg

  • Member since
    July 2004
  • From: Texas
Posted by wbill76 on Sunday, October 9, 2011 4:26 PM

Nice to see this one's still getting some attention Greg. Amazing how time can get away from you isn't it? Big Smile

  • Member since
    April 2009
  • From: Carmel, IN
Posted by deafpanzer on Sunday, October 9, 2011 8:58 PM

Hey Greg!  Always looking real good especially the radios! Yes  I am afraid how many PE sheets you have for the Tiger... Big Smile

Andy

  • Member since
    April 2005
  • From: Piscataway, NJ!
Posted by wing_nut on Monday, October 10, 2011 7:50 AM

Have not checked in on this one in a while.  That's just SICK!

Marc  

  • Member since
    December 2006
  • From: t.r.f. mn.
Posted by detailfreak on Wednesday, October 26, 2011 10:15 PM

                                  So I have been reading Tigers in the Mud,by Otto Carius during my breaks at work.My question is are there better photos of this tank ,I believe the turret number was/is 312,anywhere on the web or perhaps the Bundesarchive? Any help at all would be appreciated.


                                                            Greg"Detailfreak"RowleyYes

[View:http://s172.photobucket.com/albums/w1/g-earl828/]  http://i158.photobucket.com/albums/t104/cycledupes/1000Roadwheels4BuildBadge.jpg

  • Member since
    January 2008
  • From: Bournemouth UK
Posted by Bodge on Thursday, October 27, 2011 4:56 AM

Thats looking superb mateyYes

  • Member since
    December 2010
  • From: T-34 Hunting
Posted by TheWildChild on Saturday, November 5, 2011 5:16 PM

WOW! all that PE and scratchbuilding is amazing! i am building academys early tiger 1 with the interior and that tries my patience at times, cant imagine doing all the detail work you have done. looks awesome!!!

1/35 XM77  "Sledgehammer", 1964 Chevy Impala Derby Car

Whats next? Aircraft for Ground Attack Group Build

"I dont just tackle to make a play, I tackle to break your will." -Ray Lewis

"In the end, we're all just chalk lines on the concrete, drawn only to be washed away"- 5 Finger Death Punch

"Ahh, my old enemy.......STAIRS"- Po, Kung Fu Panda

  • Member since
    December 2006
  • From: t.r.f. mn.
Posted by detailfreak on Saturday, November 5, 2011 6:05 PM

                              Bodge ,WildChild, thanks to everyone for your time. I have spent the last several evenings on and off trying to get the firewall detailed to my satisfaction. Comparing photos and drawings and such trying to get a reasonable facsimile of that area of the vehicle.WildChild the majority of the P.E. is from an Eduard set that was actually made for the kit you are working on.Very nice stuff.As for the rest of the scratchwork it is sheet styrene or brass,much of it the scraps from the P.E. frets.I'll take some snaps and post them later.The firewall is coming along ,although at somewhat of a snailspace,lots of handles knobs and switches,oh and gurtsachs/mg ammo bags 150 rds each.I messed up on the ductwork for the exhaust coolingsystem,it will be mostly hidden by the fire suppression bottle and ammo sacks when finished.The Tiger gurus will no doubt catch the blunder but I guess its a lesson learned.
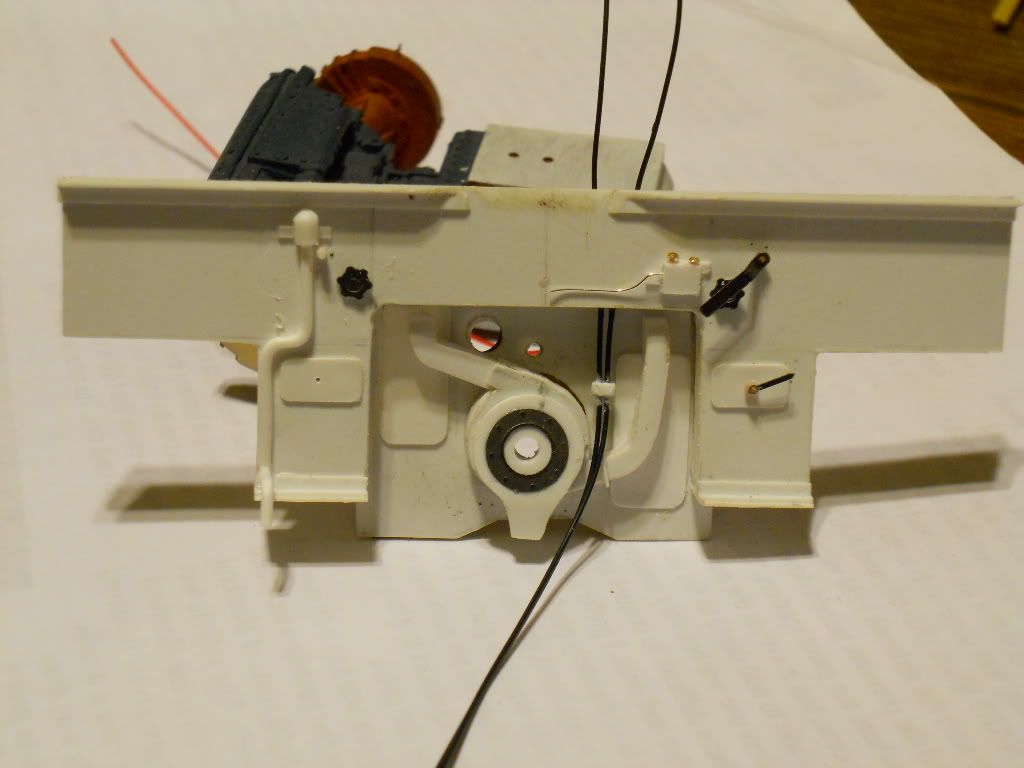
                                   The following two images were taken from the Tigerfibel and the Haynes Tiger repair manual and are for discussion purposes only.As you can see after adding the Gurtsackes not much is visible.
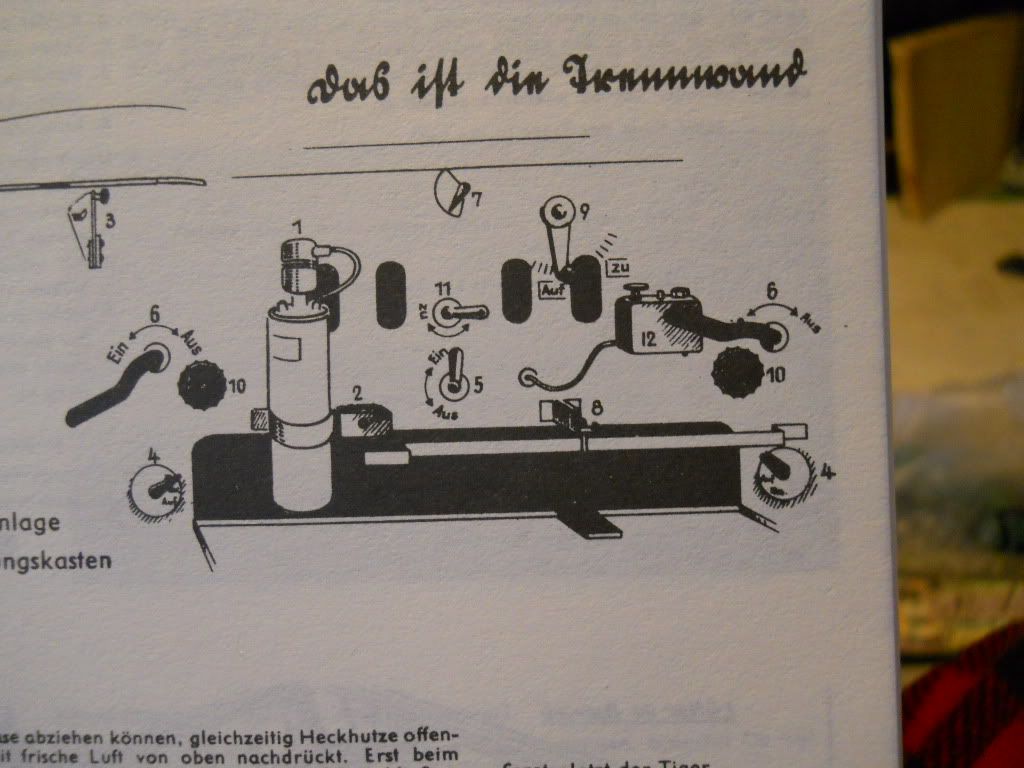
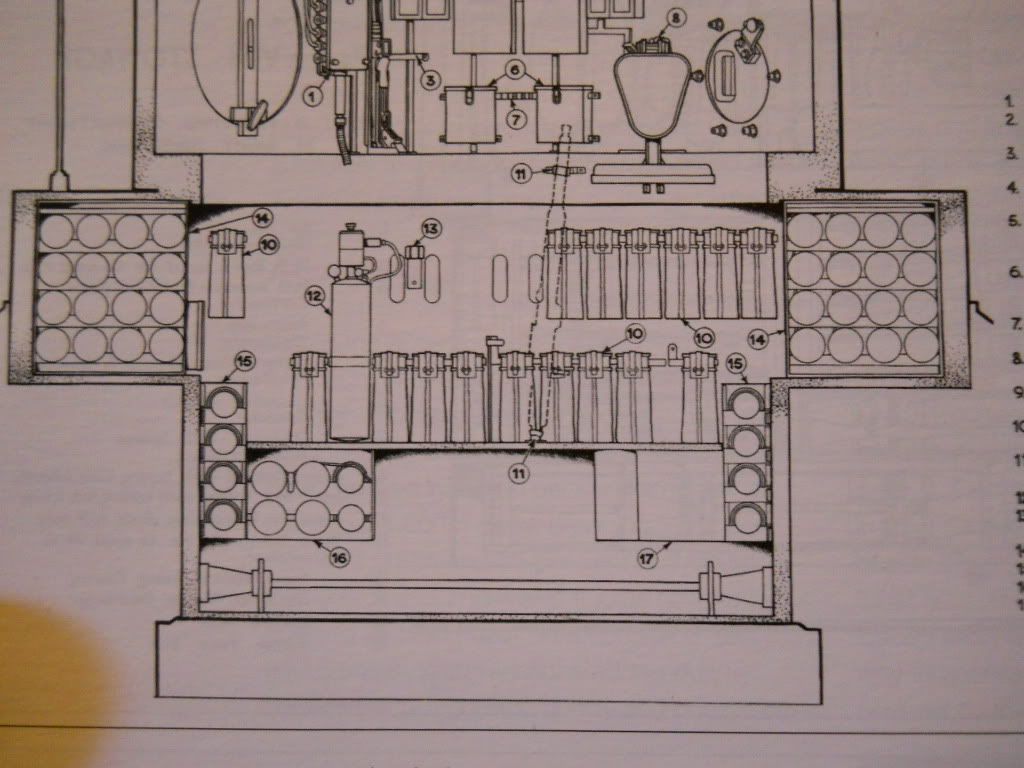
                                WildChild these are the #'s for the Eduard etch sets#35 500 which is three sheets and contains the turret basket floor and updated instructions,and the second which is bascally the same minus the turret floor is #35 134 .Please post pics of your build WildChild.


                                                           Greg"Detailfreak"RowleyYes

                            P.S. WildChild if you would like the # of the Eduard P.E. set I'll add it next posting.

[View:http://s172.photobucket.com/albums/w1/g-earl828/]  http://i158.photobucket.com/albums/t104/cycledupes/1000Roadwheels4BuildBadge.jpg

  • Member since
    December 2010
  • From: T-34 Hunting
Posted by TheWildChild on Monday, November 7, 2011 9:09 AM

it turns out i picked one heck of a project for my first 1/35 tank in the academy tiger. i am also making a diorama for it (my first real attempt) and building/painting my first figures other than the 1/48 ones that come in the revellogram aircraft kits. although i found most of the parts for the tiger pretty good (other than the gun mantlet and symmetrical turret) the academy figures were a bit disappointing. in 1/35 scale they would all be approx 6'4'' to 6'5'' tall, but i also got a set of tamiya figures just in case and found them satisfactory. (the primary purpose of getting the figure kits was to get some more of the tiger ammo, but since i had the figures i figured i would try my hand at them as well as diorama making) i will be placing my tiger in a late winter-early spring russian front diorama with the crew re-supplying the tank. i will have to look into those PE sets and thanks for the numbers. i will post pics as soon as i can, i have to make a photobucket account and then i will post them in a thread.

also Tigers in The Mud is a great book. not to be a spoiler, but i found Otto's account of destroying a sherman through a house with his Jagdtiger quite interesting. really shows the power of that 128mm gun.

1/35 XM77  "Sledgehammer", 1964 Chevy Impala Derby Car

Whats next? Aircraft for Ground Attack Group Build

"I dont just tackle to make a play, I tackle to break your will." -Ray Lewis

"In the end, we're all just chalk lines on the concrete, drawn only to be washed away"- 5 Finger Death Punch

"Ahh, my old enemy.......STAIRS"- Po, Kung Fu Panda

  • Member since
    September 2006
  • From: Dripping Springs, TX, USA
Posted by RBaer on Monday, November 7, 2011 9:21 AM

Wow, Greg. Just,...  wow.

Apprentice rivet counter.

  • Member since
    April 2009
  • From: Carmel, IN
Posted by deafpanzer on Monday, November 7, 2011 10:02 AM

Loving all of the details... hope we will be able to see all of the details when it is completed!

Andy

  • Member since
    July 2004
  • From: Texas
Posted by wbill76 on Monday, November 7, 2011 5:26 PM

Any progress is good progress Greg! Nice work on the details even if they do end up being hidden away somewhat by the MG ammo when its all said and done. Beer

  • Member since
    December 2006
  • From: t.r.f. mn.
Posted by detailfreak on Monday, November 14, 2011 10:44 AM

                                        Greetings all,a bit of an update ,if you can call it that. I was very curious to see how CMK's Tiger I transmission compared to Cornerstones and Verlinden. CMK's is just about as under scale as Verlindens,or is Cornerstones over scale??Confused  Well either way I am leaning toward the original choice of using Cornerstones.

                                     Now for a bit of a technical question. The bow gunners M.G. is supported from the roof of the fighting compartment by a spring .My question is : Does the spring attach to the head pad or to the M.G. ?


                                    Hope the pics are not to difficult to see. Still learning you know.


                                   As always any comments criticism ,constructive or not are welcome.


                                                            Greg"Detailfreak"RowleyYes

[View:http://s172.photobucket.com/albums/w1/g-earl828/]  http://i158.photobucket.com/albums/t104/cycledupes/1000Roadwheels4BuildBadge.jpg

  • Member since
    December 2010
  • From: T-34 Hunting
Posted by TheWildChild on Thursday, November 17, 2011 12:00 PM

i would think that the spring attatches to the head pad. attatching it to the gun would probably make loading and cocking the weapon difficult in my opinion.

1/35 XM77  "Sledgehammer", 1964 Chevy Impala Derby Car

Whats next? Aircraft for Ground Attack Group Build

"I dont just tackle to make a play, I tackle to break your will." -Ray Lewis

"In the end, we're all just chalk lines on the concrete, drawn only to be washed away"- 5 Finger Death Punch

"Ahh, my old enemy.......STAIRS"- Po, Kung Fu Panda

  • Member since
    December 2006
  • From: t.r.f. mn.
Posted by detailfreak on Saturday, November 19, 2011 5:05 AM

                              TheWildChild,thanks for your input.At the moment having the spring on the headpad seems to be the most logical place.As you mentioned ,it is out of the way of the feed tray cover and such.


                                                   Greg"Detailfreak"RowleyYes

[View:http://s172.photobucket.com/albums/w1/g-earl828/]  http://i158.photobucket.com/albums/t104/cycledupes/1000Roadwheels4BuildBadge.jpg

JOIN OUR COMMUNITY!

Our community is FREE to join. To participate you must either login or register for an account.

SEARCH FORUMS
FREE NEWSLETTER
By signing up you may also receive reader surveys and occasional special offers. We do not sell, rent or trade our email lists. View our Privacy Policy.