SEARCH FINESCALE.COM

Enter keywords or a search phrase below:

A Real Beute KV-1 Complete Pics p4 09-18-11

14336 views
69 replies
1 rating 2 rating 3 rating 4 rating 5 rating
  • Member since
    April 2009
  • From: Carmel, IN
Posted by deafpanzer on Tuesday, September 6, 2011 10:33 AM

Dig the camo! Yes Always wanted to try that on a 251 one day... looks like you will be able to finish it in few days. Big Smile

Andy

  • Member since
    December 2008
  • From: Northern Va
Posted by psstoff995's lbro on Tuesday, September 6, 2011 1:17 PM

I don't know how I missed the camo update. Stick out tongue Looks like this WILL be a quick build...

I wish I could put out more than a couple models a year! 

-Will young modeler Test fit master
  • Member since
    February 2003
  • From: Allentown, PA
Posted by BaBill212 on Tuesday, September 6, 2011 1:36 PM

Hi Bill,,,    wow, this is looking great. The camo, the build itself,,, all very nice!

Mostly,       thanks for sharing!

Will be watching for future updates........


Bill

Enjoy the ride!


  • Member since
    March 2003
  • From: Rain USA, Vancouver WA
Posted by tigerman on Tuesday, September 6, 2011 2:40 PM

Forgot to mention that I liked the camo as well. 

   http://i7.photobucket.com/albums/y269/wing_nut_5o/PANZERJAGERGB.jpg

 Eric 

  • Member since
    April 2005
  • From: Piscataway, NJ!
Posted by wing_nut on Tuesday, September 6, 2011 5:59 PM

Wait...what?  So I am gone for a little while and Bill starts building Russian armor?  Yeah, yeah of course it's built really well but it's... it's... not German!

Marc  

  • Member since
    July 2004
  • From: Texas
Posted by wbill76 on Wednesday, September 7, 2011 1:50 PM

Thanks guys, appreciate the comments on the camo. This one is going to be a nice "book-end" to the Wirbelwind in terms of total time to complete I think! Going to take some time with the weathering but definitely won't be a month's-long effort like last time.

Marc, nice to see you pop back in over here! if it's any consolation, it's Russian but in German service! Propeller

  • Member since
    December 2002
  • From: Bury St Edmunds, Suffolk, England
Posted by Bish on Saturday, September 10, 2011 3:39 AM

Love the look of this, and have to agree on the paint job. Have thought about something similar on a paper panzer, so nice to see how it can come out.

I am a Norfolk man and i glory in being so


On the bench: Airfix 1/72nd Harrier GR.3/Fujimi 1/72nd Ju 87D-3

  • Member since
    July 2004
  • From: Texas
Posted by wbill76 on Saturday, September 10, 2011 10:32 AM

Thanks Bish! One thing for sure when it comes to German camo, there is a lot of variety to choose from depending on time/place! Wink

  • Member since
    December 2002
  • From: Bury St Edmunds, Suffolk, England
Posted by Bish on Saturday, September 10, 2011 11:52 AM

Ye, you got that right. And one reason i like Paper panzers is that you can expand the variety.

I am a Norfolk man and i glory in being so


On the bench: Airfix 1/72nd Harrier GR.3/Fujimi 1/72nd Ju 87D-3

  • Member since
    July 2004
  • From: Texas
Posted by wbill76 on Saturday, September 10, 2011 3:36 PM

Lots of progress to report in the details department.

First up is the rear hull. The spare track links were done first, using my normal MM Metalizer Non-buffing Gunmetal base followed by a light wash of enamel Rust. A very light dry-brushing of enamel Steel was followed by some dry-brushed Burnt Umber and the links were installed into position on the fenders.

For the exhausts, they also were done with a metalizer Gunmetal base-coat but given 3 applications of the Rust wash (spaced out of course to allow the previous coats to dry thoroughly). I used some black artist pastels to darken their mouths and also put down some soot accumulation on the hull surface. This will get toned down and blended in a bit in later weathering stages.

Most challenging of all were the engine air intakes. Since these are molded as one-piece by Trumpeter and I didn't want to spend for AM PE/grills...I resorted to using optical tricks. First I applied a wash of thinned enamel Gunmetal with a small detail brush and let it dry. A 2nd wash application followed where needed to darken the "squares" in the mesh. Using the same small detail brush, I very carefully dry-brushed the hull color where the camo stripes hadn't intersected to bring the mesh back out and create a 3-d result.
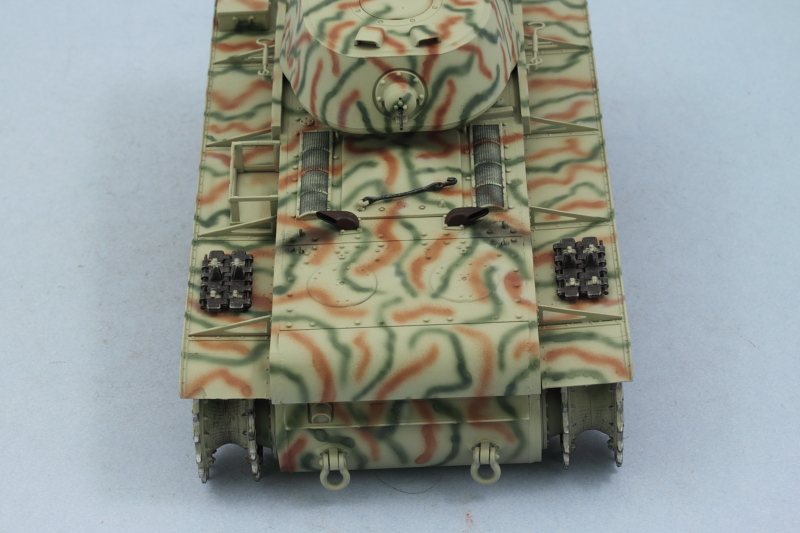
The lower hull was "pre-weathered" at this point using a round 0 sable brush and stippling some Burnt Umber to simulate scuffs/scrapes/wear. I suppose for 100% accuracy sake I could have done this with Russian Armor Green instead but the Burnt Umber just looks better in my opinion.
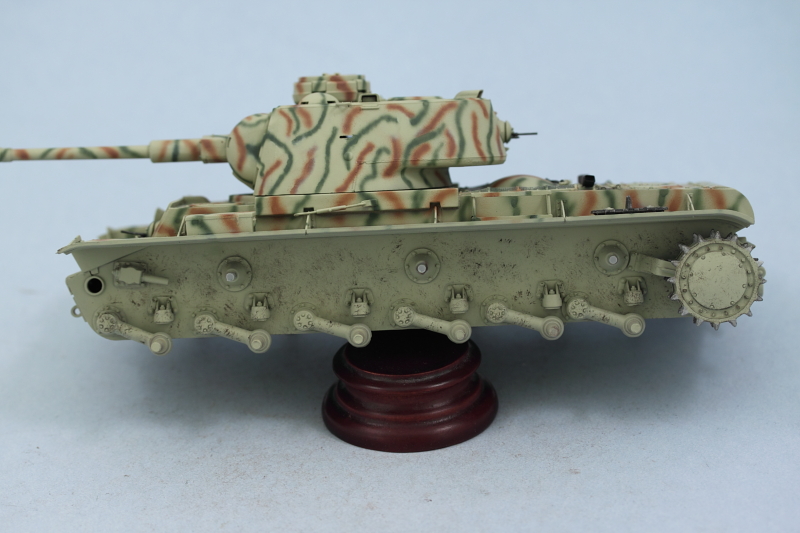
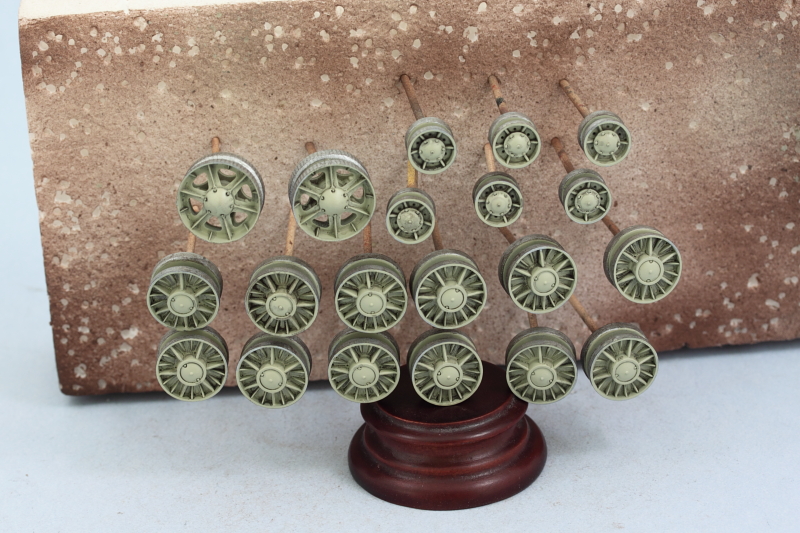
The road wheels, idlers, and return rollers also got some attention. I applied a Burnt Umber wash to the ribbed details on all the wheels and let it dry. By doing this now while they are still on the toothpicks, I got a more even finish than if I had done it when the wheels were installed. I also detailed all the bare metal surfaces using MM Non-buffing Metalizer Steel and then dry-brushing Burnt Umber over the metalizer coat.
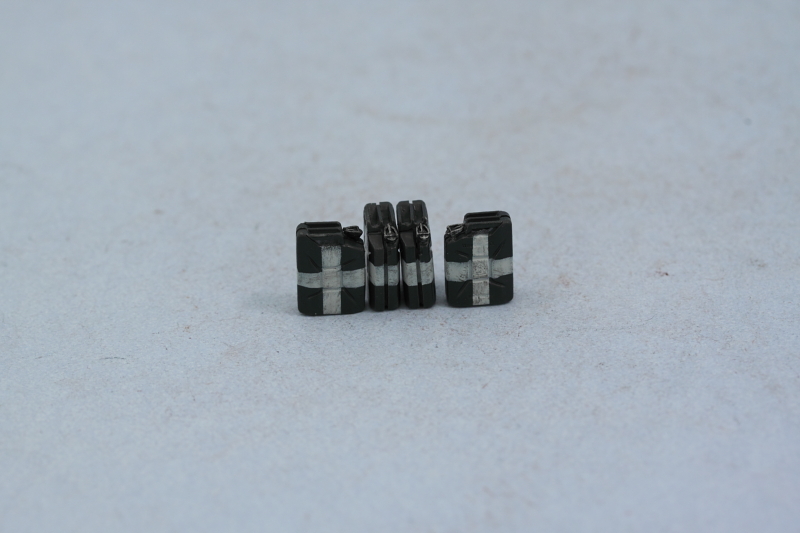
The 4 water cans for the left side were also detailed. I airbrushed a coat of Panzer Schwarzgrau and then used strips of masking tape for the water cross markings. Rather than use White (too stark), I used Light Gray instead and lightly dry-brushed some of the Panzer Schwarzgau to give it a slightly used look. The cans were then installed in their rack on the fender.
The front hull details were also taken care of. The kit supplies some very nice braided copper wire for the tow cables but you have to be careful as there's very little extra and the length of copper wire needed is 71mm per cable. I used CA gel to glue on the tow ends and then airbrushed the hull color and painted the cable portions with Metalizer Gunmetal and lightly dry-brushed with Steel. The cables aren't permanently secured to allow a little flexibility in the weathering process to work around them.

The headlight was detailed with Testors enamel Silver and the hull and turret MGs detailed as well to round things out.
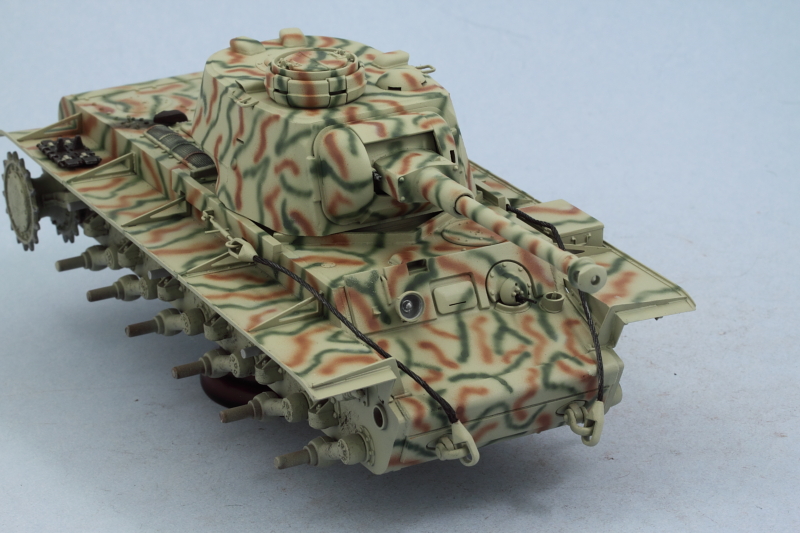
Next up will be the decals and prep for the weathering to begin.

  • Member since
    May 2005
  • From: Dublin Rep Of Ireland
Posted by terry35 on Saturday, September 10, 2011 5:43 PM

Hi, Bill I actually laughed when I clicked in to the post and realised how you zipped through this one.  Looking great.

Terry.

  • Member since
    April 2009
  • From: Carmel, IN
Posted by deafpanzer on Saturday, September 10, 2011 8:48 PM

Your Russkie tank is looking real good!  The camo is going to be a show stopper for sure...  

Jeez, it took you nearly five months to build your Wirbelwind and now you may finish your KV in 2-3 weeks.  Hope you haven't been diagnosed with bipolar or something like that? Kidding... happy to have ol' Bill Plunk back! Beer

Andy

  • Member since
    July 2003
  • From: On my kitchen counter top somewhere in central North Carolina.
Posted by disastermaster on Sunday, September 11, 2011 12:09 AM

http://th49.photobucket.com/albums/f251/WereBo/smileys/th_1thumbup.gif Tank...... what tank?

All I see is a huge bush http://th806.photobucket.com/albums/yy347/tominator06/Smileys/th_treehugger.gif

    http://i20.photobucket.com/albums/b232/gluetank/Animated/th_1-Animated-Disastermaster.gif?t=1296616998

 https://i.imgur.com/LjRRaV1.png


  • Member since
    July 2004
  • From: Texas
Posted by wbill76 on Sunday, September 11, 2011 3:17 PM

Terry, thanks as always and glad you caught it before it crosses the finish line!

BeerAndy, thanks as well and yes this one is making for a nice polar opposite to the Wirbelwind project for sure! Feels good to be back in a building groove again.

DM, now it's a bush sporting a huge German crosses! Wink See update below...they had to do something to make sure they didn't suffer from "friendly" fire with the clearly Soviet profile this vehicle has.

NFL games being shown in my area weren't engaging enough so I spent some time at the bench instead.

Applied a coat of Future via airbrush and let it set for about an hour before adding the decals. The Trumpeter markings set is very simple, 3 over-sized balkenkreuze are all that is called for. 2 for the turret and one for the hull rear. These were added and treated with Walther's Solvaset to insure they snugged down tight to the finish. Once they had set, I added a 2nd coat of Future to seal them in and protect against the coming weathering stages.

Should have this one done over the course of the next week or so depending on how things shake out.

  • Member since
    February 2009
  • From: mass,USA
Posted by scratchmod on Sunday, September 11, 2011 5:41 PM

oh yeah, more wip pics. Looks very cool Bill. nice start on the lower hull weathering as well. I agree the umber looks better than green for the chipping/scratches. Next up is my favorite part.....WEATHERING.. can't wait for those pics to pop up here.


Later

Rob

  • Member since
    December 2008
  • From: Northern Va
Posted by psstoff995's lbro on Sunday, September 11, 2011 7:23 PM

Very nice Bill!

Can't wait for the weathering stage to begin!

-Will young modeler Test fit master
  • Member since
    July 2004
  • From: Texas
Posted by wbill76 on Monday, September 12, 2011 12:21 PM

Thanks Rob and Will, appreciate the comments and support. Beer

  • Member since
    July 2004
  • From: Texas
Posted by wbill76 on Thursday, September 15, 2011 2:44 PM

Doing my best to get this one done before the BITW GB starts, so a mid-week update to report that the weathering process has begun. First step was an application of an overall wash of thinned enamel MM Raw Umber using a round 0 sable brush.

Dot filters came next. Using small dots (Flat White, Raw Sienna, Panzer Dunkelgelb) placed with a spotter brush, I blended the dots together using a very lightly thinner dampened square-tip brush. Work was done in small sections at a time and with frequent cleaning of the square brush until the entire vehicle was done.

Next came a pin wash of enamel MM Burnt Umber to bring out the details. The pin was was applied using a pointed 10/0 brush. After the wash was dry, I came back with the same brush and clean thinner and removed any tide marks or excess wash where appropriate.

I noticed a couple of spots that needed adjustment after taking the photos and those were duly addressed. Now it's on to the pigment weathering for the lower hull and tracks.

  • Member since
    March 2003
  • From: Rain USA, Vancouver WA
Posted by tigerman on Thursday, September 15, 2011 4:11 PM

Yup, all the bolts pop out nicely. Looking good.

   http://i7.photobucket.com/albums/y269/wing_nut_5o/PANZERJAGERGB.jpg

 Eric 

  • Member since
    September 2005
  • From: beacon falls , Ct.
Posted by treadwell on Thursday, September 15, 2011 7:05 PM

If the Axis would have had a 40,000 more of these, they woulda done better....

treadCool


  • Member since
    July 2006
  • From: New Jersey
Posted by redleg12 on Thursday, September 15, 2011 8:10 PM

Bill - You are a master at the German camo patterns. Very nice

Looks like you are enjoying your quickie Devil ......I know we all are Embarrassed

Rounds Complete!!

"The Moral High Ground....A Great Place to Emplace Artillery."

  • Member since
    December 2008
  • From: Northern Va
Posted by psstoff995's lbro on Thursday, September 15, 2011 10:11 PM

Continuing on your tradition of fantastic work! You make it look easy.

-Will young modeler Test fit master
  • Member since
    July 2004
  • From: Texas
Posted by wbill76 on Friday, September 16, 2011 10:20 AM

Thanks Eric! Always amazes me how much a simple pin wash can change the apperance.

Tread, no doubt! But then if they had 40k of any decent tank vehicle they would've done better...40k is about the combined total of ALL the tanks together they produced during the war. Big Smile

Mike, good to have you back posting again...and yes I'm enjoying this one, almost done!

Will, thanks as well...all it takes is patience, practice, and time! Wink

  • Member since
    July 2004
  • From: Texas
Posted by wbill76 on Sunday, September 18, 2011 12:55 PM

Work continued from where I left off previously with the weathering and the first order of business was to seal in all of the wash work and remove any remaining gloss effect from the Future coats. I applied an overall coat of Model Master Lusterless Flat lacquer via spray can. Fumes are powerful so this was done in the spray booth with the exhaust fans going full bore and while wearing a breather mask.

Now it was time for some pigment attention and I started with the lower hull. I used Mig Dark Mud pigment mixed with filtered water (with a drop of liquid dish-washing soap added to break the surface tension) and applied with an old brush.

This was left to air dry (about 20 minutes), then attacked with a wet q-tip. The Dark Mud pigment behaves more like a "stain" vs the other pigments in the Mig line and that's the effect I was going for. This built on the previous weathering attention on the lower hull and I removed virtually all of the pigment but allowed a heavier build-up to remain around the suspension arms/hubs and bump stops.

The road wheels, idlers, and return rollers were given a similar treatment off the vehicle to make it easier to work with them and get a more consistent result. Due to the numerous spokes on the road wheels, I had to work those small areas using a wooden toothpick instead of a q-tip, but otherwise the process was the same. The wheels were then installed into position on the hull.

Then it was the tracks' turn. Since they are a darker starting color, I used Mig Dry Mud for them. Applied the wet mix and let it air dry. I used an old disposable contact lens container and worked each link individually (one of the beauties of using workable tracks IMHO).

Using a combination of round and square stiff-bristled brushes, the excess pigment was removed until i had the look I wanted.

The tracks were then installed along with the idlers. The idlers were adjusted as needed before the glue set to allow for the right amount of sag on either side. I also installed the clear parts for the front headlight and rear brake light to complete the remaining little details.

Then it was off to the photo booth for the finished walk-around shots.

  • Member since
    January 2007
Posted by the doog on Sunday, September 18, 2011 1:02 PM

Well, those finished shots sold it for me, Bill--I gotta get one now! Stick out tongue

What a great looking model. A cool departure from the "normal" variants we usually see.

Excellent, as usual! Yes

  • Member since
    September 2005
  • From: beacon falls , Ct.
Posted by treadwell on Sunday, September 18, 2011 3:02 PM

Geez....I still can't get over what an axis style paint job does to my beloved KVSurprise....

Excellent as always Bill even if it didn't have all the fancy stuff that your 'truly' German builds usually have!  YesYes

great job man

treadCool


  • Member since
    April 2009
  • From: Carmel, IN
Posted by deafpanzer on Sunday, September 18, 2011 3:15 PM

Finished?  It has to be a new record!  Outstanding build! Bow Down  For the first time I like a Russian tank because it doesn't have that ugly Russian green on it.  NO offense to you my friend Trendwell. Big Smile  Your camo job really made it far better! I bet Trumpter is going to see few more KV-1 kits sold for next few weeks... thanks to you Bill!

See you in BITW GB... Beer

Andy

  • Member since
    March 2003
  • From: Rain USA, Vancouver WA
Posted by tigerman on Sunday, September 18, 2011 3:29 PM

That's a beaut indeed. I like your style Bill, it's what I try to emulate myself: weathered, but not beaten. I notice you don't do a lot of drybrushing, which is where I've gone since I started using washes, filters, and the such. Drybrushing scares me, because it can be overdone and one slip or too much paint and you have a mess.

   http://i7.photobucket.com/albums/y269/wing_nut_5o/PANZERJAGERGB.jpg

 Eric 

  • Member since
    July 2006
  • From: New Jersey
Posted by redleg12 on Sunday, September 18, 2011 4:17 PM

Bill - A nice dirt job and great work on the shoes!!  Another stunning finish.

Rounds Complete!!

"The Moral High Ground....A Great Place to Emplace Artillery."

  • Member since
    February 2009
  • From: mass,USA
Posted by scratchmod on Sunday, September 18, 2011 5:38 PM

Great finish there Bill. I thought there would be more dirt and mud, but I'm happy with what you've done here.

I'm hoping to get me a couple of those big ugly green tanks at the upcoming show. This is a motivator.


Rob

JOIN OUR COMMUNITY!

Our community is FREE to join. To participate you must either login or register for an account.

SEARCH FORUMS
FREE NEWSLETTER
By signing up you may also receive reader surveys and occasional special offers. We do not sell, rent or trade our email lists. View our Privacy Policy.