SEARCH FINESCALE.COM

Enter keywords or a search phrase below:

1/6th scale Armortek Late Tiger I Project

5023 views
10 replies
1 rating 2 rating 3 rating 4 rating 5 rating
  • Member since
    April 2005
1/6th scale Armortek Late Tiger I Project
Posted by armourguy on Tuesday, June 30, 2015 9:39 PM

It been a while since I posted on here or had any updates with my 222 project, but for the last year I have been working on a RC Late production Tiger I for a customer. The model now is in it's final phases and will soon be completed. the tank features lots of scratch built details and aftermarket parts. 
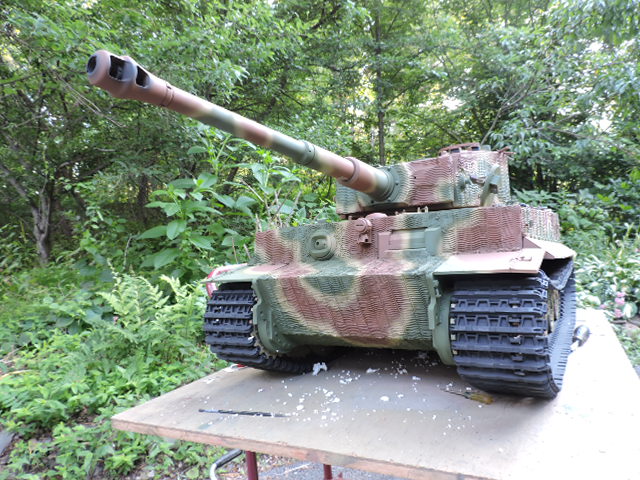
The model started off as a partially started Armortek Tiger I kit. The tank was started by antoher builder who decided to sell it off as he was not going to finish it. Like with all their kits the tank is all scale thickness aluminum. All parts are either laser cut, CNC milled, or are cast alloy.

The model was assembled as a mock up state, when I first started the project I took the tank apart to bare hull and progressed on the build from there. 

I first started with the tank's suspension. Like with all armortek german tank models the suspension is functional and uses real torsion bars instead of springs. All bare steel parts that were exposed and had surface rust on them were all cleaned off and reassembled,

the wheels were then prepainted assembled and remounted

Once the suspension was wrapped, I tuned my attention to the tank's RC equipment. The tank uses the stock armortek RC setup which works very well,

Because of the client's requirements of having the engine compartment detailing I needed to rearrange the internal layout of the electronics.

The engine compartment was completely scratch built and it's internal details were all fabricated

 https://scontent.xx.fbcdn.net/hphotos-xfp1/v/t1.0-9/10299150_292436927583691_2749505969252524923_n.jpg?oh=194dbaf9088ae89a430e8ea51c7b1d27&oe=55E828E3

Once the compartment was completed I then turned to the tank's Maybach HL230. For the engine I used my Resin HL230 kit, the engine was modded in order to have it's animations. The engine has it's flywheel and it's fan clutch drives fully functional. The exhaust manifolds are also hollow for use of the smoke system.

The fan / radiator clusters were also assembled. Like with the engine this is fully functional and is one of my resin sets

the parts were then all installed, because the tank is RC and access may be needed in the future for repairs or maintenance all parts in the engine compartment are designed to disconnect. To make things more difficult they still have to be able to function.

The tank is also fitted with a sound system and a proportional smoke system, which will all add to the realism of the model

To refill the smoke fluid the tank features an on board fuel pump. This lets the opperator refuel the system via a long hose and it will prevent any smoke fluid landing on the paint finish, the refuel ports are on the fuel fillers of the real tank.

The tank also has remote lighting, which powers both the headlight and the tail light

All of the functions are controlled under the radio operator hatch, this is also where the tank is recharged

For the tank's tin work for the fenders I used 6th scale icons Photoetch brass sets, they are very nice, but require a certain skill set to assemble them 

the side skirts are the kit ones but were cleaned off and the interior bulkheads were all added


For the top deck, the top deck is designed to be removed for maintenance purposes, 

The rest of the details were all revised, The grills and engine hatch were improved with interior detailing, tool posts were all redesigned to be more accurate, and all fastener locations were deleted. 

The tank's turret was also detailed, with improved interior detailing on the copula, and other external fittings. Mechanically the turret rotates, gun elevates, barrel recoils and flashes when fired (like a giant tamiya 1/16). 

A 6th scale Icons rear bustle bin was also used, again beautiful kit but only for really advanced builders

Before the tank was painted it went for one last pre paint test run, then off to paint

Once in paint exposed areas received a coat of primer, then everything went into dunkelgelb

For the pattern the tank is painted for SS-PZ.Abt.102 Normandy, 1944.

After the pattern the tank's markings were added. The markings are all stenciled and painted on. The pattern also got some counter shading, but was left mostly clean. This was done as per the customer's request as he wants to continue the weathering on his end.

The tank's tracks have also been painted and installed. Being made of metal and the tank being RC they will weather themselves after driven for a short distance. which should happen after these rain storms stop ;)

Currently the last of the tools and other external fittings are being painted / installed. Once mounted the model will be completed!!

More pics of the project were taken during the construction. There were all posted on the ECA facebook page

https://www.facebook.com/media/set/?set=a.215315678629150.1073741846.125690767591642&type=3

https://www.facebook.com/media/set/?set=a.449129345247781.1073741874.125690767591642&type=3

Also during the duration of the build project update videos were posted on youtube, there I go further into detail on what was done to the model and the mods that I made to it

https://www.youtube.com/playlist?list=PLd7tR3_WI_vsSbHsTMJod0zihVM20zeVU  

Once completed I'll post some final pics. 

  • Member since
    April 2013
Posted by KnightTemplar5150 on Tuesday, June 30, 2015 10:04 PM
Another sweet build, Armorguy! Very impressive!
  • Member since
    June 2013
  • From: Bay Area, CA
Posted by Reaper420 on Wednesday, July 1, 2015 3:34 AM
Where can I find a 1/6 scale tiger or other tanks? I've wanted one for some time but always have trouble finding a good website or one that actually sells them and not just showcase them. Amazing work by the way. If I ever get mine, would you be willing to be commissioned? I don't have strict time deadlines.

Kick the tires and light the fires!

  • Member since
    April 2005
Posted by armourguy on Wednesday, July 1, 2015 7:51 AM

Thanks guys,

Reaper, there are a few places to find 1/6 armor, it all depends on your budget / skill level.

Dragon put out a few 1/6th scale kits in recent years, most notability was the Panzer II , and M4A3(105)

These kits may still be found on ebay.

As for other companies, you have these listed below

Armortek

http://www.armortek.co.uk/

Field of Armor

www.fieldofarmortanks.com

Plastic Panzers

www.plasticpanzers.8k.com

There is another company out in Russia that also produces kits, they are sold through dealers, here are the two popular outlets

http://www.mark-1-tank.net/

bigtanks.de/.../bigtanks.htm

As for commission builds that can be best discussed in an email info@eastcoastarmory.com or in a PM.

  • Member since
    April 2005
Posted by armourguy on Tuesday, July 14, 2015 11:32 PM

The tank is now finished!

The last of the tools, and cables were mounted. For the tools the Armorpax kit supplied units were used, for added realism I replaced the metal handles with real wood ones.

The gun cleaning staves were also added. These too were kit supplied and the only mod I made was the addition of the swab brush.

Other misc. bits were also added like the bow MG34, turret roof periscope prism, antenna base, kit supplied armorpax resin fire extinguisher and AA gun mount

Another part that was added was the starter plate. For this model the kit supplies you with a basic plate made from CNC aluminum. Rather than upgrading the kit supplied unit I instead modded one of my early pattern plates, adding the late pattern detailing.

The new plate was molded and has been added to the catalog.

http://eastcoastarmory.com/tiger.htm

Some more markings were also added. this would include the divisional logos on the front and rear (easier seen in video), and black center on the bustle bin numbering

Once the tank was done it was taken for another final test run, which it ran well, and broke the in the track's new paint

The engine compartment was also checked and tested to see if the functions were operational, they too were working.

While filming I ran into a first when a bird laded on the tank, then flew off shortly after... guess he liked the paint job :D.

After he flew off the tank was driven some more then was placed into storage now awaiting delivery,

More pics were posted on the ECA facebook page, https://www.facebook.com/EastCoastArmory

and a final update video was posted on youtube, https://youtu.be/qSZ3pey_fZg

in addition to the new video, the entire project playlist has been rearranged in chronological order so watching the build from start to finish is now much more easier.

With the tank now officially completed, I have turned my attention back to the 222 armored car, and already have some more gun mount masters ready to mold. Once ready I will post more on that build.

I will also be starting another 1/6 commission build project that I will also post in the coming weeks, and more will follow. stay tuned!!

  • Member since
    March 2003
  • From: Rain USA, Vancouver WA
Posted by tigerman on Wednesday, July 15, 2015 2:15 AM

Superb work.

   http://i7.photobucket.com/albums/y269/wing_nut_5o/PANZERJAGERGB.jpg

 Eric 

  • Member since
    January 2006
  • From: Pineapple Country, Queensland, Australia
Posted by Wirraway on Thursday, July 16, 2015 2:34 AM

Awesome work and I am jealous of the client that has enough dough to pay for it !

"Growing old is inevitable; growing up is optional"

" A hobby should pass the time - not fill it"  -Norman Bates


GIF animations generator gifup.com

  • Member since
    November 2012
  • From: Capon Bridge West by God Virginia
Posted by feldgrau23 on Thursday, July 16, 2015 7:20 AM

What a great looking build Armourguy. that thing is huge. Would like to scare some of the neighbors dog with it!!!

  • Member since
    June 2015
Posted by Axeman on Thursday, July 16, 2015 9:13 PM

awe-inspiring build...out of curiosity,how heavy is the final product?

  • Member since
    April 2005
Posted by armourguy on Thursday, July 16, 2015 9:58 PM

All finished she comes in at around 350lbs

  • Member since
    June 2015
Posted by Axeman on Thursday, July 16, 2015 10:33 PM

350lbs

holey-moley Bow Down

JOIN OUR COMMUNITY!

Our community is FREE to join. To participate you must either login or register for an account.

SEARCH FORUMS
FREE NEWSLETTER
By signing up you may also receive reader surveys and occasional special offers. We do not sell, rent or trade our email lists. View our Privacy Policy.