SEARCH FINESCALE.COM

Enter keywords or a search phrase below:

MENG A7V "Death to the Defiler!" FINISHED PICS!

16246 views
141 replies
1 rating 2 rating 3 rating 4 rating 5 rating
  • Member since
    July 2003
  • From: On my kitchen counter top somewhere in central North Carolina.
Posted by disastermaster on Thursday, December 17, 2015 2:45 AM

DUSTER

Or a small dog wide eyed and.............

Yea.......   Somethin' Like dis?

http://1.bp.blogspot.com/_jYGEfJKYcm4/RzFlQ3BKOBI/AAAAAAAAA7c/DxugL0aI7Og/s400/smile.gif

 https://i.imgur.com/LjRRaV1.png


  • Member since
    August 2007
  • From: back country of SO-CAL, at the birth place of Naval Aviation
Posted by DUSTER on Wednesday, December 16, 2015 8:56 PM

Karl. I have been in limbo land and just discovered this gem.Bow Down You have once again succeeded in establishing a new story out of the “everyday” components of a model build.

All the kudos  are rightfully placed at your feet.  (thanks for wearing your shoes-I’m just sayin’)

The too clean-negative space problem is not an easy one to adjust without clouding your vision.  The addition of any other large element could also break the visual flow you have worked out so successfully.

As a thought though, would a drain grate help to break the paver expanse? Or a small dog wide eyed and hightailing (pun-I know, I know) it from the encounter?

SMJ has a good point as well;   the reduction to one lamp and the “forced” shadow/highlight could help create the night feeling. Though ghosts likely don’t have shadows but a soft “glow “could be used instead of their shadow which would call attention to the tagger and his shadow

  Regardless what your decide, you have a cracker-jack diorama.

This Steve is off to the sack to dream of what I could do if I had the talent; But I am taking notes.   


Steve

Building the perfect model---just not quite yet  Confused

  • Member since
    April 2007
  • From: Schroon Lake, NY
Posted by SMJmodeler on Tuesday, December 15, 2015 2:39 PM

doog:  As I expected, you had a reason for everything you did in the dio'.  

You're right, there is a "something" missing...I still think it's related to the large negative space.  I  seem to want to "scrunch" the scene together: Limit the park area, bench, grass, etc... maybe just have one "scary" light (is that what you called it")  If you had one light source you could darken the backs of the skeleton figures and focus the attention to the more lit-up vandal. Or how about casting shadows in a direction you want the viewer's eye to go (again, one light source) Make sense?

If you're trying to relay to the viewer that parks in Germany are perfectly clean you're going to have a real tough time unless there's a storyline plaque attached.  

Hope that gets the creative juices going...and thanks for your additional explaination, I sure do enjoy thinking through stuff like this.

  • Member since
    January 2007
Posted by the doog on Tuesday, December 15, 2015 1:07 PM

SMJmodeler

doog:  It's good you channeled your frustrations out this way, and I totally understand how you feel.  It has become in vogue to add graffiti to freight cars in the model railroading world and I was asked many times if that was something I did as part of my weathering...I always replied with a definitive no.  I find the graffiti to be a debasing of the property of the hardworking railroad companies and freight car manufacturers and I simply refused to add it...even if it was prototypical.  I can't even imagine the frustration I'd feel if I saw some of the great old buildings in Europe, with detailing probably never seen again, ruined by senseless graffitiAngry.  

OK, stepping down from the soapbox...

That is one fine build Karl!  The weathering effects sure do have your consistently high caliber of attention to detail and flawless execution...but what I most like is the story!  It's like the armor dio's that depict a tragic war scene...with a different take-on-it.  Never would have thought that the dead Germans still guarded their armor so intensely, great imagination...all-be-it a bit disturbingIndifferent  You haven't been spending too much time on the road lately, have you?!...Wink

Couple things:  The park feels a bit clean...I see all the dirt on the paving but I almost want this to feel like an "off-the-beaten' path memorial with the feel of a graveyard...you know, brown grass, dilapidated bench, etc.  Also, the negative space is a bit too big IMO.  The ghosts could be right on top of the kid and really add some eeriness...or maybe the dio' goes somewhat vertical and the ghosts are coming from below.  

I love the comment that was made about the lighting, if this goes to a show you should display it as night scene!

Anyway, that's my2 cents doog, always a pleasure to view your work my friend.Yes


Steve,

Thanks for looking in on this and adding your valued opinion! To be honest, you're right about a couple of things that still bother me about the dio. I agree that the openm space and park needs "something else". The problem is that I have thought and thought and wracked my brain to think of what I could add that wouldn't obstruct the line-of-sight and focal point of the scene---the vandal and his impending fate--without feeling cluttered and redundant or unnecessary. I am a stcikler for Composition, and I hate when I see a dio just thoughtlessly filled up with copious, disparate elements as if that makes a "story".

I also think that, in this case, I may be a victim of my own travels and experience in Europe and especially Germany. If you've ever been there, you know that European parks and espeically "hallowed places" like memorials are pretty much spotless. I was very consicous of that fact while composing this scene---but now, I think that while it may have been technically "accurate" modeling, it may not have been the smartest modeling. Ironically, I'm the guy who's always ready to sacrifice technical "accuracy" for "artistry"---but I have a nagging feeling that I should have minimized that former aspect in favor of the latter. The whole "backwater graveyard" idea would have been compelling, but in the end, I don't know if I could have "sold" that as "German", they being so fastidious in their society?

The other diffficult element was the lack of any elevation. Usually that helps a scene, to have variations in terrain, but this was difficult to work into the scene in any meaningful way.

I felt that it was almost pointless to fill up the green area behind the tank, as the bulk of the vehicle blocks it anyway, and most parks are just grass in Europe as I recall.

One thing that would have helped would have been a tree of some sort behind/above the tank, but I thought that would make the removal of the top very difficult. Maybe I overreached in insisting on including that option?

Anyway, something tells me that I'm not quite done with this dio. I've been waiting for something inspirational to hit me out of the blue, and maybe your suggestions will inspire something dark and fetid and disturbing to rise from my inner consciousness...? Oh one could only hope! lol Surprise...Big Smile

Thanks again for the valuable and honest critique; you know I eat that ship up! SmileYes

Oh, and it was great to read your opinion on graffiti as well! Yes

  • Member since
    April 2007
  • From: Schroon Lake, NY
Posted by SMJmodeler on Tuesday, December 15, 2015 11:46 AM

doog:  It's good you channeled your frustrations out this way, and I totally understand how you feel.  It has become in vogue to add graffiti to freight cars in the model railroading world and I was asked many times if that was something I did as part of my weathering...I always replied with a definitive no.  I find the graffiti to be a debasing of the property of the hardworking railroad companies and freight car manufacturers and I simply refused to add it...even if it was prototypical.  I can't even imagine the frustration I'd feel if I saw some of the great old buildings in Europe, with detailing probably never seen again, ruined by senseless graffitiAngry.  

OK, stepping down from the soapbox...

That is one fine build Karl!  The weathering effects sure do have your consistently high caliber of attention to detail and flawless execution...but what I most like is the story!  It's like the armor dio's that depict a tragic war scene...with a different take-on-it.  Never would have thought that the dead Germans still guarded their armor so intensely, great imagination...all-be-it a bit disturbingIndifferent  You haven't been spending too much time on the road lately, have you?!...Wink

Couple things:  The park feels a bit clean...I see all the dirt on the paving but I almost want this to feel like an "off-the-beaten' path memorial with the feel of a graveyard...you know, brown grass, dilapidated bench, etc.  Also, the negative space is a bit too big IMO.  The ghosts could be right on top of the kid and really add some eeriness...or maybe the dio' goes somewhat vertical and the ghosts are coming from below.  

I love the comment that was made about the lighting, if this goes to a show you should display it as night scene!

Anyway, that's my2 cents doog, always a pleasure to view your work my friend.Yes


  • Member since
    February 2011
Posted by knox on Saturday, September 19, 2015 8:26 AM

  I am late to the party and not sure I'm even qualified to comment, but this is an outstanding piece of work.  I find myself hoping that if the guns jam then the shovel will do the trick.  It is going to take a number of viewings to appreciate all the detail that is present.  Thank you for sharing your work.

                                                                       knox

  • Member since
    November 2007
  • From: Wisconsin Rapids, WI
Posted by moose421 on Thursday, September 17, 2015 8:11 PM

Sorry I just was able to admire your work, Karl.  Your dio is simply kick Azz.  I love the story and the you brought it to life.


Congrats on the spooktacular work.


Kim

Man I hate crappy hotel wifi.

  • Member since
    January 2013
Posted by jibber on Wednesday, September 16, 2015 6:26 AM

A while back during a photo shoot of a SW Darth Fighter, I used a flashlight as an effect because I thought some night light may look cool. I think it gave it some nice color.

Just a thought Karl. 

Terry

  • Member since
    January 2007
Posted by the doog on Tuesday, September 15, 2015 4:59 PM

Bish--thank you, man! I think I will take some pics with a black background to see how that looks, I dunno if I could capture any detail in dim light. I'm afraid it would just look washed out. I may have to wait until I get home from traveling....big plans comin up...!

Mike, thank you so much. Those are generous words. :)

BarretDuke, glad that you concur with me about the demise of Western Civilization lol. Thanks for your comments!

Bones, my hat's off to you for the great suggestion. Even my fiance' said that it was a great idea! Yes

Tankerbuilder, thank you so much! A plane would be a real challenge! I don't normally do them as it is; I'd have to research a whole new field! In any case, I"m already onto the next model--a tribute to Buddy Baker, my favorite Nascar driver as a kid, who just passed away. Watch the Auto forum in about two weeks for the build log!

Thanks once again, guys!! Big Smile

  • Member since
    August 2008
Posted by tankerbuilder on Tuesday, September 15, 2015 1:05 PM

Okay ;

    Now , do you want to do the same to a 1/48 B-25 ? If so I've got the plane and obviously you got the talent .Doog ; All I can say is Incredibly , Totally , Awesome ! ! !       T.B.

  • Member since
    March 2007
  • From: Natrona Heights Pa
Posted by Bones1977 on Monday, September 14, 2015 6:51 PM

Looks awesome Doog !! I'm happy you liked the light idea . I like the arm on the ghost coming out of the tank the bones are cool 


"To a New Yorker like you, a hero is some type of weird sandwich, not some nut who takes on three tigers."-Oddball
  • Member since
    March 2014
Posted by BarrettDuke on Monday, September 14, 2015 1:38 PM

Karl, really amazing work. Thanks for sharing it with us. And thanks for sharing your reason as well. We are certainly  moving into a difficult period in western civilization.

  • Member since
    January 2015
  • From: Tumwater, WA.
Posted by M. Brindos on Monday, September 14, 2015 12:58 PM

Karl, I admire this build far more than I can express. This is what I strive to accomplish in my own work and have not yet succeeded. My hat is off to you my friend.

- Mike Brindos "Lost Boy"

  • Member since
    December 2002
  • From: Bury St Edmunds, Suffolk, England
Posted by Bish on Monday, September 14, 2015 12:38 PM
Karl, that is absolutely stunning, you have really surpassed even your self. All the elements of this really come together nicely and I do like the composition. So many great things in there, those Plus Models items do look nice, I keep meaning to get some of there stuff. If I have understood it right this scene is meant to be at night. I think it would be nice if you could get some photo's in the dark with just some subtle lighting.

I am a Norfolk man and i glory in being so


On the bench: Airfix 1/72nd Harrier GR.3/Fujimi 1/72nd Ju 87D-3

  • Member since
    January 2007
Posted by the doog on Monday, September 14, 2015 12:27 PM

Wow, guys--to be honest, I'm a little bit humbled by all the generous comments and superlatives being throw out here, lol. I really mean that. I didn't expect such a great reaction. Thanks again to all of you who have followed along, commented, and who now took the time to give me a Yes!

Cliff, thanks buddy! Those skeletal hands were a PITA to engineer! I had to cut between the fingers with a microsaw, then thin the fingers and then mount the hands on brass wire "bones" which were drilled into the hollowed-out sleeves. Thanks for calling those out--now I feel like it was worth the effort! :)

Dave, thanks so much for such kind words. I really am humbled by the comparison, and I'm not really in agreement, but it's so generous of you to say so. Smile

Cat Daddy, Tony Lee, thanks guys, much appreciated!! Good to see you still around, Tony!

Mike B, yeah, that would be cool wouldn't it? If only I had the smarts and skills to pull that off! I thought about it, but then realized I would probably break something in frustration, lol. Thanks for the nice comment!

Steve, thanks so much, and for the cool graphic too, lol. You're always a reliably consistent guy to make us smile and I thak you for your consistency in following along and offering advice and encouragement!

Eric, lol, oh, you noticed that tattoos, huh? Great! I was wondering if anyone would see them? Yeah, not my thing, but I figured they fit the profile, lol...thanks man!!

Mike--you get off that Facebook!! Wink Hey, thanks for looking in here and promise us you won't disappear! You're an old salt here, and it wouldn't be the same without you. Thanks as always for your kind words! And Gerhardt says "woof!"!

Terry, thank you as well for your generous compliments. I wish I could just get those stupid stores closed somehow; it's unbelievable to me that anyone would encourage such destruction for such foolish reasons!

Tojo, thanks too, and for following along here! I shall be writing this one up in the future!

Thanks too, Silent Bob! I am pleased to hear that you took something modeling-related from my methods here. That's a side-benefit to doing these blogs here in the armor forum; you reach people who are in the mainstream forums, not just members of any given Group Build. Thanks for taking the time to comment, and for your words!

Thanks again, guys! I genuinely appreciate everyone who has looked in!! YesBeer


  • Member since
    February 2014
  • From: Michigan
Posted by silentbob33 on Monday, September 14, 2015 11:53 AM
Karl, your diorama is simply amazing. I'm awed by your techniques. The storytelling is great, as is your attention to the smallest detail. When I try to do a diorama I never think about the little things like roughing up the terrain a bit or adding bits of litter. Outstanding work.

On my bench: Academy 1/35 UH-60L Black Hawk

  • Member since
    March 2003
  • From: Western North Carolina
Posted by Tojo72 on Monday, September 14, 2015 7:57 AM
Another fantastic finish Karl,I fully expect to see it in an future FSM article.great work.

  • Member since
    January 2013
Posted by jibber on Monday, September 14, 2015 7:23 AM

This takes what we do to a whole other level and what you do to genius. I've always thought that what makes a great piece of art is that any one thing, by itself, can stand alone. Karl you've skillfully combined every aspect of your work, all the techniques, the imagery and the vision to make what I think is a perfect piece of art. 

Maybe you should print some up stickable posters, and next time over cover their filth with them. Better yet, paper the front of that vile store who makes money out of destruction. 

Karl congratulations I think this one will be around a while.

Terry  

  • Member since
    July 2006
  • From: New Jersey
Posted by redleg12 on Monday, September 14, 2015 6:01 AM

Karl

I have been off the grid here  at FSM for a bit....I return to see this work of art. Outstanding. Love the concept of this work of art. You never cease to amaze. Proof as always you are still king of the finish! Give Gerheart a good belly rub for me!

Rounds Complete!!

"The Moral High Ground....A Great Place to Emplace Artillery."

  • Member since
    March 2003
  • From: Rain USA, Vancouver WA
Posted by tigerman on Monday, September 14, 2015 1:39 AM

Beautiful work Karl. Love the scene and detail. I even like the tat on the guys leg. Ha-ha.

   http://i7.photobucket.com/albums/y269/wing_nut_5o/PANZERJAGERGB.jpg

 Eric 

  • Member since
    July 2003
  • From: On my kitchen counter top somewhere in central North Carolina.
Posted by disastermaster on Monday, September 14, 2015 12:55 AM


Hey Karl,


  I just can’t help but see “skilled art” in every aspect of this project. This time you've exceeded your last incursion into haunted tank territory by leaps and bounds - repeatedly proving that the more you work at this hobby, the better you can get.


  There isn’t anything here in this build that just doesn’t look grand.
 You are an extremely valuable credit to this forum.


............ you sly doog.
                                                                                                                                                    http://1.bp.blogspot.com/_jYGEfJKYcm4/RzFlQ3BKOBI/AAAAAAAAA7c/DxugL0aI7Og/s400/smile.gif

 https://i.imgur.com/LjRRaV1.png


  • Member since
    January 2015
  • From: Tumwater, WA.
Posted by M. Brindos on Sunday, September 13, 2015 9:03 PM

Karl... This is awesome!!!  :D:D:D

The only thing that would improve it would be glow paint and UV LED's in the lights. Tell me there's a glass case for this display!

- Mike Brindos "Lost Boy"

  • Member since
    August 2008
  • From: S.W. Missouri
Posted by Pvt Mutt on Sunday, September 13, 2015 8:18 PM

Karl you are

Well you are

My friend amazing you areToast

Tony lee

Shoot Low Boys They're Ridin Ponys

  • Member since
    August 2015
Posted by Cat Daddy on Sunday, September 13, 2015 8:06 PM

Mere words cannot express how much I love this diorama. Wonderful and inspiring work.

  • Member since
    February 2010
  • From: Maine
Posted by Stage_Left on Sunday, September 13, 2015 7:17 PM

Karl- this is absolute brilliance, in vision and execution. We all know the names of Shep Paine, Francois Verlinden, etc. who are legends of model building and storytelling, and I daresay that your efforts are on par with theirs.

Dave

  • Member since
    November 2009
  • From: SW Virginia
Posted by Gamera on Sunday, September 13, 2015 6:41 PM

Thanks Karl, you're going to give me friggin' nightmares!!! Indifferent

Absolutly spectacular work, I only now noticed how you'd given the ghost troopers skelital hands to go with their skull heads, I love all the little details like that!

"I dream in fire but work in clay." -Arthur Machen


  • Member since
    January 2007
Posted by the doog on Sunday, September 13, 2015 6:00 PM

Bones1977

I don't post much but I got to say this is pretty awesome !!! It's would be cool to paint the lens on the the street lights a bright neon green to make it look more spooky !


Thanks for that awesome suggestion, Bones! I'm sorry that it took me a while to get back to you on it, but I've been consumed with finishing this and have been working hard to get it done. I have to thank you for this great piece of advice, which I have used in the diorama, and I think it adds an extra level of spookiness to it!

Here are the last steps and finished photos!

I painted the Plus Models street lamps with a craft store acrylic mix--details in the article to be written soon--and then added a dash of white to the mix to paint the squiggle texture on the lamps. It kinda looks like marble to me. The white of the lanterns was again craft store acrylic, with a trimming of yellow and bright green to impart that eerie glow as suggested by Bones. Testor's enamel Brass was used for the trim. Here, I'm making a base for the lamps to slide into and which will be then placed in the grass.
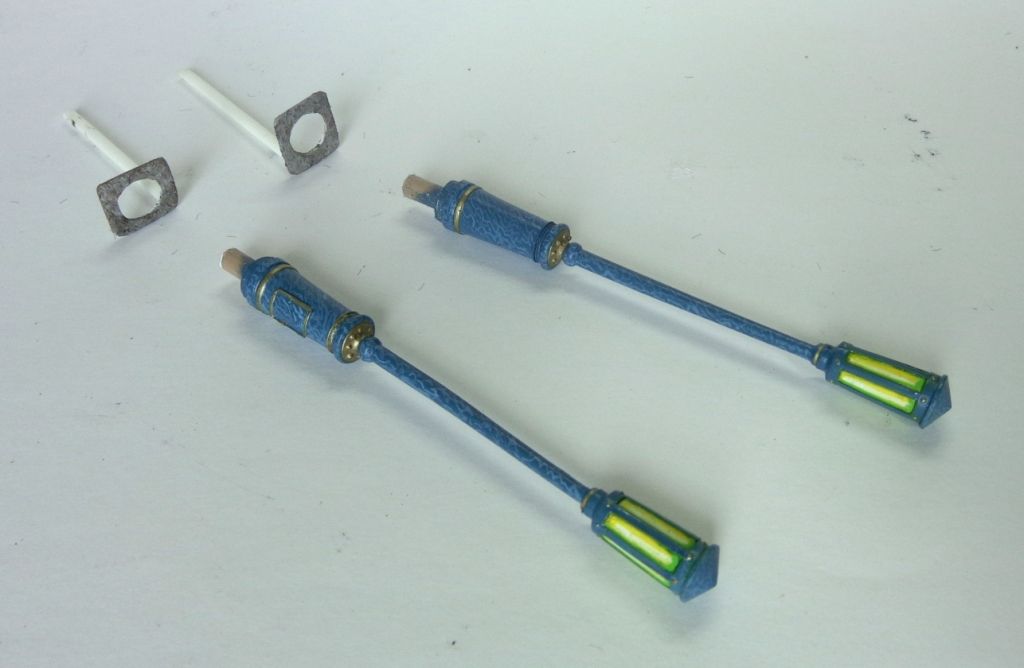
I'm using a Dremel tool to scrape away a place for the lamp base.
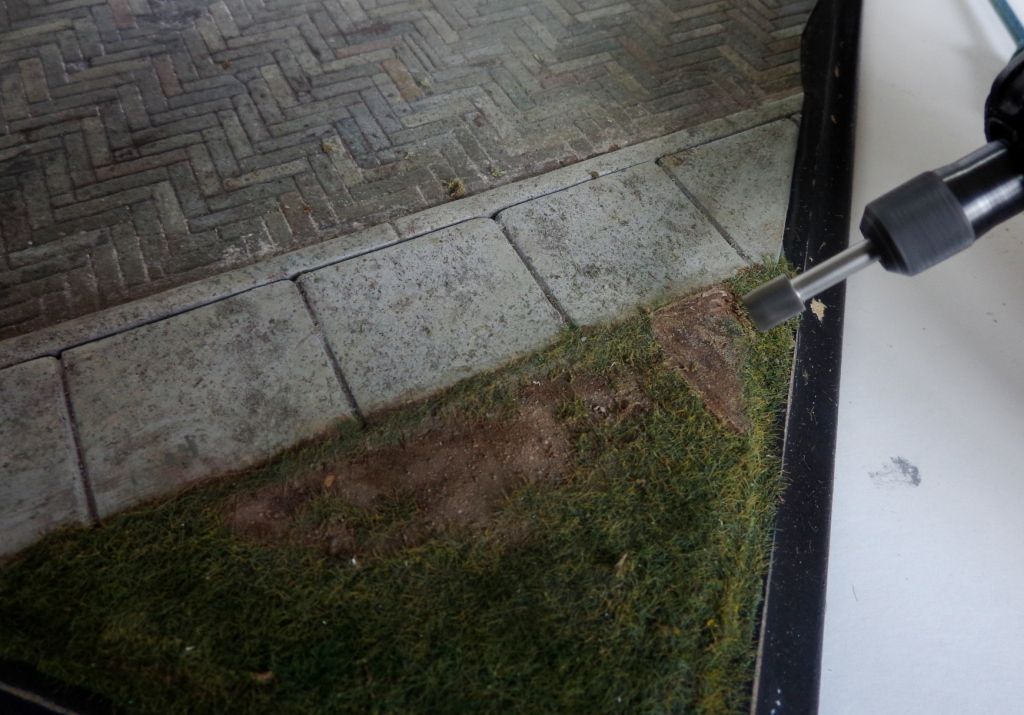
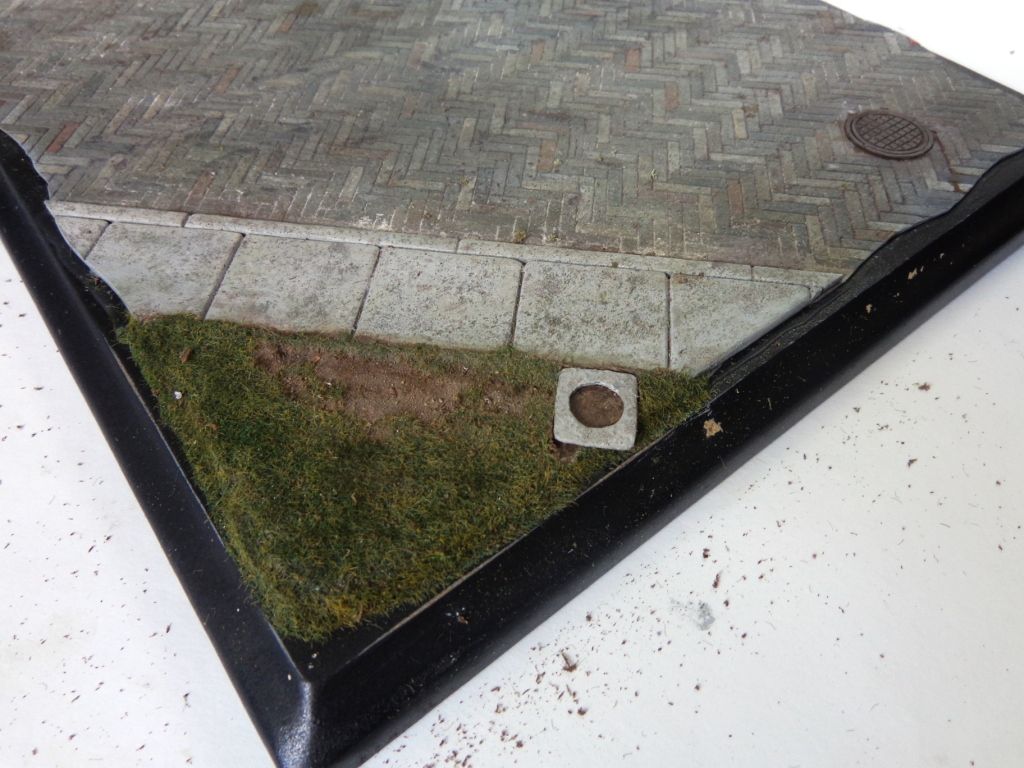
The base in place. I drilled holed for the lights and epoxied them in, and then used superglue to fill in around the edges with some more grass powder.
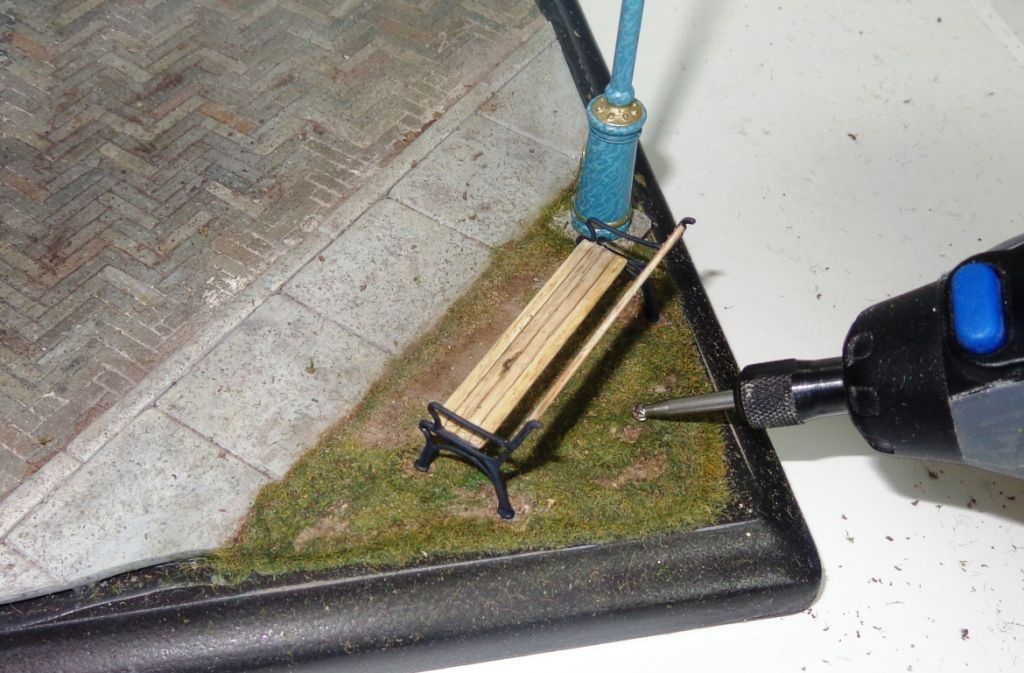
After installing the park bench (Mini Art), I use the Dremel again to rough up the ground for realism.
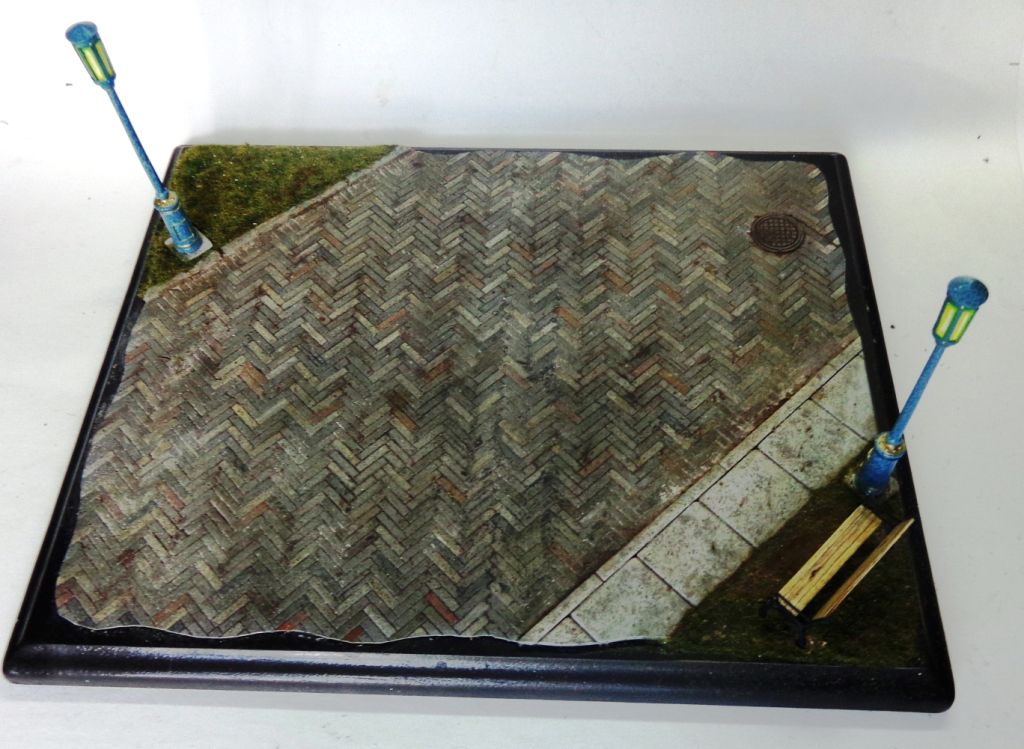
The base awaiting the elements.
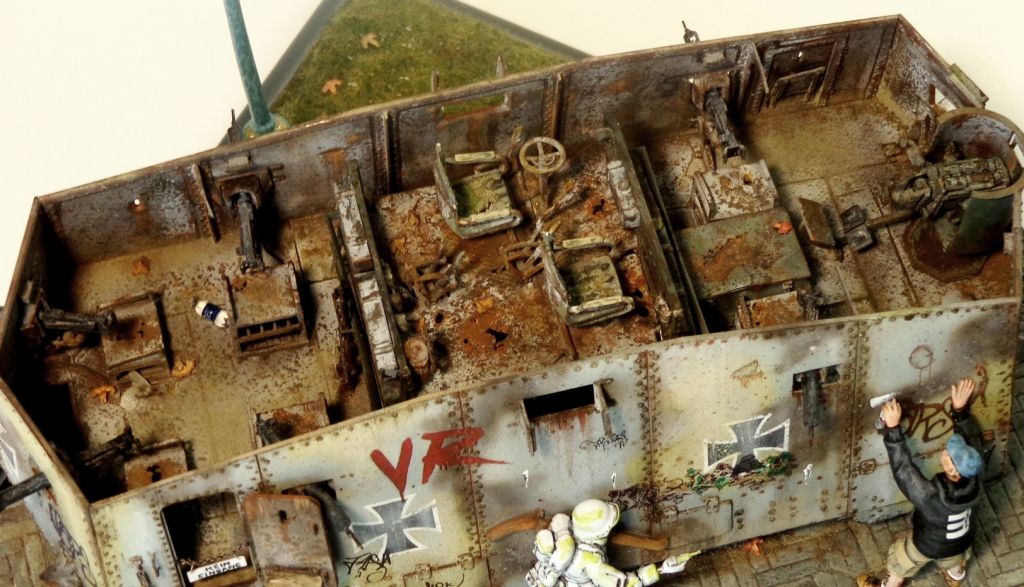
The finished diorama: "Death to the Defiler!"
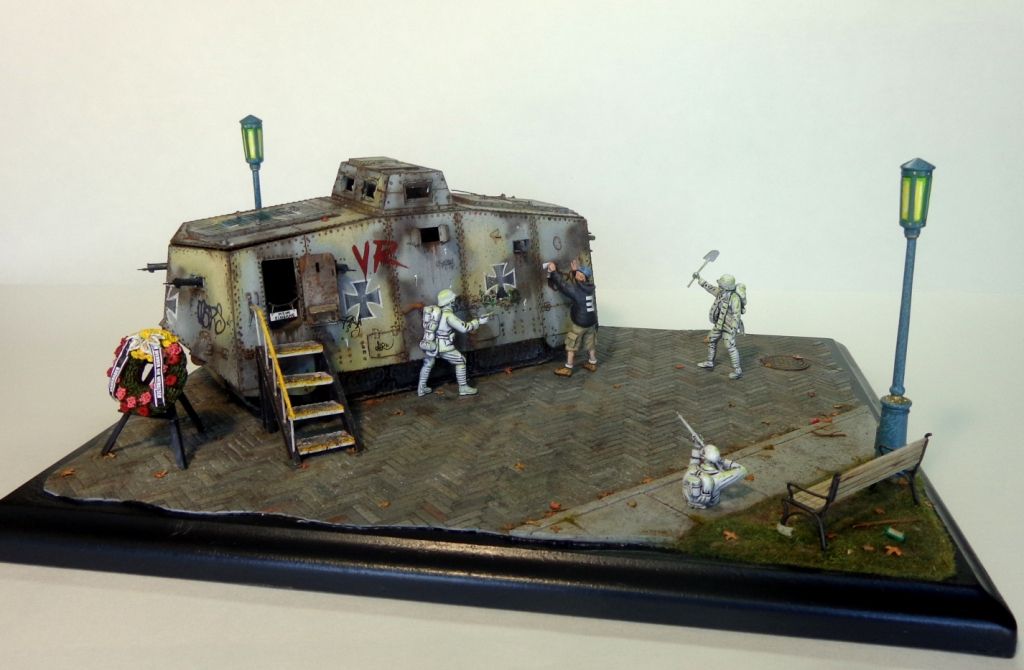
The tank was attached to the base with epoxy cement.
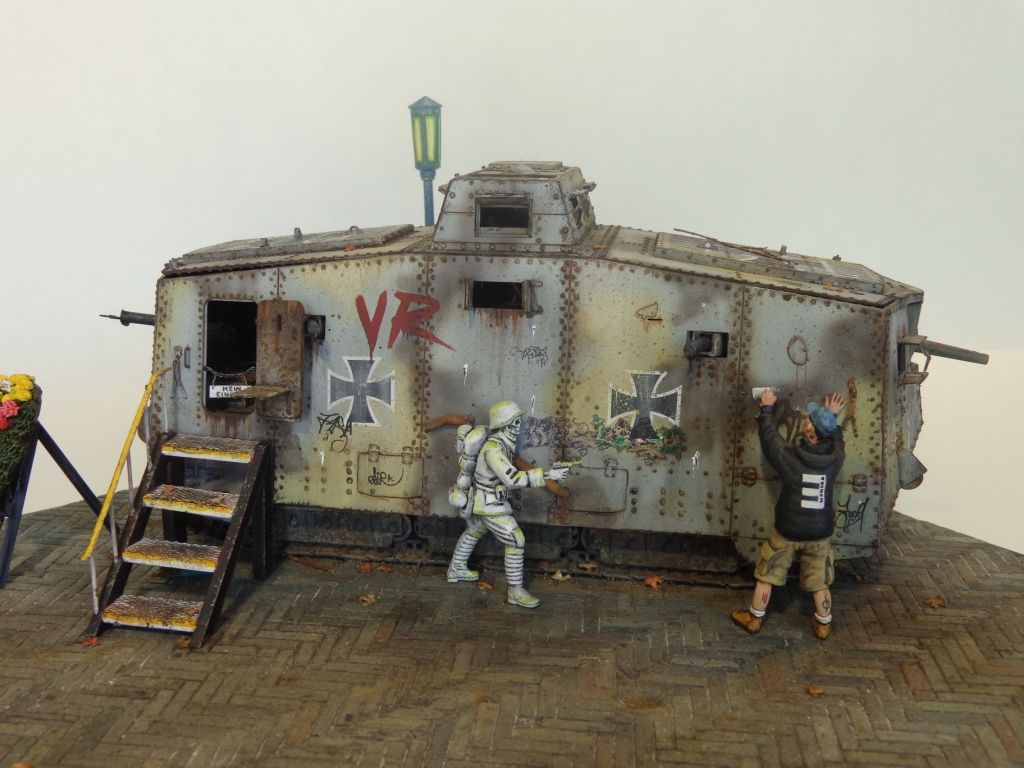
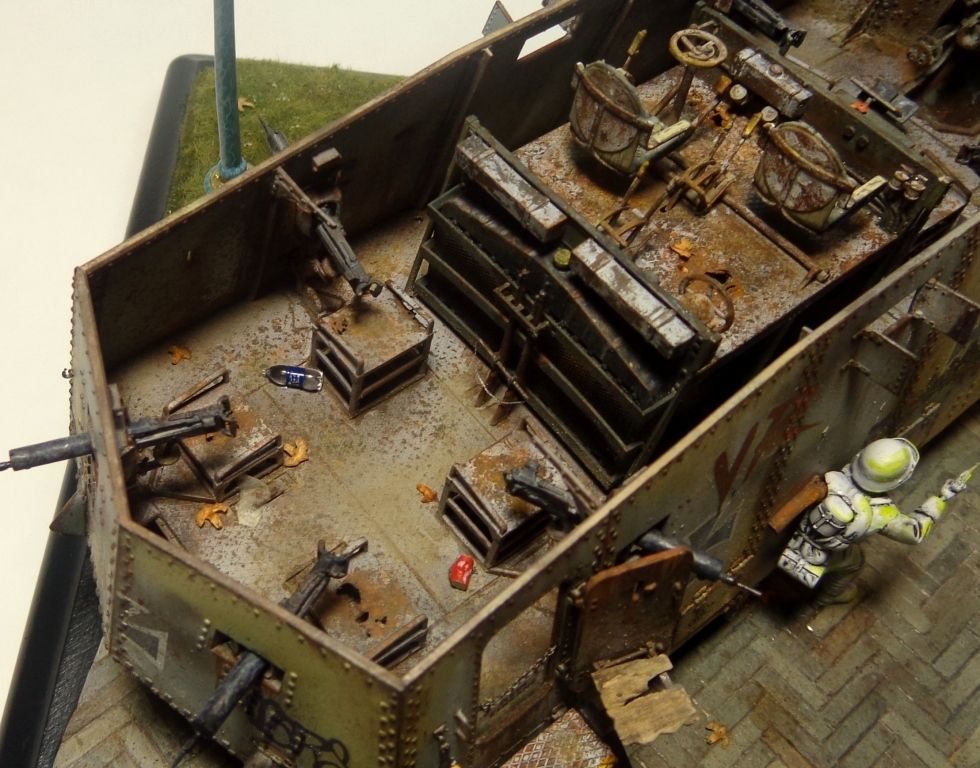
The top DOES still come off to show off the interior.
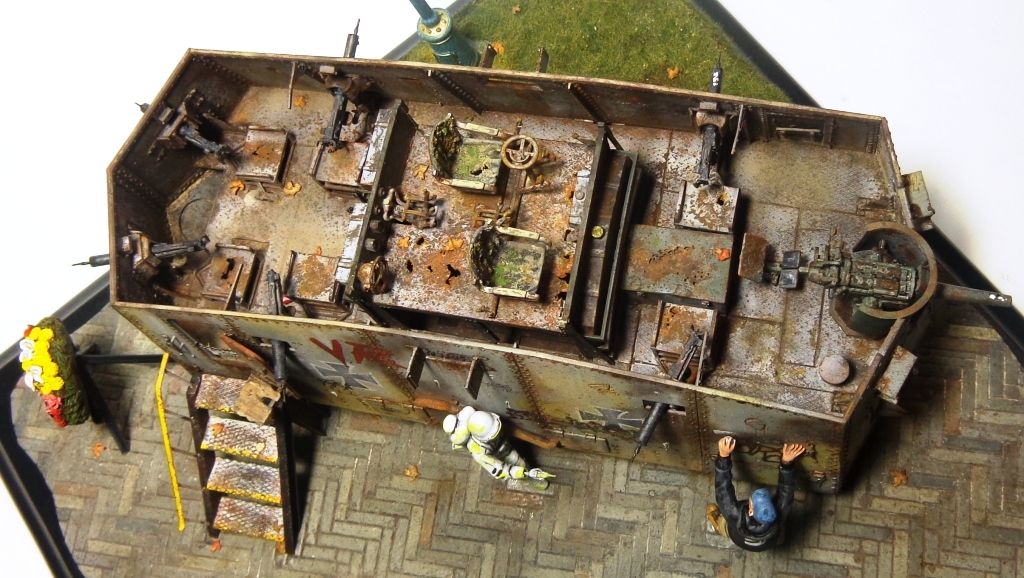
I added some litter--water bottles and coke cans, etc--to the scene at various places. I aso added two rifles stored inside which were locked securely with a dead bolt and chain.
The memorial boquet, public viewing stair and "Kein Eingang" (no entrance) sign and chain.
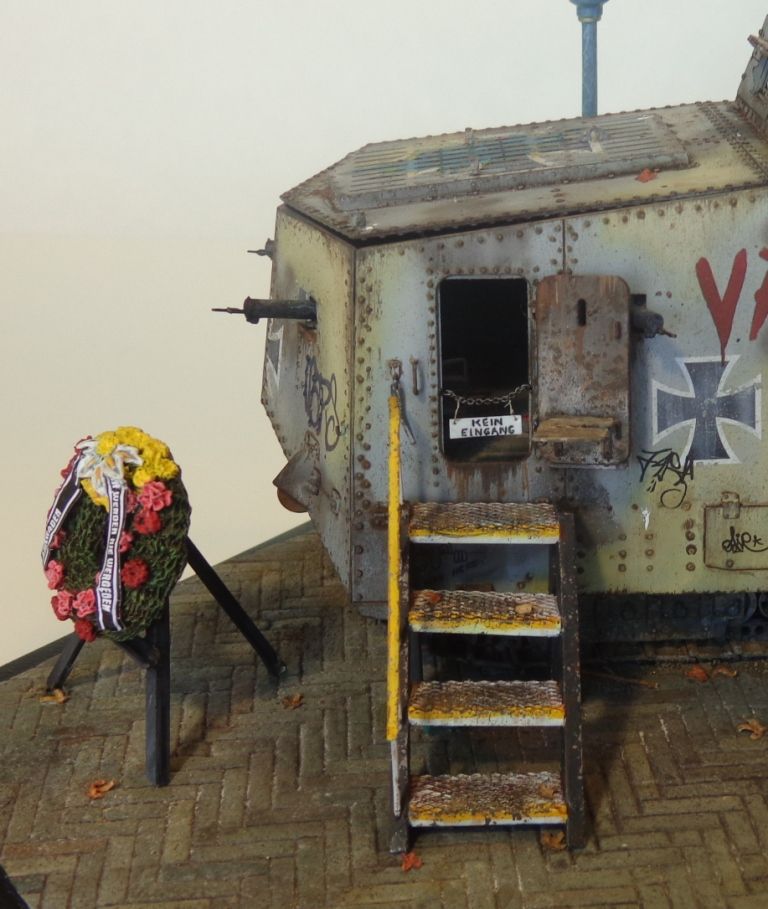
The boquet was painted with craft store acrylics. The banners come with the kit--Plus Models again--and are simply soaked in water and draped over the piece with a light coat of white glue.
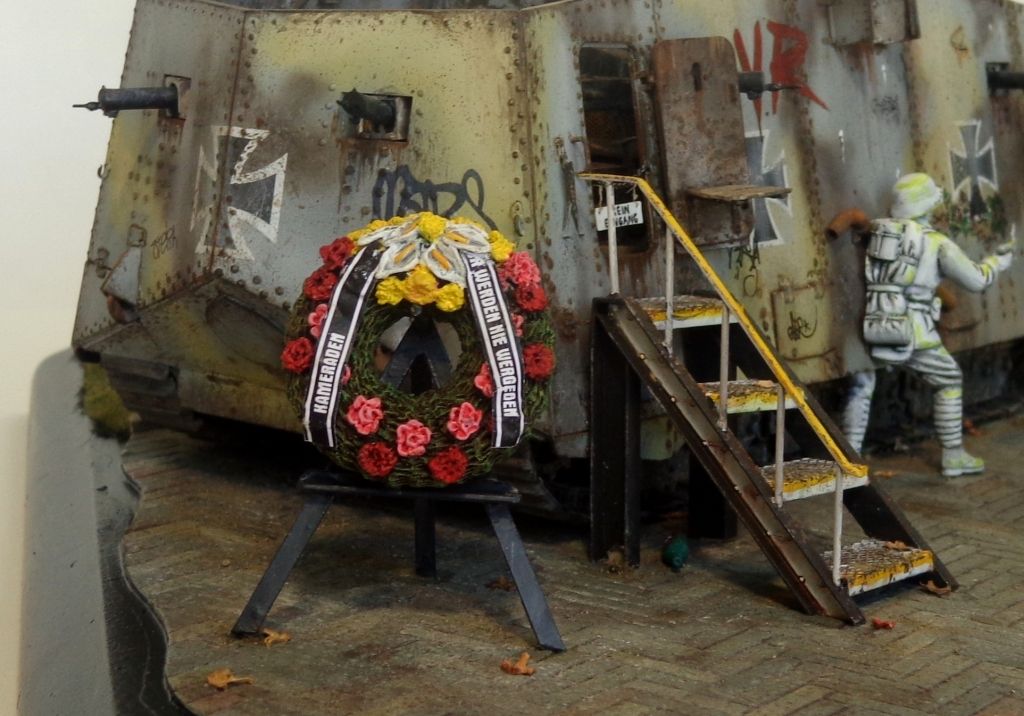
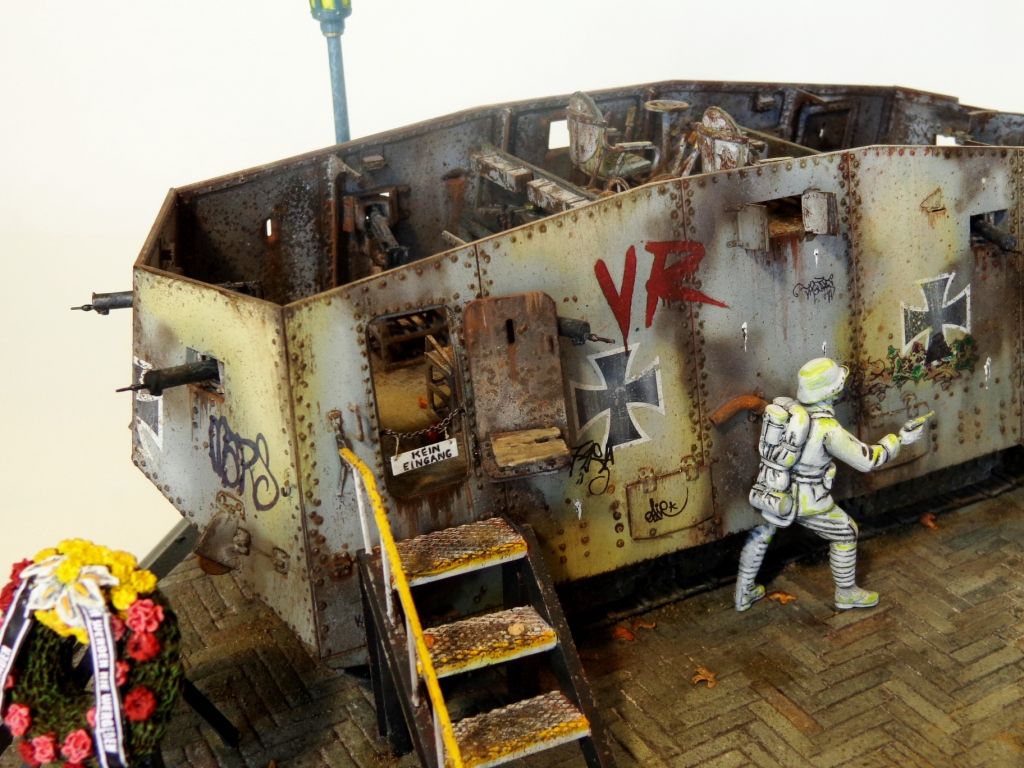
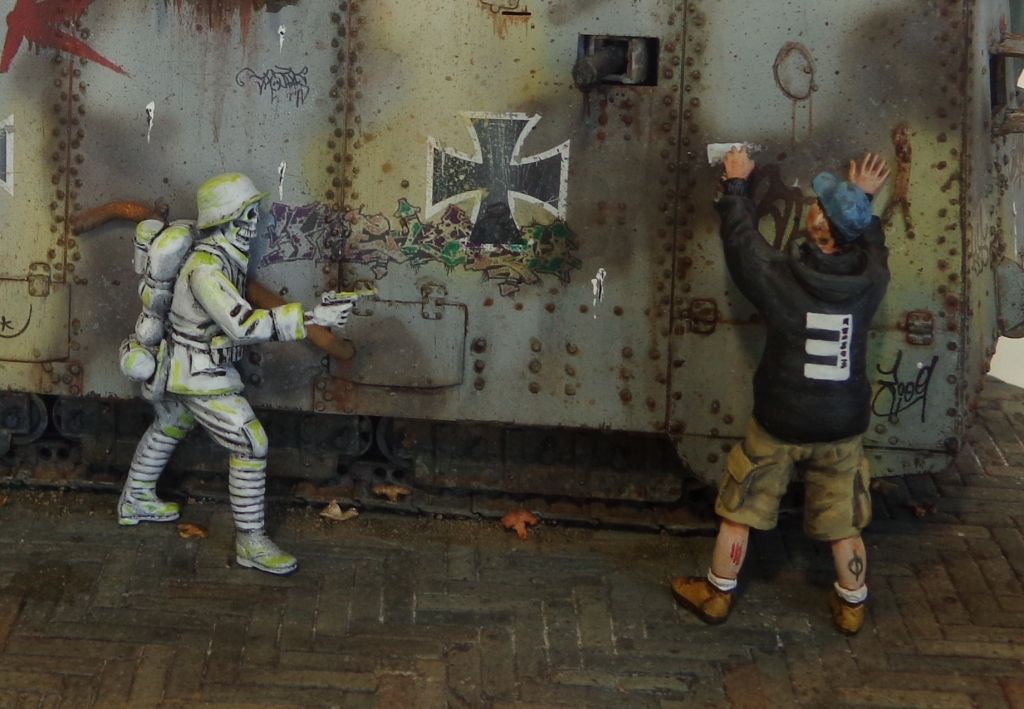
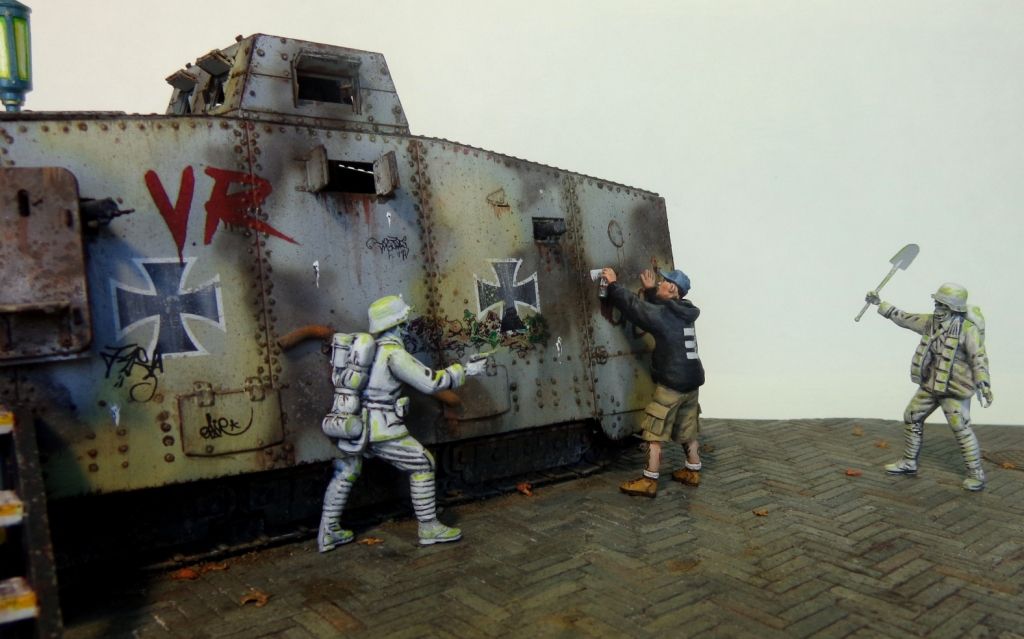
The soldier coming through the tank and the vandal...the graffitti is decals by Uschi.
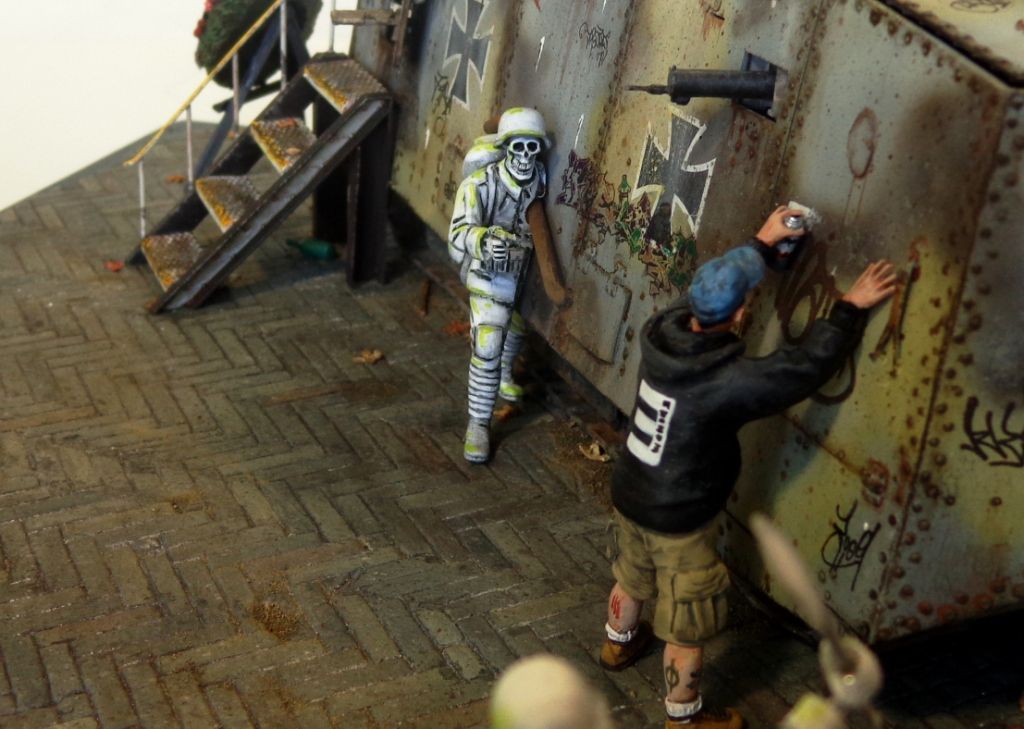
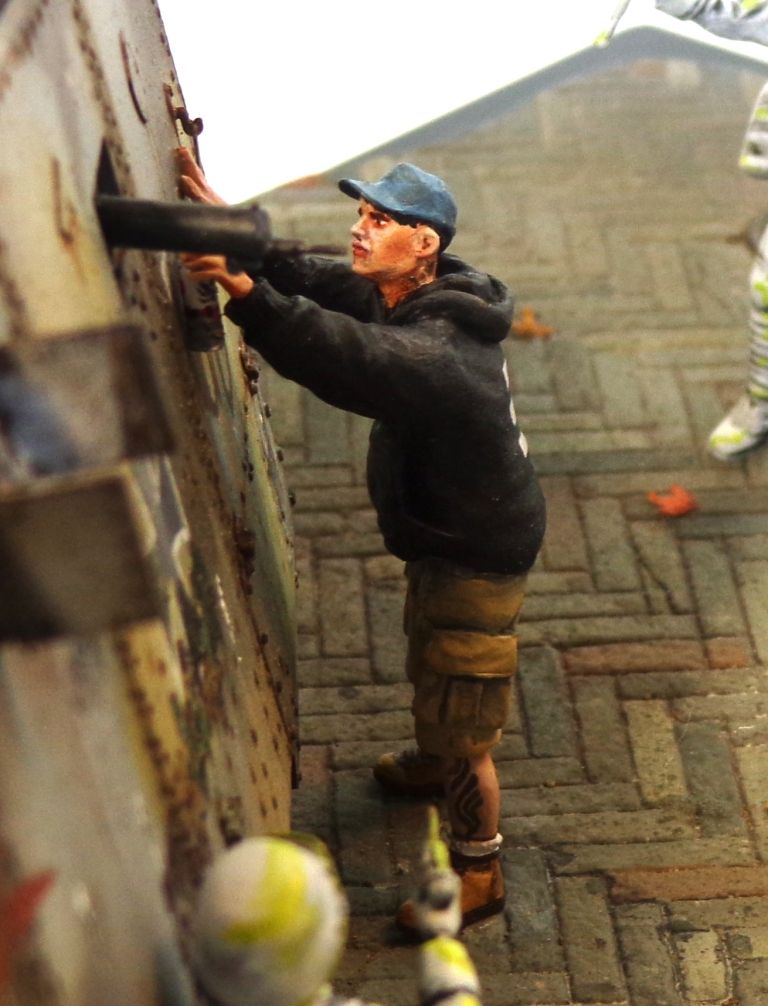
I think that this scumbag came out pretty good, face-wise? Again, painted with 90% craft acrylics.
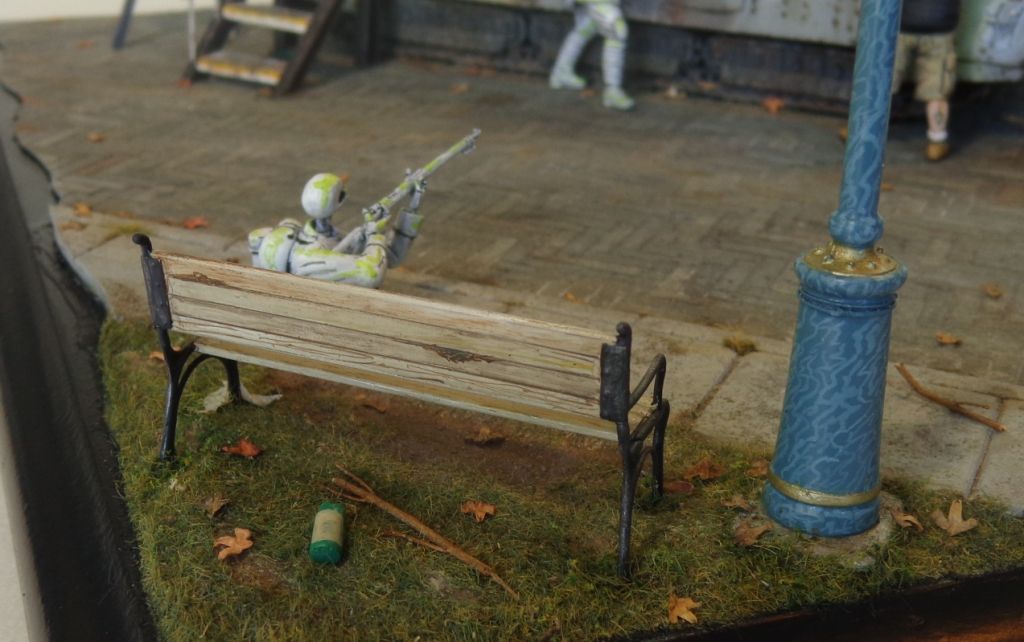
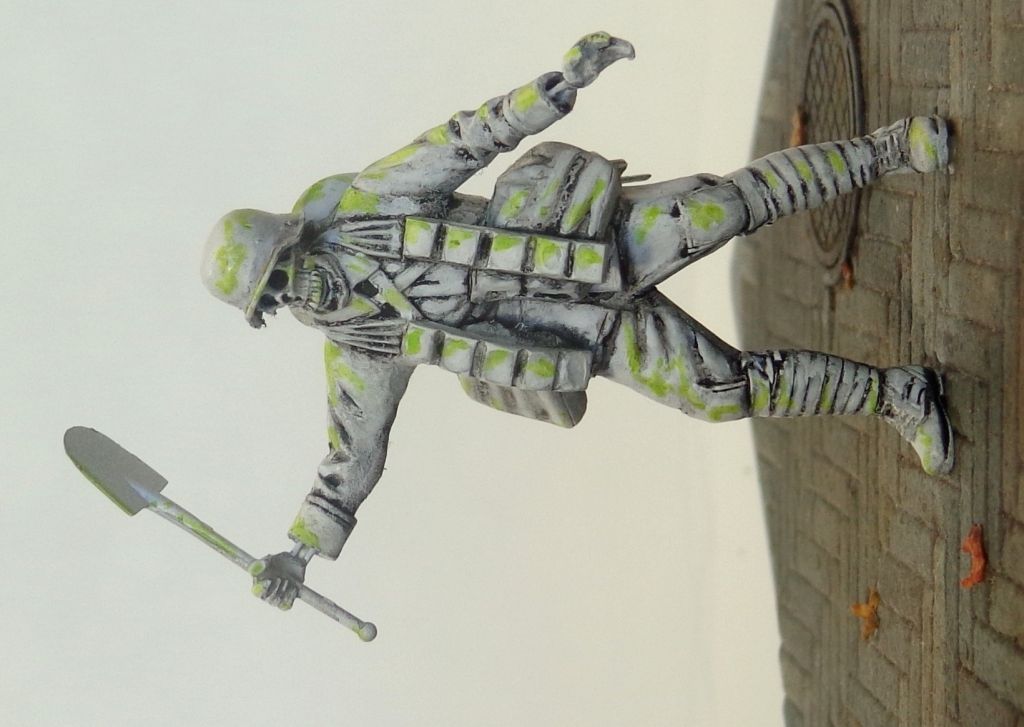
One more of the soldiers. Note how I painted the reflection of the "spooky light" on highlights of the "bones". I think this draws a more cohesive link to the overall story line and feel.
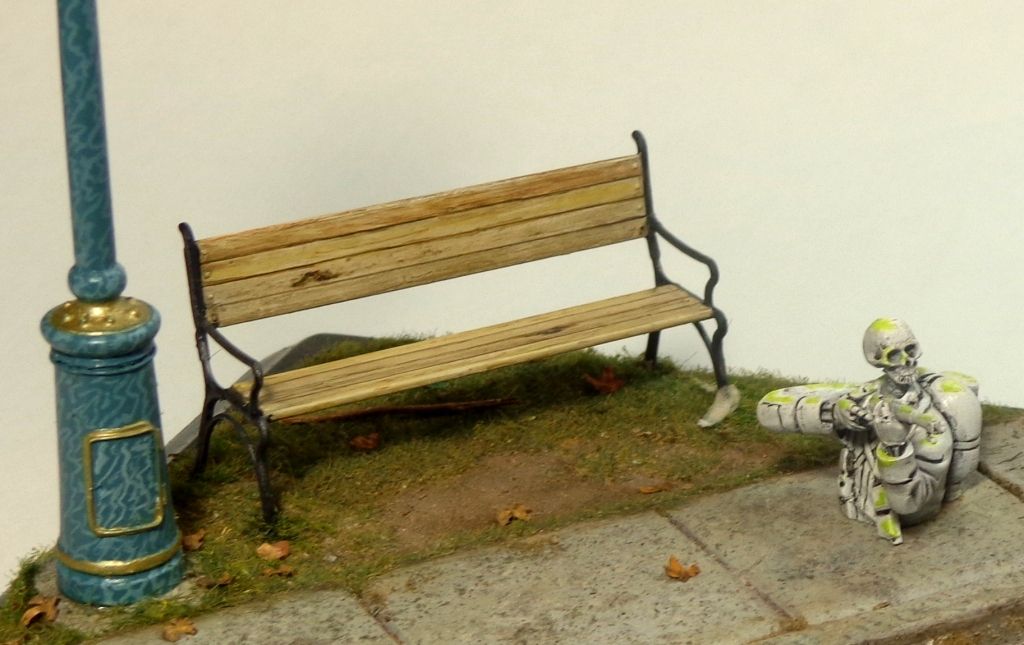
The park bench...yup, craft store acrylics. Painted by simple blending of colors on the brush. There were no oil washes used here.
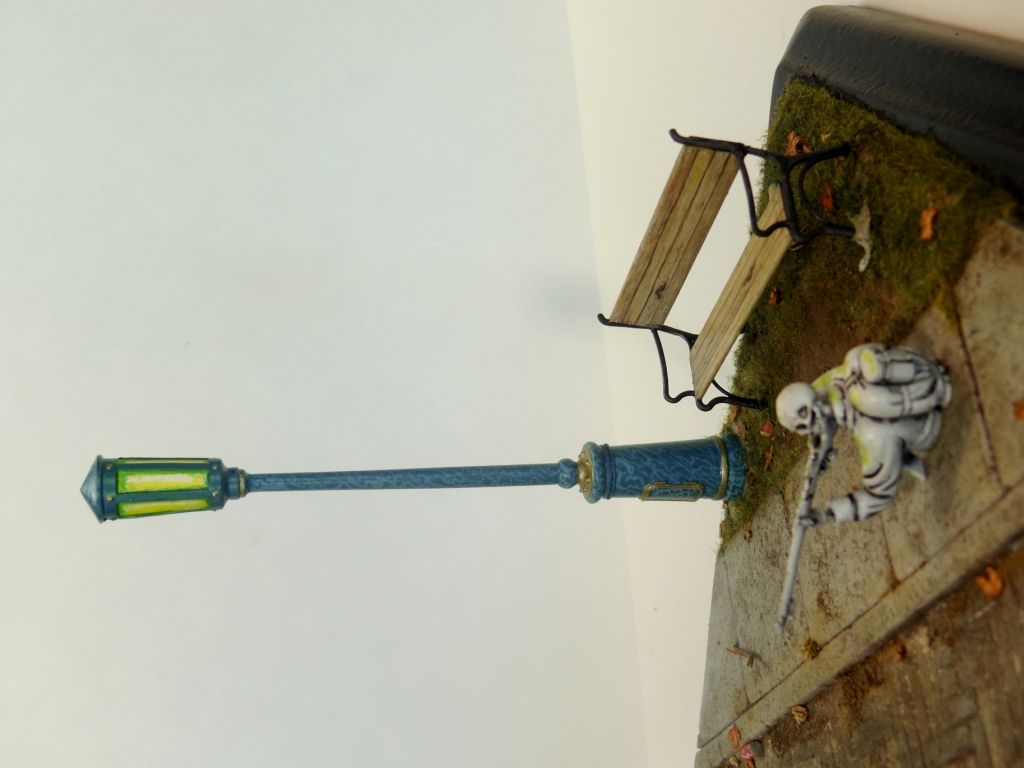
The back of the tank and dio..Joefix leaves added an aire of cold October..
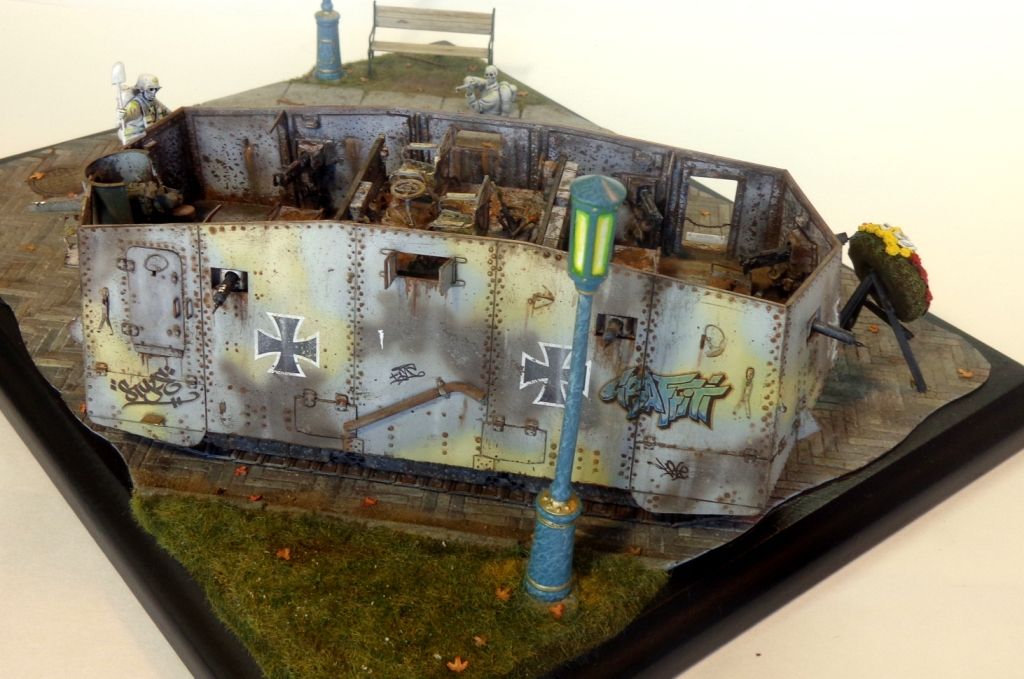
And one last angle..
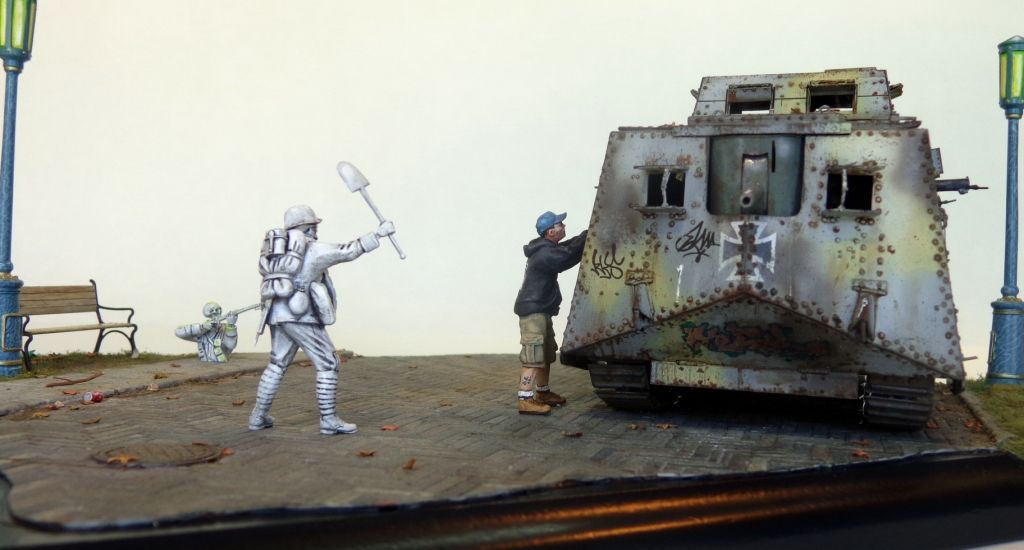
This diorama was inspired by the genuine horror that I've felt in my many travels around Europe. There, the willingness to deface and destroy what are gorgeous old monuments and incredible buildings of beautiful marble and granite by people who have a need to be recognized by the illegible scrawls that they leave rather than the good that they do apparently knows no bounds. I remember being outraged in the town of Nurnberg when I found a small store which apparently catered to this sickness, and sold the wares of the trade--small, easily-concealable paint cans, masks, and gloves, etc. The whole store was actually dedicated to "tagging". And of course, in the beautiful old city, the ease of access showed..Ugh! Angry

So anyway, this is my fantasy, my "release", to get it off my chest in an artistic way. I hope you find both humor and empathy in it. Smile As always, thanks for following along, and for all the nice comments which everyone has been so kind in offering!Beer


  • Member since
    March 2007
  • From: Natrona Heights Pa
Posted by Bones1977 on Tuesday, August 25, 2015 9:33 PM

I don't post much but I got to say this is pretty awesome !!! It's would be cool to paint the lens on the the street lights a bright neon green to make it look more spooky !


"To a New Yorker like you, a hero is some type of weird sandwich, not some nut who takes on three tigers."-Oddball
  • Member since
    January 2007
Posted by the doog on Tuesday, August 25, 2015 8:30 PM

Reaper420


I love how the ghost soldiers are about to blast that vandal for defiling their tank. And Hell, why can't they actually hurt him? It's very possible based off most ghost movies! 


That was my thought, Reaper. They have a special kind of power from the crypt...hell, even if they can't actually hurt him, making the point about the "crime" is just as significant in my view!

  • Member since
    January 2007
Posted by the doog on Tuesday, August 25, 2015 8:28 PM

GMorrison

Very nice. But somethings bothering me that I can't put my finger on. It's starting to get a little busy. I'd suggest that maybe the wreath is too big. It sort of represents a whole other parallel path of activity.

Do you think these guys can actually hurt the vandal?


Oh yeah, Bill---they're gonna whup him but good! Indifferent

Thanks for an honest opinion. I can see where you could get that impression; however, I think that once I get color on all the elements, it will look more ...what's the word..."composed"?

I need that wreath for a "memorial" insinuation. It plays an important element in telling the story in my opinion. It sets that stage for the "sacrilege" of defacing this historical vehicle. I've seen too much of this all over Europe, and that fact is what has inspired this diorama. Smile

  • Member since
    January 2007
Posted by the doog on Tuesday, August 25, 2015 8:22 PM

RBaer

Gonna do it again: Cool! The guardians are a story unto themselves, most excellent.


Thanks Russ! I was lucky to find those skulls; they really add another dimension to the characters, eh? I appreciate the comment! Big Smile

  • Member since
    January 2007
Posted by the doog on Tuesday, August 25, 2015 8:20 PM

Tojo72

Great,story really coming together now.


Thanks, Tojo, I appreciate you following along and looking in. Smile

  • Member since
    September 2006
  • From: Dripping Springs, TX, USA
Posted by RBaer on Tuesday, August 25, 2015 11:48 AM

Gonna do it again: Cool! The guardians are a story unto themselves, most excellent.

Apprentice rivet counter.

  • Member since
    June 2013
  • From: Bay Area, CA
Posted by Reaper420 on Monday, August 24, 2015 11:28 AM

GMorrison

Verty nice. Bu somethings bothering me that I can't put my finger on. It's starting to get a little busy. I'd suggest that maybe the wreath is too big. It sort of represents a whole other parallel path of activity.

Do you think these guys can actually hurt the vandal?


I love how the ghost soldiers are about to blast that vandal for defiling their tank. And Hell, why can't they actually hurt him? It's very possible based off most ghost movies! 

Kick the tires and light the fires!

  • Member since
    September 2012
Posted by GMorrison on Monday, August 24, 2015 9:39 AM

Very nice. But somethings bothering me that I can't put my finger on. It's starting to get a little busy. I'd suggest that maybe the wreath is too big. It sort of represents a whole other parallel path of activity.

Do you think these guys can actually hurt the vandal?

 Modeling is an excuse to buy books.


  • Member since
    March 2003
  • From: Western North Carolina
Posted by Tojo72 on Saturday, August 22, 2015 4:09 PM

Great,story really coming together now.

  • Member since
    January 2007
Posted by the doog on Friday, August 21, 2015 8:27 PM

Ok, a little more work here...

I have painted the base work; I figured that an ornate color pattern in a park might be cool. I used a bunch of different craft store paints and mixed them on the brush to get different colors. I then drybrushed them with some tan and light gray.

Here I've sprayed a light coat of light gray mized with Buff to tone down the colors.

Next, I cut a piece of .080 styrene card into a strip to make sidewalks.

I was going to cut these into tiles and lay them down like such, but then I realized that I could just cut and etch them into what I needed. I cut grooves with a razor saw and then opened them up with a needle file.

A strip of 2mm x 4.8mm prepared in he same way served as a curb.

The elements of the dio thus far...

I was hemming and hawing about this guy but he came out looking so cool that I thnk I'll keep him.

This nice little boquet will set the solemn scene...

The sidewalks got a coat of Mr Surfacer 500 for texture...

And that's it for tonight. I've finally primed the individual pieces and will be going about painting them in the next few days. Stay tuned for more updates! Thanks again for following along, guys! Yes

  • Member since
    January 2007
Posted by the doog on Friday, August 21, 2015 7:56 PM

Thanks for looking in, Carlos! Glad to have you along for the ride into the Twilight Zone! :)Geeked

  • Member since
    July 2004
  • From: Sonora Desert
Posted by stikpusher on Friday, August 21, 2015 2:50 PM

I'm loving the concept and execution here! A bit of dark humor Yes


F is for FIRE, That burns down the whole town!

U is for URANIUM... BOMBS!

N is for NO SURVIVORS...

       - Plankton

LSM


  • Member since
    January 2007
Posted by the doog on Friday, August 21, 2015 12:57 PM

Guys, thanks again for all the generous and flattering comments. I say that, sincerely, it never gets old hearing them. Smile

I don't think I"ll be selling this one any time soon, but it hopefully WILL be spooky! At least I hope so!

And yes, the top DOES come off--thanks, Steve, for clarifying that. Smile

  • Member since
    January 2013
Posted by jibber on Thursday, August 20, 2015 2:58 PM

Well I've been trying to think what you were going to do, but splitting a body coming through the wall is genius. Sure didn't expect that one....Terry

  • Member since
    July 2008
  • From: Vancouver, the "wet coast"
Posted by castelnuovo on Thursday, August 20, 2015 2:51 PM

This looks SUPER and I bet it will be spoooky. Can I buy it for halloween? If you would consider selling it, I asked you first...Smile

  • Member since
    July 2003
  • From: On my kitchen counter top somewhere in central North Carolina.
Posted by disastermaster on Thursday, August 20, 2015 1:46 AM

 The top is removable.... http://www.shg-vaskulitis-eifel-mosel.de/plauderecke/smileys/up.gif

 check earlier in the post and he explains how he went about it.

 https://i.imgur.com/LjRRaV1.png


  • Member since
    June 2013
  • From: Bay Area, CA
Posted by Reaper420 on Thursday, August 20, 2015 12:38 AM

As stated before, simply amazing! Love the ghost idea too! Bow Down

Kick the tires and light the fires!

  • Member since
    July 2003
  • From: On my kitchen counter top somewhere in central North Carolina.
Posted by disastermaster on Wednesday, August 19, 2015 10:03 PM

   http://firewoodhoardersclub.com/smilies/broken.gifOh the pain!
 
   Doog is splittin’ more than just hairs here.
 What a great imagination we have on this site.

http://i170.photobucket.com/albums/u244/heydoog/A7V%20Diorama/DSC05655_zps4nonnapr.jpg

 https://i.imgur.com/LjRRaV1.png


  • Member since
    December 2002
  • From: Bury St Edmunds, Suffolk, England
Posted by Bish on Wednesday, August 19, 2015 3:22 PM

Well, this just gets better, and more weird. Stunning work as always Karl.

But i have to ask. How's your eye's after painting those stones.

I am a Norfolk man and i glory in being so


On the bench: Airfix 1/72nd Harrier GR.3/Fujimi 1/72nd Ju 87D-3

  • Member since
    January 2015
  • From: Tumwater, WA.
Posted by M. Brindos on Wednesday, August 19, 2015 2:53 PM

Your vision is astounding Karl! I absolutely love this entire concept. This is the kind of thing I would expect to take a lot of awards.

I demand more. lol

- Mike Brindos "Lost Boy"

  • Member since
    November 2009
  • From: SW Virginia
Posted by Gamera on Wednesday, August 19, 2015 2:48 PM

Lol, I'm a modeler but you're an artist Karl, I'd never have thought about having the ghost coming though the hull of the tank like that. 

My hat's off to you sir! Bow Down

"I dream in fire but work in clay." -Arthur Machen


  • Member since
    January 2007
Posted by the doog on Wednesday, August 19, 2015 2:33 PM

jibber

Simply amazing Karl. Your style and vision is second to none. 
Terry


Thanks, Terry! I sincerely appreciate that! Yes

I have an update to share..

I used a base product from MiniArt to make the setting for the park/square. This is a simple 2-piece laid-stone kit that you glue together on the seam. It's actually like a 3-D base--I had to cut off the edges to make it flat, and then I epoxied it onto the wood base after sanding and painting the wood plaque.

Now I'm in the process of painting the individual stones. I will overspray it with a light sand-gray when done to minimize the differences.

I want to show what I've been doing with the rest of the dio. I've constructed a viewing stair for the public out of another MiniArt Staircase kit. Lots of hacking and trial-and-error fitting here...

I also affixed a tiny chain to the entrance: "Kein Eingang!"

The figures are taking a lot of time. I have made alll the hands into "skeletal" hands, and mounted them on brass rods to simulate "bones'. I found those great skullls online on eBay.

I wanted to put this figure "coming out of" the tank.

I cut him down the middle with a razor saw..

I then hollowed out a channel for the exhaust using my Dremel tool

Here he is coming "through" the tank! I have since-fixed that little gap with Milliuputt putty.

Here's another guy. I removed his jaw, as this was a common WWI injury..

He may be coming up out of the "ground"? Here's the general layout so far. I also have some additional details to include that are not in the photo yet...lights, a memorial boquet on a stand,...

That's it so far; as I said, a lot of little details and small experimenting and planning are slowing me down, but I'm having fun--and that's what it's all about!

Suggestions, comments and critiques welcomed!! Thanks for looking in guys!

  • Member since
    January 2013
Posted by jibber on Monday, August 17, 2015 3:19 PM

Simply amazing Karl. Your style and vision is second to none. 
Terry

  • Member since
    December 2002
  • From: Bury St Edmunds, Suffolk, England
Posted by Bish on Monday, August 17, 2015 12:51 AM

Thanks for the info on the guns Karl, i will try and remember about those ball mounts.

I am a Norfolk man and i glory in being so


On the bench: Airfix 1/72nd Harrier GR.3/Fujimi 1/72nd Ju 87D-3

  • Member since
    January 2015
  • From: Tumwater, WA.
Posted by M. Brindos on Sunday, August 16, 2015 11:52 PM

This is stunning Karl. Just jaw dropping amazing. ...and you're not even done yet...

- Mike Brindos "Lost Boy"

  • Member since
    January 2007
Posted by the doog on Sunday, August 16, 2015 6:11 PM

moose421

Nice work Karl.  I love the rusted look on the interior.  I have one question and maybe I didn't see the explaination.  What is the thicker green stuff on the drivers seats?  Moss?


The outside weathering is top notch.


Keep up the great work.

Kim


Kim, thank you!

Yes, the green is like mos, mold--a totally artistic call. This model is depicting a tank which has sat out in a public park like in a memorial setting, and so the interior would be rusted and rather neglected. I fugure that those seats would'nt fare too well in the outdoors, so...

Thanks again for the compliments! Smile

  • Member since
    January 2007
Posted by the doog on Sunday, August 16, 2015 6:03 PM

Bish

like the sWhats not to dig. I like the scheme, i take it you have gone for a faded look on that as well, so the colours are a lot lighter than they would have been in 1918.

Why were the guns so awkward to fit, given that the roof is off, its actually looks like it would be simple. But i can see why you did it like that.


Thanks, Bish!--the guns are actually a sort-of interference fit, where the bottoms of them are support stands that sit on the bottom of the floor. There is absolutely NO play in their fit! ALso, the doors which protect the ball-support are supposed to contain the ball and the ball rotates within there. I didn't know that when I glued them in, so...you get the picture...Sad


  • Member since
    January 2007
Posted by the doog on Sunday, August 16, 2015 5:57 PM

GMorrison

Really cool. The exterior camo looks wonderful.

That looks like a big old radiator down there in front of the driver.


Thanks so much, Bill! Yup, there are dual radiators on each side of the driving station. I imagine that's what made these so incredibly uncomfortably-hot as reports seem to indicate.

  • Member since
    November 2007
  • From: Wisconsin Rapids, WI
Posted by moose421 on Sunday, August 16, 2015 2:11 PM

Nice work Karl.  I love the rusted look on the interior.  I have one question and maybe I didn't see the explaination.  What is the thicker green stuff on the drivers seats?  Moss?


The outside weathering is top notch.


Keep up the great work.

Kim

  • Member since
    November 2009
  • From: SW Virginia
Posted by Gamera on Thursday, August 13, 2015 7:52 AM

Hate to sound like a broken record but again... very cool, I love it!!! 

"I dream in fire but work in clay." -Arthur Machen


  • Member since
    July 2003
  • From: On my kitchen counter top somewhere in central North Carolina.
Posted by disastermaster on Wednesday, August 12, 2015 10:24 PM


Man, this is good stuff for a hot day.
 
http://www.onpanice.fr/onpaphotos/gif%20soleil%20ventilo.gif
 
 It looks so cool, I can just feel the breeze all the way over here in Asheboro.
 
 You ought to do the box-art for the modeling companies …. like building the model and putting actual pictures of the finished kit right on the boxtop.
 
Now I want one of these.

 https://i.imgur.com/LjRRaV1.png


  • Member since
    December 2002
  • From: Bury St Edmunds, Suffolk, England
Posted by Bish on Wednesday, August 12, 2015 4:14 PM

like the sWhats not to dig. I like the scheme, i take it you have gone for a faded look on that as well, so the colours are a lot lighter than they would have been in 1918.

Why were the guns so awkward to fit, given that the roof is off, its actually looks like it would be simple. But i can see why you did it like that.

I am a Norfolk man and i glory in being so


On the bench: Airfix 1/72nd Harrier GR.3/Fujimi 1/72nd Ju 87D-3

  • Member since
    September 2012
Posted by GMorrison on Wednesday, August 12, 2015 4:11 PM

Really cool. The exterior camo looks wonderful.

That looks like a big old radiator down there in front of the driver.

 Modeling is an excuse to buy books.


  • Member since
    January 2007
Posted by the doog on Wednesday, August 12, 2015 4:03 PM

Well, I've ben weathering this beast after getting the decals on. NOTE: The kit decals are on, but I've not chosen to put the indentifying "Schnuk" or other particulars on it. I want a generic A7V to go in the diorama. Also, though there will be grafitti vandalism on it, I want to put that on AFTER the weathering, so it look new. The decals were "aged" by airbrushing some gray-white over them to simulate fading.

I used some craft paints, oil paints and a sponge to weather the exterior. Also, I used some of Wilder's Rust colors to add streaks and tone to the Raw Umber oil.

Using the sponge. This give a nice, random distribution of chips.

Note also that I've finally put all the guns in. UGH, what a PAIN that was. This model is not designed tobe built the way I built it---it's designed to be glued all together at once, so I had to really labor to get these parts in.

Here's some pics:

Don't know what happened to my white balance here, but I think it's when I turned a light on overhead to get shots inside...

 You can see the wooden seats that I made on the door there (above)

 The base is an old placque that I had...

This street pattern is from MiniArt. It's in two pieces, so I'll have to do some fancy joint work..I've cut it into the pattern you see.

I cut the stones to match in this herringbone pattern...

After gluing, I sealed up the joints with melted putty..

Well that's it for today's update! Hope you're digging it, and thanks for following along! Comments always appreciated! Big Smile


  • Member since
    January 2007
Posted by the doog on Tuesday, August 11, 2015 7:54 PM

lol, thanks, Bish. It's giong to be a sinister scene, that's for sure! Devil

  • Member since
    December 2002
  • From: Bury St Edmunds, Suffolk, England
Posted by Bish on Tuesday, August 11, 2015 4:24 PM

Nice to see where your going with this. Not sure if i like how your mind is working or if it scares me Big Smile

Liking the paint job though.

I am a Norfolk man and i glory in being so


On the bench: Airfix 1/72nd Harrier GR.3/Fujimi 1/72nd Ju 87D-3

  • Member since
    January 2007
Posted by the doog on Tuesday, August 11, 2015 3:27 PM

Thanks too, Cliff, for looking in and for the nice comment! Big Smile

  • Member since
    January 2007
Posted by the doog on Tuesday, August 11, 2015 3:25 PM

GMorrison

I'd go all the way back up the thread to what Stage Left said. I really CAN smell something dead in there.

The 100 year old weathering project is a real work of art. At every single stage you've shown, Mr. Bill has said "nooooooooo!". But then it just gets better.

There used to be a member here named Vespa Boy. I'm drawing no comparisons in terms of execution, and he didn't model armor. Stuff like sidewalks and streets. This model is in my opinion the same thing. It is so real and so filled with truly accurate details that are found in real life, that it's really something special.


Gee, Bill, that's generous praise! Wink Thank you!

I remember Vespa Boy! A temendous artist--is he not with us anymore? He was honestly amazing in his commitment to detail on the most mundane and pedestrian of subjects! I loved his work!

Thanks again, and I hope you'll stay tuned for more! Yes

  • Member since
    November 2009
  • From: SW Virginia
Posted by Gamera on Monday, August 10, 2015 7:54 AM

Exterior looks just as good as the interior Karl, looking forward to more! 

"I dream in fire but work in clay." -Arthur Machen


  • Member since
    September 2012
Posted by GMorrison on Monday, August 10, 2015 1:11 AM

I'd go all the way back up the thread to what Stage Left said. I really CAN smell something dead in there.

The 100 year old weathering project is a real work of art. At every single stage you've shown, Mr. Bill has said "nooooooooo!". But then it just gets better.

There used to be a member here named Vespa Boy. I'm drawing no comparisons in terms of execution, and he didn't model armor. Stuff like sidewalks and streets. This model is in my opinion the same thing. It is so real and so filled with truly accurate details that are found in real life, that it's really something special.


 Modeling is an excuse to buy books.


  • Member since
    March 2003
  • From: Western North Carolina
Posted by Tojo72 on Sunday, August 9, 2015 8:01 PM

Ahh,a little reminiscent of "Spooked" gonna be good.

  • Member since
    January 2007
Posted by the doog on Sunday, August 9, 2015 4:37 PM

Hi Guys,

Ok, so I got the exterior painted.

I'm going with a 3-color scheme, in what would have been an early color scheme. I'm not too worried about accuracy per se, as this tank is going to represent something like a museum piece on a public plinth, and when have bureaucrats ever done an accurate tank paint job? lol

I started with a quick coat of decanted grey primer from Duplicolor, and then shot a coat of Tamiya XF66 Light Grey. When this was covering the model, I took some Flat White and mixed it into the cup and sprayed fading lines down the side and over the roof. This to simulate sun-fading.

After that, I mixed a shade from Tamiya Buff plus Yellow an White. Once again, after spraying the patches, I "faded" it with another infusion of Flat White.

I then used Model Master Raw Umber, and repeated the fading trick.

Other side...

It looks pretty neat with the top off...

This should make a pretty cool canvas for weathering now. I will be adding the doors and guns now, and the decals as well, which will have to be suitably "aged".

And here's a peek at the vandal and the avenging soldier! There will be one more beside this one, and I have something REALLY cool planned for him!

That's it for now, guys! Thanks for looking in, and comments are of course, always appreciated! Big Smile


  • Member since
    January 2007
Posted by the doog on Sunday, August 9, 2015 4:24 PM

Bish, Terry, Steve---thanks, guys. I appreciate you taking the time to comment! It's kinda quiet in here since the "Big Change"! Update next! Wink

  • Member since
    January 2007
Posted by the doog on Sunday, August 9, 2015 4:23 PM

hogfanfs

Karl, the interior looks amazing! 

Funny, I had the pictures open of your interior, and my wife walked by and had to stop to take a look. That is the best compliment you can get! lol


Just saw this post, Bruce!You must have posted it while I was updating--that's cool; I hope your wife liked it! Thanks for looking in! Big Smile

  • Member since
    January 2013
Posted by jibber on Sunday, August 9, 2015 4:18 PM

Masterful work Karl, so cool...Terry

  • Member since
    December 2002
  • From: Bury St Edmunds, Suffolk, England
Posted by Bish on Sunday, August 9, 2015 1:59 AM

You got a great looking rusted hulk coming on there karl.

I am a Norfolk man and i glory in being so


On the bench: Airfix 1/72nd Harrier GR.3/Fujimi 1/72nd Ju 87D-3

  • Member since
    July 2003
  • From: On my kitchen counter top somewhere in central North Carolina.
Posted by disastermaster on Saturday, August 8, 2015 9:02 PM


 http://duralenta.ru/engine/data/emoticons/a14.gif Poor ol' Gerhardt looks so bored and left out.....http://www.sherv.net/cm/emoticons/dogs/funny-dog-smiley-emoticon.gif


           As for the tank.


Um, Um-Um, Ummm, Ummm, Um!


                         Yeah.

 https://i.imgur.com/LjRRaV1.png


  • Member since
    January 2007
Posted by the doog on Saturday, August 8, 2015 1:14 PM

Well, here we go. She'za ready for paint. Finally! It's been a long, arduous build full of planning stops and delays, but I'm finally ready for a bas coat and camo. Luckily, it's a soft-edge, so it will go on rather quickly.

I had to figger out how to do the tracks--this diorama is going to depict a tank that is in a park as a commemorative monument setting, so I have to figure that the tracks would have been painted alonmg with the suspension at some point and then neglected for many years after being rolled into place. I painted appropriate rust tones on the suspension and the tracks in the same manner as the interior, and then salted them up.

Next, I hit them with a dark gray mix of Tamiya German Grey and Light Grey.

Top that with a lighter shade of the same...

I knocked the salt off--well, "scrubbed it" off, more like it; this stuff sticks pretty good under paint--and then gave it an overnight wash of acrylics; Burnt Umber and Raw Sienna, for some more "deep" rust shadows.

Because of the corrosive nature of the salt, a few of the track links had been affected, and rather than go through the rigamarole of repairing what wouldn't be seen anyway, I removed the damaged links put the tracks on thusly, and glued them in place. The tracks are almost unseen beyond the first few upward-curving links, as you'll see..

Now I was finally able to put the sides on.

The guns will be put in after painting, lest they present a difficult projection outside the hull that would be a pain to mask. This way, I can easily fill the hull with tissue and spray the exterior.

Modeling doog Gerhardt watches in between his nap...HEY DOOG!

The top will be removable. Here you can see that it will sit reasonably well on the walls..

So I'm off to paint the exterior. Stay tuned; the actual diorama should be starting to take place soon once I get all the elements constructed, which shouldn't take too long!

Comments welcomed!


  • Member since
    January 2007
Posted by the doog on Saturday, August 1, 2015 6:43 PM

Bish

But there is one thing I have noticed. Where are the ceiling braces? Whistling 

lol....ok, now the curse is broken! Big Smile

  • Member since
    December 2002
  • From: Bury St Edmunds, Suffolk, England
Posted by Bish on Saturday, August 1, 2015 1:01 PM

That looks just brilliant Karl, I really like all the crud on the seats.

But there is one thing I have noticed. Where are the ceiling braces? Whistling 

I am a Norfolk man and i glory in being so


On the bench: Airfix 1/72nd Harrier GR.3/Fujimi 1/72nd Ju 87D-3

  • Member since
    March 2003
  • From: Western North Carolina
Posted by Tojo72 on Saturday, August 1, 2015 12:30 PM

Man that interior looks awful......you know what I mean.

  • Member since
    March 2012
  • From: Corpus Christi, Tx
Posted by mustang1989 on Saturday, August 1, 2015 9:11 AM

That's some great work Karl! Detail and weathering are top notch here. All I have to say is it must have been one hot mamma jamma on the inside of that beast!! Radiator and powerplant in the crew compartment......the temperatures must have soared in there!


 Forum | Modelers Social Club Forum (proboards.com) 

  • Member since
    January 2007
Posted by the doog on Saturday, August 1, 2015 9:04 AM

Well I've got the driver's platform assembled. What a genuine PITA this was. Sadly, I think I'm in line for some more frustrating Magyverism coming up here with the fit...

I found that the way that this interior is engineered, the tolerances are VERY tight, and apparently the top and upper hull is designed to be glued tightly against each other---nothing bad there, really--but it has caused problems for the way I want to display it. The top "ceiling" piece wouldn't fit without hitting the high parts on the driver's platform. I have had to do some creative re-arranging of some parts--mostly just dropping a piece or two by a few mm here or there to give clearance.

I want to leave the model with a removable top so you will be able to see all of this weathering in there. In order to make this possible without needing the tight "glue and clamp" method of assembly, I've had to remove these projections on top of the radiator pieces that act as buttresses to the ceiling. Otherwise, the top "floats".

I really don't think this is a big deal, as let's be honest--there aren't going to be any A7V engineers or experts in my viewing audience to say "Uh, where are the ceiling braces?" (OK, now I'm CERTAIN that someone will pull that line on me at an AMPS show somewhere. Propeller) It looks perfectly plausible like it is now, in my opinion, and in any case, the interior is only going to be a secondary aspect of the diorama.

In any case, here's some angles on the interior work so far.

You can see that the ceiling platform really doesn't look compromised much by the omission of those braces...

The suspension has been pre-rusted and will receive the salt treatment, etc...

Got a busy weekend so I won't get much done before Monday. Hope to have another update midweek..

Thanks for looking in and commenting, guys! It's good to have you all on board! Big SmileYes

  • Member since
    May 2013
  • From: From the Mit, but live in Mason, O high ho
Posted by hogfanfs on Saturday, August 1, 2015 8:45 AM

Karl, the interior looks amazing! 

Funny, I had the pictures open of your interior, and my wife walked by and had to stop to take a look. That is the best compliment you can get! lol

 Bruce


 On the bench:  1/48 Eduard MiG-21MF

                        1/35 Takom Merkava Mk.I


  • Member since
    January 2007
Posted by the doog on Saturday, August 1, 2015 8:23 AM

Tojo72

Very cool looking,are you leaving the roof loose,or will the only view of that fantastic interior be from the open hatches.

Tojo, I have pondered that a bit, and tried to envision how much of the interior you might actually see from just the doors and hatches opened, and I don't think it would be that visible unless you really had a good light and angle.

You'll see in my next update that I've decided to build this so that the top is removable. It's going to take some finesse, but it should be easy to just pop the top and look inside when I'm finished. Smile

  • Member since
    January 2007
Posted by the doog on Saturday, August 1, 2015 8:18 AM

Thank you, Mustang, Cliff, Hugo, and Phaisal! Thanks for coming along on this ride!

Hugo, don't work too hard. Life ain't worth living if you forget to actually "Live"!. Take a break! :)

  • Member since
    February 2003
  • From: Thailand
Posted by Model Maniac on Friday, July 31, 2015 10:54 AM

Very impressive WIP photos, Karl! This gonna be a very nice WWI diorama!

Impressive Songs:

All 10 Playlists that I created on Youtube:

http://www.youtube.com/user/ModelManiacThailand/playlists

Pan Flute Music (300 songs) (Most Popular, over 100K views):

https://www.youtube.com/playlist?list=PLUNb2zPxGTZO7alagEPsEMzgBkWt4-vKV

El Condor Pasa (Top 50) (World's most famous and my most favorite song):

http://www.youtube.com/playlist?list=PLUNb2zPxGTZOLKHbju350mLle4HkMhsb8

  • Member since
    March 2013
  • From: Puebla, Mexico
Posted by garzonh on Friday, July 31, 2015 10:44 AM

Hey Karl,

Im trying to catch up on things, since work has been a nightmare.

This looks freaking awesome.

An exceptional building model we are looking at.

Congrats my friend.

  • Member since
    November 2009
  • From: SW Virginia
Posted by Gamera on Friday, July 31, 2015 8:14 AM

Looking awesome so far! Love the seats.

"I dream in fire but work in clay." -Arthur Machen


  • Member since
    March 2003
  • From: Western North Carolina
Posted by Tojo72 on Friday, July 31, 2015 7:25 AM

Very cool looking,are you leaving the roof loose,or will the only view of that fantastic interior be from the open hatches.

  • Member since
    March 2012
  • From: Corpus Christi, Tx
Posted by mustang1989 on Friday, July 31, 2015 7:13 AM

Now THIS..........is cool!!!! Watching.........


 Forum | Modelers Social Club Forum (proboards.com) 

  • Member since
    January 2007
Posted by the doog on Friday, July 31, 2015 7:01 AM

Thanks, Steve, Dave, and Eric! I'm so happy to have you guys looking in and giving me some support!

Ernest, it's good to see you back too! Yeah, I was surprised to see this model come out, and it's a beauty to be sure. I still have the old Tauro kit; man, there's no comparison especially with the interior.

MY builds this year have been a few---here's some links to what I've been up to...

1/72 ESCI M1 Abrams

1/72 E100

1.35 Vorpanzer

Two 1/35 Leopards, 1A1 and 2A4

TAKOM Object 279

I think that's it. Hope you enjoy them! :)

  • Member since
    March 2003
  • From: Rain USA, Vancouver WA
Posted by tigerman on Friday, July 31, 2015 2:17 AM

Stunning work Karl. Can't wait ti see the final product.

   http://i7.photobucket.com/albums/y269/wing_nut_5o/PANZERJAGERGB.jpg

 Eric 

  • Member since
    July 2006
  • From: San Francisco Bay Area
Posted by bufflehead on Thursday, July 30, 2015 10:44 PM

Man, I'm gone for a few months and look what I get to come back to!  Karl building the newest A7V kit!!  Wunderbar!!  I'm so envious that you have this kit, been wishing for a new kit of the A7v for years!  I was a bit taken aback when I read and saw what you're doing to this fine kit, but after seeing the initial results all I can say is AUSGEZEICHNET!!!   YesYes Looks to be another outstanding doog build!

BTW, did I miss any other builds of yours this year?  I seem to remember you working on a Panzer earlier this year (or was it last year)?

Ernest

Last Armor Build - 1/35 Dragon M-26A1, 1/35 Emhar Mk.IV Female


Last Aircraft Builds - Hobby Boss 1/72 F4F Wildcat & FW-190A8


  • Member since
    February 2010
  • From: Maine
Posted by Stage_Left on Thursday, July 30, 2015 10:14 PM

Karl- thanks for the explanation! Very helpful. I agree, sometimes just 'going for it' can lead to some welcome results.

Dave

  • Member since
    July 2003
  • From: On my kitchen counter top somewhere in central North Carolina.
Posted by disastermaster on Thursday, July 30, 2015 8:28 PM

https://encrypted-tbn0.gstatic.com/images?q=tbn:ANd9GcQ8Z1w3zTXmh37tsuab_hoJ8_uBrFBJQDtgQC2yJQtNyPjsaIgVAA Smells like my old basement.......http://i283.photobucket.com/albums/kk302/herekitty1960/smilies/ththYouStink.gif~original

 https://i.imgur.com/LjRRaV1.png


  • Member since
    January 2007
Posted by the doog on Thursday, July 30, 2015 7:55 PM

Today's work:

The importance of pinwashes. The panels on the bottom have them, the one on top dos not. Note the difference in definition.

I used some embossing powder on the seats to make it look like shredded fabric and moss,

Here's the seats painted up to look like rotted, smelly, old moss-covered fabric seats...

That's work for today! Hope to show more tomorrow!

Thanks for looking in!! Big Smile

  • Member since
    January 2007
Posted by the doog on Thursday, July 30, 2015 7:45 PM

RBaer

Verrrr-ee eeeenteresting!

I still wanna know where the graffiti decals came from, I'm thinking a T-34 rotting away somewhere.....

THose are from "Uschi".  (click it!--link)  I won a voucher for them in a Facebook contest. Cool stuff!

  • Member since
    September 2006
  • From: Dripping Springs, TX, USA
Posted by RBaer on Thursday, July 30, 2015 9:41 AM

Verrrr-ee eeeenteresting!

I still wanna know where the graffiti decals came from, I'm thinking a T-34 rotting away somewhere.....

Apprentice rivet counter.

  • Member since
    January 2007
Posted by the doog on Thursday, July 30, 2015 7:56 AM

Stage_Left

Hey Karl- looks fantastic, as usual. Your photos are very good as always, but I want to make sure I understand your thought process: did you use the hairspray and salt techniques together to give the chipped/worn paint effect more fidelity than either technique might produce individually?

Dave

Dave, yeah, I could explain that more..thanks for asking. Smile

What I did as to brush hairspray down the sides of the braces on the wall--I wanted to allow for big rust streaks in the creases of the braces-- and then I also attached salt to it while wet. I THEN wet down the rest of the walls with water, cut with a dab of liquid soap to help dispersion, and then salted that while wet. No plan or formula to speak of beyond that, just really kinda experimenting and rolling with it.

The hairspray came off a little more than I wanted, so I re-did the areas where it was too much. I just wet it and salted it.

If I were more patient, I would have done that in separate steps, and sealed between coats, but I wanted to get something happening with the paint already. Also, I'm confident enough at his stage to know that anything that got screwed up---like the too-big patches of rust--I could fix with little effort. And besides, some of my best finishes have been preceded by minor mistakes, Smile

  • Member since
    January 2007
Posted by the doog on Thursday, July 30, 2015 7:49 AM

Thanks, too, Terry. Very kind words from you, and I appreciate the nice compliment!

  • Member since
    January 2007
Posted by the doog on Thursday, July 30, 2015 7:48 AM

Thanks, Steve, Reaper, and Bruce!! :)

Thanks for following along!! Yes

  • Member since
    January 2013
Posted by jibber on Thursday, July 30, 2015 7:20 AM

Karl your work is second to none and very inspiring. We're so lucky to have all different types of builders here but your techniques stand apart. Its not only the techniques but the vision to see through a piece of plastic on a sprue and what your looking for. So cool..

Terry

  • Member since
    June 2013
  • From: Bay Area, CA
Posted by Reaper420 on Thursday, July 30, 2015 12:30 AM
Simply amazing good sir. Nuff said.

Kick the tires and light the fires!

  • Member since
    February 2010
  • From: Maine
Posted by Stage_Left on Wednesday, July 29, 2015 10:28 PM

Hey Karl- looks fantastic, as usual. Your photos are very good as always, but I want to make sure I understand your thought process: did you use the hairspray and salt techniques together to give the chipped/worn paint effect more fidelity than either technique might produce individually?

Dave

  • Member since
    May 2013
  • From: From the Mit, but live in Mason, O high ho
Posted by hogfanfs on Wednesday, July 29, 2015 8:09 PM

Looks fantastic, Karl!

 Bruce


 On the bench:  1/48 Eduard MiG-21MF

                        1/35 Takom Merkava Mk.I


  • Member since
    July 2003
  • From: On my kitchen counter top somewhere in central North Carolina.
Posted by disastermaster on Wednesday, July 29, 2015 7:56 PM

http://i600.photobucket.com/albums/tt84/SVT-GT500/smileys/woohoo2smiley-1.gif~originalWunderbar!

                    Excellent results............

 https://i.imgur.com/LjRRaV1.png


  • Member since
    January 2007
Posted by the doog on Wednesday, July 29, 2015 6:43 PM

OK< got some more details to show...

I touched up the white a bit inside the walls, I didn't care for those large rust patches. I just laid down some more salt and sprayed the patches...I think it looks more like what I had envisioned....

I decided to do some sponge chipping next. I tore a little piece off of gray packing sponge and dabbed it into a rust color....this is some ancient bottle of "AccuFlex something-Brown"--the label is worn away...

For anyone looking to try this the first time, make sure you do a little test before each pass to make sure that your paint is of the proper liquidity to transfer that way you want it too. If the paint is to thick it will be tougher to get a good pattern---test it on a piece of paper, As the paint dries in your bottle top or wherever you put it, add a LITTLE bit of water to it to thin it a bit and it will be easier to use.

And apply it to the parts you want to chip...doing the seat backs..

The driver's floor and area..still need to do spot-washes...notice that I've used a Dremel tool to "age" the seats...

I have found that you can not only dab the sponge, but drag it along to make various effects. I've dragged it here down from some of the apertures to simulate rust streaks. Note the weird variety of colors and paints that I'm using. Basically whatever catches my eye. Mix it on the brush to get different tones and go to town!

The top panels have been done, the bottom, not...

Close up...

 And some of the other parts..

Radiators..

The gun...

The driver deck so far...the seats have yet to be painted....still thinking on these...I have to add some kind of stuffing..

Still LOTS to do on the interior. Lot of little detail parts to do and then I have to assemble it and make sure it all fits...

Stay tuned, and thanks to all for looking in! Comments and questions always welcomed! Big Smile

  • Member since
    January 2007
Posted by the doog on Wednesday, July 29, 2015 6:28 PM

TigerEP1, thank you kindly, ANd don't worry--you can learn to be a superb modeler here. Heck, this is where I learned a lot of my skill!

Cliff, thanks for the king words, I'm sure your mufflers turned out fine. You put out some cool wrk yourself!

Thanks too, Bish. I appreciate you following along!

  • Member since
    January 2007
Posted by the doog on Wednesday, July 29, 2015 6:26 PM

disastermaster

He heh.....Hey, I found an old page here on finescale that has some credible info on the exterior colors.

Cool beans, Steve! Thanks for that cool link! It's always good to find info before yo're actually looking for it! THANKS!!

  • Member since
    December 2002
  • From: Bury St Edmunds, Suffolk, England
Posted by Bish on Wednesday, July 29, 2015 1:26 PM

That does look really nice Karl, love that rusty finish.

I am a Norfolk man and i glory in being so


On the bench: Airfix 1/72nd Harrier GR.3/Fujimi 1/72nd Ju 87D-3

  • Member since
    November 2009
  • From: SW Virginia
Posted by Gamera on Wednesday, July 29, 2015 7:49 AM

Yeah, looks great Karl. I just rusted out two mufflers and wish they'd come out half as well as what you've got here.

"I dream in fire but work in clay." -Arthur Machen


  • Member since
    January 2011
  • From: Springfield, MA
Posted by TigerEP1 on Wednesday, July 29, 2015 2:18 AM

wow... just wow man. Looks amazing. I only wish i could be half as talented as you :/ (i need to learn how to airbrush) Keep up the great work!

On the bench:

1/35th Tamiya Willi's MB


  • Member since
    July 2003
  • From: On my kitchen counter top somewhere in central North Carolina.
Posted by disastermaster on Tuesday, July 28, 2015 11:14 PM

He heh.......

http://i170.photobucket.com/albums/u244/heydoog/A7V%20Diorama/DSC05146_zpskeosru2r.jpg

"Parts and recreation".

                     Looking good.

                       http://a.deviantart.net/avatars/w/h/whitesheep150.gif?9     http://forum.magicmaman.com/nfs/smilies/8/alanisalareglisse.gif https://smileyshack.files.wordpress.com/2011/11/wolf_2.gif             

Hey, I found an old page here on finescale that has some credible info on the exterior colors.

 https://i.imgur.com/LjRRaV1.png


  • Member since
    January 2007
Posted by the doog on Tuesday, July 28, 2015 4:31 PM

Hi guys,


Been busily working away on this,and it's been a real task to plan the construction vs painting necessities. I have decided that I need to paint the interior first now at this point and then worry about finishing up the exterior. I'm going to go for an unrestored, rusted-out interior and a fresher exterior paint scheme, like you would expect of a monument in a park somewhere.

Finishing up the detailing, these door-seats look like wood to me, so I'm going to replace them wth real wood from a few detail sheets that I got from a friend. I removed the plastic "wood" with a Dremel and sandpaper. Ugh, that was tedious duty!

These little PE pieces that support the driver's portals can be tricky to bend, but if you use a small bending tool with a razor blade, it's not hard at all. Did I mention that I hate PE? Big Smile

I'm starting off with a rusty base. First, a spray of dark brown over the gray primer, shot wit an airbrush.

Parts forest..

I used Adam Wlder's Nitro line "Rust Effects" to spatter some rust against the brown. This is so that when I salt and hair spray the parts, what will show through is not just bland brown rust.

The results

And now, I have used a coat of hair spray and attached regular iodized slat by sprinkling it on the wet hair spray.

Let it dry before painting...

Next, I sprayed a light and varied coat of Model MAster flat White.

Some of the parts required different colors; I mixed up a grayish-green mix for some of these parts. There is no definite consensus on the actual colors used in the interiors of these tanks, so there's a lot of leeway to play with.

The hull interior: the lower wall has had the salt brushed off.

After scraping the salt off, here's what I have so far. This is without any extra detailing or weathering.

I will now go back and add some more white patches with a sponge and brush. Washes and filters, pigments and streaking to come. Then I can finally put the walls on and get finishing the exterior, which should be a lot easier than the inside!

Thanks for looking in, guys! Lemme hear from ya if you have any suggestions or criticisms! Wink

  • Member since
    January 2007
Posted by the doog on Tuesday, July 28, 2015 4:14 PM

GMorrison

I think I just figured the story out. This'll be good! Don't the Germans get little spikey things on their helmets? Just kidding.

Yeah, you know me, G....lol....I believe I DO have one of those helmet-guys! I may use him.. Smile

  • Member since
    January 2007
Posted by the doog on Tuesday, July 28, 2015 4:13 PM

RBaer

Graffiti decals? Elaborate please! Oh the possibilities!

ha ha, all in good time, Russ! I don't want to give it away yet, but I thought it wold be obvious? Stay tuned! Surprise

  • Member since
    September 2012
Posted by GMorrison on Wednesday, July 22, 2015 7:31 PM

I think I just figured the story out. This'll be good! Don't the Germans get little spikey things on their helmets? Just kidding.

 Modeling is an excuse to buy books.


  • Member since
    November 2005
  • From: Formerly Bryan, now Arlington, Texas
Posted by CapnMac82 on Sunday, July 19, 2015 2:37 AM

Those look nicer than the old Woodland Sceneics rub-ons in HO scale.

  • Member since
    September 2006
  • From: Dripping Springs, TX, USA
Posted by RBaer on Friday, July 17, 2015 10:09 AM

Graffiti decals? Elaborate please! Oh the possibilities!

Apprentice rivet counter.

  • Member since
    December 2002
  • From: Bury St Edmunds, Suffolk, England
Posted by Bish on Thursday, July 16, 2015 11:28 AM

Thanks Karl, they do look nice and real simple to work with. I am seriously considering this and the Tamiya Mk IV.

I am a Norfolk man and i glory in being so


On the bench: Airfix 1/72nd Harrier GR.3/Fujimi 1/72nd Ju 87D-3

  • Member since
    January 2007
Posted by the doog on Thursday, July 16, 2015 10:36 AM

Thanks, guys!

Bish, yep--they snap right together nicely. ANd thy're pretty durable when moving them around. A real nice engineering job here by Meng!

Thank you, Cliff and Tojo!

KnightsTemplar, yeah, the tracks are especially a HUGE improvement over the Tauro model, which I have as well in the stash, and which are, from all accounts, a real nightmare. I have yet to decide whether to keep and build up the Tauro eventually as a "closed" model--the interior is now too rudimentary to display what with this one on the market--or sell it for cheap. But there are so many cool WWI figures being released, I may do another small dio with some cool figures at some point. :)

  • Member since
    April 2013
Posted by KnightTemplar5150 on Thursday, July 16, 2015 8:16 AM
The difference between this kit and the old Tauro A7V are really remarkable! I built up the Tauro version thirteen years ago, but still clearly remember the horrible vinyl track segments and a highly rudimentary interior. I think it took half a tube of Squadron putty to get things up to par - I'm pretty impressed by what I see here, particularly since the Meng kit is a bit less expensive than what I paid on e-Bay at the time.
  • Member since
    March 2003
  • From: Western North Carolina
Posted by Tojo72 on Thursday, July 16, 2015 7:30 AM

Looking good,and thanks for all of the heads ups.

  • Member since
    November 2009
  • From: SW Virginia
Posted by Gamera on Wednesday, July 15, 2015 10:03 PM

Nice interior detail!

"I dream in fire but work in clay." -Arthur Machen


  • Member since
    December 2002
  • From: Bury St Edmunds, Suffolk, England
Posted by Bish on Wednesday, July 15, 2015 3:41 PM

Some nice work there Karl. Am I right in thinking those track links just click together.

I am a Norfolk man and i glory in being so


On the bench: Airfix 1/72nd Harrier GR.3/Fujimi 1/72nd Ju 87D-3

  • Member since
    January 2007
Posted by the doog on Wednesday, July 15, 2015 3:15 PM

Well, I"m working away....got some more to show, but not as much as I hoped. I'm having to strategize this build so as to be able to pull it off with the finish I want. Basically this is going to be a hypothetical preserved tank in an outdoor environment so there is bound to be a lot of rust and degradation of the metal.

Also, the painting requirements make the build sequence a challenge because of the variations in color of some of the parts. I have therefore decided to skip adding some of them and will paint them on stulls.

Here's some pics:

The hull pieces, walls, and floors have dozens of these annoying little stubs to cut off..

I had to dig this piece out and re-glue it because I had it on upside-down. Whistling

The tracks are an absolute joy to assemble. I HIGHLY recommend that you do NOT join the top "shingles" on top of the individual inks until you assemble all of the 48-per-side connecting pieces. Otherwise, it's awfully hard to join them without dislodging the upper plates. NOTE also that the flat plates ARE directional---you have to apply them depending on the flat vs "crimped" side. See here:

See how they lay?

Here's the in-progress shot...

I made a new cover for the ammo bin, damaged it from long-time rust , and thinned out the seats from underneath and did th same...

I also roughed the surfaces up with glue.

Of COURSE the @#$@^#' PE didn't fit. so I had to trim the sides of the gun cupola to look correct...this is "before". Look at how far off the PE piece is! Did I mention that I HATE P??? Angry

The seats and ammo bin in place.

I cut off the driver's compartment because it is too short to fit into the tabs of the side walls. When I do finally install it, it will be sandwiched between the walls and shimmed on bottom.

Sorta like this...

I got another key element in today. The graffiti for the vehicle sides. The "Crime" for which the sentence is..... BWAH HA HA HAAAAA!! 8 ball

Miles to go before I paint....Smile

  • Member since
    January 2007
Posted by the doog on Tuesday, July 14, 2015 7:53 PM

Cliff, thanks for coming along! The running gear LOOKS complicated, but really it's not too bad. Most of it is hidden by the chassis anyway! If you liked "SPOOKED",  think you'll really like what I've got planned!

Terry, no trench, but I hope you'll appreciate the imagination I"m going to put into it!

Russ, and Bill, thanks for looking in! Bill in all honesty, I"ve been wanting to get to some WWI myself, but you know how hard it is to decide. lol Hope you can follow along!

Bish, TigerEP, and Bruce---glad to have you guys along! :)

Update soon!!

  • Member since
    May 2013
  • From: From the Mit, but live in Mason, O high ho
Posted by hogfanfs on Tuesday, July 14, 2015 5:29 PM

Bish

This looks an interesting build. I have ben thinking about getting this kit myself so i'll be following along for sure.

I'm with Bish, I'm interested in getting this kit too.

But, the bonus is, Karl, you make these WIP threads very interesting. It's hard not the get hooked.

 Bruce


 On the bench:  1/48 Eduard MiG-21MF

                        1/35 Takom Merkava Mk.I


  • Member since
    January 2011
  • From: Springfield, MA
Posted by TigerEP1 on Tuesday, July 14, 2015 5:22 PM

Saw this today at my LHS. Looking forward to your take on it.

On the bench:

1/35th Tamiya Willi's MB


  • Member since
    December 2002
  • From: Bury St Edmunds, Suffolk, England
Posted by Bish on Tuesday, July 14, 2015 4:19 PM

This looks an interesting build. I have ben thinking about getting this kit myself so i'll be following along for sure.

I am a Norfolk man and i glory in being so


On the bench: Airfix 1/72nd Harrier GR.3/Fujimi 1/72nd Ju 87D-3

  • Member since
    July 2004
  • From: Texas
Posted by wbill76 on Monday, July 13, 2015 4:14 PM

Given your enthusiasm for WW1 subjects I was wondering how long it would be before you got around to this one Karl. Beer

  • Member since
    September 2006
  • From: Dripping Springs, TX, USA
Posted by RBaer on Monday, July 13, 2015 3:09 PM

Mmmm,,  teasing us hmmm?

Schweet, all the more fun!

Apprentice rivet counter.

  • Member since
    January 2013
Posted by jibber on Monday, July 13, 2015 9:03 AM

Karl this should be a great one, we don't see enough of WWI builds and a dio too, fantastic...I can see that beast rolling over a trench with some very shaken guys underneath. Can't wait on this one.

Terry

  • Member since
    November 2009
  • From: SW Virginia
Posted by Gamera on Sunday, July 12, 2015 6:24 PM

Neat Karl, I love 'Spooked' and really looking forward to seeing you work your magic here. $@#@ that's one complicated running gear.

"I dream in fire but work in clay." -Arthur Machen


  • Member since
    January 2007
Posted by the doog on Sunday, July 12, 2015 10:10 AM

Carlos, Steve, thanks for following along!

Tojo, thanks for that link, --looks like there are some "fit minefields" to be aware of---and for coming along!

KnightsTemplar,  jersey66, and tigerman, welcome aboard as well! Tigerman, I thoroughly plan to grab a Whippet too---they're coming out with one soon!

Hugo and Dave--I think you both will like what I am going to create here. Hugo, yes, I"m sure you can suss out what diabolical idea I am creating here, lol. I Hope it turns you like I can see it in my head. Devil Dave, I've got that Mk IV as well. I may tackle that one soon as well!

Thanks again for riding along guys! I'll be working on this some more today!

  • Member since
    February 2010
  • From: Maine
Posted by Stage_Left on Saturday, July 11, 2015 9:36 PM

Karl- I'm quite excited for this. I've got the Meng A7V as well to go along with my Takom British Mk IV to display what I think is basically considered the genesis of armored warfare, but you've obviously got something far more imaginative in mind here. I'm definitely staying tuned.....

Dave 

  • Member since
    March 2013
  • From: Puebla, Mexico
Posted by garzonh on Saturday, July 11, 2015 8:19 PM

OH Karl... I know what you are upto... Im afraid it will be a bitter sweet dio... awesome tank...not respected...

But whatever it is,...we are sure it will be a perfect build.

  • Member since
    June 2015
Posted by jersey66 on Saturday, July 11, 2015 5:38 PM
I'll be following this one.
  • Member since
    March 2003
  • From: Rain USA, Vancouver WA
Posted by tigerman on Saturday, July 11, 2015 5:08 PM
Oohhhh, fun topic. I'm glad WW I tanks are flourishing. I would like a Whippet myself.

   http://i7.photobucket.com/albums/y269/wing_nut_5o/PANZERJAGERGB.jpg

 Eric 

  • Member since
    April 2013
Posted by KnightTemplar5150 on Saturday, July 11, 2015 4:01 PM
I've been very curious about the Meng kit, so I'm looking forward to following this build to see how it all comes together.
  • Member since
    March 2003
  • From: Western North Carolina
Posted by Tojo72 on Saturday, July 11, 2015 2:38 PM

Looking forward to it Karl,after I built my Tamiya British Mark IV,I wanted to try a WWI German Panzer so I grabbed this one,will be following your treatment of this one.


Here is a nice build log that might be helpful

http://www.armorama.com/modules.php?op=modload&name=SquawkBox&file=index&req=viewtopic&topic_id=232296#1958274

  • Member since
    July 2003
  • From: On my kitchen counter top somewhere in central North Carolina.
Posted by disastermaster on Saturday, July 11, 2015 1:32 PM

http://i150.photobucket.com/albums/s101/caporal30/thLumberjack.gif Logged on!

 https://i.imgur.com/LjRRaV1.png


  • Member since
    July 2004
  • From: Sonora Desert
Posted by stikpusher on Saturday, July 11, 2015 1:17 PM

Well this should be a good one to watch! I am curious to see the final setting.


F is for FIRE, That burns down the whole town!

U is for URANIUM... BOMBS!

N is for NO SURVIVORS...

       - Plankton

LSM


JOIN OUR COMMUNITY!

Our community is FREE to join. To participate you must either login or register for an account.

SEARCH FORUMS
FREE NEWSLETTER
By signing up you may also receive reader surveys and occasional special offers. We do not sell, rent or trade our email lists. View our Privacy Policy.