SEARCH FINESCALE.COM

Enter keywords or a search phrase below:

Vietnam M48A3 --- Finished. 11/6

6028 views
45 replies
1 rating 2 rating 3 rating 4 rating 5 rating
  • Member since
    July 2015
  • From: TN
Posted by Vietnam Tanker on Wednesday, December 16, 2015 5:28 PM

I was also in A Co. 1/77 Armor from August 1970 thru May 1971.  What Vietnam Tanker says is correct.  We also carried 8X8 tarps for rainy weather, cots, and a lot of Claymores and C-4.  Many of us chose not to wear flak vests because it was too difficult to get out of the turret in a hurry.  So the flak vests were left on top of the turret mainly on the Bustle rack.

  • Member since
    April 2015
Posted by qcarr on Tuesday, November 10, 2015 9:20 AM

Great job, Kim - your M48 came out really nice!  Thanks for sharing your experience and results! Smile

  • Member since
    January 2015
  • From: Tumwater, WA.
Posted by M. Brindos on Friday, November 6, 2015 10:27 PM

That looks great Kim!

I like the stowage, especially the extra sprocket. It all looks great.  :)

The texture looks very convincing also. :)

On to the next build!  :D

- Mike Brindos "Lost Boy"

  • Member since
    May 2009
  • From: Poland
Posted by Pawel on Friday, November 6, 2015 5:03 PM

Hello Kim!

Your model looks very good to me! I believe the vets you were building it for are going to love it! Congratulations on a very nice build - what's next? Thanks for sharing and have a nice day

Paweł

All comments and critique welcomed. Thanks for your honest opinions!

www.vietnam.net.pl

  • Member since
    November 2007
  • From: Wisconsin Rapids, WI
Posted by moose421 on Friday, November 6, 2015 3:02 PM

Here she is.  Just one small problem is that the decal that I used silvered a little.  Other than that I am happy with the result.  I added a bit of storage, spare tracks and a spare gear.


Thank you all for looking and following my build.


Kim

  • Member since
    December 2002
  • From: Valrico, FL
Posted by HeavyArty on Tuesday, November 3, 2015 7:52 AM

No offense taken, just adding my two cents on historical accuracy.  I also know all about building for others and adding what they want, wether it is historically accurate or not.  Its looking great.  Keep up the good work and I'm sure your buddy and his father-in-law will love it.

Gino P. Quintiliani - Field Artillery - The KING of BATTLE!!!

Check out my Gallery: https://app.photobucket.com/u/HeavyArty

"People sleep peaceably in their beds at night only because rough men stand ready to do violence on their behalf." -- George Orwell

  • Member since
    November 2007
  • From: Wisconsin Rapids, WI
Posted by moose421 on Monday, November 2, 2015 7:01 PM

Heavyarty

Yes I agree.  He wasn't part of the 1st Cav Division.  They were an independant regiment.  They had 1 troop with the M48A3's and 2 troops with the M113's.

As for the 1/1 on the right rear fender I think I just might keep it.  He was sure that they had it on the right rear and told his son-in-law (my friend).  Like before I added the Pepe's Revenge ( wasn't on his tank). His son-in-law wanted there fore I added it. 

Take no offense, I appreciated all the help in correcting some of the problems I had and made.  I will keep it to the way they want it.  I am doing this to honor his service and hope it loves it.

Thank you

Also thank you to all that have looked and gave the great compliments.  I means a lot comming from the quality of builders that is on this forum.


Kim

  • Member since
    July 2015
  • From: TN
Posted by Vietnam Tanker on Monday, November 2, 2015 12:05 PM
I was a Tanker in A co 1/77 Armor, 1/5 Mech Infantry in Quang Tri, Viet Nam. The two holes you refer to in the mantle shroud are the telescope in the left and the M-73 COAX MG on the right. In the north we used M-42 Duster ammo cans to store our personal gear and filled the bustle rack with 50 cal ammo. We also used the 50 cal mounted above the commanders cupola in a tripod cradle.
  • Member since
    December 2002
  • From: Valrico, FL
Posted by HeavyArty on Monday, November 2, 2015 10:33 AM

moose421

Once again this tank belonged to the 1/1st Cav.  They had a mix of armor and apc's.
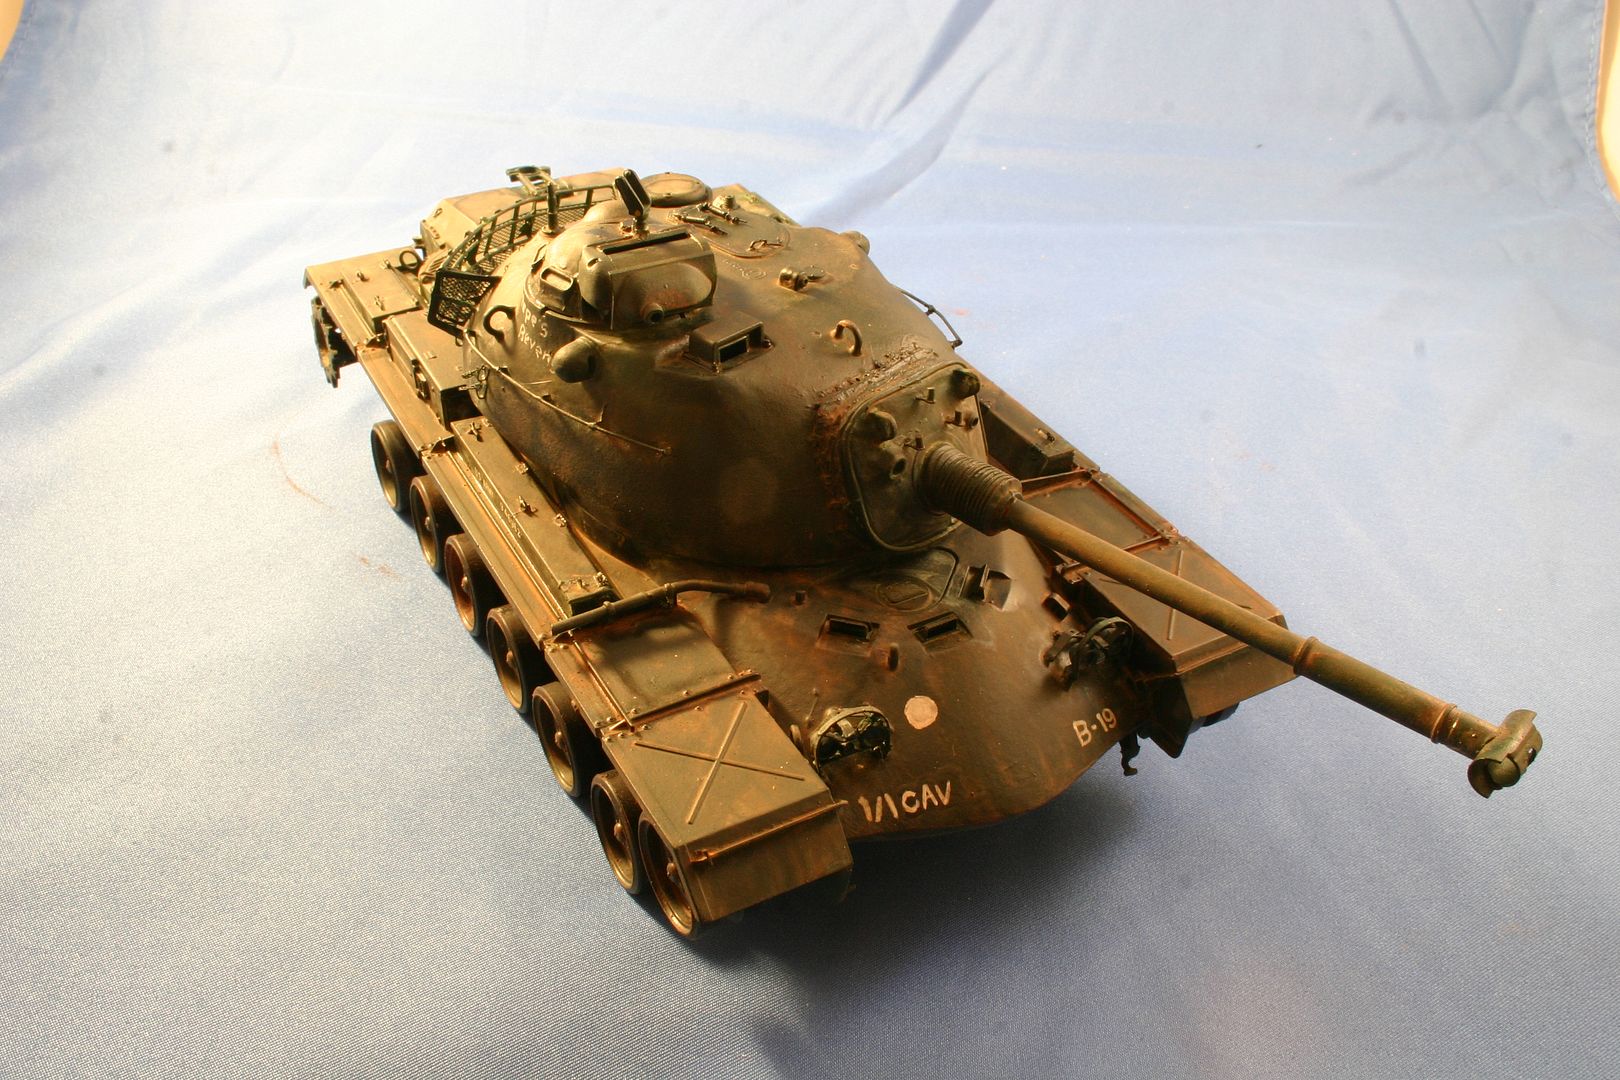


OK, I think I have sorted the unit he belonged to.  It was most likely 1st Squadron, 1st Cavalry Regiment.  They were a separate Armored Cavalry Regiment that was attached to the 101st Airborne Division during the Vietnam War.  They were not part of the 1st Cavalry Division or 11 ACR.

"Arriving in Vietnam in August, 1967, the Squadron consisted of three Armored Cavalry Troops and one Air Cavalry Troop, D Troop, which was not deployed until July 1968. The Squadron immediately deployed in the I Corps Tactical Zone around the city of Chu Lai. It was committed to battle two days after its arrival, operating against the North Vietnamese Army and Vietcong. From 01 September 1967 to June 1968, the Squadron was involved in eleven major battles and numerous smaller engagements; among these were Cigar Island, Que Son Valley, Pineapple Forest, the Western Valley and Tam Ky.

1st Squadron, 1st Cavalry Regiment remained in the field continuously during the Vietnam War from 1967-1972, attached as an independent Squadron to elements of the 101st Airborne Division and took part in 13 campaigns. The Squadron departed Vietnam on 10 May 1972."

The markings on the front are correct, but the back is still off.  It should be the same as on the front.  The left side (when looking from the rear) should have 1/1 CAV.  The right side should have B-19.  Your friend may be a little fuzzy on the placement of the markings.  The standard has always been higher unit on the left (1/1 CAV) and the Company or Troop and vehicle number on the right (B-19).

Gino P. Quintiliani - Field Artillery - The KING of BATTLE!!!

Check out my Gallery: https://app.photobucket.com/u/HeavyArty

"People sleep peaceably in their beds at night only because rough men stand ready to do violence on their behalf." -- George Orwell

  • Member since
    September 2013
Posted by blackdog62 on Monday, November 2, 2015 10:20 AM

I also found the M2 info interesting thanks for posting that.

  • Member since
    September 2013
Posted by blackdog62 on Monday, November 2, 2015 10:07 AM

What a great looking build. that fine PE makes such a difference.

Growing up my house was land locked by fort ord ca. I was the only house west of the air base those tanks and the 173 air cav. Was around and over my house daily.

This build brings back a lot of memories including walking home from school and having to put arms up in front of a m60 toting sentry that jumped out of a bush. Lol

  • Member since
    November 2007
  • From: Wisconsin Rapids, WI
Posted by moose421 on Sunday, November 1, 2015 2:55 PM

Thanks Mike, Pawel.  I didn't know that it was yellow.  My kit was given to me for this build and didn't include any decals with it.  Also I couldn't read any numbers on the dot.


Thanks I will be changing this to be correct. 

Thanks again.  This has been a learning curve building this kit. 


Kim

  • Member since
    May 2009
  • From: Poland
Posted by Pawel on Sunday, November 1, 2015 4:57 AM

Hello!

Your tank is looking even better now!

Here's some data on the yellow disc markings (weight classification sign)

http://www.vietnam.net.pl/TB746/Section4.htm#Weight%20Classification.

There's also a nice markings set by Archer - AR35003:

http://www.hmmwvinscale.com/archerfinetransfers.htm

I hope it will help you, good luck with your build and have a nice day

Paweł

All comments and critique welcomed. Thanks for your honest opinions!

www.vietnam.net.pl

  • Member since
    January 2015
  • From: Tumwater, WA.
Posted by M. Brindos on Saturday, October 31, 2015 10:25 PM

That white dot is actually yellow and indicateds the vehicles tonnage (I.E. for bridges). I believe for this one it should be 54. The kit provided decal should suffice.

The top looks more appropriate now. I think you got this licked now.  :)

- Mike Brindos "Lost Boy"

  • Member since
    November 2007
  • From: Wisconsin Rapids, WI
Posted by moose421 on Saturday, October 31, 2015 9:58 PM

Thanks for the photo Mike.

Here is a improved version.  I cleaned her up a little.  Also I eliminated the US Army on the rear fenders.  Need to blend the fix a little more.  I changed the markings on the front as well.  I noticed that I forgot the white dot. 

Once again this tank belonged to the 1/1st Cav.  They had a mix of armor and apc's.
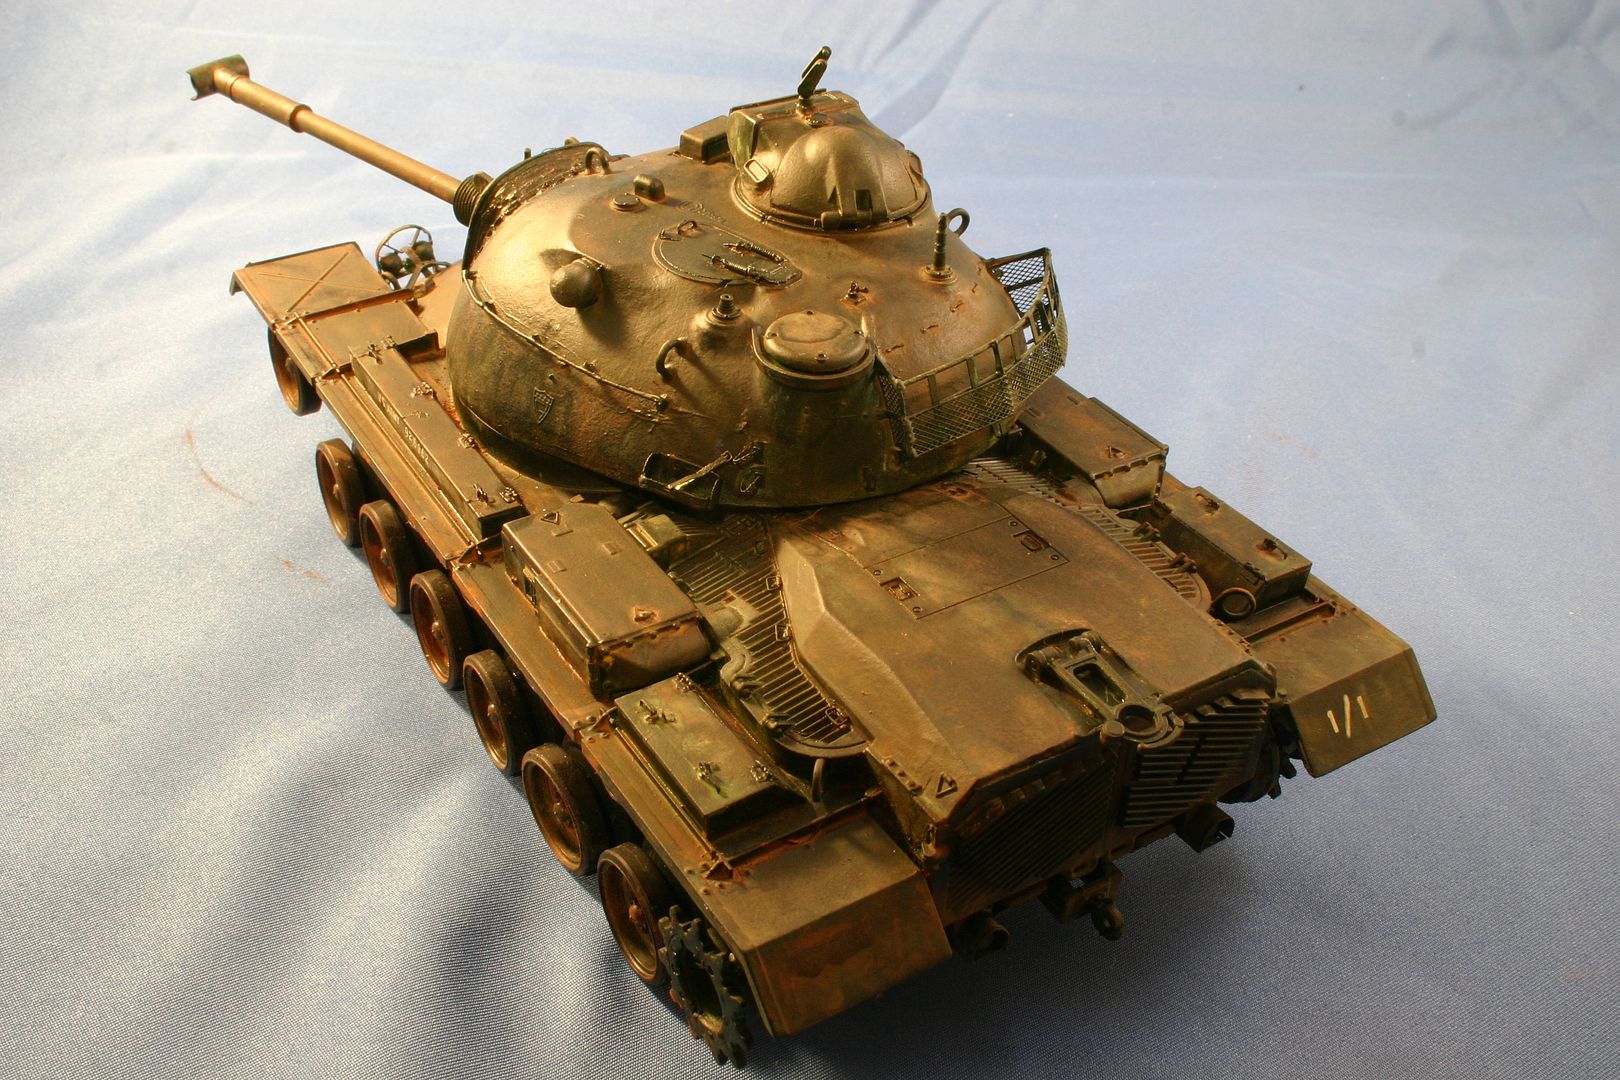
 

Thanks for looking

Kim


  • Member since
    January 2015
  • From: Tumwater, WA.
Posted by M. Brindos on Saturday, October 31, 2015 12:46 PM

I just came acrossed this picture that supports that some units may have painted US ARMY on the fenders.

http://www.mecmodels.com/wordpress/wp-content/uploads/DE-TA02-references.jpg

So apparently it is possible.  :/

Not sure where they found that picture (left side second from the bottom)

- Mike Brindos "Lost Boy"

  • Member since
    November 2007
  • From: Wisconsin Rapids, WI
Posted by moose421 on Saturday, October 31, 2015 10:21 AM

Thanks for the heads up on the wrong markings.  His unit was the 1/1st CAV.  I miss marked the front of the hull.  I enlarged the photo of him and his tank.  I thought it was the ACR, but looks more like CAV.  Also I found his units website and they have a picture of one of their M48A3's.  So, late last night I painted over the ACR and the rear US ARMY on the rear fender.  He has told me that they did have the 1/1 on the right rear fender.

I have repainted the CAV and will be soon fixing the way to dirty on the turret.


Thanks again

Kim

  • Member since
    December 2002
  • From: Valrico, FL
Posted by HeavyArty on Friday, October 30, 2015 10:29 PM

The bumper #s on the front are sort of correct.  They should be for 1st Squadron, 11th ACR (Armored Cavalry Regiment).  There was no 1/1 ACR and 1 BDE, 1 CAV would not be written that way.  The rear markings should be the same as the front ones.  The US Army should not be on the rear at all.

Examples of standard Vietnam 11 ACR markings:

The rear fender was the correct location for the rear markings as well.

Gino P. Quintiliani - Field Artillery - The KING of BATTLE!!!

Check out my Gallery: https://app.photobucket.com/u/HeavyArty

"People sleep peaceably in their beds at night only because rough men stand ready to do violence on their behalf." -- George Orwell

  • Member since
    January 2015
  • From: Tumwater, WA.
Posted by M. Brindos on Friday, October 30, 2015 9:30 PM

Aside from has already been pointed out, this is going splendidly well! I like the tone you got out of the paint and it looks really good. You did get a little crazy with the dirt up top, but you seem to already know how to fix it.

Looking good, Kim, really good.  :)

- Mike Brindos "Lost Boy"

  • Member since
    November 2007
  • From: Wisconsin Rapids, WI
Posted by moose421 on Friday, October 30, 2015 8:44 PM

Thank you for the comments.  The 1/1 was put on by the crew.  I will change the dots on the US Army though.  Thanks, after looking at the photos I see that she is to dirty on the top of the turret.  That is one point I knew I needed to tone down.  I am going on the marking on the rear fenders from my friends father-in-law.  He is the one that is in the orginal photo.  Happens to be the big guy closest to the mantlet.  If I am remembering right the unit was the 1st of the 1st Cav.  I hope that I didn't screw up the marking on the front glacis.  I know the B-19 is right but the other I guessed.


But thank you for the look and comments.  I appreciate them.

Kim

  • Member since
    May 2009
  • From: Poland
Posted by Pawel on Friday, October 30, 2015 7:49 PM

Hello Kim!

Your tank is looking good! Sometimes, looking at the photos from Vietnam you wonder if "too dirty" was even a thing there... Just watch for the logic of this - top of the turret should be somewhat cleaner than the road wheels, with maybe some footprints, but with the colour showing through, whereas the lower hull would be totally mud colour sometimes. I'm also not so sure about the markings on the rear fenders - U.S. ARMY 1/1? One thing - the marking regulation for that time period specify US ARMY, without the dots. Second - those fender quarters aren't a good place for markings, because of how often they get blown off, squashed while backing up and so on. Here are some regulations you could find useful: http://www.vietnam.net.pl/TB746_en.htm Especially the Section III. Good luck with your build and have a nice day

Paweł

All comments and critique welcomed. Thanks for your honest opinions!

www.vietnam.net.pl

  • Member since
    November 2007
  • From: Wisconsin Rapids, WI
Posted by moose421 on Friday, October 30, 2015 7:28 PM

Here is a couple of pictures of blending.  I think I might do a little more to tune it down.  It doesn't look this dirty in real life.  I guess photos show more than the eye.


Thank you for looking.


Kim

  • Member since
    November 2007
  • From: Wisconsin Rapids, WI
Posted by moose421 on Friday, October 30, 2015 7:08 PM

Here we go.  First up I did add some texture to the rear deck.  Not a lot but it may have been covered up by the paint.  Also I wasn't able to fix the rear tail lights.  They were just CA'd in to good. I didn't want to damage anything, so I left them.  Sorry rivit counters.

In the next pictures I got her painted up.  I used Olive Green Vallejo Model Air.  I then dusted the whole build with Olive Drab.

Also at request of my friend I added his Father-in-laws nickname to the turret.  The rest of the markings I figured out from the photo or personal knowledge of the father-in-law.

I used Archer transfers for the first time.  Boy, I have a lot to learn in applying those.  I had some problems, all my fault.  Also I see one is on at a angle.  Again my fault, not the manufacturer.


Next I used the dot filter method of applying washes.  I used a light green, blue, yellow orche and white.

Here she is after the dot filter washes.

Next up is after I applied MIG pigments.  This photo is before I blended with turpentine.

I will post pictures of after I blended with turpentine.

Again and alway any concerns or compliments are appreciated.

Kim


  • Member since
    March 2003
  • From: Western North Carolina
Posted by Tojo72 on Saturday, October 10, 2015 9:44 PM

Wow,lotsa details,this one is really taking shape and looking good.

  • Member since
    November 2007
  • From: Wisconsin Rapids, WI
Posted by moose421 on Saturday, October 10, 2015 6:29 PM

Thanks for the compliments guys.  Thank you Mike. I didn't know that.  Another change. Big Smile 

Once again thank you for the comments on what I missed or did wrong. 

Kim

  • Member since
    January 2015
  • From: Tumwater, WA.
Posted by M. Brindos on Saturday, October 10, 2015 2:36 PM

Wow! You are going places with yours that I'm not even touching on mine. Well done!!

The back deck cover was cast as well. Don't forget that part.  ;)

- Mike Brindos "Lost Boy"

  • Member since
    January 2007
Posted by the doog on Saturday, October 10, 2015 9:31 AM

WOw, that's a really excellent piece of work you have going no so far, Kim! I think you've even gone an extra mile past what I remember doing to mine! Can't wait to see you put some paint on her! Big Smile

  • Member since
    November 2009
  • From: SW Virginia
Posted by Gamera on Saturday, October 10, 2015 7:50 AM

She looks really good to me. Looking at all those teeny PE handles is giving me a headache. You sir have more patience than I! 

"I dream in fire but work in clay." -Arthur Machen


  • Member since
    November 2007
  • From: Wisconsin Rapids, WI
Posted by moose421 on Friday, October 9, 2015 9:46 PM

Ha I guess I did. I will be switching that.

Thanks

Kim


JOIN OUR COMMUNITY!

Our community is FREE to join. To participate you must either login or register for an account.

SEARCH FORUMS
FREE NEWSLETTER
By signing up you may also receive reader surveys and occasional special offers. We do not sell, rent or trade our email lists. View our Privacy Policy.