SEARCH FINESCALE.COM

Enter keywords or a search phrase below:

A Tale of Two Kitties (pictures are back halfway down first page)

15900 views
151 replies
1 rating 2 rating 3 rating 4 rating 5 rating
  • Member since
    April 2016
  • From: N. Burbs of ChiKawgo
Posted by GlennH on Friday, September 16, 2016 12:37 PM

I gotta say the work you put into your post graphics is as amazing as your building skills. Just excellent.

A number Army Viet Nam scans from hundreds yet to be done:

https://www.flickr.com/photos/southwestdreams/albums/72157621855914355

Have had the great fortune to be on every side of the howitzers.

  • Member since
    July 2003
  • From: On my kitchen counter top somewhere in central North Carolina.
Posted by disastermaster on Sunday, September 25, 2016 10:09 PM

Tojo72
Your attention to detail is outstanding,takes a lot of patience to achieve that level of weathering.


 As a hobby, I do this when I have nothing else to do.

  Actually it's not as much about patience as it is about taking my time. Good detail comes with learning patience and http://s4654.storage.proboards.com/5644654/i/c2ELSt7daPyF1J1zw8QZ.gif patience is a big part of this hobby - it's just a hobby to me (including the smileys and the formatting), I'm not inclined to crank out models to fill the house with, but models to attract interest and inspire creativity in others also.
 Why knock out so
http://www.animated-smileys.com/emoticons/animated-smileys-sport-120.gif so models when you can put all that effort in to one serious composition. At todays prices, it seems wasteful to hurry a model just to get it done.


               http://lparchive.org/EcoQuest-1-The-Search-for-Cetus/Update%204/emot-pervert.gifThanks again Tojo!

                           AND.......

 
  As I continue to complete "PaperbackedTiger", 
I'll eventually be taking it up to the next level with - -
 
                  "The Phantom Tiger"

                                   https://frigginloon.files.wordpress.com/2010/07/elevator.gif?w=500

...........  but it's not what you think it's gon'na be either.
                    http://rs717.pbsrc.com/albums/ww173/prestonjjrtr/Smileys/Star%20Wars/Smiley29-1.gif~c200
 And I'll be adding a lot 'ta more details and creativity for y'all guys to review
 
   Then - I'm gon'na continue beyond that also.
              Hang on, more's a coming.

 Alright,
          break's over...........  back on muh headhttp://www.freesmileyfaces.com/files/day-by-day/sports-smiley-faces/316.gif

                           (punch line from an old joke)

                                        http://i20.photobucket.com/albums/b232/gluetank/Animated/Disastermastermotion-3.gif


 https://i.imgur.com/LjRRaV1.png


  • Member since
    August 2016
  • From: Eufaula, Alabama
Posted by WannabeFarmboy on Sunday, September 25, 2016 11:26 PM

This is just incredible work. I've always built straight out of the box too, but mostly because I've just never known where to start. Actually, that's the main reason I joined the forums here. Can't wait to see further progress on this model. 

  • Member since
    March 2015
  • From: Streetsboro, Ohio
Posted by Toshi on Monday, September 26, 2016 4:04 AM

Mind boggling work.  This is far beyond me!  Amazing!

Toshi

On The Bench: Revell 1/48 B-25 Mitchell


Married to the most caring, loving, understanding, and beautiful wife in the world.  Mrs. Toshi


  • Member since
    July 2003
  • From: On my kitchen counter top somewhere in central North Carolina.
Posted by disastermaster on Thursday, September 29, 2016 11:41 PM

Gamera

Love that beautiful worn rusted look. I've got to try for something like that someday... 

Kudos sir! 

Glad 'ya like it....... http://www.sherv.net/cm/emoticons/yellow-hd/nodding-head-smiley-emoticon.gif THANKS!
T hat's all just oil paint.

                          http://i20.photobucket.com/albums/b232/gluetank/Animated/Disastermastermotion-3.gif

 https://i.imgur.com/LjRRaV1.png


  • Member since
    July 2003
  • From: On my kitchen counter top somewhere in central North Carolina.
Posted by disastermaster on Monday, October 3, 2016 12:26 AM

Bish

Lovely work DM. Thats a great looking texture and really nice attention to detail.

http://www.korat-info.com/forum/images/smilies/salute.gif Thank you Herr Bishmeister.
 There's many more cards yet to be dealt.https://encrypted-tbn2.gstatic.com/images?q=tbn:ANd9GcR_VsbU8801VPzN9l0Z6uhvyAfnM0m2fAWho1_6MLox1uDCPs50aA

                                   
                                      http://i20.photobucket.com/albums/b232/gluetank/Animated/Disastermastermotion-3.gif

 https://i.imgur.com/LjRRaV1.png


  • Member since
    July 2003
  • From: On my kitchen counter top somewhere in central North Carolina.
Posted by disastermaster on Wednesday, October 5, 2016 4:39 PM

GlennH
I gotta say the work you put into your post graphics is as amazing as your building skills. Just excellent.


Thanks Glenn,
 
http://i307.photobucket.com/albums/nn287/CariCreates/Smileys/GB.gif~original Like with a good book, I take my time. I try to make 'em as entertaining as informative.

  Good stuff coming up here soon.

http://www.greensmilies.com/smile/smiley_emoticons_foto.gifI appreciate your comments.                                                              
                                               
http://i20.photobucket.com/albums/b232/gluetank/Animated/Disastermastermotion-3.gif

 https://i.imgur.com/LjRRaV1.png


  • Member since
    July 2003
  • From: On my kitchen counter top somewhere in central North Carolina.
Posted by disastermaster on Friday, October 14, 2016 2:31 AM


WannabeFarmboy
This is just incredible work. I've always built straight out of the box too, but mostly because I've just never known where to start. Actually, that's the main reason I joined the forums here. Can't wait to see further progress on this model. 

Toshi
Mind boggling work.  This is far beyond me!  Amazing!

Toshi

Hey Wannabe and Toshi,
 Thank you for the input. Just be creative by expanding beyond out of the box and give it a try.  Works for me.              

                                          https://www.mediafire.com/convkey/7b90/qg0lxr2kl17c62z6g.jpg?size_id=2 
 Don't beat yourselves up........ we've all had to start somewhere.
This really isn't a "bridge too far". Just look how much Bish has progressed with that super
E-100 Jag dio .

I was going to include an update tonight, but it seems that Photobucket has messed http://www.millan.net/minimations/smileys/babysmiley2.gifitself.

Again, thanks guys.

 https://i.imgur.com/LjRRaV1.png


  • Member since
    July 2003
  • From: On my kitchen counter top somewhere in central North Carolina.
Posted by disastermaster on Friday, October 14, 2016 7:48 AM

 Apparently, it's my http://www.laie-smileys.com/tele.gif browser that's messed http://www.millan.net/minimations/smileys/babysmiley2.gifhttp://www.aussieghosts.com/forum/images/smilies/stinks.gifitself.

http://www.sherv.net/cm/emo/angry/smiley.gif That's just plumb irritating.

I can see everybody's pictures, just not mine.

Dang, now I gott'a upgrade my system and browser (which I don't want to do because I'm comfortable with it) before I can see what I'm doing.

So hang on........ it's soon on the way.

 https://i.imgur.com/LjRRaV1.png


  • Member since
    December 2002
  • From: Bury St Edmunds, Suffolk, England
Posted by Bish on Friday, October 14, 2016 12:46 PM

disastermaster


WannabeFarmboy
This is just incredible work. I've always built straight out of the box too, but mostly because I've just never known where to start. Actually, that's the main reason I joined the forums here. Can't wait to see further progress on this model. 
 
Toshi
Mind boggling work.  This is far beyond me!  Amazing!

Toshi


Hey Wannabe and Toshi,
 Thank you for the input. Just be creative by expanding beyond out of the box and give it a try.  Works for me.              

                                          https://www.mediafire.com/convkey/7b90/qg0lxr2kl17c62z6g.jpg?size_id=2 
 Don't beat yourselves up........ we've all had to start somewhere.
This really isn't a "bridge too far". Just look how much Bish has progressed with that super
E-100 Jag dio .

I was going to include an update tonight, but it seems that Photobucket has messed http://www.millan.net/minimations/smileys/babysmiley2.gifitself.

Again, thanks guys.


I can only echo what DM says here. Its all a matter of pushing yourself at a pace that you are comfortable with. I put things off for years concerned i would not pull it off. Tree's, scratchbuilding, Urban scenes. But none of them turned out as hard as i expected and the results were better than i could of hoped. Of course, there is room for improvment, lessons learned, but that happens with every build no matter how long you have been doing it.

Just don't be afraid to fail. If it goes wrong, so be it. I think my next challenge will be vehicle.

And DM, thank you for the compliment, that is high praise indeed.

I am a Norfolk man and i glory in being so


On the bench: Airfix 1/72nd Harrier GR.3/Fujimi 1/72nd Ju 87D-3

  • Member since
    July 2003
  • From: On my kitchen counter top somewhere in central North Carolina.
Posted by disastermaster on Thursday, October 20, 2016 11:38 PM


   http://hvac-talk.com/vbb/images/smilies/putergreet013.gifHey 'yall.
Now,  http://www.animatedimages.org/data/media/318/animated-computer-smiley-image-0039.gif  after that infernal browser episode.


                  http://yoursmiles.org/msmile/compgame/m0307.gif Here we go again.
                                                                                                          
  Well, it's been a while since my last update, but I recently got me
a new
http://orig06.deviantart.net/9bf2/f/2009/290/1/a/shooting_smiley_by_killerbeat.gifColt carbine with a stack of accessories and I've just
been having "too much fun with that". 

I hope 'ya can understand getting a bit carried away with it....... 
'specially with it being Fall and all,....  here down south.
                                  http://www.picgifs.com/smileys/smileys-and-emoticons/autumn/smileys-autumn-732782.gif
  Meanwhile,http://www.tiptopglobe.com/skin/smile/kat2/smileys-free-download-3317.gif
                  
back on the farm.


I'm still all over the place with this project guys...........  http://emoticoner.com/files/emoticons/smileys/run-around-smiley.gif


Now, back to where we left the the turret.http://www.animateit.net/data/media/86/200.gif


All hairsprayed, and headed in the panzergray way......
http://i20.photobucket.com/albums/b232/gluetank/Porsche%20VK4502%20Vorne/painted%20Porsche%20turret/PIC_zpsoas7vprj.jpg
Next,
A little further down the road (
after a bit more http://orig06.deviantart.net/9bf2/f/2009/290/1/a/shooting_smiley_by_killerbeat.gif gunplay).

Details relevant to this version.
 

The turret was specifically designed by Krupp for this vehicle.


Here's more detail on that last picture.

1.  The kit front and aft turret roof plates are the production series Tiger II 40mm plates. The turrets were originally
     built with 25mm thick front and aft roof plates as
found on the V1 - V3 Tiger II prototypes and the three VK45.02
     (P) vehicles. With the exception of a cut out on the front edge of the armor plate creating a splash guard
these plates
     sat flush with the turret front and side armor plates and left a 15mm step up to the 40mm center turret roof plate.


2.  There is a thin square deflector bar that sits across on top edge of the turrets front armor plate splash guard that
     needs to be removed.


3.  The forward blade sight mounted on the front left side of the turret roof needs to be removed.

4. The cover for the spent cartridge rounds ejection port along with the curved rain guard welded to the rear turret roof
     will have to be removed and the hole filled.


5.  The center 40mm turret roof plate that houses both the commander's cupola, loaders hatch and ventilation fan housing
     needs to have the close defense weapon removed
and the hole filled as well as the drain channel to the right of the
     loader's hatch. You'll have to acquire the armored cover for the ventilator as the kit only supplies you with
the water
     tight ventilator cover.


6.  The commander's cupola was not welded to the turret roof. It was bolted down to the roof and sat in a shallow furrow
     cut out on the 40mm center turret roof.


7.   Use the commander's cupola without the drain channels.

8.   I
removed the 4 large rivets on the hinges of the loader's hatch cover as these were not present on any of these
      vehicles. Only when used on the Tiger I.


9.   Remove the 3 sockets for the jig boom on the turret roof.

10. The rain guards over both the binocular gun sight and machine gun opening on the turret front plate were removed.

11.  The handle on the outside of the rear turret hatch is not used.

12.  I added two conical bolts just in front of the hole for the commander's viewing port on the left side of the turret. Also
      create a flat circular plug and add
welding around the plug for the commander's viewing port in the curved area of the
      turret. A decision had been made to plug this hatch.


13.  I used the supplied aluminum monobloc 8.8cm gun barrel.


Getting some collective perspective before progressing further.
http://i20.photobucket.com/albums/b232/gluetank/Porsche%20VK4502%20Vorne/painted%20Porsche%20turret/PICT0025_zpsutlksswt.jpg


Dullcoted and kind'a grim lookin' eh?


Cupola and barrel not secured yet.


Close up surface texture.......... this thing's growin' hair..........


Some buff washing up high


Got most of those shell impacts all mellowed out..... several shrapnel scrapes and scratches to work on yet.......


Some dark washing down low


And yet a bit more dusting and color adjustment.


Close up...........   still gott'a kill some of that shine.

Ta Daaaaaaa.........


And now, for a bit of fun........

I know the periscopes didn't light up but it was something fun & so simple I just had to fool around with it.


Pending some very minor turret work.......  it now begins to come together.          


And yet, there's a ton more of stuff where that came from...... stay tuned.
                                                 
                                      So now,
  http://orig06.deviantart.net/9bf2/f/2009/290/1/a/shooting_smiley_by_killerbeat.gifhttp://orig06.deviantart.net/9bf2/f/2009/290/1/a/shooting_smiley_by_killerbeat.gifOff to the range tomorrow.http://orig06.deviantart.net/9bf2/f/2009/290/1/a/shooting_smiley_by_killerbeat.gifhttp://orig06.deviantart.net/9bf2/f/2009/290/1/a/shooting_smiley_by_killerbeat.gif         
 
                                                                                          
                                        Then off to the gym.  

                                                   http://www.sherv.net/cm/emoticons/gym/dumbbell-lifting-smiley-emoticon.gif                                            
                                  https://media.giphy.com/media/rYq49SlUrPqhy/giphy.gif
                                         
https://encrypted-tbn1.gstatic.com/images?q=tbn:ANd9GcQQ1C_1yiTtfLyT9Txeijw2yYBHw1ZBfPenro3iZ-6bdV2BtP3Iz2nfiA                               http://www.millan.net/minimations/smileys/imoksmiley.gif
                                                                                            
                                               http://i20.photobucket.com/albums/b232/gluetank/Animated/Disastermastermotion-3.gif


 https://i.imgur.com/LjRRaV1.png


  • Member since
    July 2014
Posted by modelcrazy on Thursday, October 20, 2016 11:46 PM

So DM, being steel, what does that thing weigh 3 lbs. give or take?


Just pullin your chain, Wink that looks fantastic, just like steel.

Steve

Building a kit from your stash is like cutting a head off a Hydra, two more take it's place.


http://www.spamodeler.com/forum/

  • Member since
    October 2015
Posted by Modelrob on Friday, October 21, 2016 5:22 AM

Just insperational and outstanding work.


Robert

  • Member since
    July 2003
  • From: On my kitchen counter top somewhere in central North Carolina.
Posted by disastermaster on Wednesday, October 26, 2016 12:16 PM

modelcrazy

So DM, being steel, what does that thing weigh 3 lbs. give or take?

 Just pullin your chain, Wink that looks fantastic, just like steel.


Modelcrazy,
    Thank you.

Actually, it's pretty heavy. I mounted some lead weights in the hull to give it some heft and distribute the weight firmly and evenly on the tracks.

                                
http://i20.photobucket.com/albums/b232/gluetank/Animated/Disastermastermotion-3.gif

 https://i.imgur.com/LjRRaV1.png


  • Member since
    July 2003
  • From: On my kitchen counter top somewhere in central North Carolina.
Posted by disastermaster on Monday, October 31, 2016 12:06 AM

Modelrob

Just inspirational and outstanding work.

Robert


Thank you Robert.

Stay tuned....  http://www.linedanceposse.com/images/type.gif
  I'm getting another update ready to go.....
since photobucket's finally got their act together...... again.
I guarantee it'll be https://www.industrialprojectsreport.com/forum/images/smilies/digger-smiley-emoticon.gifground breaking.


After all week..........http://orig11.deviantart.net/424e/f/2007/038/b/d/_beatdeadhorseplz__by_melihitchcock.gif  

         I'm tired of struggling with'em.
                                                                http://i20.photobucket.com/albums/b232/gluetank/Animated/Disastermastermotion-3.gif

 https://i.imgur.com/LjRRaV1.png


  • Member since
    January 2006
  • From: California
Posted by SprueOne on Monday, October 31, 2016 10:47 PM

Good looking steel, I mean plastic, I mean steel...

Anyone with a good car don't need to be justified - Hazel Motes


Iron Rails 2015 by Wayne Cassell Weekend Madness sprueone

  • Member since
    July 2003
  • From: On my kitchen counter top somewhere in central North Carolina.
Posted by disastermaster on Thursday, November 3, 2016 8:48 PM


SprueOne
Good looking steel, I mean plastic, I mean steel...


http://logansteel.com/wp-content/uploads/2012/07/wf-beam-1.png

When you care to send the very best. . . . . . .


Thanks Sprue,
 I'll be throwing up some more dirt here soon......
meanwhile, back to the firing range tomorrow morn.
                                   http://3.bp.blogspot.com/-B44dzLZKBF4/Vkbb6pc4eBI/AAAAAAAAQY8/ULX2plO7AZY/s1600/emticons%2Bgun%2Bboom%2B%2B%252818%2529.gif

                                 http://i20.photobucket.com/albums/b232/gluetank/Animated/Disastermastermotion-3.gif


P.S.      Photobucket is DOWN again.                                                  
http://www.disboards.com/data/avatars/m/142/142037.jpg?1423018989I might just "kick the bucket" when
this is over.


 https://i.imgur.com/LjRRaV1.png


  • Member since
    July 2003
  • From: On my kitchen counter top somewhere in central North Carolina.
Posted by disastermaster on Wednesday, November 9, 2016 12:01 AM
                              http://www.sherv.net/cm/emo/word/welcome-back-sign-smiley-emoticon.gif
 I'm taking a break on the tank
to construct a home for it.
 
https://encrypted-tbn2.gstatic.com/images?q=tbn:ANd9GcRddInn6k3ZX3AdES2AGbuxrIM-YoahJv5zxbCqVjm0Y3vYcDLl I've been working on something simple, so as not to take attention away  from the main subject here.

Here    we       go

Got the foam packing out of a recent
https://smileyshack.files.wordpress.com/2011/01/ssc_boxedin.gif?w=150&h=120 box from ebay.
 I did a bit of doodling to get an idea of how I wanted to present this.

Before the doodles.......
                                                                 

http://i20.photobucket.com/albums/b232/gluetank/Porsche%20VK4502%20Vorne/Groundwork/Brick%20walls2016-10-28%20at%2011.25.08%20PM_zpsv6q2u14q.png


And the day af'ta the doodles.......

Not sure if I'm gon'na use'em http://www.buddy-icons.info/img/smile/1514.gif though.

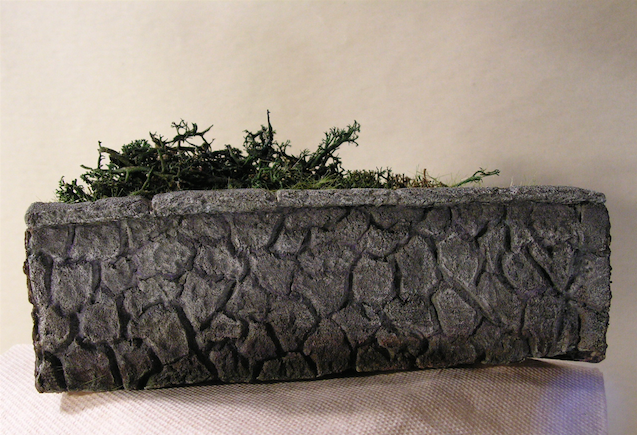
http://i20.photobucket.com/albums/b232/gluetank/Porsche%20VK4502%20Vorne/Groundwork/PICT0208_zpsqyr8qwv8.jpg
 
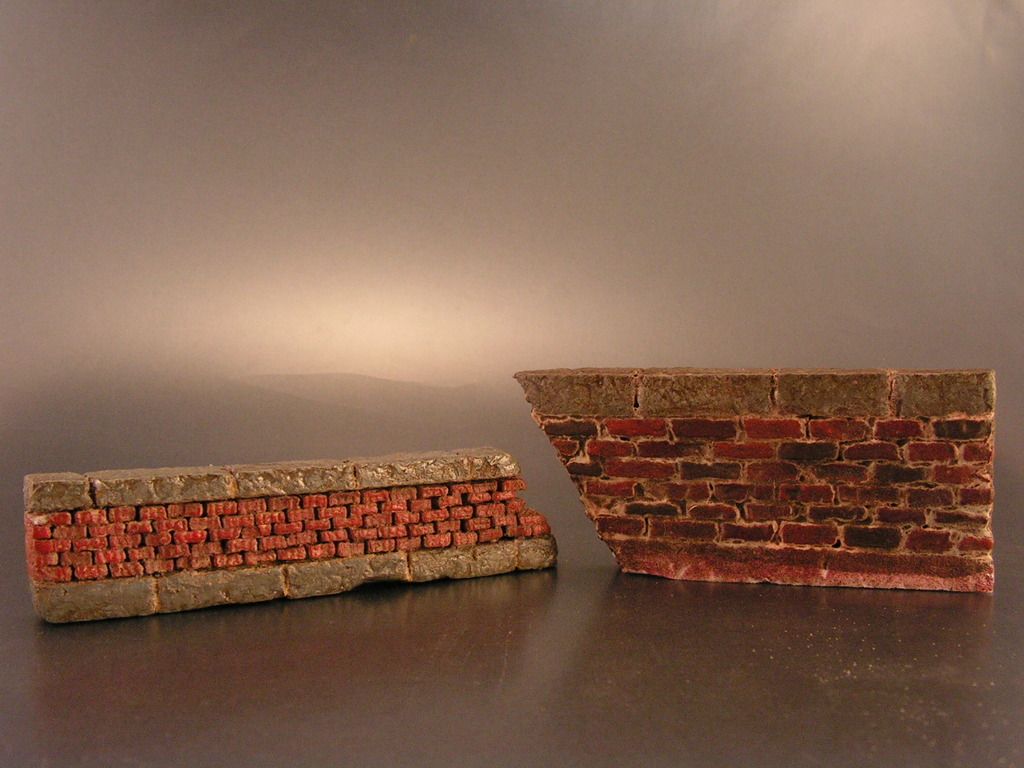
I like the brick and granite on the left......    still not sure yet.


Next is a piece of 8 x 10 foam board all laid out.
               I went to town on it

                                http://www.smileysandemoticons.com/smiley-town.gif
 
.............
or should I say to "
Kummersdorf" -  hint, hint.............
http://i20.photobucket.com/albums/b232/gluetank/Porsche%20VK4502%20Vorne/Groundwork/PICT0090_zpssfpokado.jpg


Further down the road......
http://i20.photobucket.com/albums/b232/gluetank/Porsche%20VK4502%20Vorne/Groundwork/PICT0087_zpsblbhuf6w.jpg
After much patience - later.


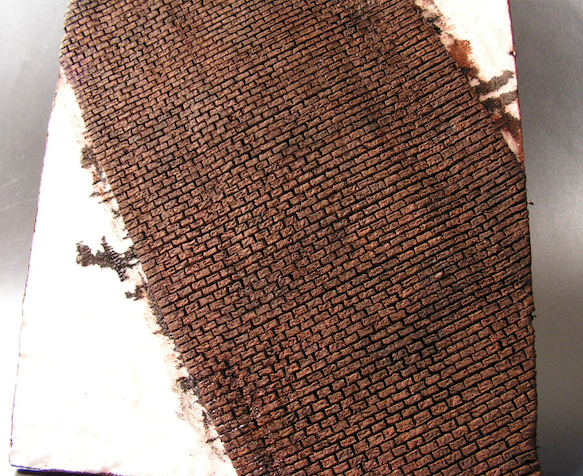
I brush painted it in brown acrylic hobby paint from wal-mart, it doesn't take that long.


Never use aerosol laquer based paint on styro-foam,

http://www.jimbronson.com/Jerry/jerryspray.gif

unless you've thoroughly
futured it beforehand.
It's a disappearing act if you don't future it first.
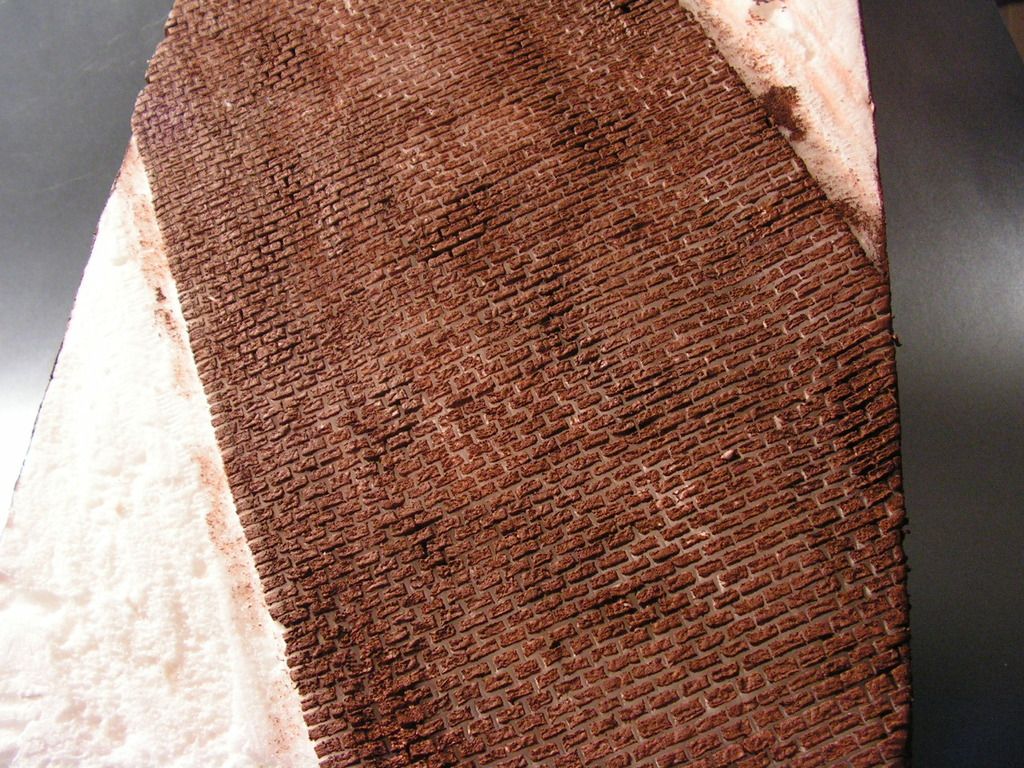
http://i20.photobucket.com/albums/b232/gluetank/Porsche%20VK4502%20Vorne/Groundwork/PICT0262_zpsegrx2vbt.jpg
Enamel based paints might/should be ok, but I haven't tried it.


Next a heavy http://smileys.smileycentral.com/cat/3/3_10_5.gifwash of raw umber acrylic craft paint.

http://i20.photobucket.com/albums/b232/gluetank/Porsche%20VK4502%20Vorne/Groundwork/Brick%20road%202.jpg_zpsorbwxxgl.png


Then, http://www.demnia.nl/images/ranks/thief.gif I took out some  blocks of pavement

                                 and

I hand painted various surface and wear details. The
unfinished areas were painted with
acrylic hobby craft paint.
I'll deal with that later.

Dirt and dust will tone it down and fill in the cracks and spaces.
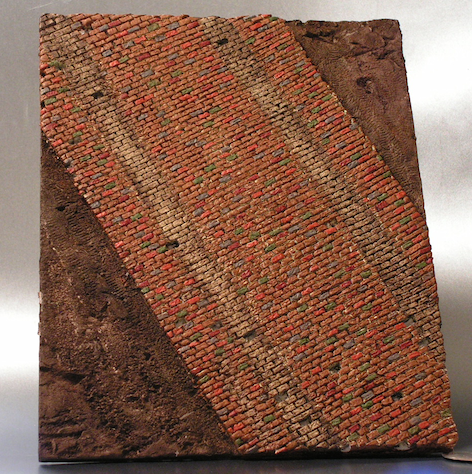

http://i20.photobucket.com/albums/b232/gluetank/Porsche%20VK4502%20Vorne/Groundwork/Brick%20road%203%20painted.jpg_zpsxkdz5omn.png


http://1.bp.blogspot.com/-vqxk8KUx1hU/UytdCQyGi1I/AAAAAAAABeo/_LtcALtDGIs/s1600/AGRICULTOR+ECOL%C3%93GICO.gifPlanted some weeds and twigs in the road crevices.


And, I tried out another wall option I did in addition to the first two I worked out.

Added some slight scrapes along the wall from errant traffic.

I think this will work better as it will give more overall color variation.
I'll save the others for another time.
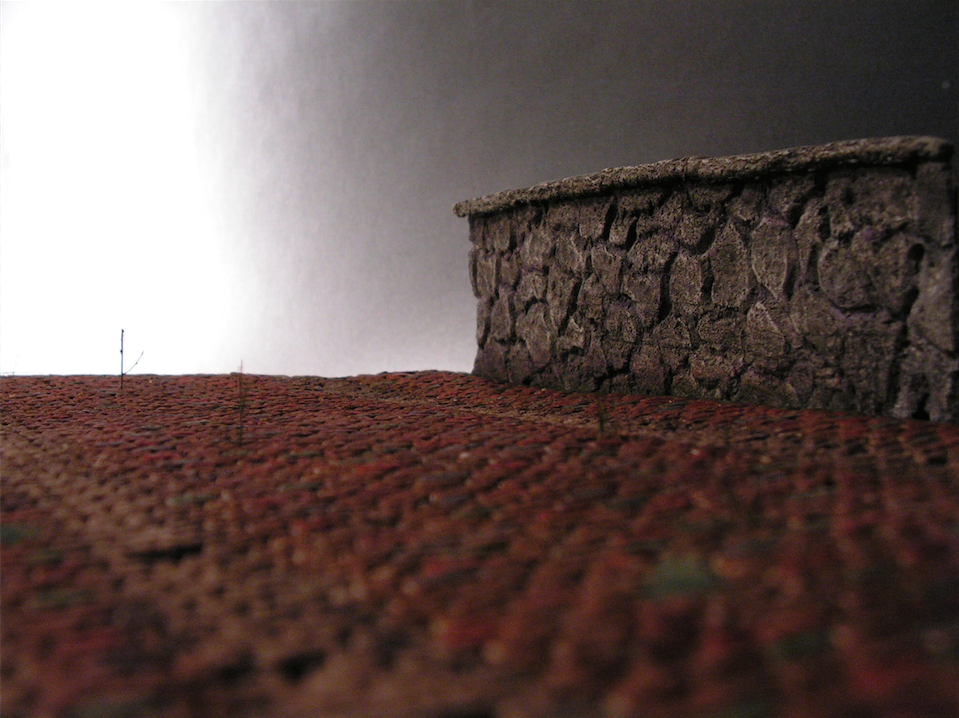
http://i20.photobucket.com/albums/b232/gluetank/Porsche%20VK4502%20Vorne/Groundwork/0270_zps07hggro3.png


Then added a bit of plant life http://smileys.newbeginningsnetwork.com/piwigo/galleries/ACTIVITIES/gardening/plant.gifon top of that stone wall before permanent installation.

http://smileys.smilchat.net/emoticon/seasons/automne/tas-feuilles.gifThere'll be a lot more greenery to go on here toohttp://i.dama.cz/s/e704.gif

http://i20.photobucket.com/albums/b232/gluetank/Porsche%20VK4502%20Vorne/Groundwork/Stone%20wall_zpsr1glkdg4.png


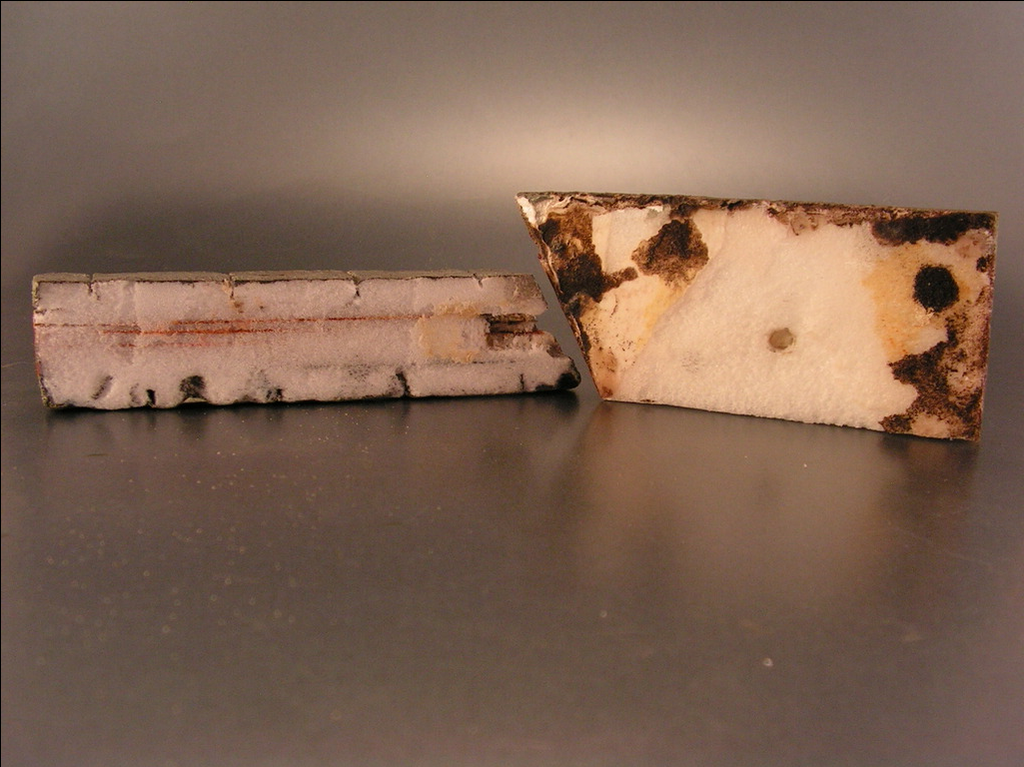
Here's another slice of that
http://rockcreeklake.com/board/Smileys/default/thEmoticon-Pie.gif dirt pie before the final placement..... 
    .....stone face on the left side - dirt and roots on the right (back) side.
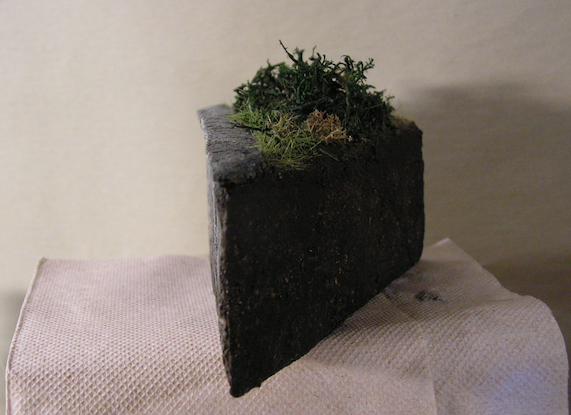

http://i20.photobucket.com/albums/b232/gluetank/Porsche%20VK4502%20Vorne/Groundwork/Stone%20Wall%20back_zps3cpbgrhb.png


Time for a picture break......... 

    
http://www.4smileys.com/smileys/cool-smileys/smiley-with-glasses28.gif  Get yer glasses and read on.


https://upload.wikimedia.org/wikipedia/commons/thumb/5/5c/PzDMunch.svg/160px-PzDMunch.svg.pngBy the spring of 1945 Germany had become a battleground. At the
Wehrmacht weapons testing grounds at Kummersdorf the various test departments
began evacuating important materials and documents and burning the rest. At the
beginning of March 1945 the “Kummersdorf Panzer Battalion was formed from elements
of the Technischen Versuchs Kompanie “Technical Test Company” it had a mixed complement
of vehicles. [On the 14 March 1945, part of the panzer battalion Kummersdorf was
absorbed into I./Panzer-Regiment 29 which was part of the newly formed Panzer-Division
“Müncheberg” a division which itself was formed on the 5th of March 1945.
 
  An OKH order dated 18 April 1945 shows that the Kummersdorf Abteilung and the
1/29 Panzer Regiment were organized into an ad-hoc regiment. The Kummersdorf or 1st
battalion had a staff, a staff company, a Tiger Company (formerly 3/Kummersdorf Panzer
Battalion), a Panther company, a mixed Panzer company, and a supply company.]
 
 The Inspector-General of Armored Forces mentioned the formation of Kummersdorf
panzer company {new unit, formed out of the logistics battalion at Kummersdorf.} during
the course of a meeting of a briefing at Führer Headquarters on 31 March 1945. It was
organised into three tank platoons (partially mobile), one armored reconnaissance platoon
(not mobile). The vehicles were taken from those kept on hand for test purposes. They
included a Panzer VI Tiger II (Sd.Kfz. 182), a Jagdtiger, two American Sherman tanks, an
Italian P 40(i) tank, and several B IV heavy explosive charge carriers armed with machine
guns. {one Tiger II, one Jagdtiger, four Panthers, two Panzer N, one Panzer III, one
Nashorn, one Hummel, two Sherman’s, and one immobile Porsche Tiger 8.8-centimeter
L/71 main gun }

  According to a priority telex message dated 4 April 1945, at least part of the panzer
company was supposed to be transferred into the Dresden area. {A report on the 19
April 1945 stated the Kummersdorf panzer company was on the march to Luchau. A final
report dated 21 April 1945 stated the battalion staff and the company had been attached
to Kampfgruppe MÖWS.} The non-mobile elements of Kummersdorf panzer company, including
a Tiger tank with the Porsche turret {Porsche Tiger 8.8-centimeter L/71 main gun} saw
action at the end of April in the fighting south east of the proving ground.  Another tank
unit was formed at Kummersdorf using the civilian drivers, including Behnisch, whose name
appears several times. According to a note dated 21 April 1945, this unit was supposed to go
into action south of Zossen as part of Kampfgruppe Kaether. With a total of 42 vehicles,
including at least one Panzer V Panther, it set out in the direction of Baruth. Troops of the
1st Ukrainian Front advancing from Golssen had to be held up. A battle developed near Baruth
in which the makeshift tank unit was completely wiped out. (Baruth is approximately
7 kilometers from village of Horstwalde following text must be dated on or about the 21st
April 1945)

 At Kummersdorf, the battle commander of Kummersdorf put together a Volkssturm unit
from the remaining men. It saw action on the road to Horstwalde. A damaged Tiger was
hauled out of the garages of the Verskraft to bolster its strength. There was a brief
exchange of fire with red army troops during which a T34 was knocked out. Fighting was
also recorded in the area of the army workers settlement, where 88-mm anti-aircraft
guns destroyed another tank. Members of the Volkssturm wielding Panzerfaust anti-tank
weapons destroyed several Russian tanks on the road from Scönefled to Gottow.
(Approximately 3km East of Horstwalde village) The defensive ring around Kummersdorf,
which had been broken in several places then disintegrated.

Conclusion
  It’s clear from the text above that the Technischen Versuchs Kompanie “Technical
Test Company” left their immobile tank behind when they were ordered south. The tank
is referred to as a “Tiger tank with a Porsche turret” and “Porsche Tiger 8.8-centimeter
L/70 main gun” This could well be nothing more than an early Tiger II with a Porsche turret.
But you never know, and just because there are no pictures of the tank at Kummersdorf
and no photographs taken in or around Horstwalde by the Russians does not rule out that
it could have been a VK4502. People have pointed out that if the Tiger which fought there
was indeed a VK4502 then it would have surely drawn the interest of a Russian Army
photographer.

 BUT to this day no Russian Army photographs of the knocked out VK4501 command tank
have ever surfaced. This one off rare tank, (lost in 1944) you would have thought would have
been photographed even if it was just a wreck. It’s very likely that once engaged - the single
tank defending Horstwalde would have been destroyed, if the tank had been wrecked - then
perhaps the remains may well have been over looked by the Russians just like the VK4501,
especially when you consider that the Maus V1 prototype and a blown up VK4502 were lying
just a few kilometres  away.

                                                                                  http://cdn.sheknows.com/graphics/emoticons/whew.gif

            Kind'a gives you an idea of where I'm headed here.


                    http://poem4you.ru/images/awards/385/metla.gif
Dirt and dusted the road with pastel chalks.
And added the rock wall
set-up.
Still needs a bit more color adjustment.... and that greenery I mentioned.
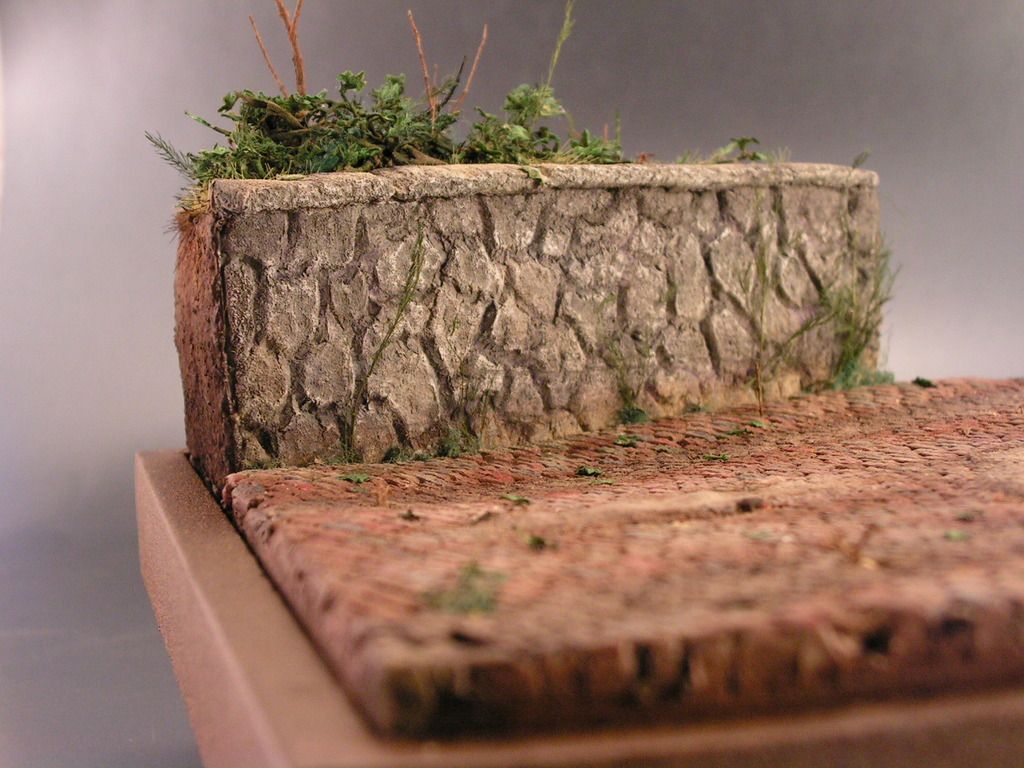

http://i20.photobucket.com/albums/b232/gluetank/Porsche%20VK4502%20Vorne/Groundwork/PICT0193_zpsjxeffchm.jpg


Color looks better now.
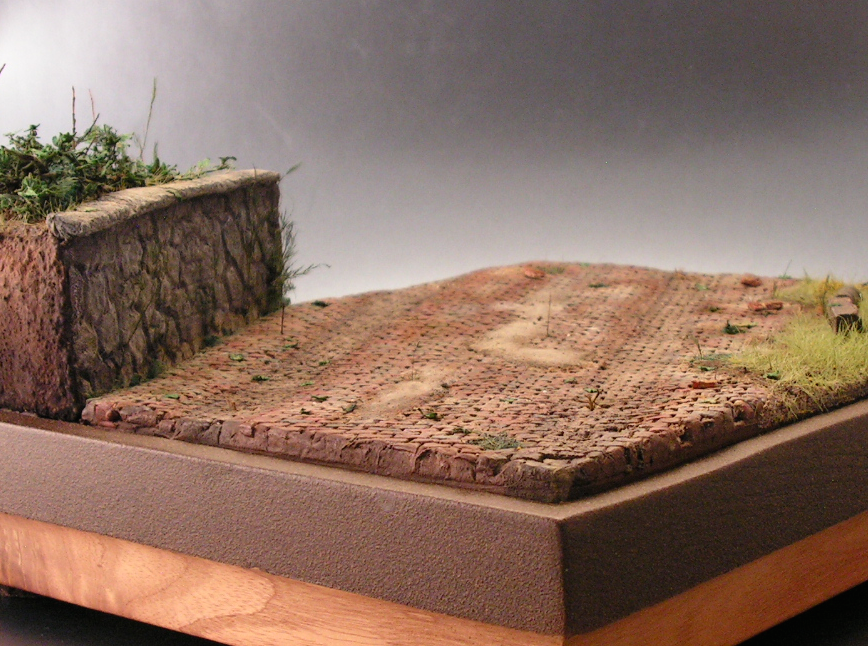
Just a dirty old -
well worn and nearly forgotten back road near Kummersdorf.
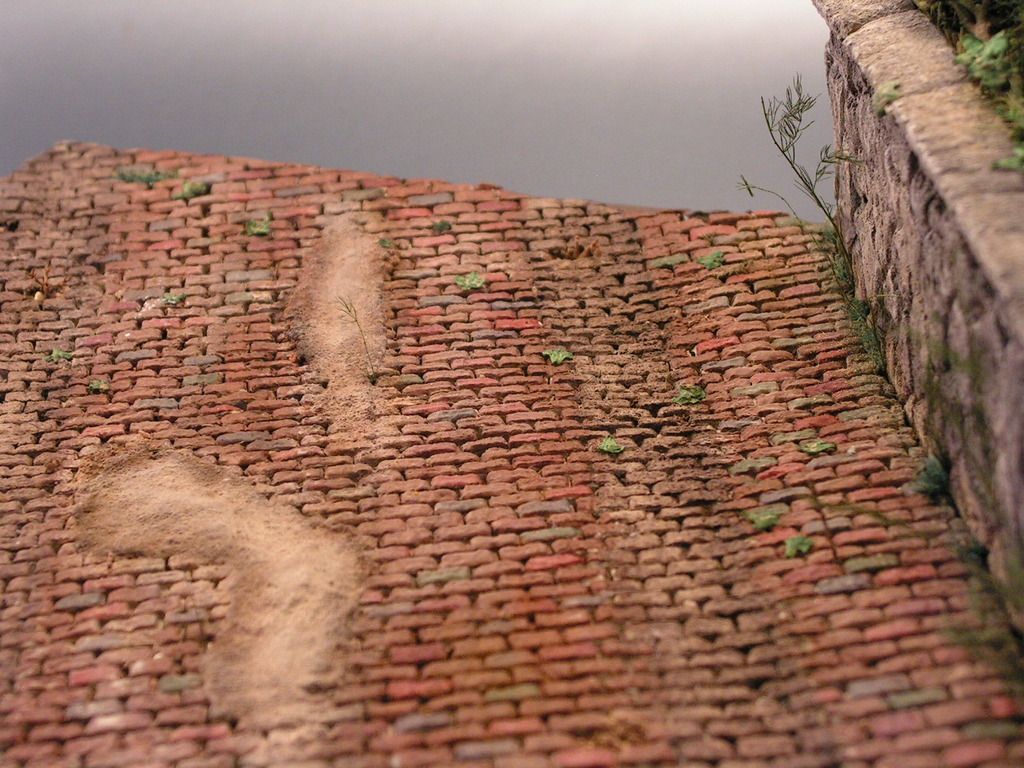
http://i20.photobucket.com/albums/b232/gluetank/Porsche%20VK4502%20Vorne/Groundwork/PICT0174_zpswbqqv3bh.jpg


Playing in the grass there on the right.
http://i20.photobucket.com/albums/b232/gluetank/Porsche%20VK4502%20Vorne/Groundwork/189_zpsdox5un17.png


Yep, somethin' BIG  is gonn'a turn up here, and that'll bring it all together.

Well,http://forums.vinagames.org/images/smilies/th_1sm086egyptdance1.gif much more on this later.

....well?
Hmm, http://solverbase.com/images/8/8f/Skype_hidden_Emoticon_idea.gifNow that's got me thinking..........

                                                    http://i20.photobucket.com/albums/b232/gluetank/Animated/Disastermastermotion-3.gif

 https://i.imgur.com/LjRRaV1.png


  • Member since
    July 2014
Posted by modelcrazy on Wednesday, November 9, 2016 12:43 AM

I'm in awe of you work DM! SurpriseIndifferent

Steve

Building a kit from your stash is like cutting a head off a Hydra, two more take it's place.


http://www.spamodeler.com/forum/

  • Member since
    December 2002
  • From: Bury St Edmunds, Suffolk, England
Posted by Bish on Wednesday, November 9, 2016 6:30 AM

Let me get this right. You carved the walls and road out of syrofoam.

Well, i imagine its somewhat lighter than plaster. Stick out tongue

What didyou use to cut it. When ever i try with a knife, it just breaks apart.

I am a Norfolk man and i glory in being so


On the bench: Airfix 1/72nd Harrier GR.3/Fujimi 1/72nd Ju 87D-3

  • Member since
    July 2003
  • From: On my kitchen counter top somewhere in central North Carolina.
Posted by disastermaster on Monday, November 14, 2016 5:33 AM

modelcrazy
I'm in awe of you work DM! SurpriseIndifferent


Modelcrazy,
    Thank you for your appreciation.

http://www.gifsanimados.org/data/media/179/buceo-y-submarinismo-imagen-animada-0007.gif
It only gets deeper from here on.
     Hope you enjoy all of it.


                                                                        http://i20.photobucket.com/albums/b232/gluetank/Animated/Disastermastermotion-3.gif

 https://i.imgur.com/LjRRaV1.png


  • Member since
    January 2015
  • From: Tumwater, WA.
Posted by M. Brindos on Monday, November 14, 2016 11:34 AM

It's been a good long while since the last time I peeked into this thread, DM.

it was totally worth the wait! 

This is one hell of an amazing build log! Details! 

WOW!!!

- Mike Brindos "Lost Boy"

  • Member since
    July 2003
  • From: On my kitchen counter top somewhere in central North Carolina.
Posted by disastermaster on Wednesday, November 16, 2016 7:10 PM

Bish

Let me get this right. You carved the walls and road out of syrofoam.

Well, I imagine it's somewhat lighter than plaster. Stick out tongue

What did you use to cut it. Whenever I try with a knife, it just breaks apart.


Hey Bish,

http://www.dawgshed.com/images/smilies/yesss.gif that's how I done it.

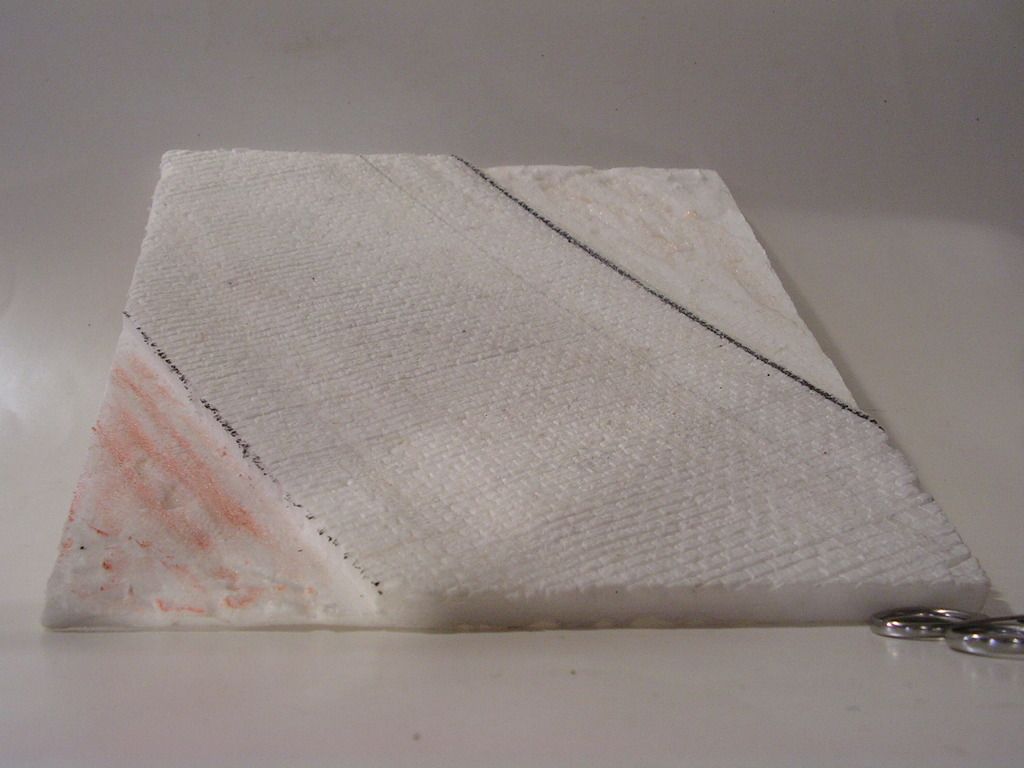
 It's all done in three sections. The road, the stone wall facing, and that block of styro glued on behind that wall.

       
It's tricky to do
http://www.laie-smileys.com/rubik.gif but it's extremely cheap, simple and it has no significant weight at all.


For the wall:
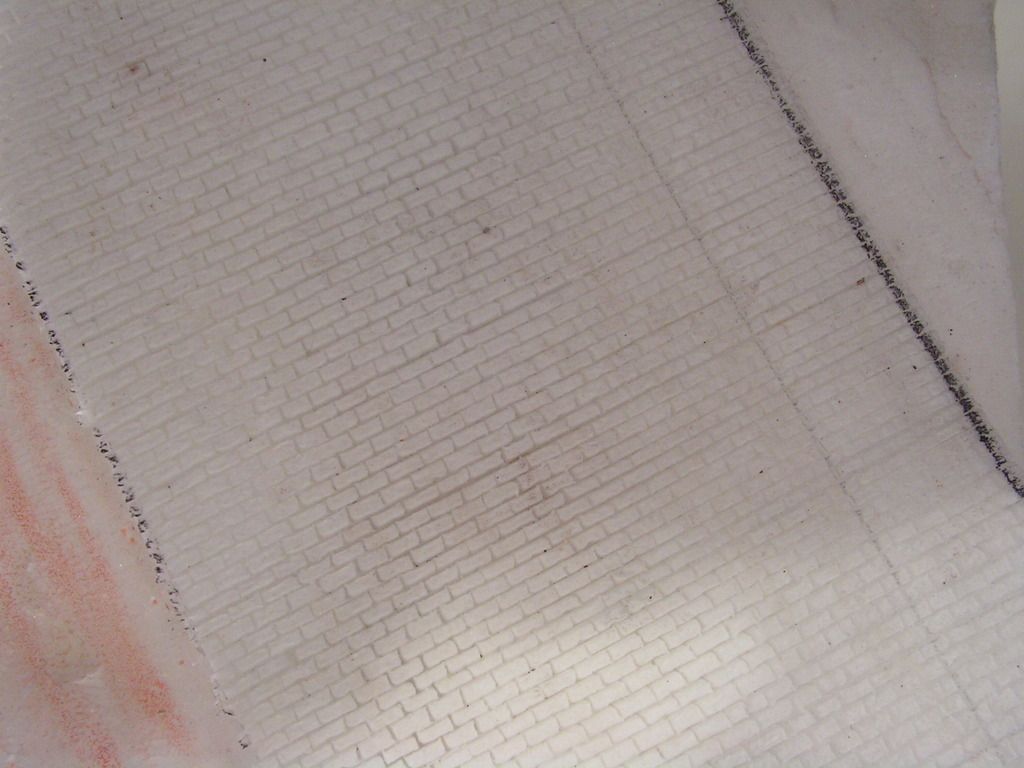
On a thin piece of styro press down and slowly draw the wall out as you want with
                                         http://static6.depositphotos.com/1003098/572/i/110/depositphotos_5722075-Carpenters-pencil.jpg
a dulled-down carpenters pencil, then use a similar (dental) tool such as this (below) to deepen and enhance the crevices between the stones.
                                   (this end)⤵
                                 http://2.wlimg.com/product_images/bc-full/dir_114/3393645/dental-burnishers-pocket-probes-scalers-art-i_p_2138479_437461.jpg
  
http://www.4smileys.com/smileys/cool-smileys/smiley-with-glasses35.gif                       
Next it's just a matter of imprinting some rough texture and painting the wall how you want it.


http://static.diary.ru/picture/1979858.gifthe road works this way.
1. Lay it out with a ruler and pencil and cut away the relief area on each side.
2. Using your imagination imprint a texture onto the surface.
3. Now coat it with future first and let dry thoroughly.

   (The future will prevent it from crumbling as you cut it)    

   If it still starts to crumble, coat it again. Remember that after you slice it, you will have to coat it again if you use any paint that will be absorbed into those cuts and be invasive to the foam.
    Test on scraps if you aren't sure.

4. I used a SHARP #11 blade in a tedious alternating bayonet/sawing fashion.


Now, if you think "that" is http://www.animated-gifs.eu/category_emoticons/smilies-hairy-3/0001.gif hairy - just wait 'til you see what I'm adding nexthttp://www.sherv.net/cm/emo/funny/2/upside-down-banana-smiley-emoticon.gif
                                               http://i20.photobucket.com/albums/b232/gluetank/Animated/Disastermastermotion-3.gif

 https://i.imgur.com/LjRRaV1.png


  • Member since
    November 2009
  • From: SW Virginia
Posted by Gamera on Wednesday, November 16, 2016 7:49 PM

That looks amazing DM! Will have to give this a try, I think maybe I can build at least a small wall. If it works out maybe I'll try a whole base like yours. Yes

"I dream in fire but work in clay." -Arthur Machen


MrT
  • Member since
    December 2010
Posted by MrT on Friday, November 18, 2016 7:59 AM


Ok I just got caught up on this and this is just fantazmagorical work.

That settles it I've got do my King Tiger from Dragon.


Big Smile


  • Member since
    September 2006
  • From: Dripping Springs, TX, USA
Posted by RBaer on Friday, November 18, 2016 9:40 AM

I just KNEW there was a good reason to check back in over here, the D-Master is at it again! Super cool work, as usual!

Apprentice rivet counter.

GAF
  • Member since
    June 2012
  • From: Anniston, AL
Posted by GAF on Friday, November 18, 2016 11:09 PM

Well, I'm not sure about the panzer (WTH do I know about tanks), but that terrain base is great!  Excellent work. 

  • Member since
    July 2003
  • From: On my kitchen counter top somewhere in central North Carolina.
Posted by disastermaster on Monday, November 21, 2016 3:33 PM

Gamera

That looks amazing DM! Will have to give this a try, I think maybe I can build at least a small wall. If it works out maybe I'll try a whole base like yours. Yes


Styrofoam is friendly to water-based solutions - remember to think it out and be diligent http://forums.totalwar.org/vb/images/smilies/gc/gc-anxious.gif when using any medium on it.
            Put a splash of laquer thinner on it
                 and watch it http://www.millan.net/minimations/smileys/crysmiley1.gif disappear .

                                             Thank you Gamera..............
                                                                                                                                                                                            http://i20.photobucket.com/albums/b232/gluetank/Animated/Disastermastermotion-3.gif

 https://i.imgur.com/LjRRaV1.png


  • Member since
    July 2003
  • From: On my kitchen counter top somewhere in central North Carolina.
Posted by disastermaster on Thursday, November 24, 2016 9:55 PM

M. Brindos
It's been a good long while since the last time I peeked into this thread, DM.
it was totally worth the wait! 

This is one hell of an amazing build log! Details! 

WOW!!!


Thank you Mike!
   That's an extremely encouraging observation.
Just like I told Bish, you'll love the next addition that I'm presently digging up... http://metaldetectingforum.com/images/smilies/Diggin_a_hole.gif .......coming soon.
  
                                                    http://i20.photobucket.com/albums/b232/gluetank/Animated/Disastermastermotion-3.gif


 https://i.imgur.com/LjRRaV1.png


  • Member since
    January 2005
  • From: Portland, Oregon
Posted by fantacmet on Sunday, November 27, 2016 10:51 AM

disastermaster


 It's good to see another one of the 'ol timers here.....
 ......looks like most everyone else has moved on.


                                                                                         http://i20.photobucket.com/albums/b232/gluetank/Animated/Disastermastermotion-3.gif


Well I haven't moved except accross town.  Never have time because of my job now.  Drivin truck.  Though I do build in the truck when I get the chance.  Usually have a few kits with me and small box of tools.


Lookin good on the build.


JOIN OUR COMMUNITY!

Our community is FREE to join. To participate you must either login or register for an account.

SEARCH FORUMS
FREE NEWSLETTER
By signing up you may also receive reader surveys and occasional special offers. We do not sell, rent or trade our email lists. View our Privacy Policy.