SEARCH FINESCALE.COM

Enter keywords or a search phrase below:

academy tiger 1 early production 1/35 full interior

4811 views
33 replies
1 rating 2 rating 3 rating 4 rating 5 rating
  • Member since
    January 2006
  • From: California
Posted by SprueOne on Saturday, December 10, 2016 12:25 PM

Nice finish. A very clever way to display this completed model.

Anyone with a good car don't need to be justified - Hazel Motes


Iron Rails 2015 by Wayne Cassell Weekend Madness sprueone

  • Member since
    October 2015
Posted by Modelrob on Saturday, December 10, 2016 3:35 AM
Great display base for a full interior. Robert
  • Member since
    July 2013
Posted by steve5 on Friday, December 9, 2016 10:34 PM

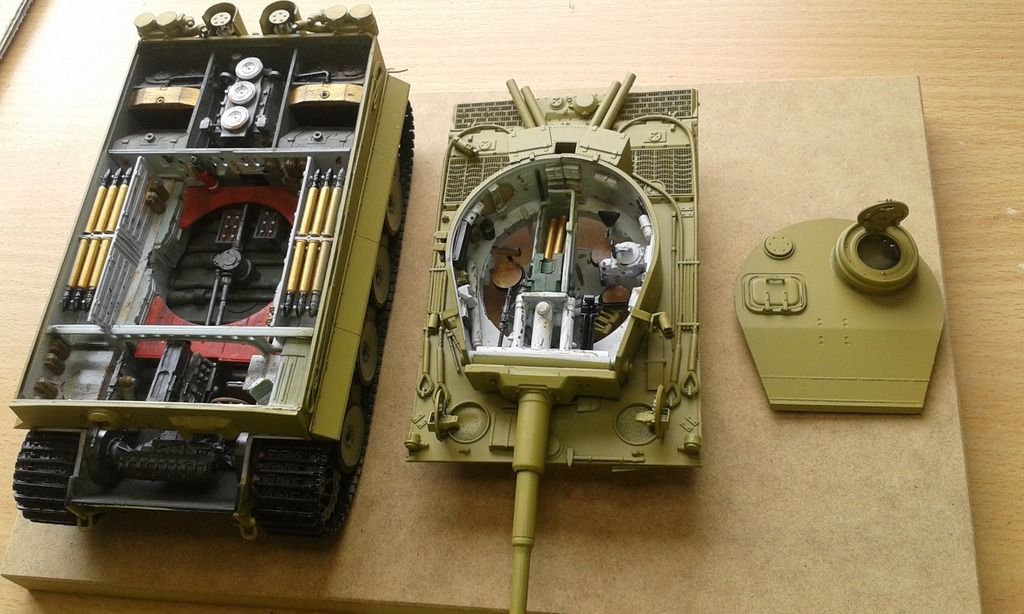
thank's everyone for the comment's and help , made my base . not glue down yet , still got to paint and weather . off tomorrow to get some supplies , and try my hand .  " />


  • Member since
    May 2015
Posted by Griffin25 on Friday, December 9, 2016 5:02 PM

That is a heck of a kit. It has it all and I think you'res looks really fantastic!! 


Griffin

  • Member since
    December 2002
  • From: Bury St Edmunds, Suffolk, England
Posted by Bish on Friday, December 9, 2016 1:40 PM

Ye, intended for use by German railways but also used by the armed forces. There is also images of a Tiger II and jagdtiger on one and the well known image of the E-100 hull is on one. But if photo's are anything to go by, their use is rare.

I am a Norfolk man and i glory in being so


On the bench: Airfix 1/72nd Harrier GR.3/Fujimi 1/72nd Ju 87D-3

  • Member since
    January 2008
  • From: Austria
Posted by Byrden on Friday, December 9, 2016 1:28 PM

That trailer was German? I stand corrected.

David


  • Member since
    December 2002
  • From: Bury St Edmunds, Suffolk, England
Posted by Bish on Friday, December 9, 2016 1:07 PM

Byrden

Gene; I don't believe the German military had a trailer that could carry a Tiger. If you have a photo, I'll be happy to be corrected.

Bish; the launchers were on S13 but they were cut off. That left the tabs on the turret roof.


David


Exactly, they were not present during the Kursk campaign.

A Culemeyer trailer could carry a Tiger.

Though weahther a single FAMO could tow it is another matter.

I am a Norfolk man and i glory in being so


On the bench: Airfix 1/72nd Harrier GR.3/Fujimi 1/72nd Ju 87D-3

  • Member since
    July 2014
  • From: Rifle, CO. USA
Posted by M1GarandFan on Friday, December 9, 2016 12:15 PM

Yeah, the "proper words"........easier said than done!

  • Member since
    July 2004
  • From: Sonora Desert
Posted by stikpusher on Friday, December 9, 2016 11:56 AM

Byrden

It's a persistent problem in the modelling world; the model companies don't do enough research. See http://tiger1.info/EN/Gun-breech.html


Great info there. Nowadays I spend far more time doing web research than the actual builds. Why? After many similar experiences, I do not trust kit instruction sheets on their color call outs. Most of the time the correct information is right at our fingertips thanks to folks like Bryan here who put the information online for us. All we have to do is type in the proper words into a search engine.


F is for FIRE, That burns down the whole town!

U is for URANIUM... BOMBS!

N is for NO SURVIVORS...

       - Plankton

LSM


  • Member since
    January 2008
  • From: Austria
Posted by Byrden on Friday, December 9, 2016 11:49 AM

Gene; I don't believe the German military had a trailer that could carry a Tiger. If you have a photo, I'll be happy to be corrected.

Bish; the launchers were on S13 but they were cut off. That left the tabs on the turret roof.


David


  • Member since
    February 2007
  • From: Brunswick, Ohio
Posted by Buckeye on Friday, December 9, 2016 11:37 AM

That really looks nice!

Mike


  • Member since
    January 2010
Posted by CrashTestDummy on Friday, December 9, 2016 10:52 AM

Nice work, and great info here!  I have this one in my stash.  Planning to put it on a trailer behind a FAMO.

Gene Beaird,
Pearland, Texas

G. Beaird,

Pearland, Texas

  • Member since
    November 2016
  • From: Baraboo, WI
Posted by Poniatowski on Friday, December 9, 2016 9:39 AM

Nice job!  I had fun with that kit too.


Smile  Ron

  • Member since
    December 2002
  • From: Bury St Edmunds, Suffolk, England
Posted by Bish on Friday, December 9, 2016 2:23 AM

steve5

stikpusher

man I am going to have to be a lot more careful , I will try to sand that seam out , the instructions said tree green , I will go over it with metallic grey .

bish

not sure yet ,what camoflage to do yet , going to brisbane on the weekend [200k's], for some supplies . could I ask how you would dirty it up , I'm really unsure on how far to go , any help would be greatly appreciated .

this is how I intend to display it , with the pieces for the turret raised to the correct height

  " />


It depends what you have to hand. I would use some Flory washes, especially the grime. Then some AK engine grime andoil is the right places. Depending on how much use its hard, things would get very grubby down there with all the dirt from the crews boots and any other debris making its way to the bottom.

If you do build the one on the box, miss out the smoke grenade launcherson the turret. These were not fitted to the real S13.

I am a Norfolk man and i glory in being so


On the bench: Airfix 1/72nd Harrier GR.3/Fujimi 1/72nd Ju 87D-3

  • Member since
    January 2008
  • From: Austria
Posted by Byrden on Friday, December 9, 2016 1:52 AM

It's a persistent problem in the modelling world; the model companies don't do enough research. See http://tiger1.info/EN/Gun-breech.html


  • Member since
    July 2013
Posted by steve5 on Thursday, December 8, 2016 8:57 PM

stikpusher

man I am going to have to be a lot more careful , I will try to sand that seam out , the instructions said tree green , I will go over it with metallic grey .

bish

not sure yet ,what camoflage to do yet , going to brisbane on the weekend [200k's], for some supplies . could I ask how you would dirty it up , I'm really unsure on how far to go , any help would be greatly appreciated .

this is how I intend to display it , with the pieces for the turret raised to the correct height

  " />


  • Member since
    July 2003
  • From: On my kitchen counter top somewhere in central North Carolina.
Posted by disastermaster on Thursday, December 8, 2016 2:05 PM

steve5

I sanded the filter's as much as I dared disastermaster , I'll just have to be a little more careful next time , thank's for pointing it out though ,

                          Glad to help!

                                      https://encrypted-tbn3.gstatic.com/images?q=tbn:ANd9GcT8Rwj1jp-HGdWVjEzWwMauIQQSq45B3Hh4952IUIh159SaRPVs

                                                 http://i20.photobucket.com/albums/b232/gluetank/Animated/Disastermastermotion-3.gif


 https://i.imgur.com/LjRRaV1.png


  • Member since
    July 2004
  • From: Sonora Desert
Posted by stikpusher on Thursday, December 8, 2016 11:24 AM

Steve, you're doing great. Your interior weathering is bringing it to life. I know you won't likely be able to see it once the turret roof is on, but there is a seam visible on the breach, just forward of the breach block. Also, I do believe the breach block should be a bare steel and not painted. But check on that before you do any color changes to confirm. These are both tiny things, and overall I'm really liking your work on this.


F is for FIRE, That burns down the whole town!

U is for URANIUM... BOMBS!

N is for NO SURVIVORS...

       - Plankton

LSM


  • Member since
    December 2002
  • From: Bury St Edmunds, Suffolk, England
Posted by Bish on Thursday, December 8, 2016 10:26 AM

Somenice work there, would definatly suit some dirtying up in there. Are you doing the vehicle on the box art.

I am a Norfolk man and i glory in being so


On the bench: Airfix 1/72nd Harrier GR.3/Fujimi 1/72nd Ju 87D-3

  • Member since
    November 2009
  • From: SW Virginia
Posted by Gamera on Thursday, December 8, 2016 8:37 AM

Oh wow that's neat, nice work! 

"I dream in fire but work in clay." -Arthur Machen


  • Member since
    October 2015
Posted by Modelrob on Thursday, December 8, 2016 4:22 AM
Steve the build is looking great.
  • Member since
    July 2013
Posted by steve5 on Thursday, December 8, 2016 3:23 AM

I sanded the filter's as much as I dared disastermaster , I'll just have to be a little more careful next time , thank's for pointing it out though ,

  " />


  • Member since
    July 2013
Posted by steve5 on Thursday, December 8, 2016 3:20 AM

I've seen a lot of your stuff stikpusher really like it , how did I go

  " />


  • Member since
    July 2004
  • From: Sonora Desert
Posted by stikpusher on Wednesday, December 7, 2016 6:39 PM

steve5

I have been modeling for about 3-4 years now, but only ship's , thought it was about time to have a go at something else ,you armour guy's are the best at weathering so hopefully , some very kind critiquing  can show me the way .


Looks nice and clean so far on the insides. You can accent that with the time tested old school methods of washes and dry brushing to bring out shadows and highlights.

For weathering you can show wear in high use areas such as floorboards where the crews boots' will wear at the paint. Dust, sand or dirt, and mud will get tracked inside by their boots, as well as dust getting pulled into open hatches while driving, depending upon the operating environment. Machinery will show fluid seepage and spillage around filler caps and this will attract dust and grime during everyday use. Ammo going in and out of the racks will ding up the paint... just some thoughts for the insides for what you show so far...


F is for FIRE, That burns down the whole town!

U is for URANIUM... BOMBS!

N is for NO SURVIVORS...

       - Plankton

LSM


  • Member since
    January 2008
  • From: Austria
Posted by Byrden on Wednesday, December 7, 2016 2:10 PM

Here's a better photo.... ;)

Feifel filters

  • Member since
    July 2003
  • From: On my kitchen counter top somewhere in central North Carolina.
Posted by disastermaster on Wednesday, December 7, 2016 4:50 AM

Hey Steve,
 The top of those
feifel filters on the rear
of the vehicle need a bit of work.
 Some guys just leave 'em flat but
that seam needs to go.

Here's a good picture for you.
http://erkennungsmarken.smugmug.com/Business/16th-Tiger-Tank-Parts/P1110189-R/703903372_qDgJA-L-1.jpg
 
http://www.phoca.cz/forum/images/smilies/icon_idea.gif Maybe I'm nit-pickin' here but I'm only
trying to help.


http://i20.photobucket.com/albums/b232/gluetank/Animated/Disastermastermotion-3.gif

 https://i.imgur.com/LjRRaV1.png


  • Member since
    July 2003
  • From: Cincinnati, Ohio
Posted by ridleusmc on Wednesday, December 7, 2016 4:47 AM

You're doing some great work.  The final drive looks very good.    


  • Member since
    July 2013
Posted by steve5 on Wednesday, December 7, 2016 3:42 AM


  • Member since
    July 2013
Posted by steve5 on Wednesday, December 7, 2016 3:40 AM

thank's guy's , got a bit more done ,

  " />


JOIN OUR COMMUNITY!

Our community is FREE to join. To participate you must either login or register for an account.

SEARCH FORUMS
FREE NEWSLETTER
By signing up you may also receive reader surveys and occasional special offers. We do not sell, rent or trade our email lists. View our Privacy Policy.