SEARCH FINESCALE.COM

Enter keywords or a search phrase below:

Building Dragons JSU-122 *updated and finished*

8637 views
43 replies
1 rating 2 rating 3 rating 4 rating 5 rating
  • Member since
    August 2006
  • From: Oromocto, Canada
Posted by Gun Tech on Saturday, April 21, 2007 4:39 PM
Marvellous! Approve [^]

Jean-Michel    "Arte et Marte"

  • Member since
    April 2006
  • From: Essex, UK
Posted by FingersEddie on Saturday, April 21, 2007 4:11 PM

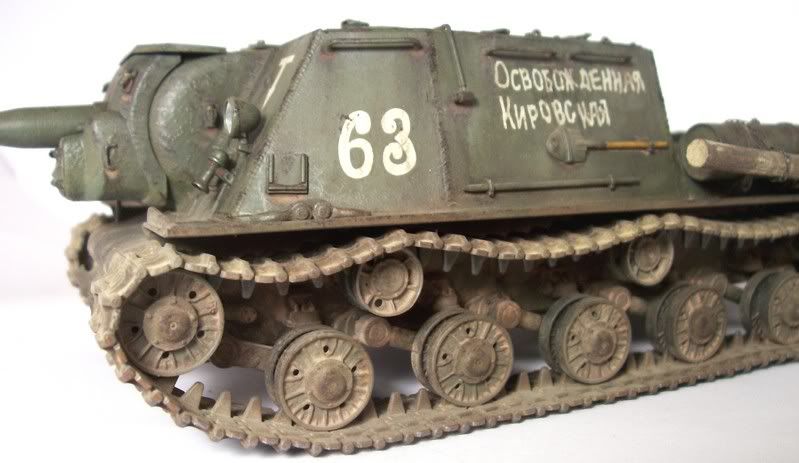
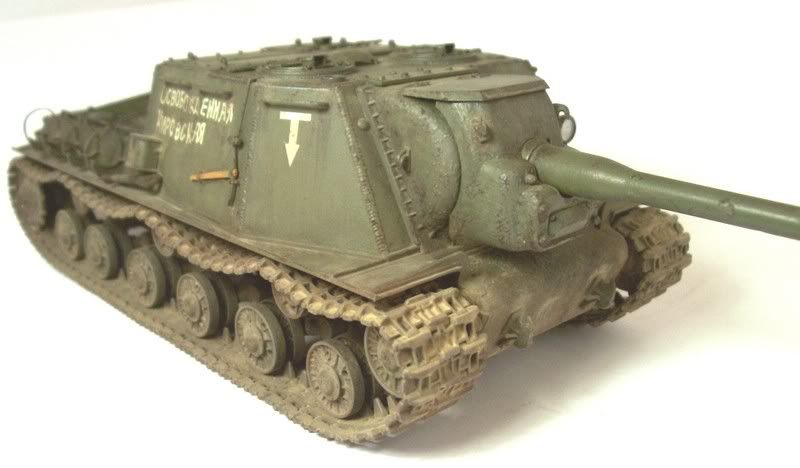
Ron, this is simply stunnin'!! You've made plastic look like real cast metal, and on a russian tank where it matters an' all. This is the best lookin' tank I have ever seen built and painted in all my life, the weatherin' is top class.

You have totally outclassed Mig Jimenez and Adam Wilder with this one, Ron. This is one hell of a build.

That Sherman, you've even made me like a Sherman! That is stunnin' too! 

"Ask not what you can do for your country, ask what your country is doin' to you!" "If liberty means anything at all, it means the right to tell people what they do not want to hear." "Say 'NO' to censorship, it leads to a dictatorship!" http://public.fotki.com/paulyrichard/
  • Member since
    July 2003
  • From: Toronto, Ontario, Canada
Posted by zokissima on Saturday, April 21, 2007 3:18 PM
Very well done. Its been an anxious wait to see the usual effect on this beast. Really brings out the massive proportions of this beast.
  • Member since
    January 2005
  • From: in the tank factory in my basement
Posted by biffa on Saturday, April 21, 2007 12:12 PM

I must say i am really grateful for the wonderful response from you guys sometimes i doubt myself and wonder if i go too far but then again i cannot help it i just love that beaten look.

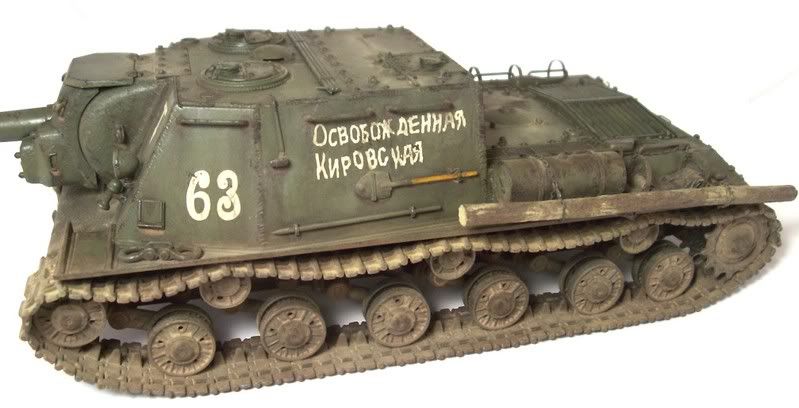
Tread i honestly dont know what the slogan means i just trusted Dragon (eeek) and went with it because it is supposed to represent a vehicle used in berlin and in case i ever decided to use this and the T34 in the same dio. (i have about 60 models awaiting dio's now lol)


TB379, I used ModelMaster acrylic "dark green" straight out of the bottle for the basecoat i also use this for all my green basecoats even US armour i then use filters and washes to acheive the tone i am looking for below is a image of a sherman i did using the the same colour for a base but i used browns for the filters instead of yellows. I never worry about the correct colour for russian vehicles basically anything goes Smile [:)]

John, i got the dry temp at a small local craft store but i havent seen it anywhere since it is basically just cheap pigments and works in the same manner, below is a link to the manufacterers website and if you look under retail catalog it is listed in paint accessories but i didnt figure out how to buy it.

http://www.palmerpaint.com/

Once again guys thank you very much for taking the time to comment this is a continuing learning proccess for me with each build i do and i am always happy to share my findings so feel free at ask


Ron..

Ron g.
  • Member since
    April 2014
Posted by Carves on Saturday, April 21, 2007 10:10 AM

********** I'm totally speachless.

Looks like building models does come natural for you Ron.

Keep 'em coming

---
Ben

  • Member since
    September 2005
Posted by Kykeon on Friday, April 20, 2007 11:03 PM

Such a beautiful model of such an ugly vehicle! Seriously, this has to be the most brutish looking beast to ever occupy a battlefield. So real looking, it's scary.Shock [:O]


  • Member since
    June 2006
  • From: Wendell, NC, USA
Posted by redd_34 on Friday, April 20, 2007 9:10 PM

 Kopfschuss wrote:
Wow....   just wow.  If I had half the skill i'd be a master. 

I second that!!!!! Bow [bow]

Ron

Don't worry about it!
  • Member since
    March 2007
Posted by Kopfschuss on Friday, April 20, 2007 9:07 PM
Wow....   just wow.  If I had half the skill i'd be a master. 
  • Member since
    March 2006
  • From: Bridgeton, New Jersey
Posted by Ozmodiar on Friday, April 20, 2007 9:55 AM
Ron I hate to ask you for any more help but I can't find the DRY TEMPERA power anywhere. May I ask where you bought it?

“Resisting temptation is easier when you think you'll probably get another chance later on”

  • Member since
    April 2005
Posted by Thunderbolt379 on Friday, April 20, 2007 8:34 AM

Hi Biffa,

Adding my congrats here -- we're in the presence of a master! This series of photos should be an advanced finishing techniques feature in FSM!

One question -- you mention MM dark green as the base color -- what shade is that, exactly? I had a thread discussing Russian green here not long ago and it was something of a mystery color.

Stupendous finishing skills, man, I hope I can come even close one day!

Best wishes,

TB379

http://worldinminiature.blogspot.com/

  • Member since
    March 2006
  • From: Bridgeton, New Jersey
Posted by Ozmodiar on Friday, April 20, 2007 8:20 AM
Another fun to watch build. You are on a roll, great stuff! I have never seen anyone build so fast  and high quality kits. Remarkable! Thanks Ron

“Resisting temptation is easier when you think you'll probably get another chance later on”

  • Member since
    March 2006
Posted by TD4438 on Thursday, April 19, 2007 9:10 PM
That is the best series of photos I have seen.With each photo you really see the vehicle come to life.I would swear that thing is made out of steel.Awesome job.

  • Member since
    March 2003
  • From: Rain USA, Vancouver WA
Posted by tigerman on Thursday, April 19, 2007 9:05 PM

 MadMel wrote:
You've done it again Ron - that is a beautiful model. Seeing your WIP pics with the accompanying explanation is very helpful to newbies like me.

Sign - Ditto [#ditto] Even us so-called veterans.

Yup, you make it all look so simple and yet it always comes out looking like a million $$$. I might try those tech's on my KV.

   http://i7.photobucket.com/albums/y269/wing_nut_5o/PANZERJAGERGB.jpg

 Eric 

  • Member since
    July 2003
  • From: On my kitchen counter top somewhere in central North Carolina.
Posted by disastermaster on Thursday, April 19, 2007 9:02 PM

Black Eye [B)] Oh crap. Banged Head [banghead] What can I say........? Thumbs Up [tup] It just don't get no better than this. Boohoo [BH] Everyone can now just go home and cry. Confused [%-)] I'm thinking I'll take up knitting...... but with my luck some little Kisses [:X] girl will put me to shame. --- Yes, on a scale of 10..... this is a definite 20+ with all entitled bragging rights SoapBox [soapbox].

Steve 

 https://i.imgur.com/LjRRaV1.png


  • Member since
    November 2005
Posted by Anonymous on Thursday, April 19, 2007 7:13 PM
You've done it again Ron - that is a beautiful model. Seeing your WIP pics with the accompanying explanation is very helpful to newbies like me.
  • Member since
    September 2005
  • From: beacon falls , Ct.
Posted by treadwell on Thursday, April 19, 2007 7:05 PM

god dang you make it look so easy,Ron!!-- and you know I know it is not as easy as it seems-- what a beauty--- you really get that sucker totally soaked when doing the washes-- something for me to work on!!-- this build really looks like a cold,hard chunk of Soviet steel-- I mean it -- the finish on this one is really inspiringThumbs Up [tup]Thumbs Up [tup]-- this is one of my favorites from you-- do you know what the political slogan says?--great job Ron--Big Smile [:D]-- treadCool [8D]

p.s. I have been trying to decypher the cyrillic--I'm not sure , but I think it is liberators of the Ukraine or liberators of uzbekistan-- I hope you know!!


  • Member since
    January 2005
  • From: in the tank factory in my basement
Posted by biffa on Thursday, April 19, 2007 5:21 PM

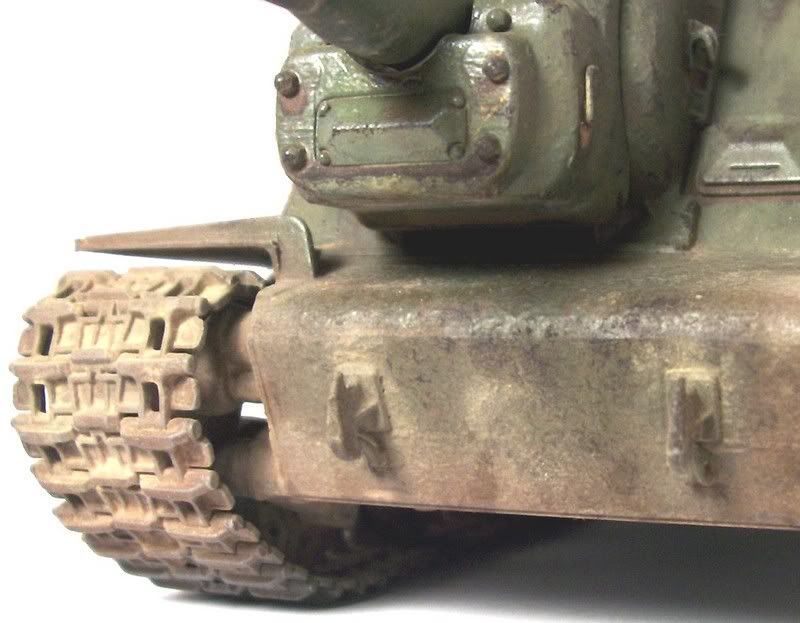
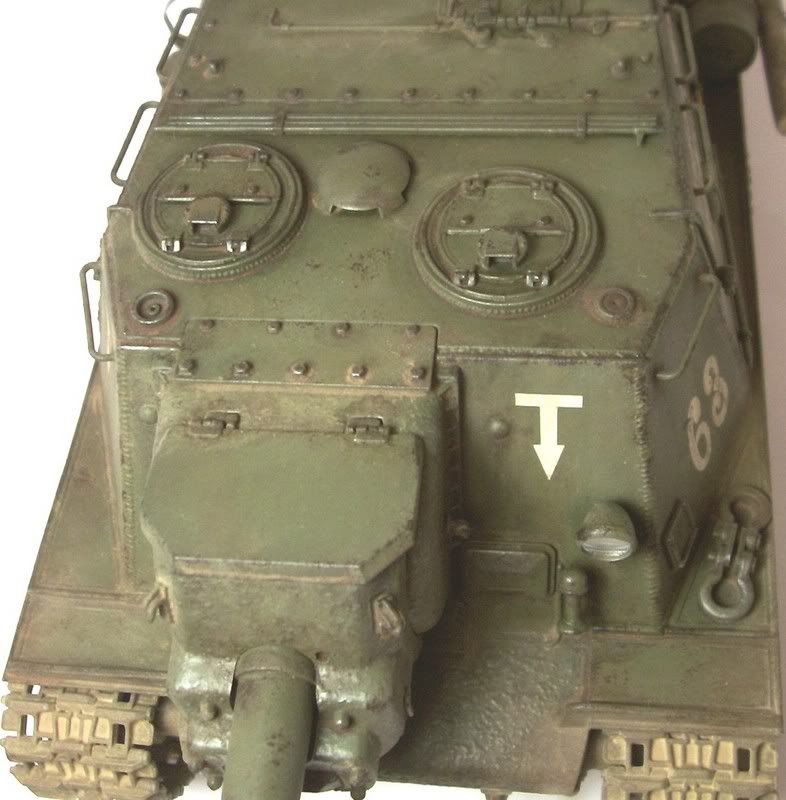
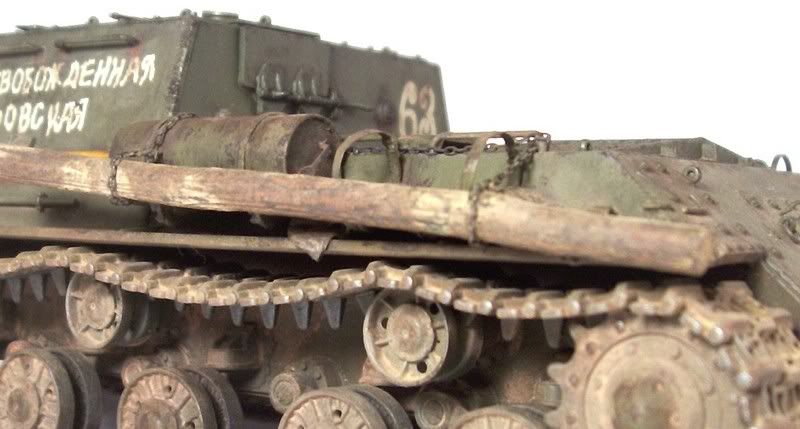
here we go fella's the 10 step paint and weathering program,

Step 1, a flat black primer followed by a base coat of MM dark green and MM leather for the tracks all applied with airbrush. a slight fading of the panels with lightened dark green.
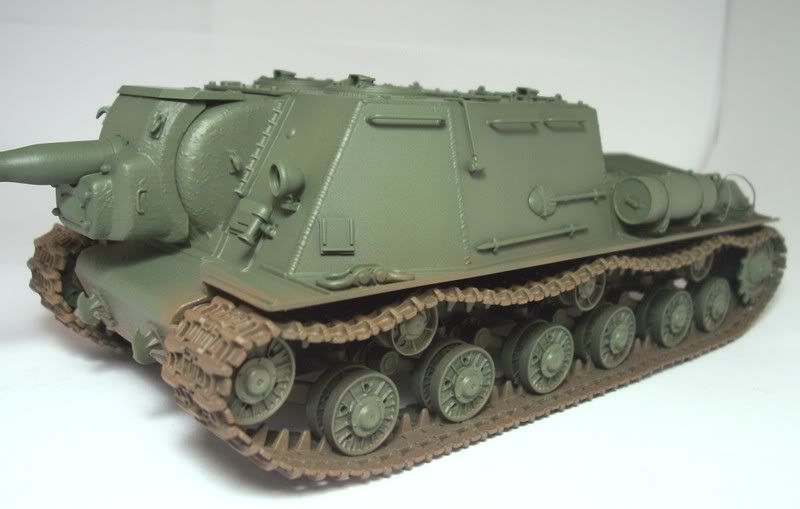
step 2, a filter in the manner of a wash useing yellow ochre.
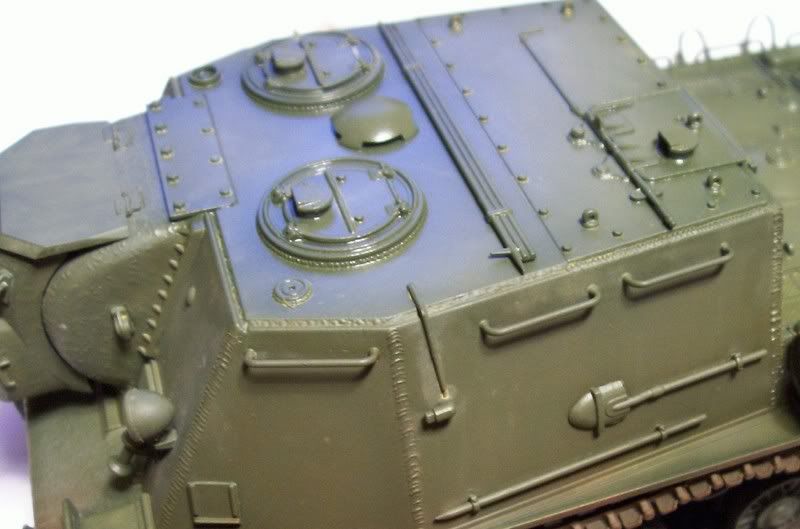
step 3, drybrushing of the tracks with "shadowed steel".
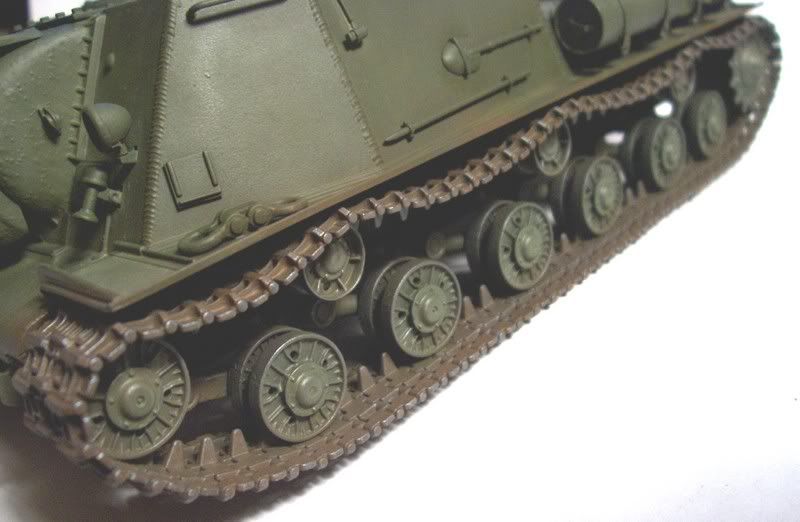
step 4, gloss coat and decals followed by another gloss coat to seal them in.
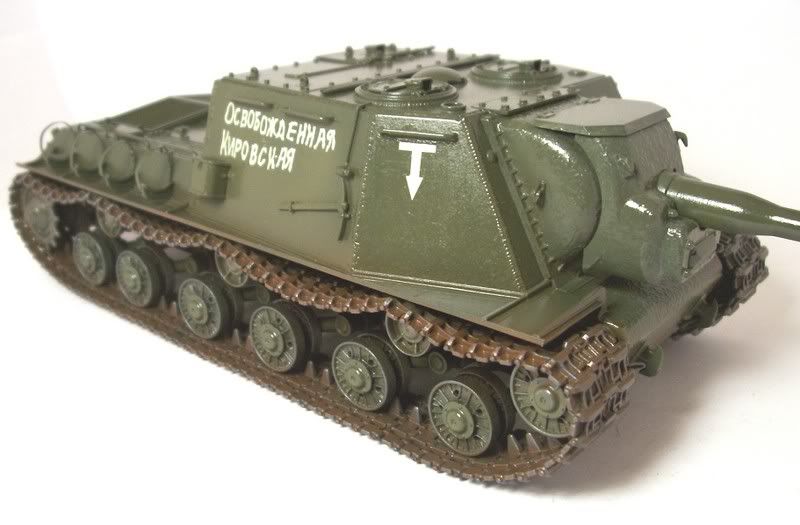
Step 5, wear and tear added using van dyke brown and a scrap of scouring pad.
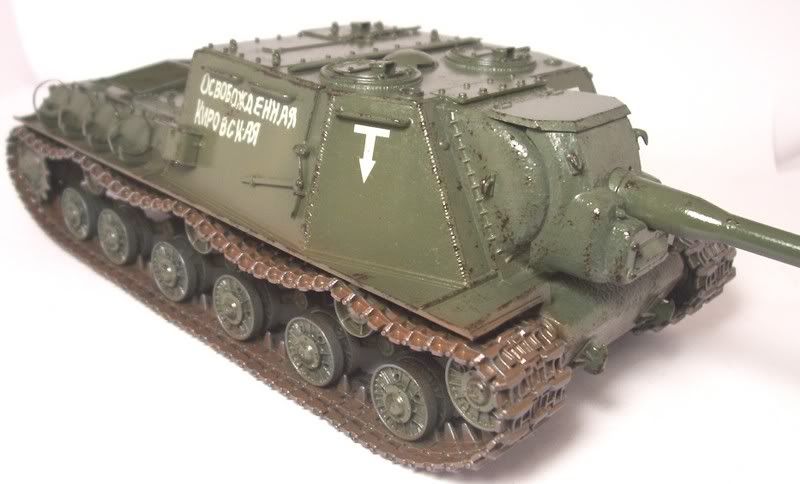
step 6, a wash of van dyke brown.
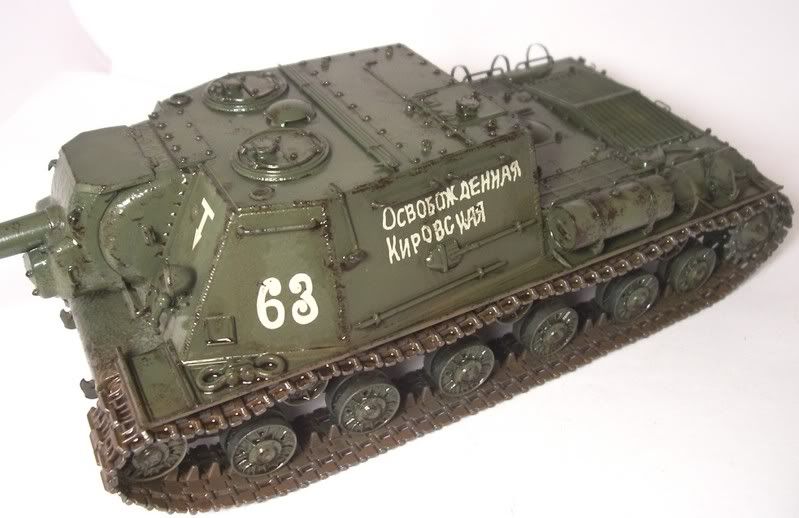
step 7, streaks added using black and white oil paints dotted on with a toothpick then brushed downwards with a thinner damp brush until almost gone.
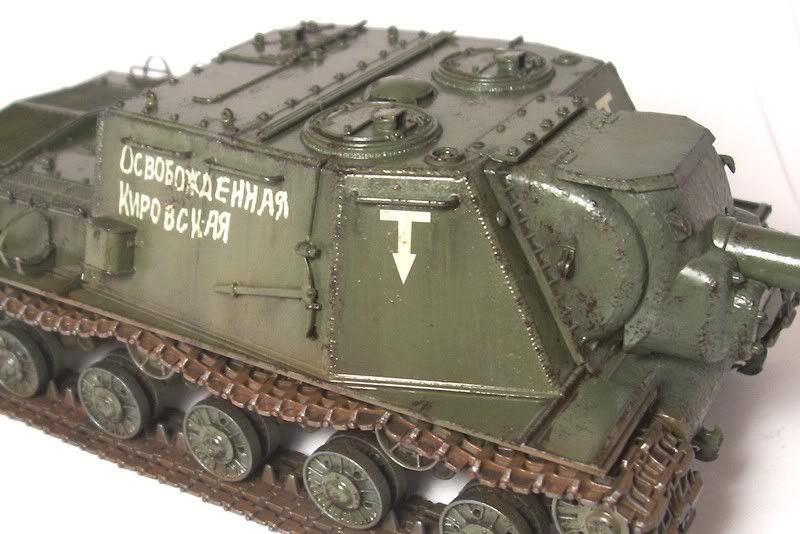
step 8, a mud coloured wash added all over.
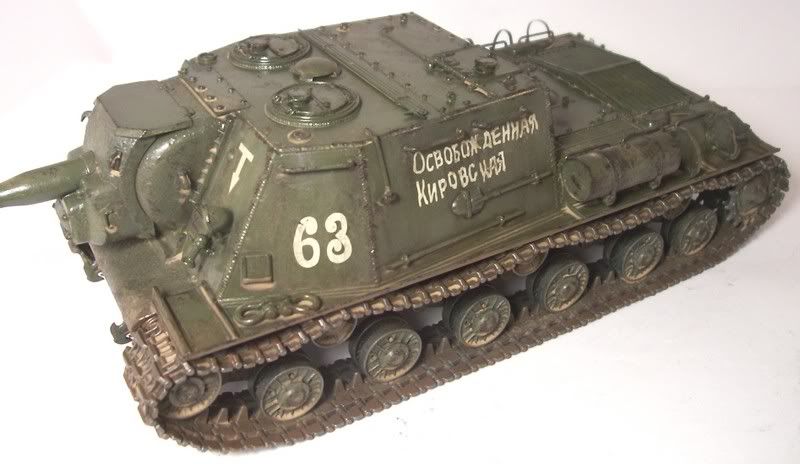
step 9, pigments drybrushed on the tracks and running gear followed by dullcote and another drybrushing all over with shadowed steel.
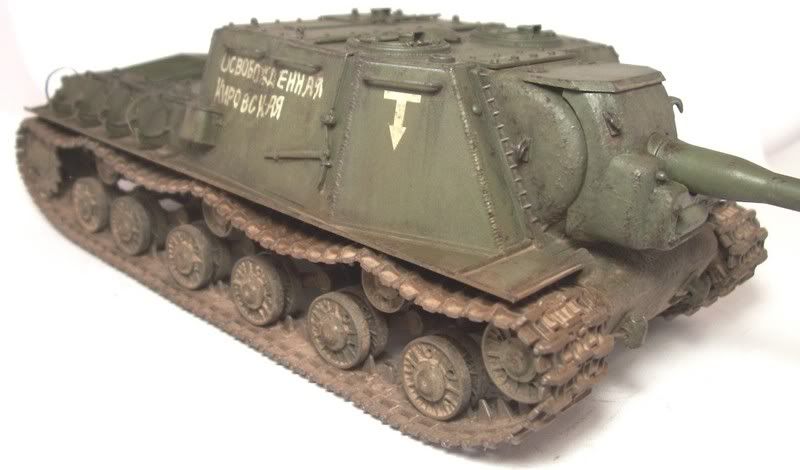
step 10, tools painted and a tow cable added plus a log and chain and tarp then finished off with some more pigments and spot washes here and there to blend it all together and shes done.
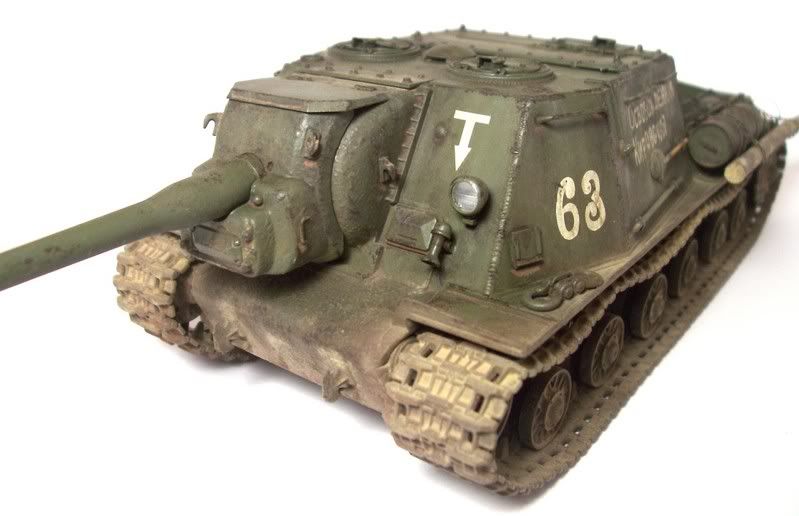
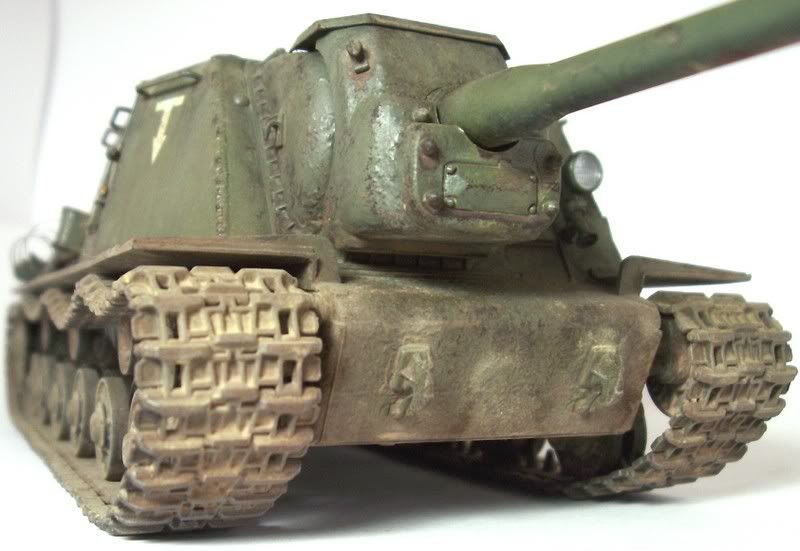
Thanks for looking in and all comments are welcome.

Ron.

Ron g.
  • Member since
    July 2003
  • From: On my kitchen counter top somewhere in central North Carolina.
Posted by disastermaster on Saturday, April 14, 2007 1:56 PM
 Carves wrote:
 biffa wrote:

thats funny i bought the trumpeter KV "big turret" last week and it almost got built instead of this one!! i must find your hidden cameras and why is that worker in the picture standing around doing nothing just wait till i get down there Smile [:)]

im actually having some good modeling days right now and i am enjoying it, i have on the bench right now,,

this one which has just been gloss coated ready for decals then onto weathering

A Tamiya pershing built and painted awaiting decals and weathering (this one as been my in between build, i work on it in between other builds)

And i have begun building the Dragon Nashorn premium kit and i am about 30% into the build i will start a thread containing all the build steps when i have cleaned the rest off the bench.     

Hey Ron,

I thought that you cleaned up your tank fab outta Stevo's hidden camera.
Maybe it is an inside job Angel [angel]

It seems that you really enjoying building stuff Ron, I totally envy you. I wish I dont got bored so quickly when building a tank. Maybe I need to find a better and faster way in building and painting stuff.

Keep on going Ron....

---
Ben 

Big Smile [:D] The camera is none other than one of those Evil [}:)] secret hi-tech gestapo projects my uncle Confused [%-)] stole while he was in the russian army unit (...... yep, that's another story) that got into Berlin first. Thumbs Up [tup] We've kept it in the family and ..... ( Shock [:O] other than my recreational surveillance of biffa's underground industrial consortium) I use it mostly for watching Alien [alien] area 51 and Yuck [yuck] female politicians Kisses [:X].

(Don't worry, I didn't mean to class you with Blush [:I] female politicians)

Zzz [zzz] I/we're watching you Ron......  


Steve 

 https://i.imgur.com/LjRRaV1.png


  • Member since
    April 2014
Posted by Carves on Saturday, April 14, 2007 8:36 AM
 biffa wrote:

thats funny i bought the trumpeter KV "big turret" last week and it almost got built instead of this one!! i must find your hidden cameras and why is that worker in the picture standing around doing nothing just wait till i get down there Smile [:)]

im actually having some good modeling days right now and i am enjoying it, i have on the bench right now,,

this one which has just been gloss coated ready for decals then onto weathering

A Tamiya pershing built and painted awaiting decals and weathering (this one as been my in between build, i work on it in between other builds)

And i have begun building the Dragon Nashorn premium kit and i am about 30% into the build i will start a thread containing all the build steps when i have cleaned the rest off the bench.     

Hey Ron,

I thought that you cleaned up your tank fab outta Stevo's hidden camera.
Maybe it is an inside job Angel [angel]

It seems that you really enjoying building stuff Ron, I totally envy you. I wish I dont got bored so quickly when building a tank. Maybe I need to find a better and faster way in building and painting stuff.

Keep on going Ron....

---
Ben 

  • Member since
    April 2005
Posted by Thunderbolt379 on Saturday, April 14, 2007 8:13 AM

Looks great!

Quick question -- are the Dragon 122 and 152 kits the same molds as now issued by Zvezda?

Cheers,

TB379

http://worldinminiature.blogspot.com/

  • Member since
    January 2005
  • From: in the tank factory in my basement
Posted by biffa on Saturday, April 14, 2007 12:10 AM
 disastermaster wrote:
 Carves wrote:

 disastermaster wrote:
Make a Toast [#toast] OK boys and men........   Laugh [(-D] Here we go on #11 for 2007......!!!!!!

Yes Steve, I believe the reason why Ron is out for a while is maybe he went out to EXPAND his tank factory.

Now, I'll bet he can crank out like 2-3 tanks in a week. Angel [angel]

---
Ben

Ben ...Wink [;)] Yes, he did.

I came across this information Tongue [:P] showing that he has completed a KV line to debut soon after the JSU lineup.

Steve 


thats funny i bought the trumpeter KV "big turret" last week and it almost got built instead of this one!! i must find your hidden cameras and why is that worker in the picture standing around doing nothing just wait till i get down there Smile [:)]

im actually having some good modeling days right now and i am enjoying it, i have on the bench right now,,

this one which has just been gloss coated ready for decals then onto weathering

A Tamiya pershing built and painted awaiting decals and weathering (this one as been my in between build, i work on it in between other builds)

And i have begun building the Dragon Nashorn premium kit and i am about 30% into the build i will start a thread containing all the build steps when i have cleaned the rest off the bench.     

Ron g.
  • Member since
    July 2003
  • From: On my kitchen counter top somewhere in central North Carolina.
Posted by disastermaster on Friday, April 13, 2007 10:50 PM
 Carves wrote:

 disastermaster wrote:
Make a Toast [#toast] OK boys and men........   Laugh [(-D] Here we go on #11 for 2007......!!!!!!

Yes Steve, I believe the reason why Ron is out for a while is maybe he went out to EXPAND his tank factory.

Now, I'll bet he can crank out like 2-3 tanks in a week. Angel [angel]

---
Ben

Ben ...Wink [;)] Yes, he did.

I came across this information Tongue [:P] showing that he has completed a KV line to debut soon after the JSU lineup.

Steve 

 https://i.imgur.com/LjRRaV1.png


  • Member since
    September 2005
  • From: beacon falls , Ct.
Posted by treadwell on Friday, April 13, 2007 7:55 PM


  What a beauty Ron!Big Smile [:D]Thumbs Up [tup]-- you have that beautiful track sag going and really IMHO nailed the base color!!--- MM leather instead of rust for a base track color-- start bright and tone it down as needed -- I also prefer that way of painting sometimes-- cool man!!-- nice job on the p.e. too!--- treadCool [8D]


  • Member since
    January 2007
Posted by the doog on Friday, April 13, 2007 6:53 PM
Roger that, Biffa! Make a Toast [#toast]Thumbs Up [tup] I have to admit that getting the rear plate to look right after putting in those shims was a nightmare in itself, but I'll probably do it again for my other two ISU's I have; heck, I've already done two IS's and the ISU-152, so it's almost routine by now! Good looking build though, nice paint; I love these beasts--the PST 1/72 line is pretty sweet too. Looking forward to the finished product!
  • Member since
    January 2005
  • From: in the tank factory in my basement
Posted by biffa on Friday, April 13, 2007 6:02 PM

Hey Doog, yea i was aware of this and after carefully weighting up the options decided with the front and rear fenders removed and the track sag giving the impression of more space i would let it be, the rear plate was already a bit off and this would have made it even worse i appreciate the heads up though, yes generally everything is painted on the vehicle except for a pershing i painted at the same time as this, which i painted off because of the rubber band tracks i seldom use rubberband tracks but when i do i paint them off the vehicle.

Ron.

Ron g.
  • Member since
    January 2007
Posted by the doog on Friday, April 13, 2007 5:43 PM

Hey Biffa, nice work so far...I kinda hesitate to post this, as I fear I'm too late, but maybe in the interests of anyone else...I don't know if this is a new casting or what, but I would assume it hasn't been retooled from the ISU releases of about 10 years ago. MILITARY MINIATURE IN REVIEW did an article/review/build on these; specifically this ISU-122 and said that,...

     "there is too little clearance between the kit's return rollers and fenders. Measuring from plans in TANK MAGAZINE FEB '94, the space ends up about 3to 5 scale inches too short. While this degree of error is minimal in scale, it shows up when the tracks are put on. My suggestion to the modeler would be to shim up the upper hull with .030-.040 strip styrene"

Now, let me just say, I'm not really one of these guys who goes about fixing fenders, rear decks, etc, that are a hair short, but I have to agree that, when consulting my reference sources (most notably the excellent CONCORD book "Stalin's Heavy Tanks") I have to admit that When I recently built the ISU-152, I couldn't leave that alone; the difference really bugged me, and I used a .040 X .040 strip to raise the hull. I don't have a photo of the ISU-152, but I have a lousy shot of my IS-2 which got the same treament. In this photo  (it's basically OOB with a bit of admittedly excess battle-damage) the clearance looks slightly exaggerated because the fenders are banged upwards a bit, but you can see that the clearance between the hull and tracks is more in the ballpark. I guess it's probably too late to correct that now, but maybe it can be done for your next ISU...perhaps the 152? It's a monster!!

   All in all though, a nice clean build!    Doog 

  • Member since
    January 2005
  • From: in the tank factory in my basement
Posted by biffa on Friday, April 13, 2007 5:41 PM

Eric this is the first time ive done them this way so im winging it but i will probably give them a couple of washes with the rest of the vehicle then a dry brushing with steel then finally some powders and maybe a bit of mud but all this could change at any time Smile [:)]

usually i brush paint them with craftpaint "nutmeg brown"  and follow the steps above but i decided to airbrush these one knowing i will be weathering them quite a bit so overspray wasnt an issue infact i wanted it to aid in the weathering. Plus i like trying new approaches.


Ron.

Ron g.
  • Member since
    March 2003
  • From: Rain USA, Vancouver WA
Posted by tigerman on Friday, April 13, 2007 5:34 PM
Ron, do you use MM Leather for all your tracks? And to jump the gun a tad, what's your finishing process for them?

   http://i7.photobucket.com/albums/y269/wing_nut_5o/PANZERJAGERGB.jpg

 Eric 

  • Member since
    January 2005
  • From: in the tank factory in my basement
Posted by biffa on Friday, April 13, 2007 5:07 PM

Thanks guys, Bufflehead it may actually be a curse i have an inability to put something down without finishing it drives me insane weather its a book, a model or home improvments i simple cant rest with something half done Smile [:)]

Small update the fuel tank straps were wrong for this vehicle so i had to do some adjusting now they look closer to what they should be and with a little weathering and some extra stowage thrown on i think they will be ok, so far i have painted the whole thing in flat black primer then a base coat of MM acrylic dark green which i then lightened with a little yellow to do some slight fading, then still with the air brush i painted a base on the tracks with MM acrylic leather.


Ron.

Ron g.
JOIN OUR COMMUNITY!

Our community is FREE to join. To participate you must either login or register for an account.

SEARCH FORUMS
FREE NEWSLETTER
By signing up you may also receive reader surveys and occasional special offers. We do not sell, rent or trade our email lists. View our Privacy Policy.