SEARCH FINESCALE.COM

Enter keywords or a search phrase below:

Academy PzIV **Pics**

1877 views
18 replies
1 rating 2 rating 3 rating 4 rating 5 rating
  • Member since
    August 2005
  • From: Sydney, Australia
Academy PzIV **Pics**
Posted by Phil_H on Sunday, March 9, 2008 5:35 AM

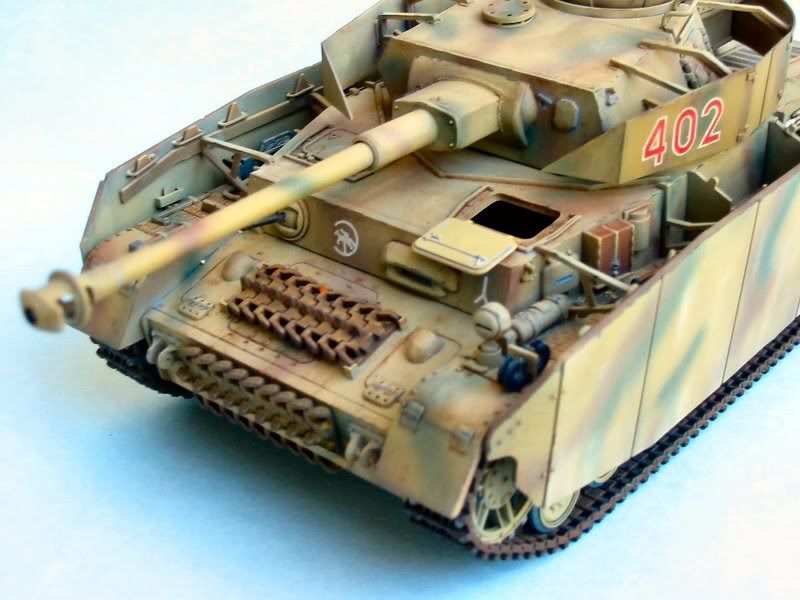
Yes folks, it's Academy's Tamiclone PzIV. To quote Luke Skywalker... "What a piece of junk!".

My reason for building this was simple - It was a cheapy kit I could use for camo practice. I think the last airbrushed multi-colour camo I did was some time around 1988 Shock [:O]

The idea was to just throw the kit together in as short a time possible and hit it with some paint.

Well, easier said than done... Though it looks reasonable in the box, it's a dog of a kit. Lots of gaps to fill and where there aren't any gaps, the parts just don't fit well. Lots of sanding and scraping and still some of the problems caused by mould misalignments are beyond recovery. And then.... the instructions don't provide any painting instructions.

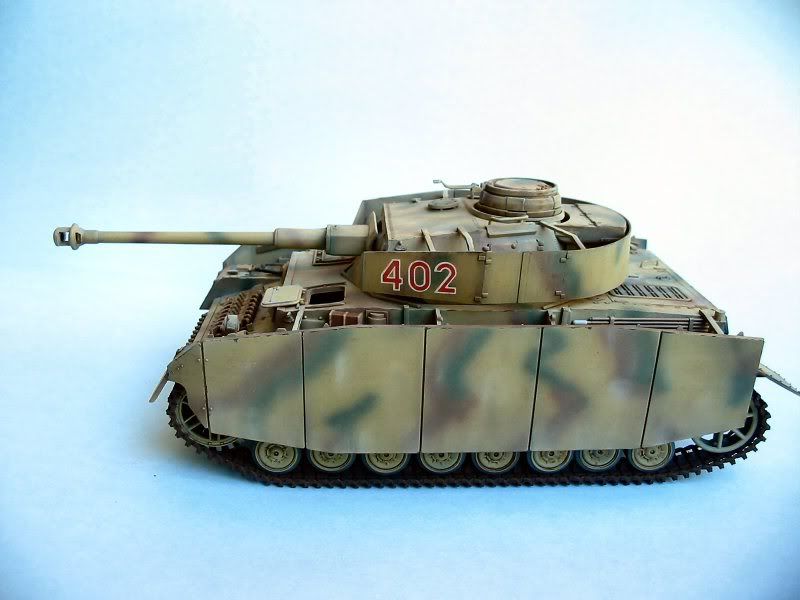
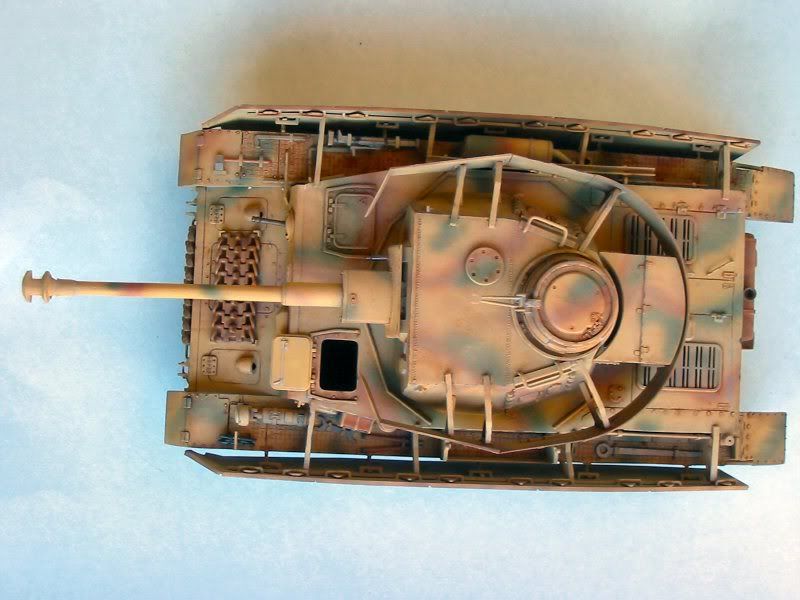
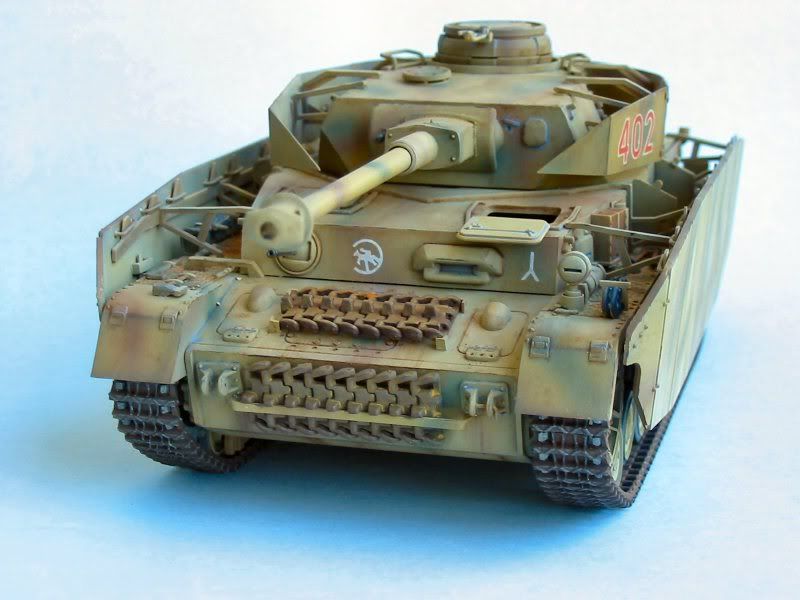
I wasn't able to find any references for the vehicle represented by the kit markings, so the colour scheme is improvised and doesn't represent any specific vehicle. The weathering is a little rough in parts (was trying out some different paints, which didn't quite work out the way I liked) and yes, it's a little on the clean side.

So here it is..
  • Member since
    July 2013
Posted by DURR on Sunday, March 9, 2008 6:51 AM
and your problem was what?       looks pretty good to me
  • Member since
    March 2007
  • From: Atlanta, Ga.
Posted by MrSquid2U on Sunday, March 9, 2008 6:59 AM

Phil,

 I'd say you 'polished up' that lump of coal mighty nice! Others can point out the kits inaccuracies, I'll just say that I see a good looking tank now thanks to your efforts.

Well Done!Thumbs Up [tup]


  • Member since
    April 2007
  • From: Schroon Lake, NY
Posted by SMJmodeler on Sunday, March 9, 2008 1:05 PM

 DURR wrote:
and your problem was what?       looks pretty good to me

Sign - Ditto [#ditto]...whatever challenges you ran into were certainly overcome...that is a darn nice looking build in my bookThumbs Up [tup]!!!..a liitle bit more with the pin washes might help, either way you did a great job!!!Make a Toast [#toast]

  • Member since
    March 2003
  • From: Rain USA, Vancouver WA
Posted by tigerman on Sunday, March 9, 2008 2:49 PM
I think you overcame everything quite nicely and you achieved your goal of painting some camoflauge. I'd be proud to display it myself.

   http://i7.photobucket.com/albums/y269/wing_nut_5o/PANZERJAGERGB.jpg

 Eric 

  • Member since
    January 2007
Posted by the doog on Sunday, March 9, 2008 3:51 PM

Hey Phil--it's a bit clean for me, but as a "cleaner" build, it's certainly an attractive effort! Yhe camo looks good, the whole kit looks nice, and I can't see anything glaring as inaccurate or poorly done.

Not a bad effort at all for a "quickie"! 

  • Member since
    July 2003
  • From: Philippines
Posted by Dwight Ta-ala on Sunday, March 9, 2008 6:25 PM
Well looks like you made it trhough the problems and came out with a great looking model. It's a bit too clean for my taste but that just me. Great job on the camo.

  • Member since
    July 2003
  • From: On my kitchen counter top somewhere in central North Carolina.
Posted by disastermaster on Monday, March 10, 2008 12:43 AM

to all the above.The image “http://e.deviantart.com/emoticons/c/clap.gif” cannot be displayed, because it contains errors.

It's easy to see evidence of the kit's simplistic detail. Those side skirts appear chunky thick.

                    Steve
 

 https://i.imgur.com/LjRRaV1.png


  • Member since
    August 2005
  • From: Sydney, Australia
Posted by Phil_H on Monday, March 10, 2008 12:57 AM

Thanks guys.  

Unfortunately, this morning a simple grey fade and shade went disastrously wrong, so this colour scheme is no more. Dead [xx(]

Back to the paint shop...   

  • Member since
    November 2005
Posted by Anonymous on Monday, March 10, 2008 3:33 PM
uh oh...too bad...you did some nice work on her...she is marked as a 24th PD vehicle, but those red and white numbers are shaped oddly...also, at this stage of the war the divisional markings probably wouldn't be so large...
  • Member since
    October 2005
  • From: Brisbane, Australia
Posted by shaun68 on Tuesday, March 11, 2008 4:55 AM
Mate, I think you're selling yourself a bit short. I've got the other Tamiclone - the StuGIV - which is all built waiting for paint. Never had anything like the probs you did. For less than   $AU20, I really couldn't give a dry rat's if it turns out like a dog's breakfast, BUT, if it finishes at least half as decent as your PzIV, I'll pat myself on the back. Shame about the final botch up. Would've left it just as is...
  • Member since
    August 2005
  • From: Sydney, Australia
Posted by Phil_H on Tuesday, March 11, 2008 5:59 AM

 Mansteins revenge wrote:
uh oh...too bad...you did some nice work on her...she is marked as a 24th PD vehicle, but those red and white numbers are shaped oddly...also, at this stage of the war the divisional markings probably wouldn't be so large...

Thanks Manny,

The markings were as provided in the box. I thought the red and white side numbers were a little oversized. Size-wise, they look more reminiscent of hand-painted side numbers.  Likewise the 24 PzD insignia. The line thickness seems heavier than it should be, and all the references I can find show this insignia as yellow, not white. (I have found what looks to be a suitable replacement in my spare decals)

Shaun,

Thanks, and yep, I should have left well enough alone.... Blush [:I] 

  • Member since
    January 2007
Posted by the doog on Tuesday, March 11, 2008 9:02 AM
 Phil_H wrote:

Thanks guys.  

Unfortunately, this morning a simple grey fade and shade went disastrously wrong, so this colour scheme is no more. Dead [xx(]

Back to the paint shop...   

What's a "gray fade and shade". and why would you be applying it now?

Fill us in on the detais, and what you did wrong? We might be able to help you prevent something like this going wrong a second time? 

  • Member since
    August 2005
  • From: Sydney, Australia
Posted by Phil_H on Tuesday, March 11, 2008 5:10 PM

Hi Doog,

No great mystery. It was just meant to be a little post-shading to tone down the brightness a little and to slightly deepen the shadow areas. Just went a bit too heavy... Banged Head [banghead]

  • Member since
    August 2005
  • From: Sydney, Australia
Posted by Phil_H on Friday, March 14, 2008 10:38 PM

Ok, we're back.

Camo pattern is a little different this time, and yes, she's still a little clean, but this time she's going to stay clean...

  • Member since
    March 2007
  • From: Atlanta, Ga.
Posted by MrSquid2U on Saturday, March 15, 2008 12:46 AM

Well,

 That was "fast"! I like this version too! "Clean" happens. There was a time in every tank's life that it was either fresh from the factory or field shops.

Thanks for sharing and great job!Thumbs Up [tup]


  • Member since
    August 2005
  • From: Sydney, Australia
Posted by Phil_H on Monday, March 17, 2008 7:36 AM

Thanks MrSquid,

One advantage of using ethanol as a thinner for Tamiya paints - it dries very quickly.. Tongue [:P]

Thanks for looking.

Cheers,

Phil

  • Member since
    February 2007
  • From: Bournemouth UK
Posted by Luftwoller on Monday, March 17, 2008 1:13 PM

I think it looks damn fine to me, and im sure it will look even better on your model shelf. Nice job on the paint scheme #2....#1 looked good too. I see what others have said about the shurzen, geez if they were true to scale im sure they would weigh half a ton each. It also looks like its got a big bore exhaust. Germans had 'Boy racers' too, i guess. lol.

...Guy

..'Your an embarrassment to the human genus, makes me ashamed to call myself Homo'.
  • Member since
    July 2006
  • From: San Francisco Bay Area
Posted by bufflehead on Monday, March 17, 2008 2:39 PM

Phil, that's a sweeet Pz IV!  Both paint jobs look good to me!  I built the old Tamiya version and it definitely a clunker, but with some TLC these kits can turn out fine, as shown with your Academy kit!  Good work!


Ernest

Last Armor Build - 1/35 Dragon M-26A1, 1/35 Emhar Mk.IV Female


Last Aircraft Builds - Hobby Boss 1/72 F4F Wildcat & FW-190A8


JOIN OUR COMMUNITY!

Our community is FREE to join. To participate you must either login or register for an account.

SEARCH FORUMS
FREE NEWSLETTER
By signing up you may also receive reader surveys and occasional special offers. We do not sell, rent or trade our email lists. View our Privacy Policy.