SEARCH FINESCALE.COM

Enter keywords or a search phrase below:

M8 Armored Car in the Ardennes Winter WIP 7/27/08 *Complete* Figs IP

32181 views
127 replies
1 rating 2 rating 3 rating 4 rating 5 rating
  • Member since
    July 2006
  • From: New Jersey
Posted by redleg12 on Monday, July 14, 2008 1:22 PM

Marc - Yep, I'm hoping to bring snow to Danbury. Thanks

Stickman - Thanks for looking in and the comments

SMJ - On the forward end...call it turret forward I tend to agree. That's why I stopped and moved to the tires for now to get some opinions and decide myself. The back I have some scratchs on the side boards and other things to "break up" the white, I may "mess" up the front a little with some more scratched or a bit more wash. In general I agree.

The snow (fresh fallen) will be Woodland Scenics. I was going to try a light satin spray to try and give a twinkle effect to the powder. For the "compressed" snow on the tires, in the fender wells and tire tracks, I was going to use sheet rock compond mixed with white glue to form what is needed. Coat with a clear, wash to "yellow or dirty" the color sloghtly and then give a coat of satin and gloss mixed.

I will be setting up some experments this week so hopefully I can apply the snow to the tires and wells and once "weathered", assemble to the model this weekend.

Thanks for looking, your comments, and all your help.

Bodge - Thanks for looking in and the comments

Rounds Complete!!

"The Moral High Ground....A Great Place to Emplace Artillery."

  • Member since
    July 2004
  • From: Texas
Posted by wbill76 on Monday, July 14, 2008 1:42 PM
Everything's coming together very nicely redleg, very nice indeed. Thumbs Up [tup]  
  • Member since
    November 2005
Posted by Anonymous on Monday, July 14, 2008 2:35 PM
Very nice...those 360 degree markings are awesome...great interior all around... 
  • Member since
    July 2006
  • From: New Jersey
Posted by redleg12 on Monday, July 14, 2008 8:42 PM

Bill - Thanks for your comment and especially your help with the decal

Manny - Thanks for you comments.

Actually it is not in degrees but in mils. The graduation is mils left or right and to the rear (half circle) ending in 32 (for 3200.....6400 mils in a circle).

Thanks again

Rounds Complete!!

"The Moral High Ground....A Great Place to Emplace Artillery."

  • Member since
    August 2007
  • From: The Plains of Kansas
Posted by doc-hm3 on Monday, July 14, 2008 9:34 PM
This is inspiring! I have wanted to build this ever since Monogram released one in the 70's, now it looks like I have to build one.

All gave some and some gave all.

  • Member since
    July 2006
  • From: New Jersey
Posted by redleg12 on Tuesday, July 15, 2008 7:29 AM

Doc - I am humbled that you are inspired and thank you for your comments,

Rounds Complete!!

"The Moral High Ground....A Great Place to Emplace Artillery."

  • Member since
    April 2007
  • From: Schroon Lake, NY
Posted by SMJmodeler on Tuesday, July 15, 2008 9:51 AM
 redleg12 wrote:

SMJ - ...For the "compressed" snow on the tires, in the fender wells and tire tracks, I was going to use sheet rock compond mixed with white glue to form what is needed. Coat with a clear, wash to "yellow or dirty" the color sloghtly and then give a coat of satin and gloss mixed.

redleg12: Try using some watered down elmers mixed with the Woodland Scenics snow for this effect.  I used plaster (older build, not my SU-122) on tracks and it worked OK but the snow takes the mixes well and will give you a more realitic look.  You made need to apply it in coats but it WILL work.  The snow will also absorb your mud and grime better than plaster, and looks very realistic:

I'll keep following alongThumbs Up [tup]...

  • Member since
    July 2006
  • From: New Jersey
Posted by redleg12 on Tuesday, July 15, 2008 10:04 AM

SMJ - We keep thinking the same way...somewhat! I tried a test last night of the plaster on a kit wheel (using resin wheels for the build so the kit wheels are available). While it looks ok, the problem is the variation in color from the WS snow. I was giong to try a mix of the snow and elmers tonight. I may also try a mix of the plaster and WS snow, This would be an effort for in the wheel wells and compressed material. On the wheel wells, I wanted to make some small "fenderburgs" (that built up compressed snow that stick to the fenders).  

Two more test wheels tonight!!

Thanks for the thoughts and the help. I appreciate you keeping up and lending comments. It is the true reason for this forum.

Rounds Complete!! 

"The Moral High Ground....A Great Place to Emplace Artillery."

  • Member since
    April 2007
  • From: Schroon Lake, NY
Posted by SMJmodeler on Tuesday, July 15, 2008 10:25 AM
 redleg12 wrote:

SMJ - We keep thinking the same way...somewhat!...

Hey, doesnt the saying go, "great minds think alike"?Wink [;)]

 redleg12 wrote:

SMJ - I was going to try a mix of the snow and elmers tonight. I may also try a mix of the plaster and WS snow, This would be an effort for in the wheel wells and compressed material. On the wheel wells, I wanted to make some small "fenderburgs" (that built up compressed snow that stick to the fenders).  

StickSmile,Wink, & Grin [swg]...with the elmers, IMO.  Try varying the water/elmers ratio.  You may even want to let the elmers/water/snow mix set-up a bit before applying it to the fenders, that way it will be stickier.  I KNOW the exact look you're going for on the fenders...and it will look sweet if you can pull it off!  That Woodlands stuff is great!!!

  • Member since
    January 2005
  • From: in the tank factory in my basement
Posted by biffa on Tuesday, July 15, 2008 11:01 AM
Coming together great Mike the interior is awesome mate the ring numbers inside the turret look spot on, great share there Bill Thumbs Up [tup]
Ron g.
  • Member since
    October 2007
  • From: Louisville, KY
Posted by pordoi on Tuesday, July 15, 2008 11:01 AM
 redleg12 wrote:
Painted the inside of the turret with Tamiya Flat White, detailed the turret gears with Alclad Steel, and seats with Tamiya Black. Then gave an oil wash for weathering.


Redleg,

I've recently played around with the Alclad metallics.  Heard that they required a black primer coat for best effect and that they needed to be sprayed; they don't brush well.  Based on my limited experience so far, I'm not sure that I agree.  What type of prep work did you do before using the Alclad Steel?


Don


  • Member since
    July 2006
  • From: New Jersey
Posted by redleg12 on Tuesday, July 15, 2008 11:52 AM

SMJ - Thanks, we will give it a test run tonight

Ron - Thanks for the comments and I agree THANKS BILL.

I wish we could set up an area to share things like custom decals. Bill saved me a BUNCH of time. I have some stuff for US howitzer ammunition I did. I'm sure there are others. If they were all in one place like a catalog, it would give help to others. As long as they were copyright free ware, so no one tries to make money on someone elses work.

Pordoi - As far as the Alclad paints:

  • Brushing - Since it is really set up to be sprayed, it is very thin and settles fast. You need to shake, do some painting, shake, do some more, and so on. 
  • Prep - The chrome and polished aluminum require gloss black prep. The steel is dark to begin with so just used Tamiya OD as the base. Two brush coats seem to get the desired effect. 
  • Spray - Since this a thinner coat than brush, it is more important to follow the Alclad instructions for base coat. Since it is so thin, lower your air pressure to the AB and try some test shots. Also you need to ventalate as the solvent smell is tremendous from Alclad when spraying.

Hope this helps

Rounds Complete!! 

"The Moral High Ground....A Great Place to Emplace Artillery."

  • Member since
    September 2006
  • From: Dripping Springs, TX, USA
Posted by RBaer on Tuesday, July 15, 2008 2:21 PM
Redleg, just picked up on this one, glad I did! Looking forward to seeing the snow camo move along, want to try that myself on a Sherman I have waiting for it. Also, have the old Monogram M8 started in the stash, will use your build as a detail guide. Big Smile [:D]

Apprentice rivet counter.

  • Member since
    July 2006
  • From: New Jersey
Posted by redleg12 on Tuesday, July 15, 2008 5:12 PM

RBaer - I thank you for your comments and I am happy that you want to use this as a guide. That make all the effort of doing a build log WIP worth while.

I love to get comments to learn and to teach. The sharing of ideas such as SMJ and I trading thoughs on snow helps me or Bill and his decal which was a huge help. More than this exchange helping me is some of the other things I did and these exchanges helping others

THAT'S WHAT THIS FORUM IS REALLY ABOUT!!

As the old Army saying goes, "cooperate and graduate"....we all get better togeather

Thanks RBaer

Rounds Complete!! 

"The Moral High Ground....A Great Place to Emplace Artillery."

  • Member since
    September 2006
  • From: Dripping Springs, TX, USA
Posted by RBaer on Tuesday, July 15, 2008 7:10 PM

Well said, redleg 12. That's the point of all this, isn't it? My builds have gotten
(in my mind) quite a bit better since I started hanging out here. I even enjoy seeing AI's builds..... But seriously, folks, it's the free sharing of information that makes this forum so rewarding to me personally.

Apprentice rivet counter.

  • Member since
    July 2004
  • From: Texas
Posted by wbill76 on Tuesday, July 15, 2008 10:30 PM
 RBaer wrote:

Well said, redleg 12. That's the point of all this, isn't it? My builds have gotten
(in my mind) quite a bit better since I started hanging out here. I even enjoy seeing AI's builds..... But seriously, folks, it's the free sharing of information that makes this forum so rewarding to me personally.

Knowledge that is not shared is useless. I've never understood those who think that hoarding it or locking it away in an exclusive forum or repository is the best use of it, especially when they had to come by it through secondary means for the most part themselves. Wink [;)]

  • Member since
    April 2007
  • From: Schroon Lake, NY
Posted by SMJmodeler on Wednesday, July 16, 2008 9:38 AM
 redleg12 wrote:

I love to get comments to learn and to teach. The sharing of ideas such as SMJ and I trading thoughts on snow helps me or Bill and his decal which was a huge help. More than this exchange helping me is some of the other things I did and these exchanges helping others

THAT'S WHAT THIS FORUM IS REALLY ABOUT!!

As the old Army saying goes, "cooperate and graduate"....we all get better together

redleg12: Well said, my friend...glad to help others, as they have helped meMake a Toast [#toast]

  • Member since
    October 2007
  • From: N.H.
Posted by panzerguy on Wednesday, July 16, 2008 5:17 PM


  Mike just got done catching up on this wip from the begining and man this is a great looking build. Everything looks perfect. Any chance we might be seeing this in Danbury? 

"Happiness is a belt fed weapon"

  • Member since
    July 2006
  • From: New Jersey
Posted by redleg12 on Wednesday, July 16, 2008 6:16 PM

RBaer, Bill and SMJ - Thanks for the support. All three of you (and there are others) emulate the learning/teaching role of this forum. I'm humbled by your agreement with my statements. It's people like you that make this the fun place it is for armor modeling.

I am on other forums also, like many of you. But I have not found the "brotherhood" there is here in the FSM armor forum. It is a testament to you and all those involved.  

Panzerguy - I hope so. The vehicle is just about finished except for "snow weathering". Then there is the base and lastly some figures. If I get tight on time, I may forgo the figures for Danbury.

But yes, the room is reserved, and the plan is to bring this (along with some others) to Danbury (fingers and toes crossed).

I am looking forward to meeting you and some of our other forum friends there, hopefully starting Friday evening.

Rounds Complete!! 

"The Moral High Ground....A Great Place to Emplace Artillery."

  • Member since
    July 2006
  • From: New Jersey
Posted by redleg12 on Sunday, July 20, 2008 2:32 PM

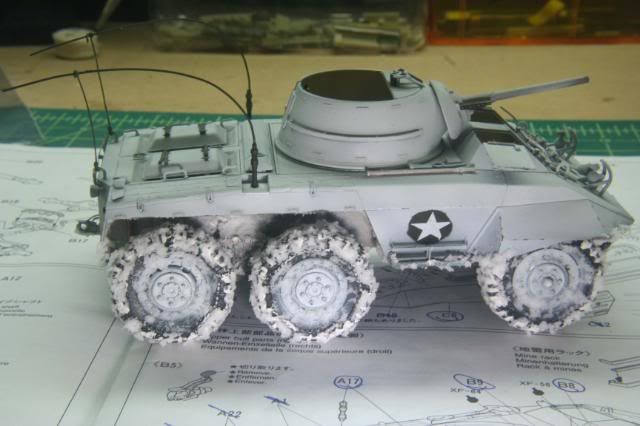
It's 95 degrees outside but there is a blizzard on my work bench.

I had a lot of input (and I am thankful for all)....and there have been toots in the past (I know Doog), but like Frank Sinatra said..."I did it my way"...so here is the winter weathering.

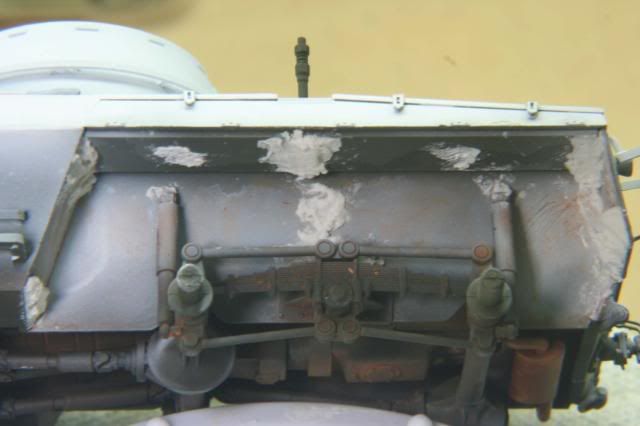
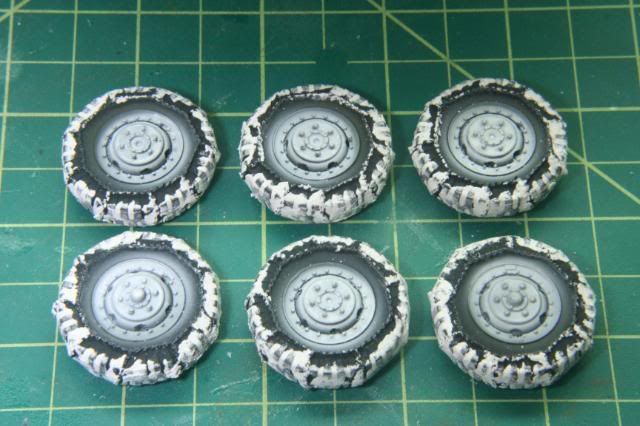
First in areas where snow would build or to fill in tire treads, I used some sheet rock spackle compound mixed with some white glue (90/10 mix).

This is the fender wells

These are the tires

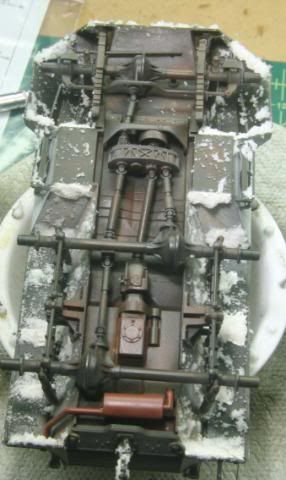
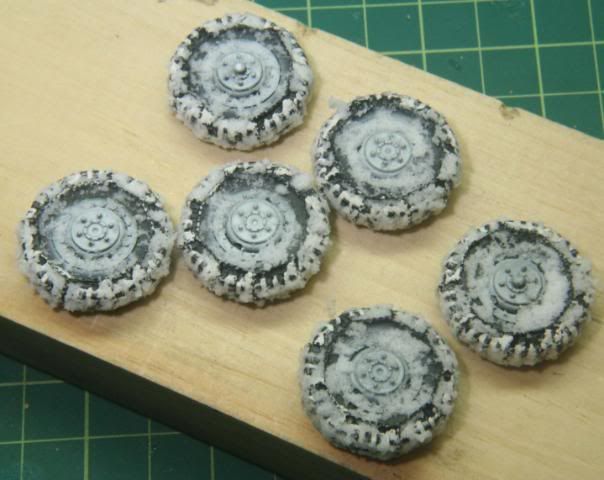
To seal the spackle and make the areas look wet, I coated the tires, model underside and fender wells with some Model Master Acryl Satin Finish. After drying I began the snow. To apply the snow in areas I wanted, I used a #5 brush, dip in landscape cement and then dip into a tray with some Woodland Scenics Snow. The brush would become covered with the snow and when it was applied moved with the consistency of "slush" (no pun). After applications in the wheel wells and tires: I also made a wash from the clear to give the wet effect to the lower half or the vehicle.

Wheel wells and underside 

Tires

Once all the snow set up, it was time to mount the tires. I also mounted the antennas and the antenna tie downs.

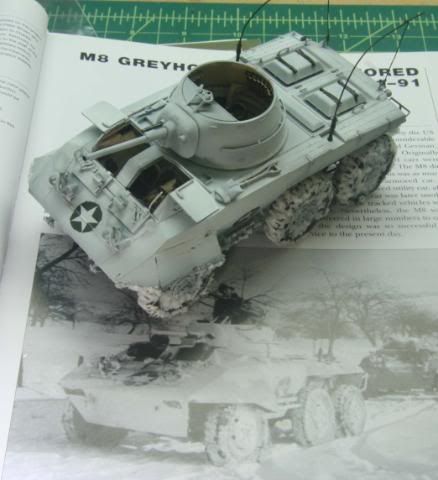
Here is a look with the original picture

The only thing left to mount is the M2 which is just about ready, so I moved on to the base.

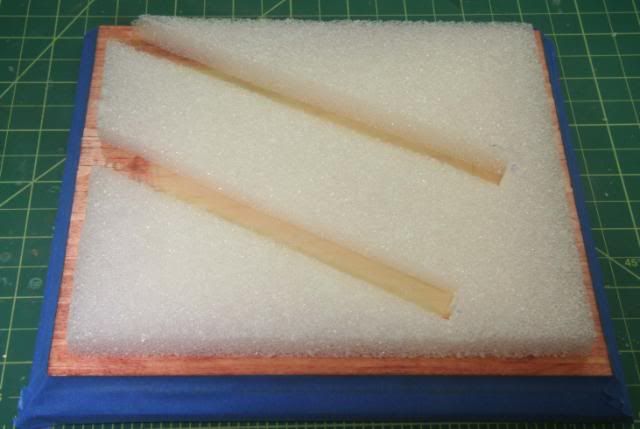
After cutting a piece of Oak, putting through the router table for a nice edge, one coat of stain, 2 coats of urethane and mask after completely dry. Then I cut some thin Styrofoam for depth and measured and cut tire ruts into it. The Styrofoam is mounted using Styrofoam spray contact cement.

Once the contact cement set up, I mixed up a batch of Celluclay tinted white and applied over the Styrofoam.

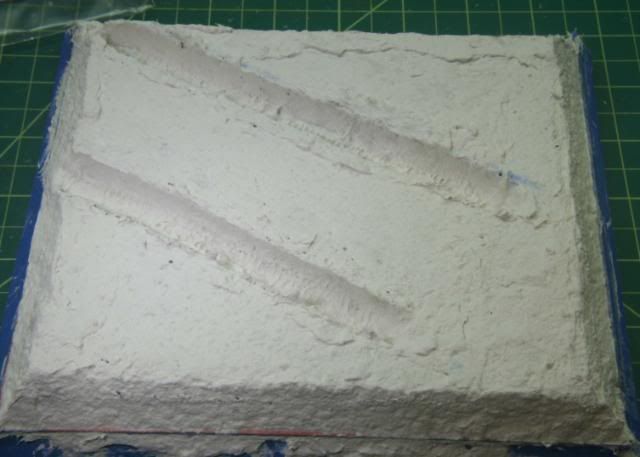
At this point I am waiting for the clay to dry, so I am going to take my parka off and head to the pool.

Next week should wrap it up except for figures. Manny, I'm still playing with that!!

Thanks for looking in. All comments welcome

Rounds Complete!!

"The Moral High Ground....A Great Place to Emplace Artillery."

  • Member since
    February 2008
  • From: ladner BC Canada
Posted by stick man on Sunday, July 20, 2008 2:45 PM

Wow your snow efect is superb! I'm going to remember the white glue/sheet rack spackle idea.

Smile [:)]

I'm 15 and I model I sk8board and I drum what could be better.
  • Member since
    July 2003
  • From: On my kitchen counter top somewhere in North Carolina.
Posted by disastermaster on Sunday, July 20, 2008 7:22 PM
 redleg12 wrote:

 
The image “http://img.photobucket.com/albums/v411/hells/26_7_25B15D.gif” cannot be displayed, because it contains errors.    Man, those wheels really add the life! 

Sherman-Jumbo-1945

"I was so much older then, I'm younger than that now"


  • Member since
    July 2006
  • From: New Jersey
Posted by redleg12 on Sunday, July 20, 2008 7:44 PM

Stick man - If you use the pre-made stuff, don't use it real wet. It should be dry to the consistancy of play-dough. Mix in the glue and use a small spatula to apply. If you need to keep some use an old pill bottle with strech wrap betwwen the cap and bottle.

Have fun with it.

Disatermaster - Glad you like them. I like the way they turned out also. The combination of the plaster which gives the sense of packed snow in the treads and the WS snow with the lighter snow hanging on to the edges and chains.

Thanks for looking and commenting!

Rounds Complete!!

"The Moral High Ground....A Great Place to Emplace Artillery."

  • Member since
    July 2004
  • From: Texas
Posted by wbill76 on Sunday, July 20, 2008 8:45 PM
Looking at those tires makes it feel like Christmas in July! Very nice effect and the styrofoam technique with the base is a nice innovation as well. Looking forward to the next round after you thaw out in the pool. Big Smile [:D]
  • Member since
    November 2005
Posted by Anonymous on Monday, July 21, 2008 8:35 AM
I'm dreaming of a white Greyhound!!! Looking freakin cool...how far down will your hound sit in those wheels grooves?
  • Member since
    April 2007
  • From: Schroon Lake, NY
Posted by SMJmodeler on Monday, July 21, 2008 8:50 AM

redleg12: Well done, sir...well done Make a Toast [#toast].  Don't forget to dirty that snow on the undercarriage a bit.  Even if it's fresh snow you're depicting, there would have probably been some old snow still wedged in the corners that was dirty.  Maybe even add some more old, dirty snow wedged deep in some areas, the contrast adds realism...

I'm going to use that foam technique in the future...great idea!


  • Member since
    July 2006
  • From: New Jersey
Posted by redleg12 on Monday, July 21, 2008 8:54 AM

Bill - Jingle Bells in July....Hummm.

The styrofoam cuts down on the weight, gives a nice flat surface, but with the cuts, allows depth for the tire tracks.

Hopefully the blizzard will finish up this week, now that I have thawed out....Brrrrrr.

Thanks for looking and your comments

Manny - Not quite to the rims, similar to the actual photo. The nice thing with the styrofoam is after I "snow" the surface, I will take a depth measurement. If I need to build up, I will add a little more Celluclay to get the height I want. With the tacks cut in the existing cut, it will give something for the new clay to stick to and I will just roll some new tracks.

Thanks for the comments.

SMJ - I hear you on the "dirty" snow. I'm not going to go too dirty, again looking at the picture even though it is B&W, lots of fresh powder....not too much dirt. I will give a final look once I put the ground work and vehicle all togeather and see how everything looks.

I may at least use a "small" amount of MIG pigments on the "fenderburgs" to get them a little bit of black/dirt.

As always, thanks for your comments, thoughts and recommendations. If I go forward with them of go another way...they are all looked at. The judgement is on the bench. Thanks

Rounds Complete!!

"The Moral High Ground....A Great Place to Emplace Artillery."

  • Member since
    September 2007
  • From: Relocating
Posted by Mobious on Monday, July 21, 2008 2:55 PM

 Hey redleg12,

 That foam base is goona be cool. Can't wait to see the snow fly! I wonder if I should be making out my Christmas list.

 Santa'a other sled the "M8 Greyhound"Big Smile [:D], Keep posting.

 Best Regards,

"It's a problem of applied physics" Roy Brown

  • Member since
    July 2006
  • From: New Jersey
Posted by redleg12 on Tuesday, July 22, 2008 8:15 AM

Mobious - Weather forecast....snow for this weekend!!

Thanks

Rounds Complete!!

"The Moral High Ground....A Great Place to Emplace Artillery."

  • Member since
    April 2005
  • From: Piscataway, NJ!
Posted by wing_nut on Tuesday, July 22, 2008 9:04 AM

BRRRRRRR...  It's getting cold in here.  Colder then a witches...Shock [:O]... well... it's just coldWink [;)]


Looks great Mike.  I think I might try that base idea for my winter PZ IV 

Marc  

JOIN OUR COMMUNITY!

Our community is FREE to join. To participate you must either login or register for an account.

SEARCH FORUMS
FREE NEWSLETTER
By signing up you may also receive reader surveys and occasional special offers. We do not sell, rent or trade our email lists. View our Privacy Policy.