SEARCH FINESCALE.COM

Enter keywords or a search phrase below:

'71 Roadrunners--FINISHED PICS, Pg 3!

12733 views
53 replies
1 rating 2 rating 3 rating 4 rating 5 rating
  • Member since
    January 2007
Posted by the doog on Friday, April 2, 2010 9:38 PM

Thank you Jim!!

And, welcome back!! Big Smile

  • Member since
    February 2003
Posted by Jim Barton on Friday, April 2, 2010 6:07 PM

Been a long time since I been on this website! Anyway, that's a gorgeous pair of Roadrunners!

"Whaddya mean 'Who's flying the plane?!' Nobody's flying the plane!"

  • Member since
    January 2007
Posted by the doog on Wednesday, March 31, 2010 1:47 PM

Thanks, Andy!

I'd love to be able to afford and run one of these sweeet cars! Your friend is a lucky man!

  • Member since
    January 2008
  • From: Bournemouth UK
Posted by Bodge on Tuesday, March 30, 2010 12:25 PM

They are a couple of beautiesKarl, attention to detail is superb and what a finnish.Yes

A mate of mine has one of those full size.

  • Member since
    January 2007
Posted by the doog on Wednesday, March 24, 2010 10:02 PM

Hey, thanks, Fox, and Count! I appreciate you looking in and commenting!

Thanks too, Narayan--these are my fave cars too. It's a thrill to have not just one but two of them sitting in my case! I just wish they were in my driveway! Thanks for the kind comments, and I have to remember to get over to Dio's and see what you're working on lately! Embarrassed...Big Smile Thanks again!

  • Member since
    March 2010
Posted by The Count on Wednesday, March 24, 2010 6:23 PM

Spectacular job man! These came out great.

On the Bench: 1:25 1969 Z/28 Camaro RS, 1/48 Hasegawa F6F-3 Hellcat

  • Member since
    April 2004
  • From: Boston MA
Posted by vespa boy on Wednesday, March 24, 2010 7:12 AM

They look GREAT Karl. Glad you stuck with it and got  the paint right. That was a neat solution with the wheels too. The red with the red interior really works for me. These are the cars I used to dream about as a kid in primary school...American cars were so cool and so hard to get in Australia.

Thanks for sharing the step by step of the builds. Its been great to see them come together.

http://public.fotki.com/nkhandekar

This ain't no Mudd Club, or C.B.G.B.,
I ain't got time for that now

fox
  • Member since
    January 2007
  • From: Narvon, Pa.
Posted by fox on Tuesday, March 23, 2010 8:15 PM

Great Job Jobs Karl. Toast Bow Down Yes Absolutely gorgeous.

JimCaptain

 Main WIP: 

   On the Bench: Artesania Latina  (aka) Artists in the Latrine 1/75 Bluenose II

I keep hitting "escape", but I'm still here.

  • Member since
    January 2007
Posted by the doog on Tuesday, March 23, 2010 5:32 PM

Wayne, thanks for the nice words! Believe me--anything you can teach me, or offer as advice, I would also appreciate! Thanks again!

Karl

  • Member since
    January 2007
Posted by the doog on Saturday, March 20, 2010 7:19 PM

Thanks, James, and Modelbuilder!

I have one more of these kits, and I'm seriously thinking that I'm going to put a Hemi in that one! I'll be going with a Ralleye Red body and gold stripe. That will look "hot" I think?!

Thanks again, guys! Smile

  • Member since
    May 2004
  • From: Kings Mountain, NC
Posted by modelbuilder on Saturday, March 20, 2010 4:47 PM

Karl

Those are a couple of awesome birds that you have built there. I will definately be using this thread when I do mine. I may have to upgrade the engines to big Hemis though

  • Member since
    April 2007
  • From: Canada
Posted by JTRACING on Friday, March 19, 2010 11:38 PM

Sweet work on both!! nice details all over

  • Member since
    May 2009
  • From: Brizioland
Posted by Brizio on Friday, March 19, 2010 11:15 PM

Thank you!!! You are to gentle!!! I really like your Roadrunners, you don't find so many made so perfect!

  • Member since
    January 2007
Posted by the doog on Friday, March 19, 2010 6:45 PM

Thanks so much guys! I sincerely appreciate the kudo's!

Bill, I've learned one thing---these "clean" finishes are MURDER! lol! Devil Every little thing that you have on your hands or fingers shows up--you virtually have to wear gloves to work on them past a point!  Still, I'm learning a lot about finishing and painting that I didn't know before. It's gratifying to FINALLY be able to get a semi-decent finish on a car! Thanks for commenting!

FastEagle--wow, cool! I wish I had the resources to get a MOPAR! There's really not a nicer compliment than I could think of than one that comes from someone who was an actual owner--thanks for the thumbs-up, ad I'm happy to have inspired you to memory lane!

Brizio--always a man of few words, but I appreciate you taking the time to leave a compliment!  Nice to hear coming from such a talented Auto modeler as yourself!

John--yeah, I was bummed about the wheelbase issues, but happy that I could correct it without too much surgery and grief! The wheels are your standard "pop 'em on" style--I just literally cut them right off at the posts and glued them on the doglegs. Thanks for your comments and compliments, John--and for the PM's! Wink

mm23t--yeah, once I get the new model, it should come together pretty quick--I just have to paint up the body, and it's pretty easy to do it now that I've dismissed the Krylon, and know not to use a certain masking tape for the trim....look for it in about two weeks...and thanks for commenting!!

  • Member since
    September 2004
  • From: Tulsa, Oklahoma
Posted by mm23t on Friday, March 19, 2010 6:41 PM

Good job as usual Karl. Sorry to hear about the meld down on the '34. I just have to chuckle when I think of a glob of '34. Sorry LOLWhistling

Medals are not "Won", they are "Earned".

Mike..


  • Member since
    August 2006
  • From: Cygnus X-1
Posted by ogrejohn on Friday, March 19, 2010 6:19 PM

Dang fine work! Shame about the wheel base being off. Was the rear end attached to the leaf springs or were they separate parts? Still, they both look great! That 440/6 is cool! I had a 70 T/A Challenger with the 340 six pack. Pretty fast little bugger, I can only imagine what a 440 six pack could do.

  • Member since
    May 2009
  • From: Brizioland
Posted by Brizio on Friday, March 19, 2010 6:16 PM

Wonderful job in both!!!

  • Member since
    December 2009
  • From: Fort Worth, Texas
Posted by FastEagle1 on Friday, March 19, 2010 6:15 PM

Doog,

I'm not a car modeler myself but a beautiful model is a beautiful model, no matter what the subject.  Your birds are gorgeous!  And many thanks for the memories - I was the owner of a 73 Roadrunner (red with white stripes and a white interior).  The white interior you created matched my recollections so well I thought I was looking at a photo of my old car.  Man, does this bring back some great memories.

Many thanks Bro.  I'm going to grab a beer and reminisce! 

  • Member since
    May 2005
  • From: Left forever
Posted by Bgrigg on Friday, March 19, 2010 6:11 PM

Wow and wow!

I don't know if I've ever seen any of your models so CLEAN!

So long folks!

  • Member since
    January 2007
Posted by the doog on Friday, March 19, 2010 5:57 PM


Mike, Tony and John--Thanks for your comments!Mike, I finally did it--I melted the body of the '34! (but I've got another one on the way!!!--I will NOT be defeated!! Angry)

Tony, that is one sweet-looking truck! I'm sorry you had to get rid of it!

OK, well, the birds are FINISHED! Here's the update and finished pics!

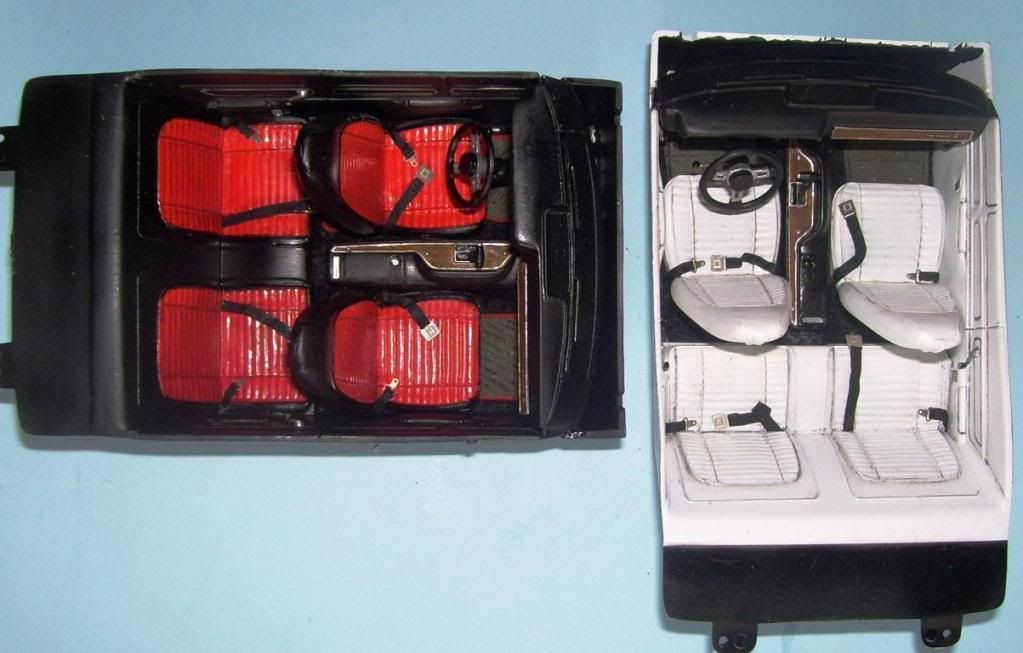
I made some seat belts from masking tape and Detail Master seat belts.

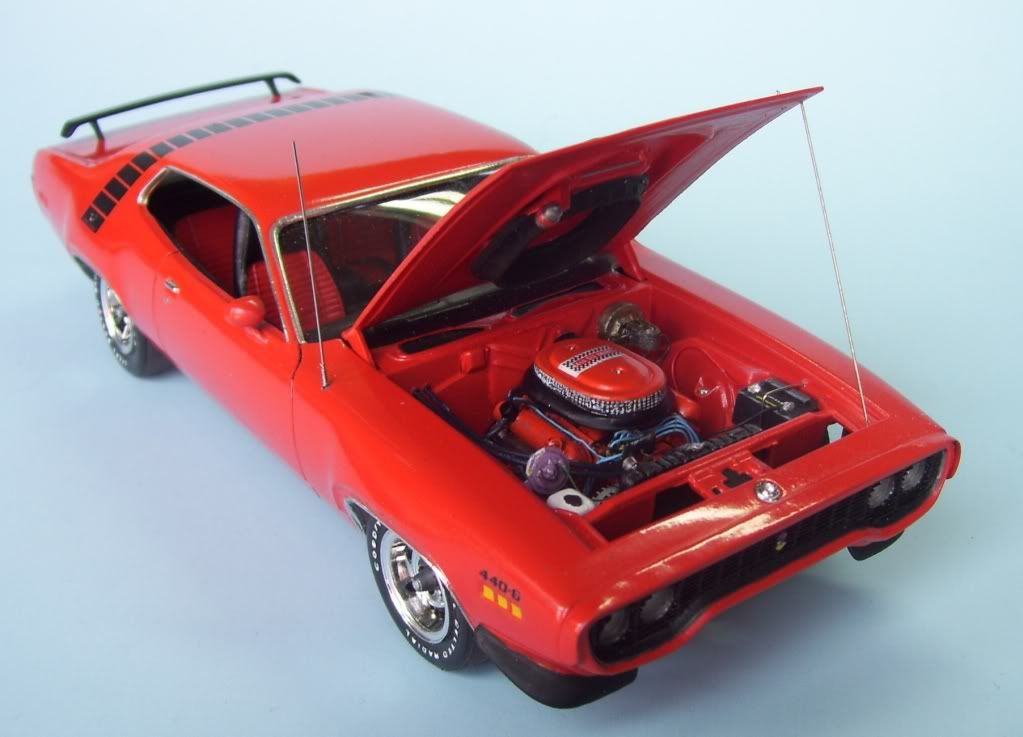
In order to get the Air Grabber hood to sit properly high on the carbs, I had to put a .030 spacer under it to raise it a little. It fits nice and snugly into the cowl.

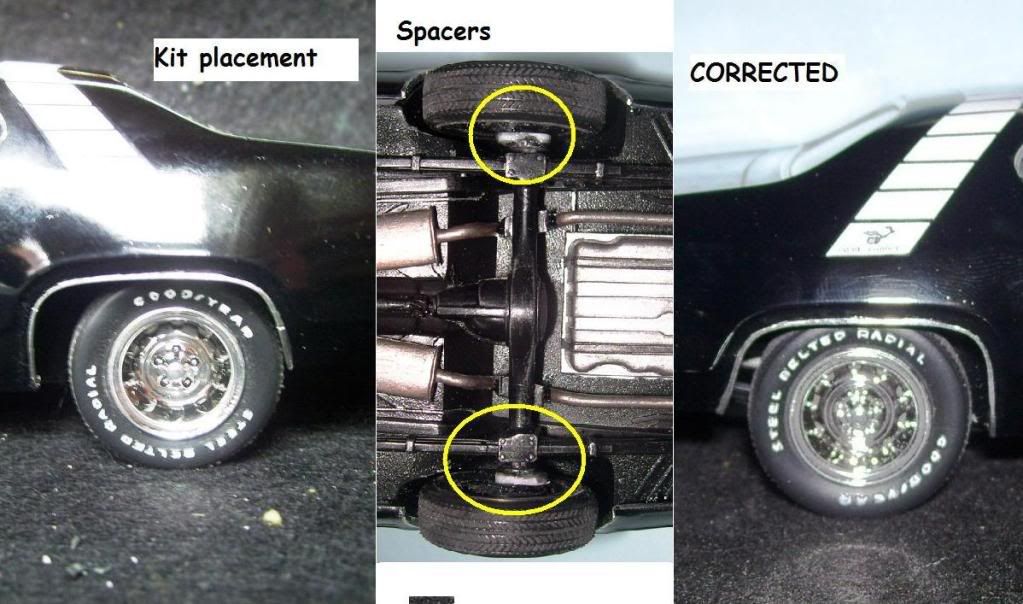
Net, the bodies were put together and the wheel clearances checked--BLECH! The wheelbase is way off! To fix it, the only thing that seemed reasonable was to cut off the wheels at the posts and put them back on with a small spacer; in effect, creating a "dog leg". Here's the photo...(ignore the dust and fingerprints for now!)

The brake master cylinders were all wrong--I cut the big balloony-looking back off, and reshaped the piece to something more appropriate. It is painted in a mix of Tamiya Silver and Gold to get that tint.

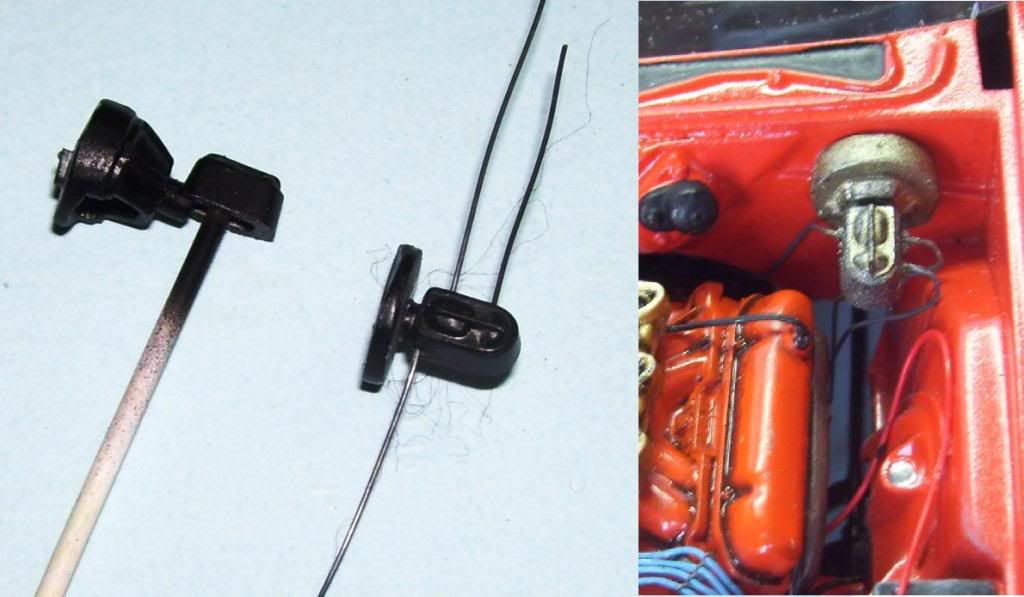
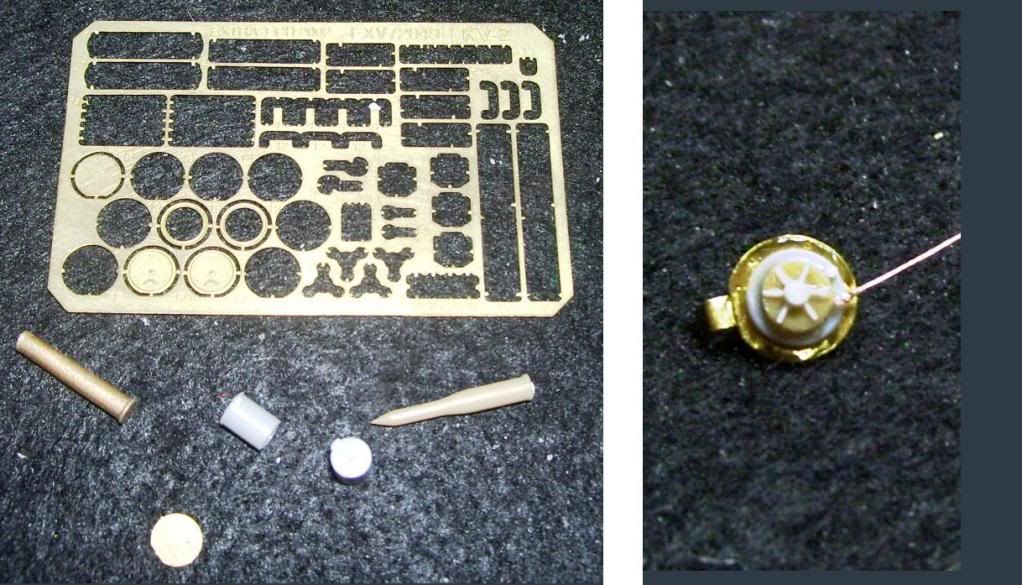
Next, what would a Road Runner be without a "Meep, Meep!"?!. To fashion the horns, I used some old Photo Etch for a 1/72 Russian tank (my main genre of modeling), along with a 1/72 Tiger II shell end, and a 1/35 shell casing end. I glued them together, added dented impressions around the edges of the brass PE exterior to simulate bolts, and painted in in Cracker Barrel paints "lavender" I also added a copper wire, to attach to the alternator.

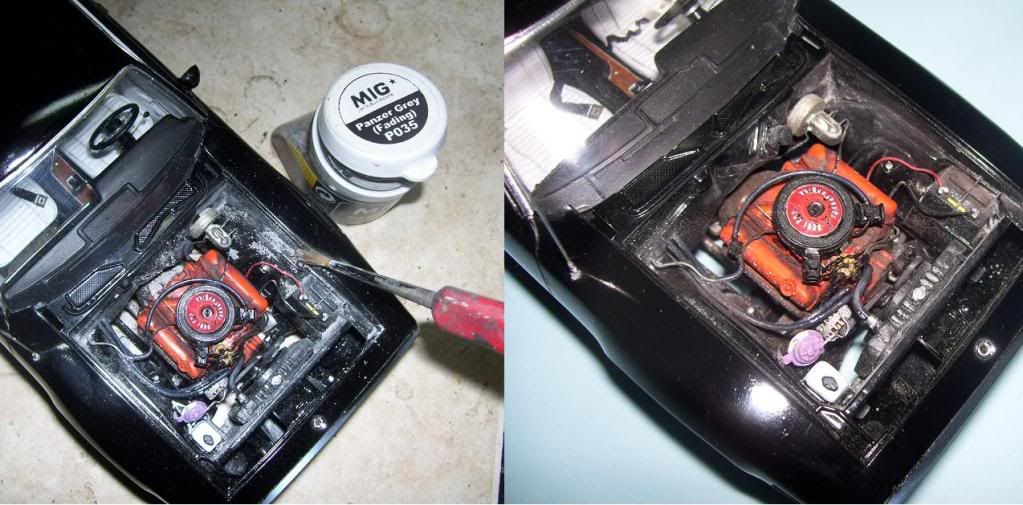
Next, I weathered the Black car's engine bay with some MIG "Panzer Grey (faded)". Just brush it on, and voila!

Black is my "daily driver" (I WISH! ) and the red one, more of a "show car".

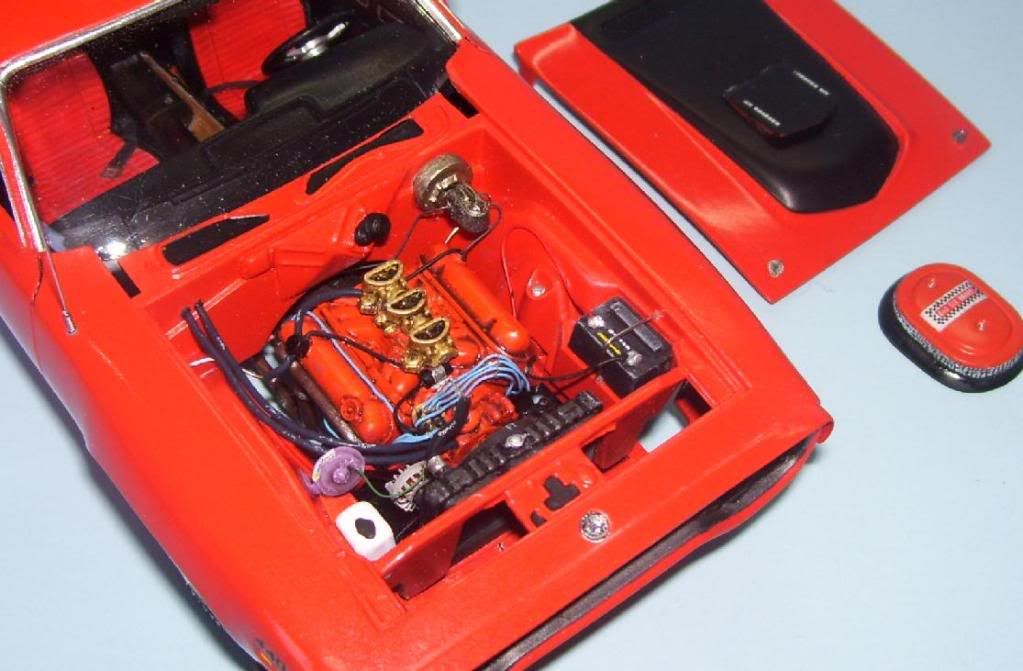
The completed 440-6.

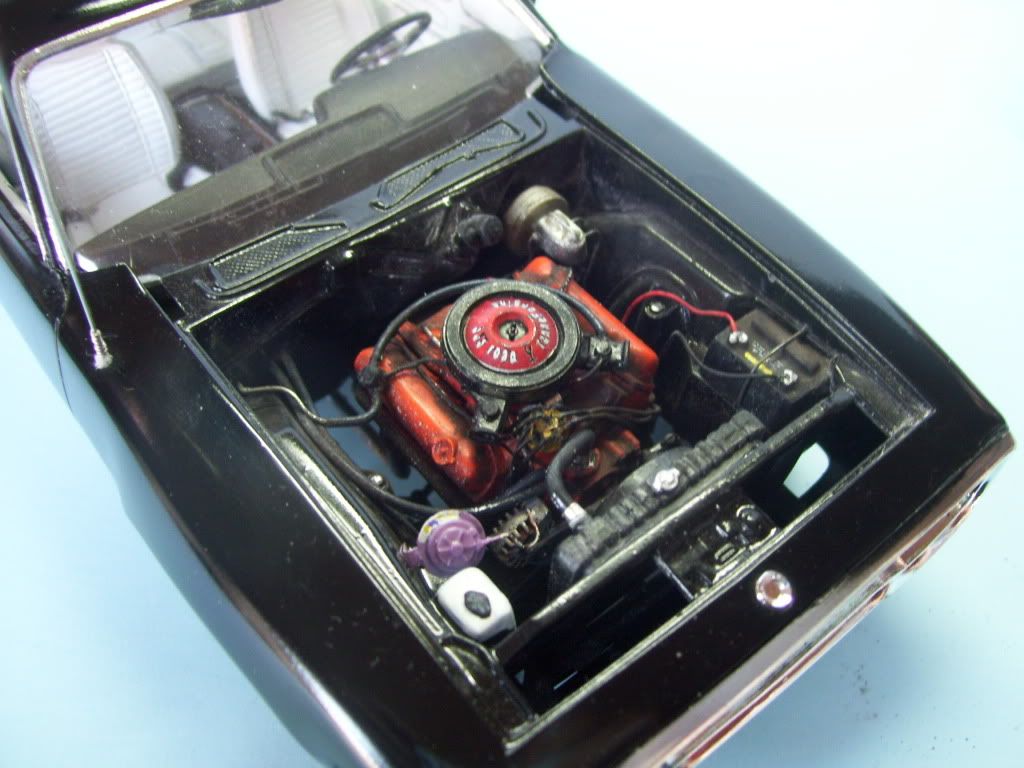
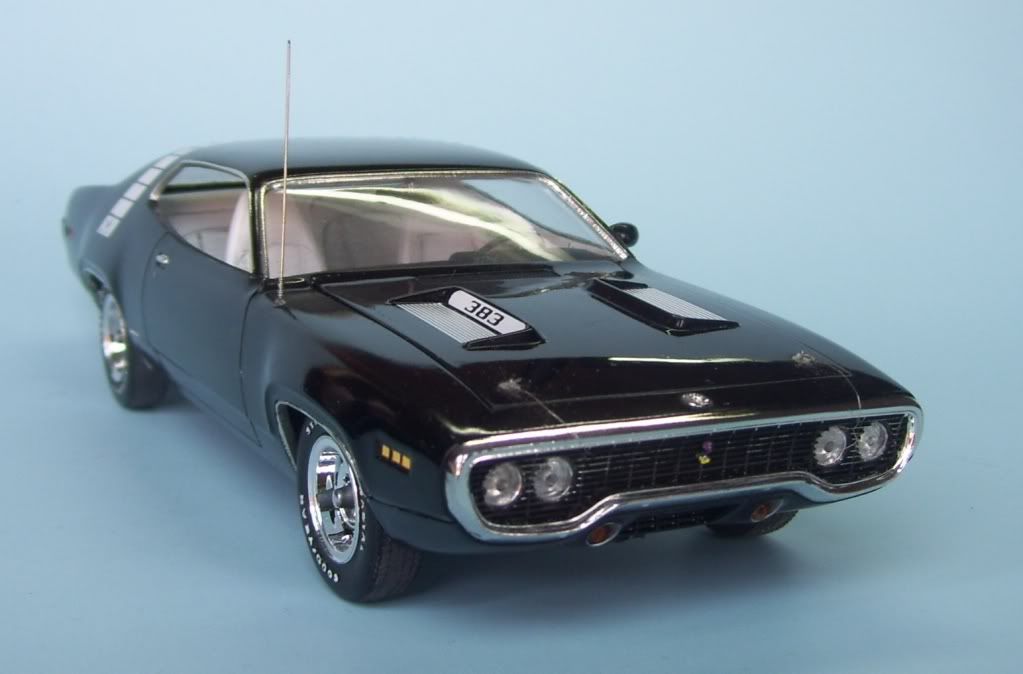
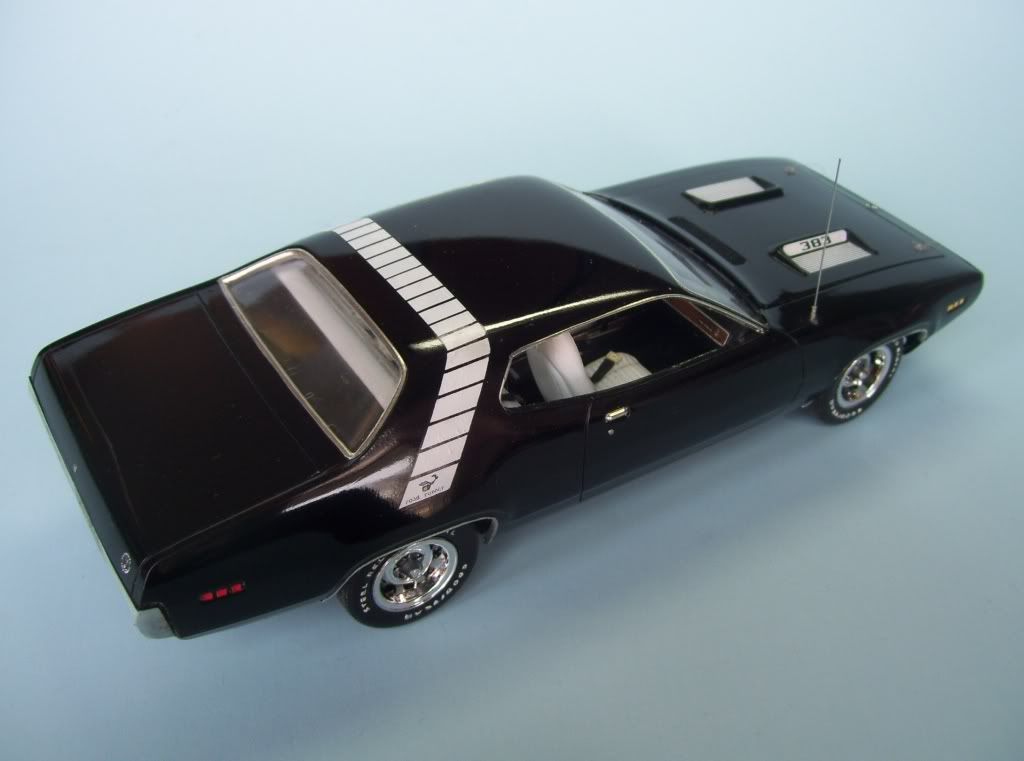
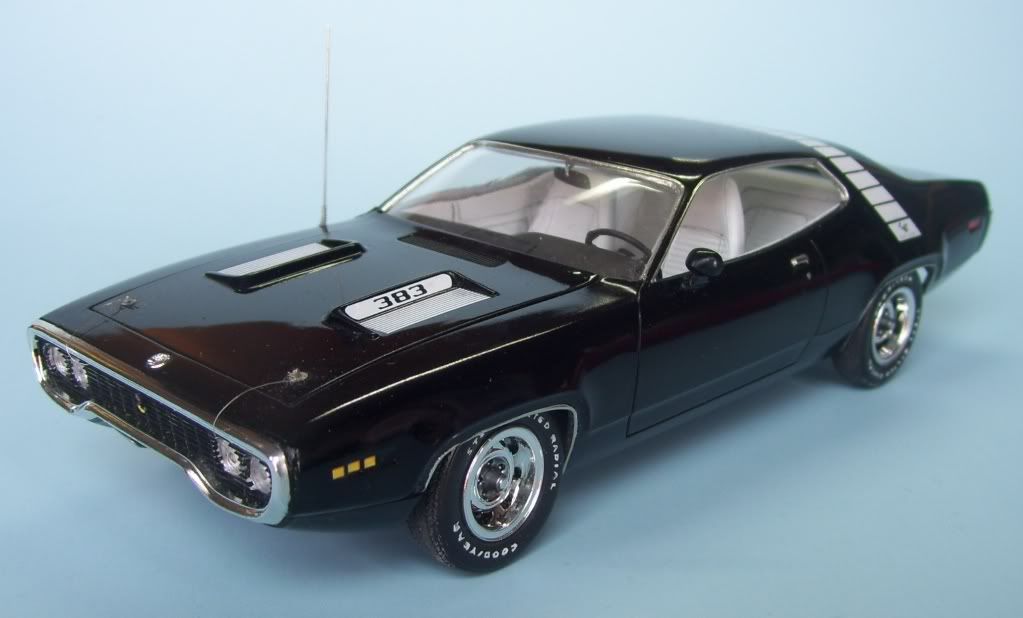
The 383 in the Black Bird

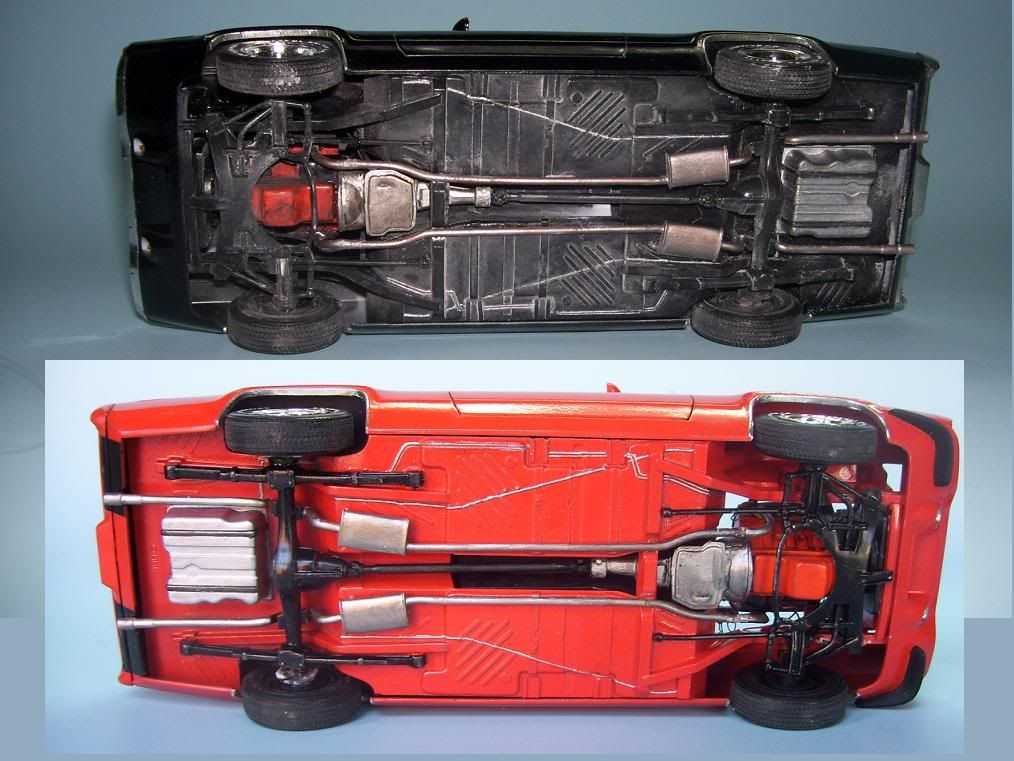
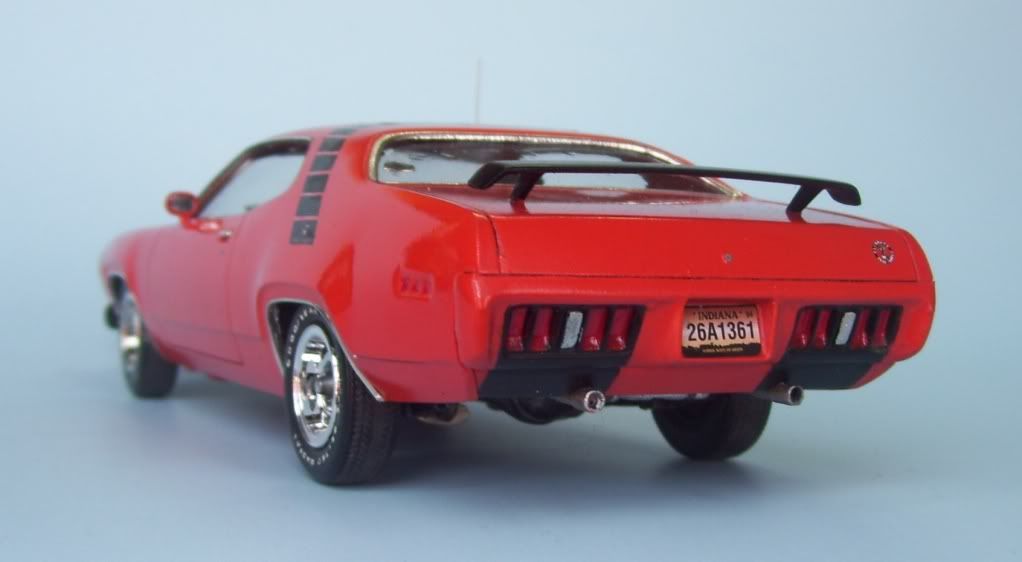
The "sit" of both vehicles--the sit on these models is too high in front, and needs to be corrected. See the previous posts for showing how I used both spacers under the rear, and a re-positioning of the front wheel pegs to achieve this angle.

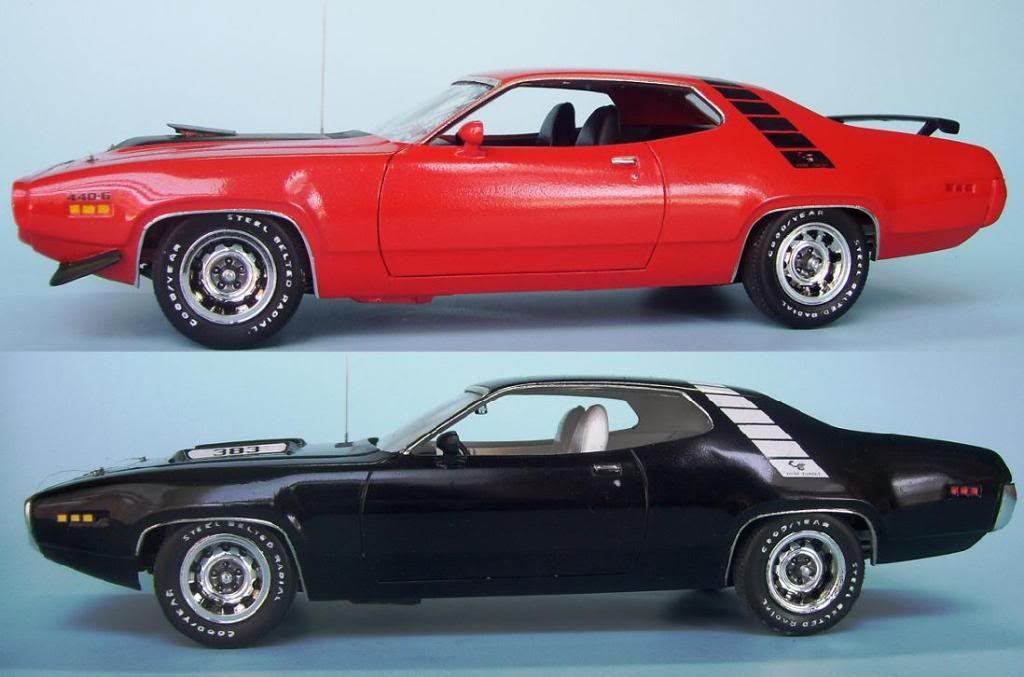
The red one is painted with Testor's Two-part Lacquer system; the color is "Hemi Orange"; the Black car is painted in Tamiya Black. The decals are Kieth Marks. Wiring by Detail Master and Radio Shack.

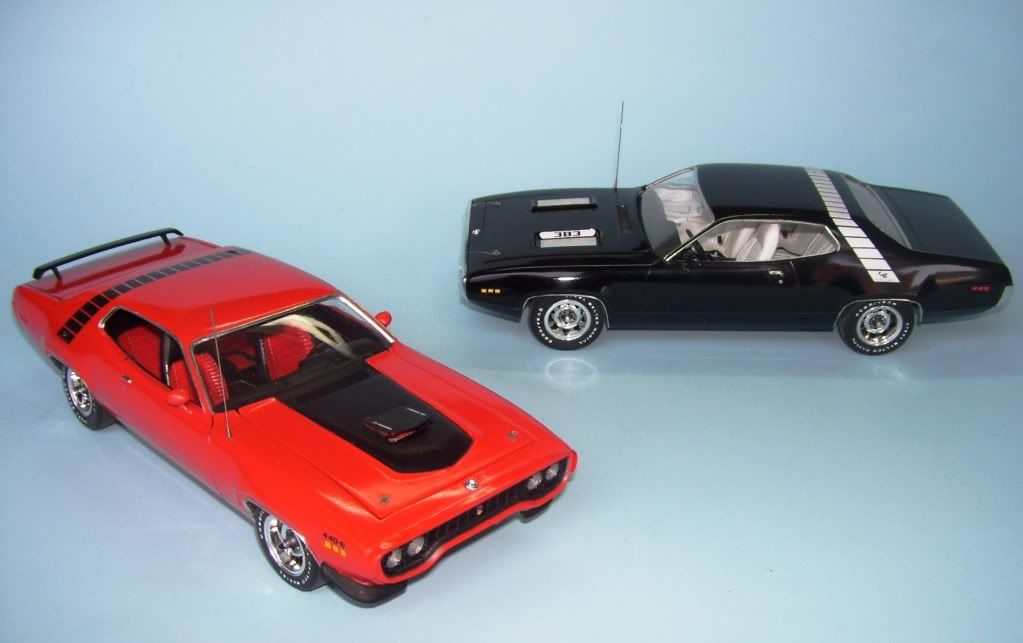
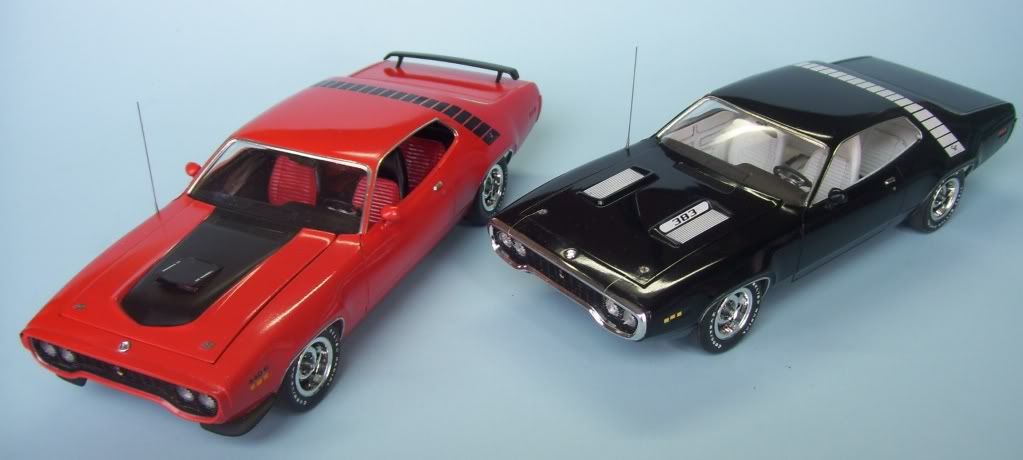
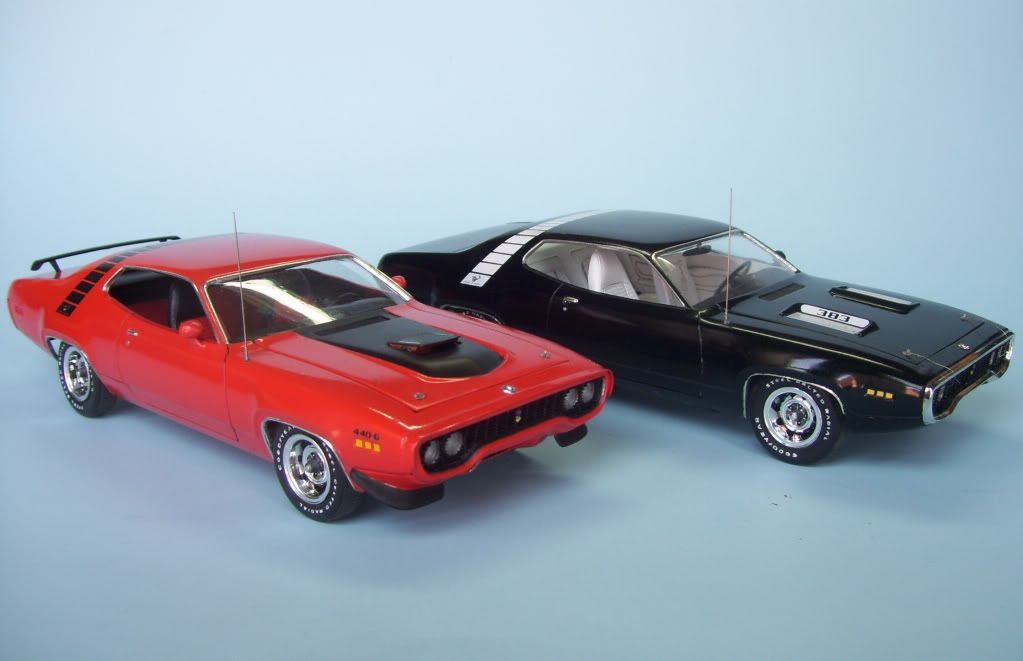
Here's some individual shots...

The painted-on stripes on the underside; part of the "Decor Group Option"

.

The Kieth Marks decals has these little Road Runner emblems that you can stick on a piece of styrene, and then if you carefully cut them out, you get that Road Runner emblem on the grille!

Well, it's a relief to get these two birds done successfully!  Thanks for everyone who left a comment, and who have contributed to this post and helped me in the build! Smile

All critiques, comments and comments are always welcomed! Big Smile


  • Member since
    September 2004
  • From: Tulsa, Oklahoma
Posted by mm23t on Wednesday, March 17, 2010 7:20 PM

Geez Karl, you have had your share of problems with the '34, that's for sure. Hang in there, but make sure you have an ample amount of Simply Green (lol).

Medals are not "Won", they are "Earned".

Mike..


  • Member since
    August 2008
  • From: S.W. Missouri
Posted by Pvt Mutt on Friday, March 12, 2010 2:12 PM

Not a very good scan but here's my grocery getter I was telling you about.

Broke my heart to sell it but hospitals don't care what it takes as long as they get paid.Crying

Tony Lee

Shoot Low Boys They're Ridin Ponys

  • Member since
    August 2006
  • From: Cygnus X-1
Posted by ogrejohn on Wednesday, March 10, 2010 5:03 PM

That's some sweet work going on there Doog! Nice toot on the mats, that will come in handy.

  • Member since
    January 2007
Posted by the doog on Wednesday, March 10, 2010 10:13 AM

JTRACING

Nice detalin' ! I really like the paint detail on the alternatorYes

Thanks, James! By the way, thanks for the tip on the Duplicolor stuff--you had told me about this stuff before, but I'm just a little leery to use it in the closed-up-for-winter apartment here, as it's not very "user-friendly" with the fumes and stuff!

The alternator was done with white+silver oil, and copper paint in the fins.

JIM BARTON--My car? Oh my god--I had to go change my shorts at the mere thought! No, no--I can't afford a primo muscle MOPAR yet. But if I could, I'll have a '71 Road Runner in my garage!

  • Member since
    February 2003
Posted by Jim Barton on Tuesday, March 9, 2010 5:03 PM

the doog

Thanks, John and Brizio! I appreciate you looking in!

Jim, that interior was indeed offered. This Monogram kit has the "Decor Group" option, which would have been available with this interior. Here's a photo of the actual interior:

http://i170.photobucket.com/albums/u244/heydoog/Plymouth%20Road%20Runners%20and%20GTX/71ply42951-3.jpg


That car is in gorgeous condition!Yes Is it yours?

"Whaddya mean 'Who's flying the plane?!' Nobody's flying the plane!"

  • Member since
    April 2007
  • From: Canada
Posted by JTRACING on Tuesday, March 9, 2010 4:16 PM

Nice detalin' ! I really like the paint detail on the alternatorYes

  • Member since
    January 2007
Posted by the doog on Tuesday, March 9, 2010 10:07 AM

Bgrigg

I gotta ask, why are you trying to use an acrylic sealer on Krylon paint?

Because I was thinking "Acrylic = water based...ahh, no problem!"

WRONG!

Honestly, this Krylon stuff has given me more heartache than I can even tell ya. I guess I should have tried it with a Krylon gloss (DUH!??) but I'm not that smart.....yet.....ha ha.

  • Member since
    May 2005
  • From: Left forever
Posted by Bgrigg on Monday, March 8, 2010 11:41 PM

I gotta ask, why are you trying to use an acrylic sealer on Krylon paint?

So long folks!

  • Member since
    January 2007
Posted by the doog on Monday, March 8, 2010 11:25 PM

Thanks, guys! I appreciate you all looking in, and appreciate that you take the time to leave a comment! Big Smile

Mike--would you believe that I was just about to post up that "finished" '34--had it all decaled and painted nicely, and went to seal it with some acrylic sealer--I figured, "eh, acrylic sealer? What could possibly go wrong?"--and the %#^@&#^@ thing crazed that damnn Krylon paint AGAIN!

For the SEVENTH TIME. I kid you not.

So, it's back in the "Simple Green" bath. AGAIN. FOR THE SEVENTH TIME!

The hell with the Krylon this time. I'm sick of it crazing, bubbling, crinkling, etc. I'm going to strip the car and re-do it with a rattle can of some other manufacturer, and maybe in a different color. I will not be defeated! I'll get that sucker built yet! Angry

JOIN OUR COMMUNITY!

Our community is FREE to join. To participate you must either login or register for an account.

SEARCH FORUMS
FREE NEWSLETTER
By signing up you may also receive reader surveys and occasional special offers. We do not sell, rent or trade our email lists. View our Privacy Policy.