SEARCH FINESCALE.COM

Enter keywords or a search phrase below:

2017 Camaro 50th Anniversary-Engine Bay-01/03

3087 views
20 replies
1 rating 2 rating 3 rating 4 rating 5 rating
  • Member since
    March 2012
  • From: Corpus Christi, Tx
2017 Camaro 50th Anniversary-Engine Bay-01/03
Posted by mustang1989 on Saturday, October 1, 2022 6:42 AM

I've been working on a pair of 1970-1/2 Camaros for the last several months. I was getting ready to get started on the Baldwin Motion half of the dual build when I found out that a good friend of mine was going to be retiring from the company that I work for in late November. He owns a 2017 Camaro "Fiftieth" Edition and I thought I'd build him a going away present. It's rare when I do this as I always tend to feel under the gun of a time frame in which to get a build finished in time.

In any case, here's the kit:

I already know this: I'm going to have to address......if you guessed it.....you're right....the ride height at the front of the car. 


 Forum | Modelers Social Club Forum (proboards.com) 

  • Member since
    August 2009
  • From: MOAB, UTAH
Posted by JOE RIX on Tuesday, October 4, 2022 2:05 PM

This should be an intriguing project Joe. Very cool of you do to this for your friend and I'm sure he will be thrilled. Ready to follow along.

"Not only do I not know what's going on, I wouldn't know what to do about it if I did". George Carlin

  • Member since
    March 2012
  • From: Corpus Christi, Tx
Posted by mustang1989 on Wednesday, October 5, 2022 7:04 PM

Thanks Joe. Yeah this one's definitely out of my comfort zone. I'm used to anything from the 40's through around the 90's at the latest and that's pushin' it. I'm old school for sure.....kind of a "Brutus vs. Geeky" approach to hot rodding.

Engine is pretty much finished up on this one aside from some minor touch ups. It's all OOB except for the AC Delco decal on the oil filter. Couldn't help myself....just had to add it.


Image

Image

Image

Image


 Forum | Modelers Social Club Forum (proboards.com) 

  • Member since
    March 2012
  • From: Corpus Christi, Tx
Posted by mustang1989 on Saturday, October 8, 2022 9:33 AM

The only chrome parts in the kit were the wheels and those aren't supposed to be chrome. They are more of a silver color with a contrasting darker color for the inlay areas of the wheel. I'm sure it's the manufacturer accommodating the masses who want to build the model "as is". No hit on AMT here but I had to make the corrections. 

The real wheel:

Image

So I went to work by stripping all of the chrome off of them and cleaning them up.

Image

Here they are finished up. One of the problems with silver is that any flash at all will show up in photos.....particularly when macro is used. In real life you've really gotta be looking to see it. I used Vallejo Silver for the wheels and shaded the darker areas with brushed on ground up black pastel as I just didn't feel comfortable painting the inlay areas. I then put a dot of chrome on the lugnuts of each wheel and used a toothpick to apply MM Silver enamel to the bowtie in the center of each wheel. 

Image


 Forum | Modelers Social Club Forum (proboards.com) 

  • Member since
    August 2007
  • From: back country of SO-CAL, at the birth place of Naval Aviation
Posted by DUSTER on Saturday, October 8, 2022 4:34 PM

mustang1989

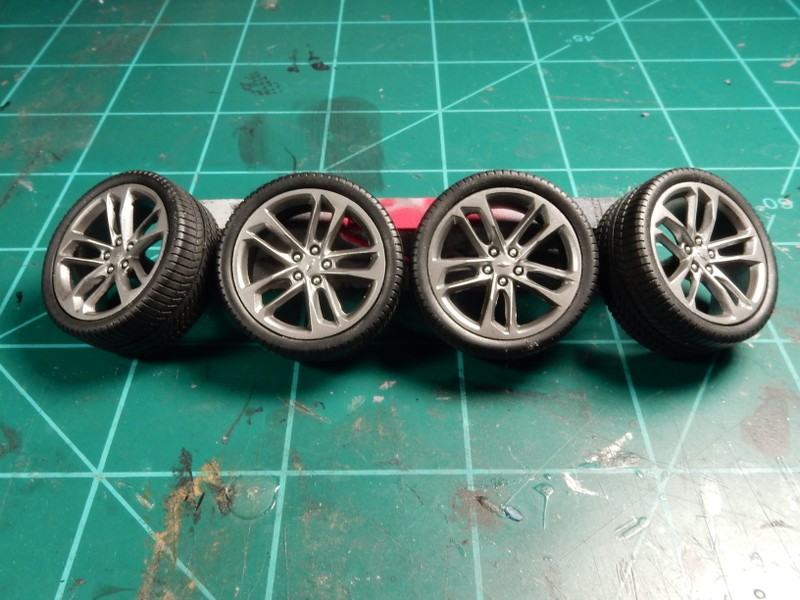
...used Vallejo Silver for the wheels and shaded the darker areas with brushed on ground up black pastel as I just didn't feel comfortable painting the inlay areas. I then put a dot of chrome on the lugnuts of each wheel and used a toothpick to apply MM Silver enamel to the bowtie in the center of each wheel. 

Image


Oh good, I was worried you were going to go overboard for a minute there. 

SERIOUSLY,  this will be a great gift for your friend.  Am looking forward to the updates as they come out.


Steve

Building the perfect model---just not quite yet  Confused

  • Member since
    March 2012
  • From: Corpus Christi, Tx
Posted by mustang1989 on Friday, November 25, 2022 6:29 AM

LOL!!! Thanks Steve.

I did some work on the rear suspension to get the stance mostly where I want it. Gonna play around with the front of the vehicle a little more to get it a tad bit lower. 

This is where we're at now but I'll be back with another mock up later:

Image

One thing that this kit has going for it is a completely detailed out undercarraige. Very high parts count (over 45 parts) and a great effort by AMT on replicating it.

I used 3 different shades of black to add depth and bring out the details.

Image


 Forum | Modelers Social Club Forum (proboards.com) 

  • Member since
    March 2012
  • From: Corpus Christi, Tx
Posted by mustang1989 on Tuesday, December 6, 2022 11:54 AM

Now to move on to the interior. After building the chassis up, I'm a little let down with the interior. I mean.....it's okay.....but the main problem is painting up the contrasting panels on the seats, door panels and dash. LOTS of masking in store for me. 

Check it out:

Image

Here's the layout which has now been primed and had the semi gloss black applied lightly for the right effects.

Image


 Forum | Modelers Social Club Forum (proboards.com) 

  • Member since
    March 2012
  • From: Corpus Christi, Tx
Posted by mustang1989 on Saturday, December 10, 2022 5:52 PM

Dash now mostly completed. Still have the steering wheel and column to go and then we're off to the seats. I did purchase another one of these kits so I could make paint masks for the seats. That'll be coming up soon I hope.

spacer.png


 Forum | Modelers Social Club Forum (proboards.com) 

  • Member since
    August 2007
  • From: back country of SO-CAL, at the birth place of Naval Aviation
Posted by DUSTER on Sunday, December 11, 2022 1:14 AM

Very nice Joe.

Oh,notice the head unit is lit up so dont forget to turn the ignition off so you don't run down the battery......boy I crack me upPropeller

Steve

Building the perfect model---just not quite yet  Confused

  • Member since
    March 2012
  • From: Corpus Christi, Tx
Posted by mustang1989 on Friday, December 30, 2022 10:08 AM

LOL!! Thanks Steve! aaaaaaaaaaaaand the interior is now finished!! The rough edges between the borders of the two tone seats is ALOT less noticeable in real life and is more the camera picking these up. I desided to go with decals from the Foose FD-100 kit for the light gray portion of the seats which resulted in a cleaner demarkation line than I could've done with paint. Masking on these irregular surfaces to achieve the same effect would've been dang near impossible for me I think. This interior was almost as difficult as the '67 Mustang interior that I just got through with a few months ago. LOTS of masking and LOTS of different shades of blak with the details being picked out. 

Now....moving on to the car body....


 Forum | Modelers Social Club Forum (proboards.com) 

  • Member since
    June 2014
Posted by BrandonK on Friday, December 30, 2022 11:25 AM

Looking good, my friend.

BK

On the bench:

A lot !! And I mean A LOT!!

2024 Kits on deck / in process / completed   

                         14 / 5 / 2  

                              Tongue Tied

  • Member since
    March 2012
  • From: Corpus Christi, Tx
Posted by mustang1989 on Saturday, December 31, 2022 9:23 AM

BrandonK

Looking good, my friend.

BK


Thanks Brandon. Shouldn't be too much longer now.


 Forum | Modelers Social Club Forum (proboards.com) 

  • Member since
    March 2015
  • From: Close to Chicago
Posted by JohnnyK on Saturday, December 31, 2022 11:18 AM

Great looking work so far! The interior is really nice.

Your comments and questions are always welcome.

  • Member since
    March 2012
  • From: Corpus Christi, Tx
Posted by mustang1989 on Sunday, January 1, 2023 6:36 AM

Thanks Johnny. Yes

Happy New Years Everybody!! 

Just got through spending numerous hours cleaning up the body. It took some fancy footwork but I got everything cleaned up and in the primer stage.

Before:

Image

After:

Image

Before:

Image

After:

Image

Before:

Image

aaaaaaaaaaaand after:

Image


 Forum | Modelers Social Club Forum (proboards.com) 

  • Member since
    October 2019
  • From: New Braunfels, Texas
Posted by Tanker-Builder on Sunday, January 1, 2023 7:25 AM

Hmmm:

          Interesting LEGO piece. Oh ,Sorry that's a dashboard from what Space Ship?

  • Member since
    June 2014
Posted by BrandonK on Monday, January 2, 2023 9:41 AM

That's gonna have a really nice paint job with all the prep.

BK

On the bench:

A lot !! And I mean A LOT!!

2024 Kits on deck / in process / completed   

                         14 / 5 / 2  

                              Tongue Tied

  • Member since
    March 2012
  • From: Corpus Christi, Tx
Posted by mustang1989 on Tuesday, January 3, 2023 6:40 AM

Thanks fellas! The instrument panel decal on the entertainment center is indeed something that I'm not used to working with.

I've got the engine bay finished up save for getting the radiator true with the core support. Not sure what happened there but I'll try to whup that into shape.


spacer.png

spacer.png


 Forum | Modelers Social Club Forum (proboards.com) 

  • Member since
    April 2003
  • From: USA
Posted by keavdog on Tuesday, January 3, 2023 8:48 AM

Looks sharp Joe.  I've been under the hood of my buddies Gen5 and that looks the part.

Thanks,

John

  • Member since
    April 2020
Posted by Eaglecash867 on Tuesday, January 3, 2023 9:05 AM

Nice work Mustang!  I'd hate to be the guy who has to change the plugs on that thing.  

"You can have my illegal fireworks when you pry them from my cold, dead fingers...which are...over there somewhere."

  • Member since
    March 2012
  • From: Corpus Christi, Tx
Posted by mustang1989 on Tuesday, January 3, 2023 9:19 AM

John: Thanks buddy. I spend alot of time in research before building these things. Try to get it as close as I can.

Eagle: Thank you good sir. They're not that bad really. That coolant reservoir comes loose on the passengers side with just a couple of bolts and it's all out of your way. The stuff on top is just engine decor panels that pop off.


 Forum | Modelers Social Club Forum (proboards.com) 

  • Member since
    June 2014
Posted by BrandonK on Tuesday, January 3, 2023 9:46 AM

Looks good, Joe. The only thing I don't care for on newer cars is all the plastic and piping that runs under the hood. You can't see all the crazy engines anymore. Looks spot on to the real thing. Keep it going.

BK

On the bench:

A lot !! And I mean A LOT!!

2024 Kits on deck / in process / completed   

                         14 / 5 / 2  

                              Tongue Tied

JOIN OUR COMMUNITY!

Our community is FREE to join. To participate you must either login or register for an account.

SEARCH FORUMS
FREE NEWSLETTER
By signing up you may also receive reader surveys and occasional special offers. We do not sell, rent or trade our email lists. View our Privacy Policy.