SEARCH FINESCALE.COM

Enter keywords or a search phrase below:

CONTINUATION OF MY 1:20 SCALE SCRATCH BUILT B17G (RADIO ROOM)

18018 views
97 replies
1 rating 2 rating 3 rating 4 rating 5 rating
Foz
  • Member since
    April 2011
  • From: S.E Bulgaria
Posted by Foz on Saturday, February 24, 2018 1:30 AM
Thanks for all your support guys!
  • Member since
    April 2015
Posted by Mopar Madness on Friday, February 23, 2018 10:12 PM

Me too!  This is true scratchbuilding craftsmanship!

Chad

God, Family, Models...

At the plate: 1/48 Airfix Bf109 & 1/35 Tamiya Famo

On deck: Who knows!

  • Member since
    April 2016
  • From: N. Burbs of ChiKawgo
Posted by GlennH on Friday, February 23, 2018 10:03 PM
Lest you think with 300 views you are posting in vain, I am following along.

A number Army Viet Nam scans from hundreds yet to be done:

https://www.flickr.com/photos/southwestdreams/albums/72157621855914355

Have had the great fortune to be on every side of the howitzers.

Foz
  • Member since
    April 2011
  • From: S.E Bulgaria
Posted by Foz on Wednesday, February 21, 2018 4:42 AM

Hi chaps


Here is a quick up date on the problem that shall be named......."The bl#@$y Sperry Ball Turret" :angry:


I wasn't going to start this part yet because I knew that I would have problems with it!....just kept putting it on the back burner!....I thought that if I cant manage to scratch build the ball turret then the whole B17G project would come to a grinding halt!...so I started trying to think of ways how I can replicate it with the least amount of fuss and specialized tools...that I don't own!!


That little yellow kids ball kept staring at me!...taunting me!...because it knew that it would be useless if I tried to use it for a mold for vac forming....not solid you see....rubbery little thing....but I just had to give it a go!


I made a do it your self vac forming kit a few years back and I dusted it down ready for a trial run on the yellow ball.

The Henry hoover was got out of storage....(I hate hoovering!!;))...and was put to good use for once!!....all connected up and ready for the off....

I started on the first attempt to use some plastic food packaging......it was pinned to the frame and popped into the oven for a few seconds....hoover on for suction and.....................failure!...the little ball stood up to having very hot plastic wrapped around it but I reckon the plastic was too thick. So next attempt I used a sheet of plastic card.......no.....too thin!.....so in the end I tried a sheet of 0.5mm and hey presto a result!..........

Then I thought that the plastic would get stuck to the soft ball ,but I didn't have any problems extracting the ball!....so I re loaded another 0.5 mm sheet of plastic on the frame and popped it in the oven (making me feel hungry all this talk of ovens!:rolleyes:)...


So now I had the two halves ready for a trim up......but I decided that I needed to cut the ball horizontally as it would be easier for me to do all the detail inside the ball.....


The next 2 photos show the two halves together......roughly!!

So....so far I think so good.....the test will be later when I try to marry up the two halves......but first its down to a load of detailing...starting with the lower half of the ball....blue ink marks the spot!

I am going to start trying to cut out all the glazing first....then on with all the detail....so I will be back when I have managed to do that!


Cheers for looking in


Fozzy

Foz
  • Member since
    April 2011
  • From: S.E Bulgaria
Posted by Foz on Friday, February 16, 2018 1:56 PM
Foz
  • Member since
    April 2011
  • From: S.E Bulgaria
Posted by Foz on Wednesday, February 14, 2018 8:57 AM

Hi there

 Here is the next up date!

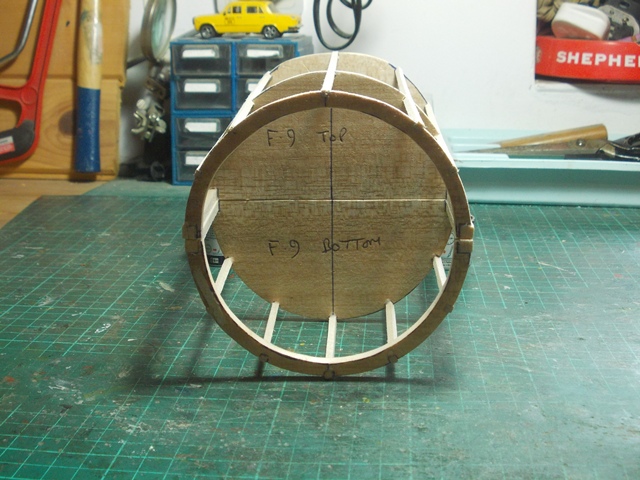
  I have spent the last few days getting the fuselage structure built...I started with the lower half and then moved on to the upper half...almost symmetrical or but a few millimeters here and there!.

  Here are the two halves.......


 Placing them on top of each other gives you the definite shape of the fuselage...
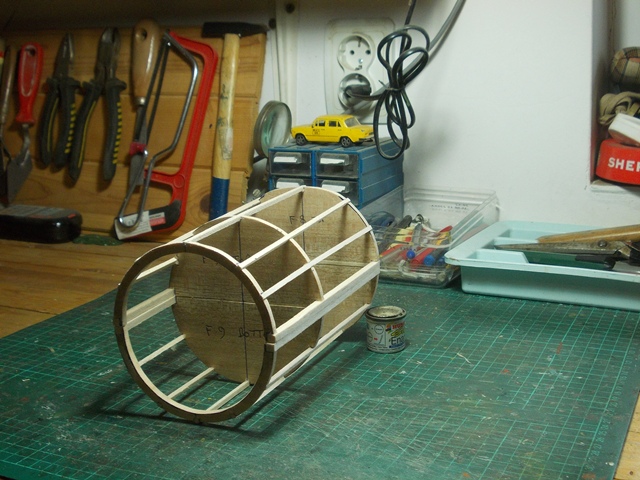


So to try and explain what the plan is for this phase of the B17 build I have tried to put a few arrows here and there.......
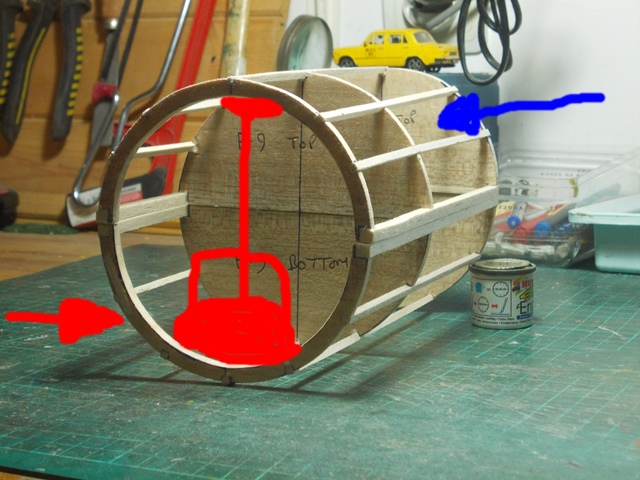


The blue arrow at the rear shows you where I am intending to detail the radio room...including the camera bay that is under the floor of the radio room. There will be doors on each bulk head as in the real B17. The Red arrow indicates the Ball turret position and I have done a rather naff diagram of the turret in red using a computer mouse!!:rolleyes:  The bulk head just after the turret will be as it is...open ....and as it is in the real B17...which is handy as you will be able to view the turret easily.

  Ball turret!...aaaggghhh:shrug:!....not looking forward to trying to replicate that...I have some ideas but I'm sure I will change my mind when it comes to doing it!

  I will be starting with the bottom half first which means it's time to get out the yogurt pot supplies!!...some of you know what I mean...will explain in my next post!;)

  Thanks for dropping by

  Fozzy


Foz
  • Member since
    April 2011
  • From: S.E Bulgaria
Posted by Foz on Sunday, February 11, 2018 1:08 PM
Thanks Glenn!
  • Member since
    April 2016
  • From: N. Burbs of ChiKawgo
Posted by GlennH on Sunday, February 11, 2018 11:54 AM
Just amazing work! I checked your site as well.

A number Army Viet Nam scans from hundreds yet to be done:

https://www.flickr.com/photos/southwestdreams/albums/72157621855914355

Have had the great fortune to be on every side of the howitzers.

Foz
  • Member since
    April 2011
  • From: S.E Bulgaria
CONTINUATION OF MY 1:20 SCALE SCRATCH BUILT B17G (RADIO ROOM)
Posted by Foz on Sunday, February 11, 2018 9:18 AM

Good afternoon to you all...I hope all is well in the scratch build world!

I haven't done a WIP of this long term project as yet...so I thought I would start with this phase of the build.


  After a break from this build I now think its time I got back to the task in hand ......and that is to continue with this beast!;)


  It was good to put this B17G down for a bit and have a go at something else but there is so much to do with this project that I am now ready and sort of focused to continue!!:hmmm:


  For those of you that have seen the photos of this build...... and as a recap.....you know that I started with......


  Phase 1.....Nose section back to the top turret


Phase 2.....Bomb bay

So now we have nearly half the Fuselage complete.........

...and so its on with phase 3.....the radio room/ball turret station.

  As usual its going to take weeks to finish this phase and I will be using the same building method and materials as before...IE  scraps of this and that!. Onto the first photo then..........

  Here we have the scaled up 1:20 scale plans pinned to the building board and the red circle shows the area I will be constructing (Radio room) and the blue cross depicts the position of the ball turret......


At first ,my idea was just to build the radio room but for displaying purposes it will be better to tag the ball turret to the rear of the radio room bulk head. I will need to construct "an open top" of the radio room so you can see all the detail...as I did with the cockpit in phase 1...not sure how to do this but will work it out when I get to that point!!

  So former's were made for the bulk heads and marked out on a sheet of 5mm balsa wood....only 3 bulk heads for this phase!


Here they are all cut out ready....


I am going to build this section as I did in phase 1 and 2....in two halves.

  Starting with the lower half here are the former's and stringers in place....


So that is as far as I have got at the moment.


Until the next post....of many I fear!


Cheers


Fozzy


JOIN OUR COMMUNITY!

Our community is FREE to join. To participate you must either login or register for an account.

SEARCH FORUMS
FREE NEWSLETTER
By signing up you may also receive reader surveys and occasional special offers. We do not sell, rent or trade our email lists. View our Privacy Policy.