SEARCH FINESCALE.COM

Enter keywords or a search phrase below:

well, here's a very stupid question....

10323 views
151 replies
1 rating 2 rating 3 rating 4 rating 5 rating
  • Member since
    December 2003
  • From: Colorado
Posted by psstoff995 on Monday, March 23, 2009 10:09 PM
You mean like pea pattern? I'd say a reaaaal fine brush and just stab the paint onto the model in a polka dot kinda layered pattern?

-Chris

US Army Infantryman

  • Member since
    December 2008
  • From: Las Vegas, Nevada
Posted by model maniac 96 on Monday, March 23, 2009 8:14 PM
thanks for all your help guys, and BTW, does anybody out there know how to do halfway decent German camouflage?? cuz i have been trying my hand at it, and let's just say that it has not been going very well, so any help would be great!

Thanks, Jim
"Veni, Vidi, Vici" Julius Caesar: I came, I saw, I conquered.
  • Member since
    December 2003
  • From: Colorado
Posted by psstoff995 on Monday, March 23, 2009 6:49 PM
HA!!! Did I ever tell you about my first dio? Whistling [:-^]

-Chris

US Army Infantryman

  • Member since
    January 2009
  • From: clinton twp, michigan
Posted by camo junkie on Monday, March 23, 2009 6:30 PM
actually i already have him in a dio. my very very first one. maybe i'll post a few pics but its "pretty bad" ...lol Whistling [:-^]
"An idea is only as good as the person who thought of it...and only as brilliant as the person who makes it!!"
  • Member since
    December 2003
  • From: Colorado
Posted by psstoff995 on Monday, March 23, 2009 5:14 PM
hahahaha well hey- how I'm I supposed to live vicariously through your updates if you wont even admit them to be decent filled and sanded 1/35 figures??

BTW do all those figures have a dio in mind? I’d love to see the one you have cooked up for the Delta guy in Woodland Camo

-Chris

US Army Infantryman

  • Member since
    January 2009
  • From: clinton twp, michigan
Posted by camo junkie on Monday, March 23, 2009 1:38 PM
hahaha....awe p.o. seems like your the sensitive kind....lol. j/k buddy. again...only giving you a hard time.... Mischief [:-,].
"An idea is only as good as the person who thought of it...and only as brilliant as the person who makes it!!"
  • Member since
    December 2003
  • From: Colorado
Posted by psstoff995 on Monday, March 23, 2009 1:24 PM
 camo junkie wrote:


as far as p.o. saying i can give ya advice on priming,sanding and filling...LOL...guy doesnt know me as well as he must think he does....haha.


Hey now-


These figures have no gaps, are painted very well and look great! You might have cheated on the sanding and filling lol but they turn out like you know what you're doing Tongue [:P]

-Chris

US Army Infantryman

  • Member since
    January 2009
  • From: clinton twp, michigan
Posted by camo junkie on Monday, March 23, 2009 1:01 PM

jim, just follow what p.o. has said 4 now. think of it this way...if in the end you dont like them...you can always repaint them with a primer coat etc. again like p.o. stated, you could use it as a base coat/primer and repaint...however, i know what that intails and unless your sure you want to do that then dont worry about it. picasso wasnt an artist right away either without practice.

as far as p.o. saying i can give ya advice on priming,sanding and filling...LOL...guy doesnt know me as well as he must think he does....haha. as i said, i dont fill/sand if i can help it. one figure i am working on though i have no choice i just cant get the gap between the resin and plastic to "fit" without sanding it down to nothing...therefore i will fill it (but only a small gap). even if you dont want to get some small files...use some sanding paper and gently sand the torso and leg joints as well as the arms. remember though, the idea is not to remove details...just seams and making a "tighter" fit with minimal to no filling and sanding!

with that, keep it going. you may be having problems with the little stuff and may paint a uniform worthy of gold...who knows...dont give up, and believe me again from my own experiences...you'll get there in no time!!!

"An idea is only as good as the person who thought of it...and only as brilliant as the person who makes it!!"
  • Member since
    December 2008
  • From: Las Vegas, Nevada
Posted by model maniac 96 on Monday, March 23, 2009 12:58 PM
great, thanks man! I was not going to be happy if I had to prime over a week of total work...


Jim
"Veni, Vidi, Vici" Julius Caesar: I came, I saw, I conquered.
  • Member since
    December 2003
  • From: Colorado
Posted by psstoff995 on Monday, March 23, 2009 11:20 AM
Very cool! Lucky guess haha Hmm... I think if you have the faces and base color done to your liking, that might be fine for your first set of figures. I think what you can do is use the base coat, now that it’s dry- as your first layer to prime the plastic so the next layers can stick.

You can start laying the paint on top of the base coat as long as the gray plastic doesn’t show through you’re doing fine for your first set of 1/35 figures. Camo knows his stuff, he’ll give you some pretty good advise next time around on priming and sanding and filling.

-Chris

US Army Infantryman

  • Member since
    December 2008
  • From: Las Vegas, Nevada
Posted by model maniac 96 on Monday, March 23, 2009 10:46 AM

all right, thanks guys! psstoff, you are good man, you shure do know your stuff, the kit is a dragon 8cm mortar. And camo junkie, ok I will try primeing next time, but I was wondering, do you think that I shuold prime these figures right now, because I have the faces done and have also finished the base color on the figuresSigh [sigh], that would take a wile to redo, what do you think???Confused [%-)]

             Thanks, JimSmile [:)]

"Veni, Vidi, Vici" Julius Caesar: I came, I saw, I conquered.
  • Member since
    January 2009
  • From: clinton twp, michigan
Posted by camo junkie on Monday, March 23, 2009 10:08 AM
btw jim, the reason y the paint is "lifting" is because you didnt prime them. the paint needs something to "stick" to and therefore wont "lift" with your brush strokes! do that and let it dry then paint...you'll see remarkable improvements!
"An idea is only as good as the person who thought of it...and only as brilliant as the person who makes it!!"
  • Member since
    January 2009
  • From: clinton twp, michigan
Posted by camo junkie on Monday, March 23, 2009 10:04 AM
priming would work as p.o. suggested. what's going on is that your "stripping"/"lifting" the undercoat of paint off. DONT get discouraged....i used to do the same thing which is y i say your on the right track...(also y i switched to enamels...lol). see, if u look at your pics u can see the plastic showing through the hands and faces and unfortunately, there is no short cuts to painting figures. you have to prime, let it dry then paint. p.o. can tell ya what to do exactly with acrylics (along with many others)...as i said not much help in that department. although the same basic rules still apply. like i said though dont let my comments discourage you, or think you need to throw these guys away...u dont. i tried the acrylics, was doing it the exact same way you were b4 i realized 1) i didnt like painting with acrylics 2) i needed to prime my figs 3) i needed to let my base coat dry...Whistling [:-^] 4) needed to file away/remove the mold seems and make joints fit better...while tedious...makes a hell of a difference and i havent needed to "fill" any joints with putty in a few years now! 5) cannot take ANY shortcuts if i wanted to achieve good results. 6) a miniature file works wonders on plastic figs!! somethings to think about buddy...but you got the right idea and i know (based on my own painting) your gonna get it and get it soon!!! Thumbs Up [tup]
"An idea is only as good as the person who thought of it...and only as brilliant as the person who makes it!!"
  • Member since
    December 2003
  • From: Colorado
Posted by psstoff995 on Sunday, March 22, 2009 11:44 PM
I agree with camo- you definitely have the right idea. The colors look pretty good, I think in the future you might want to prime the plastic, or perhaps add a few extra coats of the base color as the gray plastic looks like it might be showing through? Or perhaps your washes were too thin? The poses look nice- always a fan of a dio and I can already tell they’re a few artillery men am I right? -perhaps a motar crew

-Chris

US Army Infantryman

  • Member since
    January 2009
  • From: clinton twp, michigan
Posted by camo junkie on Sunday, March 22, 2009 7:54 PM

hey jim, they look like they're coming along. judging from your pics, did you happen to "remove" the mold seams on your figs? i only ask because it looks like they are still there. not a big deal. dont know what your finacial situation is, but you might want to invest in some small files. (i use them on my plastic figs to remove the seams. its an easy process. i also use them to "sand" flatter edges so the torso and legs, etc. fit better. (a hole lot less filling when done that way...filing the joints makes it easier)!! also you might (and this is just my way) get yourself some abroid pro-weld. its fantastic for plastic figs, goes on easily and if ya press down tight (and do it right) no filling and sanding!!!! runs anywhere from $2.50-$4.00 a bottle depending where ya get it! that's my way of doing it...and of course my way isnt gospel...but is my My 2 cents [2c].

anyway, anxious to see them fully painted. you've got the right idea sir. keep the pics coming. Thumbs Up [tup]

"An idea is only as good as the person who thought of it...and only as brilliant as the person who makes it!!"
  • Member since
    December 2008
  • From: Las Vegas, Nevada
Posted by model maniac 96 on Sunday, March 22, 2009 6:54 PM

Well guys, here it is: Some of my new figures for my upcoming Seelow Vingette. Hope you like them! faces are almost done, and the gaps have been filled and sanded.Party [party] Constructive criticism and compliments are always welcome.  

These are just the figures from the vingette. You can check out the full WIP at

/forums/31/957046/ShowPost.aspx#957046

Jim Smile [:)]


"Veni, Vidi, Vici" Julius Caesar: I came, I saw, I conquered.
  • Member since
    January 2009
  • From: clinton twp, michigan
Posted by camo junkie on Saturday, March 21, 2009 6:32 AM
yeah, p.o.'s not much for speed... Whistling [:-^] (j/k)...i'll feel lately im not either!
"An idea is only as good as the person who thought of it...and only as brilliant as the person who makes it!!"
  • Member since
    December 2008
  • From: Las Vegas, Nevada
Posted by model maniac 96 on Friday, March 20, 2009 10:56 PM
 psstoff995 wrote:

 model maniac 96 wrote:
but beware I haven't made that much progress.

Thanks, Jim

Don't worry- camo's used to seeing updates from me!! Laugh [(-D]


ha ha......
"Veni, Vidi, Vici" Julius Caesar: I came, I saw, I conquered.
  • Member since
    December 2003
  • From: Colorado
Posted by psstoff995 on Friday, March 20, 2009 10:15 PM

 model maniac 96 wrote:
but beware I haven't made that much progress.

Thanks, Jim

Don't worry- camo's used to seeing updates from me!! Laugh [(-D]

-Chris

US Army Infantryman

  • Member since
    December 2008
  • From: Las Vegas, Nevada
Posted by model maniac 96 on Friday, March 20, 2009 10:05 PM
tonight I hope, just keep watching this thread, but beware I haven't made that much progress.

Thanks, Jim
"Veni, Vidi, Vici" Julius Caesar: I came, I saw, I conquered.
  • Member since
    January 2009
  • From: clinton twp, michigan
Posted by camo junkie on Thursday, March 19, 2009 12:36 PM
good now when ya going to show us some pics??? Whistling [:-^]
"An idea is only as good as the person who thought of it...and only as brilliant as the person who makes it!!"
  • Member since
    December 2008
  • From: Las Vegas, Nevada
Posted by model maniac 96 on Thursday, March 19, 2009 10:41 AM

Thanks guys for all your help, it is really helping my figure painting skills.Propeller [8-]


                                JimSmile [:)]

"Veni, Vidi, Vici" Julius Caesar: I came, I saw, I conquered.
  • Member since
    December 2003
  • From: Colorado
Posted by psstoff995 on Tuesday, March 17, 2009 1:00 PM
lol nah, just making sure you didn't think I thought it was only so-so, it really was top notch stuff

-Chris

US Army Infantryman

  • Member since
    January 2009
  • From: clinton twp, michigan
Posted by camo junkie on Tuesday, March 17, 2009 12:41 PM
 psstoff995 wrote:

 camo junkie wrote:
 modelchasm wrote:


camo, glad to get a closer look at that OIF figure .... You nailed that tri-color camo as well as the base. The face looks nice too!


yeah well model, dont tell p.o. that...lol...he thinks i only came "close" to the "grey/green" color! as far as the camo...was just getting somewhat good and the military had to go and change to that Censored [censored] digital pattern!! Laugh [(-D]


Hey wait a minute! I was looking at a tiny little figure about 1" tall on my computer screen- and I said I think you got closer than anyone I've ever seen who has tried to paint that 3rd color! And it was tiny!!! Now that I have a shot that puts him at his actual scale- I agree- you got it dead on.
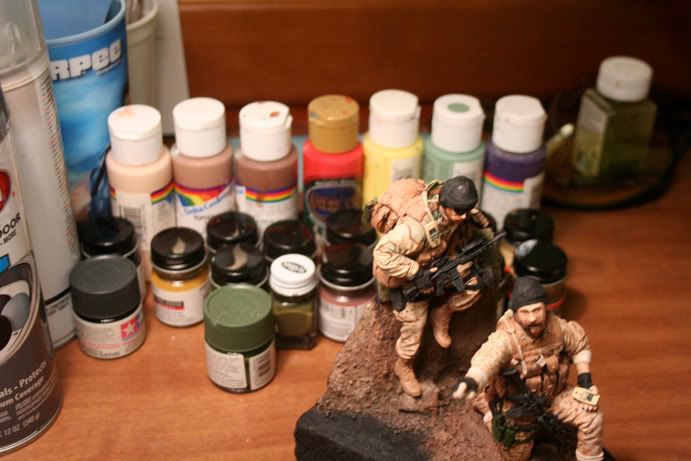


Look how greenish mine is!! It looks so goofy on his parka after seeing yours

sorry p.o. was only being sarcastic and giving you a hard time...LOL. thought u saw that aaallloooonnnngggg time ago.

"An idea is only as good as the person who thought of it...and only as brilliant as the person who makes it!!"
  • Member since
    December 2003
  • From: Colorado
Posted by psstoff995 on Tuesday, March 17, 2009 12:23 PM
 ajlafleche wrote:

Highlights: Unless you're doing something very textured like fur or hair, NEVER drybrush. Add layers of very thinned until it shows.


I like working fast and nothing beats Acrylic for that.

I agree, however sometimes if I’m planning on putting multiple future coats (not the floor polish stuff- if I’m planning on putting a lot of coats on in the future)- I’ll drybrush the highlight color onto the model, just so I know where the extreme highlights are- sometimes in 1/35 it’s difficult to tell the exact features of the face you’re dealing with. But I do agree, thin coats with subtle differences in color over lots of layers makes for a much more realistic skin tone. As far as uniforms and equipment, in 1/35 you can use washes and drybrushing pretty effectively, however once you start getting much bigger than that, it’s usually better to apply individually by brush- someone wrote up a real nice explanation, let me dig it up.

Edit- here you go!

-Chris

US Army Infantryman

  • Member since
    December 2003
  • From: Colorado
Posted by psstoff995 on Tuesday, March 17, 2009 12:18 PM

 camo junkie wrote:
 modelchasm wrote:


camo, glad to get a closer look at that OIF figure .... You nailed that tri-color camo as well as the base. The face looks nice too!


yeah well model, dont tell p.o. that...lol...he thinks i only came "close" to the "grey/green" color! as far as the camo...was just getting somewhat good and the military had to go and change to that Censored [censored] digital pattern!! Laugh [(-D]


Hey wait a minute! I was looking at a tiny little figure about 1" tall on my computer screen- and I said I think you got closer than anyone I've ever seen who has tried to paint that 3rd color! And it was tiny!!! Now that I have a shot that puts him at his actual scale- I agree- you got it dead on.


Look how greenish mine is!! It looks so goofy on his parka after seeing yours

Jim- As for what paints to use, what’s best etc. If you notice in the background of that shot- I use everything from Testors and Model Master Enamels, Model Master Acrylic, Tamiya Acrylic, even craft store Apple Barrel and Delta Creamcoat Acrylic colors.

The two 1/16 scale figures in the foreground were made with primarily Acrylics, the craft store kind to be exact. The one thing I like about the Acrylics is that I can finish one layer real nice, then spray on a coat of Krylon Matte Finish over top (which is some kind of Enamel based system I believe) and then do washes (with water as my thinner) right over top the clear coat (which, without the clear coat would start to cause the original Acrylic to lift and peel) and if I want to drastically change it, I can use a lot of water thinner and clear off the mistakes, leaving everything under the clear coat intact.

If you want to skip the clear coat, you can do all of your primary painting with Enamels, then do your shading and washes with thinned Acrylic and it would damage the undercoats- if you mess up, just get a bunch of water and lightly scrub away.

The way I chose one over the other- simply based on what color I want. Enamels make better OD greens and military colors in general IMHO, but sometimes they need a few coats. My craft store Acrylics have some nice tans and skin tones- and when it comes to me and mixing paints, I only use Acrylics to mix as they can be thinned with water. Also- I think when it comes to painting “wet on wet”, Oils are by far the best- so if you want to do gradient style shading on your flesh tones, use Oils, in my experience, Enamels will dry a little slower than Acrylics, but it depends on how much thinner, what kind of colors/effects you’re going for. I don’t have any flesh colors in any medium other than Acrylics, so that’s what I use. I’d love to try Oils I suppose, but it’s almost a little too slow for me.

I like working fast and nothing beats Acrylic for that

Sorry for the long-winded post, had to catch up a bit!

-Chris

US Army Infantryman

  • Member since
    December 2002
  • From: Massachusetts
Posted by ajlafleche on Tuesday, March 17, 2009 11:55 AM

If you're going the acrylic route, Vallejo and Andrea are the way to go. Period. They are specifically designed for figure painting, i.e., brush application. The paint will run out before it dries out. I've had some for ten years and it's as fresh as new.

Highlights: Unless you're doing something very textured like fur or hair, NEVER drybrush. Add layers of very thinned until it shows.

My recipe for caucasian flesh is this

Base color: beige red

Shadows: add (Vallejo games) Dark fleshtone

First highlight: Add pale flesh to beige red

Top highlight: Straight thinned pale flesh.

Go here and click on "model Color" then scroll down for the Vellejo tutorial.

If you need to paint ethnic skintones, go here.

Remember, if the women don't find you handsome, they should at least find you handy.

  • Member since
    January 2009
  • From: clinton twp, michigan
Posted by camo junkie on Tuesday, March 17, 2009 9:23 AM
anytime Thumbs Up [tup]
"An idea is only as good as the person who thought of it...and only as brilliant as the person who makes it!!"
  • Member since
    December 2008
  • From: Las Vegas, Nevada
Posted by model maniac 96 on Monday, March 16, 2009 10:17 PM
 camo junkie wrote:
ok...well....haha....i cant help ya there....ya need someone with acryl. experience!! i'm sure someone will post an answer for ya soon. i'f i had to guess (only) maybe a drybrush?? again only a guess. sorry cant be more help in this case!


no problem, thanks for answering though.

Jim
"Veni, Vidi, Vici" Julius Caesar: I came, I saw, I conquered.
  • Member since
    January 2009
  • From: clinton twp, michigan
Posted by camo junkie on Monday, March 16, 2009 1:29 PM
ok...well....haha....i cant help ya there....ya need someone with acryl. experience!! i'm sure someone will post an answer for ya soon. i'f i had to guess (only) maybe a drybrush?? again only a guess. sorry cant be more help in this case!
"An idea is only as good as the person who thought of it...and only as brilliant as the person who makes it!!"
JOIN OUR COMMUNITY!

Our community is FREE to join. To participate you must either login or register for an account.

SEARCH FORUMS
FREE NEWSLETTER
By signing up you may also receive reader surveys and occasional special offers. We do not sell, rent or trade our email lists. View our Privacy Policy.