SEARCH FINESCALE.COM

Enter keywords or a search phrase below:

Bandai 1/72 Destroid Spartan

16622 views
241 replies
1 rating 2 rating 3 rating 4 rating 5 rating
  • Member since
    October 2021
Posted by PhoenixG on Wednesday, October 18, 2023 7:45 PM

Bakster

Oh... a Merry Christmas to you! Way to go... Big Smile

LOL.  It was admittedly an indulgence to get both a laser printer and an inkjet.  I really want to try out a laser printer for making waterslide decals and the sale put it within my reach.  Hopefully I won't suffer from buyers remorse. Smile

Bakster

Your filling and sanding looks sweet! Nice work, sir.  It is coming along nicely...


Thank you sir!
I don't think I've ever spent that much time with sanding sticks and a single set of parts. 
 
The Great Karnak tells me he sees more of it in my future. 


On the Bench:

Bandai Starblazers 2202 Garmillas Zoellugut

  • Member since
    July 2014
  • From: Franklin Wi
Posted by Bakster on Thursday, October 19, 2023 1:05 AM
"I don't think I've ever spent that much time with sanding sticks and a single set of parts. 
 
The Great Karnak tells me he sees more of it in my future."

Lol. I can certainly relate. I am going through the same process right now. Blah.

Let us know how the laser printer works out. I toyed with getting one for myself.


  • Member since
    July 2014
  • From: Franklin Wi
Posted by Bakster on Thursday, October 19, 2023 1:19 AM

Btw. I visited my nearest Hobbytown this week for paint. I was shocked at the number of  Bandai kits they had, like what your are building. They had 4 full rows of them, stacked high, overflowing into the main aisles. Model cars, planes, armer, and sci-fi are relegated to two rows against the back wall. Slim pickings by comparison. I once commented to the manager about the volume of bandai kits he stocks, and he told me, you would not believe the interest in them. People come in and buy them by the box full. Some driving in a few hours to do so. Quite eye opening.

  • Member since
    October 2021
Posted by PhoenixG on Thursday, October 19, 2023 3:48 PM

Last night I did the next step of assembly for the should boxes.  To keep them square during assembly I am using small pieces of square tubing.  They'll help keep corners and edges square.

As I don't have any kind of mitre for models y biggest challenge is cutting the tubing square.  I made a basic jig to help make things square-ish.

laughablejig

Basically it is tall enough and provides just enough surface area to help keep the blade perpendicular.

Lots of trial and error making tiny boxes.

oops

But a few did turn out well enough to start some assembly.  Basically glue the cube in the corner and it helps hold the other pieces square during assembly.  It also increases the gluing surface, thereby strengthening the assembly.

box1box2

The above is of the missile bay with the back panel attached to the right side.

More of the supporting cubes attached in preparation of glueing on the other panels.

tiny boxes everywhere

Hopefully I'll have box and cover completed in short order.


On the Bench:

Bandai Starblazers 2202 Garmillas Zoellugut

  • Member since
    October 2021
Posted by PhoenixG on Thursday, October 19, 2023 5:42 PM

Bakster

"I don't think I've ever spent that much time with sanding sticks and a single set of parts. The Great Karnak tells me he sees more of it in my future."

Lol. I can certainly relate. I am going through the same process right now. Blah.

Sanding itself doesn't bother me.  I can attribute that to my father.

As a kid I'd be pestering him while he was doing something in the basement.  He'd hand me a piece of wood and a chunk of sandpaper and tell me to get cracking and wouldn't consider it done till it was practically glass smooth.  I learned early in life the zen of sanding.  Only way a 5 yr. old could handle it. 

I was nearly an adult before I realized he'd been handing me scraps of 2x4 that never went to anything.  Upon confronting him on this he wasn't the least bit perturbed.   His response was along the lines of "it kept you out of my hair and taught you how to sand properly."  Neither statement I could argue with. Big Smile

Bakster
Let us know how the laser printer works out. I toyed with getting one for myself.

Absolutely.  I just started printing off some examples for comparison.  I'd like to do a write up with example pictures.  My biggest complaint when trying to compare laser printers to inkjets was finding images of prints that coule be evaluated for quality.

On the Bench:

Bandai Starblazers 2202 Garmillas Zoellugut

  • Member since
    October 2021
Posted by PhoenixG on Thursday, October 19, 2023 7:19 PM

Bakster

Btw. I visited my nearest Hobbytown this week for paint. I was shocked at the number of  Bandai kits they had, like what your are building. They had 4 full rows of them, stacked high, overflowing into the main aisles. Model cars, planes, armer, and sci-fi are relegated to two rows against the back wall. Slim pickings by comparison. I once commented to the manager about the volume of bandai kits he stocks, and he told me, you would not believe the interest in them. People come in and buy them by the box full. Some driving in a few hours to do so. Quite eye opening.


It is much the same at the Hobbytown out this way.  The Bandai lines, which are mostly Gundam themed, are larger than the ships, aircraft, and military vehicles combined. The only thing as big/bigger than Bandai at the shop is their RC product lines. 

The quality and fit of the modern Bandai models is hard to beat.  Their engineering is top notch.  They practically build themselves.  Add to that a trick where they can inject different colored plastic on the same parts tree and now you can have a multi-colored model w/o paint.  They also have various grades of the same model.  From basic kits with simplified building and detail.  To high end kits at larger scale that have much more detail molded in. All of which have that same fantastic fit and ease of assembly.

My niece will only build modern Bandai models because they assemble like legos, and come precolored.  I tried interesting her in other models (she was 18 at the time).  Her response was along the lines of they require too much effort to look as pretty.

To that point.  There was a modeling club at my daughter's college.  It was exclusively Bandai models.  It wasn't their charter, it's just what everyone built.  >90% of what they made was straight out of the box.  No additional detailing, painting, etc.

What it really comes down to is they've greatly reduced the barrier to creating a good looking model on the first try.  All that's needed is a tool to cut parts off the tree. 

The model I'm currently building pre-dates the revamp and has many of the challenges you would expect from a typical kit.  I see it as a blessing in disguise.  The skills I develop from "basic" assembly can be honed to personalize the model far more than is possible with out of box. :)

On the Bench:

Bandai Starblazers 2202 Garmillas Zoellugut

  • Member since
    July 2014
  • From: Franklin Wi
Posted by Bakster on Thursday, October 19, 2023 9:19 PM

PhoenixG


Bakster

Btw. I visited my nearest Hobbytown this week for paint. I was shocked at the number of  Bandai kits they had, like what your are building. They had 4 full rows of them, stacked high, overflowing into the main aisles. Model cars, planes, armer, and sci-fi are relegated to two rows against the back wall. Slim pickings by comparison. I once commented to the manager about the volume of bandai kits he stocks, and he told me, you would not believe the interest in them. People come in and buy them by the box full. Some driving in a few hours to do so. Quite eye opening.


It is much the same at the Hobbytown out this way.  The Bandai lines, which are mostly Gundam themed, are larger than the ships, aircraft, and military vehicles combined. The only thing as big/bigger than Bandai at the shop is their RC product lines. 

The quality and fit of the modern Bandai models is hard to beat.  Their engineering is top notch.  They practically build themselves.  Add to that a trick where they can inject different colored plastic on the same parts tree and now you can have a multi-colored model w/o paint.  They also have various grades of the same model.  From basic kits with simplified building and detail.  To high end kits at larger scale that have much more detail molded in. All of which have that same fantastic fit and ease of assembly.

My niece will only build modern Bandai models because they assemble like legos, and come precolored.  I tried interesting her in other models (she was 18 at the time).  Her response was along the lines of they require too much effort to look as pretty.

To that point.  There was a modeling club at my daughter's college.  It was exclusively Bandai models.  It wasn't their charter, it's just what everyone built.  >90% of what they made was straight out of the box.  No additional detailing, painting, etc.

What it really comes down to is they've greatly reduced the barrier to creating a good looking model on the first try.  All that's needed is a tool to cut parts off the tree. 

The model I'm currently building pre-dates the revamp and has many of the challenges you would expect from a typical kit.  I see it as a blessing in disguise.  The skills I develop from "basic" assembly can be honed to personalize the model far more than is possible with out of box. :)


Wow... that explains it so well. Thanks for writing all that. I might have to buy one!

  • Member since
    July 2014
  • From: Franklin Wi
Posted by Bakster on Thursday, October 19, 2023 9:22 PM

PhoenixG

Last night I did the next step of assembly for the should boxes.  To keep them square during assembly I am using small pieces of square tubing.  They'll help keep corners and edges square.

As I don't have any kind of mitre for models y biggest challenge is cutting the tubing square.  I made a basic jig to help make things square-ish.

laughablejig

Basically it is tall enough and provides just enough surface area to help keep the blade perpendicular.

Lots of trial and error making tiny boxes.

oops

But a few did turn out well enough to start some assembly.  Basically glue the cube in the corner and it helps hold the other pieces square during assembly.  It also increases the gluing surface, thereby strengthening the assembly.

box1box2

The above is of the missile bay with the back panel attached to the right side.

More of the supporting cubes attached in preparation of glueing on the other panels.

tiny boxes everywhere

Hopefully I'll have box and cover completed in short order.


I like your solutions, your thinking, and your documenting. Nice work, sir! Yes

  • Member since
    October 2021
Posted by PhoenixG on Saturday, October 21, 2023 1:04 AM

Yesterday I was apparently bit by a bug that put me into a deranged state.  Resulting in very long winded postings.  I'm feeling better now.  Today will be short and sweet. Stick out tongue

Very pleased with how well the pieces that were measured and cut conform to the original shape.  Positive sign that the end product will align well.

side

different view

Missile cover in process of assembly.  The little squares are doing exactly what they should be. Holding the pieces square while the glue dries.  It's actually a trick I transfered over from carpentry.  Putting square blocks in corners to help maintain shape during assembly.

cover

On the Bench:

Bandai Starblazers 2202 Garmillas Zoellugut

  • Member since
    November 2009
  • From: SW Virginia
Posted by Gamera on Saturday, October 21, 2023 9:45 PM

Oh that looks good Phoenix! Looking forward to seeing how the missile boxes come out! 

And the tiny boxes gave me a little PST. I was cementing ERA boxes to modern Russian tanks till my eyes crossed. I had to put the thing down and work on something else. Now I wonder what a mech covered in ERA bricks would look like..... 

Neat story about the sanding. Hey I guess it did keep you out of dad's hair plus wood and sandpaper are cheap right???

And some of the guys at our club have been talking about Bandai kits as a 'gate-way drug' to more serious modeling. As you say most kids are happy with what they've got but some might be interested in adding a little weathering or modifying the kit. Ya never know... 

"I dream in fire but work in clay." -Arthur Machen


  • Member since
    October 2021
Posted by PhoenixG on Sunday, October 22, 2023 7:58 PM

Bays were progressing nicely and then two mistakes happened.

First one.

I was assembling the floor of the box and discovered I'd made a mistake when making the template.  The second floor section is too short.  It's about half the size it needs to be.

missingfloor

Should be able to cut out another rough sized piece.  Since this really won't be seen to worried about it looking pretty.  Other than that minor snafu it's coming along nicely.

Second mistake is on the cover and is not recoverable.

Rather than glue on the cover in sections, I decided to try and lay it down as a single piece.  Glue on a section, bend at a corner, secure that section, and so on.   Make for a nice seamless top.

bay cover 1

But the styrene is too thick and stiff to make that corner easily.  Then it occurs to me.  A little heat in that area could do the trick.  Break out the hot air rework gun.

bentcover

Nice!  That worked really well.  

And then it happened....

fail1

Fail2

The temp was just to high for the last bit and had too much hot air moving across it.   It's warped the front of the cover pretty badly.  So, it won't be usable for a final product but it can still be used as part of the test build.

Miffed with myself for not thinking about how much heat I was applying in that small area. Bright side is that it is still usable for doing some checks and brainstorming.

Should get the box done in short order and will move on to crafting a bunch of missiles. My challenges with cutting the square tube square has me thinking I should consider a mitre before starting on the missiles.

On the Bench:

Bandai Starblazers 2202 Garmillas Zoellugut

  • Member since
    October 2021
Posted by PhoenixG on Sunday, October 22, 2023 8:26 PM

Gamera
And the tiny boxes gave me a little PST. I was cementing ERA boxes to modern Russian tanks till my eyes crossed. I had to put the thing down and work on something else. Now I wonder what a mech covered in ERA bricks would look like.....

Well hopefully the flashbacks to that model weren't bad.  As it turns out there is a patlabor model that's about half covered with ERA.  Might give you ideas, or fits.  Not sure which.  Stick out tongue

Gamera
Neat story about the sanding. Hey I guess it did keep you out of dad's hair plus wood and sandpaper are cheap right???

They are indeed.  It has also guaranteed that I am tasked with all the sanding duties on any carpentry project.   lol

Gamera
And some of the guys at our club have been talking about Bandai kits as a 'gate-way drug' to more serious modeling. As you say most kids are happy with what they've got but some might be interested in adding a little weathering or modifying the kit. Ya never know...

I fully believe that to be true and the display case at my LHS indicates they are out there.

As for myself.  I am a troubleshooter by nature and profession.  It brings me great joy to problem solve my way through a challenge. 

Though sometimes you just want it to work.  That's when I pull out one of those tiny 1/144 Bandai Star Wars models.  Gets my stress levels down.  Then I'm ready to grab the next frustration in a box.  I mean model kit.  Wink

On the Bench:

Bandai Starblazers 2202 Garmillas Zoellugut

  • Member since
    November 2009
  • From: SW Virginia
Posted by Gamera on Sunday, October 22, 2023 8:59 PM

Ouch Phoenix! I did something sorta like that years and years ago when painting a Tamiya Panzer III I set it too near a heater to get the paint to dry faster. And it ended up melting and twisting the side skirt on that side...

Well, live and learn... 

Shouldn't be too hard to build another missile box, shame about the time invested though. 


Oddly I got enough of a hankering for giant mech action I pulled out Pacific Rim and just watched it again. I guess it's not real Gundam but I like it. 

"I dream in fire but work in clay." -Arthur Machen


  • Member since
    October 2021
Posted by PhoenixG on Tuesday, October 24, 2023 4:56 PM

Gamera

Ouch Phoenix! I did something sorta like that years and years ago when painting a Tamiya Panzer III I set it too near a heater to get the paint to dry faster. And it ended up melting and twisting the side skirt on that side...

Well, live and learn... 

Shouldn't be too hard to build another missile box, shame about the time invested though. 


Oddly I got enough of a hankering for giant mech action I pulled out Pacific Rim and just watched it again. I guess it's not real Gundam but I like it. 


Absolutely sir.  We learn more from our mistakes than our successes. 
 
Pacific Rim.  Now there's a fun movie.  YesYes
Hard to top the EPIC battle in Hong Kong.  I might have to watch that tonight.

On the Bench:

Bandai Starblazers 2202 Garmillas Zoellugut

  • Member since
    October 2021
Posted by PhoenixG on Thursday, October 26, 2023 1:34 PM

Slow progress but I finally got the missile box complete.  It isn't pretty but 90% of it will be hidden inside the shoulder and black paint should disguise the rest.

missile box

Putting the box and cover together to get the overall aesthetic of it.  No filler or sanding done.  This is just the raw assembled pieces.

paired

pair2

I like the look of the single piece top of the missile cover.  Despite the obvious accident caused by too much heat, it provides a more rounded look such as seen in the boxart.

Something I noticed with that as well.  The long and short sides of the missile box are reversed on the model when compared to the boxart. 

Below is an attempt of a picture-in-picutre comparison.

pip

There's no way to fit 10 missiles before the bend. Realistically it may be 1/3-2/3 split.

So, it won't be possible to match the box art, but it may mean the missiles won't hit the cover at launch and explode.

On the Bench:

Bandai Starblazers 2202 Garmillas Zoellugut

  • Member since
    November 2009
  • From: SW Virginia
Posted by Gamera on Friday, October 27, 2023 8:58 PM

Hmm, that's odd about the depication of the missile box on the box top. 

Still nice work- it's looking good! 

"I dream in fire but work in clay." -Arthur Machen


  • Member since
    May 2011
  • From: Honolulu, Hawaii
Posted by Real G on Saturday, October 28, 2023 2:09 AM

Yeah, I think those shoulder launchers always had the top three or so rows of missiles firing up into the covers!  That's anime for ya!  Still, it looks so cool...

“Ya ya ya, unicorn papoi!”

  • Member since
    October 2021
Posted by PhoenixG on Tuesday, October 31, 2023 10:40 PM

Gamera

Hmm, that's odd about the depication of the missile box on the box top. 

Still nice work- it's looking good! 


Well as we know the box art isn't always representative of what's inside.  I almost submitted this for the "Bamboozled by the boxart" GB.  Big Smile lol


On the Bench:

Bandai Starblazers 2202 Garmillas Zoellugut

  • Member since
    October 2021
Posted by PhoenixG on Tuesday, October 31, 2023 10:42 PM

Real G

Yeah, I think those shoulder launchers always had the top three or so rows of missiles firing up into the covers!  That's anime for ya!  Still, it looks so cool...


Heck 99% of how mechas move in is physically impossible.  The shows would be so boring if they tried to base everything upon our modern capabilities in engineering and physics.   I'll go for cool over practical any day!

On the Bench:

Bandai Starblazers 2202 Garmillas Zoellugut

  • Member since
    October 2021
Posted by PhoenixG on Tuesday, October 31, 2023 11:14 PM

The past weekend was lost to having clean up and straighten my workbench.  It was such a disaster I couldn't get anything done.  This was not helped by having airbrush issues.

Good news is the disaster is more contained and my airbrush is working normally again (thank you sonic cleaner).

I'd thought about getting a mitre for cutting the tubing/rod for the missiles.  However, with the new printers no budget left for new toys.  Time to get creative.

I've got scrap wood, a chopsaw, and a drill. Time to make a device for 90 degree cuts.

First off was cutting a piece of 2x4 large enough for the chisel blade to rest flat against, but still be shorter than the blade.

cutwood

Place the block beside my cutting mat and scribe a line along the edge.

scribe

Next, pull out the drill gauge If you don't have one of these I highly recommend getting one.   Fastest and easiest way to determine the size of an unmarked drill bit.  Or in this case find out the best drill bit to use to create a hole that will fit the tubing.  Benefit is you can find them for cheap at just about any hardware store.

gauge 1

It also works for square tubing as well.guage2

Sine the block of wood is so small I need to mark the first hole a ways to reduce the chance of it breaking.  The drill guage is handy for marking where to drill.  Place the mark just on, to slightly above the line. This way the bottom of the opening of the hole will align with the top of the cutting mat.

marking

marks

When drilling I find the best way to keep the bit from walking across the piece is to take drill bit and tap an impression of the tip into the wood.  Automatically centered and no worries.

bit starter

And drill the holes.

holes

Dang it!  The one on the right is high.  No worries.  stick a few sheets of paper under the cutting mat and they're aligned again.

The hole on the right was a little tight so a couple of additional passes with the same sized drill bit opened it up a little more and voila!  I now have a tool for cutting mostly square ends.

monsier guillotine

Rest the chisel blade flat against the side and push down.

littlesquares

littlebits

And I can drill more holes to fit other size tubing I may need.

Clamp the wood block down and a stop in front of it and I can quickly cut to whatever length is needed.

Next up.  Cutting a few tests lengths of tubing to test sizing and placement in the missile box.


On the Bench:

Bandai Starblazers 2202 Garmillas Zoellugut

  • Member since
    October 2021
Posted by PhoenixG on Wednesday, November 1, 2023 8:25 PM

No woodworking lessons in this post. Wink

Was able to churn out a bunch of missile tubes this evening with very little effort thanks to the cutting block.  Used blue tack to hold them in place to check how they look visually.

front

profile

Like how this is looking and I think the .156" diameter styrene tubing is just right.

Time to reveal the visual magic.  From front to back this is how the tubes actually look.

reality

If I don't use three different lengths of tubes this is what it looks like.

real box

The bend makes the missiles in the back look shorter even though they protrude above the lip of the box at the same height as the ones in the front.

It also means they need to be posed permanently open or closed.

ooops

At least I now know why they only provided the closed option on the kit. Big Smile

On the Bench:

Bandai Starblazers 2202 Garmillas Zoellugut

  • Member since
    July 2014
  • From: Franklin Wi
Posted by Bakster on Wednesday, November 1, 2023 8:57 PM

PG, oh no about the heat. My friend, glad to see I am not the only one here that makes a mistake. Lol.

Keep at it sir. You will get there. I am enjoying your build and thread!

  • Member since
    October 2021
Posted by PhoenixG on Wednesday, November 1, 2023 9:59 PM

Well I seem to be on a roll tonight.  Getting all sorts of stuff done.  Can't express how much of a relief that is.  Felt like I've been in a holding pattern forever.  Nice to make some real progress on this build.

Tonight is a significant milestone.  With satisfactory results with the scratchbuilt missile pod I decided to take the leap and hack off the original cover.

I don't have a razor saw but a while back I did pick up Hasegawa's Trytool photoetch saws.  This will be their first real outing.

hasegawa

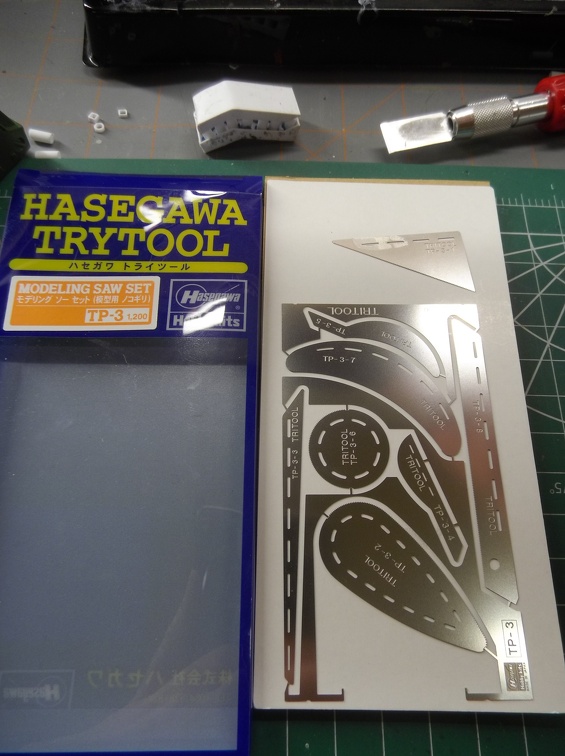
I grabbed the beefier long saw blade and chucked it into my hobby knife handle and started cutting.

I carefully scribed all the sides first to create guides for the saw blade to follow so it wouldn't want to walk in or out.  I've been caught by that when sawing other materials.

noreturn

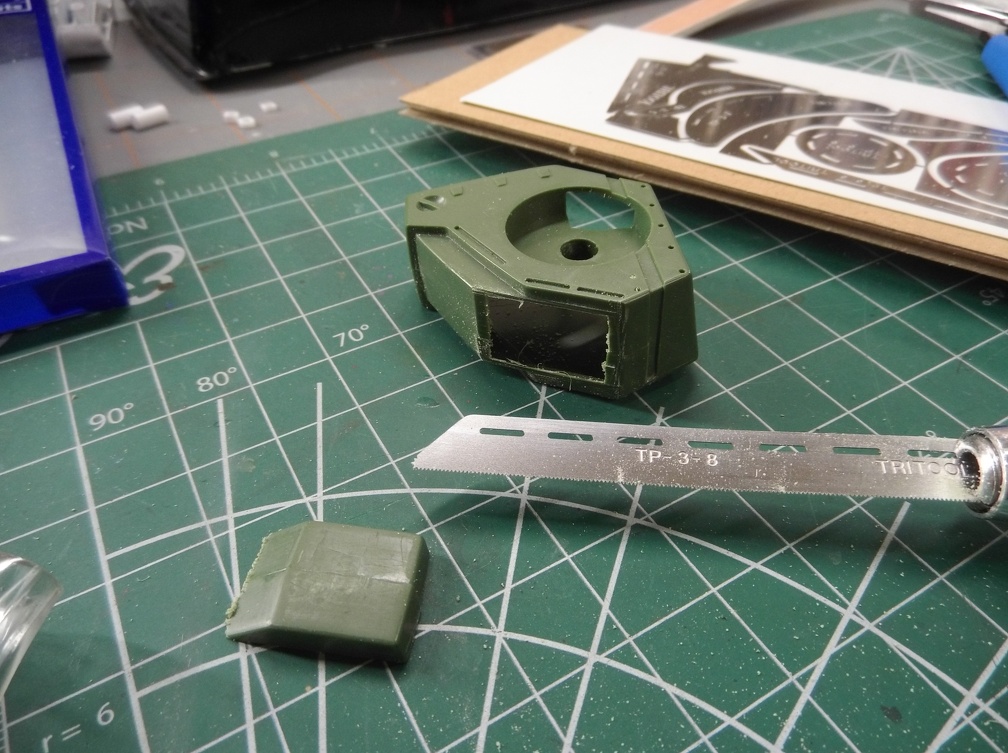
Like the Phantom of the Opera said, I've passed the point of no return.  I'm all in now.  That photoetch saw worked really well.  Once it bit in I had to be real careful because it went through the plastic so quickly.

Time to take off the rest of the cover.

Same process as before.  Scribe the three sides and start sawing.  However, this time I used the smaller triangular blade to do the cutting. The other was just too long and flexible for this.  I actually sawed through each side individually.

bighole

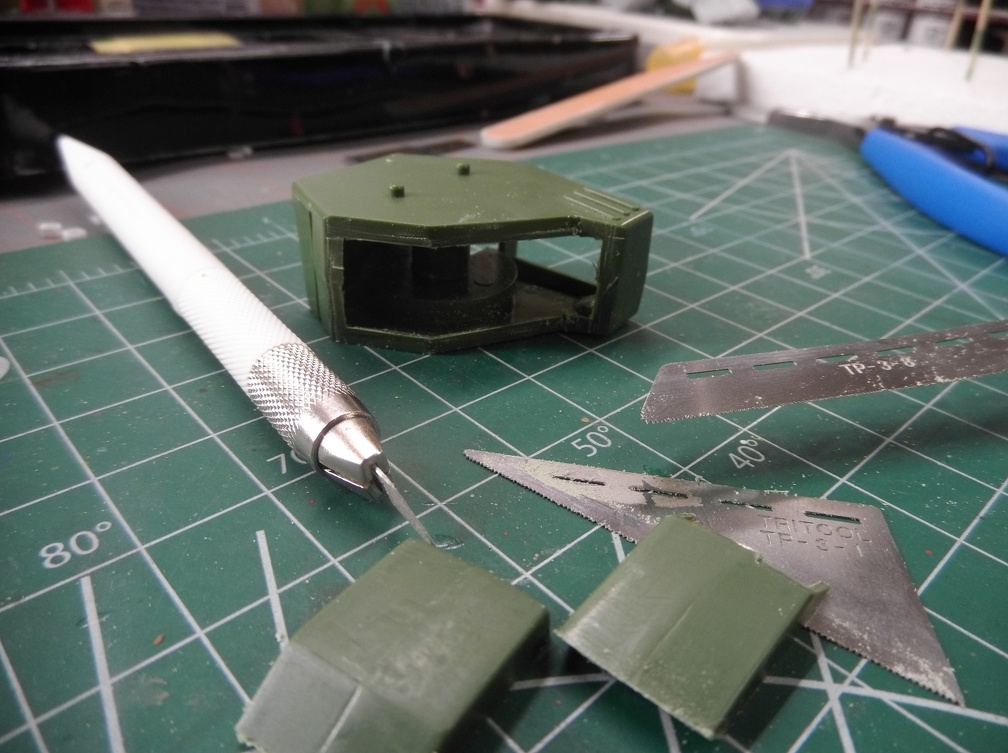
Pretty proud of how clean this turned out given it's my first attempt sawing apart something like this.

cleanupon aisle three

spill on aisle 4

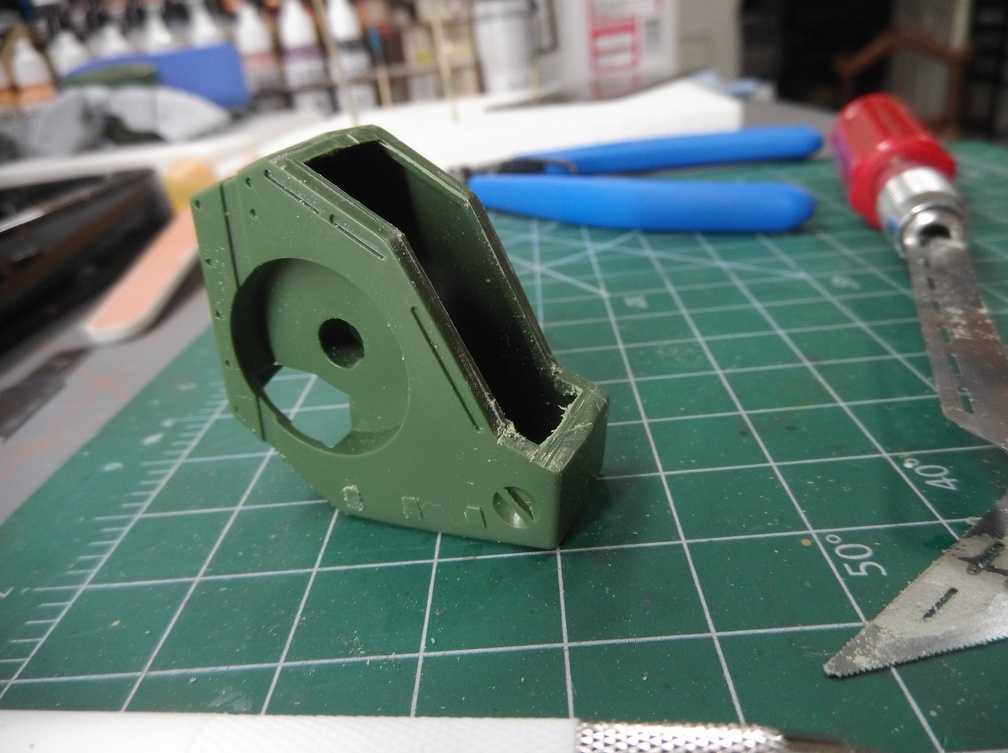
You can see there are a couple of raised places where my scribe lines weren't quite close enough, but those were pretty easy to scrape off with a hobby knife

A little sanding to finish it off.caution wet floor

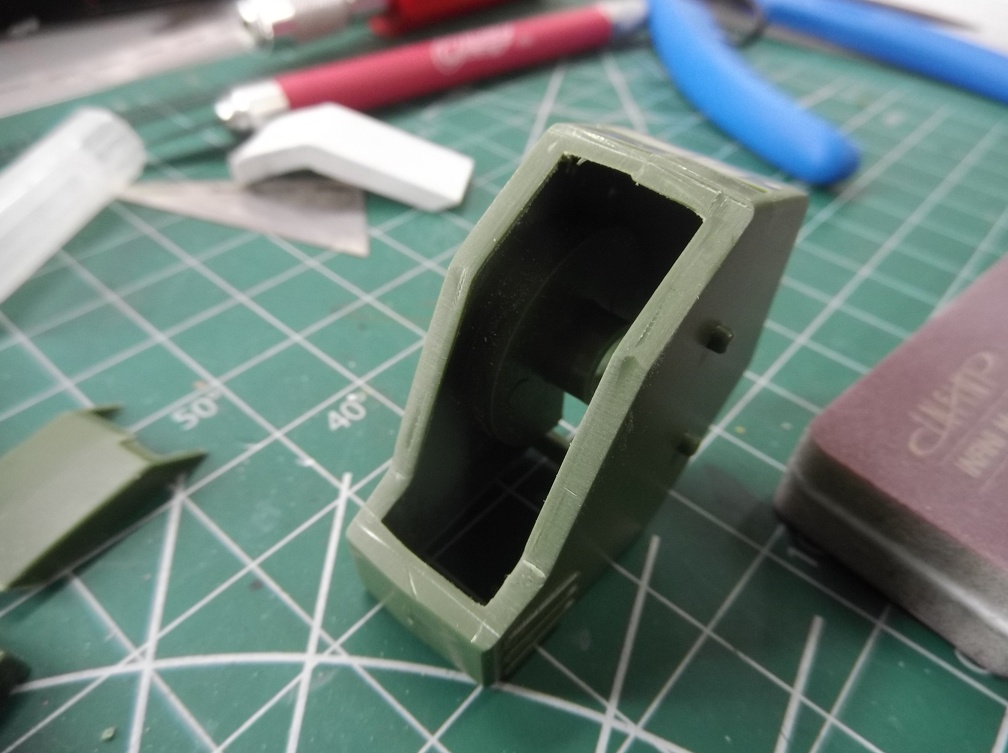
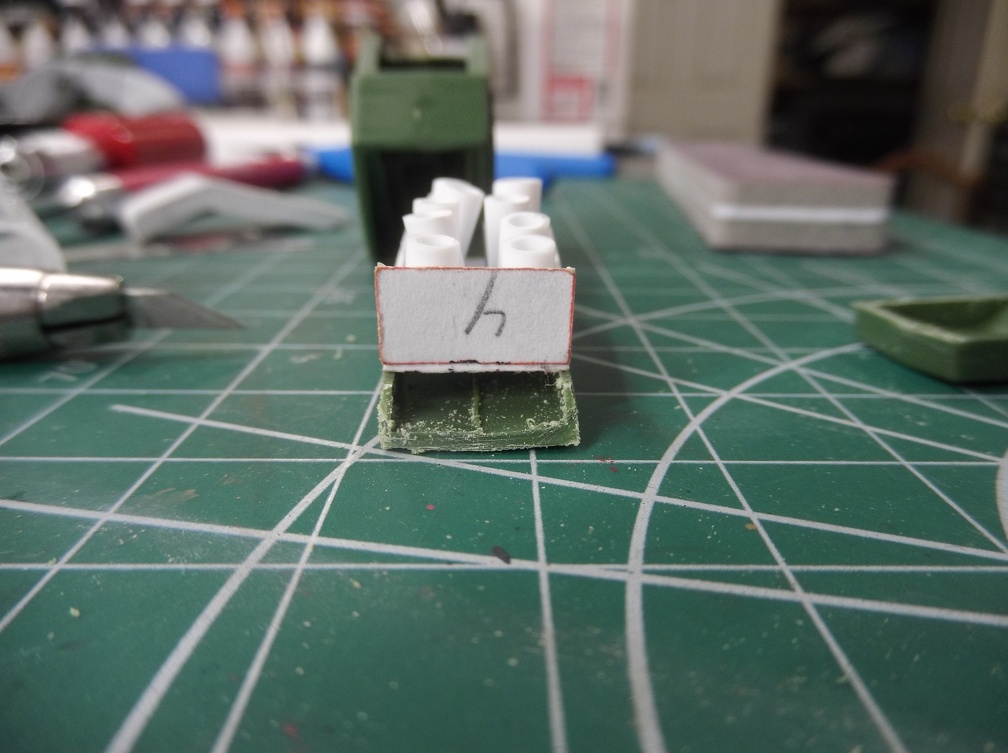
Quick check to see how well the box fits and...
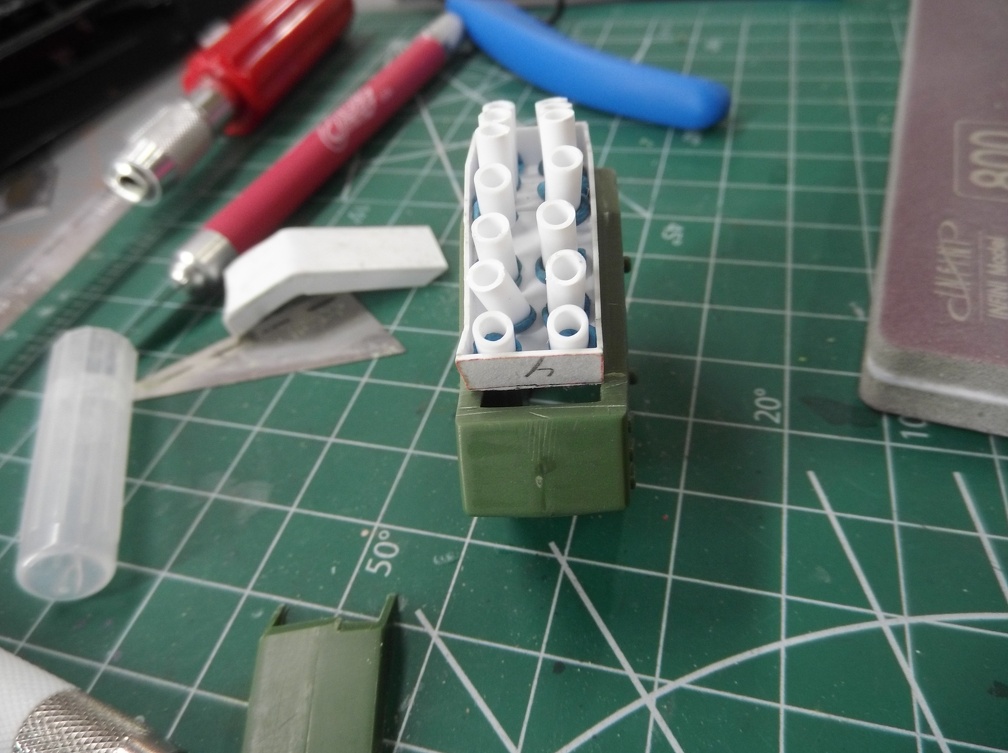
Do these pants make me look

Fail.

However, that wasn't unexpected.  I'd measured outside dimensions because I wasn't certain of the thickness off the walls. 

yup its a miss

By the looks of it there is plenty of room inside the scratchbuilt box to shrink it down so it will be a slip fit into the shoulder well.  Shouldn't take too long to measure the new dimensions for the box and get new templates drawn up.

Final check of the missile cover.

Im sure I was a size

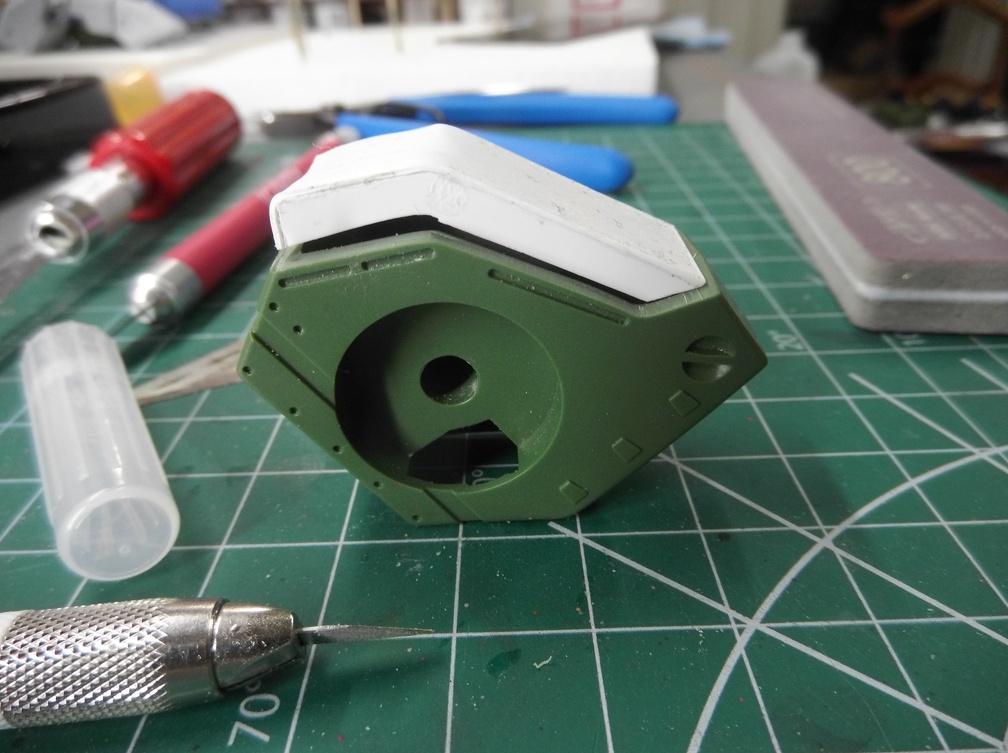
A little off, but given how well it fit before the heat gun debacle I am confident the original design will work just fine.

Because I am the cautious sort I am only going to do this one shoulder for now.  The other will wait till this one is done.

I'd say it was time for a beer and a pat on the back.  LOL Big Smile


On the Bench:

Bandai Starblazers 2202 Garmillas Zoellugut

  • Member since
    October 2021
Posted by PhoenixG on Wednesday, November 1, 2023 10:19 PM

Bakster

PG, oh no about the heat. My friend, glad to see I am not the only one here that makes a mistake. Lol.

Keep at it sir. You will get there. I am enjoying your build and thread!


I think as a modeler making mistakes is one of the key skills that gets lots of practice.  LOL

Glad you are enjoying the build and thread. Truth be told the work I watched you do on your builds has been an inspiration to me.  Smile

I also have to thank Real G.  He's the one who put me up to this mod.  If he hadn't suggested it, I probably would have never tried.  This is really helping me get over my fear of modifying a model.  Other than one very simple mod I did a while back, everything has been out of box.

Still don't know what the final product will be like, but that's part of the adventure. Big Smile

On the Bench:

Bandai Starblazers 2202 Garmillas Zoellugut

  • Member since
    May 2011
  • From: Honolulu, Hawaii
Posted by Real G on Thursday, November 2, 2023 1:23 PM

PG,

We like to call it "cross contamination" among my friends.  It can lead to excessive stash enlargement, but it also helps us to become better modelers and most importantly enjoy our hobby to its fullest.

Aaaaand I work for the Model Devil.  My sworn mission is to convince people to move out of their comfort zone and go mad in the process.  Devil

“Ya ya ya, unicorn papoi!”

  • Member since
    July 2014
  • From: Franklin Wi
Posted by Bakster on Thursday, November 2, 2023 2:54 PM

PhoenixG
Still don't know what the final product will be like, but that's part of the adventur

Right on, man. It's the journey.


PhoenixG
I think as a modeler making mistakes is one of the key skills that gets lots of practice.  LOL

Again, right on!

  • Member since
    July 2014
  • From: Franklin Wi
Posted by Bakster on Thursday, November 2, 2023 2:59 PM

Way to go using the trytool!

  • Member since
    October 2021
Posted by PhoenixG on Saturday, November 4, 2023 12:03 AM

Real G
We like to call it "cross contamination" among my friends. It can lead to excessive stash enlargement, but it also helps us to become better modelers and most importantly enjoy our hobby to its fullest.

Yes it has, yes it is, and I certainly am.  Your three for three Real G!


Real G
Aaaaand I work for the Model Devil. My sworn mission is to convince people to move out of their comfort zone and go mad in the process.  Devil

ROFLMAO!

The next time someone in my family comments about the amount of time spent at the bench, I'm going to point to your post and say "the Devil made me do it."  Wink

On the Bench:

Bandai Starblazers 2202 Garmillas Zoellugut

  • Member since
    October 2021
Posted by PhoenixG on Saturday, November 4, 2023 12:14 AM

Bakster

Way to go using the trytool!

Thanks Bakster.

it was a learning curve.  The blade is so thin because it's photo etch.  A few times I started going to fast and caused the blade to bind and bend.  Slowed way down after that because I didn't want to put a permanent kink in it on the first use. Even go real slow I was surprised at how fast it removed material.Yes

That triangle on the other hand is solid as a rock.  No discernible flex in that while I was sawing away, but not being able to chuck it into a handle causes lots of hand fatigue.  The triangle is best used for small jobs.

Still don't know what I would use more than half those blades for but I'm looking forward to discovering it. Yes

On the Bench:

Bandai Starblazers 2202 Garmillas Zoellugut

  • Member since
    October 2021
Posted by PhoenixG on Monday, November 6, 2023 2:01 AM

Well there was going to be a substantive update but the site keeps returning a "403 Forbidden" every time I time to post it.  After fiddling with my post for over a half hour I give up. Angry Bang Head

Summary:

New box fits and is in place. Missile cover to be assembled.


On the Bench:

Bandai Starblazers 2202 Garmillas Zoellugut

JOIN OUR COMMUNITY!

Our community is FREE to join. To participate you must either login or register for an account.

SEARCH FORUMS
FREE NEWSLETTER
By signing up you may also receive reader surveys and occasional special offers. We do not sell, rent or trade our email lists. View our Privacy Policy.