SEARCH FINESCALE.COM

Enter keywords or a search phrase below:

1/35 "Hell Hound" hover truck - Complete (for now...)

20918 views
68 replies
1 rating 2 rating 3 rating 4 rating 5 rating
  • Member since
    October 2008
  • From: italy
Posted by bsyamato on Monday, March 23, 2009 6:10 AM

Great modding work Big Smile [:D]


  • Member since
    August 2005
  • From: vernon hills illinois
Posted by sumpter250 on Monday, March 23, 2009 11:54 AM

Ok, I know it's been awhile, but I kinda got stuck for a bit. I got really indecisive about some minor details; piddling stuff really.

I can identify with that!  Looking good so far, I too, am waiting to see how you weather the final assembly. I get the feeling that you not only know how this "hell hound" operates, but also what conditions it operates in. Knowing the "prototype", before modeling it, has its advantages. 

Lead me not into temptation ..................I can find it myself

  • Member since
    December 2007
  • From: Louisville, KY.
Posted by Cosmic J on Tuesday, March 24, 2009 12:50 AM

Thank you gentlemen, you are all very kind.

I'm torn on the weathering. On the one hand, I prefer a clean model w/ minimal weathering, and as an Israeli Defense Force vehicle, it probably wouldn't get too beat up w/ normal use.

On the other hand, if those hoverfans are strong enough to actually lift this thing, they're going to throw a lot of mud and dust into the air and onto the hull.

Suggestions and tips always welcome.

  • Member since
    January 2006
  • From: Baton Rouge, Snake Central
Posted by PatlaborUnit1 on Wednesday, March 25, 2009 12:19 PM

J I am in the same exact situation with my hovetcraft recovery vehicle.  As a recovery vehicle it will not be slogging through the mud and crashing through the trees, but it will be throwing dust everywhere plus going over the occassional bush. I plan a trop paint job with plenty of Mig pigments in the corners and on the air cushion skirt.  The final decideing factor for you will be the actual operating terrain and how often your HT gets washed.


Looks GREAT so far by the way, I have never sen one of these finished!

Build to please yourself, and don't worry about what others think! TI 4019 Jolly Roger Squadron, 501st Legion
  • Member since
    August 2005
  • From: vernon hills illinois
Posted by sumpter250 on Wednesday, March 25, 2009 12:47 PM

if those hoverfans are strong enough to actually lift this thing, they're going to throw a lot of mud and dust into the air and onto the hull.

Q. will this model be displayed "in a scene"?....which brings up Q2, will the scene be wet, or dry? In other words, what exactly will the fans be throwing ?(I was going to ask what would be hitting the fans, but perhaps that is territory that shouldn't be explored) . In a wet environment there will be mud, that dries into thick buildups of material, the same color as.....dust! that would evenly coat surfaces when operating in the same environment, during the dry season.

Lead me not into temptation ..................I can find it myself

  • Member since
    December 2003
  • From: Colorado
Posted by psstoff995 on Wednesday, March 25, 2009 6:05 PM
Don't forget small rocks dinging up the paint!! Looks really nice so far

-Chris

US Army Infantryman

  • Member since
    December 2007
  • From: Louisville, KY.
Posted by Cosmic J on Saturday, April 4, 2009 2:33 AM

 PatlaborUnit1 wrote:

J I am in the same exact situation with my hovetcraft recovery vehicle.  As a recovery vehicle it will not be slogging through the mud and crashing through the trees, but it will be throwing dust everywhere plus going over the occassional bush. I plan a trop paint job with plenty of Mig pigments in the corners and on the air cushion skirt.  The final decideing factor for you will be the actual operating terrain and how often your HT gets washed.


Looks GREAT so far by the way, I have never sen one of these finished!

Thank you, I appreciate that. Cool [8D]

I saw a finished one at Wonderfest USA back in 07, I think, the year it came out. Other than that one, I'm surprised not to have seen more of them too. I think it gives the impression of easy modding/kit-bashing, so maybe folks are thinking of changing it up when they build it, which slows down the process. That's what happened to me. Laugh [(-D]

 sumpter250 wrote:

if those hoverfans are strong enough to actually lift this thing, they're going to throw a lot of mud and dust into the air and onto the hull.

Q. will this model be displayed "in a scene"?....which brings up Q2, will the scene be wet, or dry? In other words, what exactly will the fans be throwing ?(I was going to ask what would be hitting the fans, but perhaps that is territory that shouldn't be explored) . In a wet environment there will be mud, that dries into thick buildups of material, the same color as.....dust! that would evenly coat surfaces when operating in the same environment, during the dry season.

It won't be "in scene" at first. It's part of an IDF group build that I joined late, and it has to be done by the 20th to get the badge so... I'm just gonna finish it first, then see what I can do about building a dio for it afterwards.

It's an (conjectural) IDF vehicle, so Israel would be its primary terrain. I got some pictures from White_R34 of the area, hung them below.


 psstoff995 wrote:
Don't forget small rocks dinging up the paint!! Looks really nice so far

You know, I had honestly not thought of that. Don't know why, but now that you mention it it's obvious. Those rocks would be moving at a very high speed too. Looks like I'm gonna be beating this little guy up a bit...

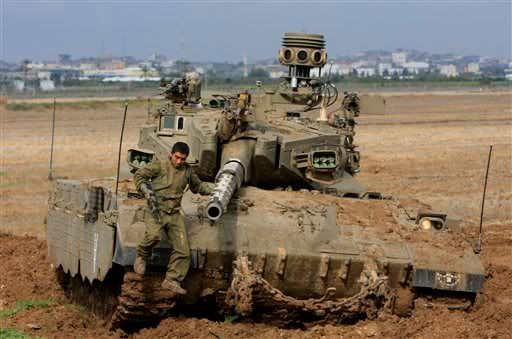
As I said, White_R34 sent me some recent images to help me out. Here are some of them:

 White_R34 wrote:

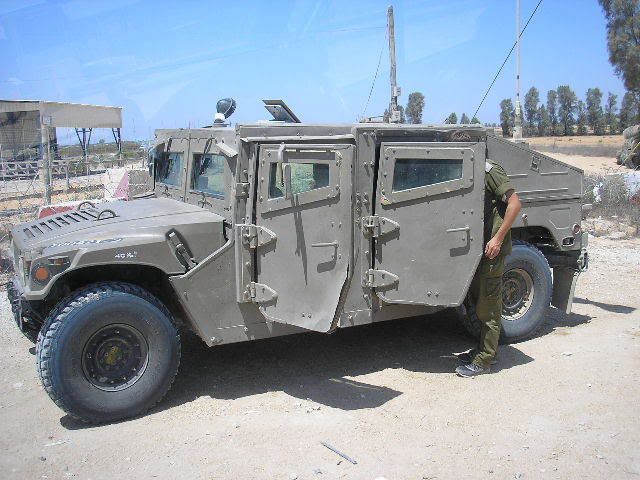
Here's some new photos from the region, of the Active sevice and Reservis units.
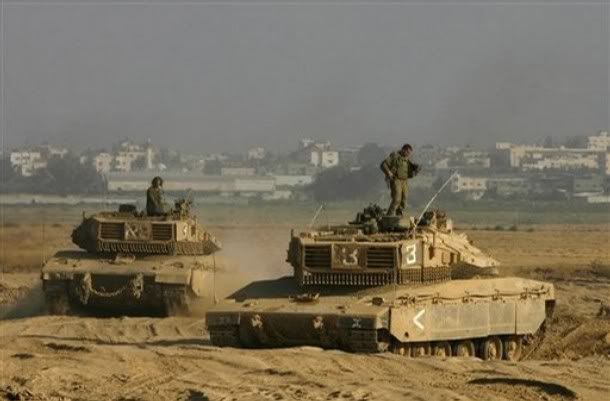
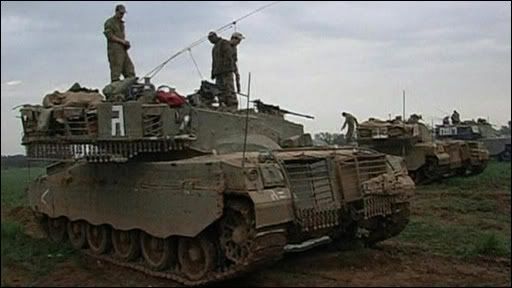
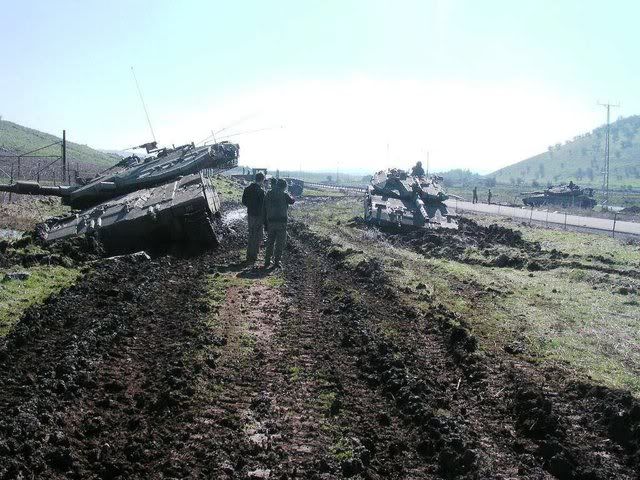
 

 White_R34 wrote:

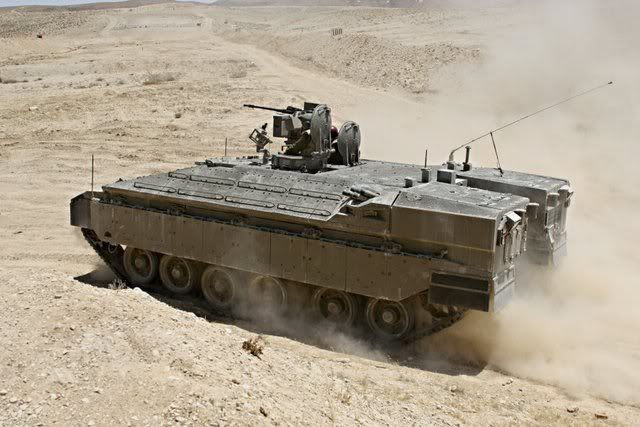
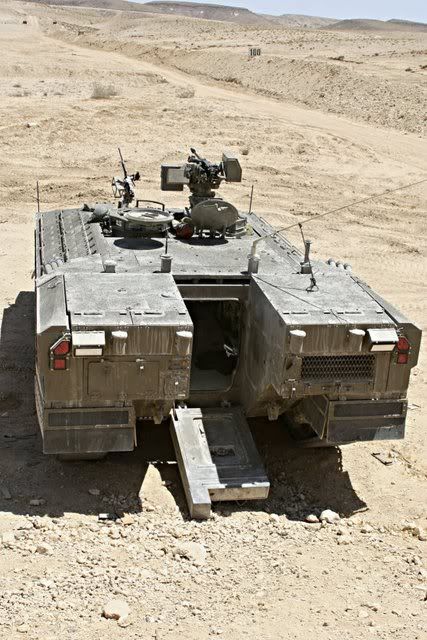
Here's a Mk II on patrol at the Israel border., It's call the Mk. IID for the armor added to the turret and sides of the upper hull.

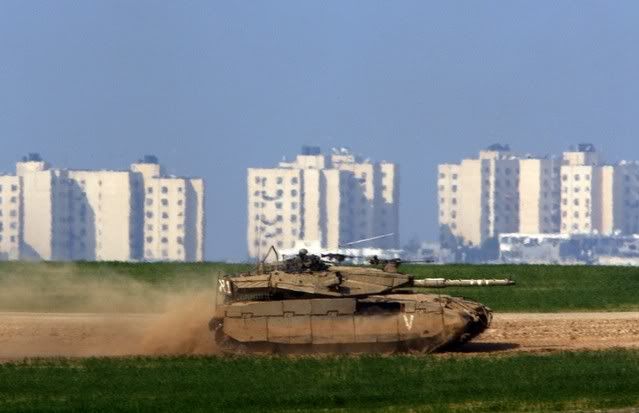
An one last thing I wan to show you all the IDF D9 an D9R Catt, this thing is truly a beast. They use thing to help push there way over built up hills and man made obstacles.
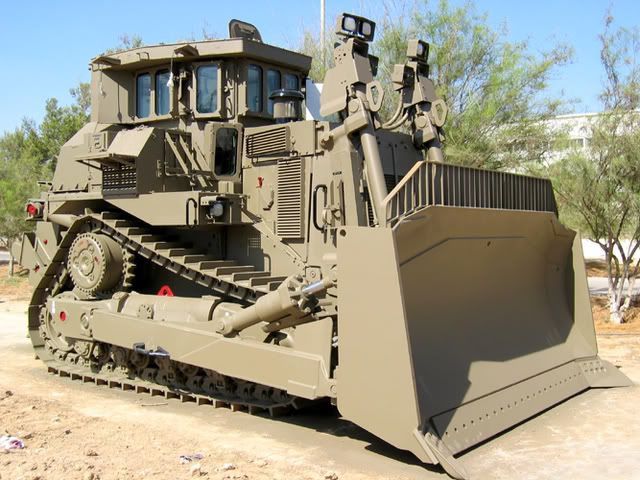
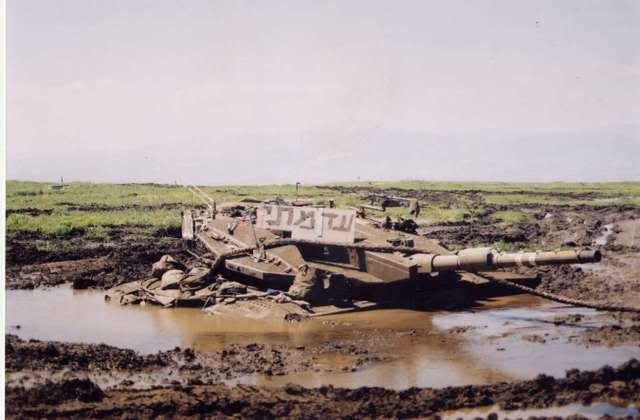
 White_R34 wrote:

 You know your hovercraft would be a great Idea! No more MUD holes!!

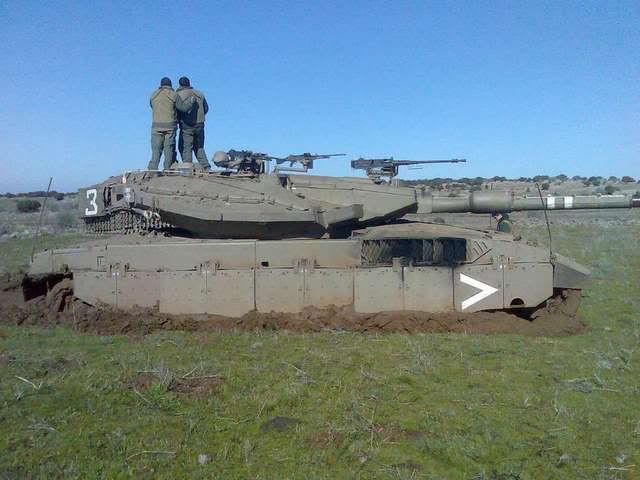
I'm struck by how little damage the vehicles have on them, especially the combat bulldozer. You would think that they would at least have more chipped paint or scratches. Dirty as hell though...

It may be ironic, but I think to be "realistic" my model will have to be more beat up than the real thing. Smile [:)]

Thanks for the support guys, I appreciate it.

Post shaded the hull today (would have done it sooner, but I came down w/ a bout of the flu...). Came out a little garish. Toning it down tomorrow, then maybe pixs.


  • Member since
    December 2007
  • From: Louisville, KY.
Posted by Cosmic J on Thursday, April 9, 2009 7:06 AM

Finished post shading the hull and assorted parts. I mixed 4 parts Israeli Armor Sand and 1 part Burnt Umber to make the shadow tone. Notice how it seems to darken the overall color. I'm really grooving on this color, don't know if it's accurate or not, but I'm definitely gonna use it again for other projects.

One note for other builders of this kit: The turret is completely open on the inside, giving a view of the inside of the hull. For some reason, I thought there was a "basket" that the turret gunner sat in. Had I paid attention, I would have known to paint the interior parts before assembly, and maybe added some detail in there. Oh well. I painted everything I could reach the shadow color and just got on w/ it.

Some more notes on the turret: The interior has some details that need to be painted before you assemble it. Otherwise, it would be difficult or impossible to paint all the little parts and instrument faces.

Also, the turret parts don't line up perfectly. I had hoped to just snap the parts together after doing the interior, but the seam will need gluing and putty for a flush join. I'll do that after I paint all the details inside.

More soon...

  • Member since
    August 2005
  • From: vernon hills illinois
Posted by sumpter250 on Thursday, April 9, 2009 12:13 PM

  Cosmic J said, "When you open your mouth, you allow others to see into your mind.".............So, CJ, stop posting those photos that make my jaw drop.....my mind is not a pretty sight! :) :)

  Sweet work!, and you definitely should be able to accurately weather, using those photos of real armor, in the real environment. The small rock damage..........I would think that would be mostly on the bottom of the vehicle.....the rocks that could cause serious "dinging" would be too heavy to lift to sufficient altitude to come down on the upper surfaces with enough force to "ding" armor plate......chip paint? maybe, but make noticeable dents in armor plate, I think not.

Lead me not into temptation ..................I can find it myself

  • Member since
    December 2007
  • From: Louisville, KY.
Posted by Cosmic J on Friday, April 10, 2009 3:13 AM

LOL! Thank you sir. High praise indeed! Cool [8D]

I hear you about the chipped paint. I figure this vehicle would have to be made of a lightweight (non-ferrous) metal, so the paint chips will be steel or aluminum colored rather than rusty. Looking at it carefully, it doesn't have much in the way of easily damaged parts (like fenders and such) so the only real damage I would add if I was doing another would be some nicks and gouges to the rubber bumpers on the engine housings, and even then I'd keep it light. This thing is pretty sturdily built! Big Smile [:D]

Turret is almost done, then spot washes and drybrushing. Still a ways to go...

  • Member since
    May 2005
  • From: Dublin Rep Of Ireland
Posted by terry35 on Sunday, April 12, 2009 6:55 PM

eeeh............. just brilliant, can't do anything but be amazed..... awe struck....

Coming along great,

Terry.

  • Member since
    December 2007
  • From: Louisville, KY.
Posted by Cosmic J on Monday, April 13, 2009 9:29 AM

Cool [8D] Thank you.

Finished the turret today, and am now working on the engine fans... pictures soon.

  • Member since
    December 2007
  • From: Louisville, KY.
Posted by Cosmic J on Friday, May 22, 2009 4:33 AM

Sorry to have been away for a bit. I had a thing. Y'all know how it is... Cool [8D]

Interior of the turret is done, and the seam has been filled and painted. Mr Surfacer 500 was very useful here. I don't know if anyone will be able to see any of these details once the completed gun and spotlight are in place, but there it is.

Applying washes to the pieces and hull now.

  • Member since
    August 2005
  • From: vernon hills illinois
Posted by sumpter250 on Friday, May 22, 2009 11:58 AM
I don't know if anyone will be able to see any of these details once the completed gun and spotlight are in place, but there it is.
And, if they can't, you will still know that they are there. Very nice touch!

Lead me not into temptation ..................I can find it myself

  • Member since
    February 2008
  • From: Schaumburg, IL
Posted by SkullGundam on Friday, May 22, 2009 6:20 PM
Awesome CJ.  You are an inspiration.  I know life gets in the way sometimes, but I have to say I've missed seeing updates on your two Gundam kits.  They look so good, I want more.

If at first you do succeed, try to hide your astonishment.

Join the Club and Swap Books for Free! - PaperBackSwap.com

  • Member since
    December 2007
  • From: Louisville, KY.
Posted by Cosmic J on Wednesday, May 27, 2009 9:25 AM

 sumpter250 wrote:
I don't know if anyone will be able to see any of these details once the completed gun and spotlight are in place, but there it is.
And, if they can't, you will still know that they are there. Very nice touch!
 

Big Smile [:D] Thanks for understanding. If I had left them unpainted it would have made me nuts, even if no one else ever noticed. Big Smile [:D]


 SkullGundam wrote:
Awesome CJ.  You are an inspiration.  I know life gets in the way sometimes, but I have to say I've missed seeing updates on your two Gundam kits.  They look so good, I want more.

Appreciate it SG. Cool [8D] I got all my other business out of the way, and those two kits are the top of my list now. I promise more soon. Thumbs Up [tup]

  • Member since
    May 2009
Posted by Barry C Hark on Saturday, May 30, 2009 5:37 PM

That is looking Very Smart So far !

Nice use of detail and parts from other kits to get your desired look.

A lot of heavy looking Engineering going on there, and it all looks Right.

 All the Best,

Barry.

  • Member since
    December 2007
  • From: Louisville, KY.
Posted by Cosmic J on Saturday, May 30, 2009 8:44 PM

Thank you Barry. Very kind. 

I'm taking a break from applying washes as I type this, and I hope to have some images up by tonight. Then comes drybrushing, decals/transfers, Dullcote-ing, weathering... I'm almost done! Big Smile [:D]

  • Member since
    April 2008
  • From: Philadelphia PA
Posted by smeagol the vile on Saturday, May 30, 2009 9:22 PM
I so cant wait to see the finished product


  • Member since
    December 2007
  • From: Louisville, KY.
Posted by Cosmic J on Saturday, May 30, 2009 11:31 PM

LOL! It does take me a bit, don't it? I hope to get it finished in less than a month, which would be good because I'm falling behind the rest of y'all. Cool [8D]

Ok, here she is w/ the washes applied to the panel lines. It took a long time to do because this sucker is way bigger than any model I've ever done this to before, and it's got a lot of panel lines. Whew!

This is most of the bits:

Closer on the little parts:

Hull:

Cargo bed:

You can see a sheen on some of the pieces; this is because the washes aren't completely dry. Over the next couple of days (and a final layer of Dullcote) the surface will have a nice matte finish.

I assembled the engines and you can see the fans from both the top and bottom. I like it. I also painted lots of little details like the tail lights and the bare steel sections of the compression cylinders on the engines.


Next step is drybrushing, which will tone down some of the gaudiness and bring the edges of details into sharp relief.

  • Member since
    December 2003
  • From: Colorado
Posted by psstoff995 on Sunday, May 31, 2009 9:44 AM
Looking really good- the dry brushing should really make things pop!

-Chris

US Army Infantryman

  • Member since
    August 2005
  • From: vernon hills illinois
Posted by sumpter250 on Monday, June 1, 2009 11:53 AM

this sucker is way bigger than any model I've ever done this to before, and it's got a lot of panel lines. Whew!

Sounds like maybe your next build should be even bigger.....just to "push the envelope".  All the right techniques, well executed.

My "Kodiak" build has taken me into "territory" I haven't fully explored before. I hope it turns out half as well as yours. 

Lead me not into temptation ..................I can find it myself

  • Member since
    April 2008
  • From: Philadelphia PA
Posted by smeagol the vile on Monday, June 1, 2009 3:14 PM
question, does this monster have an interior?


  • Member since
    December 2003
  • From: Colorado
Posted by psstoff995 on Monday, June 1, 2009 10:38 PM

 Cosmic J wrote:

Hmm... looks like there's a lot of room, and plenty of attachment point looking thingers in there. If it doesn't I'm sure some styrene and spare parts could dress it up nice enough to open the doors. The 8th MS series has quite a few episodes that spend a good bit of time with the "camera" in there, plenty of reference at least.

Even if there's an interior "dead zone" that didn't get it's 15 minutes of fame on the series, I guess it'd be totally open to one's own interpretation. No one could tell you that ___ wasn't there anyway lol

BTW great looking paint job Cosmic!! Been following this and I enjoy the look, nice IDF future feel so far Thumbs Up [tup]

-Chris

US Army Infantryman

  • Member since
    December 2007
  • From: Louisville, KY.
Posted by Cosmic J on Tuesday, June 2, 2009 10:32 PM

 psstoff995 wrote:
Looking really good- the dry brushing should really make things pop!

Thank you. I finished DBing the main hull and engines today, still have to finish the ramp and other bits.

 sumpter250 wrote:

this sucker is way bigger than any model I've ever done this to before, and it's got a lot of panel lines. Whew!

Sounds like maybe your next build should be even bigger.....just to "push the envelope".  All the right techniques, well executed.

My "Kodiak" build has taken me into "territory" I haven't fully explored before. I hope it turns out half as well as yours. 

LOL! Yeah, I would build more big stuff if I had the space to display it. When I finish this Hovertruck, I got this guy in the stash, and he's been winking at me slyly... and he doesn't seem to have as much surface detail...:

 http://www.hlj.com/product/BAN949844


 smeagol the vile wrote:
question, does this monster have an interior?

None to speak of, but as psstoff995 points out, there is a lot of space in there.

There's a dividing wall/support structure between the front and rear compartment that seems to be in the correct position. It has a major seam running horizontally, but that could be hidden by seats and various greeblies, or just blanked off w/ styrene.

All the hatches have only rudimentary detail on their inner surfaces, but that could be spiffed up easy enough. The three hatches on the top, the front armored window covers and the cab doors can all be opened. There's even some clear pieces to represent windshields.

The big side hatch door cannot be opened without some conversion/scratchbuilding.

All the interior surfaces are marked by ejector pin marks and reverse relief indentations of the exterior details. Lots of sheet styrene would be needed to blank off these areas. Other than the driver's cab, I don't know that much else would be visible w/o major surgery.

When I first started building this, I considered taking the cab details from a Revell Fuchs (or some similar truck type vehicle), but then decided I didn't want to pay that much money to finish this kit.

I still haven't figured out where the main engine/power plant is supposed to be. Question [?]

Sooo, no interior detail worth noting, but lots of possibilities for improvement. Cool [8D]


  • Member since
    December 2007
  • From: Louisville, KY.
Posted by Cosmic J on Friday, June 5, 2009 5:01 PM

Finished drybrushing all the major and minor components, getting close to the end now. I still have some minor detail painting to get to, like power cables and such, and I'll be applying decals and dry transfers before I Dullcote the whole thing.


Comparisons of the painting process. Base paint. Post shading. Drybrushing.


  • Member since
    February 2008
  • From: Schaumburg, IL
Posted by SkullGundam on Friday, June 5, 2009 9:32 PM
Wow man, it looks amazing.  I love the fan blades from your last post.  This is why I'm scared to get a tank kit, I can't do the weathering.  Mine would look like your base coat shot.  One of these days I need to stop being scared and try.  What did you use for your wash?

If at first you do succeed, try to hide your astonishment.

Join the Club and Swap Books for Free! - PaperBackSwap.com

  • Member since
    December 2007
  • From: Louisville, KY.
Posted by Cosmic J on Saturday, June 6, 2009 11:52 PM

Thank you SG. You always have a kind word, I really appreciate it.

 Painting went like this:

1) Base Coat w/ Israeli Armor Sand

2) Shadows airbrushed by mixing the base color w/ Burnt Umber at about a 4 to 1 ratio.

3) Panel lines are darkened w/ a wash of Burnt Umber and Black, at about a 1 to 5 ratio (1 part paint, 5 parts thinner). Same was used on the engine fans.

4) Drybrushing was done w/ the base color mixed w/ White at about a 2 to 1 ratio. Fans were drybrushed w/ Steel and then Silver.

It not really hard, just time consuming. Try it out on something small, like a 1/72 or 1/48 scale tank, and you'll get the hang of it quick, I'm sure.

  • Member since
    December 2003
  • From: Colorado
Posted by psstoff995 on Sunday, June 7, 2009 12:28 AM
 Cosmic J wrote:


Try it out on something small, like a 1/72 or 1/48 scale tank, and you'll get the hang of it quick, I'm sure.


Hmm- at 1/72 the size might make it a small/quick test bed- but the parts are so tiny and any weathering/dry brushing could quickly become over done.  And any kind of chipping/scratches would be almost pointless. 1/48 might be a good bet- for a bigger sized tank. But a 1/35 scale smaller sized tank (think Panzer 1 or even a Jeep) would give you a small enough piece of armor to work on/get the build over with quick, while also giving you a bigger/more common scale test bed to practice weathering/shading/chipping techniques etc.

Just my $0.02. Weathering a 1/72 tank is different than a 1/48 is different than a 1/35 in the finer techniques. Just make sure if it’s for practice, that it’s a skill that can trasfur over. I guess dry brushing is dry brushing and a wash is a wash though..

I mean definitely don’t go 1/35 if you’re planning something like this Hell Hound- it’s huge!! Looks bigger than a King Tiger or an Abrams... That comparison shot with the Russian tank at the beginning of the thread was out of control!! lol


-Chris

US Army Infantryman

  • Member since
    December 2007
  • From: Louisville, KY.
Posted by Cosmic J on Wednesday, June 24, 2009 11:11 PM

Well, I'm calling it done, at least for now. It's not weathered yet, I'm waiting to figure out what kind of display I want to do first, so I can avoid handling it once the powders and such go on.

I finished painting the detail parts. The gun in particular has lots of little bits, including a camera/light fixture, a targeting screen and three ammunition feed belts.

I added some MV lenses for the headlights, and the top-mounted searchlight. I was afraid they might look like craft store rhinestones, but I think they came out ok.

I added Verlinden Dry transfers for markings. Not many, because most Israeli vehicles don't carry many markings.

I replaced the antenna w/ a length of .010 brass wire, painted black. I also didn't like the power cable on the seismic sensor, so I made a new one out of 1mm spring tube and wire. It hangs much better than the kit supplied cable.

After that, a final layer of Dullcote to seal it up and level out the color layers.

JOIN OUR COMMUNITY!

Our community is FREE to join. To participate you must either login or register for an account.

SEARCH FORUMS
FREE NEWSLETTER
By signing up you may also receive reader surveys and occasional special offers. We do not sell, rent or trade our email lists. View our Privacy Policy.