SEARCH FINESCALE.COM

Enter keywords or a search phrase below:

Revell Y-Wing Finished Pg.2

6163 views
32 replies
1 rating 2 rating 3 rating 4 rating 5 rating
  • Member since
    May 2005
  • From: Dublin Rep Of Ireland
Revell Y-Wing Finished Pg.2
Posted by terry35 on Saturday, January 3, 2009 4:19 PM

Well now, this is being done for the starwars GB, over in Group Builds.

IT not an overly expensive kit, Graham/bobafett got one for $8. They are about 20 euros over here, don't ask what the euro is in real money.

Any hoo lets see pic's.

The good old bagged sprues, had to prove it was still baged on new years eve.Smile [:)]

out of the bags.

The fuselage.

Some pipes etc. painted in. at this stage I had also very lightly drybrushed some very light greys over the entire model with the exception of the nose/cockpit area.

This may frighten some people but I mixed up some Burnt Umber and raw Umber oil paint and liberally covered the model with it, and left it to set in for a few hours.Whistling [:-^] Don't come crying to me if you try this and it doesn't work, Its one technique I do not promote in any way.
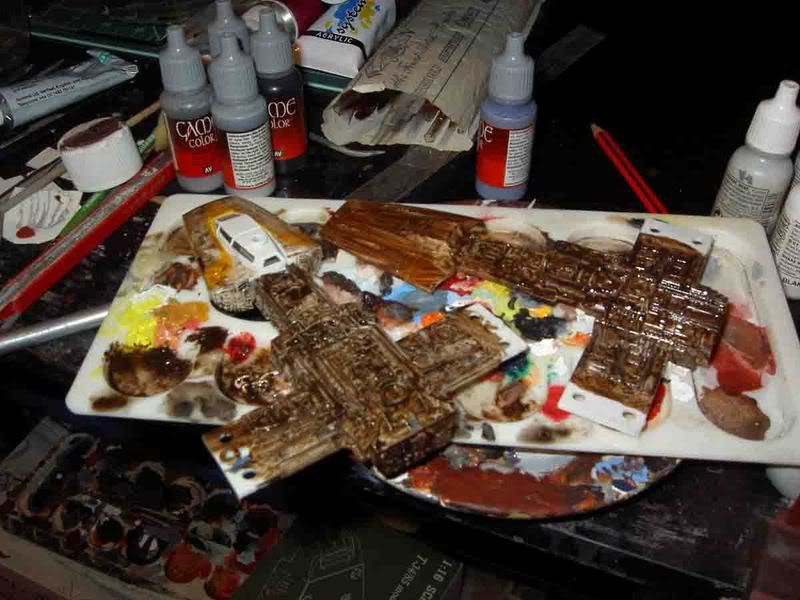
With an old soft cloth dampened in thinner I then wiped off theh entire model, very smelly procedure, at least have a window open or do it outside, it really stinks.

Your left with this.

I did reapply some of the mix for the cockpit panels.

Heres whats done so far, hope you like it, I will post pretty regular with updates as work progresses.

Thanks for looking, all comments welcome.

Terry.

  • Member since
    February 2007
  • From: Casa Grande, Az.
Posted by DesertRat on Saturday, January 3, 2009 8:00 PM
While I'm not even going to attempt the sludge wash you did, she certainly came out looking awesome! Very well done, Terry! Cool [8D]WHich kit was this?

Warmest regards,

Roger

  • Member since
    May 2005
  • From: Dublin Rep Of Ireland
Posted by terry35 on Saturday, January 3, 2009 8:42 PM

Thank You for the kind words, its the Revell Snap kit. I know the originals Falcon, Darths Tie, X-wing were only released in europe, with Graham getting one I presume the second batch were released in thte U.S. as well.

Its bigger than the AMT snap kit from like a million years ago, and stands up well against pic's of the original on Starship modeller.

See Here.....

http://www.starshipmodeler.com/starwars/starwars_ships.htm

Terry.

  • Member since
    May 2008
  • From: Wherever the hunt takes me
Posted by Boba Fett on Saturday, January 3, 2009 10:30 PM
Nice! Even though this is in the GB, you added more WIP pics here. I weathered mine with a thinned acryl black wash. Looks good man!

  • Member since
    May 2005
  • From: Dublin Rep Of Ireland
Posted by terry35 on Saturday, January 3, 2009 10:47 PM

Its 4.30am, I'm, going over to GB's now to look for your Y-wing. Graham I will add to the Gb's posts as work progresses. the photos are crappy at the moment but I had the camera setup different.

Terry.

dmk
  • Member since
    September 2008
  • From: North Carolina, USA
Posted by dmk on Sunday, January 4, 2009 8:24 AM

 terry35 wrote:
This may frighten some people but I mixed up some Burnt Umber and raw Umber oil paint and liberally covered the model with it, and left it to set in for a few hours.Whistling [:-^] Don't come crying to me if you try this and it doesn't work, Its one technique I do not promote in any way.

 Did you thin this paint, or just apply it like it came straight out of the tube? 

  • Member since
    May 2005
  • From: Dublin Rep Of Ireland
Posted by terry35 on Sunday, January 4, 2009 7:04 PM

Plop it on as a paste and spread it with a damp brush, eeek.

Wouldn't dare do it on an expensive kit.

Terry.

dmk
  • Member since
    September 2008
  • From: North Carolina, USA
Posted by dmk on Sunday, January 4, 2009 7:26 PM

 terry35 wrote:
Wouldn't dare do it on an expensive kit.

It came out pretty nice.  

  • Member since
    May 2005
  • From: Dublin Rep Of Ireland
Posted by terry35 on Sunday, January 4, 2009 7:32 PM

Thanks, still banging away at it. hope to finish  with about two hours work, absolutely no more time on this.

Good luck with X-Wing.

Terry

  • Member since
    January 2006
  • From: Baton Rouge, Snake Central
Posted by PatlaborUnit1 on Monday, January 5, 2009 9:31 AM

i did the overall mix like you did with my old MFalcon. Then i took a one inch wide art brush and lightly swept the model to wipe off even more of the paint, and feather the edges.

that gave it a great look that I was going for...deeply encrusted dirt and grime.

I havent started the GB yet...

Build to please yourself, and don't worry about what others think! TI 4019 Jolly Roger Squadron, 501st Legion
  • Member since
    May 2005
  • From: Dublin Rep Of Ireland
Posted by terry35 on Monday, January 5, 2009 4:18 PM

Just an update before finishing, I'm calling the washes finished but need to finish with chalks.

Saturday night before final wash (Blues, browns and reds)

Close up.

Cockpit area done, needs a small aomunt of scorching.

Top, just for fun

Port engine

Scorching up close.

Front

Bottom, needs scorching at torpedo launchers.

Bottom of engine, you can barely make out the red washes.

Scorching at front engine cap

What the Tie fighter pilot seen.............. Bang...bang.... KAPOOOOOOOOOOAngel [angel]

Front again.

Thanks for looking, all comments welcome.

Regards,

Terry.

dmk
  • Member since
    September 2008
  • From: North Carolina, USA
Posted by dmk on Monday, January 5, 2009 7:45 PM

That looks great Terry. The cab is really beat up. Very cool. I love the scorching on the engines too.


 How did you do all the paint chipping? Was that painted on over the top?  It looks very good. 

  • Member since
    February 2003
  • From: USA
Posted by fussionboy on Tuesday, January 6, 2009 9:36 PM

That looks awsome!!!!    I think I know what I'm goin to buy with my lhs gift card(LOL)

the wash and wear look incredible, you hit the look of a rebel fighter right on!!!

  • Member since
    May 2008
  • From: Wherever the hunt takes me
Posted by Boba Fett on Wednesday, January 7, 2009 11:58 AM
 fussionboy wrote:

That looks awsome!!!!    I think I know what I'm goin to buy with my lhs gift card(LOL)

the wash and wear look incredible, you hit the look of a rebel fighter right on!!!

If so, come to Group builds and go to the Star Wars GB! (shameless, I know...Wink [;)])

  • Member since
    January 2006
  • From: Baton Rouge, Snake Central
Posted by PatlaborUnit1 on Wednesday, January 7, 2009 12:25 PM
 terry35 wrote:

What the Tie fighter pilot seen.............. Bang...bang.... KAPOOOOOOOOOOAngel [angel]


hehe....that's MY view from the cockpit! ;-)

 Its really coming togehter now. that blue has tied the drudgery of the filth together with the grey and the reds and yellows balance it out. Wha is your preferred method for the scorching?

excellent---adn quick--work!

Build to please yourself, and don't worry about what others think! TI 4019 Jolly Roger Squadron, 501st Legion
  • Member since
    May 2005
  • From: Dublin Rep Of Ireland
Posted by terry35 on Wednesday, January 7, 2009 2:43 PM

Thanks very much for the kind words guys, Graham yours is comming along great, seen it in the GB thread.

To answer questions, the chipping was done by painting each chip seperately, yes you read correctly seperatly. Small brush and thinned acrylics.

The scorching was done with Tamiya weathering pigments, I should say that I m no fan of these, my opinion is that they are overly expensive and for the most part useless. If nobody has seen these, they come in a box like womens makeup, including a little brush and applicator.

THanks again for the kind words, I have finished working on the kit and hope to post final pic's at the weekend, I go out on thursdays and fridays so it will be saturday.

Terry.

  • Member since
    February 2003
  • From: USA
Posted by fussionboy on Saturday, January 10, 2009 10:53 AM
I did it, I bought the new revell y-wing,just could not hold out any longer. I have been looking at this kit at the new lhssince it opened,I hadbought the republic stardestroyer,but now after seeingthe in work picsand finalon the awsome Y-wing on this page I hadtoposses it!!!! LOL
  • Member since
    July 2008
  • From: PBG, FL
Posted by John31388 on Saturday, January 10, 2009 11:25 AM

wow great work

  • Member since
    February 2007
  • From: Casa Grande, Az.
Posted by DesertRat on Saturday, January 10, 2009 1:20 PM

That is outsanding work, Terry! I can't even describe how realistic she looks!

My opinion? You really need to send these pictures to the editor at FSM! I think they would print those in a heartbeat! Bow [bow]

Warmest regards,

Roger

  • Member since
    May 2005
  • From: Dublin Rep Of Ireland
Posted by terry35 on Saturday, January 10, 2009 2:49 PM

THanks for that, I'm not really into writing articles and stuff, but I might get better photos and submit to the readers gallery or what ever its called.

Terry.

  • Member since
    May 2005
  • From: Dublin Rep Of Ireland
Posted by terry35 on Wednesday, January 14, 2009 3:31 PM

Just sorted out the scorching.

Thanks for looking.

Terry.

  • Member since
    May 2008
  • From: Wherever the hunt takes me
Posted by Boba Fett on Wednesday, January 14, 2009 3:40 PM
WOW!!!!! That looks awesome!!! Bow [bow]

  • Member since
    May 2005
  • From: Dublin Rep Of Ireland
Posted by terry35 on Wednesday, January 14, 2009 5:21 PM

Thanks Graham, I calling it finished, time to move on, I'm going to do a bit of armour now.

Terry.

  • Member since
    May 2008
  • From: Wherever the hunt takes me
Posted by Boba Fett on Wednesday, January 14, 2009 5:29 PM
Alright. Put the finished pics on the GB and I'll update page 1 for you!

  • Member since
    May 2005
  • From: Dublin Rep Of Ireland
Posted by terry35 on Wednesday, January 14, 2009 6:12 PM
Rightey O.

  • Member since
    December 2008
  • From: Las Vegas, Nevada
Posted by model maniac 96 on Saturday, February 14, 2009 1:34 PM

NiceThumbs Up [tup]


     Thanks, Jim


"Veni, Vidi, Vici" Julius Caesar: I came, I saw, I conquered.
  • Member since
    April 2008
  • From: Philadelphia PA
Posted by smeagol the vile on Sunday, February 15, 2009 12:52 AM
Heads up, I hope the Ion cannon spins, cause its facing backward.


  • Member since
    April 2008
  • From: Charlottesville Va
Posted by Stern0 on Sunday, February 15, 2009 8:24 AM
terry, I don't build much sci-fi, but i'm a big Star Wars fan...(Ive built X-wing, Jedi fighter, and speeder bike) Your Y-wing is right on the money!!! Fantastic weathering!....BTW the cannon on top is a manned position and rotates 360 deg. to cover the six,right? Agian, great job on capturing the battle weary equipment! Thumbs Up [tup]
Always Faithful U.S.M.C
  • Member since
    April 2008
  • From: Philadelphia PA
Posted by smeagol the vile on Sunday, February 15, 2009 1:10 PM
Ion cannon does turn, for the rear gunner, but no reason why it would be facing backward if its in a landed position.


  • Member since
    May 2005
  • From: Dublin Rep Of Ireland
Posted by terry35 on Monday, February 16, 2009 7:26 AM

smeagol its glued in backward, Its not landed but I'm thinking of a small Dio with a death star trench section just for display, thanks for the heads up.

Terry.

JOIN OUR COMMUNITY!

Our community is FREE to join. To participate you must either login or register for an account.

SEARCH FORUMS
FREE NEWSLETTER
By signing up you may also receive reader surveys and occasional special offers. We do not sell, rent or trade our email lists. View our Privacy Policy.