SEARCH FINESCALE.COM

Enter keywords or a search phrase below:

Battletech Black Lanner kit by Elfbait - Final Project Photos at bottom of page 1

6143 views
15 replies
1 rating 2 rating 3 rating 4 rating 5 rating
  • Member since
    October 2010
Battletech Black Lanner kit by Elfbait - Final Project Photos at bottom of page 1
Posted by Warmuncher on Tuesday, February 25, 2014 7:00 PM
It's been a while since I've posted anything on these forums. Over the last month I've been working on a special project for a friend of mine. I resin cast of a model sculpted by my good friend Elfbate. You can find more information about him on Facebook here: https://www.facebook.com/snotandanvil. If you are interested in custom sculpted battletech figures definitely check out some of the stuff Elfbate is working one. I received this small resin kit at the beginning of February. It is a rather plain kit as far as 15mm war gaming giant tiny robots go. So instead of just building her and putting her on a base I chose to go super stupid ambitious. I also took a crud load of photos of the build process. So instead of just posting the final results I'm going to post some build in progress photos before posting the final piece. 1) The original model I received was pretty much the worst of the lot. I had to chop off a few details because of bubbles in the resin.  2) Next I broke her up into as many pieces as I could without ruining the model. The theme of my vision is "explosive" so I need a flexible design that can support that theme. There are also pieces of this kit that were simply ruined by the casting process. For example, I had to chop off the missiles and the TAG system. The bubbles in the mold made these parts impossible to work with. As you will see later in the build I used these issues as opportunities for improvement over the base design.  3) And finally the candidate pose of the Elfbate Black Lanner  Tomorrow more mods and preview of something extra special to show that this isn't just another mech for the gaming table.

You can find me on Photobucket under Warmuncher

Proud Member of Southern Maine Scale Modelers, IPMS

  • Member since
    October 2010
Posted by Warmuncher on Wednesday, February 26, 2014 11:43 AM

You can find me on Photobucket under Warmuncher

Proud Member of Southern Maine Scale Modelers, IPMS

  • Member since
    January 2005
  • From: Cave City, KY
Posted by Watchmann on Wednesday, February 26, 2014 6:19 PM

Looks good, muncher!

  • Member since
    October 2010
Posted by Warmuncher on Thursday, February 27, 2014 5:59 PM
I mentioned earlier that this project had a vision and the theme is "Explosive". As such I can't simply strike a pose and cover it with photo etch and call her done. I need a base to build upon. The base is an attempt at forced perspective. Hence the unusual shape. This is what I started with. 1) The base is made out of sculpy and large metal wire which is used to stabilize the platform. I don't have the photo of the underside to show off the wires.   2) The wire on top of the base is the framework for the scene.  3) And finally the framework is skinned with light weight hydrocal and plaster cloth. The rocks are formed from light weight hydrocal and shaped via rock mold. This is not the final placement of rocks and material. It is just a test fit to see how things look.  4) And finally, how is that mech coming along? It looks like she has her first base coat and is masked for another session with the airbrush.

You can find me on Photobucket under Warmuncher

Proud Member of Southern Maine Scale Modelers, IPMS

  • Member since
    October 2010
Posted by Warmuncher on Friday, February 28, 2014 7:48 PM

Up today is both a painting update for the Elfbait Black Lanner and an update on base construction. Unfortunately I didn't take as many photos during the build process as I should have so after this point things are going to move along fast. I got a bit too involved in the work and lost sight of recording the reference photos.

First up the Black Lanner. After the Base coat and the first mask ended up with this. I was going for a German-esk style cammo scheme. I also saw a Clan Hell's Horses regiment in these colors with a similar paint camo scheme on CamoSpecs and decided to give it a shot. The mech will be marked as a Hell's Horses mech however the Camo Spec won't be on target. In all honestly I don't really care. A combat unit will dress their units in whatever they need at the time and put on dress colors for the parades. This gal is fighting for her life so she needs every advantage she can get.

1) The first mask pass:

2) After the second color dried I pulled the mask and added a second mask for the third color in my camo pattern. Wait, where did the Black Lanner go! The camo must be working already.

3) The third color dried and I pulled the mask. One thing to note. If you are going to use a heat gun to dry quicken dry time between coats be really careful with your mask. You could melt it to your model. I don't have any major issues to report other than a few sticky gotcha's that I was able to resolve quickly.

And finally I colored in the cockpit with a neutral color so I could separate the camo from the windows. You have probably noticed by now that most of the photo etch has vanished. Don't worry. It will return later on in the finishing stages of the project.

While I let this sit on my work bench for a few days I turned my attention to the base. And this is where I learned my lesson with technology. A tablet with a pen and a graphics arts program is an excellent lab to work out details for a finished product. The images I am about to share were mocked up on a tablet before I went hog wild with construction and layering on my detail.

1) The base with a tree grown from my own sweat. :)

Front:

Back:

She looks like total stupid cat puckish trash now but just wait. She's going to get much worse before she gets better. Those photos tomorrow sometime. Until then enjoy.

You can find me on Photobucket under Warmuncher

Proud Member of Southern Maine Scale Modelers, IPMS

  • Member since
    January 2005
  • From: Cave City, KY
Posted by Watchmann on Friday, February 28, 2014 8:29 PM

Yes

  • Member since
    October 2010
Posted by Warmuncher on Sunday, March 2, 2014 9:20 AM

Today is the day that I fast forward about a week and a half to the end states of the project. I got so wrapped up in the details that I simply let the picture taking fall by the wayside. Sorry about that. The good news is that you have to watch me drone on for too much longer.

So, this is where the Black Lanner meets her permanent home. Keep in mind that even though model and base looked finished it isn't. Things are too shiny, there is little to no weathering, parts of the project are also in various states of drying and curing.

If you scroll up to my second post you will see a photo of Golden's Acrylic Gel, a blue LED, and some other products. Well, this is where those other products and more become important.

1) Here is the before and after photo of the Base and then the base with the Black Lanner attached. I just happened to capture to images from the same perspective:

2) As you can see the results are quite dramatic. But what's up with the stupid ballerina split? Well, the theme of the project is "Explosive." Out of control and off balance is part of that theme. It may not be apparent yet but this lady is charging full speed across uneven ground in the middle of a fire fight. Well, more on that later. You will also notice that the water is a wonderful baby blue. Don't worry about that bit.

3) Finally, what's up with the blue light. The blue light is a chip LED. Most of the models I build these days have LEDs integrated with them in some way. I've never done a mech with LEDs so I decided to give it a go. I thought wouldn't it be grand if this mech could be firing off a PPC bolt at an enemy mech off screen. This is the step that could have ruined the whole model and forced me to build a new gun arm from scratch. Thankfully it didn't come to that.

The PPC is not a hollow object. It is a solid object that I chose to hollow all the way down to the join that connects her to the mech. I spent hours hand turning gradually larger drill bits until I made the walls as thin as I could without compromising the integrity of the piece. This is a very delegate piece. Finding a chip LED the right size also proved a challenge. I did find one a from Evan Designs that was the right size and already pre-wired for a 3 volt power source. When I got the chip I found that I had to file down the corners of the chip so that I could fit the square chip in a round hole. Below are the results of my efforts.

4) And finally, I wired the tree with two flickering Orange LEDs and one solid orange LED. I enhanced this photo a little bit so you can see what's going on.

The last batch of photos I have are of the finished project.

You can find me on Photobucket under Warmuncher

Proud Member of Southern Maine Scale Modelers, IPMS

  • Member since
    November 2009
  • From: SW Virginia
Posted by Gamera on Monday, March 3, 2014 11:38 AM

Very cool! Please keep us posted!

I like the action pose, more interesting than having the model posed just standing there. Looking forward to seeing how the LEDs look in place and lit up.

"I dream in fire but work in clay." -Arthur Machen


  • Member since
    October 2010
Posted by Warmuncher on Monday, March 3, 2014 5:22 PM

Good afternoon,

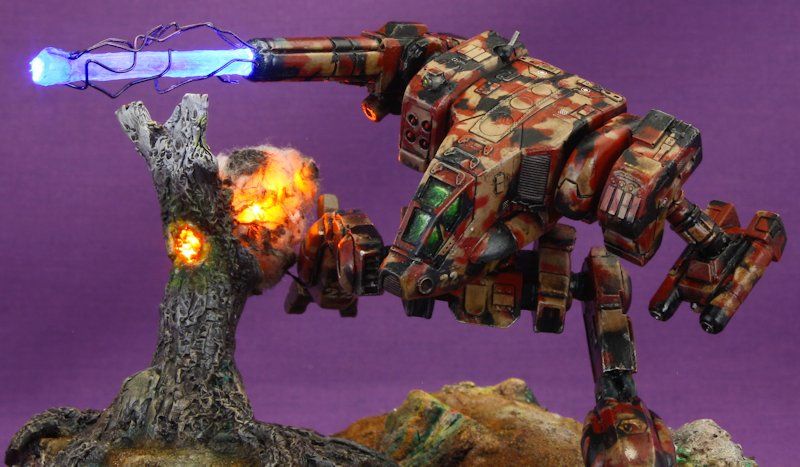
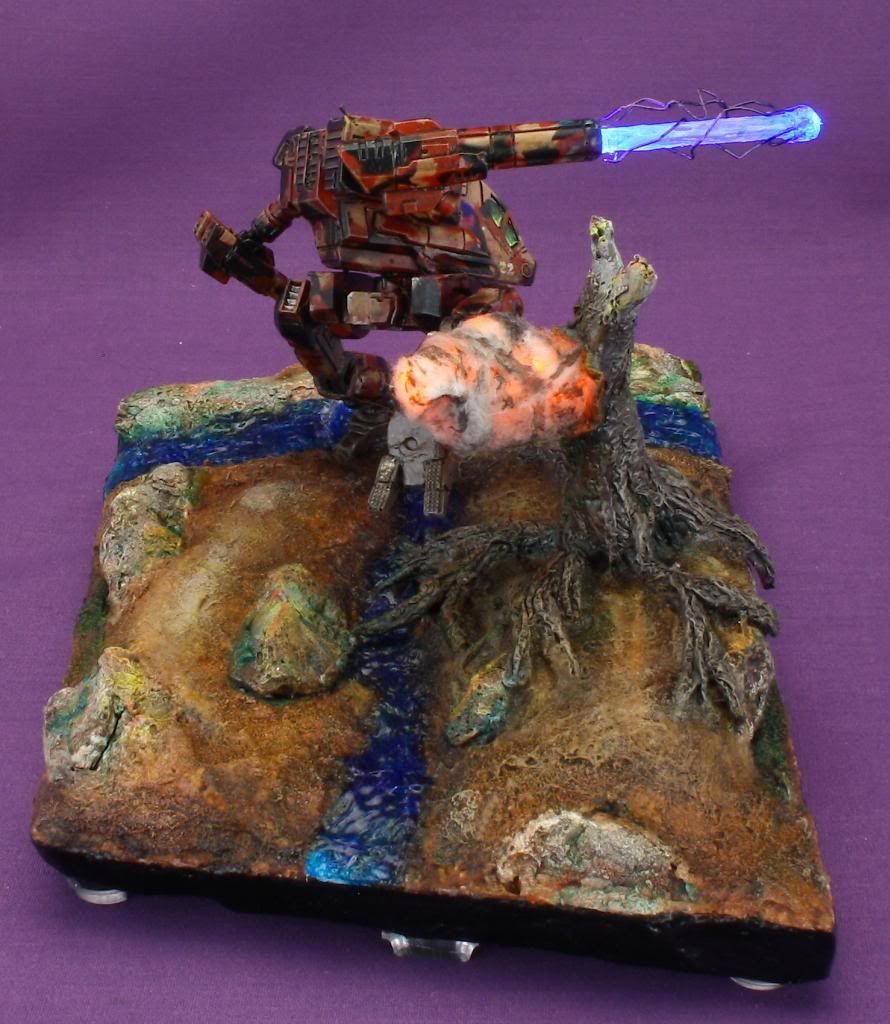
I present to you the hyper-active Black Lanner combat scene.  What's going on here?  The Black Lanner pilot is crashing through the country side, off balance, and trying to shoot back at an assailant that is off stage.  The tree next to the Black Lanner takes a hit just missing the mech.  The blast way catches the back foot and adds to the overall stress of the machine. I would say this pilot is forcing his machine to the edges of its tolerances.   I would be surprised if the Black Lanner doesn't do a face plant soon.  The PPC is lit with a Blue LED chip.  The tree explosion is done with two flickering orange LEDs, a 2mm orange straw hat LED, and some cotton.  The PPC is made up of a side glow LED, black floral wire dry brushed with violet interference paint, and some clear acrylic gel to break up the perfect LED cylinder shape.  Both are very bright however they got a bit washed out in the photo booth.

Anyway, I hope you all enjoy these photos.  This kit took me about 80 hours from beginning to end to complete.  I put a lot of care into this kit and I think my efforts paid off with a wonderful display piece that I think any MechWarrior fan would enjoy to have.

You can find me on Photobucket under Warmuncher

Proud Member of Southern Maine Scale Modelers, IPMS

  • Member since
    August 2007
  • From: back country of SO-CAL, at the birth place of Naval Aviation
Posted by DUSTER on Monday, March 3, 2014 5:44 PM

Congratulations, very impressive  

You have taken this to a new level

Steve

Building the perfect model---just not quite yet  Confused

  • Member since
    January 2005
  • From: Cave City, KY
Posted by Watchmann on Monday, March 3, 2014 5:49 PM

Very cool, muncher!

  • Member since
    August 2005
  • From: Glenolden, PA
Posted by highlanderburial on Thursday, March 6, 2014 12:40 PM

LOVE B-Tech kits! Great job man!!!

Imagine a witty signature right .....here....

  • Member since
    October 2010
Posted by Warmuncher on Thursday, March 6, 2014 4:49 PM

So a friend of mine challenged me to take some low light photos of this kit. I changed out the batteries and turned the lights off. This is what I got. The first photo is a normal camera setting. The next two are with long exposures.

And a side shot. I couldn't do a shot head one because the fiber optic in the PPC overwhelmed the camera.

Thanks for the comments everyone.

You can find me on Photobucket under Warmuncher

Proud Member of Southern Maine Scale Modelers, IPMS

  • Member since
    April 2010
  • From: San Diego, CA, USA
Posted by Gerry on Thursday, March 6, 2014 5:00 PM

Object d'art

Gerry ...Young at Heart - Other parts slightly older.

  • Member since
    January 2006
  • From: NW Washington
Posted by dirkpitt77 on Friday, March 7, 2014 3:59 PM

That is DAMNED impressive. I salute you, sir.

    "Some say the alien didn't die in the crash.  It survived and drank whiskey and played poker with the locals 'til the Texas Rangers caught wind of it and shot it dead."

  • Member since
    November 2009
  • From: SW Virginia
Posted by Gamera on Monday, March 10, 2014 8:01 AM

That looks friggin' awesome!!! I love those 'night' shots!

"I dream in fire but work in clay." -Arthur Machen


JOIN OUR COMMUNITY!

Our community is FREE to join. To participate you must either login or register for an account.

SEARCH FORUMS
FREE NEWSLETTER
By signing up you may also receive reader surveys and occasional special offers. We do not sell, rent or trade our email lists. View our Privacy Policy.