SEARCH FINESCALE.COM

Enter keywords or a search phrase below:

Ma.K. Raccoon S.A.F.S. Type R

8543 views
77 replies
1 rating 2 rating 3 rating 4 rating 5 rating
  • Member since
    February 2022
Posted by SplatterMan on Thursday, June 16, 2022 8:58 AM

That's looking good. I like the subtle colour difference between the lid rim seals and the leather pilot padding. I agree that he looks a bit... disturbed.

I just got a few model color and model air paints to try out. I've been using tamiya acrylics with retarder to do brush painting to this point and it's less than optimal. I like the model color. I haven't tried the model air yet...


  • Member since
    October 2021
Posted by PhoenixG on Thursday, June 16, 2022 3:18 PM

Thanks, SplatterMan.

The base grey was airbrushed on with Vallejo Mecha Color Z Grey.  First time using that line, so far pretty happy with it.  Bought a few different bottles of Mecha Color as it was the only way to get a couple of colors I was looking for.  I recently started using Model Air and enjoy the convenience of it.  It's ready to airbrush right out of the bottle.  Though I add a few drops of Flow Improver to minimize dry tip.

Other than what I called out on the hatch, everything else was brush painted with Model Color.  I've enjoyed working with those paints.  Bakster posted a topic on brush painting in the painting forum that several members contributed really good info to.  I added a rather lengthy treatise on using Vallejo Model Color to it.  It's a great read if you're having a hard time falling asleep one night. :)

On the Bench:

Bandai 1/72 Defender Destroid

  • Member since
    July 2014
  • From: Franklin Wi
Posted by Bakster on Thursday, June 16, 2022 6:50 PM

Hi Phoenix... cool project. I sure wish the subscribe feature worked. I must remember to check in on this.

Looking good!

  • Member since
    October 2021
Posted by PhoenixG on Thursday, June 16, 2022 9:53 PM

Thanks Bakster!

This one is moving in fits and starts but has been great fun.  Lots of learning about this line of models as well as new modeling tips and tricks.  But still working on how not to paint creepy looking heads.  Big Smile

I've had challenges off and on with both subscribing and or posting.  It seems pretty random.   Most recently the forum has been having fun giving me "403 Forbidden" errors when I try to post a reply. I've taken to writing aything more than a sentence in a word document because of the number of times that error wiped out my stuff.

Keep up the great work on the Nautilus!


On the Bench:

Bandai 1/72 Defender Destroid

  • Member since
    July 2014
  • From: Franklin Wi
Posted by Bakster on Friday, June 17, 2022 9:52 AM

PhoenixG
This one is moving in fits and starts but has been great fun.

I know that feeling. I noticed in the painting section you having an AB issue. Been there, done that too!

PhoenixG
've had challenges off and on with both subscribing and or posting.  It seems pretty random.   Most recently the forum has been having fun giving me "403 Forbidden" errors when I try to post a reply. I've taken to writing aything more than a sentence in a word document because of the number of times that error wiped out my stuff.

Yeah, I do the same. I have been burned more than once when creating a long post, and the thing dumps when I hit the submit button. Ugh! Maddening. Now... I make sure to copy the entire thread into Word before hitting the one-armed bandit button--the  Submit button. Doing so saved my tail more than once. Sure wish they'd fix this site. 

PhoenixG
Keep up the great work on the Nautilus!

Thanks my friend. I hope to work on it this weekend. Life keeps getting in the way. And you too! Keep up the good work! I am following...


  • Member since
    July 2014
  • From: Franklin Wi
Posted by Bakster on Friday, June 17, 2022 10:01 AM


PhoenixG
The head is still a WIP.  I find his current look a little unnerving...

PS: I think this looks awesome. Beautifully painted! 

  • Member since
    September 2006
  • From: Bethlehem PA
Posted by the Baron on Friday, June 17, 2022 1:03 PM

Yeah, the expressions on some of the figures are interesting.  Especially on some of the Strahl pilot heads-they have a s**t-eatin' grin.  The grin of a side that thinks it's winning the war.  But they all paint up really well.

The bigger the government, the smaller the citizen.


  • Member since
    May 2011
  • From: Honolulu, Hawaii
Posted by Real G on Friday, June 17, 2022 3:27 PM

Hey... that guy is watching cat videos on his monitor!!!  Stick out tongue

Baron, I have a set of resin Strahl crew busts where one looks like he ate all the other guys' candy!  The candy-less guy looks like he's shouting mad!

“Ya ya ya, unicorn papoi!”

  • Member since
    October 2021
Posted by PhoenixG on Saturday, June 18, 2022 5:57 PM

the Baron

Yeah, the expressions on some of the figures are interesting.  Especially on some of the Strahl pilot heads-they have a s**t-eatin' grin.  The grin of a side that thinks it's winning the war.  But they all paint up really well.


There were two heads to chose from in the kit.  I went with the grinning pilot because it was different from the box art and therefore didn't have an easy reference at hand.  Don't understand the reason for the grin but I like how it lightens the mood of the piece.
Interesting the Strahl tend to be cast with big grins.  If what I read was accurate the Mercenary army did a pretty darn good job of kicking their a**. At least initially.
 
I'm enjoying the 1/20th scale.  It's large enough to render more molded detail and easier to handle for painting.
 

On the Bench:

Bandai 1/72 Defender Destroid

  • Member since
    October 2021
Posted by PhoenixG on Saturday, June 18, 2022 6:12 PM

Real G
Hey... that guy is watching cat videos on his monitor!!!

ROFL!!  The mystery of why he's grinning has been solved!  Big Smile

I'm going to do my best to make this happen!  Hmm, which still image to use.  The classic "hang in there" or perhaps kitten with a ball of yarn? 

Real G
I have a set of resin Strahl crew busts where one looks like he ate all the other guys' candy! The candy-less guy looks like he's shouting mad!

Big Smile That's some great imagery there! 


On the Bench:

Bandai 1/72 Defender Destroid

  • Member since
    October 2021
Posted by PhoenixG on Sunday, June 19, 2022 9:44 PM

Been conduciting lresearch on figuring painting as I wanted to improve the face.   Added some highlights to the upper half of the face.

highlighter

Snapped a shot of the palette to show how I mixed the colors.   Drug a llittle of the base flesh tone out and then mixed touches of scarlett, white, or brown to get the various hues and shades.palette

Final touch was drybrushing a little scarlet to the nose and cheeks.  Happier with the results. It's amazing how adding eyebrows change things.  Smile

rosycheeks

Needed to put him down for a moment so stuck him in silly putty that was handy. Seeing it like this made me think of Odo from DS9. :)

odo

The water based putty arrived the other week and finally got around to applying it. 

puttying

Much easier to work with than solvent based.  Priming will reveal how well it was done.

Sanding the polycaps didn't entirely solve the paint adhesion problem but worked well enough.  The joints are supposed to be a lighter shade than the body.

joints

On the Bench:

Bandai 1/72 Defender Destroid

  • Member since
    September 2006
  • From: Bethlehem PA
Posted by the Baron on Tuesday, June 21, 2022 9:58 AM

Well done on the pilot's face, PG!  Have you painted figures before, or is this your first?

The bigger the government, the smaller the citizen.


  • Member since
    July 2014
  • From: Franklin Wi
Posted by Bakster on Tuesday, June 21, 2022 12:05 PM

the Baron
Well done on the pilot's face, PG! 

Ditto. It looks good!

  • Member since
    October 2021
Posted by PhoenixG on Tuesday, June 21, 2022 3:21 PM

the Baron

Well done on the pilot's face, PG!  Have you painted figures before, or is this your first?


Technically I have painted figures before.  I've done a couple vaguely humanoid sci-fi miniatures.  Greater artistic license allowed when dealing with fictional creatures.  However, this was my first human face.
 
Basic techniques are the same but how you apply them and the details to be picked out are very different.  The Figures forum has been a treasure of info, and I've been going through my modeling reference books looking for methods and techniques.  I do have one advantage not found in books.  My daughter is an art major.  Smile
 
She regularly gives me advice on color theory and harmony.  She's also the one who told me I should add a subtle hint of red to the cheeks.  Apparently it's a pretty common thing artists do to make drawings/paintings of people more realisitc.  Didn't believe it till I saw the results.  Something about the transluecency of our skin that when lit reveals some of the color of the blood flowing beneath it.

On the Bench:

Bandai 1/72 Defender Destroid

  • Member since
    October 2021
Posted by PhoenixG on Tuesday, June 21, 2022 3:27 PM

Bakster
Ditto. It looks good!

Thanks Bakster! 

It's been relegated to the 'do no touch' area of the bench.  I've got a bad habit of continuing to fiddle with a piece to make it better, only to watch the previous successes melt away (figuratively and literally) because I couldn't leave well enough alone.

Hence the designated "do not touch" area of my bench.  :)

On the Bench:

Bandai 1/72 Defender Destroid

  • Member since
    October 2021
Posted by PhoenixG on Tuesday, June 21, 2022 3:40 PM

Real G
Hey... that guy is watching cat videos on his monitor!!!

First test prints of cat videos!
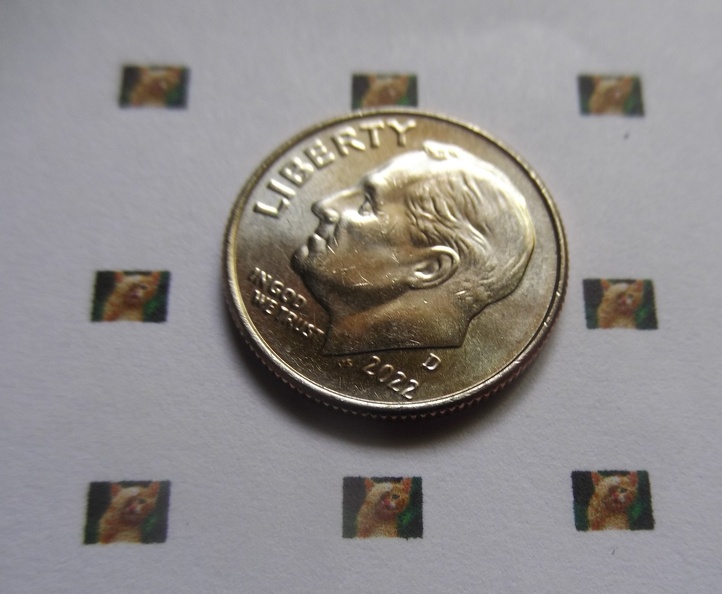
kitty

Images are .145" across.  You can almost make it out with naked eye. Interesting bit of trivia.  Most printers have a resolution of 4000 dots per inch (DPI) or better. Meaning if you have good enough paper you could accurately print an entire 4k screen in 1" of paper.  Surprise 

The cat pictures above have a resolution of about 360K pixels each.  it started as a 1.4 megapixel (1600x900) image that I resized using Photoshop Elements.  It had to be reduced to 600x600 pixels in order to fit the resolution of my printer.  Hopefully the decal paper will take the ink better than plain paper.

On the Bench:

Bandai 1/72 Defender Destroid

  • Member since
    July 2014
  • From: Franklin Wi
Posted by Bakster on Tuesday, June 21, 2022 5:44 PM

PhoenixG


Real G
Hey... that guy is watching cat videos on his monitor!!!


First test prints of cat videos!

kitty

Images are .145" across.  You can almost make it out with naked eye. Interesting bit of trivia.  Most printers have a resolution of 4000 dots per inch (DPI) or better. Meaning if you have good enough paper you could accurately print an entire 4k screen in 1" of paper.  Surprise 

The cat pictures above have a resolution of about 360K pixels each.  it started as a 1.4 megapixel (1600x900) image that I resized using Photoshop Elements.  It had to be reduced to 600x600 pixels in order to fit the resolution of my printer.  Hopefully the decal paper will take the ink better than plain paper.


Lol.  Wow, that is cool! Nice job reducing the images.

  • Member since
    July 2014
  • From: Franklin Wi
Posted by Bakster on Tuesday, June 21, 2022 5:47 PM


Hence the designated "do not touch" area of my bench.  :)


That is a good policy. Better to quit while ahead then to see it all go sideways! I follow the same policy!

  • Member since
    November 2009
  • From: SW Virginia
Posted by Gamera on Tuesday, June 21, 2022 8:00 PM

Great job on the face Phoenix, hard to believe you're new to this! 

And I love the cat video idea and your implimentation of it! 

"I dream in fire but work in clay." -Arthur Machen


  • Member since
    October 2021
Posted by PhoenixG on Thursday, June 23, 2022 12:10 AM

Gamera

Great job on the face Phoenix, hard to believe you're new to this! 

And I love the cat video idea and your implimentation of it! 


Thanks Gamera!
Printed the decals today and they are drying.  I'm excited to see how it turns out!

On the Bench:

Bandai 1/72 Defender Destroid

  • Member since
    October 2021
Posted by PhoenixG on Thursday, June 23, 2022 12:19 AM

Apparently black goes with everything but black.

pose1

pose2

Turns out there can be such a thing as too much black.  The shoulders are grey because they were in the "do not touch" section which was serindipitous.  It inspired me to try this as a two tones suit.  The second color is going to use the same dark grey as the joints but not a heavy coat. Just enough to show it is a different color.

Thinking it will work best on things like the knee, shoulder, and hip pads.  Hoping to get that done tonight so another test fit can be done tomorrow.  Fingers crossed...

On the Bench:

Bandai 1/72 Defender Destroid

  • Member since
    September 2006
  • From: Bethlehem PA
Posted by the Baron on Thursday, June 23, 2022 11:24 AM

May I ask, what's your purpose for the black primer/undercoat?

I use a matte black enamel primer on my MaKs as the first step in a weathering process.  Black enamel primer, then water-based acrylics over it for finish colors.  Then I use a green scouring pad to scuff the finish colors to reveal the black undercoat, to show wear and tear.

Is your undercoat to impart the tone to the finish coats over it?

The bigger the government, the smaller the citizen.


  • Member since
    October 2021
Posted by PhoenixG on Thursday, June 23, 2022 3:14 PM

the Baron

May I ask, what's your purpose for the black primer/undercoat?

I use a matte black enamel primer on my MaKs as the first step in a weathering process.  Black enamel primer, then water-based acrylics over it for finish colors.  Then I use a green scouring pad to scuff the finish colors to reveal the black undercoat, to show wear and tear.

Is your undercoat to impart the tone to the finish coats over it?


Absolutely can ask!

The primer is grey.  The black is actually the finish color I had been planning on.  The idea was a night recon and therefore a blacked out SAFS.  Didn't think I could get a grey to the point I wanted.  The sheen on the paint isn't a coat either.  It seems to happen when adding flow improver or thinner to the paints. 

I'd read somewhere that pure black or pure white were bad color choices, but thought in this case it could work.  My effots confirmed that pure black is still a bad idea. Big Smile

I was able to add the dark gray blue to the pads last night and liked it enough that I attempted to use it as a highlight on the rest.  This time I used Vallejo satin clear coat to dull the shine. Needed to get see it closer to finished product to decide if the whole color scheme was going to be kept or scrapped.

Here's the most recent test fit with the changes to the color.   It is looking much better!

grey1

grey2

grey3

Thinking it is ready for the camo.

Cut some templates a couple of days ago for camo patterns because my freehand airbrushing is nonexistent.

templates

The scouring pad is a brilliant idea!  Now I wish that had been my intent.  Totally going to use it on the cammo paint to wear it.   Thanks for sharing that method!

On the Bench:

Bandai 1/72 Defender Destroid

  • Member since
    February 2021
Posted by JimC2020 on Thursday, June 23, 2022 6:57 PM

Damn that looks so cool! The paint job on the cockpit and pilot is awesome, crisp, just great!

  • Member since
    October 2021
Posted by PhoenixG on Friday, June 24, 2022 2:08 PM

JimC2020

Damn that looks so cool! The paint job on the cockpit and pilot is awesome, crisp, just great!


Thanks JimC!  Glad you are enjoying it!

On the Bench:

Bandai 1/72 Defender Destroid

  • Member since
    October 2021
Posted by PhoenixG on Monday, June 27, 2022 2:31 AM

Whew, it's been a marathon weekend!  Got in the groove and pieces were falling into place and just couldn't stop till it was done!

Discovered that 22AWG hookup wire is the perfect size for the power lines that aren't part of the kit and do a great job of looking like they were plugged in!  Just strip off the insulation at the ends, drill a hole to match the wire guage, insert the wire and voila!  A cable that looks plugged in.  Turns out it wasn't half bad for the whip antenna either.

wires

The original plan was to finish this with a flat or satin coat, but after applying the gloss coat for the decals I found myself enamored with the look and decided to keep it.

Before getting to the pictures I'd like to give a shout out to RealG and Baron for sharing their knowledge and experience with Ma.K.  Their suggestions and input had a big influence on how I approached this build.  I truly feel it helped make it a better build than it otherwise would have been.  Thank you!

Onto the pictures!!

Now I have to ask myself, why is a guy sitting in a war machine looking so happy?

happy head

Turns out the answer is simple.  Cute cat videos!  (Thanks for the idea RealG!)

kitty

rightside

left side

back side

And now with the hatch buttoned down.

tincan

tincanside

canback


This build was a ton of fun and am looking forward to my next Ma.K. project!

On the Bench:

Bandai 1/72 Defender Destroid

  • Member since
    July 2014
  • From: Franklin Wi
Posted by Bakster on Monday, June 27, 2022 9:42 AM

Hey PhoenixG, sweet work! What a cool project and you delivered a beauty! 

"Turns out the answer is simple.  Cute cat videos! "


Lol. They always make ME smile!

Thanks for sharing your build. I enjoyed it.


  • Member since
    September 2006
  • From: Bethlehem PA
Posted by the Baron on Monday, June 27, 2022 12:31 PM

Nice finish, PG!  And I like the antenna, too.  And I'm glad any tip I gave was useful.  That's what the hobby is all about!

The bigger the government, the smaller the citizen.


  • Member since
    October 2021
Posted by PhoenixG on Monday, June 27, 2022 9:49 PM

the Baron

Nice finish, PG!  And I like the antenna, too.  And I'm glad any tip I gave was useful.  That's what the hobby is all about!


Thank you for compliments Baron!

You saved me from raging at the ploycaps and losing a large chunk of time in the fruitless pursuit of a better method to paint them.  In the photos I cleverly hid all the spots where the paint peeled off during assembly, but the truth is I just got lucky.  Most of the joints were naturally hidden.  Smile

I'm prepped for the next Ma.K. model with the acquisition of some Aves Apoxie Sculpt you recommended. Looking forward to trying it out! Yes Big Smile

On the Bench:

Bandai 1/72 Defender Destroid

  • Member since
    October 2021
Posted by PhoenixG on Monday, June 27, 2022 9:51 PM

Bakster

Hey PhoenixG, sweet work! What a cool project and you delivered a beauty! 

"Turns out the answer is simple.  Cute cat videos! "


Lol. They always make ME smile!

Thanks for sharing your build. I enjoyed it.


Glad you liked it!  Thanks for joining and coming along for the show. Smile

On the Bench:

Bandai 1/72 Defender Destroid

JOIN OUR COMMUNITY!

Our community is FREE to join. To participate you must either login or register for an account.

SEARCH FORUMS
FREE NEWSLETTER
By signing up you may also receive reader surveys and occasional special offers. We do not sell, rent or trade our email lists. View our Privacy Policy.