SEARCH FINESCALE.COM

Enter keywords or a search phrase below:

Musashi wreck.

40537 views
172 replies
1 rating 2 rating 3 rating 4 rating 5 rating
  • Member since
    March 2003
  • From: Towson MD
Posted by gregbale on Monday, June 1, 2015 9:38 AM

philo426

After you light the fuse ,make sure you back away.Shrapnel can be damaging!

I second that! Not good losing a vital part in the name of modeling.

Thanks for sharing your thought process while working through this. Both the technique and inspiration are very motivating.

Greg

George Lewis:

"Every time you correct me on my grammar I love you a little fewer."
 
  • Member since
    July 2014
Posted by modelcrazy on Monday, June 1, 2015 9:50 AM

Yeah, I was thinking of placing the "device" in a medium cardboard box to absorb any flying shrapnel.

I played this song before when I was about 14 during summer break.

I had the brilliant idea to see what a firecracker would look like inside a 5 gal water jug (they were glass back then). So I placed the jug in the middle of the garage as my parents were gone at work, lit a firecracker with and exceptionally long fuse, I think I even attached another fuse to make it longer. I then dropped the explosive device into the jug and, here's the good part, screwed down the lid. Luckily for me I had at least one brain cell working at the time and got behind the door to the house and watched around the corner.

KA-BOOM, the jug explodes into a zillion pieces (I must have been sleeping through the physics lecture which explains compression). Needles to say, I spent the next several days of my summer vacation clearing and cleaning the entire garage so there was not one sliver of glass left. I think secretly my parents were glad they had a reason to make me clean the garage.

I learned my lesson and will be careful if I try it, thanks.

It would be interesting to see the results. I'd just have to do it when my wife is gone.

Steve

Building a kit from your stash is like cutting a head off a Hydra, two more take it's place.


http://www.spamodeler.com/forum/

  • Member since
    July 2014
Posted by modelcrazy on Monday, June 1, 2015 11:59 AM

Thanks Greg,

I was researching some torpedo damage pictures and, of coarse, found a ton. This one seems to be one of the clearest, although I'd like to find and example of what our aerial torpedoes would do instead of one of those Japanese nightmares.

Steve

Building a kit from your stash is like cutting a head off a Hydra, two more take it's place.


http://www.spamodeler.com/forum/

  • Member since
    December 2002
  • From: Bury St Edmunds, Suffolk, England
Posted by Bish on Monday, June 1, 2015 12:15 PM

Steve, after seeing your last ship build, this will be one to follow. Looks like your doing plenty of research for this, I like it.

I have seen a dio of a sunken Sherman before, but I don't think a ship. The Sherman was set is clear resin, or something like that, for the water. Will you be doing that or will you leave out the water.

I am a Norfolk man and i glory in being so


On the bench: Airfix 1/72nd Harrier GR.3/Fujimi 1/72nd Ju 87D-3

  • Member since
    July 2014
Posted by modelcrazy on Monday, June 1, 2015 12:25 PM

Bish, thanks for following.

I've seen that Sherman dio, it was done very well.

I will be leaving the ship out of "water" as It would take huge amounts of resin to cover this size diorama. What I've seen on Titanic and Bismark dioramas though, is what appears to be an algae green or blue sprayed on the set to try to simulate an underwater look, like you were looking at it with artificial lighting from an ROV. I was thinking of doing something like that, but haven't decided yet.

Steve

Steve

Building a kit from your stash is like cutting a head off a Hydra, two more take it's place.


http://www.spamodeler.com/forum/

  • Member since
    December 2002
  • From: Bury St Edmunds, Suffolk, England
Posted by Bish on Monday, June 1, 2015 12:27 PM

Well, sounds like your got a plan. I'll certainly be following along.

I am a Norfolk man and i glory in being so


On the bench: Airfix 1/72nd Harrier GR.3/Fujimi 1/72nd Ju 87D-3

  • Member since
    July 2014
Posted by modelcrazy on Monday, June 1, 2015 9:17 PM

What do you think?

Here is the dented starboard side. I have some smoothing to do, but it will also be covered with silt .

And the torpedo hit. The outer plates are blown out, while the interior side and bulkheads are pushed in. Looking at the damage on the video, the sides are blown out, but let me know what you guys think. It is easily changed at this point.

A different view of the damage. I drilled holes into the "framing" in the torpedo bulge to try to dress it up a little. You can see the inner bulkhead.

And finally the framing structure and the engine room. Maybe I can come up with something to replicate the engines. This will be totally cut away and collapsed along with the keel. Studying the side scan sonar, it looks like the keel collapsed, probably during the impact with the sea floor.

Comments are wanted.

Steve

EDIT,

And here's the sea floor with the acrylic gel and paper.

Steve

Building a kit from your stash is like cutting a head off a Hydra, two more take it's place.


http://www.spamodeler.com/forum/

  • Member since
    March 2005
Posted by philo426 on Tuesday, June 2, 2015 11:42 AM

Looks really good!

  • Member since
    July 2014
Posted by modelcrazy on Tuesday, June 2, 2015 9:58 PM

Here's the stern in it's resting place. I still need to add some twisted metal at the break and work a little on the props and rudder.

Steve

Steve

Building a kit from your stash is like cutting a head off a Hydra, two more take it's place.


http://www.spamodeler.com/forum/

  • Member since
    July 2004
  • From: Sonora Desert
Posted by stikpusher on Tuesday, June 2, 2015 10:12 PM

Wow... this is a bold project and you are really pulling it off.


F is for FIRE, That burns down the whole town!

U is for URANIUM... BOMBS!

N is for NO SURVIVORS...

       - Plankton

LSM


  • Member since
    April 2013
Posted by KnightTemplar5150 on Wednesday, June 3, 2015 12:15 AM
You're moving right along there, Steve - things are looking good!
  • Member since
    March 2003
  • From: Towson MD
Posted by gregbale on Wednesday, June 3, 2015 9:48 AM

Steve, both the build and the groundwork are very impressive so far. Really glad you're sharing this with us.

Greg

George Lewis:

"Every time you correct me on my grammar I love you a little fewer."
 
  • Member since
    July 2014
Posted by modelcrazy on Wednesday, June 3, 2015 11:27 AM

Thanks ST, KT and Greg,

I was a little hesitant at first to put this thread out there as I'm just winging most of it. I'm collaborating with a very nice lady, Rebekah,  at USSFlyerProject.com who is the Exhibit Designer at the Great Lakes Naval Memorial and Museum. I have gleaned most of the final moments of the Musashi's career from her website  http://www.ussflierproject.com/tags/musashi/. The problem here is that there are so few publicly released pictures that it is difficult to make an accurate representation of the wreck, therefore I do my best, and add a little "artiest conception" to the mix.

I appreciate everybody's following along and your encouragement. I am very happy with the results of my experimentation so far, and as always, I'll will continue to try to justify the steps I'm taking and why.

Steve

Steve

Building a kit from your stash is like cutting a head off a Hydra, two more take it's place.


http://www.spamodeler.com/forum/

  • Member since
    December 2002
  • From: Bury St Edmunds, Suffolk, England
Posted by Bish on Wednesday, June 3, 2015 11:36 AM

For someone who is winging it, you are not doing half bad.

You asked about the Torpedo damage, well I am no expert, but it looks good to me, even before painting it defiantly looks like bent metal.

You post as many progress pics as you like, this is a joy to watch.

I am a Norfolk man and i glory in being so


On the bench: Airfix 1/72nd Harrier GR.3/Fujimi 1/72nd Ju 87D-3

  • Member since
    July 2014
Posted by modelcrazy on Wednesday, June 3, 2015 12:14 PM

Thank you Bish.

The stern is easy, The bow on the other hand.....11 torpedo strikes and 13 bomb hits by my count on the area from turret 1 to the bow, not to mention numerous near misses, which cause their own kind of damage. I envision the bow as a mess of twisted metal below the main deck. I'm going to have do drink a whole lot of soda to come up with that much aluminium.

Steve

Building a kit from your stash is like cutting a head off a Hydra, two more take it's place.


http://www.spamodeler.com/forum/

  • Member since
    March 2015
Posted by CallSignHuck on Thursday, June 4, 2015 9:41 AM

Hi MC, I'm late rolling in but this looks great!

H

On the bench: 1:700 USS California BB 44

Next up: 1/48 A-10C MDANG

Would love to do: USS Samuel Robert DE 413

  • Member since
    July 2014
Posted by modelcrazy on Friday, June 5, 2015 9:45 AM

Thanks Huck,

I wasn't able to get to it last night, but should be able to get some progress done tonight. I'm almost finished with the stern, I think. There's always something to add to something like this.

Steve

Building a kit from your stash is like cutting a head off a Hydra, two more take it's place.


http://www.spamodeler.com/forum/

  • Member since
    June 2013
Posted by RobGroot4 on Friday, June 5, 2015 6:16 PM

modelcrazy

Thank you Bish.

The stern is easy, The bow on the other hand.....11 torpedo strikes and 13 bomb hits by my count on the area from turret 1 to the bow, not to mention numerous near misses, which cause their own kind of damage. I envision the bow as a mess of twisted metal below the main deck. I'm going to have do drink a whole lot of soda to come up with that much aluminium.

You could always switch to beer... 

You mentioned the engines in the stern section in a previous post.  Speaking of U.S. Navy ship here, but the engines are usually toward the center of the ship so I think all you'd see at about that point of the ship would be the shafts, IF the Japanese used a similar armored citadel approach.  The armored citadel is basically an extra layer of really thick armor plating all around the central portion of the ship (superstructures, engines, turrets, magazines, etc.).  You can see this on the WWII battleships, even below decks there are some hatches going through really thick (10+ inches) bulkheads.  If you google "Iowa Class Armored Citadel" there are plenty of images that explain it.  There's also a nice image (can't share from the computer I'm on) with a blue highlighted portion and you can see where the engines are.  That is of course Iowa Class, but I think the Japanese followed the traditional thinking in terms of design and just made them bigger.

This is really looking awesome as it comes together.  Your torpedo hole and buckling looks great!


Groot

"Firing flares while dumping fuel may ruin your day" SH-60B NATOPS

  • Member since
    August 2014
  • From: Willamette Valley, Oregon
Posted by goldhammer on Friday, June 5, 2015 6:19 PM

If your fireworks/can works out, don't neglect to make a years supply while the explosives are available.  Looks great so far.

  • Member since
    July 2014
Posted by modelcrazy on Friday, June 5, 2015 11:54 PM

Thank you Groot for the information, that is very helpful.

The engine room was beneath the stack, which from studying the side scan image and doing some rough measurements, it looks as though the stern broke off right in the area of the stack

As far as the citadel, I imagine most of the interior bulkheads were not damaged in the attacks, while the outer sections were compromised. This flooding would have caused the list, so the crew probably counter flooded to try to stabilize the ship. When the ship capsized and went down, at around 100 feet or so the citadel probably imploded which would be the reason for the incredible devastation of that area. The Yamato and Musashi didn't have a 8 or 16" hull. They had 1" hull with 16" armor plates attached. When it comes to implosion, it's the 1 inch hull and the girders behind them that is providing the resistance, not the 16" armor plates affixed to them.

Anyway, here's tonight's work.
I added some thicker metal to the sections where one would see the thickness of the armor. I hope it makes a difference. Anyway, I believe I'm finished with the stern. I'm not concerned about the non smoothness. The wreck will be covered with silt, some sea life, rust and a greenish color.

Some pics of the actual wreck.

Bow and starboard anchor. Notice the cable above the anchor and below the Chrysanthemum which was used for degaussing.

Bow with the deteriorated Chrysanthemum.
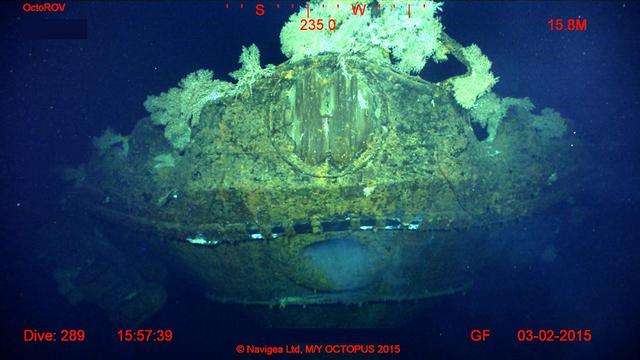
Bow deck with starboard anchor chain. Again, notice the degaussing cable just to the left of "Musashi Expedition"..

Here is my completed stern. The sea floor will be filled up to and bury some of  the hull.

And the screws and bent main rudder. The outer port screw has a broken shaft.

The actual ship.

That's all for now. I will start on the bow tomorrow.

Steve

Steve

Building a kit from your stash is like cutting a head off a Hydra, two more take it's place.


http://www.spamodeler.com/forum/

  • Member since
    December 2002
  • From: Bury St Edmunds, Suffolk, England
Posted by Bish on Saturday, June 6, 2015 1:38 AM

I am amazed at how well detailed the scans of the real ship are. I think you have got the broken prop shaft perfectly and that whole section is looking really nice.

I am a Norfolk man and i glory in being so


On the bench: Airfix 1/72nd Harrier GR.3/Fujimi 1/72nd Ju 87D-3

  • Member since
    June 2013
Posted by RobGroot4 on Saturday, June 6, 2015 3:27 PM

MC,

I hate to say it, I think you have the props on the wrong shafts (look at the direction the blades pitch in the actual photo).  

Your stern section looks awesome.  I'm intrigued to see how you tackle the growth on the parts you are modeling.  

Groot

"Firing flares while dumping fuel may ruin your day" SH-60B NATOPS

  • Member since
    December 2002
  • From: Bury St Edmunds, Suffolk, England
Posted by Bish on Saturday, June 6, 2015 3:32 PM

Steve, I think Groot might be right. The two on the inner shafts should be on the outside.

I am a Norfolk man and i glory in being so


On the bench: Airfix 1/72nd Harrier GR.3/Fujimi 1/72nd Ju 87D-3

  • Member since
    July 2014
Posted by modelcrazy on Saturday, June 6, 2015 4:50 PM

By golly your right. I'll just fix that right away, thanks.

Steve

Building a kit from your stash is like cutting a head off a Hydra, two more take it's place.


http://www.spamodeler.com/forum/

  • Member since
    December 2002
  • From: Bury St Edmunds, Suffolk, England
Posted by Bish on Saturday, June 6, 2015 5:16 PM

Well that's the advantage of doing a WiP. Someone is bound to spot what you missed, happens to me all the time.

I am a Norfolk man and i glory in being so


On the bench: Airfix 1/72nd Harrier GR.3/Fujimi 1/72nd Ju 87D-3

  • Member since
    July 2014
Posted by modelcrazy on Saturday, June 6, 2015 5:22 PM

Just fixed it. Thanks guys. When it was pointed out and I looked at it.....DOGH!! How could I miss something so obvious?

Steve

Building a kit from your stash is like cutting a head off a Hydra, two more take it's place.


http://www.spamodeler.com/forum/

  • Member since
    November 2009
  • From: SW Virginia
Posted by Gamera on Saturday, June 6, 2015 5:23 PM

She looks awesome Steve, I love the crumpled up decks. And good eyes there Groot, I'd never have caught it.

"I dream in fire but work in clay." -Arthur Machen


  • Member since
    July 2014
Posted by modelcrazy on Saturday, June 6, 2015 10:58 PM

RobGroot4

 I'm intrigued to see how you tackle the growth on the parts you are modeling.  

Groot

Groot, I'm not sure yet, I have several ideas witch include utilizing minute pieces of those dried pieces of vegetation one can purchase at craft stores and repainting them. Other ideas include tying fly tying thread into a knots to simulate some of the sea life. I working on it.

Experimentally, I painted the stern with a mix of highly diluted acrylic Raw Umber, followed up with an application of water mixed with Rust colored pastels. I will spray over that with a light coat of pale yellow and a light coat of interior green. The prop shafts will retain their silver color as reflected on the actual ship. This assembly, and the sea floor, will be covered with dirt which has be pulverized into a talcum form to simulate silt. I hope it works, I'm making it up as I go along.

And to the bow. I marked X's here there were hits. Obviously the hits on the deck were bomb hits and the hits on the hull were torpedos. The only exceptions to these are near bomb misses at either side of the extreme forward bow. This thing is going to be a mess. My only dilemma is on Mr Allen's video, the only damage I saw was a torpedo strike and a dent on the port side. As the ROV flew over the fore deck, I didn't see any damage at all. The only thing I can figure is the ROV had a very narrow field of view and it didn't go over any damaged areas.

Here's the bow before I have fun.

Steve

Steve

Building a kit from your stash is like cutting a head off a Hydra, two more take it's place.


http://www.spamodeler.com/forum/

  • Member since
    July 2014
Posted by modelcrazy on Monday, June 8, 2015 10:06 AM

Here is the internal structure for the bow. It is constructed from cardboard instead of sheet styrene. I's a whole lot easier to cut and form, not to mention much cheaper. My wife's idea Confused. Another of my wife's ideas, is the #1 turret barbette made form a paper towel tube. I was wondering how I could bend the cardboard without making a bunch of creases. Boy, I'm glad I have her.
Sorry for the fuzzy image. I still have to install the bulkheads on the upper deck and a considerable amount of work to do to the barbette to make it look plausible, before I start to destroy everything I made.

Steve

Building a kit from your stash is like cutting a head off a Hydra, two more take it's place.


http://www.spamodeler.com/forum/

  • Member since
    March 2005
Posted by philo426 on Monday, June 8, 2015 10:33 AM

Hey,whatever works!Should be a great diorama when completed!

JOIN OUR COMMUNITY!

Our community is FREE to join. To participate you must either login or register for an account.

SEARCH FORUMS
FREE NEWSLETTER
By signing up you may also receive reader surveys and occasional special offers. We do not sell, rent or trade our email lists. View our Privacy Policy.