SEARCH FINESCALE.COM

Enter keywords or a search phrase below:

Arii Albatross 1/36 Yacht (Vintage Kit)

3388 views
20 replies
1 rating 2 rating 3 rating 4 rating 5 rating
  • Member since
    September 2014
Arii Albatross 1/36 Yacht (Vintage Kit)
Posted by Brenticus on Monday, November 7, 2016 11:30 AM

 Untitled by Brent Dudgeon, on Flickr

I am a sailor- both of tall ships and small boats.  Therefore, I have an interest in model kits of both great sailing ships and small yachts.  That latter category, however, seems almost nonextistent in plastic kits.  In fact, I didn't think any existed.

However, I lucked upon a one of these old Arii kits: the Albatross.  She's just a regular sailing yacht.  IT DOES EXIST!

I don't know of any build logs of this kit- or even pictures of a completed kit (aside from the box) so I will make one.


First, my impressions...


THE KIT:

 Untitled by Brent Dudgeon, on Flickr

 Untitled by Brent Dudgeon, on Flickr

This kit is a strange mixture of just GARBAGE parts (to me, anyway) and some really nice features.  The hull fits fine (yay!), but there are ZERO little notches to use for aligning (boo!).  The plastic quality, as one might expect from a vintage kit like this, is garbage.

However, some parts- like the winches/grinders, the stanchions and bow pulpet parts are really nice shiny plastic- ready to go as they are!  Pretty sweet.  The sails are fine- they are standard vacuum-formed deals we all know.

The keel is weird.  Like, REALLY weird.  It looks like  a swing keel- but one that is partly hauled up.  very strange.  Didn't look like anything I had ever seen.  I asked my buddy and he said that "it's probably not accurate for any boat."  He should know, he owns a sailing shop.  Seems like a weird thing to change- why not just make a more standard keel for this kit?  Oh well, it doesn't matter- it's going to have to go.

THE BUILD:

  • I'll have to scratch-build a fin keel, I think.  That should be easiest anyway. 
  • I'm not going to paint the deck.  I'm looking at it, and I think it looks a lot like fiberglass already.  The look of plastic is pretty accurate, and the non-skid parts are fine in white as well.  Should save me some effort, and I think it'll still look really good
  • I'm not happy wit the way you're supposed to attach the Genoa sail to the forestay.  That thread wrapping around looks silly to me.  I think I'll use some kind of copper or brass wiring to simulate the look of a hanks-on sail.  I considered beefint up the forestay to make it look like a roller-furler but I kind of like the idea of making tiny hanks for my Jenny.
  • I'm not going to use those decals.  Any of them.  They seem awful.  Nuff said.
  • I'v ealways loved boats with a blue hull but red beneath the water line.  I'll try to do that with this kit, might use some tape to separate the colors.
  • Sails seem rathe rplain too.  I'll have to add some telltales and maybe manufacturer's marks- and some battens.  A few other small details to make them look better...

I've already started so I'll post what I've done so far in the following build posts.


Tags: arii , boat , sailboat , sailing , sloop , yacht
  • Member since
    December 2010
  • From: Salem, Oregon
Posted by 1943Mike on Monday, November 7, 2016 12:07 PM

I am NOT a sailor so my question may be viewed as coming from someone who knows very little about the actual vessels that are and were powered by sail.

I do wonder why you (and your buddy) think that the keel is so strange. It's probably my ignorance regarding these sorts of things but I do recall having seen some centerboards in my time - at least pictures of them - and the art work on the box doesn't seem strange to me at all.

When I was a kid (12 years old in 1955) my dad took a picture of me sitting on top of his little 32' cabin cruiser which I'm inserting into this reply. The Arrow (the vessel's name) had been built in the 1890's as a lobster fishing sailing boat. It was converted to an engine powered cabin cruiser in the 1930's (an old 3 cylinder Lathrop engine that we had to start by turning a heavy flywheel after having adjusted the spark and having primed the cylinders - no battery - just magnetos). My dad bought it in the early 50's and did a lot of work on it. He told my brother and I that when it was a fishing boat it had a centerboard so I don't understand what about your model looks unrealistic.

Hopefully you'll educate me on drop keels.

Mike

"Le temps est un grand maître, mais malheureusement, il tue tous ses élèves."

Hector Berlioz

  • Member since
    September 2014
Posted by Brenticus on Monday, November 7, 2016 12:30 PM

Neat picture- and cool boat!

What's odd about it isn't that it's a centerboard at all.  That would make perfect sense to me.  But the kit doesn't actually seem like it's trying to be a representation of a centerboard.  There's no recess for it to be retracted into- or a cable to hoist it up, etc.  It's fully formed into the hull- tapering from the hull to the keel.

But with this boat, the keel has the look of a centerboard, but it's molded like a fin keel.  Only a fin keel shaped like a centerboard.  That's the part that's weird.  If it seemed like it were intentionally being a centerboard it wouldn't seem weird at all to me.  If it had a recess where it could be retracted I would feel better about it.

Maybe I'm being too picky with this old kit? lol

  • Member since
    December 2010
  • From: Salem, Oregon
Posted by 1943Mike on Monday, November 7, 2016 1:42 PM

OK, now I understand. No allowance for a realistic depiction of the retractable centerboard/keel. Well, for me, I wouldn't worry too much about it but then I'm not really picky or educated enough about such things to let it bother me Wink.

You might scribe and then open up a centerline area to depict the stowage/deployment of the keel but I'd cetainly not go that much trouble. In any case I would be interested if you were to start a WIP on this kit.

Good luck in whatever you decide to do with it.

Mike

"Le temps est un grand maître, mais malheureusement, il tue tous ses élèves."

Hector Berlioz

  • Member since
    September 2012
Posted by GMorrison on Monday, November 7, 2016 2:06 PM

That looks like an old IOR keel. It has a certain valid kind of look to it.


 Modeling is an excuse to buy books.


  • Member since
    September 2014
Posted by Brenticus on Monday, November 7, 2016 2:28 PM

That's what my buddy said about it- that it was an IOR boat (not that I knew what that was- it's International Offshore Racing.  While I may be a small boat and tall ship sailor...I'm new to both, so I am no expert.  My buddy also tagged someone else in his post that knew more, but he never responded).

That said, I couldn't find any IOR boats in any image searches that had a keel like this. 

It sounds like you know a good deal about this.  If this is a real IOR keel, could you tell me: is it trying to represent a centerboard and left out the opening it would retract into?  Or is it just an unusual fin keel design?

  • Member since
    June 2014
  • From: New Braunfels , Texas
Posted by Tanker - Builder on Monday, November 7, 2016 3:32 PM

Hi ;

 If I am not mistaken that's an adjustable fin type keel .It was made to set to one side or the other to improve sailing characteristics . I built three that had that type of keel . All ballast that would be used on a regular fin keel was inside the hull in a pod on centerline .

     When I bought the molds I didn't know it was an I.O.R. type boat . I just liked the way they sailed . My own boat at the time , not counting my loaded Ranger Bass Boat was a " Friendship " Sloop built in New England in 1940 and rebuilt by me after I salvaged her from the bottom of Puget Sound .

    I had her rigging done by a sail loft and rigging specialist in Seattle for single handed sailing . Best darned boat I ever owned . Except for the Ranger it definitely was not a " Hole in the water into which you put your hard earned money ".

  As a matter of fact none of my sail craft were that and luckily not one of my engined large boats were either . Didn't do so bad and I would recommend the Arii kits to anyone for the basic hull . Change everything else though . I have a 12 meter R.C. sailboat that keeps my feelings about sailboats alive and well .

     For masts and spars use dowels sanded to shape and make your own sail gear . You won't regret it . You might even get some advice if you contact Bluejacket Shipcrafters about the sail gear .

  • Member since
    September 2014
Posted by Brenticus on Thursday, January 19, 2017 11:31 AM

Sorry for taking so long to reply.  I got distracted making a baby room and then having a baby.  We had a son- Jack Aubrey Dudgeon (sailors might recognize the name)!

But I'm finally back to this build (though distracted by other builds as always)!

Boy, Tank, that sounds like a GREAT time!  I envy your sailing time and experience!  I love those friendship sloops (probably because all the ones I see are wooden...I love wooden boats/ wood on boats). 

Given you have personal experience with a keel like this, I would have considered keeping it but I've long since cut it off, intending to replace it with a simpler fin keel.  At the very least, it will look more like what I find in google images- if nothing else.

As for using a dowel, how should I go about adding things like winches, etc?  I'm not sure how much effort I want to put into those extra touches like that, as I've got a lot of work to do on some other big sailing ships that are of a kind I like even better.

That said, if it wasn't a huge deal (or a lot of extra parts), I always like to take whatever advice I can! 

I definitely am going to be changing up the rigging.  Wires instead of thread, I think.  I'd love to have something as a turnbuckle, but that seems hard to add.  Maybe just aluminum foil around it?  Maybe I could get that to not look like garbage?  Idk.

Anyway, thanks for the input and any advice you have!


CURRENT PROGRESS:

- Cut off the old keel, filled and sanded the hull

- Cut two pieces of styrene in the shape of a keel, glued them together

- Sanded the "new keel" into a rough approximation of a fin keel (not perfectly shaped but looks good at this scale I think)

- Attached keel and filled in around it (may need more filling), sanded a bit and primed to see how it looks.
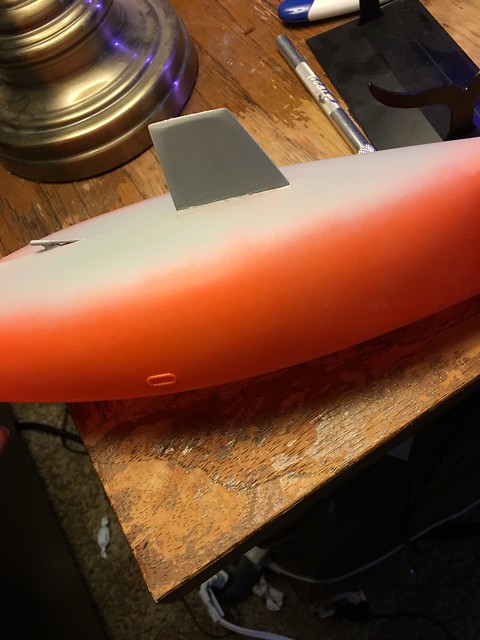
 

 New keel 2 by Brent Dudgeon, on Flickr

  New keel 2 by Brent Dudgeon, on Flickr
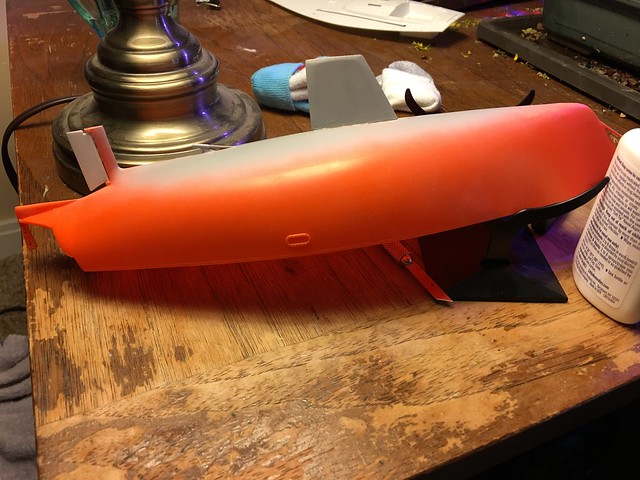
 

The seams are apparent with tis primer on but I've sanded them so I can't even feel them.  Hopefully they'll disappear with the red paint?  We'll see I guess. 

Hopefully more progress soon!

  • Member since
    September 2014
Posted by Brenticus on Thursday, January 19, 2017 12:16 PM
Question to any readers: what's the best way to have a stripe around waterline? I'm ok at taping things off, but I would like to have a nice white stripe between wind and water. Should I just tape that off, or is there a decal or some other stripe that I could buy? Thanks for any input!
  • Member since
    September 2012
Posted by GMorrison on Thursday, January 19, 2017 3:48 PM

This is an unusual situation. The challenge is that the hull has so much curvature. A bootstripe, cheatline, decorative band, whatever you want to call it; has a level top and a level bottom. Because of hull curvature, here a lot of it, it will be widening towards the bow and stern. So it needs pretty careful masking.

 Modeling is an excuse to buy books.


  • Member since
    March 2003
  • From: Towson MD
Posted by gregbale on Thursday, January 19, 2017 5:25 PM

What a nostalgia rush! I seem to remember this kit from one of America's Hobby Center's massive mail-order catalogs back in the late '70s! Awfully glad to see one being built.

As to the boot-topping stripe, the only effective method I've found is to somehow jig the hull upright and level, then find a proper-height stand for a pencil, and simply 'trace' around the hull. Makes masking a tape line much easier.

Good luck with your build! I will be following it with great interest.

Greg

George Lewis:

"Every time you correct me on my grammar I love you a little fewer."
 
  • Member since
    September 2012
Posted by GMorrison on Friday, January 20, 2017 12:01 AM

Model Expo sells this dingus. Worth owning.

 Modeling is an excuse to buy books.


  • Member since
    September 2014
Posted by Brenticus on Friday, January 20, 2017 8:18 AM
Well ain't that fancy! Looks like a cool tool. Might keep that in mind whenever I have the budget/room for such a thing (short on both these days lol). Might just have to be *real* careful in the meantime. Or maybe make a similar rig myself... Progress: - I wasn't happy with how the keel looked against the hull, so I added some more filler stuff and I'm going to sand again. Then it will be ready for priming all around and some painting. I want the hull to be red below the waterline, blue above, and white right at waterline. - Dry Fitting: A while back, I was dry fitting the whole thing together, and I must make note of how poorly the deck fit against the transom. It just didn't fit. It didn't fit one way, it didn't fit another. I ended up having to cut down some of the bow to get the deck to fit further forward, allowing room for the transom to meet the deck properly. Filling will be very necessary here, as well. Pretty disappointed with this particular part of the fit, as the hull matched up pretty well.
  • Member since
    September 2014
Posted by Brenticus on Friday, January 20, 2017 8:25 AM

As a reference, this is the kind of boat that this kit is made after, though with a different keel (which I am reproducing).

 0_3al by Brent Dudgeon, on Flickr

  • Member since
    November 2009
  • From: Twin Cities of Minnesota
Posted by Don Stauffer on Friday, January 20, 2017 8:56 AM

gregbale

What a nostalgia rush! I seem to remember this kit from one of America's Hobby Center's massive mail-order catalogs back in the late '70s! Awfully glad to see one being built.


Ah, do I remember AHC!  They were the only big mail order retailer I knew of in my youth.  Sure remember their full page or two page ads in Air Trails and Model Airplane News!  Bought a lot of stuff from them, all flying model stuff, back in the fifties!


Don Stauffer in Minnesota

  • Member since
    September 2014
Posted by Brenticus on Friday, January 20, 2017 9:29 AM
So these kits weren't available everywhere? Maybe that's why it was so hard for me to find something like it...
  • Member since
    June 2014
  • From: New Braunfels , Texas
Posted by Tanker - Builder on Friday, January 20, 2017 10:14 AM

" G ";

 Thank You ! I didn't know the proper name for that tool was a " Dingus " LOL.LOL.I built one of these years ago for sail models out of aluminum and a holder from an old compass . I use it for All my maritime full hull projects .  T.B.          P.S. I've come across four more of the Arii kits at Flea Markets !

  • Member since
    November 2005
  • From: Formerly Bryan, now Arlington, Texas
Posted by CapnMac82 on Friday, January 20, 2017 8:57 PM

I borrowed one of the early Model Expo "dinguses" and was not impressed with the base size, nor using a pencil.

I had a somewhat distressed oarnge ABS carpenter's Speed Square.  I mounted a scrap of plexiglass using the flanged leg of the square.  That gave about  6" x 8" worth of stability to the doohickey.

I used a couple of cable clamps screwed to the swuare to hold a mechanical pencil (old-fashioned lead holder for 2.5mm drafting "lead"--I used a Venus 3 jaw that was no longer getting and drafting table time).  Only, I used a compas needle point from a K&E compas set    The steel needle can be stropped on a stone to be made sharp as needed.

One of the other things I learned is to invert the hull whenever possible.  First off, it's way less "tippy."  Secondly, you have mast holes, deck elevations, and the like to establish proper planarity.

I had access in those days to quite a lot of scrap frisket film, so that is what I used to mask the pre-painted stripe.   A person could likely use baremetal foil for a really thin mask. 

Also, only cut one side of the stipe at the time, the side getting the next hull color.  This leaves the other side masked.  Then, cut the other side, and mask the other color as needed.

That's my 2¢, you'll have to buy your own coffee.

  • Member since
    June 2014
  • From: New Braunfels , Texas
Posted by Tanker - Builder on Sunday, January 22, 2017 8:27 AM

WOW !

   Naming one's child after Cap'n Jack ? Awesome . I bet I know what you like to read .  Great . T.B.

  • Member since
    June 2014
  • From: New Braunfels , Texas
Posted by Tanker - Builder on Sunday, January 22, 2017 8:30 AM

Hey !

 You mean after that technical jargon about your "Doohickey"- " you won't spring for Joe " ? Geesh !  T.B.        P.S. I have even made the darned things out of LEGOS . So There ! LOL.LOL.

  • Member since
    June 2014
  • From: New Braunfels , Texas
Posted by Tanker - Builder on Sunday, January 22, 2017 8:34 AM

Brenticus ;

 Seems to me , I remember they were popular in the northern part of the west coast . I saw them a lot there from Monterey to San Francisco then on to Seattle and down to Portland .

    They didn't do to well  say, in Arkansas . We wanted  "Fishin Boats"  T.B.

JOIN OUR COMMUNITY!

Our community is FREE to join. To participate you must either login or register for an account.

SEARCH FORUMS
FREE NEWSLETTER
By signing up you may also receive reader surveys and occasional special offers. We do not sell, rent or trade our email lists. View our Privacy Policy.