SEARCH FINESCALE.COM

Enter keywords or a search phrase below:

Trumpeter U-552 in 1/48

41722 views
118 replies
1 rating 2 rating 3 rating 4 rating 5 rating
  • Member since
    May 2012
  • From: Pennsylvania
Trumpeter U-552 in 1/48
Posted by pilotjohn on Friday, May 5, 2017 10:03 PM

Well, here goes for my first ship build, or should I say underwater build:)  I am not really a naval guy, but this kit caught my eye as I am looking at it as a bunch of separate dioramas all put together.  I also got some fine wiring and some nano light and will be adding the lighting to each station.

I decided to start with the engine as it seemed the most detailed and if I could get through it I should be well on my way.  I am finished with it, and here is a photo:

Those small wheel handles are PE and really hard to line up at least for me.  The long "rods" (sorry I don't know the actual technical names) mostly had no line up holes and I found it a little tough to get them all straight.  And my oh my, those small pipes...

Next to complete the rest of the diesel engine room.

John


  • Member since
    July 2012
  • From: Douglas AZ
Posted by littletimmy on Friday, May 5, 2017 10:26 PM

I wanted to get this kit but MRS. Little Timmy said....    HOW MUCH???  so I will follow this with keen interest!

A brief comment on what you have so far.

     OOOOOOOOOOOHHHHHHHHHHHHHH!!!!!!!!!!!!!!!

Are you doing a cut away to show the interior?

Or are you going to build the second engine and button it all up? Thus proving the "insanity" we all have.


 Dont worry about the thumbprint, paint it Rust , and call it "Battle Damage"

  • Member since
    May 2012
  • From: Pennsylvania
Posted by pilotjohn on Friday, May 5, 2017 10:56 PM

I am going to just build the half and display it as the cut away.  I may leave off the clear side piece since I am not sure if it will hurt the "view" so to speak.  I too had to think long about the price, but the cost per hour when you break it down won't be too bad.  At least that is how I am rationalizing it:)

John

  • Member since
    July 2013
Posted by steve5 on Saturday, May 6, 2017 1:53 AM

I would love to have a go at this kit , aside from the cost , [ my mnister of finance would kill me , god love her Whistling] , where do you put it at nearly 1.5 metre's long .

I think I'll just watch you build your's , and you are doing beautiful work Bow Down


  • Member since
    May 2012
  • From: Pennsylvania
Posted by pilotjohn on Saturday, May 6, 2017 10:07 AM

Steve;

Thank you.  I am just trying to go slow and it does require a lot of dry fitting and working to figure out exactly how everything ends up at the end.  I counted 95 parts for the engine build.

The instructions are pretty good, but it was difficult at times to find the actual resting places for some of the piping by just following a long arrow showing you where to insert the pipe.  Also if you are doing this one, when the instructions reference put this first, or place this last, I do believe that they are correct.  So many pieces fit inside or underneath others that getting it out of sequence would be a big problem as it is tough to work with a piece of plastice so thin and long.

The painting booklet showing the color diagrams is really nice and helps immensely.  Most of the paint numbers to colors make sense, but there are a couple that don't seem to match up.  The engine has some pipes that call for "Metal Black" and are listed as Vallejo 864 and Model Master 1402.  Those are both a steel color.  Some photos I searched for, and their color booklet, do show black.  Vallejo gunmetal gray is 863, so I am not sure about that.  Also, they list the majority of the engine being Hemp with only color numbers for Mr. Hobby listed.  No equivalent for Model Master, Vallejo, Tamiya, or Humbrol.  I mixed up my own from dark green, flat white, and RLM66.  I think it came out a little too dark, but oh well.

I will try to get to work on the rest of that compartment this weekend and post some photos when I am done.

John 

  • Member since
    December 2015
  • From: providence ,r.i.
Posted by templar1099 on Saturday, May 6, 2017 3:01 PM

That engine is cherry,lookin' foward to the main build.

"le plaisir delicieux et toujours nouveau d'une occupation inutile"

  • Member since
    May 2012
  • From: Pennsylvania
Posted by pilotjohn on Saturday, May 6, 2017 6:25 PM

Forgive the clamps and tape, but I have dry fitted all the main foundation pieces of the compartment.  Nothing has been painted.  Here is a photo:

That little wire hanging from the top is about where it will end up after the top pieces are added.  It has one of the nano chip LED lights at the end of it.  Here is photo of it lit up:

I think this will all come together nicely.  There is one more light to be added along the one bulkhead, so it shoudl brighten things up even more.  I honestly don't know how bright these compartments were so I may have to tone it down about.

John

  • Member since
    March 2003
  • From: Western North Carolina
Posted by Tojo72 on Sunday, May 7, 2017 8:38 AM
Should be awesome,will be checking in

  • Member since
    January 2015
Posted by TheMongoose on Tuesday, May 9, 2017 9:27 PM

That light changes the whole look of it, really excellent! I definitely have to watch this come together.

In the pattern: Scale Shipyard's 1/48 Balao Class Sub! leaning out the list...NOT! Ha, added to it again - Viper MkVii, 1/32 THUD & F-15J plus a weekend madness build!

  • Member since
    July 2013
Posted by steve5 on Wednesday, May 10, 2017 1:05 AM

keep the photo's coming john , really liking this build

steve


  • Member since
    June 2014
  • From: New Braunfels , Texas
Posted by Tanker - Builder on Thursday, May 11, 2017 7:55 AM

Hi ;

 To my knowledge there were four lights in there . Some had six . All right over the engine . Then four smaller ones for the walkway area between those sweet engines .

 It was like the mains were something akin to 60 watt and the walkway area about 40 watts . No biggie but there was a lot of shadow anyway .  T.B. P.S. I thought " Hemp " was a greenish brown ?

  • Member since
    May 2012
  • From: Pennsylvania
Posted by pilotjohn on Thursday, May 11, 2017 12:29 PM

TB;

thanks for the info.  Yes, I too thought hemp seemed a strange name for the color shown on the painting manual.  The only listing provided for that color is Mr. Color 336.  I have seen several shades, but this one seems pretty green to me:

I hope to have some more postings tonight.

John

  • Member since
    May 2012
  • From: Pennsylvania
Posted by pilotjohn on Thursday, May 11, 2017 7:01 PM

I am struggling now with the one color.  The painting booklet says to use Medium Sea Gray.  I have the Vallejo Model Color that is labeled Medium Sea Gray, but looks to be too light.  The Vallejo reference number on the chart in the painting booklet points me to Neutral Grey which seems to be a better match.  I am stumped as I don't know if there was a large contrast to some of the objects inside each of the compartments that were different shades of grey.  Is there a "right" shade....

Anybody have any thoughts?

John

  • Member since
    May 2012
  • From: Pennsylvania
Posted by pilotjohn on Saturday, May 13, 2017 8:24 PM

Well, I really underestimated the time it would take to complete the compartment.  There were losts of pipes and valve wheels and so forth that needed to be cleaned up and then painted almost exclusively by hand.

I decided to use the darker color for some of the "boxes" so as to get a better contrast.  I have no idea if it is close to reality.  Instead of Medium Sea Gray I used Neutral Gray.  The Light Gray for the base was painted with Sky Grey.  It is almost identical to the plastic color itself only more matte than the shiny plastic.  That was a bit of a challange as it was a little difficult at times to make sure I had gotten coverage.  For those interested in the technical painting details, my airbrushing is done with a Grex Tritium TG with a .3mm needle.  All my paints are Vallejo either Model Air or Model Color.  The psi was set to 15 to 18.  Hand painting was also done with Vallejo Model Air and Model Color.  The last color challenge I had was with what the instructions call "Gun Chrome" and the only reference is to Mr. Color 104.  I chose to use Vallejo Model Color Oily Steel.  It was a bit shiny, so I made an acrylic wash of Vallejo Burnt Umber, distilled water, and a couple of drops of Flo-Aid from Liquitex to break the surface tension.  I gave it a bit of a darker look, but I may do another pass once I see it under the final build and the lighting.

Now for the photos.  Firstly, here is the base upon which the engine and the walkway will sit:

The formers in the back gave me a little trouble getting straight, but when I place the long "cap" and snapped it into place it really helped straighten them out.  I don't think any of them will be visible once it is assembled.

Next is the "roof" with all the valves and other "boxes" attached.  There are some more pipes to go in, but they are added as the comparmtent is put together.  The hole in the overhead light piece is where the nano diode will be.

Next are the two bulkheads.  The first one was pretty easy with just one piece of PE.  There was one decal at the top showing some gauges, and I gave it a couple of coats of Walter's Solvaset and it settled down around the shapes for the dials.

The second bulkhead was the busy one.  There are 12 PE valves to be placed, and a couple of areas on the bulkhead that had to be hand painted as they were part of the mold itself and not separate pieces.  Some of the valves were to be green, with the rest being red.  I followed the painting guide, so I have no idea if it is accurate.  There is a little foldout desk kind of thing just above all those valves to the left of the hatch and it was tobe painted the same gun chrome, so I did it also in the oily steel.  There were 5 little "things" that were to be painted a blue with a red button on them.  Probably some kind of emergency shutoff perhaps?  My naval knowledge is very poor, so pleas forgive me if I am butchering the items.  The second light to be placed is to go in that small hole just to the left of the red valve in the upper left section.  The whole is too small for the nano diode to be pushed in from the outside, but the two wires will fit if I put them through and then pull it taut from the outside.  I will CA glue the diode once I get the compartment all sealed up.

Lastly, here is the walkway that goes down the length of the compartment.  This is what was to be the gun chrome.

I did not prime anything as I don't expect to be doing any real weathering as once closed up, I don't know if it would make much of a difference.  I hope to put it all together tomorrow if I get the time and I don't have any "ooops" moments.

John

  • Member since
    July 2013
Posted by steve5 on Saturday, May 13, 2017 10:45 PM

this is a very impressive build john , really enjoying it

steve


  • Member since
    July 2003
  • From: Cincinnati, Ohio
Posted by ridleusmc on Sunday, May 14, 2017 12:15 AM

Yeah, this build is looking pretty awesome.  I don't know if I have room for a 1/48 U-boat, but I want one.  The compartment details are worthy of the added work of LED's and open view display considerations.  It's pretty cool.   

  • Member since
    May 2012
  • From: Pennsylvania
Posted by pilotjohn on Sunday, May 14, 2017 9:04 PM

Thanks for all the kind replies.  I had an ooops moment this afternoon.  There is one piece of PE that has alot of bends that is to make the base for some kind of table that has an odd looking tube underneath it.  All the bends and trying to get it straight did not work so I scratchbuilt some of it and then attached it to the floor:


The mess on that tube is the remains of some CA glue that was originally used to attempt to attach to the PE.  It looks OK from a distance, but a disappointment.  With all the small piping that was molded in, I wonder why that piece was needed to be done in PE?  Sometimes I think model companies are trying too hard just so they can say they have a kit with PE.  Next is the assembly of the main compartment sections.

John

  • Member since
    May 2012
  • From: Pennsylvania
Posted by pilotjohn on Tuesday, May 16, 2017 2:39 PM

I remember that painter Bob Ross who had a show on TV saying that there were no mistakes, just happy accidents.  Well, I had a couple of happy ones, but perseverence with this kit is the key.  I had glued the engine to the floor mounts and then realized when I was dry fitting the roof that it was too far forward.  Luckily I was able to pry it loose and re glue it.  Here is the engine attached to the floor mounts and the floor also attached to the one bulkhead:

The instructions are clear the the opposite bulkhead is to be attached last and they mean it.  Note the two large pipe sections that are floating at the opposite end.  It would be hard to get them inserted if both bulkheads were attached to the floor pieces first.

The "table" that I talked about with the PE does not look that good as things come together.  Each leg is in the appropriate slot on the floor, but it looks out of whack to me.  I think I will debond the CA and use some styrene strips and make more substancial and square legs:

As I was dry fitting the roof section, it all came together when the instructions mentioned some of the engine piping to be "joined" to other parts.  those parts are on the roof section.  Here is the compartment with the roof section attached:

Note the long pipe that is hanging loose.  The unattached end will be secured into a locator hole on the other bulkhead.  The other larger pipe section kind of falls in behind the engine and is not seen.

Here is the same picture but with some red circles.  They show the ends of the pipe sections from both the engine and the roof that are to be "attached".  The room for error is almost nil as the diameter of those small pipes is really small.  It is worth noting that since the opposite bulkhead is not attached, there is a lot of slack in there but it will require some fine tuning afterwards.

Note on the left side of the roof one of the red handles is missing.  It cam unglued during the process but it shuld be easy enough to glue back after final assembly.  I found the bulkhead assembly needed to be CA glued as there was some warping and you need to have everything snug.

In the next picture, the red circle at the right shows where the other nano LED has been placed.

The above picture shows an opening in the roof at the upper left.  that is where a curved large exhaust pipe is to attach to the engine and then to a piece that will sit atop the next compartments roof section.  After several attempts to "snake" that pipe thorugh the hole and try to bend it around those small pipes I decided to cut the thing in two to make it easier to work with.  Below is the result:

This next picture shows the compartment from the end where the second bulkhead will go.  The red circles show the gap that I referenced that should close up when the bulkhead is attached:

Lastly for now, the last picture shows two ribs/formers at the right that I snipped off abit to make sure that they wouldn't interfer with final assembly as my dry fitting had me a little concerned.

Well that was what I got to last evening, so hopefully I will have some more tonight when I get finished from work.

So far my recommendation would be to follow the instructions when it comes to do this first/last, and do LOTS of dry fitting and testing.  I know this kit is expensive, but I am looking at it as about 6 or 7 different models and so far the time spent when you expand it out over all of it will make it on par with a lot of other higher end planes or armor.  thanks for looking.

John

  • Member since
    January 2015
Posted by PFJN on Tuesday, May 16, 2017 3:11 PM

Wow,

Your build looks great.  The level of detail in the kit is amazing.

Can't wait to see more pictures of your build.

Pat

1st Group BuildSP

  • Member since
    June 2014
  • From: New Braunfels , Texas
Posted by Tanker - Builder on Tuesday, May 16, 2017 4:27 PM

Hmmph;

 You got me with the first picture ( the engine ) . I would've changed only one thing .On some of the earlier boats ( if you wanted to do a transitional vessel ) The floor plates in the engine room were open steel grating like you'd find on top of a railroad Boxcar .

 I would probably use it also , because it helps break up shadows in such a small area ! You're going to light it but not overlight it . Let the details WORK for you . This material is available from Tichy Train Group .

 Check them out .They and Walthers have a lot of crossover materials you can use . For a sub , lots of piping means the Walthers 1/48 or " O " guage  Refinery piping set . Lots of nice pipe joints with flanges and bolts already on them ! . Plus , plenty to build your own piping or subsistute for the kit parts .( if they fight you ) . T.B.       P.S . One more thought . Can you imagine working on the hull side down low , on the diesel engine . Only the smallest guys could !

  • Member since
    July 2013
Posted by steve5 on Tuesday, May 16, 2017 9:59 PM

really nice john , the detail is incredible ,your also a really neat modeler , it look's real . steve


  • Member since
    May 2012
  • From: Pennsylvania
Posted by pilotjohn on Thursday, May 18, 2017 10:38 AM

Well, this compartment is just about done.  After several dry fitting attempts, I had what I think was the best way to add the last bulkhead to the compartment.  I started with the two tabs at the top of the bulkhead and then worked my way down.  I was able to use some pretty good size clamps so I went with normal Tamiya thin cement instead of CA.  The floor has a good amount of flex possible so it was then easy to put it into the slot on the bulkhead.  Lastly the bottom pieces lined up pretty well and some more clamps and after about 30 minutes she was very solid.  With the heft of the plastic bulkheads and ribs at the bottom this compartment is very stable.  The one long hanging pipe was then glued to the bulkhead.  Here is a picture:
 
 
Here is a second picture using a flash to get a little brighter image.  I am using my phone for the pictures, so I apologize for the quality as I am not a photographer.
 
 
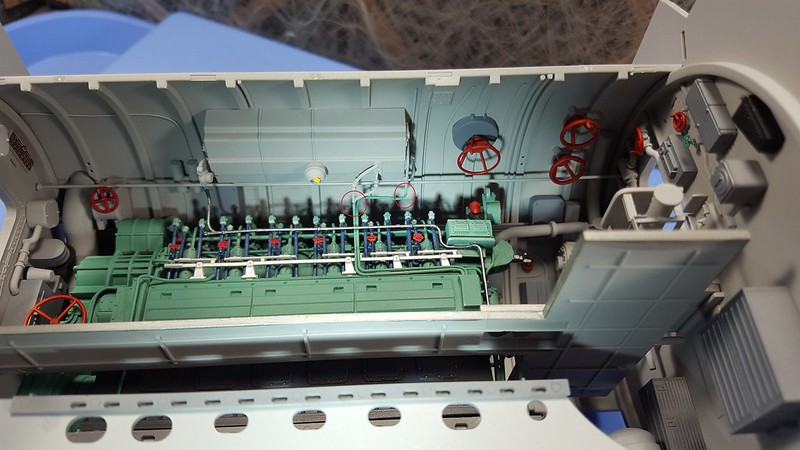
The next step was to get those pipes on the roof piece to mate up with the ones on the engine.  I double-checked the instructions and it turns out that there are only two that are supposed to match up.  The third seem to just end.  Perhaps it was capped and used for some kind of pressure relief?  I was really surprised to see how close it was after all my messing around.  The one pipe met up almost exactly and the other was only off a bit.  I did need to trim a very small piece of length off as they were overlapping.  One joint just needed a small drop of regular cement and the other got some CA as there was a bit of a bend to the joint.  That was probably more my fault of not getting the proper alignment of the pieces when I glued them separately.  The red circles show where the joints are. 
 
 
This next picture shows how the exhaust piece a cut comes out of the roof part and lies in the cutout on the top of the bulkhead.  It will extend onto the top of the roof of the next compartment and when those two are mated up I will add it in.
 
 
This picture shows the exhaust as it comes down from the roof and bends in and around and mates up behind the engine.  I did not glue it at all as I need to be able to make sure it fits at the top, so just some tape for now.  You cannot see behind the engine so if it off a bit you will never know.  You can also see the join of that long pipe section.
 
 
This picture shows how the ribs from the bottom match up to the roof piece.  These are not going to be visible at all.  It is not a perfect flush fit as the stick out a little behind the curve of the pieces.  I don’t know if they will have to be trimmed when I fit it into the hull or if there is some room.  Time will tell on that one.
 
 
These are the last three long pieces that need to be attached.  The instructions say to put these in first before the last bulkhead, but I chose to wait as I had some maintenance to do joining those pipes, replacing the valve wheel I knocked off, and I just wanted to make sure about the LED diodes too.
 
 
Here they are after being attached.  No issues.  The curve in the one pipe going around that one large valve wheel is real not an optical illusion.  For all the issues we have read about with some Trumpeter kits, this one so far has been pretty good to work with from the assembly perspective.  I have no idea about historical accuracy.
 
 
Now for what we all want to see and why I got this one; the lighting.  Let me say these were taken in a very dark room with a cell phone, so the image is not a completely true picture of how it looks.  Here is the first one:
 
 
This second one from a slight angle:
 
 
I do believe that the one end is too dark, and I will probably add another LED at that end somewhere.  The instructions show only two light fixtures, but I want to make sure it looks more like it actually would have.  I have to believe they had enough light in there to see what they were doing…
 
Well that is all for a bit.  I am going to take step back and make sure I don’t get too anxious to rush things.  I am not sure what compartment will be next, but I will post it up as I go.
 
Many thanks for looking and again a thank you for all your comments.
 
John
  • Member since
    August 2014
  • From: Willamette Valley, Oregon
Posted by goldhammer on Thursday, May 18, 2017 1:43 PM

All I can say is.........WOW!!!!!Bow DownBow Down

fox
  • Member since
    January 2007
  • From: Narvon, Pa.
Posted by fox on Thursday, May 18, 2017 4:37 PM

O-u-t-s-t-a-n-d-i-n-g!!!

Jim  Captain

 Main WIP: 

   On the Bench: Artesania Latina  (aka) Artists in the Latrine 1/75 Bluenose II

I keep hitting "escape", but I'm still here.

  • Member since
    July 2012
  • From: Douglas AZ
Posted by littletimmy on Thursday, May 18, 2017 8:23 PM

Man this makes me want to watch Das Boot for the144th time!

Earlier in your posts I was thinking the interior color should have been slightly darker, but I'm no expert on the subject. You did the right thing going with the light grey, it makes the interior easy to see.

Besides, the Germans were having a hard time mixing batches of the same shade of grey every time..... what with the Allies bombing the shipyards all the time.

Sitting on the edge of my seat wating to see more of this....(wipeing drool off my chin!)


BTW/ That engine could stand alone as a work of art all by itself!!!

 Dont worry about the thumbprint, paint it Rust , and call it "Battle Damage"

  • Member since
    June 2014
  • From: New Braunfels , Texas
Posted by Tanker - Builder on Sunday, May 21, 2017 9:47 AM

John !

 That is some awesome work .Do they give you both engines in the kit ? Next please ! T.B.

  • Member since
    January 2015
Posted by TheMongoose on Sunday, May 21, 2017 9:57 AM

Stupendous! 

I think you're right about the lighting, seems to need a little more by the hatchway. 

In the pattern: Scale Shipyard's 1/48 Balao Class Sub! leaning out the list...NOT! Ha, added to it again - Viper MkVii, 1/32 THUD & F-15J plus a weekend madness build!

  • Member since
    May 2012
  • From: Pennsylvania
Posted by pilotjohn on Monday, May 22, 2017 9:20 PM

Tanker - Builder

John !

 That is some awesome work .Do they give you both engines in the kit ? Next please ! T.B.


TB; Thank you very much.  No there is only one engine.

john

  • Member since
    May 2012
  • From: Pennsylvania
Posted by pilotjohn on Monday, May 22, 2017 9:21 PM

TheMongoose

Stupendous! 

I think you're right about the lighting, seems to need a little more by the hatchway. 


Thank you.  There are a couple of compartments with four lights listed in the roof, so it will be interesting to see if those are too much.

john

  • Member since
    May 2012
  • From: Pennsylvania
Posted by pilotjohn on Monday, May 22, 2017 9:22 PM

fox

O-u-t-s-t-a-n-d-i-n-g!!!

Jim  Captain


Jim;

Thank you.

john

JOIN OUR COMMUNITY!

Our community is FREE to join. To participate you must either login or register for an account.

SEARCH FORUMS
FREE NEWSLETTER
By signing up you may also receive reader surveys and occasional special offers. We do not sell, rent or trade our email lists. View our Privacy Policy.