SEARCH FINESCALE.COM

Enter keywords or a search phrase below:

1/350 Hasegawa Akagi Complete.

39618 views
494 replies
1 rating 2 rating 3 rating 4 rating 5 rating
  • Member since
    July 2014
Posted by modelcrazy on Tuesday, March 9, 2021 8:47 AM

I worked on the hull weathering but I was just not happy with the hammock splinter shields I made from Milliput for the gun platforms and such. They were out of scale and just didn't look good and took away from the overall picture IMO....so I removed them. After replacing the railings around the 12.7mm platforms and sanding where I had attached the other shields I was done for the night. I have a few more places to replace/install the railing and then on to the rope splinter shelds for said guns. First I need to repair the paint where the hammocks were located


Steve

Building a kit from your stash is like cutting a head off a Hydra, two more take it's place.


http://www.spamodeler.com/forum/

  • Member since
    December 2020
Posted by Thuntboss on Tuesday, March 9, 2021 11:51 AM

modelcrazy

Thuntboss, you can't see any of pics at all? I haven't uplaoded any in the past few days.


No sir, not a one.

"Do it as well as your experience and skill allow. Practice and persistence increase skill"


  • Member since
    July 2014
Posted by modelcrazy on Tuesday, March 9, 2021 12:10 PM

Hmmm, that's very odd. I think you're the only one, at least you're the only one that said anything. I'm not sure what to do to change that. I use Imageshack and have for years without any issue.

Steve

Building a kit from your stash is like cutting a head off a Hydra, two more take it's place.


http://www.spamodeler.com/forum/

  • Member since
    May 2020
Posted by Keyserj on Tuesday, March 9, 2021 9:17 PM

Nice work on the hull Steve. I have no problem seeing your pics.

"Why don't you knock it off with them negative waves?"- Oddball


John

On the bench:


  • Member since
    July 2014
Posted by modelcrazy on Wednesday, March 10, 2021 9:38 AM

Thanks John,

No pics today but I did spen most of the evening reinstalling the railing that went were the splinter shields went. I should be able to complete the port side and touch up paint in the next few days then back on track. My list is getting shorter and won't be long before it's in the seascape base and just working on the crew and planes. 160 days left to finish her completly 

Steve

Building a kit from your stash is like cutting a head off a Hydra, two more take it's place.


http://www.spamodeler.com/forum/

  • Member since
    August 2014
  • From: Willamette Valley, Oregon
Posted by goldhammer on Wednesday, March 10, 2021 12:22 PM

Keep the faith, we all know you'll have her at Nat's, even if on a towing hawser tied off to a cruiser.

No justice to be had if you don't bring a trophy home to put along side her on the shelf.

  • Member since
    July 2014
Posted by modelcrazy on Tuesday, March 16, 2021 9:02 AM
A few more days, a few more things added, a few more things to repair.
My fat hands just can't seem to keep their meat hooks from bending or breaking off a piece of something painstakingly added. Oh well, two steps forward, one step back.
I completed the hull weathering and was starting on the futon shields that I made, and they just looked out of scale and took away from the build IMO. So, ...I took them off......one step back. After reinstalling new railing where the shields were (I like the non-Hasegawa stuff better anyway) and re-spraying and weathering the hull, I sprayed some dull coat to the entire ship...part of a step forward. I took the build to a friend’s house to see it in person, but I saw the silvering on the wind direction strips decal attached to the bow. With everything else looking like it is, that just stuck out like a sore thumb. Once I brought it back home, I took 24 hours considering my options. The best, and one I went with, was to scribe along each strip and using wet sandpaper, 1000 grit, I was able to remove the offending additional carrier paper.... continuation of the step back. New problem, now I have a triangular section that's clean and almost perfect  . After re-applying a gloss coat, I wet sanded again, this time trying to match the areas that were weathered. Once completed I then went back over the area with an oil wash. It turned out pretty well I think and assuming that you never knew what had happened, almost unnoticeable and looks like I meant it.... the rest of the first step forward.
The above paragraph represents around 7 lost days   but the good news, it takes care of issues that surely would have counted against me. Tonight, I need to go back over that area with some dull coat.
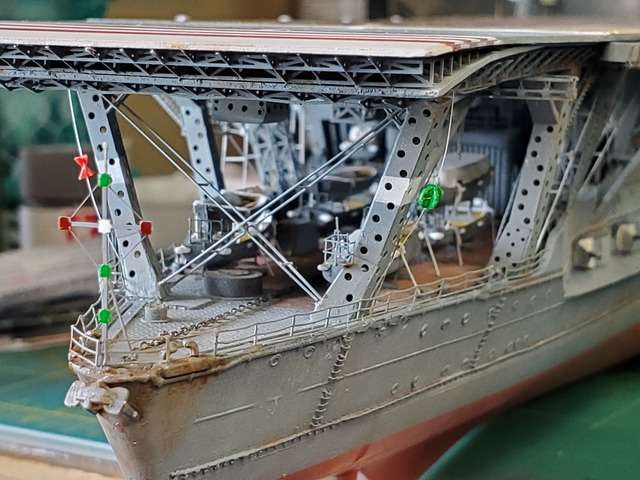
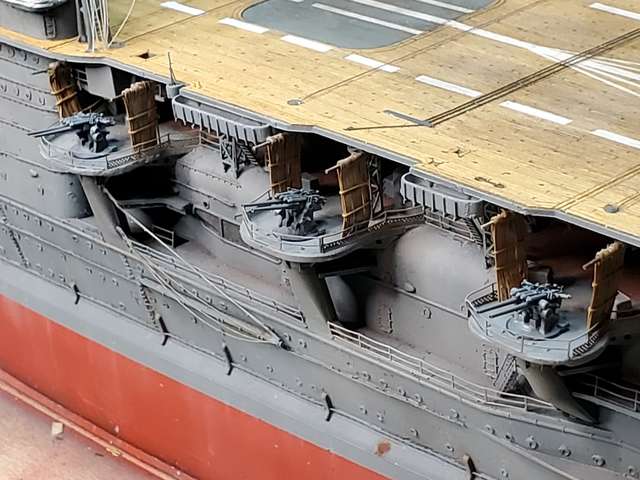
Now on to the second step forward. I completed the rope shields using the laser paper cut-outs from Korea (remember those) which again, took a few days to get right, installed the Type 10 120mm twin AA guns and the flags/pennants to the mast lanyards. As close to the picture taken before the second wave as I could. I couldn't find a white/blue/white/blue/white pennant, so I went with a red/white/red/white/red. It's probably telling them to attack their own carries for all I know.
I'm also in the process of installing the boats to the davits and of course that's proving to be a small pain as well.

Steve

Building a kit from your stash is like cutting a head off a Hydra, two more take it's place.


http://www.spamodeler.com/forum/

  • Member since
    April 2015
Posted by Mopar Madness on Tuesday, March 16, 2021 9:39 AM

I'm not up to speed on my ship jargon to know exactly what a wind directional item is but I certainly can't see anything in the pictures that stands out. Excellent save my friend!

Chad

God, Family, Models...

At the plate: 1/48 Airfix Bf109 & 1/35 Tamiya Famo

On deck: Who knows!

  • Member since
    July 2014
Posted by modelcrazy on Tuesday, March 16, 2021 3:13 PM

Thanks Chad, they were stripes painted at angles on the fore deck. There was a steam outlet at the point of the arrow which would show the direction of the wind for the pilots. The decals had carrier paper which covered the entire arrow.


Steve

Building a kit from your stash is like cutting a head off a Hydra, two more take it's place.


http://www.spamodeler.com/forum/

  • Member since
    January 2015
Posted by TheMongoose on Tuesday, March 16, 2021 7:39 PM

Can't wait to see it! Got the email saying Vegas is still on. Wife and I plan to live it up.

In the pattern: Scale Shipyard's 1/48 Balao Class Sub! leaning out the list...NOT! Ha, added to it again - Viper MkVii, 1/32 THUD & F-15J plus a weekend madness build!

  • Member since
    July 2013
Posted by steve5 on Tuesday, March 16, 2021 11:40 PM

you should be proud of what you have built steve , it's just awesome . Bow Down

very jealous of you too mongoose , getting to see it live . Smile


  • Member since
    July 2014
Posted by modelcrazy on Wednesday, March 17, 2021 9:47 AM

Thanks Chris and Steve,

Chris, we should plan on lunch or something. Maybe with the other FSM members that show up.

Steve

Building a kit from your stash is like cutting a head off a Hydra, two more take it's place.


http://www.spamodeler.com/forum/

  • Member since
    January 2015
Posted by TheMongoose on Wednesday, March 17, 2021 8:53 PM

modelcrazy

Thanks Chris and Steve,

Chris, we should plan on lunch or something. Maybe with the other FSM members that show up.


for sure! We'll have to start a thread for lunch meet up once we get closer Smile Burger

In the pattern: Scale Shipyard's 1/48 Balao Class Sub! leaning out the list...NOT! Ha, added to it again - Viper MkVii, 1/32 THUD & F-15J plus a weekend madness build!

  • Member since
    April 2020
  • From: Mountains of Western MD
Posted by BBorBust on Wednesday, March 17, 2021 9:53 PM

Fantastic work steve! Have not checked in for a while. Life has been crazy. Glad to see this thing trucking along. 

  • Member since
    July 2014
Posted by modelcrazy on Thursday, March 18, 2021 8:07 AM

Thanks BB! Life has been nuts for me as well. If I'm lucky, I get maybe an hour a night on this thing. Supper lucky, half a day.

I'm thinking, at this point all I have left on the ship itself is the landing light system, finish the 14 25mm AA guns, install the colapsible aerial antennas, deck neting, fix the rails on the fore and aft deck, install the jack masts and anchors and that's all I can think of right now. I know there's one or two more items but barring anything more demanding on my schedule, I think I probably have a week or two before I can call the ship finished.

Then on to the seascape, planes and crew.

Steve

Building a kit from your stash is like cutting a head off a Hydra, two more take it's place.


http://www.spamodeler.com/forum/

  • Member since
    December 2003
  • From: 37deg 40.13' N 95deg 29.10'W
Posted by scottrc on Friday, March 19, 2021 3:31 PM

I have been away from modeling and FSM too, I am glad to see you made so much progress and overcame a lot of challenges with this build.  The reaserch you have done really shows in your efforts.  It is a really fine rendition of Akagi you have Steve.

Scott

  • Member since
    July 2014
Posted by modelcrazy on Monday, March 22, 2021 10:02 AM

Thanks my friend!

I was able to get quite a bit done this weekend. Almost done with the carrier itself!

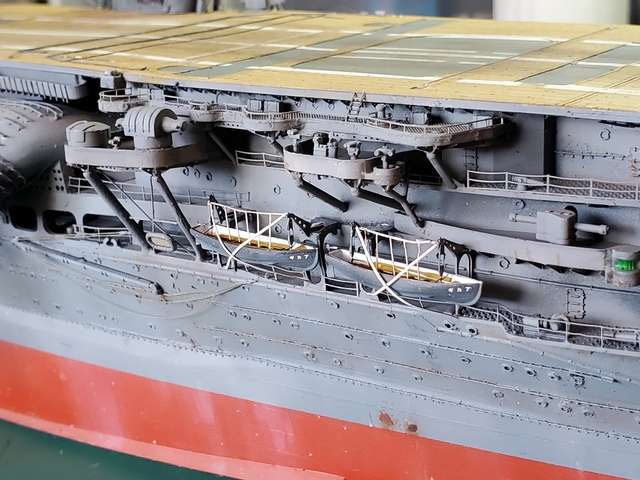
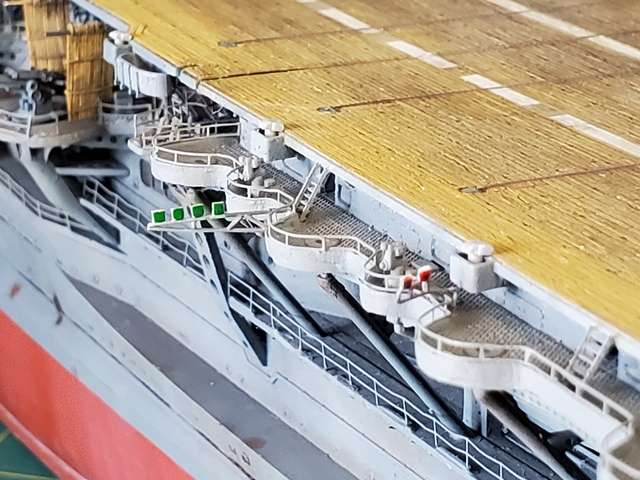
I completed the side boats, scratched the landing light system, repaired various area broken off or bent with my fat fingers, scratched the rudder position indicators and touched up the paint.

I started the water base because setting it in the base, while making it difficult to work on it due to the bases large size, 12"x32", will lessen the possibility of breaking items such as the folding aeriels and safety netting hanging off the side of the flightdeck.

The rope shields with the type 10 120mm AA guns.

Forgive me if I you already saw some of these pics. I loose track.
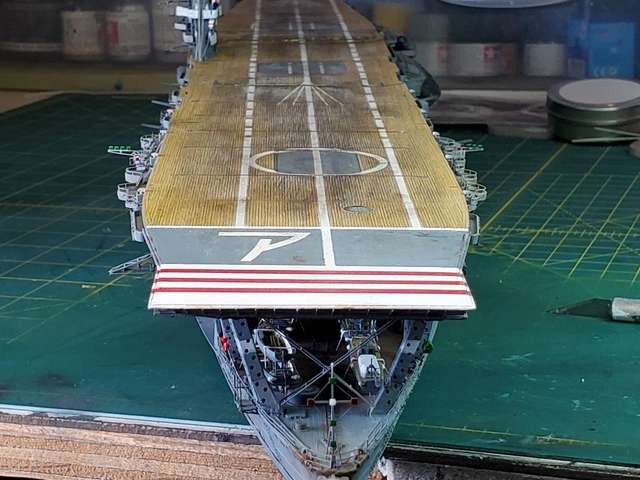
The flight deck, decal carrier paper post surgery. The deck aft of the indicator lines is a little too sanded down but that just adds to show wear, at least I hope it does.

The side boats tied down.
Landing light system
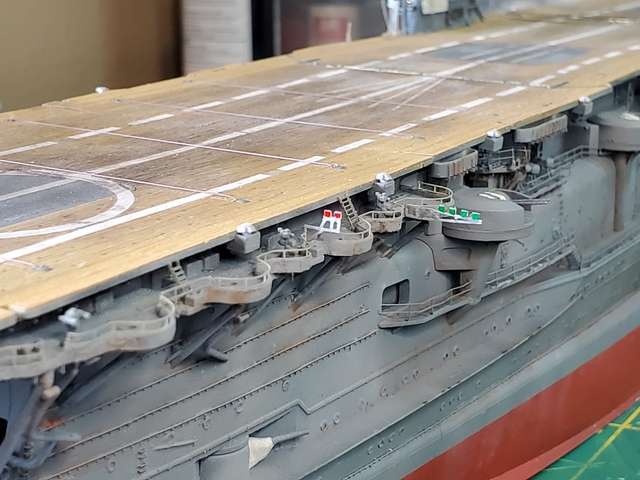
The rudder indicator system. Port, red hourglass, starboard, red ball.
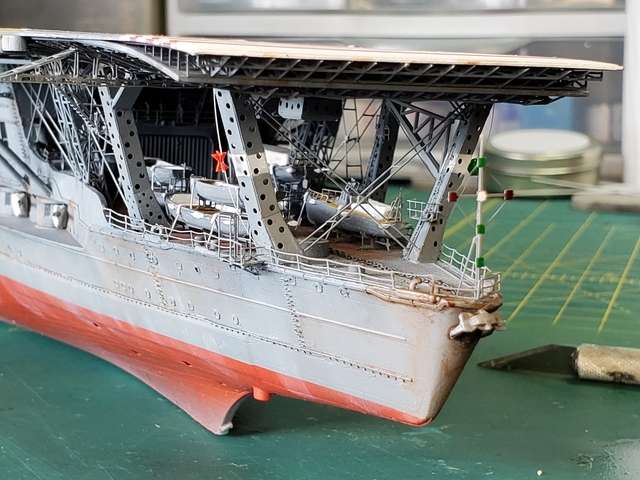
What everything would have looked like landing.
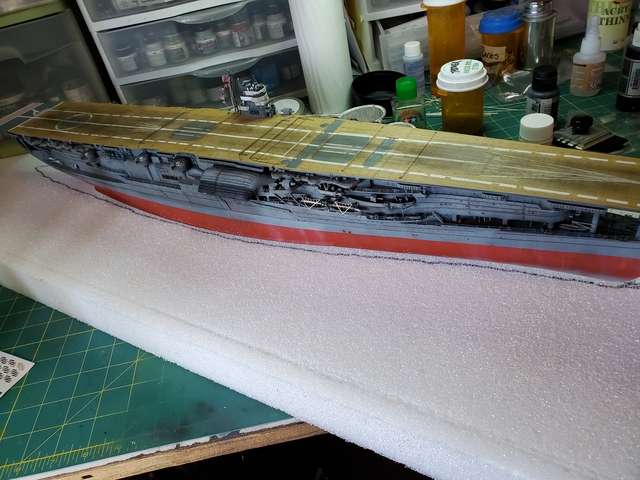
On to the base. I started out as usual tracing the hull. Why I don't do this before I start building is beyond me.
Next, cut out the hull, and grind the waves. The Akagi just came out of a squall so the waves were a little rough before they launched.
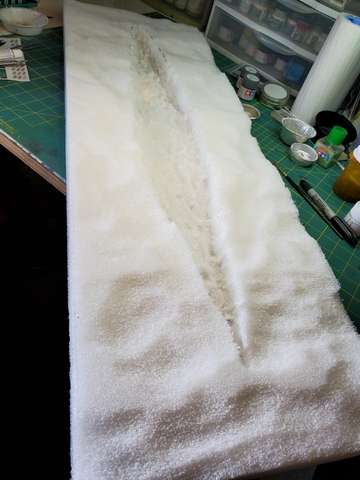
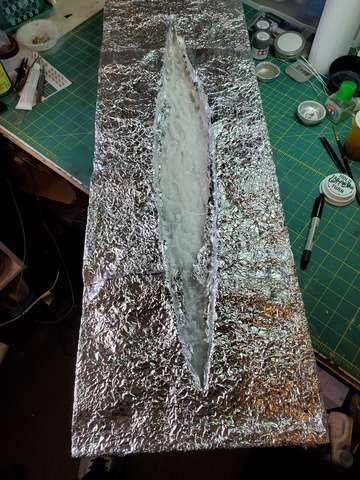
Next, I added aluminum foil for the chop and primed with grey paint to cut down the metallic look, I also added some paper towels soaked with glue to fill and acrylic medium the gaps. I did this by placing Saran Wrap on the base, placing the hull in it and spreading paper towles and acrylic medium to fill any gaps at the hull and removing both the hull and Saran Wrap. This is why I need to do this before building the kit. When will I ever learn. None of this will be seen in the final product.
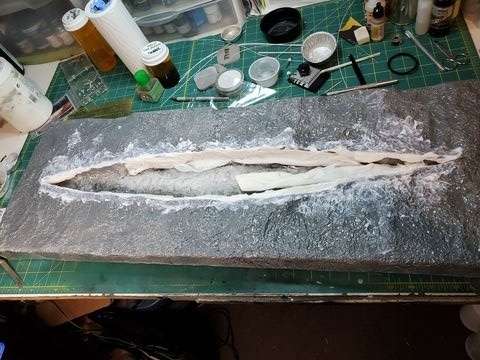
  

After all is dry in a few days, I will start the acrylic medium and painting process.

Steve

Building a kit from your stash is like cutting a head off a Hydra, two more take it's place.


http://www.spamodeler.com/forum/

  • Member since
    October 2019
  • From: New Braunfels, Texas
Posted by Tanker-Builder on Monday, March 22, 2021 10:52 AM

Well;

 Now you went and done it! I was looking at my Hornet and said to myself " Self!" If Modelcrazy can do that model and do it justice like he doing,You can do this." See what you started ? You Craftsman, You! Ship looks Awesome!

  • Member since
    July 2014
Posted by modelcrazy on Monday, March 22, 2021 11:18 AM

Thanks TB. I'm only following in your footsteps my friend.

Steve

Building a kit from your stash is like cutting a head off a Hydra, two more take it's place.


http://www.spamodeler.com/forum/

  • Member since
    April 2016
  • From: N. Burbs of ChiKawgo
Posted by GlennH on Monday, March 22, 2021 1:53 PM

mustang1989

This......

is just plain crazy...


No kidding! I had no idea.

A number Army Viet Nam scans from hundreds yet to be done:

https://www.flickr.com/photos/southwestdreams/albums/72157621855914355

Have had the great fortune to be on every side of the howitzers.

  • Member since
    July 2014
Posted by modelcrazy on Monday, March 22, 2021 2:26 PM

Thanks Glenn, I'll be starting on them shortly.

Steve

Building a kit from your stash is like cutting a head off a Hydra, two more take it's place.


http://www.spamodeler.com/forum/

  • Member since
    September 2013
  • From: San Antonio, Texas
Posted by Marcus McBean on Monday, March 22, 2021 3:37 PM

Steve,

Very nice work installing the landing lights, ship;s boats, etc.  Didn't mention it earlier but the weathering of the landing deck showing the wear of landings really is a great touch.  She looks like she hasn't had a break from action since Pearl Harbor.  She a sweet looking ship.  Nice job. 

Marcus Beer

  • Member since
    April 2015
Posted by Mopar Madness on Monday, March 22, 2021 4:18 PM

Ok, this is just too awesome! I may have to go to the Nats just to see it in person! 

Chad

God, Family, Models...

At the plate: 1/48 Airfix Bf109 & 1/35 Tamiya Famo

On deck: Who knows!

  • Member since
    July 2014
Posted by modelcrazy on Monday, March 22, 2021 7:19 PM

Thanks Marcos,

As the first carrier of Carrier Division One and constantly the flag, I don't believe she got any breaks. Her and the Kaga were considered the best the Japanese had. Losing her, the Kaga, Soryu and Hiyru were a devastating blow leaving the less experienced Zuikaku and Shokaku as the only fleet carriers left.

Chad, it would sure be great to see you my friend. As it stands now, it might be a while before I make it back to Richardson. Possibly next year for my annual check they think. 

Steve

Building a kit from your stash is like cutting a head off a Hydra, two more take it's place.


http://www.spamodeler.com/forum/

  • Member since
    July 2014
Posted by modelcrazy on Wednesday, March 24, 2021 11:02 AM

While I'm waiting for the deck to dry I started on the planes. As an update, here is what I'm working with. The Infini 350 detail set and the Hasegawa Carrier aircraft sets.

Here is one of the Zeros with the area to be removed in black and after the PE interior is installed.

I found it difficult to grind out the interior just enough not to either gring theough the exierior or break the fuse where it is thin. I have 15 zeros to pratcice with and the first wave only had nine. The Kates will appreciate the practice.

First wave Zeek markings

Still trying to get a list of the 27 Kates. I found 4 and each are a little diffrent from the other but I may have to make it up.

Steve

Building a kit from your stash is like cutting a head off a Hydra, two more take it's place.


http://www.spamodeler.com/forum/

  • Member since
    October 2019
  • From: New Braunfels, Texas
Posted by Tanker-Builder on Wednesday, March 24, 2021 12:49 PM

OIK!

   I thought I was bad with duplicating all the printed gear on a 1/400 Cidade-Del Rio paper model. Only two cranes to go. That is Not for me -Good Luck !!

  • Member since
    October 2019
  • From: New Braunfels, Texas
Posted by Tanker-Builder on Wednesday, March 24, 2021 12:52 PM

I made another post further on!

 Following in my footsteps? My Gosh, what have I done? I hoped to teach folks, But this? This project is Awesome from start to where you are now, I love it! It definitely makes me proud to say I BUILD MODELS ! !

  • Member since
    August 2019
  • From: Central Oregon
Posted by HooYah Deep Sea on Wednesday, March 24, 2021 2:01 PM

I just received my 1/350 Marine Air Group kits and looked at them. I can't even imagine putting cockpit details on those itty-bitty planes and helos. Magnifying lenses, tweezers, or whatever; these fingers can't do it. Not in my skillset.   Wow!!!

"Why do I do this? Because the money's good, the scenery changes and they let me use explosives, okay?"

  • Member since
    July 2014
Posted by modelcrazy on Wednesday, March 24, 2021 2:09 PM

Thanks TB and Hoo Yah

I never would have thought a company was crazy enough to make such a kit. Leave it to Infini to do such a crazy stunt. Whats really nuts, the PE sets are usually sold out, so theres more nutso people out there than just me.

BTW, Infini also makes a WW2 USN aicraft set as well.

Steve

Building a kit from your stash is like cutting a head off a Hydra, two more take it's place.


http://www.spamodeler.com/forum/

  • Member since
    July 2014
Posted by modelcrazy on Friday, March 26, 2021 8:26 AM

Moving on with the base.

First using rough sandpaper, I sanded the base to remove any sharp peaks caused by painting on the gel.

Next, I mixed the color for the sea. Since the Akagi was in deep water the sea will be a dark blue. I used acrylic tube paint mixed with water to spray. The mix was 1 part green, 3 parts grey and 7 parts blue.

Once that was dry I added some white to my blue mixture to color the water where it churned and caused bubbles.

Satisfied with that I sprayed acrylic varnish thinned with water to protect the coats and give it an initial sheen.

Possably tonight I'll set the Akagi in the base and start on the cotton.

Steve

Building a kit from your stash is like cutting a head off a Hydra, two more take it's place.


http://www.spamodeler.com/forum/

JOIN OUR COMMUNITY!

Our community is FREE to join. To participate you must either login or register for an account.

SEARCH FORUMS
FREE NEWSLETTER
By signing up you may also receive reader surveys and occasional special offers. We do not sell, rent or trade our email lists. View our Privacy Policy.