SEARCH FINESCALE.COM

Enter keywords or a search phrase below:

T34/85 w/bedspring armor WIP *finished*

13016 views
91 replies
1 rating 2 rating 3 rating 4 rating 5 rating
  • Member since
    January 2005
  • From: in the tank factory in my basement
T34/85 w/bedspring armor WIP *finished*
Posted by biffa on Thursday, February 1, 2007 1:22 AM

Hi guys, tonight i got to start on the new Dragon T34/85 with bedspring armor and im going to try do a bit of a build thread on it, it wont be anywhere near as good as some of the other excellent articles being done but it will be a little better than some finished images and a "what a beauty of a kit" statement or at least i hope so.   :)
Well for about 2 hours work tonight i managed to get through steps 1,2,3,and 5, i skipped step 4 which consists of the front and back plates of the lower hull so i could get the wheels on and setting up for the night

Step 1, preparing the wheels,
 now the wheels look really great but i have one small gripe and that is the road wheels have four heavy connection points to each wheel and these are a bit of a pain but it is only a small gripe.

Step 2, this is the suspension boxes and small plates that glue to the bolted ring of the drive wheel housing.

Steps 3 and 5, this consists of the suspension arms and the wheels. i didnt get pics of the suspension arms for some reason but there are no issues with them except the usual cleanup and they fit very well after the image below was taken i took 2 straight edged sanding boards and slotted it between the road wheels so they will set up straight by morning.

hopefully more progress tommorrow.

Ron g.
  • Member since
    March 2003
  • From: Rain USA, Vancouver WA
Posted by tigerman on Thursday, February 1, 2007 6:54 AM
This is what the natives have been asking for. I enjoy all the tutorials. You just can't beat the hands-on knowledge you're getting. Needless to say I, like others, can't wait until you get to the weathering. Didn't hurt to get a cool topic either.

   http://i7.photobucket.com/albums/y269/wing_nut_5o/PANZERJAGERGB.jpg

 Eric 

  • Member since
    July 2003
  • From: Toronto, Ontario, Canada
Posted by zokissima on Thursday, February 1, 2007 7:35 AM
Great idea. I will be watching with interest. I just finished building the T-34-85 premium, sans the bedsprings armor. Will be interesting to see you go through this one.
  • Member since
    July 2003
  • From: On my kitchen counter top somewhere in North Carolina.
Posted by disastermaster on Thursday, February 1, 2007 8:05 AM

Approve [^] Here’s Biffa in action last night.
Propeller [8-] Late into the night, while all the rest of us sleep…..
Zzz [zzz] Zzz [zzz] Zzz [zzz] Zzz [zzz] Zzz [zzz] Zzz [zzz] Zzz [zzz] Zzz [zzz] Zzz [zzz] Zzz [zzz]

…….  the machine continues to run.

(....the sound of "24" in the background)


Shock [:O] This is #6 already ! Laugh [(-D].

Steve


Sherman-Jumbo-1945

"I was so much older then, I'm younger than that now"


  • Member since
    July 2004
  • From: Texas
Posted by wbill76 on Thursday, February 1, 2007 12:57 PM
Looking forward to seeing this one through to completion Ron! Off to a good start.
  • Member since
    January 2005
  • From: in the tank factory in my basement
Posted by biffa on Thursday, February 1, 2007 1:22 PM

Big Smile [:D] steve how you get a camera into the basement Big Smile [:D]

Thanks guys i appreciate the support, Eric the painting and weathering will be the hardest to log but i will give it my best effort. Zoran did you experience any of the problems i mentioned below with your build? Bill this whole idea is kinda your fault, you've spoiled everyone with your build logs Smile [:)]

Well when i woke this AM there was snow on the ground so no work for me for the rest of the week the kid is out of school for snow days and the missus is working nights till weekend so shes in bed (see's an hard working RN) so this can only mean one thing,, Bench time,

So to continue from last night i went back to step 4 which was the front, and rear hull plates and tow hooks this went without a hitch and then onto step 6.

Step 4, rear plate with tow hooks (seams still to be removed i find it easier on some things to do it on the vehicle). The pics dont show too well but there are some nice weld beads on this and the front plate.

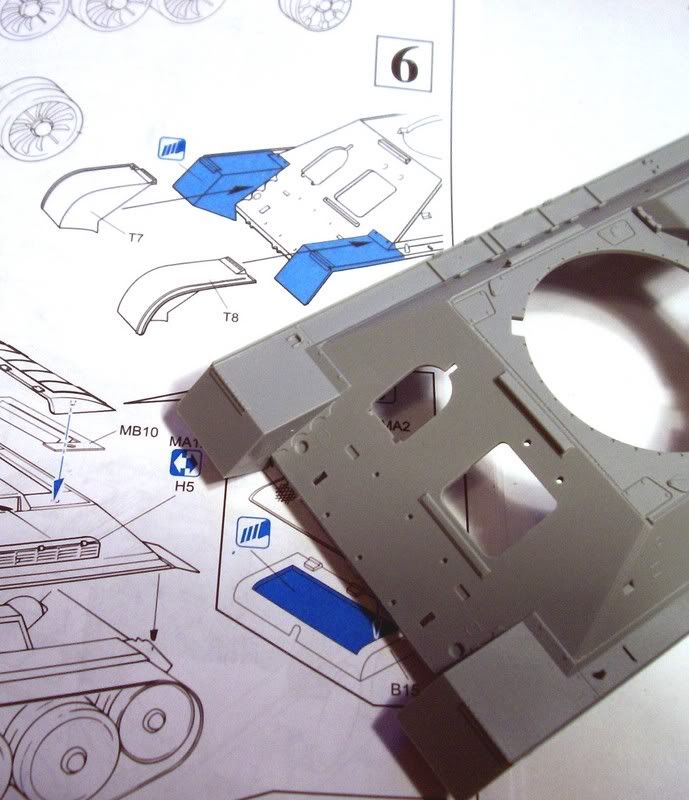
Step 6. now this step suprised me a little mainly because i wasnt
expecting it, this requires that you cut of the front fenders and replace them with another plastic set,, now replacing them with a PE set i could understand but in a kit of this caliber this just struck me as a little odd, no biggie the surgury went as planned and all look well in the recovery room.

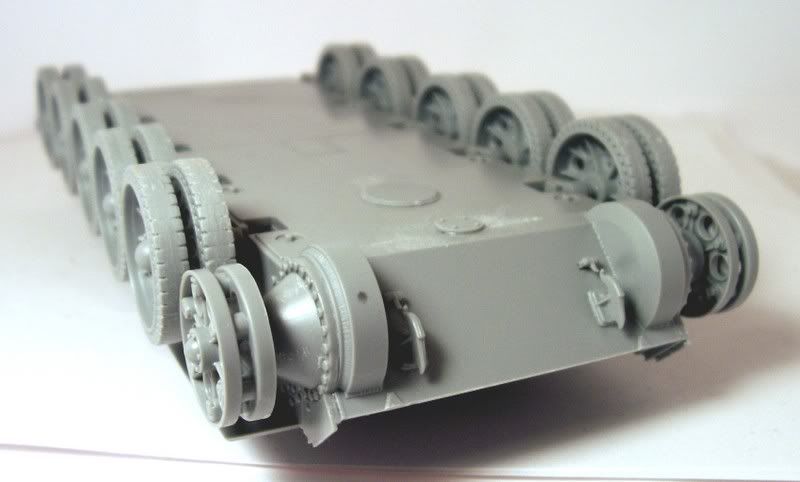
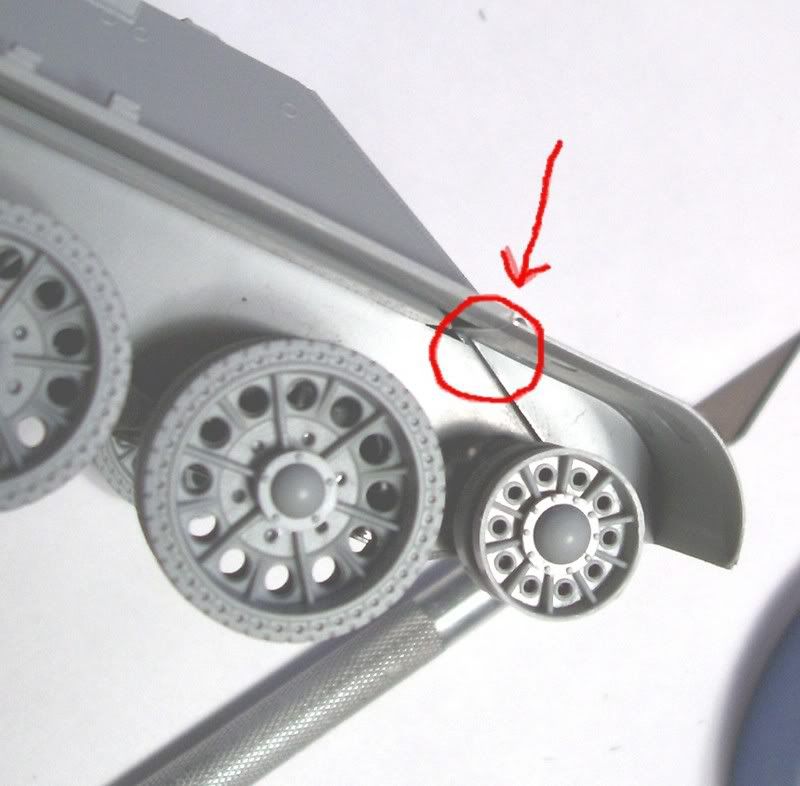
Now at this point before i moved onto step 7 which is the tracks and then onto the upper hull with the PE grills and louver vents i wanted to check the fit of the upper hull to the lower and im glad i did because i would have been in trouble.
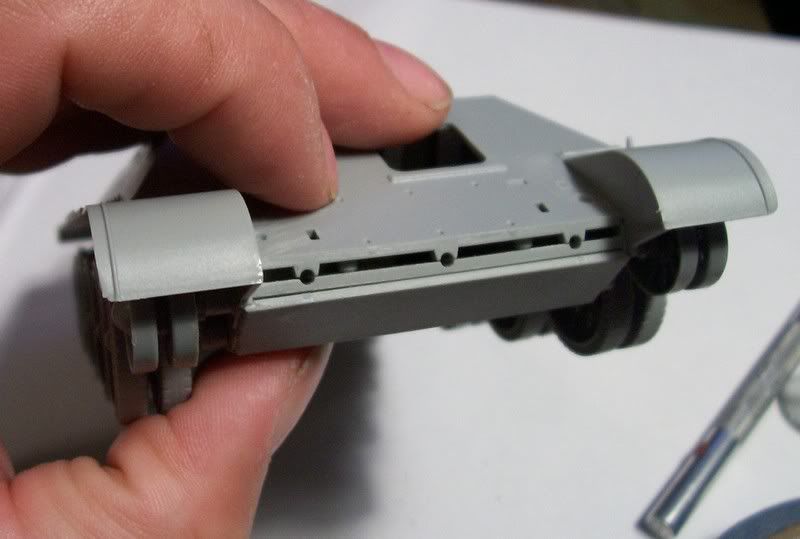
Here you see problem 1 the new fenders dont sit right on the lower hull

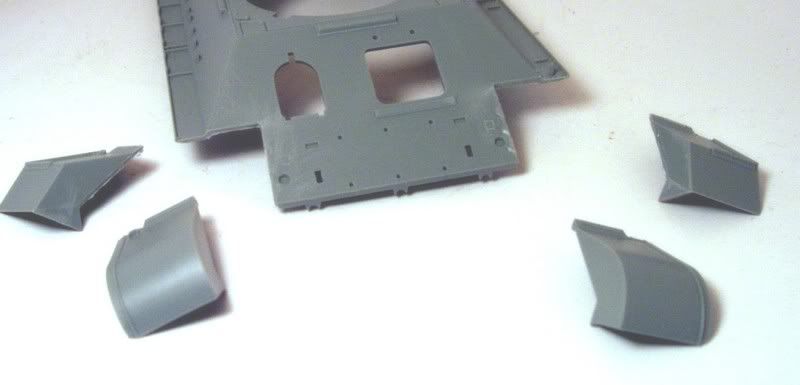
And here is the effects of that, point 1 as been fixed but see how point 2 doesnt sit correctly

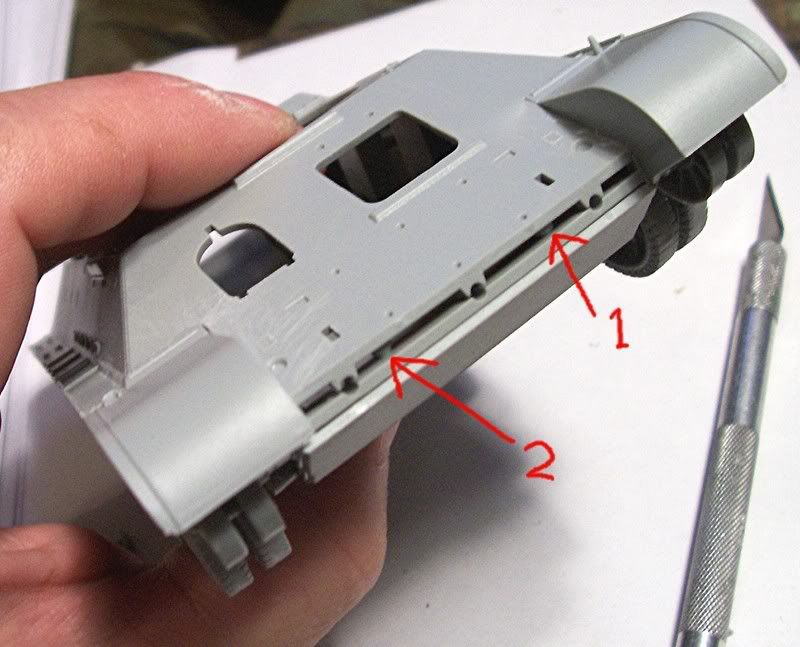
This also throws out the fitting of the rear section

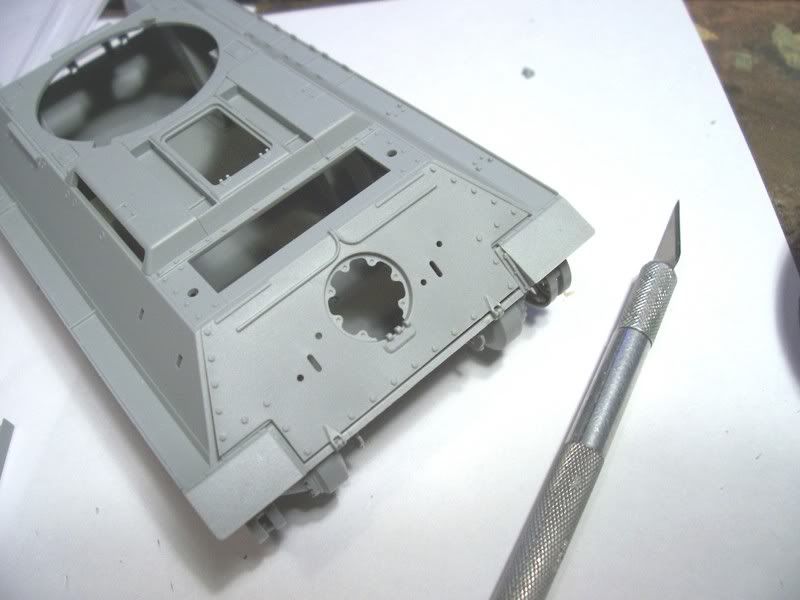
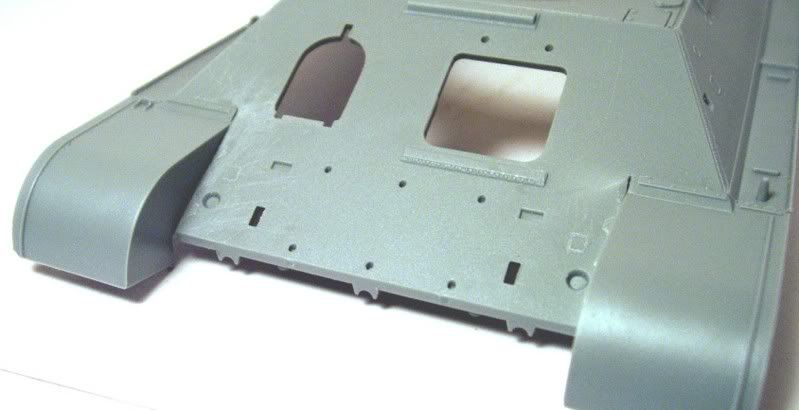
To fix this i sanded down these areas

And also had to sand down these areas to help the rear hull fit right

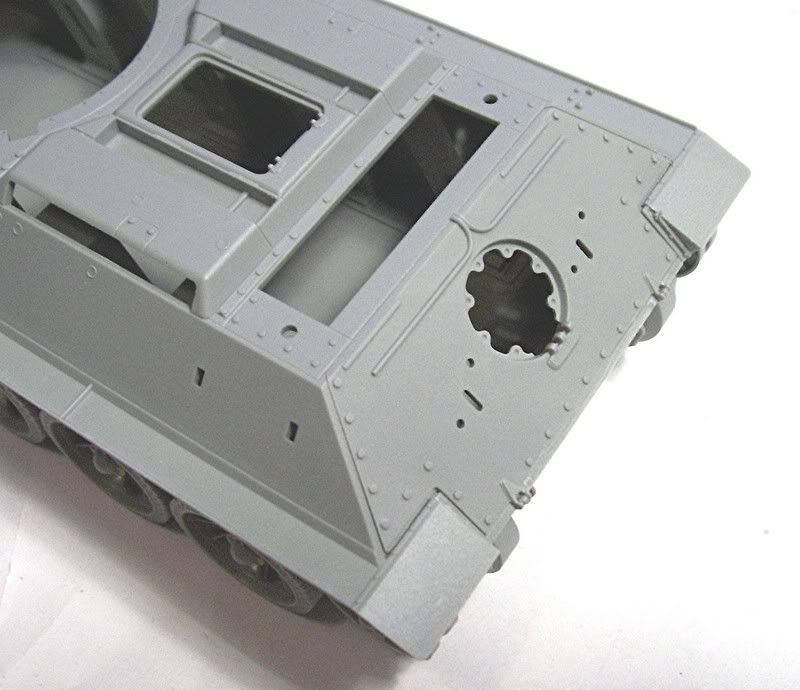
And thin the rear upper plate a tad here

And now i have this and all looks well

next up will be the tracks hopefully in the next day or two.

Ron g.
  • Member since
    April 2006
  • From: Essex, UK
Posted by FingersEddie on Thursday, February 1, 2007 2:32 PM
Is this really a Dragon offerin'?! Seems like a lot of work goin' on here to get things fittin' right! Its a great start, nonetheless Ron!
"Ask not what you can do for your country, ask what your country is doin' to you!" "If liberty means anything at all, it means the right to tell people what they do not want to hear." "Say 'NO' to censorship, it leads to a dictatorship!" http://public.fotki.com/paulyrichard/
  • Member since
    January 2003
  • From: Burlington, Ontario Canada
Posted by gburdon on Thursday, February 1, 2007 3:03 PM

I know all too well the trouble with poor fit. However, your work looks like it is well on its way to becoming a showpiece worthy of the effort. I look forward to the completion photos.

Cheers;

Gregory

VETERAN - (Noun) - Definition - One who signed a blank cheque as: “Payable to The People of Canada, Up To and Including My Life."
  • Member since
    August 2006
  • From: Oromocto, Canada
Posted by Gun Tech on Thursday, February 1, 2007 3:19 PM
Looking good so far Ron! You take great pictures and it's a great tutorial. I like that you point out exactly where there is some fit problems Smile [:)]

Jean-Michel    "Arte et Marte"

  • Member since
    January 2005
  • From: in the tank factory in my basement
Posted by biffa on Thursday, February 1, 2007 7:20 PM

Thanks for the comments guys i really appreciate it, i dont want to give the wrong impression about this kit i believe the replacement fenders are the biggest culprits with the fit issues and these are easily overcome once aware of it, and believe me this kit is going to look nice when done Smile [:)] looks like i will get the tracks on tonight and some of the PE on the rear deck.

Heres a pic of the PE.

Ron g.
  • Member since
    January 2005
  • From: in the tank factory in my basement
Posted by biffa on Thursday, February 1, 2007 9:29 PM

Last update for the day, and finishes up all steps from 1 through 7, Nothing to report except everything went nicely and looks great .

Step 7, The tracks. i simply laid out two long runs then using a small brush and testors liquid cement put the tip of the brush in the center of the track and let it pull the glue. After giving the two pieces of track about 30 minutes i simply fed the track around and glued it on the wheels.

Cutting out and replacing the engine deck intake with the PE set. Be careful to only cut the center of the plastic grill out leaving the frame then sand it flush this may sound obvious but for a crazy moment there,,,

Fitting the PE louvers

PE fender support brackets

The four smaller intake vents.

Well wrapping up step 7 and i am very happy with the way it looks and cant wait to continue on.

Thanks for looking and feel free to comment in any way.


Ron g.
  • Member since
    March 2003
  • From: Rain USA, Vancouver WA
Posted by tigerman on Thursday, February 1, 2007 11:29 PM
It's coming alive Ron. The PE screens really bring the rear deck out.

   http://i7.photobucket.com/albums/y269/wing_nut_5o/PANZERJAGERGB.jpg

 Eric 

  • Member since
    July 2004
  • From: Texas
Posted by wbill76 on Friday, February 2, 2007 8:21 AM

Moving right along Ron, making very good time on this one. I think disaster's right about the factory in your basement. Wink [;)] Thumbs Up [tup]

The approach with the engine deck screen is interesting and probably easier to get the mesh and frame to fit the curve vs. glueing the mesh to the frame and then trying to get both to curve. Have to remember that.

  • Member since
    July 2003
  • From: Toronto, Ontario, Canada
Posted by zokissima on Friday, February 2, 2007 12:12 PM
Moving along nicely. Yeah I had some minor fit issues as well when joining the upper and lower hulls. However, I also had a transmission and engine in there, so a bit more sanding was done on my part to get the thing to fit right. I also opted to not use most of the PE stuff, and saved it for another T-34 to be completed at a later time.
  • Member since
    January 2005
  • From: in the tank factory in my basement
Posted by biffa on Friday, February 2, 2007 1:26 PM

thanks guys for the comments,

Bill this seems the best method to me simply because i only had to bend the grill, the frame i just glued the back run and set it in place then glued the front run and it layed across the curve perfectly, i had imagined trying to bent two pieces together and one or both of them trying to buckle.

Zoran i will be saving a lot of PE from this also seeing as with the bedspring armor none of the fuel tanks will be used plus a lot of handles and straps. But i do have three more T34's in the stash so,,,, 

Ron g.
  • Member since
    December 2002
  • From: Winsted CT
Posted by jimz66 on Friday, February 2, 2007 2:38 PM
Looking fantastic Ron, only two questions did you glue the tracks and the road wheels in place or did you just fit them for now? and if you did glue them won't that make your job in painting the tank harder?
Phantoms rule the skies!!!
  • Member since
    August 2006
  • From: Oromocto, Canada
Posted by Gun Tech on Friday, February 2, 2007 7:03 PM
Building really fast Ron! It start to take a very good looking shape Thumbs Up [tup]

Jean-Michel    "Arte et Marte"

  • Member since
    September 2005
  • From: beacon falls , Ct.
Posted by treadwell on Friday, February 2, 2007 7:28 PM
hey ronBig Smile [:D]beautiful looking build going !!-- love the tutorial style--- and you write it well -- it reads as though we were having a conversation--- very niceThumbs Up [tup]!-- I do have one comment or question-- I don't understand why Dragon instructions told you to cut off the ' angular style' fenders already attached-- Question [?]-- while the rounded type are not incorrect,many many more of my reference shows angular type for t-34/85-- the rounded style was kind of a hold over from the t-34/76 or up gunned hulls with the '85 turret installed with necessary modifications to accomodate it--- my 1/16 kit gives both-- just thinkin maybe you wouldn't of had the fit problem with the molded on fendersBig Smile [:D]-- anywhoo, it looks great to me and it looks like the kit really does a nice job with the suspension detail -- very nice!--she's gonna be a beauty my friend -- you know i will be following this baby!!--- treadTongue [:P]


  • Member since
    January 2005
  • From: in the tank factory in my basement
Posted by biffa on Friday, February 2, 2007 9:27 PM

hi jimz, yes i did glue the tracks and wheels in place its just how i have always built, ive tried the other ways but i end up losing something or messing it up attaching it or some other brainless act so its easier for me to built everything and paint it altogether Smile [:)]

Treadster i guess im in your neck of the woods now heh your point is totally valid but the only thing is the decals i want to use (the white band around the turret and #k230) looked too cool to pass up and this calls for rounded fenders so off they came it might have been wiser to get some different decals but being wise is something i have never been accused of heh.

Thanks GT appreciate the support.

Ron g.
  • Member since
    August 2006
  • From: The Green "Mountains", Vermont
Posted by IanIsBored2000 on Friday, February 2, 2007 10:16 PM
Great job so far, and those PE bedsprings will look great, but I was just wondering, what kind of protection would a bedpring really offer?  I know its probably something obvious, but I know very little about ww2 weapons.
"Scanlon: work your knobby hands on the table in front of you, constructing a make-beleive bomb to blow up a make-beleive world."
  • Member since
    January 2005
  • From: in the tank factory in my basement
Posted by biffa on Saturday, February 3, 2007 2:01 AM

Hi Ian, the bedspring armor was designed to prematurely detonate the shaped charges fired from panzerfausts during the close quarter fighting in the city im sure someone more qualified will beable to elaborate more.

A small update.

Steps 8 & 9, these went well with no major problems except for he hull mg see pic, point 1 is supposed to fit over point 2 and trap the ball to make the mg movable but it does not fit and i didnt see the need for it too so i just solid glued the whole deal

Steps 8 & 9 completed

Step 10, this is nothing more than the exhausts and covers, now here you have a choice dragons new slide molded ones which are a tad long or the two piece which are correct length i used the new ones. (top one)see pic below

Step 11 & 12, 11 consists of the external fuel tanks which i will not be using because of the bedspring armor so i skipped this step and 12 is the the handles and hatch on the engine deck and rear access hatch i also filled in the holes where the fuel tanks go.

Step 13, this is where i start getting into new waters part of this step consists of removing the plastic handles for the straps which hold down the ice cleats and replacing them with PE ones, now i knew i wouldnt be using the ice cleats because of the bedspring armor but i still put the handles and straps on for visual effect.
 

now needing a break from the small stuff i decided to put the turret together which is steps 16 & 17, and also address the issue of the metal barrel being too small for the hole, although the plastic barrel is nice being done using the slide mold technology it just isnt shiney like the metal one :)
So i first filled the hole with filler and squished the barrel in and left to harden.

I then cleaned around the hole and scraped a slight indention then dropped a little thin CA glue in and she looked good to go i also taped off the seam around the turret and used the same filler to create a weld bead i want to make this one look a little rough the weld seam in the pics still needs a little cleaning up.
 

this thing is starting to look like a tank :)

Ron g.
  • Member since
    December 2002
  • From: Winsted CT
Posted by jimz66 on Saturday, February 3, 2007 11:00 AM
Keep em coming Ron it is looking great. I can't wait to see how you finish it. I really would like to know more about how you paint the smaller details on the road weels and tracks. When you get some time fill us all in on your methods. Looking like this kit is going to have to go on my list of ones to purchase.
Phantoms rule the skies!!!
  • Member since
    July 2004
  • From: Texas
Posted by wbill76 on Saturday, February 3, 2007 12:00 PM
Nice work on the turret seam Ron, have to remember that trick with the masking tape.
  • Member since
    April 2006
  • From: Essex, UK
Posted by FingersEddie on Saturday, February 3, 2007 12:05 PM
Hey Ron, those ice cleats are a beautiful touch! Real nice work.
"Ask not what you can do for your country, ask what your country is doin' to you!" "If liberty means anything at all, it means the right to tell people what they do not want to hear." "Say 'NO' to censorship, it leads to a dictatorship!" http://public.fotki.com/paulyrichard/
  • Member since
    January 2005
  • From: in the tank factory in my basement
Posted by biffa on Saturday, February 3, 2007 4:41 PM

thanks guys i appreciate the feedback.


Steps 14 through 16 finish up the details of the hull all except the bedspring armor which will go on after the basecoat and decals everything goes on well through these stages there is a little pe work on the tool box and a nice kit supplied tow cable

for the tool box instead of cleaning of the plastic ends i just replaced them

tool box with PE fittings
 

tow cable complete and grab handles added

toolbox fitted and the rest of the tools, handles, lights etc,,
 

and here is where we are at as of now with steps 1 through 17 completed

thanks for looking and feel free to comment in anyway.

Ron g.
  • Member since
    August 2006
  • From: Oromocto, Canada
Posted by Gun Tech on Saturday, February 3, 2007 5:00 PM
That weld seam looks awesome Ron. Man your fast! I enjoy your tutorial greatly and can't wait to see when you start the magic.

Jean-Michel    "Arte et Marte"

  • Member since
    December 2003
  • From: Montreal
Posted by buff on Saturday, February 3, 2007 6:34 PM
Great tutorial Ron.  I'm going to have to keep that weld seam technique in mind.

On the bench: 1/32 Spit IXc

  • Member since
    November 2005
Posted by Anonymous on Sunday, February 4, 2007 7:16 AM
that build is looking great! keep going.
  • Member since
    July 2004
  • From: Texas
Posted by wbill76 on Sunday, February 4, 2007 11:29 AM
By the time I come back from Sydney I expect this one will be done Ron, looking forward to it! Big Smile [:D]
  • Member since
    January 2005
  • From: in the tank factory in my basement
Posted by biffa on Sunday, February 4, 2007 8:14 PM

Thanks chaps, just a short update today i couldnt get motivated so i piddled with the PE bedspring armor a little, the instructions are very vague for the pe parts but its not overly complicated luckily and i soon figured it out.
All pieces are just posed for the time being.

Ron g.
JOIN OUR COMMUNITY!

Our community is FREE to join. To participate you must either login or register for an account.

SEARCH FORUMS
FREE NEWSLETTER
By signing up you may also receive reader surveys and occasional special offers. We do not sell, rent or trade our email lists. View our Privacy Policy.