SEARCH FINESCALE.COM

Enter keywords or a search phrase below:

T34/85 w/bedspring armor WIP *finished*

13036 views
91 replies
1 rating 2 rating 3 rating 4 rating 5 rating
  • Member since
    September 2005
  • From: beacon falls , Ct.
Posted by treadwell on Sunday, February 4, 2007 9:26 PM
hey ron-- the thoma screens look great--- any to go on the tiurret for this build?--- the p.e. you have for this kit is in my opinion very nice--such as on the tool box etc.---I have had to order a special set for my t-34Sad [:(]-- mo money mo money! aw well -- any way, this is gonna be super looking I am sureBig Smile [:D]-- Thumbs Up [tup]Thumbs Up [tup]-- treadTongue [:P]


  • Member since
    February 2006
  • From: Cincinnati Ohio
Posted by DantheMan85 on Sunday, February 4, 2007 9:50 PM
Its looking pretty good Cool [8D]

On my Work Bench: Tamiya Ford GT 1/24

Up Coming: ?


  • Member since
    March 2006
  • From: Drummondville, Quebec, Canada
Posted by Yann Solo on Monday, February 5, 2007 6:03 AM

It will look good Ron.  Fantastic job so far.

Hey Ron, I need your help.  I may do a bedspring version with my 1/16 T-34/85 but I can't find any reference on those.  Can you give me some measurements whenever you can?  Overall dimensions plus dimensions of the openings of the grills.  Then, I'll try to find something that will match these dimensions.  Thanks.

No matter where you go ....... there you are.
  • Member since
    July 2003
  • From: Toronto, Ontario, Canada
Posted by zokissima on Monday, February 5, 2007 11:22 AM
Fantastic work so far. This thing is really comming together.
  • Member since
    April 2006
  • From: Essex, UK
Posted by FingersEddie on Monday, February 5, 2007 11:29 AM
Great progress on this, Ron! It looks like some surefire aimin' with the airbrush is in order to get past those bedsprings! They look really nice!
"Ask not what you can do for your country, ask what your country is doin' to you!" "If liberty means anything at all, it means the right to tell people what they do not want to hear." "Say 'NO' to censorship, it leads to a dictatorship!" http://public.fotki.com/paulyrichard/
  • Member since
    November 2005
Posted by Anonymous on Monday, February 5, 2007 6:12 PM
those bedsprings look really good. i cant wait till you paint this. i really need this kit
  • Member since
    January 2005
  • From: in the tank factory in my basement
Posted by biffa on Monday, February 5, 2007 7:36 PM

Thanks fella's as always your comments are appreciated.

Yann sure ill get some measurements what do you want it in mm's? 

ok guys this is the last update on the build because its ready paint

Steps 18, 19, 20 and 21 were the turret details which went ahead perfectly without issue. I also finished the small weld bead on the turret.

Steps 22 and 23 are the final build steps which is the bedspring armor for the turret, again the instructions are not very clear but can be figured out. Here are the final images of the built tank as its sits ready for painting, the bedspring armour is loose and will be removed for this.

Thanks for stopping in and stayed tuned for the painting and weathering.

Ron g.
  • Member since
    March 2006
  • From: Drummondville, Quebec, Canada
Posted by Yann Solo on Monday, February 5, 2007 10:21 PM
 biffa wrote:

Yann sure ill get some measurements what do you want it in mm's? 

Doesn't matter, I can handle both metric or SAE, it's up to you.  And I'm not in a hurry so ..... whenever you got time.  Or perhaps you have a reference document or website on the subject, that would do it.

 Many thanks.

Oh, I like what you did on the turret with that glazing putty. I might give that a try on my current build.

No matter where you go ....... there you are.
  • Member since
    July 2004
  • From: Texas
Posted by wbill76 on Tuesday, February 6, 2007 5:08 AM
Looking great Ron, can't wait to see it painted. Thumbs Up [tup]
  • Member since
    December 2003
  • From: Montreal
Posted by buff on Tuesday, February 6, 2007 7:04 AM
The bedsprings look great Ron.  Not too fiddly?

On the bench: 1/32 Spit IXc

  • Member since
    December 2006
  • From: Markham ON
Posted by J West on Tuesday, February 6, 2007 1:56 PM
That looks wild man. I'm lookin forward to seeing how you paint it.
  • Member since
    March 2003
  • From: Rain USA, Vancouver WA
Posted by tigerman on Tuesday, February 6, 2007 2:07 PM
Wow, that's cool. With your weathering talents, those bedsprings will really pop out. Are you going to mangle them up a bit?

   http://i7.photobucket.com/albums/y269/wing_nut_5o/PANZERJAGERGB.jpg

 Eric 

  • Member since
    May 2005
  • From: Dublin Rep Of Ireland
Posted by terry35 on Tuesday, February 6, 2007 3:55 PM

Excellent going Ron. Can't wait to see it finished.

Terry.

  • Member since
    January 2005
  • From: in the tank factory in my basement
Posted by biffa on Thursday, February 8, 2007 1:52 AM

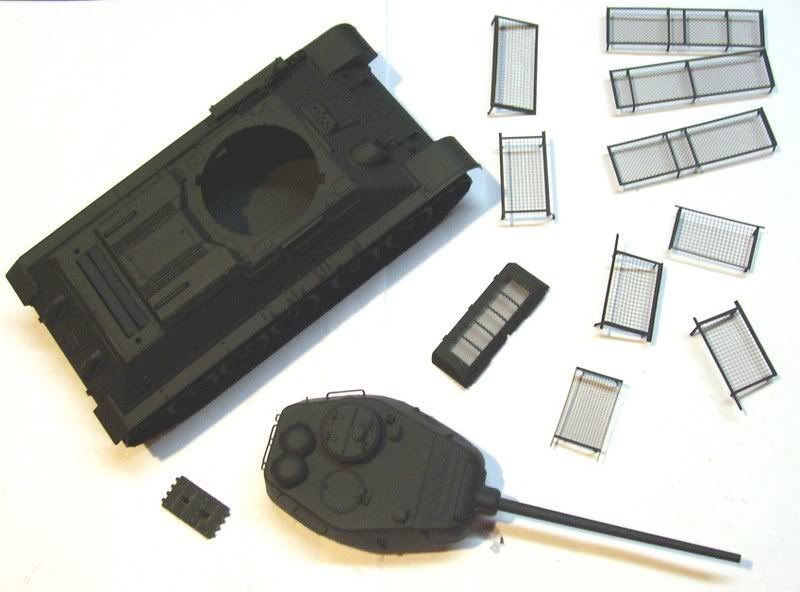
thanks guys as always your feedback is appreciated. the bedsprings were quite easy to assemble but i dont have a hold and fold or any folding device so using razors made the task a tad more fiddly still nothing serious and to answer Erics question i wasnt too concerned because they will be getting a bit beat up in the end anyway. Smile [:)]


well painting has begun now since the tiger is now out of the way.

first thing everything was primered with flat black auto primer of the cheapest variety

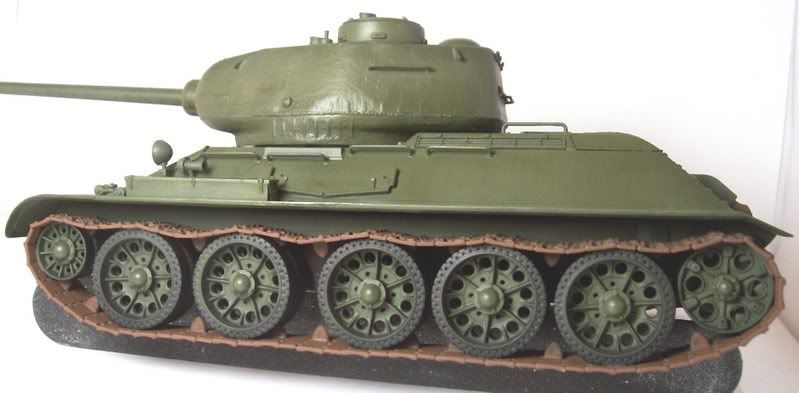
next up the basecoat which is mm acrylic dark green i let a little of the black show through in places and using my airbrush close in i painted the wheels while leaving the tires black this is important because they would be hard to paint later.
 

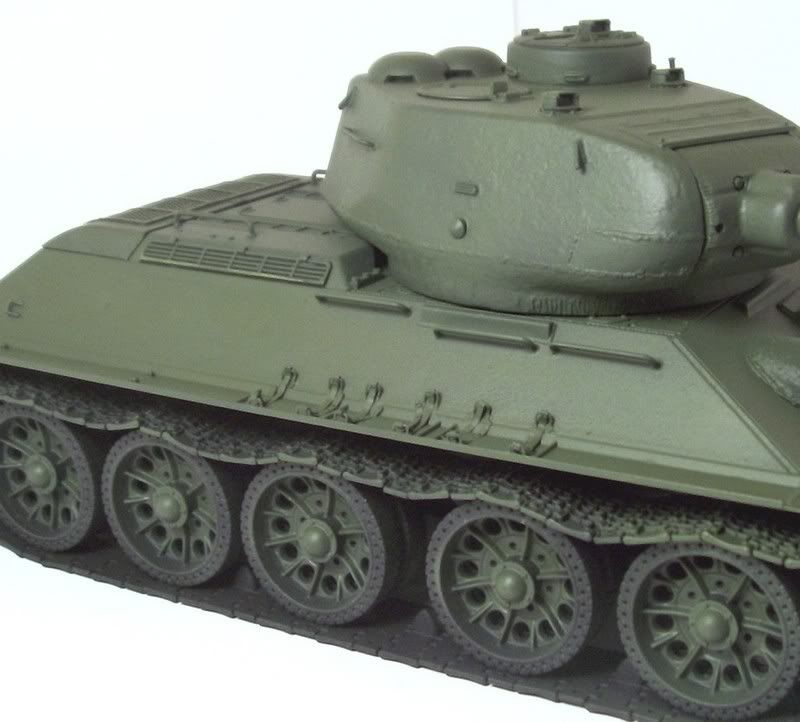
then i lightened up the dark green with a little mm desert tan and did a little fading here and there just to break things up a bit

now the fun begins, i did a filter of yellow ochre and ivory black oil paint working the filter in using a brush and oil thinner dont worry about making a mess it will all clean off if need be also make sure not to do this on an enamel base without some kind of sealer.

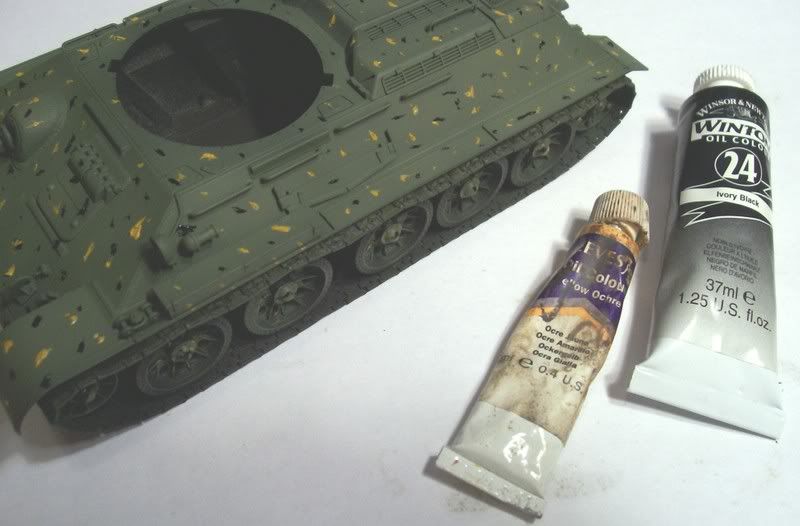
once all worked in i then began cleaning it a little with downward strokes to create a little streaking

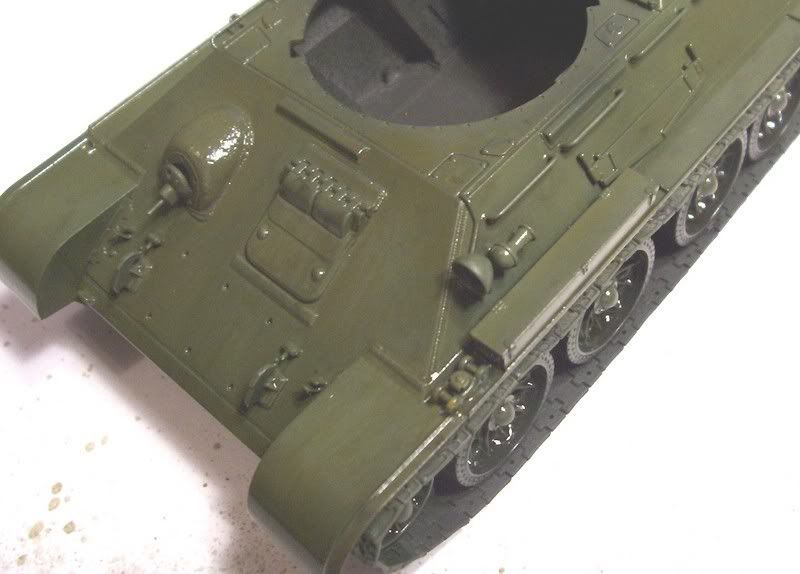
now then its time to paint the tracks, to do this i use a small brush and acrylic craft paint from walmart yes the cheap stuff works fine this is just a basecoat, i made sure to put a couple of thin coats rather then a thick one this makes it easier to get close into the wheels without touching and it wont dry and cover all the track detail up.

with that done i painted in the small straps and put a base coat on the mufflers and next up is a coat of future on the turret to ready for decals, this is the only part i am kind of anxious about getting them to lay across all those handes and what not.

Ron g.
  • Member since
    July 2003
  • From: On my kitchen counter top somewhere in North Carolina.
Posted by disastermaster on Thursday, February 8, 2007 4:04 AM

Dunce [D)] That's a new one.
I've never seen filters put on in that manner.

Steve 

Sherman-Jumbo-1945

"I never know what to expect here anymore."


  • Member since
    March 2006
  • From: Drummondville, Quebec, Canada
Posted by Yann Solo on Thursday, February 8, 2007 7:19 AM

I heard about that DOT filter method before but It's clearer now.  Thanks for showing this to us Ron.  We can clearly see how to make it and what wonderfull results we can get of it.

Really nice progress Ron.  Keep 'em coming.

No matter where you go ....... there you are.
  • Member since
    April 2006
  • From: Essex, UK
Posted by FingersEddie on Thursday, February 8, 2007 7:40 AM

Ron, the general rule is to apply filters to a matt surface. Over a gloss surface, it jus' becomes a wash. Is this what you intended?!

The build is comin' along real fine, nonetheless! 

"Ask not what you can do for your country, ask what your country is doin' to you!" "If liberty means anything at all, it means the right to tell people what they do not want to hear." "Say 'NO' to censorship, it leads to a dictatorship!" http://public.fotki.com/paulyrichard/
  • Member since
    July 2004
  • From: Texas
Posted by wbill76 on Thursday, February 8, 2007 10:01 AM

Making good progress ron and am looking forward to the next installment. 

  • Member since
    July 2003
  • From: On my kitchen counter top somewhere in North Carolina.
Posted by disastermaster on Thursday, February 8, 2007 12:45 PM
 FingersEddie wrote:

Ron, the general rule is to apply filters to a matt surface. Over a gloss surface, it jus' becomes a wash. Is this what you intended?!

The build is comin' along real fine, nonetheless! 


Dunce [D)] Yeah, that's what "I" thought. Maybe he sealed it with dullcote....Confused [%-)]


Sherman-Jumbo-1945

"I never know what to expect here anymore."


  • Member since
    January 2005
  • From: in the tank factory in my basement
Posted by biffa on Thursday, February 8, 2007 2:02 PM

hey guys, thanks for the comments, i may have my terminology wrong but something i use to change the overall tones and add depth to the paint job i usually call a filter sometimes i use this method and sometimes a use my airbrush and spray a very thinned colour or several different thinned colours but it is always to a flat finish (the finished basecoat was flat but may look a tad glossy in the pics) also there is not as much thinner on the model as the pic may indicate it wasnt so much as to run off but enought to move the paint around, if ive completely missed the point here please let me know heh Smile [:)]

 thanks.

Ron g.
  • Member since
    March 2003
  • From: Rain USA, Vancouver WA
Posted by tigerman on Thursday, February 8, 2007 4:21 PM

Ah, the secrets revealed. Thumbs Up [tup] Hehe. I'm still amazed that modelers can paint the tracks already on without making a mess all over the idler, sprocket and tires.

I just kind of read about how to do this thing with the dots. So, you take a brush and kind of mix it all up on the model and then apply downward strokes with a new thinned brush? Sorry, I'm a bit slow.  Dunce [D)]

   http://i7.photobucket.com/albums/y269/wing_nut_5o/PANZERJAGERGB.jpg

 Eric 

  • Member since
    January 2005
  • From: in the tank factory in my basement
Posted by biffa on Thursday, February 8, 2007 4:55 PM
thats pretty much it Eric i dont totally blend all the colours but try get a little variety then when i get it all mixed to suit i add a few gentle down stokes to suit but this choice is yours on how you want it to look.
Ron g.
  • Member since
    July 2004
  • From: Texas
Posted by wbill76 on Thursday, February 8, 2007 5:22 PM

The difference, as I understand it at any rate, between a wash and a filter is simply that one is applied "wet" either as an overall wash or a pin wash and the other is "dry" in the form of dots or smudges of paint. The "wash" is allowed to flow using capillary action of a gloss coat and then cleaned up with clean thinner as needed. The filter is "dry" in the sense that the paint is applied first and then clean thinner used to remove/streak/blend it as a very light translucent/transparent overlay to the base. They have shared characteristics but I don't think it matters all that much whether you apply them over a gloss or a dull coat except in the "tooth" factor for ease of blending/manipulation. The final seal for me is always a lacquer based dullcoat so all washes and filters have to be applied on a gloss coat of Future (I don't bother trying to "dull" a Future coat) for the acrylic protective layer.

That's the neat thing about this hobby though, we are constantly inventing jargon or adapating terms from the artistic realm to suit the approaches/techniques. You could just as easily call it the "polka dot" weathering approach although it doesn't sound as "cool" as a filter I guess. Big Smile [:D]

  • Member since
    January 2005
  • From: in the tank factory in my basement
Posted by biffa on Thursday, February 8, 2007 9:49 PM

quick update, i got the decals on, they were a little awkward and took some slicing and coaxing but armed with a tooth pick, cotton bud and some future they finally succumb and i think they are going to look cool.
I also moved on with the painting.

i dry brushed the tracks a little to get some metal wear using shadowed steel from reaper.

then it was time to do a little wear and tear and a bit of chipping, for this i used a scouring pad torn off a kitchen sponge and applied van dyke brown oil paint by dabbing the edges.

now i need to give the whole thing a couple of good coating of testors dullcote before i begin with the heavy stuff, here she is with everything above.


*Edit* i had a last minute change of heart and decided to add all the extra's now so everything will get the same weathering from here on.

Ron g.
  • Member since
    July 2003
  • From: Toronto, Ontario, Canada
Posted by zokissima on Friday, February 9, 2007 9:38 AM
Comming along fantastically. I'm sure a lot of people will appreciate the effort you're going through to explain the techniques throughly.
  • Member since
    November 2005
Posted by Anonymous on Friday, February 9, 2007 10:00 AM
awesome
  • Member since
    July 2004
  • From: Texas
Posted by wbill76 on Friday, February 9, 2007 1:26 PM

Ron,

If you can get it in your area or online, I highly recommend Walther's Solvaset solution for getting decals to lay down. I've used it on several builds now with different manufacturer's decals and it works great. Your T34 is progressing nicely, I'll echo zoran in saying that it's of great value to get this inside peak into your methods. Wink [;)]

  • Member since
    July 2003
  • From: On my kitchen counter top somewhere in North Carolina.
Posted by disastermaster on Friday, February 9, 2007 1:59 PM
Sign - Ditto [#ditto]   It's the best! Once you put it on, do not touch it for ANY reason. It will look like a ghia pet to start with but it will smooth out by itself.

Sherman-Jumbo-1945

"I never know what to expect here anymore."


  • Member since
    January 2005
  • From: in the tank factory in my basement
Posted by biffa on Friday, February 9, 2007 3:02 PM

many thanks fella's as always your support is greatly appreciated and i will check that out Bill it sounds like something i could definatly use.

onwards with the weathering,,, :)

I applied dullcote and did a slight dusting around the fenders and running gear with a lightened rust.

close up of turret.

and the rear.

next came the first wash this was a heavily applied van dyke brown as it dried i followed around adding and working it where nessesary.

this is how it looked when dry.

next came a black wash which was more precise and not as heavy.

i then dry brushed a little "shadowed steel" around the bedsprings and such to give a hint of metal and wear.

i feel this one getting close to the end now and i am quite pleased with the way it is looking.

Ron g.
  • Member since
    April 2006
  • From: Essex, UK
Posted by FingersEddie on Friday, February 9, 2007 4:05 PM

This is lookin' beautiful now, Ron! The weatherin' accentuates everythin' superbly! It looks like those filters in a previous step, are totally lost under all these washes you've applied now. Don't get me wrong though, this is real fine work!


"Ask not what you can do for your country, ask what your country is doin' to you!" "If liberty means anything at all, it means the right to tell people what they do not want to hear." "Say 'NO' to censorship, it leads to a dictatorship!" http://public.fotki.com/paulyrichard/
JOIN OUR COMMUNITY!

Our community is FREE to join. To participate you must either login or register for an account.

SEARCH FORUMS
FREE NEWSLETTER
By signing up you may also receive reader surveys and occasional special offers. We do not sell, rent or trade our email lists. View our Privacy Policy.