SEARCH FINESCALE.COM

Enter keywords or a search phrase below:

Kitty Hawk 1:35 SH-60b Seahawk: Start to Finish Build

24373 views
149 replies
1 rating 2 rating 3 rating 4 rating 5 rating
  • Member since
    March 2012
  • From: Louisville, KY
Posted by Builder 2010 on Wednesday, February 16, 2022 6:05 PM

As an epilog... Here's what my work space looks like when I'm done.

 This phenomenon only occurs every so often when work is done. Sadly, it doesn't last very long.

And here's my high-tech method of dealing with the sharps that are created constantly. I buy my #11s in the 100 piece packs and change then very often, especially when using it to cut decals, masking, bare metal foil, etc. I toss them all in a yogurt container and when full, tape the darn thing shut and toss it in the trash. I don't handle them any more than I have to. Being an AFid person and on a blood thinner, I try and not cut myself.

Lastly, when I said there were a lot of unused parts, I wasn't kidding. These are not all of them. I threw out a bunch of sprues that had parts on them besides these. It seems like a lot of waste.

Well... that's that. Next up will be the massive Missouri Turret project. I'm still waiting for the kit and guns to come to my local hobby shop. I'm finding more and more reference images and am busy drawing all the parts. I'm posting the whole deal on the ships part of this forum.

  • Member since
    March 2012
  • From: Louisville, KY
Posted by Builder 2010 on Wednesday, February 16, 2022 5:05 PM

Thanks all!  It's a free country. You can post any thread you'd like AND I'd be interested to see how you tackled all the challenges that I fumbled my way through. I know you'll have it dead on...

  • Member since
    January 2022
Posted by Svt40 on Wednesday, February 16, 2022 11:18 AM

Ahh you're going to kill me.

.

.

.

.

.

.

.

Nah, great job and now I'm even more concerned about trying to build mine! 

Hope I would not be stepping on anyones toes if I did the same thing if and when I eventually start mine. Make a build thread that is. Although mine would be more about correcting the kit.

  • Member since
    July 2014
Posted by modelcrazy on Tuesday, February 15, 2022 4:47 PM

Superb work Builder 

Steve

Building a kit from your stash is like cutting a head off a Hydra, two more take it's place.


http://www.spamodeler.com/forum/

  • Member since
    December 2002
  • From: Valrico, FL
Posted by HeavyArty on Tuesday, February 15, 2022 4:03 PM

Very nice.  She came out great.

Gino P. Quintiliani - Field Artillery - The KING of BATTLE!!!

Check out my Gallery: https://app.photobucket.com/u/HeavyArty

"People sleep peaceably in their beds at night only because rough men stand ready to do violence on their behalf." -- George Orwell

  • Member since
    March 2012
  • From: Louisville, KY
Posted by Builder 2010 on Monday, February 14, 2022 10:35 PM

Big day! Had a gall bladder imaging session this morning to see if it's working right and finished the Seahawk this afternoon. Won't know about the gall bladder for a couple of days, but you'll learn about the finished Seahawk tonight.


Before putting the rotor on I had to get the tail boom on. I chose to use epoxy putty since there wasn't much gluing surface for conventional adhesive AND the surfaces themselves were not very secure. I put a wad of putty on the back of the fuze side of the ResKit hinge component and pushed the parts together. Had to hold it for a while by hand and then used some tape. The putty cures pretty fast, and while this was going on I removed a lot of the stuff that had oozed out of the joint all over the place. 


After it cured I did more fine cleaning using various dental tools. BTW: you may want to ask you dentist if he has any tools that are no longer usable in the practice, but could be very useful for us modelers. I got a bunch from my dentist. After cleaning I had to go back and touchup paint any areas that degraded during all this fussing.


I did final touchup on the main rotor, trimmed all the extra-long pins that are now holding the blade hubs, and did final finish on all the wires and bits. 


I had to repair the rear blade brace since it fractured right near the fuze joint. Don't know when it happened. I drilled and pinned it. Not easy with the model so far completely and the brace glued to it. Kitty Hawk styrene was a bit brittle and broke way too often way too easily. The rotor went on easily and all the blades aligned perfectly with the braces. Miracle! 


I then remembered that I had to add paint and add the missile warning sensors that go onto the port and strbrd EMS pods in front, and the HF antenna wire. I also had to reattach the open engine cover this time with wire. It's now a bit flexible so you can bump it without it fracturing off. CA is too darn brittle! 


For the antenna, I used E-Z Line Lycra inserted into a 0.030" Albion micro tube held with some thin CA. For those that haven't use E-Z Line, it's great for rigging antenna and small naval ship rigging. It is hugely elastic and when slightly stretched stays taut. It also glues almost instantly with thin CA. I think it has to do with the huge surface area within the fiber itself. The stands making up the yarn are very fine. The tube was inserted into a hole I drill in the fuze at the antenna entry point. Also a pain in the butt since the model (including the rotor) was already there and in the way.


With that it was done. I still plan on doing the base, but the model stands on its own nicely. Here's the album.


So there you have it. Work started in mid-Oct and ended in mid-Feb about 4 months of pretty intensive work. My opinion of the model:

Pros:

1. Beautiful surface detail especially with the addition of the ResKit parts.

2. Lots of choices on build and configuration. (Huge amount of parts still left on many sprues.)

3. It's a great model in a great scale. You can really go to town on super-detailing.

Cons:

1. Instructions leave something to be desired. Terrible instructions on creating the stowed version

2. That reversed part HD33 that i had to redraw and 3D print.

3. Styrene was fragile and broke at the worst possible times. You better be a good problem solver.

4. The ResKit parts did not mate 100% accurate with the kit's requiring further problem solving.

5. Fits - While having the interior as a separate box seemed like a good idea at the time, in reality it made getting a good main joint nearly impossible requiring a lot of filling.


It was singularly the most complex aircraft build I ever did and I've been building models almost non-stop since 1954 at my 9th birthday. I've made a practice recently to have each project I attempt to push my skills. This project did not disappoint. That said, I love how the rotor head and engine came out. They met the image I had in my mind's eye and for that all the work was worth it.


  • Member since
    March 2012
  • From: Louisville, KY
Posted by Builder 2010 on Friday, February 11, 2022 5:35 PM

Now that's what I love about this forum (all forums for that matter). There's no way I as a  non-naval person I could have ever gained this level of knowledge without the contribution of the folks who join in the discussion. I suspected it was a worm drive turning the blades. The level of complexity to convert the Blackhawk to the Seahawk is staggering and tells you a lot about the increase in costs to design craft to serve in more than one branch. I suppose the Blackhawk would also have some way to index the blades and lock them so they wouldn't windmill when sitting on the ground in strong breeze.

I finished the rotor head, did the repaint, connected the deice lines, and refinished the blades including painting the pop-out nitrogen leak indicator. I also did the anti-collision belly light and finish painted the rear landing gear. I fixed all the blade lock indicators putting on fresh little slivers of PE fret to complete them. They do need some touch up paint. And I notice that I didn't trim the phos-bronze rotating pins. 

There may be a few more areas needing attention such as cleaning up the accent around the blade bolts.

While mounting the rotor and attempting to position the blades into the holders, I broke one of the holders. I also knocked off one of the blade clamps. I drilled both and pinned them.

Ran out of time today to put it all back together. I also broke off the engine hatch by grabbing the model in the wrong spot. It's a very delicate beast. It will be finished on Monday.

So everyone have a happy Super Bowl Sunday! I'd like Cincy to win, but really don't care who does as long as it's a good game that doesn't embarrass anyone.

  • Member since
    January 2022
Posted by Svt40 on Friday, February 11, 2022 3:42 PM

Some interesting tidbits about the SH-60B.  Sadly they no longer exist in the Navy's inventory nor do the HSL squadrons that used to fly them.


The aircraft has 13 pop buttons to show if something is clogged or empty.

The tail used to fold automatically

There are two large and very heavy vibration absorbers in the cabin ceiling.

If the MAD towed body hits the water or gets hung up on something it will automatically have the cable cut by a modified .38special cartridge.

There are only 6 driveshafts.

The tail rotor spins at 1100rpm

The main rotor spins at 256rpm

The engine output shafts, or high speed shafts, spin at 30,000rpm.

Every 365 calendar days the aircraft is completely gutted for inspection including draining and entering the fuel tanks.

Every 150 flight hours the aircraft goes through a major inspection A, B, C, and D.  The D inspection is the complete teardown of the rotor head.

The rotor head is made completely of titanium.

The entire aircraft is run on what is basically two Commodore 64 computers.

The UYS-1 Spectrum Analyzer, which analyzes the sonobouys signals is smart enough to re-route past failed circuit cards and costs $1.2m dollars to replace.

The aircraft has three software programs that it can run.  One is to operate the aircraft.  One is to operate the ESM system and the last is for troubleshooting the aircraft systems.

The aircraft data link system is capable of sending voice, aircraft telemetry  and video from the FLIR back to the ship.  The helo can also allow the ship to control several systems onboard the helo via data link (AKA Hawk link).

The aircraft can be towed down to the flight deck in rough seas using the RAST system.  This same RAST system is used to move the aircraft into and out of the hangar aboard ship. (FFG, DDG and CG). (missing from the KH model kit)

The aircraft can carry the following weapon systems:
Mk46 torpedo

Mk50 torpedo

AGM-114 HELLFIRE missiles (with the AAS-44 FLIR installed)

AGM-119 Penguin missiles (with the AAS-44 FLIR installed)

M-60D machine gun

GAU-16 machine gun

Mk240B machine gun

  • Member since
    March 2018
  • From: Chicago suburbs
Posted by Luvspinball on Friday, February 11, 2022 3:08 PM

While it all makes sense in how it is set up, it still amazes me that the blades just didn't fly off the rotor head.  Aint technology a beautiful thing?

Fabulous build, BTW.  I have one of these in the stash.  Not sure if I will go to your level, but nice to have a blueprint if I wanted to.

Thanks!

Bob

Bob Frysztak

Luvspinball

Current builds:  Revell 1/96 USS Constitution with extensive scratch building

  • Member since
    January 2022
Posted by Svt40 on Friday, February 11, 2022 12:37 PM

Folding the blades was quite involved.

First the rotor head had to be indexed.  So the correct two blades are facing forward and in the correct position.  There was a line painted on the swashplate that showed the index if it had to be done manually.  Typically an electric motor similar to a starter engaged the rotor brake to turn the head. The motor was on the backside of the main gear box.

Once the head was indexed the hydraulics would move all the flight controls to a certain position.  Once in place there was a pitch lock motor on the rotor head that would lock the spindles into their proper angle for folding.  

Once the pitchlocks were good the lockpin pullers would open.  The bladefold motor would drive the lockpins out. These would unlock the blades from the spindle hinge.  Once the lockpin pullers were fully extended they pulled a gear which then engaged a worm drive electric motor inside the cuff on the spindle. This motor would fold the blades back. These would run until they hit the limit switch shutting them off.


Clear as mud.


  • Member since
    March 2012
  • From: Louisville, KY
Posted by Builder 2010 on Friday, February 11, 2022 10:24 AM

I believe that paraphrasing Yoda would be appropriate at this time. "Scared... you should be." or something like that. Yes... the Reskit products are great when off the model and a total bear to build, but they're even more challenging when attempting to integrate them into the model. For example. The transmission, barely fits and I had to do some surgical procedures to make it fit. The blade claws (don't know what else to call them) don't seem to go over the rotating motor head and more work needs to happen. The bumpers on the blade claw seem to keep them from rotating inward far enough to get in line and I removed them too.

Good to hear that the real birds folding was no fun either. I can just imagine. Do you know just what the mechanism was that actually turned the blades. I'm envisioning one of two methods. A spur gear in the head that is rotated by a hydraulically operated rack, OR a worm gear turning a worm wheel in the head. Creating the rotating motion in the blade arms seems more difficult than having a hydraulic cylinder in them. Do you know?

I will attempt to weather as you've described.

  • Member since
    January 2022
Posted by Svt40 on Friday, February 11, 2022 10:07 AM

Builder 2010

Something was wrong with FSM's Forums yesterday. I kept getting an error about not accessible yesterday, on both this and the one I'm writing on the Turret project. Today it seems it was fixed. Good.

I did (FINALLY) get the four blades attached to the hub. My new parts worked although they still required a styrene spacer and then do some creative carving of both the claw and the rotation motor head on the hub to get the new parts to sit correctly on the hub. Again, the pinning idea was the reason I could do this at all. The hub's taken quite a beating and will need some TLC to bring it back to it's prior self.


Here are the two sets of claws. I'm glad I made a bunch since I did use a few before I got it right.

And here are the four blade facing in the correct direction. The broken hub came loose again, but the pin I inserted kept it in position. I'm letting it float until I put the blades into their racks and then I'll hit it with some CA. I have to hook up the blade deicer lines and repaint the rest that show their underlying copper. Actually, considering the abuse it took and the number of times I dropped it on the floor, the fact that it looks this good is a minor miracle. I have to put back most of those PE straps on the ends of the blade lock indicators. I have to touch up the blade paint, detail the sensors on the hub end and do some slight weathering on the bolt heads.


Getting the blade fold working correctly on the real aircraft is almost as hard is it on the model!

For weathering:

The bolts on the blade root are all  covered in 8802 which is a sealant and prevents them from rusting.  The bolts that hold the blade to the rotor head are all stainless steel and also do not rust.

All the wire harnesses on the rotor head would be black with no metal showing except at the ends.  The damper lines are blue as you already have them painted.

The bifilar weights on top of the rotor head are usually lubed up with lubriplate which is a whiteish-grey color.  The bolt heads and washers underneath are silver.

I really need to look into a 3D printer.  You've also got me scared to use the reskit rotor head!

  • Member since
    March 2012
  • From: Louisville, KY
Posted by Builder 2010 on Friday, February 11, 2022 9:59 AM

Something was wrong with FSM's Forums yesterday. I kept getting an error about not accessible yesterday, on both this and the one I'm writing on the Turret project. Today it seems it was fixed. Good.

I did (FINALLY) get the four blades attached to the hub. My new parts worked although they still required a styrene spacer and then do some creative carving of both the claw and the rotation motor head on the hub to get the new parts to sit correctly on the hub. Again, the pinning idea was the reason I could do this at all. The hub's taken quite a beating and will need some TLC to bring it back to it's prior self.


Here are the two sets of claws. I'm glad I made a bunch since I did use a few before I got it right.

And here are the four blade facing in the correct direction. The broken hub came loose again, but the pin I inserted kept it in position. I'm letting it float until I put the blades into their racks and then I'll hit it with some CA. I have to hook up the blade deicer lines and repaint the rest that show their underlying copper. Actually, considering the abuse it took and the number of times I dropped it on the floor, the fact that it looks this good is a minor miracle. I have to put back most of those PE straps on the ends of the blade lock indicators. I have to touch up the blade paint, detail the sensors on the hub end and do some slight weathering on the bolt heads.

  • Member since
    December 2002
  • From: Valrico, FL
Posted by HeavyArty on Wednesday, February 9, 2022 9:51 AM

Gino P. Quintiliani - Field Artillery - The KING of BATTLE!!!

Check out my Gallery: https://app.photobucket.com/u/HeavyArty

"People sleep peaceably in their beds at night only because rough men stand ready to do violence on their behalf." -- George Orwell

  • Member since
    March 2012
  • From: Louisville, KY
Posted by Builder 2010 on Tuesday, February 8, 2022 9:42 PM

The problem with having your thread read by people who ACTUALLY know about the model you're building is sometimes they tell you things you're doing wrong and that you must fix. This happened with yesterday's post. I was told by words and pictures that I installed the blades in backwards. Ugh! They were awful to get in the first time. However; there is a silver lining... sort of. 

By spending the time to pin the blades to the knuckles and not gluing them, I was able to pull the pins and remove the blades without breaking them. 

While trying to get the blades back on I re-torqued the knuckle that I broke yesterday and rebroke it. This time, knowing that more CA wasn't going to do the trick, I drilled and inserted a 1/32" diameter phos-bronze pin. It was much more secure after regluing.

I got three of the four blades in again. The last one is the one with the 3D printed end. I just printed the mating half which I've also pre-prepared with hole positions to pin the parts together and to the end of the blade since I'm also cutting of the battered plastic end. This will give me two good eyes into which I will put the mounting pin.

Tomorrow, the blades will be on I promise. I'm still having trouble positioning them fully folded. The resin knuckles and the plastic blade ends do not conform well to each other. I've had to grind away little bits of the blade end to let it swing further towards the hub's center.

Meawhile, I'm continuing to draw like mad on the Iowa Turret Project. I got the gun loading apparatus finished. This was a very challegning SketchUp task. Here is the cradle in the loading position. The gun is held at 5° during the loading procedure. This gun can be reloaded in 30 seconds.

And here it is in the firing position. There's still more detail to add around this equipment which I will eventually get to.

Again, I'm fully describing this project elsewhere in the forum.

  • Member since
    March 2012
  • From: Louisville, KY
Posted by Builder 2010 on Monday, February 7, 2022 9:32 PM

Spent a lot of time today fussing with getting the blades mounted and didn't finish. I did get the blade racks installed. i found that there was a pin on one end of the bottom member that could go into the holes in the fuselage if there were holes there. There were keyslot-shaped engravings at the correct locations on the strbrd-side. I measured the pin and drilled out those areas. Then I realized that I had put the mounting pins on the wrong end of this member and had all the paint schemes backwards.

I had to make new pin on the rear set using Evergreen round styrene of a very similar diameter. The front one's pin was intact and I was able to use this. I repainted all their bottoms to conform to the scheme on the rotor head. I also added all the blade clamps before painting. The red was air brushed. The rest was hand painted.

Then came the real fun. Getting the kit's plastic blades into the scale-like attachment points. I was able to use metal pins on all of them without further wrecking the plastic components. Getting these things in was approaching a horror show. At one point I over-torqued one of the hubs and broke it off. I reglued it.

The remaining blade was an hour's worth of work. Besides using another 3D printed knuckle after I wrecked the first one, I also had to fix where I destroyed the connection journel for the de-icing wiring. I broke the copper wire off from manhandling the knuckles to stay glued. So I re-drilled the tiny hole to reapply the copper. Then it happened again. This time I broke off the carbide tiny drill in the hole and couldn't get it out meaning I couldn't redrill it. It's impossible to re-drill a hole with a chunk of tungsten-carbide buried in it. 

I ended up cutting the whole journel off and replacing it with some Albion micro-tubing. That too took wayyyyy to long because I kept losing pieces as I was cutting them off using the razor blade. It was getting late. I was getting tired and hungry and the basement was getting cold.

I finally got that done and next session I'll get this blade finally mounted.

As you all know by following my work, I generally do not give up. I will keep trying until I get it. Meanwhile, the  blades will need repainting due to all the messing around with them.

  • Member since
    January 2022
Posted by Svt40 on Friday, February 4, 2022 9:20 PM

In the home stretch.

In the photo showing the tail strut scissors.  If you look above the HSL-41 (I went to FRAMP there) straight up from the 4, you see three dimples in the fuselage next to the door that should not be there.  The top and bottom hole should be flat red.  They are indicators to let you know if the engine fire bottles have gone off.  If the fire bottles get used the pressure pops out the indicators leaving an open hole.

In the same picture.  That piece just ahead of the tail strut is the lower anti-collision light.  The bottom is white and the top is red.

On the "torpedo".  I only say it that way because I have no idea what torpedo they are trying to represent.  In the green section you will find 4 raised ribs.  Those should be painted stainless steel. 

For the blade fold poles they are all red with the color markings for the blades as per the picture.  The struts that hold the poles are red on the blocks with matching color codes.  The pole is stainless steel and the round piece in the middle (locking mechanism ) is black.  On the stbd tail boom you'll see two little pear shaped covers  One about halfway and the other near the access panel near the hinge section.  Those are the panel that flip out of the way for the blade struts to go into the tail.


The clamps themselves are red.  The part HE47 would be stainless steel color.There are two rubber pads on the inside of each clamp that are black.  The clamps themselves are not color coded.

You can attach a small line to part HE47 or use a boat hook as in the picture to close/open the blade clamps when installed onto the blades.


Here is a pic showing the light and all the orange goo is hydraulic fluid leaking from the drains

  • Member since
    March 2012
  • From: Louisville, KY
Posted by Builder 2010 on Friday, February 4, 2022 6:02 PM

It was one of those days where I spent 30% of my time doing new stuff and 70% of my time fixing crap that I broke off. 

For the new stuff, I built the blade support racks and their associated blade clamps. The kit parts have a very narrow, scale-ish, connection between the forward half of the two-part assemblies and the main part. There are two sets that vary in size. I was seiriously concerned that this narrow part wasn't going to make it especially after it got softened by the solvent cement in its proximity.

I fixed this by drilling and applying a piece of 0.014 guitar string and a corresponding hole at the correct angle in the main part. I put on accelerator and then pooled some thin CA in the joint. Much, much stonger.

You can't use sprue cutters to cut guitar string (or any music wire for that matter). It's so hard it will put nice half-moon dents in the cutters and ruin them. You need a good hardened cutter. I have a Xuron Hard Wire Cutter. But surprisingly, my 30 year-old Channellock long-nose pliers have a cutter near the hinge and cut hard wire with no damage. It's all abou the metallurgy. Chinese tools generally don't hold up.

The Xuron cutters can't cut a tiny piece due to the thickness of the jaws, so a bit was sticking out the bottom of the assembly. This will imapale you so it needed to be removed. I used the Dremel with a diamond-coated burr. Took my time and didn't grind away the much softer plastic surrounding the wire.

The blade clamps were another small assembly that too much too much time due to the poor engineerig. They needed to be glued together OFF the blade since I'm going to airbrush the entire blade clamp, but I needed it to be spaced as it would be on the blade. I measured the blade's thickness at the point where the clamps go and then used a piece of cardboard of that width to glue the clamps. When they were reasonably set, I placed them on the blades to finally cure. 

Here is the gluing set up.

And here's all the parts waiting for paint (on Monday).

I glued the rearview mirror back on. First I tried 30 minute epoxy, but it wasn't viscous enough to stay put and there was no way to clamp it. I wiped off the epoxy and then used some epoxy putty. This worked! It help the part still and cured hard. The mirror is firmly attached. It needs a little cleanup which I'll do next week.

While fussing with the mirror, I had the model supported on a foam block. It fell off and a main wheel came off, a tailwheel came of and the scissors link broke again. That's the seond time it broke off since I replaced the original with my 3D printed one. It had become a mess. I still had some printed ones left over, so I made a new one. This one I actually got the hinge wired too. Needs painting.

I painted the main rotor color coding. The tape idea wasn't working so well. Besides the hub there's also coding on the swash plate connection links.

Lastly, I got all the loadout items installed. Had to reglue the torpedo. Very small contact area for these parts... i.e., really fragile. This is NOT A TOY! IT IS NOT FOR CHILDREN TO PLAY WITH!

So, that was a pretty big week! Got a lot done and it's almost finished. What's left is putting on the main rotor blades with their stowage clamps, and put on the tail boom in the folded position. I may use epopxy putty on this application due to the small gluing area and the weight of the part. 

The blade mounts when you look at a prototype image show a connection into the fuselage to locke them into position. The model does not have this, but I'm going to add it. Otherwise, all those blades are just hanging out there.

All y'all have a nice, safe weekend.

  • Member since
    March 2012
  • From: Louisville, KY
Posted by Builder 2010 on Thursday, February 3, 2022 5:04 PM

Had an ice/sleet/rain/snow storm today and into tomorrow. Good day to spend some time in the basement building cool things.

It was pointed out to me that I mounted the engine hatch at the wrong angle, but couldn't get the work platfom part flat. Well... after carefully looking at a guy kneeling on the hatch and working on the engine, I realized that I put the wear strips on the wrong wing of the hatch. The strips go to the hinge side, not the outside. With that understanding, I removed the strips, fixed the paint, made new strips, applied them and redid the weathering. I also had to repair where I had glued the door in the wrong position to the helicopeter's body. All's well that ends well.

I then got the wipers on using the wire. Touchy, but not too difficult.

Lastly, based on Svt40's additional info, I'm adding the color-coding strips to the various places identifying all the blades, their holders and other parts. I painted some Tamiya tape and attempting to use that. It's not sticking as I wish it should. I think I'll give it a little patch of clear gloss since things stick to gloss better than flat.

Onward and upward!

It looks like they had to destroy one of these Seahawks in that successful ISIS raid last night. Mechanical troubles. In look how complex these beasts are it's amazing they work at all.

  • Member since
    March 2012
  • From: Louisville, KY
Posted by Builder 2010 on Thursday, February 3, 2022 2:15 PM

I tried to get it horizontal, but from where the hinge is, that's as far as I got. Does the hinge articulate to let the door swing out and then down?

  • Member since
    January 2022
Posted by Svt40 on Thursday, February 3, 2022 10:07 AM

Looking good.  The bottom is nice and dirty like the real deal.

The engine door should be parrallel to the deck when open.  It only has a 90º arc from closed to fully open.  Also non skid strips on the bottom inside of the door since it doubles as a work platform.

If you decide to add an exhaust trail to the bird then the stbd side will be heavier as the MAD pylon breaks up the flow and pulls the soot down more on that side.  So the stbd stab is always dirtier than the port stab. 


  • Member since
    March 2012
  • From: Louisville, KY
Posted by Builder 2010 on Thursday, February 3, 2022 9:58 AM

I sincerely hope that's the last one because we're days away from being done with the model and I don't want to go back and fix stuff.

I will add the color coding becasue I thinks that's a cool tiny detail that only the in-crowd will know anything about.

I finished all the weathering I'm going to do. I dirtied the bottom up and added dirt on the walking arees on the roof. I got the engine door installed, broke it off in handling the model improperly and glued it back on again. I got the front door mounted with wire. And I spent WAYYYYY to much time screwing around with the tiny marker lights on the wheel sponsons and the windshield wipers. Didn't finish them, but will do so today.

Here's the bottom: Notice the wheels are now on.

And here's the model showing its newly attached doors. I'm very happy I was able to fix that door window. Dodged a bullet on that one. 

Lastly, the wipers. I find that some of the smallest details drive me the most crazy. It's the Pareto principle at work, except it's 3% of the parts take 90% of the work (and aggravation). It's a small gluing area and they weren't drying correctly. I ended up using gel CA. I'm wiring them on since the mount points weren't holes, just tiny flat spots. I want the model to be able to put for the long haul.

When laying the model on its side while putting on the cockpit door I broke off the port side mirror. Glued it on with gel CA and then broke it off again. This time I'm going to J-B Weld it and then not touch it again.

Tuesday's post... I had left it open and didn't sent it. So I'll try and re-create it and post it.

  • Member since
    January 2022
Posted by Svt40 on Wednesday, February 2, 2022 11:04 AM

Builder 2010

I won't kill you, and you do make trouble, but it's "Good Trouble". So I immediately put all of your actual real helicopter knowhow to build a better model.


Lastly, I stripped the decal off the airbrake on the MAD (magnetic anolmaly detector) which I have been erroneaously calling a towed sonar device, and painted it flat white to simulate the styrofoam that they are now made of. I will paint the aluminum pad that holds it on tomorrow.

That brings us up to date. I need details of the engine bay cover latch. I'm going to mount both the bay door and the cockpit door with bent wires. We're getting closer to the end each day. I still have the running lights to install, do the powder weathering, and then mount the blades and the tail boom. I have to paint and install the main rotor folding in clamps. And it will be done.

Bis Morgan... (see you tomorrow.)


The piece that holds the tail to the MAD is grey plastic.  I have no pictures of the latch mechanism for hte engine door.  But it's simply two rods that go from the latch.  One short one in the front and a long one to the rear. There is also a keeper at each end of the door that the rod slides through.  The latch mechanism is usually either grey or a dull aluminum color

One last hint is each blade is color coded.  The PCRs and PCLs (on the tail) will have a colored ring painted on them to denote which blade it is.  The spindles will also sometimes have a small stripe painted on them as well.  I mention this because with the head being folded the main rotos blades will be in a specific position.  The fwd stbd blade is blue, aft stbd is red.  Fwd port is yellow and aft port is black.

Here is a good pic of the blade poles and one version of the color markings for them.  We had ropes that attached to the clamps to open and close them.  In this picture they have a boat hook for doing the same.

Tail rotor showing the color markings.  When folded the tail is not indexed to a certain position other than to allow the stab to fit between the paddles.


Here you can see the stripes on the PCRs.


Hopefully that will help you out some more.

And here is another pic of one of our aircraft I painted up for the 50th anniversary of D-Day in Portsmouth England in 1994.  We came home on a Friday and went back to work on a Monday and the the squadron immediately painted over it over the weekend!

  • Member since
    March 2012
  • From: Louisville, KY
Posted by Builder 2010 on Tuesday, February 1, 2022 9:29 PM

I won't kill you, and you do make trouble, but it's "Good Trouble". So I immediately put all of your actual real helicopter knowhow to build a better model.

I put in the brake lines. I used magnet wire and diameters of Albion tubing to make a faux fitting. I made a strap clamp out of wine bottle foil. This stuff works great, but you first must remove any printing or coating on it with acetone. The coating prevents good gluing.

I realize that is not the kind of clamp they actually use, but the kind they use is really hard to model.

i then finished all the painting on the sonobuoy rack and it looks much better. I also painted the break line leaving the brass natural metal since the actual junction is natural metal also.

Lastly, I stripped the decal off the airbrake on the MAD (magnetic anolmaly detector) which I have been erroneaously calling a towed sonar device, and painted it flat white to simulate the styrofoam that they are now made of. I will paint the aluminum pad that holds it on tomorrow.

That brings us up to date. I need details of the engine bay cover latch. I'm going to mount both the bay door and the cockpit door with bent wires. We're getting closer to the end each day. I still have the running lights to install, do the powder weathering, and then mount the blades and the tail boom. I have to paint and install the main rotor folding in clamps. And it will be done.

Meanwhile, if y'all are interested in ship stuff, I've started another thread on this site in the building of the missing interior for the new Takom 1:72 USS Missouri 16" main turret. The model's cool, but has nothing but the exterior shell. I'm drawing and will 3D print all of the interior apparatus down to the first projectile deck. I've finished the main guns yesterday, and starting working on the below turret decks. 

Here's the guns...

Here's the link to the thread.

https://cs.finescale.com/fsm/modeling_subjects/f/7/p/190013/2187110.aspx#2187110

Bis Morgan... (see you tomorrow.)

  • Member since
    January 2022
Posted by Svt40 on Monday, January 31, 2022 10:41 PM

Looking good.

But you're going to kill me.  The MAD towed body tail is actually white styrofoam.  The round thing on the back of it with the bar is grey plastic to secure the foam to the MAD body.

The earlier fiberglass tails were painted as you show here but look completely different.

Here are some more photos for you.


MAD towed body tail.


Main landing gear brake line routing.  Sorry I have no pics of the brakes and where the line connects.

And a shot of my last bird with the HELLFIRE missiles mounted up and ready to fly.  Somewhere in the North Arabian Gulf.

  • Member since
    March 2012
  • From: Louisville, KY
Posted by Builder 2010 on Monday, January 31, 2022 9:16 PM

Again, your imput caused me more work. It was one of those two-steps back and one forward.

I tried to save the damaged door window, but it was a mess. The other two door windows in the kit were for other version of the Sikorsky bird inlcuding the Blackhawk and their cockpit door windows varied slightly in configuration. I woke up thinking about this and decided to go for it. The model's coming out too good to let that crappy window detract from it. 

I filed and sanded the replacement and got it to fit reasonably well.

I installed it without mess up, repainted the door's interior and did some trim painting around the outside. This took quite a while.

I then repainted the landing gear shock strut to do it like it's supposed to be. Still needs just bit of tending loving care.

Here's the fixed door and the towed sonar rear portion freehand. No decals for that. I had to blend Tamiya yellow and white to get to the lighter yellow.

And I'm repainting the sonobuoy bays. The inside is tan, and the holes are completely black as I could see looking more closely to some photos. I didn't finish this job today. I got the tan done and most of the black. I will have to back paint the body color next session.

The main struts need some brake lines. I should add them since I added all those tubes on the rotor head.

Till next time...

  • Member since
    January 2022
Posted by Svt40 on Friday, January 28, 2022 6:47 PM

The 3D printing is nice.  I'd love to get into that myself!

The bottom of the bird is usually very dirty.  Oddly enough there will actually be mold at the drains towards the front and it turns more oily in the middle drains then more hydraulic fluid towards the rear especiialy the two large gange drains at the back.


The main mount should be chrome on the skinny part at the bottom.  The very bottom will be gray and the part you chromed would also be grey.


The sonobouys are a creme color.  Like a light colored vanilla pudding.


  • Member since
    March 2012
  • From: Louisville, KY
Posted by Builder 2010 on Friday, January 28, 2022 6:27 PM

That's a lot of information.  Today was a milestone day with the panel accenting, flat coat and unveiling of the glazing. I got a got set of prints, but they're too thin. I got the profile dead on, but the depth needed some shimming.

Here's the comparison to the original

After fitting it on the hub and blade I found that it was about 0.040" too thin and used some styrene CA'd in place to do the job. It all fit nicely.

It all fit nicely until, both eyes fractured when I put a little bit too much downward pressure when fitting the hub on the craft and trying to determine how much droop the back two blades will have to have. I will epoxy the blade without the full eyes and then use some Bondic to reconfigure the contours.

I used the Tamiya Black Panel Accent to highlight all the doors, seams and compartments this machine has. It looks pretty awful when you first put this stuff on. You have to let it dry before removing the excess.

The bottom had a lot of places.

I use the traditional Q-tip lightly dampened with low odor mineral spirits. I was annoyed that the mission paint dissolved in the mineral spirits. That's not supposed to happen. Tamiya paint DOES NOT. Also on the bottom, some of gloss coat was not sturdy enough and the accent leaked into the flat paint underneath making clean removal of the excess difficult.

But, with all of that, the final results after shooting with Tamiya clear flat boosted with a bit more flat base, came out pretty nicel

There will be more dirtying the bottom with pastels since even on clean Seahawks there enough stuff being discharged from various vents to make things interesting.

I actually almost blew by getting all set up to spray the flat only to realize I didn't do any of the panel acccenting. You can't do that on a flat finish. It makes a mess.

After the flat dried it was time for the "great unveiling". I took the tape off all the glazing. I was worried that the canopy cement might not have enough grip to resist the pull of the masking tape and I hate when my worries come true. The first window I de-masked popped out. it was the window in the sliding cabin door so I was able to put it back carefully using solvent cement. All the other windows de-masked without problem except for the co-pilots door. The tape was too tight, especially where I sealed the edges with clear gloss.

That window got damaged. All the others are perfect. I put on several coats of Pledge with Future floor wax and hope it will be okay. There are two other sets of cockpit doors, but they are not for the SH-60B. The "B's" window has a curved notch taken out of it, while the others are straight. If this window is too damaged, I'll make one of those work.

Here's the glazing exposed. It's nice to see the engine again. I missed seeing it.


I did a few more punchlist items. I filled the hollow rear-view mirror housings with Bondic and then painted them with Molotow Chrome. Decanting the marker was one of the smartest things I've done in a while. It's really slick to be able to brush the paint where you want it. The felt tips work good for the first application, but make a mess if you have to go back and add more. I also used the same to paint the oleo strut on the main gear. There's still some more tiny paint jobs that need doing and that will wait until Monday.

Above the oleo strut is an elastomer bellows. That will be painted rubber black.


I also did the back painting on the sonabuoy noses and they look good now.

I also took Gino's advice and built the fuel tank. So I'll have the torpedo on one rack and the fuel tank on the other.

The model proper will be done some time next week. The base and figures are still out there. 

  • Member since
    January 2022
Posted by Svt40 on Friday, January 28, 2022 9:26 AM

Builder 2010

So get it out of your stash and get cracking while this stuff is still fresh in your mind. Svt40, I am following your terrific instructiosn as best I can.


That's the goal but I have three 1/72 scale Abrams and an FT-17 to finish first.  Plus I have no real place to build.  Just using the coffee table and couch ATM.

My intention with the KH Bravo kit is to do similar to yours and show a full build.  Showing all the things that need to be removed or added to make it a true Bravo.

The kit KH put out is obviously done by someone who has never seen a Bravo in real life.  The fuselage and cockpit center console are both Foxtrot/Hotel bits.  It's missing a lot of things that are Bravo only items as well.

It's actually real close to the aircraft we had at the Key West Florida SAR squadron.  It started on the assembly line as a Bravo and halfway through construction was converted to a Foxtrot.  Then at the end they did another conversion to make it similar to a Hotel.  It was a nightmare aircraft as it had a lot of one off parts that could not be used in any other aircraft but that one. We could not even swap parts between the two birds we had for troubleshooting.

  • Member since
    December 2002
  • From: Valrico, FL
Posted by HeavyArty on Friday, January 28, 2022 8:22 AM

Gino P. Quintiliani - Field Artillery - The KING of BATTLE!!!

Check out my Gallery: https://app.photobucket.com/u/HeavyArty

"People sleep peaceably in their beds at night only because rough men stand ready to do violence on their behalf." -- George Orwell

  • Member since
    March 2012
  • From: Louisville, KY
Posted by Builder 2010 on Thursday, January 27, 2022 9:18 PM

So get it out of your stash and get cracking while this stuff is still fresh in your mind. Svt40, I am following your terrific instructiosn as best I can.

I started today with the best of intentions to finish up more of the model and get the blades mounted on the hub. I decided to reinforce the flimsy pins that hold the plastic blade knuckle to the hub swivel by drilling and pinning with 0.032" phos-bronze. After drilling I attempted to hold the two parts of the blade knuckle with a clamping tweezers. Before I could get the glue near the joint the small mating part snapped out the tweezers with the wire attached. The wire hit the floor and the part.... well... the part went into the atlernate universe. I swept the entire freaking shop and examined every flat surface, but it was gone, gone, gone. (BTW: Great old Everyly Brothers song from the mid 60s).

So there's three parts when I need four. And I really need that part! 

So I photographed the part from four directions, measured the critical dimensions with the digital calipers and drew a diagram, and then drew it in SketchUp. I put it into the slicer and will print it tomorrow. It will print in a little over an hour.

Here's the drawing.

Here's the array of many parts on the slicer.

Why make one when I can make a bunch. Since they're all the same height, the print time does not change and the total resin use is $0.29. It's really great to know that in some cases, even in desparation, I can still create parts when I need them. This really is only reasonable with small, east-to-visualize parts. If I screwed up one half of the fuselage, that would be a different matter.

I did get one other thing done and that was painting the ends of the sonobuoy dispenser. This view is after painting the NATO black, but BEFORE, back painting to fix all the parts that shouldn't be black. A little touch up with body color and it will be perfect!

  • Member since
    January 2022
Posted by Svt40 on Thursday, January 27, 2022 9:44 AM

No need to be so concerned with feathering the data link radome paint.  I've seen them all 320 side grey, all 495 bottom grey or a mix of both.


More painting stuff missing from the instructions.

The searchlight will have a black lens on it for an NVG equipped aircraft.  Clear glass if not NVG. All deployable aircraft are NVG compatible.  I'm not sure if they would put the NVG filter on the search light for the show birds.  The searchlight body can be 320 side grey, 495 bottom grey or CARC dark OD. The two hover lights in front of the RADAR radome are always clear glass.

The two RAD-ALT antennas on the bottom of the front ESM fairings (round things on corner) are a light tan-brownish color

The upper TACAN antenna on the nosebay is a darker 320 side grey.

The doppler antenna on the bottom near the tail strut is gloss white with a frame painted in 320 side grey or 495 bottom grey.

The UHF/VHF antennas (with the hot dogs on top) are 320 side grey.

The sono antenna near the tail strut is also 320 side grey

The ELT antenna on the turtleback is gloss white

The GPS antenna "chicklet" as we called it.  Was gloss white, light 320 side grey or CARC dark OD.

The tail rotor indexer head is always a forest green.

The FLIR turret when shut off would have none of the lenses visible.  Just the exhaust fan on the back of the turret would be seen.

  • Member since
    March 2018
  • From: Chicago suburbs
Posted by Luvspinball on Wednesday, January 26, 2022 11:06 PM

Fabulous job.  Got one in my stash and marked this thread so I can come back to it.

Bob

Bob Frysztak

Luvspinball

Current builds:  Revell 1/96 USS Constitution with extensive scratch building

  • Member since
    April 2003
  • From: USA
Posted by keavdog on Wednesday, January 26, 2022 5:57 PM

Looks great!  Getting close to the finish line now. 

Thanks,

John

  • Member since
    March 2012
  • From: Louisville, KY
Posted by Builder 2010 on Wednesday, January 26, 2022 5:29 PM

Almost everything that can be painted is. The decaling began in earnest and is basically finished. The aircraft didn't have as many stencils as other models I've built. I use MicroSet first, put down the decal and the MicroSol. I may add more MircroSol if more shriveling is needed.

I started on the starboard side, did the same side of the tail boom, did the port side and then port side boom. I've complained about the instructions, but the decals are excellent. They're thin, have nice narrow margins, didn't tear, laid down well with solvent, have good color registration and opacity.

Because of the folded tail, I had to slide the HSL decal under the folded wing and get it into position. It goes down parallel to the little vertical stab that sticks out the back and that's completely behind the folded horizontal stab.

I did the same routine on the ports side, then I decaled the torpedo and towed sonar. There's only enough decals for one torpedo which makes no sense to me.

And the I added the missing radome under the nose. I thought the FLIR was an option for this part misreading the instructions. It was pointed out to me that it is essential. I traced the part and scraped off the many layers of paint so the solvent cement could do its job. I now have to go back and airbrush the blend of body and bottom color. There's one decal that goes on the front of the dome. And then all the painting will be done! Well actually, I still have to prepare the blade stowage racks and paint them, and put on all the marker lights and missile warning sensors. Can't forget those. The tail sensors are buried deep in the space protected by the folded wings.

The main rotor blades are fully painted also. 

I'm going to do some very conservative weathering including some panel accenting. Then I'll give it an overall flat finish (except the glossy tail, which remains so.) And do final assembly. I still have to order the figures from Reedoak and do the base work. We're almost done.

  • Member since
    March 2012
  • From: Louisville, KY
Posted by Builder 2010 on Tuesday, January 25, 2022 6:08 PM

It makes me very happy when folks are following closely. Posting this stuff takes some effort and it's good that it doesn't go to waste.

Short session made even shorter, which I'll explain later.

Painted the fold joint details and masked and painted the two torpedoes. 

The torps came out nicely and still need the prop areas to be painted red and a decal to be put on. The plans call for the warhead to be yellow-orange.

I was all set to start adding decals to the tail boom now that the fold area was finished and then I noticed that I had OVERSPRAYED YELLOW-ORANGE ALL OVER THE GLOSS BLACK. it seems that I was holding the torpedoes in proximity to the work area and made a slight mess. I then had to go back and re-shoot the black and that killed the decal session.

I did get the first coat of body color on the tops of the main rotors. Tomorrow I'll do the bottom and that will get them ready for assembly.

Tomorrow, decaling will officially commence. I glued back on that fussy antenna that kept getting knocked off. This time with very stout piece guitar B string.

  • Member since
    June 2018
  • From: Ohio (USA)
Posted by DRUMS01 on Monday, January 24, 2022 5:56 PM

Looking nice! Having followed this from inception, I feel like we are building this together. I'm happy for you to get to the decal stage. All the little details you've added will really make this build stand out.... good job mate.

DRUMS01, Ben

"Everyones the normal until you get to know them" (Unknown)

LAST COMPLETED:

1/35 Churchill Mk IV AVRE with bridge - DONE

NEXT PROJECT:

1/35 CH-54A Tarhe Helicopter


  • Member since
    December 2002
  • From: Valrico, FL
Posted by HeavyArty on Monday, January 24, 2022 5:35 PM

Coming along really nicely.  The end is in sight.

Gino P. Quintiliani - Field Artillery - The KING of BATTLE!!!

Check out my Gallery: https://app.photobucket.com/u/HeavyArty

"People sleep peaceably in their beds at night only because rough men stand ready to do violence on their behalf." -- George Orwell

  • Member since
    March 2012
  • From: Louisville, KY
Posted by Builder 2010 on Monday, January 24, 2022 5:15 PM

Better late than never... Glad I can be of help.

I'm at the stage where waiting for paint to dry is the number one activity. I sprayed Allclad Aqua Gloss as the gloss coat. It's water-based and has no odor. It takes a number of hours to be safe do decaling. I'm champing at the bit to start doing decals, but have to hold off until the finish is all fixed.

I finished touching up the tail rotor, fixed a blemish on the tail boom and went back and touched up damages to the body color. That touch up necessitated doing a deep clean of my airbrush in the ultrasonic.

While all this was drying I built the load outs. I'm adding one towed sonar and two torpedoes. The torpedoes had ridiculous propellers; a series of tiny, bent PE that had to be glued on is a radial array. It was a bit of struggle and, while necessary, i'm not a big PE fan for PE's sake.

Here are both of them complete ready for paint.

The torpedoes have a three-color paint scheme: props and tail = red, back = silver, middle = O.D, and nose Yellow-orange. I shot the tail with Tamiya rattle can silver.

I also shot the main rotor blades with Tamiya White Primer to maine the Misison Paint adhesion problem. I then sprayed more clear on the areas when I re-shot the body color to fix some discolored areas.

When this is fully cured tomorrow, I believe that I can actually start decaling next session. I have to add the mirrors in the rear-view mirrors, paint the outer ends of the sonobuoys in the array. I did remove the masking in the exhaust duct and it came out okay. I can't remove any masking on the glazing until all the decals and any panel accent work is done, and the flat coat is applied. The end is near. I also have to mount the blades and those fold clamps... can't forget that. The last thing to do is add the marker lights.

  • Member since
    September 2021
Posted by The Lt387 on Saturday, January 22, 2022 7:14 PM

I wish I saw this before i started my KH kit. VERY IMPORTANT if your undertaking this kit. Although I did develop more scratch building techniques, I was disapointed in the directions too.

  • Member since
    January 2022
Posted by Svt40 on Saturday, January 22, 2022 2:50 PM

You are correct it's just a visual check.  IIRC and it's been more than 10 years since I retired the BIM will be all white when it's good and if the blade is leaking it will have three black and three white stripes.


As for the paint do not worry too much about following the paint guide as there was a LOT of variation in the tactical paint schemes.

Heck we even put invasion stripes on one of our birds for a while.  We also used non standard markings while deployed.

  • Member since
    March 2012
  • From: Louisville, KY
Posted by Builder 2010 on Saturday, January 22, 2022 2:40 PM

Since you gave that great response, I'll finish the post here. It complicates my multiple postings, but i'll perservere.

So the pressure sensor doesn't anunciate remotely? It's one of the visual checks that are made when the crew does the walk around?

Here's the version I'm going with. I like that it doesn't have the lo-viz insignia. Since you have to overcoat the whole deal with gloss so the decals work, the gloss black tail works.  There's more flat black over the exhaust on the roof, but that would mean masking. And masking right now could be a problem. I'm going to leave that bit of black off.

I sprayed the tail boom completely with gloss black and then that little bit of the main fuselage. I freehand painted it. It's not great and I back-painted with body color to get it better, but as you'll notice if you look closely at the color sheet, there's a white line decal that demarcates the black and that will hide any unsteadyness.

And here's that tail bit.

I then took the gun in hand and attempted to fuzzy up the bottom color edges. I was taking a helluva risk doing this, but it didn't ruin anything. I'm not sure I like the result, but it did soften the edges a bit.

Here's the tail rotor with the detail painting, but not totally done. I still have to back paint the de-ice boots to get the line a little cleaner. My freehand painting hands are NOT steady! I wish I could have masked,  but it would have made a bigger mess.

That brings us up to date.... happy weekend.

  • Member since
    January 2022
Posted by Svt40 on Saturday, January 22, 2022 1:49 PM

Builder 2010


While this was drying I drilled (my new supply of 0.0125 arrived) the rotor blades to accept the lead wire from the nitrogen leak sensor. The real blades are hollow filled with nitrogen. If there's a crack, the nitrogen leaks out, the sensor notes this and alerts the crew that the blades is no longer flyable. This lead is the last wire to tie into the hub along with all the other wires and pipes. It was easy doing this when they weren't on the model.


That is actually the de-ice harness.  Most aircraft do not have them installed unless they are deploying somewhere very cold as the system tends to not work so well and it's just one more thing to corrode.  The nitrogen leak detector is the little thing sticking out of the side of the blade opposite the de-ice harness.  It's called a BIM.  IIRC it stands for Blade Indicator Method.

The reflection is from retroflective tape that is put on the blue PCR for use when doing track and balance of the rotor head.


That engine bay door is spot on perfect!  Just add the door latch assembly to the inside and it's complete.


  • Member since
    March 2012
  • From: Louisville, KY
Posted by Builder 2010 on Saturday, January 22, 2022 12:08 PM

I bit the bullet and painted the top darker color (Tamiya XF-53) freehand and was satisfied with it. I held the gun at angles that would let the edges drift around the curves without fouling any protrusions getting oversprayed. 

While this was drying I drilled (my new supply of 0.0125 arrived) the rotor blades to accept the lead wire from the nitrogen leak sensor. The real blades are hollow filled with nitrogen. If there's a crack, the nitrogen leaks out, the sensor notes this and alerts the crew that the blades is no longer flyable. This lead is the last wire to tie into the hub along with all the other wires and pipes. It was easy doing this when they weren't on the model.

I also painted the exterior dark parts of the engine hatch and then, after it was dry, put textured black graphic arts tape to simulate the anti-slip tape on the prototype. This door will be open.


I decided on the paint scheme. It requires the entire tail, top and bottom and boom to be gloss black. It also angles onto the fuselage in front of the hinge. At this time I got a nasty shock. The Mission paint has lousy adhesion compared to Tamiya. I tried to mask the de-ice boots on the tail rotor blades and promptly pulled the gray paint off the resin. I touched it up and then had to paint them by hand...ugh!

I thought the paint lifting was limited to resin parts, but then it did the same thing on the boom which was styrene. In other words, Mission paint pulls off. In the future I will have to spray Tamiya primer first and that's aerosol so I'd have to do it outside, which I can't do in winter temperaturs.

Here's the paint scheme. I'm going on an errand will save this so it doesn't time out. I'll edit later.

  • Member since
    January 2022
Posted by Svt40 on Thursday, January 20, 2022 5:20 PM

Just use some low pressure and feather the edges should be little to no overspray.  If there is then it's still good.  My first detachment Chief used to say these birds are supposed to be ugly.

  • Member since
    March 2012
  • From: Louisville, KY
Posted by Builder 2010 on Thursday, January 20, 2022 5:09 PM

Didn't work today, but will use your color information for sure.

Still don't know what to do about the non-sharp color edges. Could go back and free the edges and just protect anything that may get hit.

  • Member since
    January 2022
Posted by Svt40 on Wednesday, January 19, 2022 8:08 PM

Yup the tail hinge is all the same 320 grey.

The pullys are a dark reddish brown.  The hydraulic lines are all stainless steel as is the bottom of the lower hinge.  The rippled piece going from one side to the other is black plastic wire loom. The clamps holding the loom will be silver in the center with yellow rubber bits on the edges.

The two gears on top are going to be a dark greyish black as they're always covered in molybdenum grease.  There will also be a very small grease sling ring around the gear under the #5 driveshaft cover.


  • Member since
    March 2012
  • From: Louisville, KY
Posted by Builder 2010 on Wednesday, January 19, 2022 5:38 PM

You guys are messing with my mind... I hope I didn't throw that radome out. The instructions seem to tell me that it was optional with the FLIR. Regarding the painting, I'm still trying to figure out what configuration I'm going to use. In some of the wild schemes I have to do more work on the exhaust black areas. And it would require more masking... ugh!

I did paint today! I laid on all the FS36320 Dark Ghost Grey using the Mission Models paint (which I like a lot) thinned a bit with some A-K interactive thinner. They seem to be compatible.

Started with the tail after finishing the masking of the bottom color areas.

I believe that the fold machinery is body color and not zine chromate. If it's zine, I can do that too.

Did the tail rotor. After I took the pic I used some Dullcoat on selected areas that are going to be painted black. The black ares are the elastomer boot at the blade base and the de-ice book that goes partially out on the leading edge from the root.

And then I painted the main part. I had to go back and shoot some minor light spots, but all in all it painted really well. Dries quickly too, but I'm giving it overnight to make it better for further masking. Right now my edges are going to be pretty hard. If I wanted soft edges I would have stood the tape off the surface a bit. Because of all the stuff sticking out, doing a freehand job wouldn't have worked. The overspray would have hit parts that were supposed to remain the other color. The same goes for the darker top color getting all over the tops of the sponsons, hoists, etc.

I like it alredy now that it's monochromatic. I'm really not all that excited about doing all the additional color work and masking required for the flashy decal schemes. I'm almost ready to just make it a ultilitarian bird. Having readers that have actually FLOWN THE REAL THING adds to my challenge.

Stay tuned.

  • Member since
    January 2022
Posted by Svt40 on Wednesday, January 19, 2022 3:14 PM

Builder 2010


As seen in this image, the nose has a very specific curve also a circular shape so that too would get the dividers treatment.


I just noticed you're missing the data link radome under the FLIR diving board.  That is one of those required items for an SH-60B.

  • Member since
    January 2022
Posted by Svt40 on Wednesday, January 19, 2022 8:57 AM

I love the mirror arms.  I may have to try that on mine.


As for the tactical painting all the edges are feathered with no hard lines. 

The main landing gear can be white on the bottom and grey on top.  The earlier aircraft did this.  Later aircraft are just solid 320 side grey.

Here is my aircraft from Desert Storm.  Just to throw you way off.  We did not even have the black exhaust markings on ours!  The MAD reeling machine was removed and a blank off plate installed.  The bomb racks were sealed up and the sonobouy launcher was also removed as was the UYS-1 Spectrum Analyzer.


  • Member since
    March 2012
  • From: Louisville, KY
Posted by Builder 2010 on Tuesday, January 18, 2022 9:06 PM

Thanks and you're welcome.

Short session today. Paint masking is well underway. I decided, because of the way the side and bottom colors interact, especially around the sponsons and radome, that I would have to mask them carefully. There's a nice seam line running down the fuselage length to demarcate the bottom and side colors.

To mask the dome I measured it's diameter, cut it in half, set the calipers and cut the circle. I've described this before when masking the wheel hubs. This was easier since it's easier to use the dividers as a circle cutter on bigger diameters. I have one point sharpened to a cutting chisel in the direction of the cut.

To mask the lower edge, again, measured its diameter, cut it in half and used that setting. I got a really accurate mask this way.

As seen in this image, the nose has a very specific curve also a circular shape so that too would get the dividers treatment.

And here's how I did it. In the above it also seems to show that the gear legs are bottom color. Is that correct?

And then I got going on the rest using a combination of 3M Blue Tape and three thicknesses of Tamiya. I absolutely love Tamiya tape, but it's more expensive than the 3M so I use them selectively with the 3M covering bigger areas. The curves had to be 3M due to the width I had.

I still have to mask the sponsons on the opposite side and then I'll be ready to shoot some gray base color. I don't think the bottom of the personnel hoist is bottom color. None of my diagrams show that. 

  • Member since
    December 2002
  • From: Valrico, FL
Posted by HeavyArty on Tuesday, January 18, 2022 4:37 PM

Looking good.  Thanks for the heads up on the folded stab support too.

Gino P. Quintiliani - Field Artillery - The KING of BATTLE!!!

Check out my Gallery: https://app.photobucket.com/u/HeavyArty

"People sleep peaceably in their beds at night only because rough men stand ready to do violence on their behalf." -- George Orwell

  • Member since
    March 2012
  • From: Louisville, KY
Posted by Builder 2010 on Monday, January 17, 2022 10:16 PM

I Redid the left side mirror frame. It's still not perfect, but it's better. It really doesn't take very long to bend and solder a new one togeher.

Painting has officially begun today with the masking of the exhaust channels. This was a finicky masking job because of curves and concave faces. After masking I coated the edges with clean to better seal them.

I was tired of bending and un-bending the static discharge probes and scrapped them and replaced them with 0.012" guitar string (I think it's a B string since I use very like gauge strings). They're tough as nails... well actually tougher than nails since piano wires is harder than most nails. And they're very sharp and will getcha!

I broke my last micro drill, but 20 more are arriving shortly from Drill Bits Unlimited.

I mixed up a very light gray, almost white for the bottom color and air brushed all the bottom facing things including the undersides of the horizontal stab. This all has to be masked and that will probably happen on Wednesday.

I then I find these on the HF sprue. Looks kinda like the support struts to hold the horizontal stabs in the folded position. Too late. That boat has left the dock. I tried to remove the homemade ones, but they were just too well glued and I didn't want to risk any damage. It's part HE33 and is on the Seahawk-only sprue. There was no mention in the instructions or any information about folding the stab at all. If you're following along with me and plan on building this model, now you know. There are parts to fold the stab, but they just don't tell you. Now you've been told.

  • Member since
    March 2012
  • From: Louisville, KY
Posted by Builder 2010 on Friday, January 14, 2022 5:52 PM

I found a print for a tie down cup. It's 9.81" in diameter and almost 4" deep. I drew them and will print a gaggle of them. I also am drawing a US Navy wheel chock set and the base itself which will duplicate the surface of a hangar deck. The models is a scale 60 feet long so the base is going to be 30" by almost 14" with 60 tie down pucks. Reedoak wanted $5.50 USD for 14 pucks plus shipping from Europe. It would probably be $50 just for the tie downs. It took me 20 minutes to draw them after I found the drawing on Google and the run of 20 will cost $0.25 worth of resin. I'll print 60 for about $1.00. BTW: with the 3D work that I've sold over the last two years, the printer is paid for more than once, so any work I do is a direct cost savings to me.

These will be the modern 5 spoke design. They should print nicely. This is how they will appear on the machine when done (only upside down).

Here's my hangar floor design. I eyeballed the plate and tie down spacing. I looking at a series of hangar deck images, it looks like the plates are 8' wide and the tie downs look like they're 2' off the seams and about 4' apart. Does anyone know the actual dimensions. I making it on a bias so it's more interesting.

I'm also drawing a set of 1:35 Naval wheel chocks. It looks like the only sizes commercially available are 1:32, 48 and 72. Now they'll be 1:35s also.

In the shop I did some stuff also. Got the tail plane clamps done. One of my fabricated clamps worked okay, but the other fell apart during shaping. I chose a different approach making it out of a solid piece. However, as you can see they're not exactly the same. They're on the underside of the tail and difficult to view. I'm calling them done. I also replaced the missing hinge loops on the tail planes that were wrecked when breaking the joints.

I touched up the wheel paint and the rear landing gear. I then went to work making a set of metal rear-view mirror frames. It took a couple of iterations, but got them built.

These small jobs are made very doable with the resistance soldering unit AND the MicroMark ceramic soldering pad that lets you stick the parts into the surface and hold everything still with T-pins. The metal is more scale in appearance than the plastic and a whole lot stronger.

Here's the right side one being fitted.

And the left side...

And with the mirror housing installed.

There is a slight problem. When looking straight ahead the left side is hanging lower than the right. Fixing that (if I fix it) will have to wait until Monday.

  • Member since
    January 2022
Posted by Svt40 on Thursday, January 13, 2022 7:46 PM

Builder 2010

The last things I painted was the exhaust chutes. I first shot the turbine outlet some dark iron and then went back and did the whole area with flat black taking car to not overcoat the previously shot dark iron.

This is flash shot (which I rarely use) that lights up the innards.

And here's a non-flash shot showing the whole area. This will be masked to the proper outlines as needed. The last thing I did was shoot this paint with DullCoat to seal the black and make good base for the body colors. BTW: that chute where you can see a little bare color is the APU's exhaust which would be in that part of the overhead.

What is the diameter of the modern USN tie down cup?


The square opening behind the exhaust on the stbd side is the ECS exhaust.  Basically the air conditioner for all of my electronics.  It's a light fiberglass brown color similar to the IPS ducting on the engine.  THe square hole lower on the fuselage, same side, is the intake for the ECS and is the same color deeper inside but often times grey at the edges.

As for the tie down padeyes it all depends on what type of ship.  I was usually on cruisers where the padeye is about 6 inches across with 4 bars. 

Funny story about those.  New guys tend to get hazed a bit and sent on errands to get stuff that does not exist.  Such as a "padeye wrench".  Well we sent the new guy out for one and he came back with one!  Turns out the padeyes on the cruiser were removable with 4 allen head bolts.

  • Member since
    March 2012
  • From: Louisville, KY
Posted by Builder 2010 on Thursday, January 13, 2022 5:30 PM

The page just froze... so I''m doing it again.

Those are great pictures and I used the tail rotor image to create a index motor head. I didn't go the full route with the roller and pin, but it's shaped so it fits the crown on the tail rotor rear. I was wondering why that part was shaped that way... now I know. (and so do all of you). Looking at this close up, it's still a bit big and I can reduce it.

We're at the stage of the model that's equivalent to the punchlist phase of building a new house. The last little bits and pieces take an iordinately long time. Another thought I have is just how much more complicated the helicopter became when they turned the Blackhawk into the Seahawk. All the folding stuff adds mechanical complexity AND sensors to ensure that the flight crews knows everything is in the right place. Blackhawks don't need a blade indexing motor.

I started cobbling together the tail plane lock bars. They attach to the hinge point on the tail plane and clamp to the edge of the center section. I added doublers to some styrene stock that I'll shape to make the contours more like the real ones. They have to dry overnight since when I tried to shape them before they were fully dry, they didn't like it.

I also had to add back a hinge point so it would have something to hold onto. The kit's part disintegrated when I had to rip off the already-glued tail panels.

I started painting stuff! This is a milestone. I painted the tires rubber black which finished the smaller tail wheels. 

remember I made some round masks for the small wheel hubs a while ago when I painted them white.

But for the large main wheels I didn't paint and mask the hubs first. The tie-down ring protrudes from the wheel and I didn't want to break it by masking on top. In this case, using the same dividers with one leg sharpened to a chisel edge, I cut the circles, but used the piece with the holes.

I then sprayed them a base coat of lacquer, in this case some Tamiya silver, and I go back and paint the while. The lacquer acts as a barrier and prevents the black from leaking through. I always put on DullCoat when I'm going to change colors and don't want any blending.

The last things I painted was the exhaust chutes. I first shot the turbine outlet some dark iron and then went back and did the whole area with flat black taking car to not overcoat the previously shot dark iron.

This is flash shot (which I rarely use) that lights up the innards.

And here's a non-flash shot showing the whole area. This will be masked to the proper outlines as needed. The last thing I did was shoot this paint with DullCoat to seal the black and make good base for the body colors. BTW: that chute where you can see a little bare color is the APU's exhaust which would be in that part of the overhead.

I have to write a real punchlist to ensure that I don't miss anything. It's a relief that all the ResKit work is now complete and reasonably successful. I still have to solder together the rear view mirror brackets, which I'm doing tomorrow.

I also glued on the big radome on the bottom since it was time.

I need to build a base and want it to duplicate the surface of a hangar deck. I'm going to 3D print my own tie down cups. They're available from Reedoak, but they're expensive and I want to keep my powder dry to buy their 1/35 Naval Aviation service people.

What is the diameter of the modern USN tie down cup?

  • Member since
    January 2022
Posted by Svt40 on Wednesday, January 12, 2022 8:15 PM

Some excellent work completed today.  The wires you added to the tail are for the de-ice harness.  Getting me motivated to start on mine.  I just have a few M1 Abrams and an FT17 to complete first.

Here is a picture of the tail rotor index motor engaged. You can see how it engages with the crown on the back of the tail paddles.


Here is a shot of the rear tensioner for the HF longwire antenna.  The standoff is similar to the rest except it has a spring loaded capture device that holds the wire and provides the correct amount of tension.  You can also see the black wire from teh HF to the tail boom just in front of the standoff.  The black triangle is a weight and there is one before each of the upper standoffs.  The black wire just keeps it from flying up and getting caught in the blades if it were to break.

  • Member since
    December 2002
  • From: Valrico, FL
Posted by HeavyArty on Wednesday, January 12, 2022 5:43 PM

It is coming along great. Good additions of the prop rods.

For the deck, there is this…

I have one and it looks really nice.

Gino P. Quintiliani - Field Artillery - The KING of BATTLE!!!

Check out my Gallery: https://app.photobucket.com/u/HeavyArty

"People sleep peaceably in their beds at night only because rough men stand ready to do violence on their behalf." -- George Orwell

  • Member since
    March 2012
  • From: Louisville, KY
Posted by Builder 2010 on Wednesday, January 12, 2022 5:30 PM

Svt40 made a valid input and of course I never ignore valid input. The first thing I did today was add the wiring that goes from the pitch hub into the center fitting on the tail rotor. You can clearly see this wire in this image. This wire's hole would have been MUCH easier to drill had I realized I needed it BEFORE building the whole deal, but I persisted and got the holes drilled. I am NOT installing that finer loop wire that goes from the spider. The wire in question is the fatter one.

It's interesting to note that the rotor has no actual hinging for the pitch control. There are two crossed carbon fiber beams that go from the tip of one blade all the way across the center to the tip of the opposite blade. The fiberglass blade sleeves slips over these beams. The beams act as torsion bars and will twist when pitch motion is introduced into the. The blades leading edge are titanium and there is an applied rubber de-ice boot on the leading edge also.

Svt40 also pointed out several other small details that I'm going to add. One is the ehad of the rotor indexer. The indexer positions the blades so they don't get damaged when the boom is folded. I put the motor shaft in, but his drawing also calls out for some head detail. I'd love to get a picture of it. My search today came up empty.

The other details are the removalable struts that secure the tail planes in their folded position and secure the boom itself. I will make these also. And I need to get some "remove before flight" tags.

This image shows the struts in position keeping the tail plane in the folded position. The picture also nicely shows the color line for the white/light gray bottom.

The strut goes from the movable hinge to the fixed hinge.

I put on the static probes, but they're really flimsy and I constantly was bending and unbending them. They needed to be on becasue it would be awful to try and install them on a painted model. In this image you can see the index motor shaft. The boom is almost done.

Here's a fold test to prove that YOU DO NEED TO FOLD THE TAIL PLANES FOR THIS THING TO WORK. The instructions missed this entirely was a big and almost fatal omission.

I kept breaking that rear antenna support. I fixed it at least three times and each time it was getting worse. I bit the bullet and made one out of soldered wire. Not exactly scale due to the round versus airfoil cross-section, but it ain't gonna break.

We're really closing in to the day when I break out the masking tape and airbrush and start painting this model. All in all, it's one of the most challenging and complex plastic aircraft kits I've ever built. I knew it would be a challenge, but the addition of the ResKits really upped the ante. Some of the challenges were my own doing in fixing my mistakes. Others were just in the nature of the beast.

Any ideas for a carrier deck base for this model? I'm sure there are 1:32 bases. Would they work for 1:35.


  • Member since
    January 2022
Posted by Svt40 on Wednesday, January 12, 2022 12:06 PM

I was torn on getting the res kit tail paddles but opted not to.


One thing you will need to add is the wire that go from the top to bottom of each pitch control link.

Also since you are folding it there is an indexer motor the kit does not come with that is under the tail gearbox cowling.  It indexes the tail paddles to allow the stbd stab to fold.  Drill out the hole indicated and put the rod sticking out of the hole.  The rod will be about half the size of the hole. The head engages with the "crown" to index the paddles.


For the stabs and pylon to be folded you'll also need to fab up the struts used to hold them.  These are some drawings but not to scale obviously. Remove before flight tags would also be on the struts.

  • Member since
    March 2012
  • From: Louisville, KY
Posted by Builder 2010 on Tuesday, January 11, 2022 6:27 PM

Great diagram and good info of the updated models. 

Today's post combines yesterday and today's work. Got the tail rotor built and wrestled the horizontal tail plane into submission. 

The ResKit tail rotor has great detail, but in my case, the lifting rods (that control the pitch horn) just seemed way too short so I substituted them with 0.022" wire. Drilling the small rod ends was painstaking, but went ahead without difficulty.

Here are the four blades with the three parts attached: Blades, hubs and angled horns.

The arrow denotes on of the tiny counterbalance arms that broke off during cleaning. Another broke during assembly so two are not metal. Nothing attaches to these protrusions.

The four lift rods go between the spide and the horns. The arrow points to the kit part that just is way too short. I doubled checked what I was doing and couldn't find a mistake.


The instructions called out exchanging the kit supplied prop shaft with another that was significantly shorter. Unfortunately (for me) I had already fully assembled the tail boom and that required this part to already be installed.

The solution was simply to drill the resin hub deeper to accept the kit's pin.

Here's the rotor in place without glue.

Next was finishing the boom with the horizontal wing. I glued it up according to the instructions. The actual gluing points between the side pieces and the center were ridiculously small and fragile.

After it cured for about an hour I tried to snap it into place with the two small pins protruding from the center piece that engaged into two holes in the tail boom mount. It was quite flimsy, and when I put it into the folded position the wing was completely in the way. How the heck did this thing fold?

As I studied the tail plane I realized that those delicated attachment points were actually hinges. The darn thing folds! This was not called out at all in the instructions, nor did I study the folded tail intensely enough to pick this out. So broke the previous delicated joints and realized their surface area could not support the tail pieces in the upright folded position. Instead I faked it and made some phos-bronze wire supports. They're not scale nor prototypical, but they'll support the tail pieces in the display position. While the main rotor is folded hydraulically, all the tail boom folding appears to be manual.

That finished yesterday's work. Today I 'hinged' the opposite side and did some more work on the center section. I drilled it out 0.022" and then opened to 1/32" and used wire to make a much stronger assembly.

And here's the end result with the tail planes in their folded position (unglued) that will allow the boom to fold next to the fuselage as it should.

Now y'all are up to date.

  • Member since
    December 2002
  • From: Valrico, FL
Posted by HeavyArty on Saturday, January 8, 2022 2:39 PM

No issue, times they are a changin'.

Here are good diagrams that show the 3-tone color scheme. 

Gino P. Quintiliani - Field Artillery - The KING of BATTLE!!!

Check out my Gallery: https://app.photobucket.com/u/HeavyArty

"People sleep peaceably in their beds at night only because rough men stand ready to do violence on their behalf." -- George Orwell

  • Member since
    January 2022
Posted by Svt40 on Saturday, January 8, 2022 2:36 PM

My mistake.  I got out just before the HSL squadrons turned into HSM and changed from Bravos to Romeos.

  • Member since
    December 2002
  • From: Valrico, FL
Posted by HeavyArty on Saturday, January 8, 2022 2:33 PM

Great reference pics.  One point though...

Svt40
The HSM-40 bird is a training squadron in Florida.  000 is their "show" bird...The aircraft itself is actually an SH-60R.  

The HSM-40 helo is actually an MH-60R, they are no longer SH-60s.  With the S and R models they are considered MH or Multi-mission Helicopters since they are used for many different purposes.  The MH-60S is a navalized version of the Army UH-60M Black Hawk, while the MH-60R is the latest naval version.  They can both be used for ASW, SEAL support and insersion/extraction, VertRep, SAR, etc., etc....

MH-60S info: https://www.navair.navy.mil/product/MH-60S-Seahawk

MH-60R info: https://www.navair.navy.mil/product/MH-60R-Seahawk


Gino P. Quintiliani - Field Artillery - The KING of BATTLE!!!

Check out my Gallery: https://app.photobucket.com/u/HeavyArty

"People sleep peaceably in their beds at night only because rough men stand ready to do violence on their behalf." -- George Orwell

  • Member since
    January 2022
Posted by Svt40 on Saturday, January 8, 2022 12:30 PM

The first bird 456 is from one of my old squadrons.  I actually worked on 456 but not the one shown in the picture.  That one most likely replaced the one I worked on.

The cargo hook is probably a new one and in a pristine 320 grey.  All the dark spots you see on the bottom of the aircraft are actually drain holes.  A LOT of hydraulic fluid leaks from them.  Also towards the rear there are two square holes which are gang drains for the engines and hydraulics and can get very nasty.

The HSM-40 bird is a training squadron in Florida.  000 is their "show" bird.  Each squadron is allowed one "show" bird which get brightly painted.  Those birds typically do not deploy. HSM-40 never deploys overseas.  The missiles are AGM-114 HELLFIREs.  The aircraft itself is actually an SH-60R.  The red cover with the handle is an avionics fan cover  If you look just below that cover you can see the brake line for the main landing gear.

The bottom picture of 712 does indeed have the 495 grey on the bottom.  It's just very very dirty.

  • Member since
    April 2003
  • From: USA
Posted by keavdog on Saturday, January 8, 2022 11:45 AM

What a great resource.  The last bottom pic looks lighter to me - you can see the demarcation along the boom.  And the super clean pic has 000 - CAG bird? 

Thanks,

John

  • Member since
    March 2012
  • From: Louisville, KY
Posted by Builder 2010 on Saturday, January 8, 2022 11:14 AM

I downloaded the file you suggested. Thank you! Always great to have a follower with actual real world experience on this equipment. I've been studying a lot of pictues and some look to be the medium gray throughout. Some of the images show the vast variations in weathering that can be applied from sparkling clean to worn in various spots especially the underbelly.

This one is pristine! And appears to be monochromatic.

Here's some underbelly soiling that could be added. It also shows the lighter bottom color and it looks like I'll have to add that. Good view of the missile detection sensor on the EMS at the front corner. And here I thought it was another search light... The cargo hook in the belly looks like it's painted light blue.

And another bird... Again, very clean... a little soiling on the tail boom. Also, panel lines are very tight and not very noticeable. Amazing extension on the tail wheel shock strut.

Here'sa  close up showing just how clean these things can be. What is that red panel with the handle on it? Notice the Maverick missile loadout.

Another bottom shot. This one again shows the soiling esepcially in the low pressure area behind the radome. This one looks like the bottom is NOT painted in the lighter color.

  • Member since
    January 2022
Posted by Svt40 on Friday, January 7, 2022 10:22 AM

35237 blue on top

36320 grey on the sides

36495 light grey on the bottom.

Not sure those colors correspond with as far as model paints.

There was also a LOT of variation in how those colors were applied.  But typically the struts were solid 320 grey.  Sometimes they might have 495 light grey on the bottoms of the struts.  The tail strut can be either 495 grey or 320 grey.

MIL-STD-2161B(AS) is the 2008 copy of Navy paint schemes.  The SH60 series is page 166 and it can be downloaded. The NATOPS manual can also be downloaded and it shows a ton of information useful for modeling.  A1-H60BB-NFM-000.  But you may want to skip that one because it will show you just how much is wrong with the kit and you are too far along to fix some of it.

I've been waiting on La Quinta Studios to come out with their 3d decals for the cockpit and SO station.  I'm also trying to learn how to vacuum form so I can make the clear shield for the sono launcher.


One problem with the KH kit is the main struts are wrong.

If you look down near the axle there is a small bump on the top and bottom of the drag beam.  That is a jacking point and should only be on the bottom of the strut.  The top side would be a nut.

Also if you look near the hinge you will see a small arm sticking out between the two plates  That is the Weight on Wheels switch and is on the top of the port strut only.  The stbd strut does not have it.

The wheels can be gloss white or 320 grey.  Either is correct and can be mixed and matched.  The brakes calipers are gloss white.  There is also a brake line that runs along the strut to the hinge area where it comes to a large orange QD.

Also your tail pylon trailing edge fairing is missing the two MWS sensors.  Not sure if they are in the kit as an option or not.

I was an AT (Aviation Electronics Technician) Pretty much all the electronics and weapon systems were mine to maintain.  We were also required to be a plane captain which means you must know the entire aircraft from rotor tip to tail to ensure it's flight worthiness.

  • Member since
    March 2012
  • From: Louisville, KY
Posted by Builder 2010 on Friday, January 7, 2022 9:55 AM

Wonderful! I love forums. There are always followers who have actual, real-world experience on what I'm building.

What color are the gear struts themselves. Normally they're white, but in this case they're always exposed.

I still haven't decided on exactly what color scheme I'm going to use. There are soooo many choices.

  • Member since
    March 2012
  • From: Louisville, KY
Posted by Builder 2010 on Thursday, January 6, 2022 8:45 PM

As you can see I screw up with regularity, but I also have great recovery skills and lots and lots of persistence. I had a short session and kept working on the tail boom and the main landing gear.

The tail boom has a small vertical stabilzer that went on nicely. Needed a little filing here and there to get a close fit.

I then needed to back up and build the main landing gear. The instructions on its assembly are a bit sparse. The main gear housing (minus the strut) consists of a 3-piece sandwich. I built the first one after figuring that the two pieces I removed from the sprue didn't quite make the whole assembly. Then I went to cut the parts for the other side and only found two of the three on the sprue. I didn't remember cutting off one of those pieces, and after a thorough search of the work bench area and parts racks, was unable to find it. It was quite desparate becasuse this was not an easy part to scratch-build. I did a complete search of the immediate floor around the workspace, but nada. Then I spotted a beige piece of plastic across the room under my 3D printing bench. And it was the missing piece! I don't know how this happened, but I was very happy that I didn't need to fabricate a new one. And with Kitty Hawk out of business, I don't know of any way to get a new part from them.

The strut is captured by fingers in the housing and, if the shock strut actually moved, could articulate. But... since the strut is solid the gear is fixed. I also glued the wheels together in preparation for painting. BTW: a large part of the filled underbody in the front will be covered by the large, round radome.

And we had our first snow of the season here in Da Ville. Winter has finally arrived.

  • Member since
    January 2022
Posted by Svt40 on Thursday, January 6, 2022 1:46 PM

Builder 2010


There are sensors that go on the four corners of the cabin. Not sure what they are, but they have lights on the front ones also which I pre-treated with the Molotow. The FLIR goes on an optional bracket on the nose. It even includes some nice connecting leads. 

The forward half of the FLIR ball is transparent so I pre-masked the optical windows before attaching to the airframe.


Can someone tell me what that rectangular array is? IFF?


The square antennas, two front and two rear are the ESM.  Electronic Surveillance Measures antennas.  Each antenna covers 90º and can identify and track RADAR emissions.  On the front next to them are the Missile Warning System sensors.  Which detect the launch plume of a missile and warn the crew inside and give them a direction as well.

The ESM antennas on older aircraft are a gloss white.  Newer antennas are flat grey similar in color to the sides of the helo.  They also have "ANTENNA DO NOT PAINT" at teh top and bottom of them.  The words on the bottom are upside down.

The MWS sensors, two on front and two on the tail pylon trailing edge fairing are usually either a black anodized color or as they age begin to turn a slight purple-ish red color.  The centers have a chrome sphere coverd in a flat plate of glass.

I worked on the SH-60B for 20 years right up until they phased them out.  Any questions on colors etc please feel free to ask.

Sadly the Kitty Hawk Bravo kit has got a LOT wrong with it as they just used Foxtrot parts for most everything.
  • Member since
    March 2013
Posted by LonCray on Thursday, January 6, 2022 8:06 AM

I've made mistakes like that before and it usually meant the kit went back in the box and onto the shelf for a few years before I had the courage to pull it back out.  Nice job with the repairs!

  • Member since
    March 2012
  • From: Louisville, KY
Posted by Builder 2010 on Wednesday, January 5, 2022 6:02 PM

Spent most of a long work session fixing a mess! You see I misread the instructions on "what to remove" on the tail booms. The plans showed the colored area and I read that as it needed to be removed... which I did yesterday. When I trimmed out the resin hinge bulkheads and fit them, this is what I saw.

That humongus gap was the material I erroneously cut away. You weren't supposed to "remove" that colored area, you were supposed to "thin" it by .3mm from the inside. I neglected to see the decimel point and my ADD brain jumped to the wrong conclusion. The resin pieces were still supposed to sit between the fuselage styrene. They were just a little thicker, so the styrene needed to be re-shaped.

This meant I had to add back the missing material and dress it so it wouldn't be noticeable to the novice viewer. Show judges would probably pick it up. I used some styrene strip held with both solvent cement and CA. I replaced rivet holes in the new parts.

I then shaved the new material on the movable boom so the piece would sit between the packing. On the fixed portion I have the hinge butting up against the fuselage.

With the both sides fit to their remade ends I was able to actually start building the hinge assembly. As usual ResKit is asking you to assemble and fabricate stuff that just about at the edge of my skill set. Lots of butt joints held by CA. The pulleys are almost microscopic and they expect you to thread some .2mm wire around them to simulate control cabling. I'm thinking about it, but may not do it. I actually hinged the parts with 0.022" wire and they work, but...and it's a big but... the next parts you add prevent the hinge from working.

I glued the part to the movable boom and that's where I had to stop. The folded boom would block painting of the fuselage and the closed side of the boom. I will have to glue it all in after the painting.

There were more gaps that need filling. I used a combination of a thin styrene and Bondic. I traced the shape of the open onto a piece of paper and cut the piece. It need more adjusting and then further filling.

Here is the gap filled.

Last thing up today was the tail strike bumper. This little assembly was one of those royal pains in the butt. If you've had the fun of watching "Rocco Sciavoni" on PBS streaming, you'd know that this was probably a "9th level pain in the ass." He ranks them with the 10th level being a murder. This  little job took 15 minutes or more.

You have to captivate the movable strut in the two holes and then glue it together. The triangualar shape made gripping difficult and the part kept rotating and coming out of the holes. I tried all sorts of things including taping one half to the bench so it wouldn't be moving around. I finally got to a big sigh.

Once I got it together, putting it on the plane was not a problem. It could have been engineered differently since the part is not actually movable in the final install. It could have been slipped into a slot and glued.

As much as I'm champing at the bit to get painting this job, all these bits and pieces must be installed properly. And, BTW: That pointy antenna sticking out of the bottom broke off AGAIN! As I said, IGNORE THE INSTRUCTIONS AND GLUE ALL THE TINY ANTENNAS ON AT THE LAST POSSIBLE MOMENT BEFORE PAINTING. Otherwise, you be re-gluing them, and fixing them for the rest of the build. There are so many that it's hard to grab the beast to do any heavy lifting (like adding filler pieces at the tail to fix big mistakes).

  • Member since
    March 2012
  • From: Louisville, KY
Posted by Builder 2010 on Tuesday, January 4, 2022 6:01 PM

Thank you! Gino, I will do the engine cover like that.

Hope everyone had a decent and safe New Years. We stayed put and had a nice FaceTime with our friends back East. We're all getting older and several folks from our group were having health issues.

Put the metallic antenna loops onto the Fuze after making a 3rd one. I was trying to add some bulk with various kinds of media including epoxy putty and Bondic. Putty didn't stick. Bondic did sort of. When attempting to shape it with the Dremel I thinned the phos-bronze too much and it bent in half. Ergo, making another.

I put them onto the fuze with gel CA with a bit of medium CA to smooth the edges a bit. These should be more rugged than the frail styrene ones I was replacing.

The movable part of the tail boom gets glued together now, but before you do you have to captivate a actuating cylinder in two slots on either side. I didn't like the depth of the plastic lugs so I added some 1/32" phos-bronze. 

I got started on the ResKit tail boom hinge replacment. It's a pretty complex little project including faux pulleys with wire simulating the cables that control the tail pitch. You have to remove material on both the fixed and movable parts to create proper space for the more detailed resin parts. And here are the results. I used a combination of #11 blade, micro-razor saw and an Xacto #11-sized saw to remove the plastic.

The hinge area had to be surgically removed to give space for the more detailed hinges on the resin parts.

Here's the fixed boom with it surgery completed.

Lastly, here's the first resin part that I'm preparing. You have to open up some slots in the part as well as cut it out of the sprue block. The resin is tough, but not that tough and you can screw it up pretty good if you're not careful. You can see the highly detailed hinge parts that will fit into the newly cut holes.

  • Member since
    December 2021
Posted by chopperlover on Friday, December 31, 2021 8:02 AM

Wow!

  • Member since
    December 2002
  • From: Valrico, FL
Posted by HeavyArty on Wednesday, December 29, 2021 6:34 PM

Looking great.  The antenna along the fuselage is a low frequency one.  As for the inside of the engine compartment access cover, it is actually zinc chromate yellow, has a flat plate for a floor and black anti-slip tape as it is used as a work platform, as on the UH-60s below.

You can see the flat floor plate well here.

Gino P. Quintiliani - Field Artillery - The KING of BATTLE!!!

Check out my Gallery: https://app.photobucket.com/u/HeavyArty

"People sleep peaceably in their beds at night only because rough men stand ready to do violence on their behalf." -- George Orwell

  • Member since
    March 2012
  • From: Louisville, KY
Posted by Builder 2010 on Wednesday, December 29, 2021 6:21 PM

More fuselage work...

Before I forget, let me make a proclamation. DO NOT PUT ON ALL THE LITTLE ANTENNA AND OTHER THINGYS THAT STICK OUT FROM THE FUSELAGE (technical term) WHEN THEY TELL YOU TO IN THE INSTRUCTIONS. PUT THEM ON AS CLOSE TO PAINTING AS POSSIBLE. Otherwise you will break them! And repairing them is neither fun nor optimal. I'm really annoyed that I didn't follow this advice and have been repairing things that stick out continously as I handle the model to do other important things.

I built and installed the mount for (I am assuming) is the MAD (magnetic anomaly detector) towed device. This one had a signal line in styrene and a sway brace that flush mounts to the fusselage.

I'm preparing the model for painting. That requires mixing up the instructions. In my case it meant putting on the hydraulics fairing that wasn't called out unti near the very end. It will also include the bottom radome that goes on tomorrow.

The fairing fit poorly, again due to that fuselage gap. As I mentioned yesterday, this gap keeps rearing its ugly head forcing parts to no longer fit by the amount of the gaps dimension. I don't know what I'm going to do with this mess. I may build out and smooth the flank to erase this discrepency. Might as well since I've been doing it all along.

In my handling I doinked the rear antenna mast. These protrusions are the reason I made the proclamation at the start of this post. I didn't even know that I broke it until I found it as you see it here.

I was just thick enough that I could actually drill and pin it. Not a pefect solution! Further smooting will help a bit.


To prevent more of this, I chose to fabricate the remaining two of this array out of metal. They are standoffs for a wire antenna that I'm going to assume is a low frequency communications link, but Gino will correct me.

I formed the phos-bronze and cut some PE fret for the bases. I will further finish them by bulking out the airfoil shape of the mast with some CA or Bondic. I solder these embedded into a ceramic soldering pad that is fantastic for soldering small assemblies. I will do this again when I fabricate the metal tripod that's going to support the rear-view mirrors. I'm going to replace the styrene struts without giving it a second thought.

Here are the two supports ready for further finishing.

The rear EMS pods went on port and strbd without problem.

I also forgot to color the floor of the engine compartment so protected the engine and airbrushed some dark iron into the space. I also did this on the inside of the engine cover which will be displayed open. I first shot this with the Tamiay silver laquer. Paint was scrtched off when I was fitting it.


For initial engine protection during painting, I covered it with some wet Bounty towel.

And then stuck the engine cover on as best I could.

We're getting close to painting time. I have to install the main landing gear and then work on the tail boom including the ResKit swing joint and tail rotor, so there will be some resin building fun. I have to decide whether to paint the exhaust ducting before and masking it and the shoot the gray, or after and and mask the gray. Any thoughts? I'm also thinking about how to actually hinge the copilot's door.

  • Member since
    March 2012
  • From: Louisville, KY
Posted by Builder 2010 on Tuesday, December 28, 2021 5:56 PM

Thanks Gino! I did do just that. I did all the masking off the craft and then glued it in place. I did NOT use canopy cement. It's not secure enough. I DID use solvent cement and think I was careful enough to not wick it onto the clear portions. The Eduard decal set almost worked perfectly for these windows. I say almost because the Seahwak version does have some slight variations even on the front windscreen starting with the overhead control panel that is a painted portion of the glazing and has a curved portion on the left top that gets left unmasked. I'm adept at using a #11 to trim windshield masks even without them being pre-cut. None of the side windows masks worked at all.

That 1/32" cap on the roof keeps rearing its ugly head. In this instance it made an objectionable gap on the left side door, both on top and at the windshield joint. The windshield ended that gap's thickness too soon and didn't reach the door.

I again used shaped styrene to fill the gaps. There was also another gap at the right-top-rear edge of the windshield, also filled neatly with styrene. Filling with styrene reduces (not necessarily elimates) using paste fillers that often need multiple coats to fill a stubborn gap.

Before snapping the door in place (no glue needed), I painted the inside of the shim with interior black using a brush with a long handle from the opposite side of the cockpit. That's in case the rivet counters peer through the open door and see white styrene on the other side. I know, I know AMS!

With the door in place the gaps are now closed and the door fits tight enough to not need internal masking.

The right side fit was too tight and I had to trim the inner door frame so it would close enough to seal the paint out. The other shim is pointed out here. I had to use some canopy cement on the door's upper edge to keep it shut before painting. As I said, it's not that strong and the door is removable. This door will be open.

I added the left side weapons sponson. it too had four of those tiny sway braces. Little spot needing some filler.

We're not making out annual trip back East for New Years. Too many unknowns with the pandemic. I'm telling y'all this to say, building will not be interrupted.

  • Member since
    December 2002
  • From: Valrico, FL
Posted by HeavyArty on Tuesday, December 28, 2021 4:16 PM

Looking great.  The details are really making it pop.


Builder2010

I’m re-thinking installing the main glass to avoid having to mask the delicate interior.


I always install the canopy/windscreen first and then mask off the clear areas before painting, just like you did on the side windows.  I find it way easier than covering up all of the interior.

Gino P. Quintiliani - Field Artillery - The KING of BATTLE!!!

Check out my Gallery: https://app.photobucket.com/u/HeavyArty

"People sleep peaceably in their beds at night only because rough men stand ready to do violence on their behalf." -- George Orwell

  • Member since
    March 2012
  • From: Louisville, KY
Posted by Builder 2010 on Monday, December 27, 2021 5:47 PM

 Happy Monday after Christmas.

Odds and ends day. Finished masking the cockpit doors, hung the personnel hoist, prepared and installed the corner cockpit windows and the nose skin, and installed the outer wall that covers the sonar rack.

Again, I masked the interior and exterior of the cockpit left door, sealed all the edges with clear gloss to prevent color leakage. And again, made the hand pull out of phos-bronze wire. Since the metal stuck through the other side a bit, I drilled holes in the inner frame so the wires wouldn't keep the frame from seating properly. The plastic door handle is again wired in place.

I airbrushed the interior parts with NATO black and then pulled the tape. Came out okay. Before gluing on the inner frame I picked out some details with my "steel" metallic mix. I AM going to put one of the doors (co-pilot's) in the open position reinforcing it with wire. It will require reshaping the hinge details so the door can be properly opened.


I masked and installed the outer left skin that covers the sonar rack. I had to carefully position the left side of this panel since it wanted to fall into the craft to deeply. Needs a tad of filler on the lower lip.

Assembled the personnel hoist and then glued it to the fuselage. it was trickier to position than I would have thought and I had to remove some of the locating pin on the stem so it would settle down on the fuze properly.

It was time to install the nose cone and the lower corner windows. After putting on the nose cone, I had to paint the edges and touch up the interior before the glazing could go on.

I masked these windows off the model and then glued them in place, again with canopy cement. Again I sealed the edges with clear. I'm re-thinking installing the main glass to avoid having to mask the delicate interior.

It's too bad that you can no longer see any of the avionics which I so painstakingly painted...

  • Member since
    March 2012
  • From: Louisville, KY
Posted by Builder 2010 on Thursday, December 23, 2021 8:53 PM

Finally got a reasonable scissors link installed. I don't really like it, but I've spent WAAAAYYY to many hours screwing around with it. 

Tomorrow is Christmas Eve. Everyone have a wonderful one!

  • Member since
    March 2012
  • From: Louisville, KY
Posted by Builder 2010 on Wednesday, December 22, 2021 6:28 PM

So glad you are enjoying it. It's been fun for me too.

Started masking the various glazing needed to do the early painting. Then I found that the Eduard masks for the MH Blackhawk don't actually fit this version, as seen here.

If I'm going to have to add more mask to fill out the spaces, I might as well mask from scratch, which is exactly what I did. This was the exterior of the glazing.

 And I masked the interior too. The sliding door interior will not be seen, but the cockpit doors are viewable and will be painted black.

I also replaced the plastic door pull and the missing door handle with metal parts.

Lastly I spent a lot of time... to darn much time on making the scissors links. Here's me cross-drilling the link. My drawing was a little off making the legs too thick. In attempting to open up the gap I kept breaking the legs. I also broke a ton of these drills for various reasons including putting side pressure on the drill and actually bummping something when I put it down on the bench.

I ended the session without finishing this. At least I can print more. I'm post-curing one batch for the second time to maybe toughen it up a bit more. Not too much production for an afternoon's work.

  • Member since
    April 2003
  • From: USA
Posted by keavdog on Tuesday, December 21, 2021 7:06 PM

Really been enjoying this build thread.  Now that is one tiny part!

Thanks,

John

  • Member since
    March 2012
  • From: Louisville, KY
Posted by Builder 2010 on Tuesday, December 21, 2021 6:09 PM

I re-designed the scissors print. Instead of printing them all directly on the build plate, i drew a plank below them and supported each print sufficiently so no part of the link would attempt to print in free space. My reasons for this change are due to the nature of starting layers. The first 8 layers printed are exposed for 60 seconds per layer (as compared to 10 secs/layer on the rest) to ensure that they are well hardened and adhered to the build plate. If not, when the plate lifts to allow fresh resin to backfill for the next layer, the previous layer could adhere to the teflon barrier at the resin vat bottom, and not lift with the build plate thus creating a failed print job. This long exposure has a negative side effect. It causes the first layers to spread out beyond the part's boundaries creating what's know as an "elephant foot". For large parts, the elephant foot's no big deal, but on small parts it can distort the shape pretty badly as it did on my first attempt. 

By elevating the parts off the plate and supporting them, the elephant foot is on the plank, not the parts, and the parts come out true size. Notice that the print was actually starting to faill on the right side of the image with the plank lifting off the build plate, but enough of the plank was still attached to produce a bunch of good parts. That's why I ALWAYS print a lot more parts than I actually need. The resin is cheap for tiny parts, and the print time is the same since it's the number of vertical layers that determines print time (along with exposure times and print layer thickness).

I post-hardened the bars before drilling the holes and separating them from the bar.

I tried to drill one and did have success. THEY WILL WORK! Notice the one in the background has a broken leg. Again, that's why I print so many. They're fragile and drilling is a bit abusive to tiny parts.

Work continued adding fuselage details. There were three antenna that went onto the tail boom. I had pre-opened holes for two of them, but had missed opening the square hole for the middle one. Rather than just drillng anywhere, I came up with a scheme to shine my iPhone light down the boom and lo and behold, the thinner plastic where the location was on the inside glowed just enough so I could poke the hole from the outside and produce the square hole in its correct location.

The crew door is supposed to be installed now, but I want it in the open position to pose a mechanic sitting on the sill. That means the fuselage must be painted before the door goes on since you can see the fuze wall through the glazing. I also drilled and pinned the delicate door handle. I have the Eduard transparent parts mask set for this model. I use the Testor's Canopy Glue for all the transparent parts.

Up next was the torpedo rack on the strb. side. It's a 3-piece affair where you have to sandwich a part inside before gluing the two halves together. It was confusing to me just how this part was to be installed so I spent a lot of time studying it and ultimately got it right.

Onto it when four, very tiny sway braces. These suckers were really, really tiny. I used a 'parts catcher' apron (a la watchmakers) stapled to the underside of my work bench that catches about 80% of the crap that I drop (as long as I remember to clothes pin it to my shirt). One of these parts dropped into it. Here's what it looks like. Imagine seaching the floor for that!

In case you think I'm being hyperbolic, he's a cropped closeup showing it's actually a molded part.

And here they are glued in position on the underside of the torpedo rack.

Last thing I did was assemble the co-pilot's door. Again, I have to hold off on the full assembly since the inside of the door is black, like the interior, but there's a inner frame that goes on over the glazing, making painting and masking more complicated. I'm going to mask the glazing inside and out, paint the inner wall, then assemble and paint the outer frame. I looked to see if it was possible to open the door, but it's not going to be very straight forward since half of the hinge is molded into the fuze wall. I it could be cut out and glued to the door part it might work. I think about it.

\

Until next time...

  • Member since
    March 2012
  • From: Louisville, KY
Posted by Builder 2010 on Tuesday, December 21, 2021 8:35 AM

This is now the 3rd time I've started writing this post. The second time was when I had to replace almost the entire thing because I swiped right on the touch pad and the page disappeared. I then started a 3rd, but stopped in the middle due to being late and this morning that too disappear since it timed out. 

So here we go. First I unsuccessfully printed a gaggle of scissors links that turned out to be too thin to properly drill for the assembly wire I was going to us. I'm going to redesign.

I then finished cleaning up that complex fill area where the engine house joins the tail section. I used various sanding aids including a riffle file that works on concave surfaces.

The rest of the long work session was spent installing lots of little bits that make the model unique. The SH-60B LAMPS version has a lot of antenna and sensor sticking out everywhere. I reinforced some of the most delicate with wire. The instructions called for the canopy to be installed now, but I'm holding off until much later. I will mask the interior without the glazing. I also built and installed the FLIR unit that hangs on the front. There are loads of lights on the ship which I install with canopy glue on a surface prepared with Molotow Chrome Paint.

This phos-bronze is firmly holding this protrubing antenna.

There are two lifting eyes that were broken on the sprue. There are two "E" sprues and the part was broken on both.

I formed new ones out of wire and installed them with CA. They're a little thick, but that's the best size I had. Everything else was too thin or even thicker.

Here are some of the lights. That ugly seam is actually closed with CA. When painted it will disappear... thankfully!

There are sensors that go on the four corners of the cabin. Not sure what they are, but they have lights on the front ones also which I pre-treated with the Molotow. The FLIR goes on an optional bracket on the nose. It even includes some nice connecting leads. 

The forward half of the FLIR ball is transparent so I pre-masked the optical windows before attaching to the airframe.

It's captivated by the two halves of the lower frame. The ball articulates vertically, but does not rotate.

Can someone tell me what that rectangular array is? IFF?

  • Member since
    March 2012
  • From: Louisville, KY
Posted by Builder 2010 on Wednesday, December 15, 2021 6:15 PM

Thanks Gino!!! I am persistent and today that persistence paid off. I decided to go for it and mount the entire engine housing on the craft. It took lots of handling, pushing and shoving and if any more add-on details were on the plane, I would have surely broken most of them off.

Before doing this I started working on the major gap issues. For the top gaps I used a combination of strene strips and med-acccelerated CA. 

When dry I used a single-edges razor to slice the excess off near the skin line, and then using power precision sander and other sanding tools to level it. This entire joint is buried beneath the engine housing. I also used the razor to scrape the joints, not just rely on sanding.

For the bottom and tail seams I used mostly Tamiya filler and some strategic CA to fill it all. In this case I didn't use the power sander, but used the bow sander for all the convex curves.

Getting the engine house on required some surgery and lots of pushing and pulling. I though I wouldn't be able to use the ResKit trans because fit issues, but that was a red herring. The real culprit was the engine itself. It was too fat and was holding the entire assmbly off the plane. I also had to pop off the intake fairing to so more cutting. I relieved the front edges also. I lost the control rods on the trans, but they would be buried under the nose fairing. 

I had to grind some of the engine, and cut one of the pipes so the engine would fit properly.

With the interference removed I was able to rubber band and clamp the housing and start gluing all around.

One joint needed some more attention with the addition of a piece of 1/32" rod and CA. That joint, even with removing the interference, was still too high and need persuasion to get where it belonged.

Here are some of the other fits after correction.

I was rewarded after all this work to see that the nose fairing fit almost as it should. This is not glued. There's some internal pieces that must go on first. You can see what's left of that Phos-bronze pin.

The last gap was due to a mismatch of the fuze sides at the rear engine mount vertical face. I could see this offset, but it seemed in a difficult to remove it, so I decided to handle it with filling.

Again, I used styrene (2 pieces of 0.015" stock) to fill it. It will dry overnight and I'll sand it the next work session.

  • Member since
    December 2002
  • From: Valrico, FL
Posted by HeavyArty on Monday, December 13, 2021 8:44 PM

Glad you made it through safely.  Coming along nicely.  Keep at it, it will look great in the end.

Gino P. Quintiliani - Field Artillery - The KING of BATTLE!!!

Check out my Gallery: https://app.photobucket.com/u/HeavyArty

"People sleep peaceably in their beds at night only because rough men stand ready to do violence on their behalf." -- George Orwell

  • Member since
    March 2012
  • From: Louisville, KY
Posted by Builder 2010 on Monday, December 13, 2021 6:07 PM

Happy Monday. First of all I want to tell everyone that Louisville was spared any damage from the monster storm that ran through KY. Unlike many, I do not either blame a diety or praise one regarding where a weather front decides to become malevolent or benign. It is almost the pure definition of random. it's that randomness that drives people to want to identify an actor, but there is none. With tornadoes, a house on one side of the street is reduced to molecules and the one on the other side of the street is untouched. Gods have nothing to do with this. What I would want a god to do would be to prevent the storm from happening in the first place.

On Friday afternoon, I listened to a broadcast from one of our local weather forecasters where he was discussing "Athmospheric Caps." I hadn't heard the term, but it was very interesting. It is the high pressure that exists high in the atmosphere that can limit the ability of a storm front to make tall super cells. It results from when low and high pressure areas collide and the high pressure rides up over the low.

It was strong over our area and weak in Western KY. He said depending on how long it hangs around, it could mitigate how strong the storms would be over Louisville. I feel this effect was the main reason the storms broke down as they reached our area. Tornadoes did form about 25 miles south of the city. Meanwhile, my trash totes didn't even move. Others in the Commonwealth did not fare so well and it was horrific in the extreme.

So I am extremely happy that my wife are I are alive and well... that our house is intact, and my workshop is here so I can build this model and write about it to you.

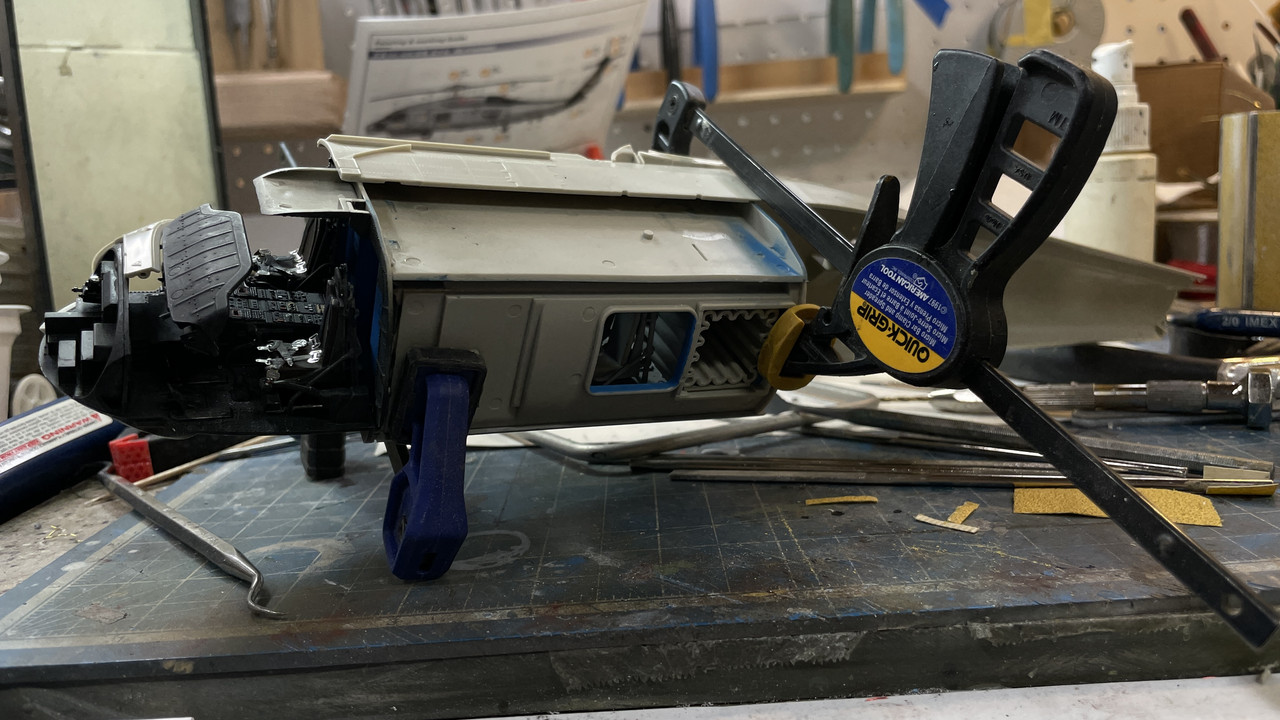
Today began with gluing the interior onto the right hand fuselage side. I used some Quickie clamps to hold it tightly in place. The fit was pretty good so far. 

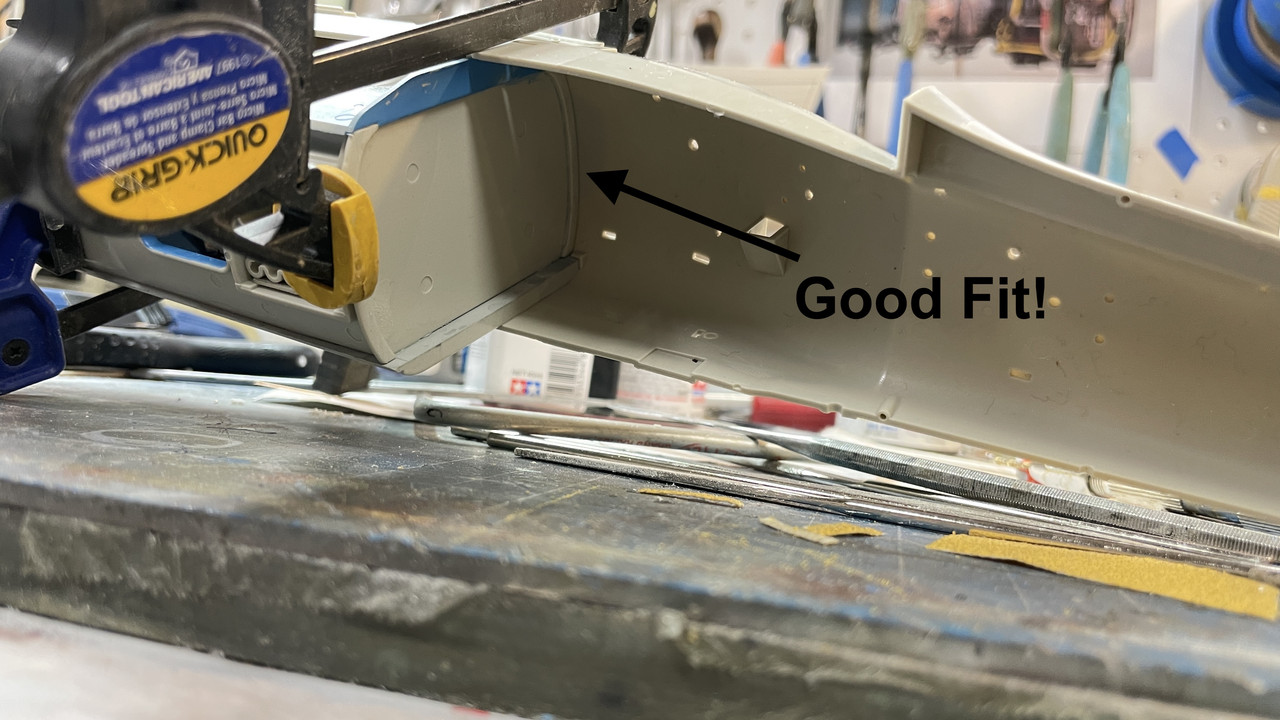
This view shows how nicely the rear of the cabin fit the fuze side. I forgot to put in a piece that lay inside the nose one each side. I had to stick it to a sticky picker and slide it into the narrow space, and glue it. No harm no foul. I did glue it to the other side that wasn't attached.

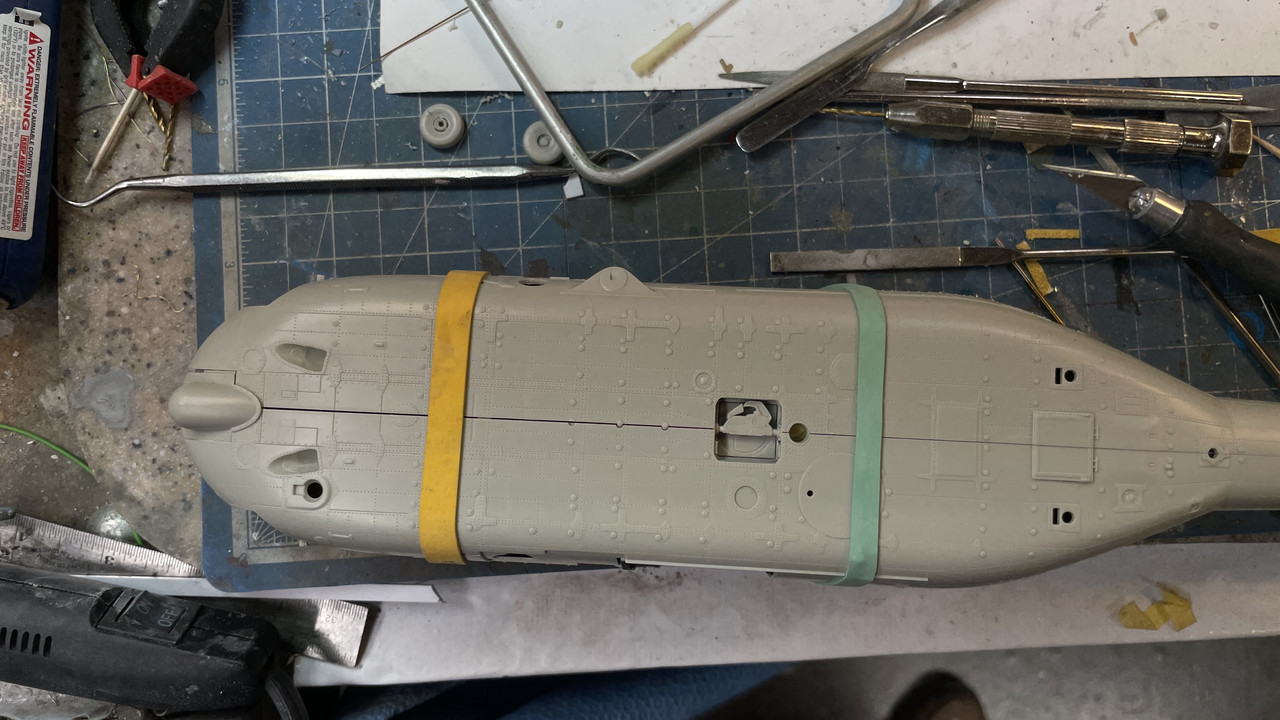
I then attempted to fit the left side in place and was greeted with terrible gaps. If I got the top to fit tightly, the bottom was wide open and vice versa. Two factors were at work. With the cabin being a completely enclosed structure, you can't look and see if it's aligned properly as you could when it was just on one side, and I suspected that the cabin bulkheads were just too wide in spots preventing closer.

Here was the bottom: Notice the bulb in the front. That was an option that I decided after it was all glued in that I didn't want to use it since I wanted the FLIR option on the front end.

And this was the top! Ugh!

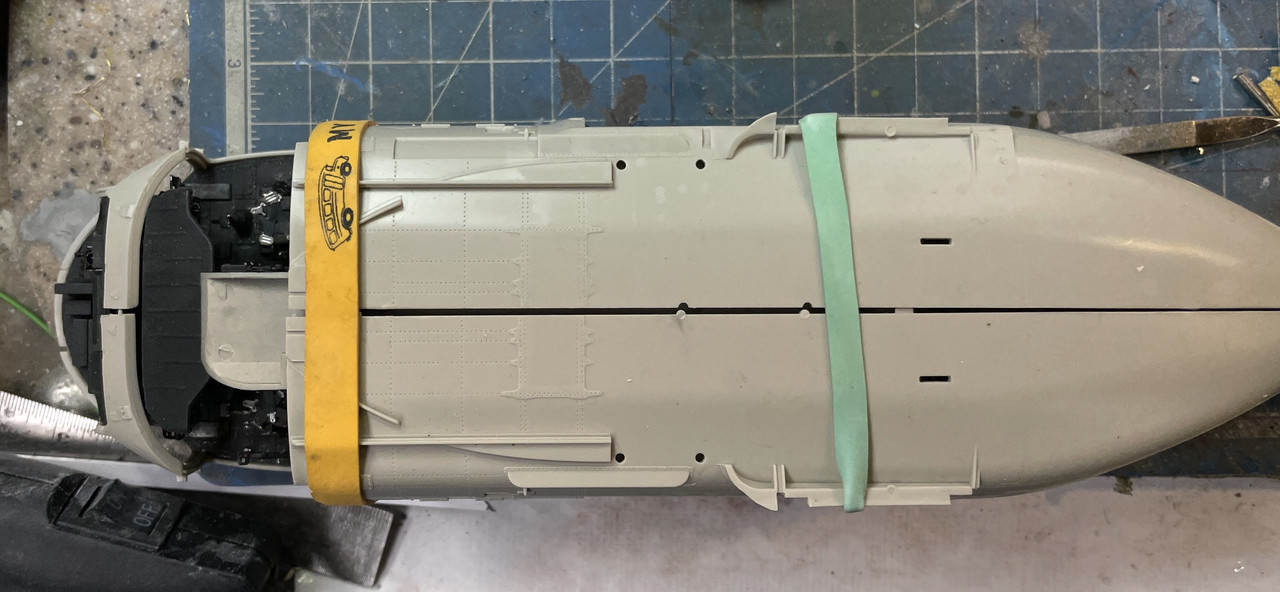
This was totally unacceptable and made for bad fits of the engine housing and the front fairing.

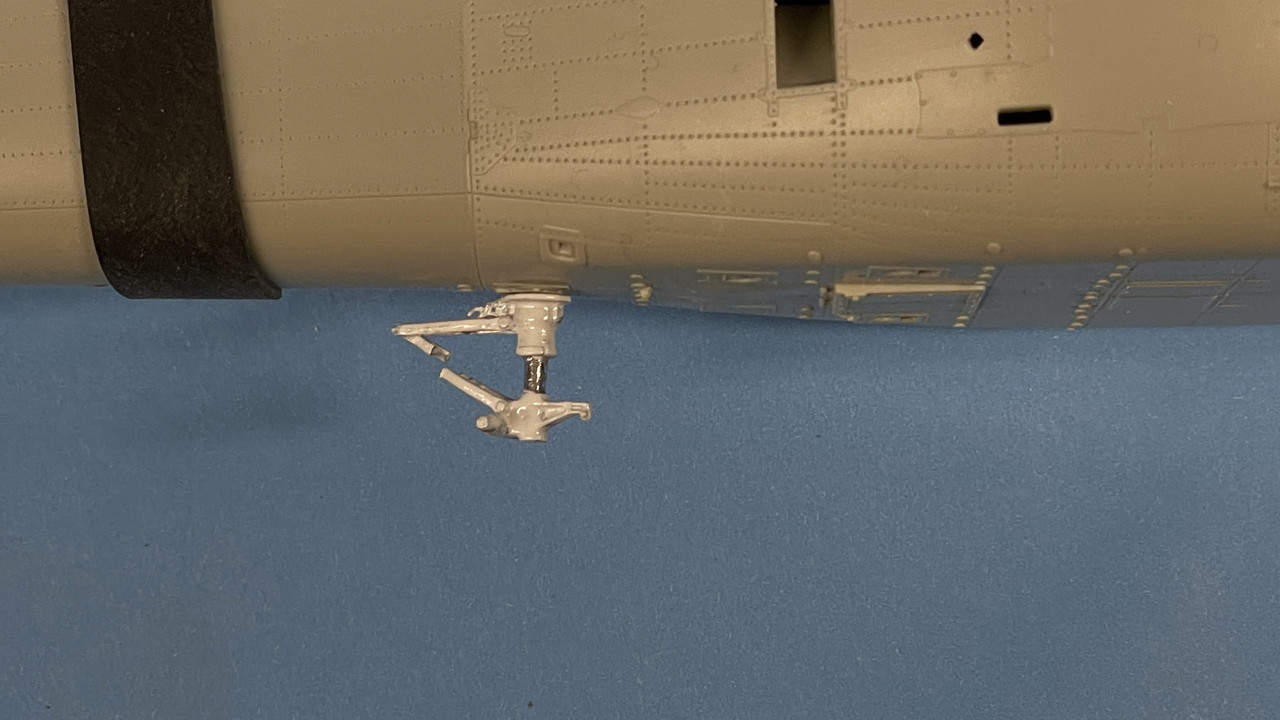
I selectively reduced the outer edges of the bulkheads and kept trying the fit. I finally got it as far as it would go, so it was time to glue. But first, the rear landing gear has to go in because it's trapped by the two fuze halves.

I painted the gear silver only to identiy that it was probably white. I first tried bare metal foil for the oleo strut, but scrapped that and used Molotow chrome brushed on. Meanwhile, the scissors link broke. I glued it together once, and it broke again when I was fussing with the foil. This time I drilled and pinned the scissors joint and glued it again. This time reinforced with thin CA.

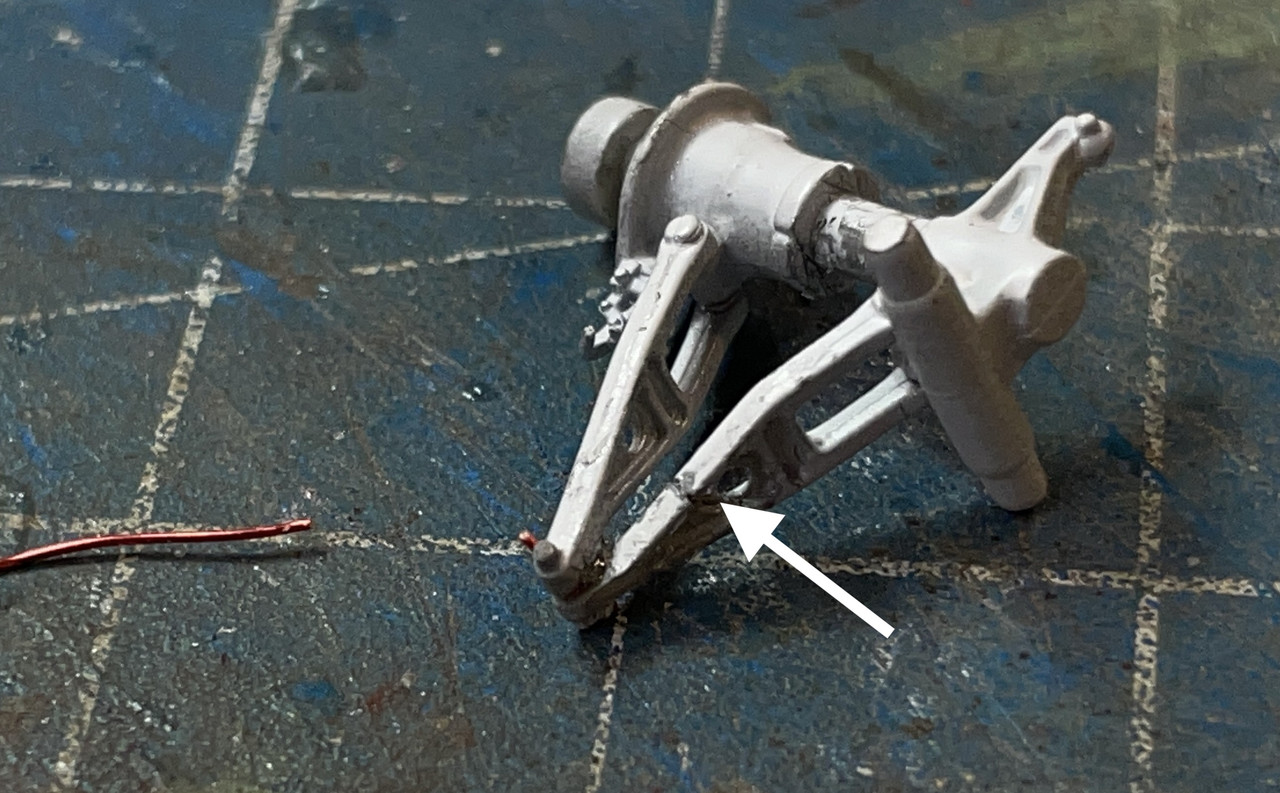
But then, disaster struck again during all my manhandling when trying to close those pesky joints. Another piece of the scissors broke in another place and got lost.

I'll have to scratch-build or 3D print another scissors. Annoying! My UV 3D printing resin is tougher than styrene... or at least the Kitty Hawk styrene.

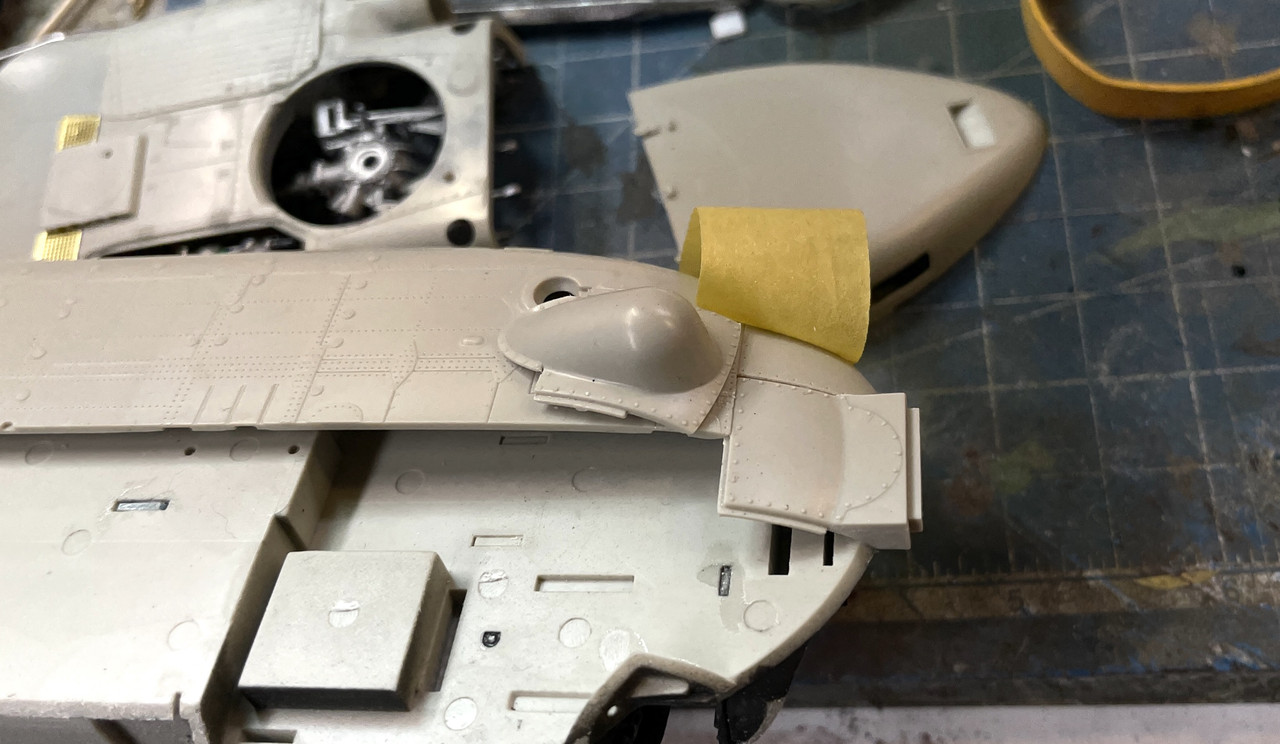
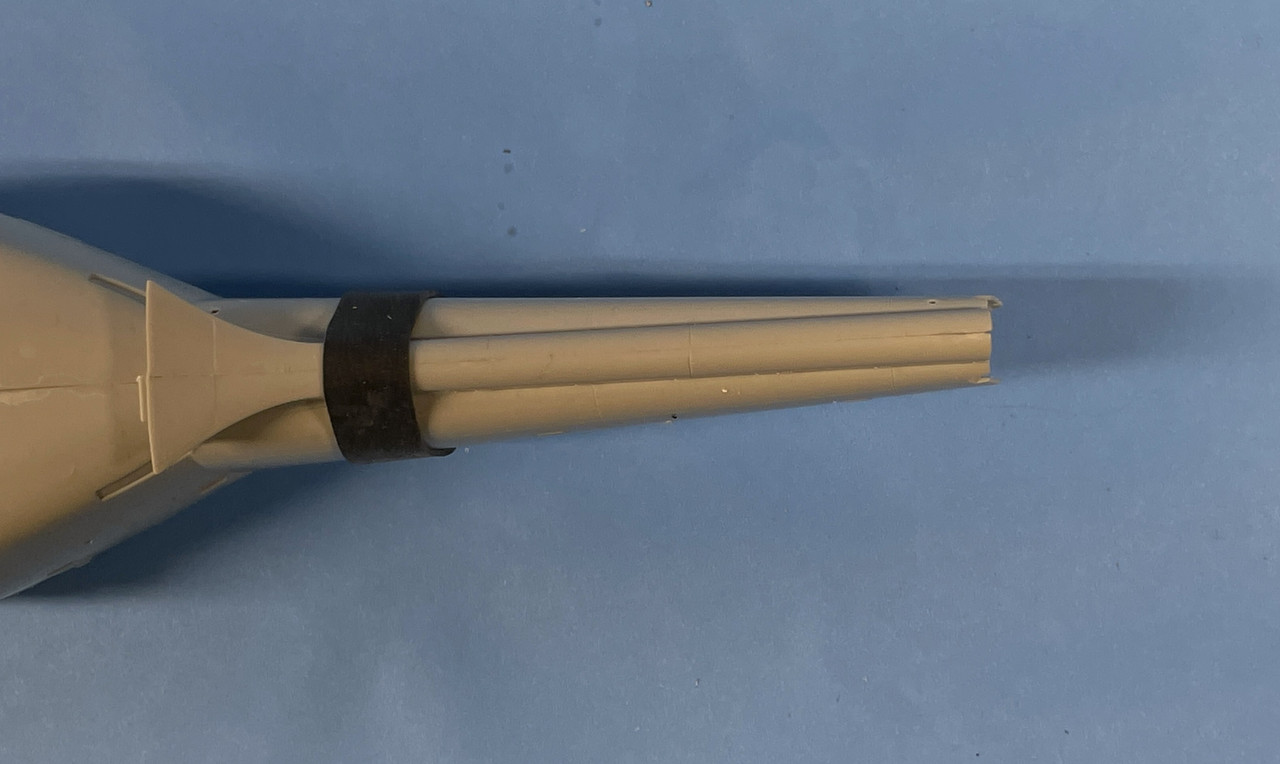
I changed out that front piece before commencing the fuze gluing. This one has the mount for the FLIR in front.

It was time to glue the fuze together trapping the landing gear and the front piece. I worked the bottom joint first since it's exposed more. I let the top joint go for a while. The bottom will get a little filling tomorrow after the joint is fully dry.

The top joint still ain't so hot, but it's hidden. It could cause fit problems with engine housing, fairing and the front glazing that I'll have to figure out as I go.

I'm going to fill this seam with styrene and then filler. 

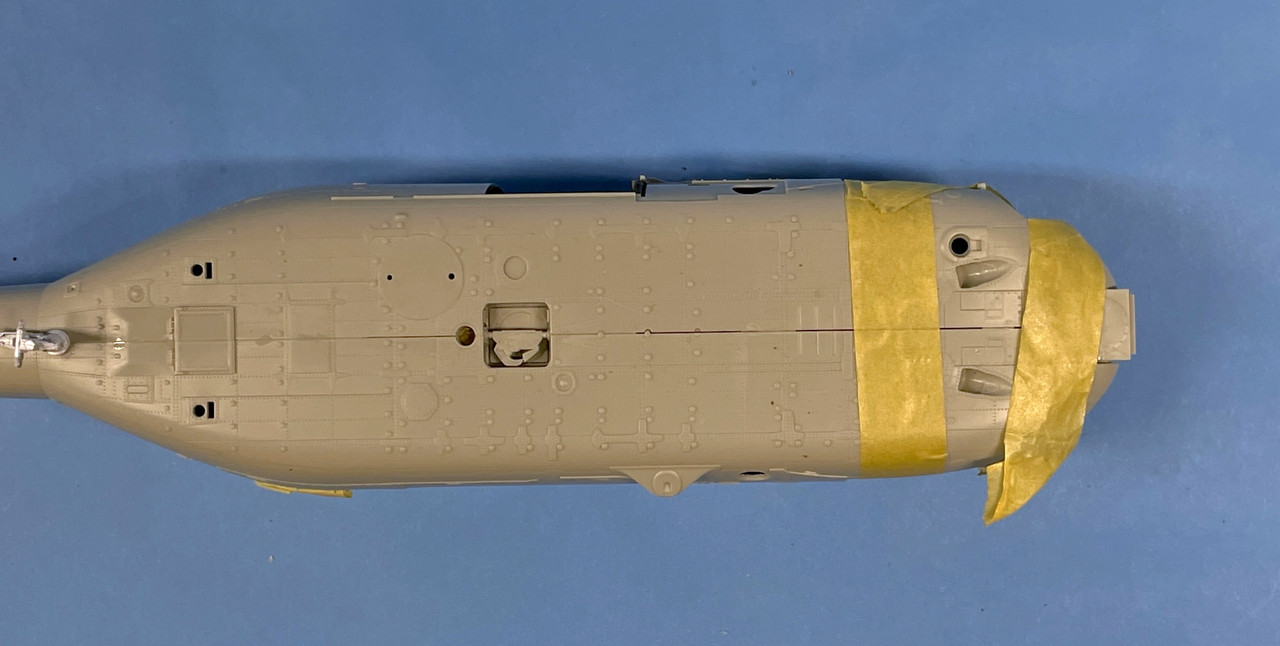
The tail seam was the best of the bunch and looks pretty good. I apply the liquid cement on the inside in as many areas as I can before wicking it in from the outside.

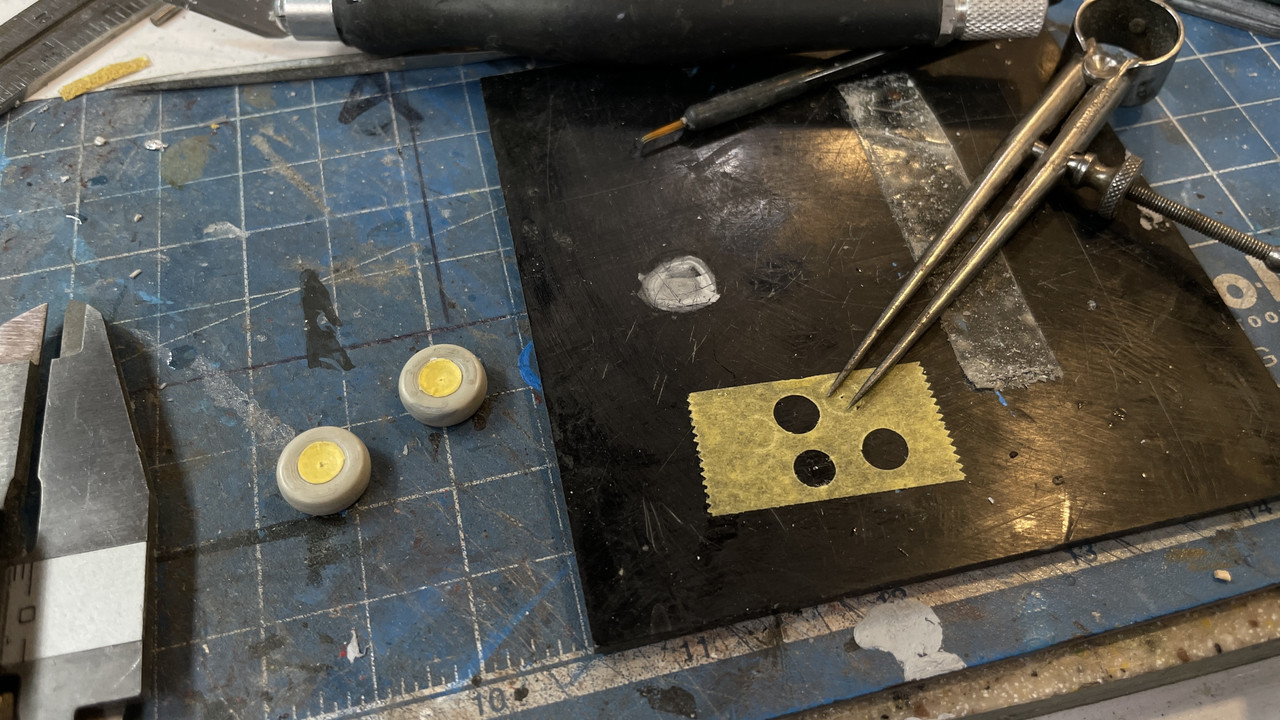
While the paint on the gear was drying I assembled the wheels and made some masks for the hubs. I use a small machinist dividers with one point ground to a sideways chisel edge. I measured the diameter with the digital calipers, divided it in half and used this setting to set the dividers. I added a dab of Molotow Liquid Mask to cover the tiny hole from the dividers' point.

Fuze cleanup will start tomorrow.

  • Member since
    March 2012
  • From: Louisville, KY
Posted by Builder 2010 on Friday, December 10, 2021 7:05 PM

I wish Tamiya made this kit! I'm having trouble with some of the fits and the aftermarket stuff isn't helping. I spent a lot of time today, filling gaps and preparing the surface after that activity. I was unsure about how the intake fairing fit and my suspicions were well-founded since the engine hatch didn't fit well and needed a piece of fitted styrene to fill it. Later on I checked the entire assembly onto the fuselage roof and the fit there was quite challenging. It's going to require a shoe horn and some patience to get it settle down as it should. That step is very late in the assembly and that, unfortunately could make it more difficult. There are two slots on the fuselage top that mate to two tabs on the inner engine compartmemt walls. It's a blind joint and would really benefit by having your finger pushing up to engage the pins. But... you won't be able to do that because the cabin will be installed and nothing will be able to get in there. It may be better to just cut off the tabs so nothing has to go into blind slots.

I didn't like the obvious seam running down inside the exhaust stacks so I filled that with Tamiya putty. I used some adhesive backed sand paper wrapped around a paint brush handle to sand it smooth.

I used shaped styrene to fill the intake fairing gap.

I then finished it with a bow-sander with fine grit. I had to re-engrave the seam lines. I used masking tape to protect the surfaces around the fill to not do more damage.

There is another fairing that encloses the other half of the exhaust outlet. It too has some more seams that needed a little help although nothing to the extent of the intake gap.

I again used Tamiya putty to fill and the sanding bow to level it. Not only was there a gap and I also got a significant glue smear resulting from putting the liquid cement in the back, but having it wick out the front under my thumb.

Here is the sanded version.

Lastly, some PE and some antennas and such went onto the engine housing roof.

Y'all have a nice weekend. We're due for some strange and rare weather tonight and I'm not happy. There is a significant tornado threat all night long as a major cold front crashes into this unseasonably warm weather we've been having. Most of the most agressive parts is supposed to be west of Louisvile, but you never know. I don't like tornado threats!

  • Member since
    March 2012
  • From: Louisville, KY
Posted by Builder 2010 on Thursday, December 9, 2021 5:38 PM

The main rotor is pretty much done. I did more detail painting, painted the white patches on the distributor, added some bright brass at the pipe ends, added some panel accent block in some strategic locations, and painted a single pipe to the snubbers a blue that matches what I've seen in the pictures. The ResKit was challenging and at times, so daunting that I wondered if it was worth it. That said, the results are definitely worth it. If you can stand breaking more than a dozen tiny carbide drills and lots of CA gluing frustration, I would recommend it.

Here's a side view.

There's one more line that goes on after the blades are installed; the nitrogen leak sensor line that goes to the spot of the arm where the other half of this line was previously installed.

Just for comparison, here's the real deal showing that blue line going to the snubbers.

I could still add some more metallic accents to the tubing clamps. I'll see what my mood it...

The intake fairings didn't fit well over the ResKit's angle drives. They are bigger than the kit's I think. Some selective shaving took care of it, but if you'll notice on the above picture, the fairings DON'T full close the drive housing openings. The instructions DO NOT clearly show this and I was attempting to get them to fit. 

Here's the rubber-band clamps getting it all together, but now I have to go to the shop to see if I glued the forward part in error. Nope... not an error. Here's the fit. Again, instructions do not tell you how this should fit. That acts as a splinter to not injest boundary air, also gets some cooling to the trans and final drives.

  • Member since
    March 2012
  • From: Louisville, KY
Posted by Builder 2010 on Wednesday, December 8, 2021 5:41 PM

It certainly does. Today the intake trunks were installed along with another piece of skin. I then did the detail painting on the rotor, but there's still more to do there.

The trunks had a very narrow gluing edge. I spent time finishing the outside edges, but you don't see that. What you do see is the inside seam looking up the trunk. That doesn't matter either since the spliter and intake protector block off any view lines. I needed to give a little clamping assistance to make sure that all the seams were down tight.

The angle drives needed to be detatched from the torque tubes to fit them into the airframe. In all these images, neither the trans or the final drives are actually glued in place. The unit is upside down in these two images.

While this was setting up, I went about painting all the details on the rotor hub. I used Bare Metal Foil brushed aluminum for the main shaft. I picked out some of the mechanicals with my dark galvanized mix (steel) and flat aluminum. I then used NATO black to paint connectors and piping. I used Molotow chrome on the snubber rods.

Lost another one of those %&$#()%$@ brass straps. I don't have more. Will have to make one out of PE fret. Bummer!

The rotor is gloss coated so I can use some Tamiya Panel Accents. They don't work well with a flat finish. I also need to pick out pipe fittings with gold (Brass) and further age the unit just a trifle with some pastels. Some of the hoses are not black and I will make those additions as I go on.

Here's a status shot, again, not finally assembled. I also treated the engine compartment walls with some brown panel accent, and a mixture of black and rust pastels to simulate the heat damage to the walls as seen on some of the pictures.

  • Member since
    December 2002
  • From: Valrico, FL
Posted by HeavyArty on Tuesday, December 7, 2021 7:04 PM

Looking good.  The paint really makes it pop.

Gino P. Quintiliani - Field Artillery - The KING of BATTLE!!!

Check out my Gallery: https://app.photobucket.com/u/HeavyArty

"People sleep peaceably in their beds at night only because rough men stand ready to do violence on their behalf." -- George Orwell

  • Member since
    March 2012
  • From: Louisville, KY
Posted by Builder 2010 on Tuesday, December 7, 2021 5:59 PM

Trans is finished and I painted both it and the T700. Still have to paint the rotor head (tomorrow). Armed with my engine pictures I painted the different engine sections various shades of metal, plus some transparent green metallic shade for the grit separator scroll. I then picked out the various piping/wiring/sensors and appliances in flat aluminun, flat black and Molotow Chrome (decanted and using brush).

The darker shade is flat aluminum mixed with flat black. The lighter shade for the accessory case is flat white and flat aluminum. The compressor section was the initial silver leaf spray brush coated with Tamiya flat clear.

Lastly, I also sprayed the trans with the silver leaf and then went over most of it with the darker black/aluminum mix. I left some parts shiny and painted the oil filler cap yellow.

Just for reference. here's the engine pic that I used for color choice.

  • Member since
    March 2012
  • From: Louisville, KY
Posted by Builder 2010 on Monday, December 6, 2021 5:51 PM

Clean is good. And thanks for the accolades. You do have to be slightly nuts to go into the dark pit of extra detailing. I've just been doing it over the last few years (and I'm 76). You have to be good at problem solving since stuff keeps happening.

The transmission and final drives are built and ready for paint. I kept breaking off the little actuator ball ends and ended up pinning various parts in place so I wasn't just relying on CA.

The lever bracket had a square opening that you needed to open. I missed it at first and was having a heck of time getting the lever set to fit in. I then saw the little "Cut" writing on the rectangle, removed it and the lever went in without difficulty.

Lots of other stuff went on this final drive including an oil filler which is also pinned. 

The angle drives that come from each engine have a right and a left. I didn't pay attention to this! I didn't read the instructions carefully enough to realize they had two different part numbers. So of course I put them on backwards (Darn Murphy!!). I was able to pop them off and put them on correctly. 

I took these pictures with the trans and engines in relatively correct positions. I think they're upside down. The tail rotor take off is there too.

Painting will commence again tomorrow.

  • Member since
    November 2005
  • From: Formerly Bryan, now Arlington, Texas
Posted by CapnMac82 on Saturday, December 4, 2021 1:29 PM

Builder 2010
Notice how clean it is.

Great strides have been made in keeping helos flying.  So, instead of needing around 10 hours of mainteance per hour of flight, it's down to around 6 or 7.

Which is plenty of time to keep things clean.  And, there is the benefit that any leaks are easier to detect on a clean surface.

The brownshoes are pretty thorough about these things.  On small craft (like DDG) they have hanger space to work on the birds out of the weather. 

  • Member since
    March 2012
  • From: Corpus Christi, Tx
Posted by mustang1989 on Friday, December 3, 2021 12:10 AM

Dude you are a frickin' wildman with this stuff!!! Love all the details!!! WOW....just WOW!!! 


 Forum | Modelers Social Club Forum (proboards.com) 

  • Member since
    March 2012
  • From: Louisville, KY
Posted by Builder 2010 on Thursday, December 2, 2021 10:22 PM

I Can't believe that this is the 3rd time I've written this post. I keep doing something that changes the Safari tabs and I lose the entire thing. I'm going to copy the darn thing so I can retrieve it when I screw up.

I got the rotor piping done today. I did the rest of the arms in the same time as it took to do one yesterday. If I had to build another I'd even be faster. Up the learning curve I go...

I did some more research on the prototype learning about the Biflar Vibration Dampening System on the top of the rotor mask. It uses free floating tungsten weights that oscilate opposing the natural vibration generated by the rotors. The system is dynamically balanced, but the rotors still generate a lot of vibration. With the system vibration is reduced 55% in the cabin making for a quieter and smoother ride.

The engines are fully computer controlled by Digital Engine Control Unit (DECU). This takes all the fuel and engine settings away from the pilot. All they do is put the throttle control on idle, hit start, when it spools up, move it to fly and that's it. Everything else is controlled by the DECU based on the flight inputs and how much power is needed.

The tubular duct running across the top of the engine is the output from the Grit Removal System. A centrifugal impeller drivers particulates out of the air stream and then a separate blower pushes the dirty air out to the exhaust trunk (a la the Dyson vacuum).

I found more good images for detailing and coloration. Notice how clean it is. The Biflar weights are very obvious in this image.

And this is even cleaner. I think this is a new aircraft. Most is body color, but there's enough bare metal to add interest.

The rotor system even has a power fold actuator (another hydraulic line).

I broke another blade lock sensor and had to scratch-build the complete part this time. No big deal. I was pressing too hard when trying to scrape a bit of excess CA off some small detail. It's a complicated thing, ain't it?

I primed it with Tamiya white primer.

I will be adding more details using bare metal foil during the finish painting time.

While this was drying I started working on the transmission and angle drives. The hydaulic pumps come off the angle drives, not the engines. There were four sub-assemblies requiring tiny resin parts and Gel CA. Not fun! Too small of gluing area and critical angles.

These parts going onto a bracket that attaches to the trans body. This stuff may not be visible unless I open some more panels. 

The Seahawk also has an APU that's nestled between the exhaust trunks that provides starting air and power when main engines are off. The kit does not have this, nor are there any AM parts. I suppose I could draw it and 3D print it, but then I'd have open another panel. I don't think I'm doing this.

  • Member since
    March 2012
  • From: Louisville, KY
Posted by Builder 2010 on Wednesday, December 1, 2021 6:37 PM

I decided to find out what these parts really were and found the Pilot's manual for the SH-60B Seahawk. A good, complicated read that I should have review BEFORE doing all the engine piping. There are good images of engine details and components. Here's the main rotor. The cylinders on the sides of the arms are shock absorbers. And the plate on top with the weights hanging on the ends (which are separate snap on pieces on the rotor kit) are tungsten weights that act as a vibration damping system.

  • Member since
    March 2012
  • From: Louisville, KY
Posted by Builder 2010 on Wednesday, December 1, 2021 5:28 PM

Piping work on main rotor hub continues. Spent about 1.5 hours today, with over one of those hours spent fixing the fittings on the hydraulic distributor. I used up all the resin ones I had including the double set that was included. The last two that I cut off the sprue were damaged since I cut too close to the part and actually removed some of it. I ended fup enlarging the connector end with some accelerated CA and made them work. Hopefully, when painted, they'll be okay. Getting the piping threaded under the piece and through the hole wasn't the big challenge. The challenge was geting the fitting into the holes and holding them there. I also replaced some of the straight connectors.

The next pipes ot go on were the large group that feeds the blade locks, and others that connect to the various components. One pipe comes out of the holes in the ring below the distributor. They were a large hole which I drilled deeper with the tiny drill.

This line curves under the blade angle cylinder — I suppose that's what it is since nothing actually tells you what all this complexity does.

There are four lines that go to the distribution fitting on the top of the claw (that's what I'm calling it... it's probably called the blade hinge. Three go to the claw: one into the back of each lock cylinder, one f the claw, and the last into the back of the clevis. That hole I didn't pre-drill and had to add it now. It was delicate to say the least!

All of those lines will have to painted black once the hub is painted. Next session I'll get as much done as I can.

  • Member since
    March 2012
  • From: Louisville, KY
Posted by Builder 2010 on Tuesday, November 30, 2021 6:05 PM

Gino, that's why all this crap is sold as aftermarket. It's personal choice at work.

I put the first color coat on the engine. Tamiya Dark Iron. It's a little dark so I might dust it with some orangy shade.

Then I got down to business and finished the mechanical assembly of the rotor head proper (not the gear box which is another model in itself) and started piping.

The swash plate and locking lugs that connect it to the rotor shaft was reasonably sane except for breaking the ball end of one of the connecting rods. Again, I drilled it and used Guitar strings. Getting a bit tired of this. The first three rods when in in 10 minutes. That last one took probably a half hour. The lugs that connect the swash ring to the main shaft via that two-ended forging needed some filing to open up the slot so it would slip over the parts without forcing (which tends to break things).

Got the first pipe in and you'll notice in this image that I got all four PE rotor lock indicator bars in place.

Piping is going okay so far except for a slight distraction.

There were holes in the top rotor piece that i neglected to open. One of the pipes goes up through these holes and attaches to the underside of the angled fitting. I decided to re-pipe correctly and starting doing this late this afternnon and just got started on it.

And you'll now notice that some of the bars already popped off. I hate gluing PE with CA! I'll put some more in once all the handling is actually done.

  • Member since
    December 2002
  • From: Valrico, FL
Posted by HeavyArty on Monday, November 29, 2021 7:49 PM

Wow, great work.  I think I will stick with the kit rotor head though.  To me, it looks like way too much work for a marginal increase in detail level.  The kit rotor head is actually pretty nice, especially after plumbing it.

Gino P. Quintiliani - Field Artillery - The KING of BATTLE!!!

Check out my Gallery: https://app.photobucket.com/u/HeavyArty

"People sleep peaceably in their beds at night only because rough men stand ready to do violence on their behalf." -- George Orwell

  • Member since
    March 2012
  • From: Louisville, KY
Posted by Builder 2010 on Monday, November 29, 2021 6:00 PM

Hope everyone survived Thanksgiving day! Our son and family were in from State College, PA so it was the first time the cousins saw one another in over 2 years. When kids are in their teens, two years is a whole lotta change, you know. It took a day for them to get comfortable with each other, but they all warmed up.

First thing I did today was to throw a coat of rattle can Tamiya Silver leaf on the T700 for the first metallic coat. I let it dry completely. It already looks better. I masked the firewall so I would have to repaint the Ocean Gray.

The rest of a reasonably long work session was wrestling with the main rotor resin kit. Let me tell you, this is a real beast. I was spending as much time cobbling together repairs as I was building the assembly. There is a link with a universal joint on one end that seems to be part of the collective pitch mechanism. It's a two-part affair, with the cylindrical main part and another that will have a hydraulic line in it. 

The cylinder casting was a total bear! There was an air bubble flaw in the narrow portion connecting it to the eye clevis on one end. This bubble caused a failure of every one. They gave six of these and I used all six. I ended up drilling and using guitar string to attach the parts back together.

To complicate things more, the eye angles were not in line with the cylinder main axis. I ended up first gluing them in the wrong angle since there was really no way to tell. To get the assembly right I broke the joints so I could rotate the eyes around the piano wire and get them together. It was a half-moon hole in the hub to accomodate the same shaped pin, but of course the pin was slightly oversized and needed careful filling so it would assemble without excess pressure that could break more piston rod joints. Ask me how I know this. After each was in the best position I used med CA with accelerator to fix them.

Through all this manhandling the little PE straps came off and some of the pins to which they attach broke also. I replaced one with 1/32" phos-bronze and will do the same with the other broken ones. I have extra PE parts and will replace them AFTER all the pieces are together. The resin is quite brittle. My 3D printed parts are tougher.

Meanwhile, I wised up and drilled as many of the 0.012" holes as I could before getting these parts attached.

Then more troubles cames. The main shaft was still too tight a fit into the hub for my comfort. I didn't want to have to press too hard to get these together for fear of breaking more stuff in doing so. To rectify this I attempted to chuck the shaft into my DeWalt and spin it so I could sand it round. That worked until it didn't! A little too much side pressure and the smallest part of the shaft fractured. That part disappear into the ether. I found that the diamter was really close to 3/32" so I replaced it with a piece of tubing of that size. This worked pretty well and I dodged another bullet.

There is a hydraulic distribution component that sits atop the main shaft and this part has 8 fitting that needed to be installed AND drilled 0.012" The kit had two extras of each type (straight and elbow). I drilled them BEFORE separating them from the mold sprue. That part worked. What was less successful was getting them attached to their respective holes in the distributor. The holes were slight undersized and in pushing them in I broke a couple and lost more. 

I opened these holes to a #58 drill to give more room. I still lost one elbow — and that was with my parts capture apron in place — so I started to scratch-build a little soldered affair that needs one of those small holes for a hydraulic line. It's a small piece of Albion tubing and a 1/32 piece of phos-bronze soldered together. I was in the midst of drilling the hole when it was time for dinner.

Just for scale, that large wooden log is a toothpick! That drill is really freaking small! The 0.012" is holding up much better than the 0.010" ones I was using (and breaking) before.

  • Member since
    March 2012
  • From: Louisville, KY
Posted by Builder 2010 on Monday, November 22, 2021 5:34 PM

Short session so I didn't paint, but continued with the main rotor. I started to drill the tiny holes for the many hydraulic lines. There's a mock fitting on top of the rotor hub arms that's supposed to have 2 lines going through it. I attempted to drill it, but the resin started breaking out. So I filed them off and will make holes clamps with wine bottle foil. 

I drill the five holes in the hydraulic manifold fitting on top of the outer arms. That was fun! Not! That's my thumb for scale. I'm going to lay in these lines now when I have easy access to the holes. I will cut them to length upon final install. I may drill and pin some of the actuating levers too for a more permanent construction.

The rotating portion of the rotor hubs went on next and I found that I glued that little shoe thingy (technical term) in the wrong place facing in the wrong directly. I now know why they gave you 8 of these things when you only need four. They get lost really easily. They can also foul the fit of the rotating portion from seating properly in the hub arm. I had to removed two of them (broke one in the process), glue in the arm and then put the shoe back on.

There are rights and lefts of this rotating part and you need to pay close attention to their placement when doing the rotor-fold version, which I am. To further complicate things, the two in "front" get canted up 10° from level. I set up the level on my iPhone at 10 degrees to use as an approximate guide. 

The last thing that went on in this step was a tiny piece of PE. In the real bird, this bar indicates clearly when the lock pins are engaged (in) or disengaged (out), so it can be seen from the ground easily. Since I'm building it with the blades folded, the pins would be in the outward position as the part was molded. You're instructed to cut them off if you're building with the blades in the operating position.

I found the easiest way to put these on was to lay them face down on the little piece of plexiglass I use when cutting PE, put a small amount of gel CA on the pin ends, and then bring the pins down to the PE until it grabs. Trying to hold the PE in aligment with tweezers was an exercise in futility.

I'm going to pre-drill any hydraulic line holes before assembly whenever I can. 

  • Member since
    March 2012
  • From: Louisville, KY
Posted by Builder 2010 on Monday, November 22, 2021 9:13 AM

Darn it Midnight! You caught me! Thought I could get away with it. I'll try and do better.

  • Member since
    April 2003
  • From: USA
Posted by keavdog on Saturday, November 20, 2021 12:01 PM

That looks like quite the complex rotor head!

Thanks,

John

  • Member since
    March 2012
  • From: Louisville, KY
Posted by Builder 2010 on Saturday, November 20, 2021 10:24 AM

The checked out the RedOak site and found four that would be great. That said, the $100 isn't so great so I'm going to hold off until the model is further down the road and see if it will justify the additional investment.

I am very envious of the people who create such beautiful figures. I have little or no talent for it. I had to sculpt my own bomber crew for a 1:16 B-17 RC model I built 10 years ago for a commisision. My figures came out like Nick Park's "Wallace and Gromitt", as evidenced by this picture. The co-pilot looks like he's facing iminent death. 

And that was after reading about how to do it. I've learned some more since doing this. I was using Sculpey and was trying to form the entire figure before curing in the Toaster Oven. I've since learned that you can work it in layers, getting the basic shapes down, firing it, adding more details, firing and so on. This way you don't keep disturbing the things you're getting right by working on the outer layers. That said, I'm still no sculptor. So if I want a crew, I'am going to have to buy it or find STL files somewhere and print my own.

The model did fly as can be seen in this video. I hadn't built and RC plane in 25 years before doing this one.

https://www.youtube.com/watch?v=LxKgPPQQl-4

I primed the bulkheads with Mission Paints Dark Ghost Gray which is called out for the exterior color for the verison I'm doing. I then set this out to dry and continued working on the main rotor hub. 

The next bit required a three-part assembly with lots of cleanup. This time I was able to use my razor saw or #11 blade to remove the sprue. You have to remove a web that's in the middle of a curved surface. This shell mates to the other part. You had to be very careful in removing the exess around the shaft portion of the mating part. There were extended flats that are required to correctly position the seond part's angular location. It would be bad to accidentally cut them off when doing the clean up since the geometry is very complex and it would make building the hub much more difficult.

It took almost an hour and a half to assemble the four rotor attachment parts. There's one more piece that goes into this that is the actual rotor blade hinge point. This part is not used on the Army Blackhawk version without the folding blade requirement. To properly remove the flash you DO need to be a bit of a sculptor.

The assembly in the lower left, if you look closely, you can see a white line on on the ear that's projecting out. That ear broke when I was holding too tightly during the filing operation. I CA'd it back on. It's not secure. I'm going to add a laminate of some PE fret brass to make sure it doesn't break again. The resin is hard AND brittle.

  • Member since
    February 2003
  • From: East Bethel, MN
Posted by midnightprowler on Saturday, November 20, 2021 7:25 AM

C'mon. posting pics of a real engine and passing it off as a model just isn't right!Wink

Hi, I am Lee, I am a plastiholic.

Co. A, 682 Engineers, Ltchfield, MN, 1980-1986

1 Thessalonians 4:13-18 1 Corinthians 15:51-54

Ask me about Speedway Decals

  • Member since
    July 2014
Posted by modelcrazy on Friday, November 19, 2021 11:21 AM

Looks Builder. I have the Academy 1/32 MH-60 and am looking forward to it.

Steve

Building a kit from your stash is like cutting a head off a Hydra, two more take it's place.


http://www.spamodeler.com/forum/

  • Member since
    December 2002
  • From: Valrico, FL
Posted by HeavyArty on Friday, November 19, 2021 11:15 AM

Looking better by the day.

Builder 2010
 I’d love to make a diorama with service being done to this bird and would like to find some 1/35 green shirt characters to fill it out. Any suggestions?

Reedoak out of France does 1/35 3D printed figures that include USN Pilots, Deck Crewmen, and Mechanics. They look awesome, I have a few for future projects.

http://reedoak.com/#!/1-35/c/13281305/offset=20


Here are a few painted up in a dio, not by me. This is a former work by Rotorman over at ARC.


Gino P. Quintiliani - Field Artillery - The KING of BATTLE!!!

Check out my Gallery: https://app.photobucket.com/u/HeavyArty

"People sleep peaceably in their beds at night only because rough men stand ready to do violence on their behalf." -- George Orwell

  • Member since
    March 2012
  • From: Louisville, KY
Posted by Builder 2010 on Friday, November 19, 2021 9:33 AM

Thanks Gino!

I had to replace another resin pipe that broke and will need to replace one more. They're really fragile! This one was a challenge since it winds its way around the oil filler cap and then through an opening in the cool end bulkhead.

Started getting the engine bay together. Found some images showing their internal color. As best as I can tell it's basically the same gray as the exterior with a lot of dirt. I mounted the kit engine on its front and back supports. I also fit the ResKit engine and found that one of the resin pipes and one of my mods interfered with the inner wall. You can just make it out in this image.

I relieved the wall in these spots and got a good fit.

I didn't glue the ResKit side in now. Instead I primed it and will do the engine painting before encloising it. I will be spraying the entire kit side with the interior color. It will be closed up so the engines only there to hold the bulkheads in place.

While waiting for the primer to dry I started the next super-challenge in this build: the ResKit Main Rotor kit. Here's what it looked like in the box. If you look closely you can see the rotor hubs parts attached to their sprue block. They're the cylindrical pieces.

These pieces were VERY DIFFICULT to remove from the sprue. The attached face has the 1/4 cylinder of the central shaft hole. Not only is it a finished round surface, it's also canted from the perpendicular since the entire rotor head arms have an upward pitch. Then to make matters worse, the four quadrants go together with pin and hole arrangement, but the pin was right in the cutting path you follow to remove the sprue block. I used the needle burr and removed most of the material and then a round burr to re-shape the openning. And I removed half of the pins in the process.

I decided that all the resin pins had to go and replaced them with 1/32" phos-bronze.

I got the four parts together as I figured they should go using gel and thin CA. I then went through the hole with a series of drills spun by hand to open it up and round it. It's still a tad tight on the shaft so one more drill size to get the slip fit I want. Press fits can break the joints. Any slight misalignment will be hidden by the blades in the folded position.

I'd love to make a diorama with service being done to this bird and would like to find some 1/35 green shirt characters to fill it out. Any suggestions?

Also found an image showing an engine that's been in service. Good color study.

  • Member since
    December 2002
  • From: Valrico, FL
Posted by HeavyArty on Wednesday, November 17, 2021 5:37 PM

Looks great.

Gino P. Quintiliani - Field Artillery - The KING of BATTLE!!!

Check out my Gallery: https://app.photobucket.com/u/HeavyArty

"People sleep peaceably in their beds at night only because rough men stand ready to do violence on their behalf." -- George Orwell

  • Member since
    March 2012
  • From: Louisville, KY
Posted by Builder 2010 on Wednesday, November 17, 2021 5:03 PM

Glad you're enjoying it. It's been mostly fun for me too.

Today, albeit in a short session, I actually did complete the T700 build with the addition of engine mounts, the bleed air duct (I'm assuming that's what it is), and some more resin piping. This piping was more robust so I was able to work with it. One I fastened with a piece of guitar string.

My new drills arrived. I ordered 0.012" instead of 0.010" and a slightly shorter length. This makes the drill just a little more robust and a slightly larger hole to make it easier to slip the skinny wire in. The 0.010" was just too tight a fit and the wire would often bend over when trying to insert.

I removed the flange around the exhaust duct with the Dremel.

I then tried it out and was rewarded with a nice tight fit.

I was only able to get one resin engine mount assembly to work and used one of the kit mounts to substitute. I put all the other remaining items on the engine and CA'd it to the bulkhead. I hope I won't regret that step when I get to painting it. I like that it's now captivated and is much more secure to hold onto it. Also, I'll be able to paint over all the excess CA that seems to be floating around.

Tomorrow, I'll build the kit left-hand engine and get ready to paint them. While I'm aware of all the not-so-hot things in this engine build, when you look at it from normal observing distance, it looks pretty cool.

  • Member since
    June 2018
  • From: Ohio (USA)
Posted by DRUMS01 on Tuesday, November 16, 2021 7:14 PM

This whole build is very entertaining and inspirational. 

Keep up the wonderful work.

Ben

"Everyones the normal until you get to know them" (Unknown)

LAST COMPLETED:

1/35 Churchill Mk IV AVRE with bridge - DONE

NEXT PROJECT:

1/35 CH-54A Tarhe Helicopter


  • Member since
    March 2012
  • From: Louisville, KY
Posted by Builder 2010 on Tuesday, November 16, 2021 5:34 PM

Short session today. I am now declaring that the piping of this baby is done. Some of the piping isn't... it's wiring. In fact, that thing I struggled with the last piece yesterday is actually a wiring harness that's just wrapped with yellow tape in the prototype. I actually thought about ways to recreate this effect then dropped the entire idea when I reminded myself that this is on the back side of the engine and won't be seen by anyone excpet, me, the creator.

Creating that wrapped harness in 1:35 would be an interesting challenge, but I'm not going there because of my above rationalization. There's lots of different colors in this little model.

Here's my final rendition before I finish the last little bits (engine mounts).

I tried the model out in the plastic kit part that captures the engine on both ends. On the exhaust end it's okay, but on the intake end I have to remove the nice flange that surrounds the intake bell as pointed out by the arrow.

  • Member since
    March 2012
  • From: Louisville, KY
Posted by Builder 2010 on Monday, November 15, 2021 5:50 PM

Happy Monday!

My wife and I have a deal that I don't work in the shop on weekends, so for me, Monday is actually a pretty happy day.

I literally spent hours doing a very few things. This is bordering on watchmaking or creating Fabergé eggs. I found that that my magnet wire is a few thou smaller in diameter than the brass wire so I replaced Friday's harness. It's a bit better. It's still a little larger gauge (2.4mm vs. 2mm) than specified in the instructions.

Next up. There was a ridiculously fragile resin ring that is the fuel manifold (I presume). It broke two times and I gave up on it. Some things are best not cast in resin. There's also a bunch of piping that is going to be replaced one-by-one as I get to them. If you can get them off the casting block you're still left with the challenge of re-shaping them so they're round.

I made a new ring out of 0.022" phos-bronze. It wasn't fully rounded yet in this image.

I placed the engine in my PanaVise to stabilize it while I glued the new ring in place touching each of the fuel injector sites.


The accessory drive was comprised of three castings. They're fragile and exemplified by my breaking one in half. There are some alignment pins on some of the parts. Unfortunately they don't fit their corresponding holes. I ended up sanding them off. 

Gonna be a lot of fun painting all these details.

There was another very small/fragile cast pipe array that held a pump in place. The pump DOES NOT actually glue to the gear box, but instead, is completely held in space by two pipes; this elaborate longer one, and a very tiny insignicant small one. My first attempt was to use the resin long pipe. Notice I used some Phos-bronze wire to replace the almost-non-existent resin locating pin. The other pipe was a tiny resin elbow that I also replaced with metal.

The longer pipe broke so I replace it too. I left the 90° part which had the fitting.

There were some electrical boxes that went on next. Working on styrene kits is much more predictable since many of these pieces went into approximate locations. Here's the diamond burr I use to remove resin parts from their sprue blocks. It gives great control, much better than using a blade or razor saw.

But wait! There's more! There was this wiring harness as laid out in the instructions.

In a previous step they had you glue together the two resin branches. Yeah! Like that was gonna happen? They're actually telling you that brass wire should connect some how to the various points of this resin assembly. 

Here's how those parta looked on the sprue block.

I didn't even attempt to use them. Instead I first tried to use some 28 gauge wire sheathing with the correct number of pipes as shown, but this wasted 1/2 hour of my time and produced basically nada. I then decided to go a little over-scale and use shrink tubing. This is on the aircraft side of the engine and probably won't be visible with the open cover on the model. It was much easier to use the shrink tubing. I didn't get all the terminations done by quitting time. I suppose I could use some small brass tubing to do this. I will think about it... This is a bit clunky! The beauty of scratch-building is I can do it over and over until I get it right.

  • Member since
    March 2012
  • From: Louisville, KY
Posted by Builder 2010 on Saturday, November 13, 2021 11:12 AM

Glad you like it, but there were things I didn't like (and still some more). First of all, here's a shot of the instructions showing some of the challenges. 

With the gauge wire I'm using there was no way to stuff three or four pipes into the tiny resin aspects that they're telling you to do. After my futile attempts to grind them and smash the wiring into them with Bondic resin, I decided to eliminate them and redo them, albeit larger.

The cylinder on the left was a molded part, and the bracket on the right was actually an added part. There were no holes or slots in either and putting them in was nearly impossible.

To facilitate threading the piping through the new blocks I used some Albion micro-brass tubing. Here's the tubing slide onto the brass wire. BTW: the source of the brass wire was a woven nest around the bottle of some Italian or Spanish wine. Wine bottles are a great source of modeling supplies including the foils that wrap their tops. And they have the added benefit of providing pleasure. It's a win-win! 

This image also shows the three holes drilled to accept the tubing. I made a silly mistake. I thought I was drilling them with the correct 0.020" carbide drill, but had a 0.032" drill, so the holes were oversize. Later I realized my mistake and used the correct size. In the foreground is a reject block where the holes joined together.

Here's the information on the Albion Tubing. Chuck Wallace uses this in his super-detailing work and I really like it. I cut it with a new single-edged razor with the tubing thread over a piece of High-E guitar string. This captivates the little buggers which are prone to go into the ether with the slightest provocation. Use a hard wire to hold the cut pieces. If you use brass, the wire will cut along with the tubing and create a problem you  don't need. You don't have to press too hard. Look at the reflection of the tubing in the razor as you roll it back and forth. Keep the reflection pointing straight back as if it were the same piece to ensure your cutting squarely and not cutting a spiral.

I believe for this application I'm using the .6mm tubing.

For the rear teminus, I drilled a piece of 3/64 Evergreen styrene. Four pipes go into this. I don't know how ResKit expects the builder to terminate the wire without holes to go into. I am sensitive that these blocks are about 2X oversize, but I really couldn't deal with them any smaller.

I really didn't like how the piano wire was laying. The loops were too large AND I couldn't bend them much tighter. That stuff is really tough. 

The fact that they're already nice and shiny didn't matter since the entire engine's going to be painted including the piping.

So I pulled them all out and substitiuted them with the brass of the same gauge.

And the reverse view. You see another small block that substituted for a tiny bump through which that pipe was supposed to pass. Really?!

More crazy PE had to go on. I lost a few of these. What made it worse, when removed from the fret, they were to wide at the base so I have to clip their corners with a #11 blade, and that was particularly not fun!

Some of this detail is nonesense at this scale. I would like it better if it were 1/32 or even better at 1/24. It is astonishing to me that a turbine can produce 1,900 hp and weigh less than 500 pounds. They're really quite small.

Another set of pipes goes around the perimeter from points in the circumference and then through that bracket. I removed the kit part and substituted another drilled block supported on a piece of Phos-bronze wire. The kit calls out .2mm wire for this run and I'm using the equivalent of .3mm. I think I have some magnet wire that has a smaller diameter and could replace this too. The piping is not too hard to rip out and fix.

Getting that brass to lay nicely is like herding cats!

That's brings us up to date. See y'all on Monday!

  • Member since
    December 2002
  • From: Valrico, FL
Posted by HeavyArty on Thursday, November 11, 2021 8:43 PM

Nice job on the engine so far.

Gino P. Quintiliani - Field Artillery - The KING of BATTLE!!!

Check out my Gallery: https://app.photobucket.com/u/HeavyArty

"People sleep peaceably in their beds at night only because rough men stand ready to do violence on their behalf." -- George Orwell

  • Member since
    March 2012
  • From: Louisville, KY
Posted by Builder 2010 on Thursday, November 11, 2021 6:25 PM

Today began the building of the ResKit T700 turbomachinery. As much as I was looking forward to this, the build is going to be very challenging for me. They want you to put in all this piping, but you have drill all the holes yourself. That's that dastardly 0.010" carbide drill. I broke three and still have a lot more holes to drill. They're $1.75 each so those are some expensive holes, but there's really no other way to create .3mm holes in resin without drilling them, or so it seems to me. I was happy that I was able to remove the sprue block without difficulty starting with the Dremel Flexi-shaft and a pointy diamond coated burr. It beat trying to finagle using some saw or another to do it. 

I started using some 0.010" brass wire, and you'll see how it worked. I then started using piano wire (High-E guitar string). It's really tough material and if you bend it wrongly, you're screwed, but it holds it shape very well. You cannot cut this with normal sprue cutters. The steel is harder than the jaws and will leave nice half-moon grooves in the cutters. You must use hard wire cutters.

I drilled a test hole and tried out the brass wire. If fit nicely.

I started laying in piping based on the instructions. The instructiions show four pipes going to a small block on the left side. There was no way to drill that at all, let alone put four small holes or one large one. Insteaad, I milled a slot down the middle using the burr. Even with that, getting three lines terminated there was sub-optimal. I ended up building the block up with some Bondic. I reshape that when all the lines are there.

When I could drill holes for the piping I did. There was a very fine pair of PE pieces function of which I have no idea, that went into a tiny groove around the circumferance. It's a very thin PE and I continually kept bending these little protrusion over. I found one that already broke off. If all broke off I don't think anyone will miss it.

And here's where I left it tonight. As you can see I started using the piano wire on some of the piping. I think the curves are too high, and it's not exactly the way it supposed to look. There's a lot more piping that needs to go on. These engines are advanced models all to themselves. The arrow points to the Bondic expanded block.

Tomorrow work will continue.

  • Member since
    March 2012
  • From: Louisville, KY
Posted by Builder 2010 on Wednesday, November 10, 2021 8:32 PM

I changed the seat belt color to comply with the images Gino posted. 

While doing this I must have put some pressure on the right rudder pedal on the co-pilot's side and broke the tiny plastic pin holding it to the base. I drilled the pedal and base with the 0.010" drill for some High-E Guitar String. Here's what that ridiculously small drill looks like. They're so brittle and fragile that it's quite easy to break them taking them out of their little holder box, or if you exert any side pressure at all.

I re-installed the pedal with the wire, but it's a little long. I'm leaving it as it is.

It was time to finish the interior starting with the cockpit end bulkhead and some other appurtenances along with the overhead control panel. It seems like the trottle controls are overhead.

I then went an painted all the controls. There's a decal for this, but there's so much raised detail that I felt hand painting was okay.

There were two more seats that needed construction. As I noted before, I'm not happy with the engineering of these seats. They're attempting to make scale-sized members, but that gives no gluing surface and some of the cross-sections can't sustain themselves.  

A perfect example is the ceiling supports that literally hold this seat into the aircraft cabin. The plastic narrows down to probably less than 0.020" and I broke two before I got one built and even then it broke when I glued it into the ceiling. 

To hold it steady I sat a steel angle block on it. 

As it is I now see that it shifted on the wall mount when I used med CA to hold it in place. Notice the pressurized gas cylinder that I piped into the Sonabuoy launcher.

But as you'lll see, the extrerioir wall completely hides this seat so no harm no foul.

That's not glued in yet. I did do some trim painting on the other side, which also is impossible to view. You can just see it looking in the window on the opposite side of the cabin. Haven't seen images of this wall and really don't know what the coloration, but it isn't visible.


  • Member since
    March 2012
  • From: Louisville, KY
Posted by Builder 2010 on Wednesday, November 10, 2021 9:34 AM

Moving ahead on the interior. I used some clear flat on the non-gauge areas of the instrument panel and built the assembly and installed it. I added two more interior/exterior walls after painting the blue trim around the window next to the sonar station. I added some more small details which sometimes cause more stress than they're worth. I then went to the hobby shop to drop off the commission work I was doing including 3D printing some very small 1/72, 105mm Howitzer hand wheels. They were the smallest parts I ever printed.

Other than the "warped" "steam gauges",  I agree with Gino that the decal looks okay.


This was one of those small parts that should have been a breeze to put in, but it wasn't going in. I then found that there was one of those ejection pin huge pieces sticking out on the bottom keeping it from settling in. Once i removed it, things went better.


Gino informed me on another forum that the seat belts are black with the circular lock black also. The clasps are silver. I'll attempt to make that change today.

Picked up the remaining ResKit parts at the hobby shop. I was very pleased with the engine kit where it calls out in detail all the piping that makes turbine engines so interesting. I now have four more complicated sub-kits: Main Rotor, Tail Rotor, Rt T700 Engine and the articulated tail joint.

  • Member since
    December 2002
  • From: Valrico, FL
Posted by HeavyArty on Tuesday, November 9, 2021 8:41 AM
Coming along nicely.

Gino P. Quintiliani - Field Artillery - The KING of BATTLE!!!

Check out my Gallery: https://app.photobucket.com/u/HeavyArty

"People sleep peaceably in their beds at night only because rough men stand ready to do violence on their behalf." -- George Orwell

  • Member since
    March 2012
  • From: Louisville, KY
Posted by Builder 2010 on Monday, November 8, 2021 6:03 PM

Had a nice long work session today and worked on several items at once. I'm continuing to work on the cabin and cockpit area. I installed the seats, sticks and pedals. There was a huge mold ejection stub that needed to removed on each pedals front side. The mounting point for the pedal was sorely under-designed. It was just a tiny little dimple. I drilled the dimples with 0.032" carbide bit. This gave the pedal some purchase and I glue them in with gel CA. 

The sticks are painted with three kinds of black. NATO black for the grip area. Semi-gloss for the tubular part and rubber black for the boot at the bottom. I then picked out the buttons with a tooth pick to match the colors on my prototype pick.

Next up was the instrument panel. Like Gino, I decided to give the decal a try. When first laid on it was rather scary.

Before applying I put down a coat of Allclad water-based gloss. I painted the panel NATO black for decaling and it's flat so the gloss was needed. I really didn't have to paint it at all. I also applied some Micro-Sol to the gloss. After application I coated it with Micro-set, and did this at least three times.

This image was an intermediate shot with about two applications of setting solution.

I went back and poked some holes and slices in areas that really needed some more help. And here's what it looks like now. It's snugged down pretty well, but I really don't like how the dial gauges distorted.

I will go back and selectively apply matte finish to everything except the CRT and guage faces. I might have been better to scrape all the raised details off before applying the decal. Oh well...

Next up was the sonar module. I have a great picture of it so I was able to match the coloration closely. The piece glues into the model at this stage by just two legs of the stand. It's a very dubious connection. 

And then this happened!

While I could have drilled the broken halves with a 0.010" drill and pinned it with guitar string steel, but I chose, instead, to build another wire assmbly. Once I found out how quickly I could cobble these together with the RSU, I just got to work and did this.

After trimming to match the old stand, I CA'd the sonar assembly into some re-drilled holes in the floor.

Once again, dodged a bullet.

See y'all tomorrow...

  • Member since
    March 2012
  • From: Louisville, KY
Posted by Builder 2010 on Thursday, November 4, 2021 5:35 PM

I corrected the seat color. Can't have inaccuracies like that, can we?

I also finished the black boxes below the seats and dry-brushed some wear on the cockpit floor.

I painted the seat frames NATO black with a bit of flat aluminum. I then painted the seats Tamiya red brown with some NATO black. Seats are still not glued in since the seat paint was not dry.

I also finished two of the three 3d printing jobs. The loco pilot came out terrific and I'm hoping that it will fit. The other was a very quick and simple job to print PRR station signs.

  • Member since
    December 2002
  • From: Valrico, FL
Posted by HeavyArty on Thursday, November 4, 2021 8:10 AM

It looks like anodized black to me that has a lot of wear and rubs. If you look at the bottom rear of the seat pan where no one touches, it still looks flat black to me.

Gino P. Quintiliani - Field Artillery - The KING of BATTLE!!!

Check out my Gallery: https://app.photobucket.com/u/HeavyArty

"People sleep peaceably in their beds at night only because rough men stand ready to do violence on their behalf." -- George Orwell

  • Member since
    March 2012
  • From: Louisville, KY
Posted by Builder 2010 on Wednesday, November 3, 2021 9:39 PM

Thanks! I have a picture that shows a different frame color.

It's really not black. Actually I'm not sure what color that is.

  • Member since
    December 2002
  • From: Valrico, FL
Posted by HeavyArty on Wednesday, November 3, 2021 7:31 PM


Looking good. I do the compartments under the pilots’ seats the same way. As to the pilot seats, they too are black, seat pan, frame, and cushions.


Gino P. Quintiliani - Field Artillery - The KING of BATTLE!!!

Check out my Gallery: https://app.photobucket.com/u/HeavyArty

"People sleep peaceably in their beds at night only because rough men stand ready to do violence on their behalf." -- George Orwell

  • Member since
    March 2012
  • From: Louisville, KY
Posted by Builder 2010 on Wednesday, November 3, 2021 5:44 PM

Thanks Gino! Got both seats fixed, painted and ready for final install. I painted more NATO black items that called out. The ResKit rotor head and tail rotor kits are now in my posession. The engine hasn't arrived yet. I got more commission 3D printing jobs. The model club has dubbed me, "The Master Fabricator" and they're taking advantage of it. Included in the batch of odd jobs are 1/72 handwheels for a 105mm cannon mounted in a M3 Priest, a set of 1/48 armored fuel caps, a 1/48 Pennsylvania RR station sign and a complete replacement pilot on both ends of a New Haven RR GE "Jet" electric passenger loco. The first pilot is coming off the machine in a couple of minutes. I'll have to take it to the owner to see if it fits and if any corrections need to be made to the design. The orginals are Zamac white metal castings that have completely crystalized and crumbling. Taking measurements from them was very difficult.

Onto the SH-60: Soldered another seat support system together and built both of the seats. Initially painted them the light gray, but then over-coated them with a mix of Allclad base aluminum with a little Allclad yellow aluminum. The real color is metal of some form or another, not paint. It's paint in the passenger compartment, but not the cockpit.

I bit the bullet and decided to add some greeblies to the empty under-seat boxes. To facilitate getting stuff into them, I made some false floors out of some ABS sheet scrap. This way I can build the entire deal out of the model and put it in as an assembly.

I'll paint them off the model and glue them in complete. This image shows the seats with their new colored frames.

The inside of that chamber was supposed to be flat black, but there's a skin over it that completely conceals it. Oh well...

  • Member since
    December 2002
  • From: Valrico, FL
Posted by HeavyArty on Tuesday, November 2, 2021 10:19 AM
Good recovery on the seat frame. Color on the rear compartment walls looks good. Nice job.

Gino P. Quintiliani - Field Artillery - The KING of BATTLE!!!

Check out my Gallery: https://app.photobucket.com/u/HeavyArty

"People sleep peaceably in their beds at night only because rough men stand ready to do violence on their behalf." -- George Orwell

  • Member since
    March 2012
  • From: Louisville, KY
Posted by Builder 2010 on Monday, November 1, 2021 10:08 PM

Thanks Gino!

Finished the console area with some flat clear, added color to the underneath area, a coupld of floor details and the right hand bulkheads. I needed to mix more of the blue wall color. It's not an easy mix of blues and a bit of yellow. I adjusted lightness with white. I made enough so I could airbrush it. I reuse all my screw-top airbrush bottles. After cleaning any dried paint with MEK, I plop it in the ultrasonic cleaner for 10 minutes and the bottle is sparkling.

I started building the cockpit seating. Again, getting the little pins on the seat bucket to engage in the spots on the seat frame was a pain in the behind. I wised up and drilled some small 0.022" holes for the seat's pins to find and it was much, much easier.

The angle braces for these seats presented another more tractable problem; two out of four of them broke in the same place. I first attempted to glue it together. First supporting it in some clay with solvent cement.

Didn't work. Second attempt: glue it together with Bondic UV resin. 

Didn't really work either. Plan B: make my own out of various pieces of wire.

I have the tools to work with fine metal pieces. I solder all the PE together on my 1:350 ship model antenna towers, so this shouldn't be too bad.

Measured, bent and cut using one of the two good ones as a guide. I have a ceramic soldering pad that lets you pin things in position.

To do this effectively requires one more tool, my resistance soldering unit (RSU). This is not a cheap tool (actually my most expensive), but what it does is irreplaceable. It applies high current and low voltage between the tweezer electrodes that heats only the joint area controlled by a foot pedal. When the solder melts you release the pedal, but keep pressure on the tweezers to hold the joint together until the solder solidifies. I use 63/37 eutectic solder which goes from liquid to solder instantly with no slushy stage. It's great for electronic work since the slushy stage creates a crystal structure that can be resistive (cold solder joint), but it's also good for metal work since it solidifies so fast.

Here was the first one I did, but before I added the last thin part on the bottom. The wire is 0.032" and 0.022".

I bulked out the joint areas with some Bondic, but am not going to attempt to add any more detail to this part. The metal frame is held to the seat with gel CA.

And here's the first complete seat with a plastic one on one side and the metal frame on the other. I have to make another one of these, since I broke two. I flatten the metal at the joint areas with a pliers and some pressure to increase the contact area.

When the seat is painted, the differences will not be too obvious. I suppost I could add a few drops of Bondic to simulate the fasteners at the junctions. Tomorrow, I'll build the other one.

Remember: IT'S NOT WHETHER YOU SCREW UP, IT'S HOW YOU RECOVER THAT DETERNINES TRUE SUCCESS!"

  • Member since
    December 2002
  • From: Valrico, FL
Posted by HeavyArty on Sunday, October 31, 2021 5:22 PM

The sonar panel is looking nice.  Good job on it so far.

Gino P. Quintiliani - Field Artillery - The KING of BATTLE!!!

Check out my Gallery: https://app.photobucket.com/u/HeavyArty

"People sleep peaceably in their beds at night only because rough men stand ready to do violence on their behalf." -- George Orwell

  • Member since
    March 2012
  • From: Louisville, KY
Posted by Builder 2010 on Saturday, October 30, 2021 1:48 PM

Since I did order the rotor head, your point is correct, but, I still perfected the HD33 piece  as best I could using the print method available to me, so I will have those parts and can make them available to folks who rather spend a couple of bucks (USD) than to shell out $35 for the complete assembly. 

To that point, my latest mods to the part brought the holes in perfect alignment, got the size matched to the blade lock cylinders, and further refined the overall shape of the other end with the arm with the pin on it. Here is it in position with the mating kit's part.

If I could only print without those pesky supports, the part would be essentially perfect.

Here's the fit of the correct part included with the kit.

I'm going fully assemble the kit's rotor just for fun and compare it to the ResKit parts. 

I finished up work on the weapons console. I didn't like how the plastic hand grabs were fitting so I made some out of 0.022" phosphor bronze.

I chose to add the decals using a lot of Micro Sol and Micro Set after applying some Tamiya clear to provide a better surface.

I then glued the completed console onto the deck after scraping off the paint in the glue area for a good connection.


That finishes up the work for the week. See y'all on Monday. And Happy Halloween!!!

  • Member since
    December 2002
  • From: Valrico, FL
Posted by HeavyArty on Thursday, October 28, 2021 10:23 AM

Good deal. Of note, if you get the Res/Kit SH-60 rotor head set, it replaces part HD33 with their own parts, so you may not need to continue on it.

Here is a link showing the Res/Kit Naval H-60 sets. https://forums.kitmaker.net/t/news-res-kit-1-35-naval-hawk-update-sets/7793


Gino P. Quintiliani - Field Artillery - The KING of BATTLE!!!

Check out my Gallery: https://app.photobucket.com/u/HeavyArty

"People sleep peaceably in their beds at night only because rough men stand ready to do violence on their behalf." -- George Orwell

  • Member since
    March 2012
  • From: Louisville, KY
Posted by Builder 2010 on Thursday, October 28, 2021 9:58 AM

Don't know if I'll add it... but I might not be able to help myself (AMS). Got a very little time in the shop, but did get the latest iteration of the HD33 rotor part cleaned up and checked. It's still a tad off. The donut and its hole are a scosh to far out so the hole didn't align with the kit piece. If I want to make this available to others it needs to be just about perfect, so I'm printing another modified bunch (Ver 3.0). Notice tht sink hole in the plastic part.

And I did some more fine detailing on the center console. I'm thinking I've gone as far as I can with this part. And now I have to decide to add some greeblies in those equipment boxes under the seats. 

I've also been introduced to some terrific resin details by ResKit that I'm having my LHS order for me. Actually the proprietor showed them to me. I'm getting them. Since I'm gong nuts on this model I might as well go all-the-way nuts.

  • Member since
    December 2002
  • From: Valrico, FL
Posted by HeavyArty on Wednesday, October 27, 2021 7:20 AM
I guessed what under the seats looked like. I can't find any clear pics and they are just boxes and wires. I took kit part HB4 (B18 in the MH-60L and HH-60G kits), which is only seen if you build it with the nose compartment open, and cut it up into two squares that slide down into the under seat compartments. I added a couple more boxes and wires to fill the area up as well. Once the seats are in place, you can't see much anyways, so they look good enough.

Gino P. Quintiliani - Field Artillery - The KING of BATTLE!!!

Check out my Gallery: https://app.photobucket.com/u/HeavyArty

"People sleep peaceably in their beds at night only because rough men stand ready to do violence on their behalf." -- George Orwell

  • Member since
    March 2012
  • From: Louisville, KY
Posted by Builder 2010 on Tuesday, October 26, 2021 6:07 PM

How did you determine what boxes go down there? I was wondering why that space was there. There's also a "no-step" stencil on the bulge on the front of the boxes.

First of all, I was finally able to nail the printing problem I was having earlier. I dumped the Elegoo Mars FEP film (one use) that failed miserably and replaced it with my standby EPAX Non-FEP film that seems to work much better. I also redesigned the part further to improve its accuracy and more refined. Lastly I increased the raft size under the part. I set up to print 9 more. And the print was perfect. They're now cleaned and in the post-UV cure chamber. Due to their delicate nature, I harden them before removing supports and use a needle shaped, diamond coated burr in the Dremel flexi-shaft to cut off the supports without shocking the part. I get pretty good results doing it this way. Even flush cutters can impart enough shock to break small details.

I'm going to make these parts available to anyone who's building these kids for a very small fee. The only caveat is you can't use solvent cement since it doesn't affect the cured UV resin. CA is a must.

I got the weapons ofc seat finally installed. I said it many times before. I'm not a patient person. I am a very persistent person. When I screw up, it's because I haven't let glue or paint dry sufficiently to permit moving to the next step. Case in point... I glued the seat together using solvent cement. Thought it was sufficiently dry to handle and finish painting. It wasn't. It fell apart and re-gluing got more onerous the more I attempted it. Finally I resorted to med CA with accelerator. if I would have left the seat cure overnight, it wouldn't have happened.

The above also shows the weapons console (or whatever it's called). The images I have show it to be light gray and the interior walls a light blue with a little green in it. The fold-down work tray has a separate hinge piece on the far side that captivated the pins on the tray. The tray also has a separate hand controller that gets glued underneath. One the prototype there is a retaining bar on the outside that is not present in the model. I added a piece of styrene (over-scale) to positively hold the tray in position.

It then started painting the center console. I have a great picture showing each knob on it.

I didn't finish the painting, but it's getting there. I'm attempting to make that red band around the CRTs in the cosole. I'm not there yet. I could make a custom decal or cut the screen's decal out of the total console decal.

I'm letting all the blue paint dry before doing anything else. It's Vallejo. Valllejo flashes off quickly, but doesn't really dry for 24 hours. It's one of my complaints with it. I've also used Life Color of some of my naval models and find it much more controlable.

  • Member since
    December 2002
  • From: Valrico, FL
Posted by HeavyArty on Tuesday, October 26, 2021 10:35 AM

Looks like you are off to a good start. I used the decal instruments on both my KH 1/35 MH-60A backdate and HH-60G models. Surprisingly, with a bit of decal solvent and decal set, they snugged right down with no issues. They look really good too.

Also, in the openings below the seats, there are electronic boxes and wiring.  You can see how I did it above and the actual openings below.

You should post this over at the Aerscale Rotary Wing forum too:  https://forums.kitmaker.net/c/aircraft-scale-modeling/rotary-wing/16

Gino P. Quintiliani - Field Artillery - The KING of BATTLE!!!

Check out my Gallery: https://app.photobucket.com/u/HeavyArty

"People sleep peaceably in their beds at night only because rough men stand ready to do violence on their behalf." -- George Orwell

  • Member since
    March 2012
  • From: Louisville, KY
Posted by Builder 2010 on Monday, October 25, 2021 8:49 PM

My 3D printed rotor part was almost right. It needed some very minor tweaking which I did on the drawing. I checked it by mating it with the other half and was able to determine the interference fits and hole placement. I then attempted to print 10 more. I had a brand new FEP film. This time I used one of my Elegoo sheets. I've had bad luck with these, but decided to give them one more chance. It was a total bust. What didn't stick to the flim failed anyway. I'm putting another EPAX film on tomorrow. I haven't had a failure like this in quite a while and it worries me a bit.

That said, I continued working on the model itself. 

The assembly of the floor started with puting what looks like the hoist motor that goes under the floor. It's held with two end pieces which were supposed to have notches in the floor surrounding the opening. The notches actually weren't there. There was a hint of a slot, but it didn't work. I could have cut the tabs off the pieces, but chose the oppositie route; cutting new slots. The instructions clearly showed these non-existent slots.

I started by drilling a series of holes partially through the thickness. The trick was to stop drilling before I cut all the way through.

I then used a tiny chisel to open the slot to accept the tab. I did have to shave a bit off each piece so they would settle down flush.

Here is the assembly done.

I glued in the center console, it's back piece, and the two collective pitch levers that sit to left side of each flight deck seat.


I downloaded even more good images of Seahawk interior showing the color of the floor material, wall, and cockpit area. I airbrushed the cabin floor a Tamiya light gray. I masked the cabin off from the cockpit and painted that with Nato Black. I like using Nato black instead of flat black in a lot of instances. Most things aren't pure black in use. The pictures of the cockpit showed that the black is not pure black.

I then sprayed it with Dullcoat to prepare it for further coloration. The first place this occurred was in the box area under the seats which I saw in a picture was zinc chromate. If you look closely under the seat you can see the area I'm talking about.

Here's the floor pan. 

Also shown in the above is the beginning of building the first seat....the weapons offcer's. The contact point for the seat frame to the back frame was tenuous at best and took me 10 minutes to actually figure out just how it was supposed to connect.

There are decals for all the instrument panels, but I'm not so happy with them. I may just go old school or order the Eduard set. The decals would never settle into all the texture on the panels. If I have to scrape it all off, I might as welll put in a PE interior.

Just checked. Eduard has an MH-60 interior, but not the Seahawk. The instrument panel is updated with more displays and the center console is very different. I'll go old school.

  • Member since
    March 2012
  • From: Louisville, KY
Posted by Builder 2010 on Sunday, October 24, 2021 10:47 AM

I am eternally envious of the guys in these model companies that must work from actual drawings, and how they're able to covert them to prototypes and then cut dies for them. The real test will be when I clean it up and how it fits. If it fits it works!

I went to that website and downloaded some more images of details to concentrate on.

  • Member since
    December 2002
  • From: Valrico, FL
Posted by HeavyArty on Saturday, October 23, 2021 6:59 PM

The 3D printed HB33 part came out looking good.  Should be a good fix.

Gino P. Quintiliani - Field Artillery - The KING of BATTLE!!!

Check out my Gallery: https://app.photobucket.com/u/HeavyArty

"People sleep peaceably in their beds at night only because rough men stand ready to do violence on their behalf." -- George Orwell

  • Member since
    March 2012
  • From: Louisville, KY
Posted by Builder 2010 on Saturday, October 23, 2021 2:28 PM

Once again, Gino, you came through. I will check out that walk around.

I cleaned the HB33 part, but haven't separated it from the support system or did any post-processing on it (drilling out the hole to correct diameter for instance), but you can get a reasonable idea of how close my rendition is to the actual part. I believe it should work. If it fits, it won't be detectable after painting.

This image shows something else for those interested in 3D printing. My newly adopted support scheme has been pretty successful. I let the slicer automatically place heavy supports first. Then I go back and remove all of those that are connected to the delicate areas and replace them with my custom-designed medium supports. These have a heavy weight stem so they don't fail, but have a light weight end termination so they don't damage the details when I remove them. The slicer shows you where the supports need to be placed when you rotate the part view in the slicer. Any areas that are going to fail are highlighted in red. The brighter the color the more in jeopardy that area is.

I found that using the default medium and light settings also made very thin support legs which often failed due to the pulling forces encountered in the printing process. By thicking the legs, but keeping the tops narrow I got the best of both.

  • Member since
    December 2002
  • From: Valrico, FL
Posted by HeavyArty on Friday, October 22, 2021 9:50 PM

Good deal.  I have been waiting to see how you tackle this one.

Builder 2010
You have to open up a bunch of slots and holes since this pan is also used on other versions of this helicopter incluing the army version, Black Hawk.

Actually, only the Navy versions use this floor part.  Kitty Hawk uses a totally different floor and interior parts, as they shoud since they are very different, on the Army MH-60L Black Hawk and the USAF HH-60G Pave Hawk kits.

Builder 2010
And point of information: what is the interior color of this ship? The instructions do not identify the basic color. They do note flat black on various parts of the interior, but not for the entire surface.

The rear cabin interior has light grey metal parts and medium blue plastic and fabric-covered parts.

Everything forward of the step up on the floor (entire cockpit; walls, IPs, ceiling, seats, etc...) is flat black to be NVG compatible.

A full SH-60B walkaround with interior shots can be found at Prime Portal:  http://www.primeportal.net/hangar/michael_block/sh-60b_sea_hawk/


Gino P. Quintiliani - Field Artillery - The KING of BATTLE!!!

Check out my Gallery: https://app.photobucket.com/u/HeavyArty

"People sleep peaceably in their beds at night only because rough men stand ready to do violence on their behalf." -- George Orwell

  • Member since
    March 2012
  • From: Louisville, KY
Posted by Builder 2010 on Friday, October 22, 2021 9:09 PM

Hey Gang! I'm back. Work has officially restarted on the Seahawk. I was diverted for a few months by two commission projects: a restoration of a large metal commemorative model of a Lockheed Elektra (L-188) that was missing a propeller and stand. The second was a complete scratch-build of a Cletrac M2 High-Speed Service Tractor in 1:48.

The L-188 was bequeathed to a college student in town by his deceased grandfather who flew this plane for the FAA. I created the stand out of stainless steel sheet metal and 3D printed the propeller from my own drawings. I could have scanned one of the other props, but don't have the capability. Results were appreciated by the client.

To simulate real metal on the resin prop, I decanted the liquid metallic ink in a large tip Molotow Chrome Pen and airbrushed it. It was a suggestion from the hobby shop and worked great. So great that I'm using the chrome ink as a paint instead of in a felt point pen.

The M2 was created entirely by my drawings based on images found on a Google search. The Cletrac (Cleveland Tractor Company) M2 was used throughout airfields in WW2 to tow our bombers on un-improved air fields in Europe. I found one line drawing that has overall dimensions that helped me scale it corretly. The model parts are produced on my Elegoo Mars 3D LCD Matrix resin printer and consists of a number of sub-assemblies.

Here was the exploded drawing showing all the parts and how the.y related to each other.

And here is a prototype drawing. This was the one that I used in the SketchUp Match Photo process to draw directly over it.

And here's the complete model. I made two. One for the owner of Scale Reproductions, Inc. (one of the best hobby shops in the USA) and one for display in the store.

Now onto the Seahawk. I firmly decided not to procede with the cut and paste method to create the correctly-facing rotor head component, sprue numebr HD33, but instead decided to attempt to scan it with my newly acquired iPhone 12Pro with the LIDAR range finder. I found a scanning app that I thought would do the job, but it really didn't work. It could focus the process down to less than a half meter, but the resolution was horrible. The resulting STL files were just a jumble of lines looking kind of like a Alexander Calder modern art creation and bore no resemblance to the actual component. 

So I went to plan B. I imaged the part in three views and drew it in SketchUp. Since SU doesn't like working in tiny sizes, after measuring critical dimensions I set the scale to 100X larger. After fully drawing the object I shrank it to .01 and exported it as an STL file for the printer.

I attempted to print a bunch, as you can see in this screen shot of the printing scheme.

Unfortunately, only three stuck to the build plate, the remainder sticking to the Teflon at the vat's bottom. I got three good ones as seen here in the ultrasonic cleaner's basket. The little down-facing arm is very thin in cross-section and I'm not sure if it will hold up when I remove the supports. To fix that, I thickened the arm in the drawing and will try and reprint. I'm thinking of making these fixed parts available for sale.

And I actually started working on the model with the preparation of the floor. You have to open up a bunch of slots and holes since this pan is also used on other versions of this helicopter incluing the army version, Black Hawk. This naval version has all kinds of anti-sub apparatus inside and these pieces needed mounting on this floor.

And point of information: what is the interior color of this ship? The instructions do not identify the basic color. They do note flat black on various parts of the interior, but not for the entire surface.

I'm going to have a lot of fun super-detailing the gas turbines that power this model. The engines do have some of the larger piping, but there's a lot more that can be added.

And due to the massive print failure, I have to change the teflon. I damaged it when trying to remove the stuck remains of the failed parts.

If any of you following this thread are going to build this model and would like a replacement HD33 rotor head part, let me know.

  • Member since
    March 2012
  • From: Louisville, KY
Posted by Builder 2010 on Sunday, May 2, 2021 11:23 AM
Picked up the Eduard Mask Set for this model (actually for the HH-60, but I'll make them work). I just finished the Bradley (on another thread) and will be working on the rick house under-construction for the model railroad. So helicopter building will be in about a month (or less) from now. One of the rotor hub parts for this model are molded in the reverse from what it needs to be to display with the blades in the stowed position. I've downloaded instructions on modifying the part (cutting and pasting), but am toying with the idea to photograph it, draw it, reverse it and then 3D print it. If I can do this, I will make the 3D printed parts for sale.
  • Member since
    March 2012
  • From: Louisville, KY
Posted by Builder 2010 on Monday, April 12, 2021 6:05 PM

Picked up the model at the LHS on Firday. It's now in the queue.

  • Member since
    March 2012
  • From: Louisville, KY
Posted by Builder 2010 on Wednesday, January 20, 2021 8:38 PM

I certainly hope my engine comes out 1/2 that good.

  • Member since
    February 2003
  • From: East Bethel, MN
Posted by midnightprowler on Wednesday, January 20, 2021 4:30 PM

Watching this.  I have the Academy kit and a bunch of pe for it ill be starting soon. 

Hi, I am Lee, I am a plastiholic.

Co. A, 682 Engineers, Ltchfield, MN, 1980-1986

1 Thessalonians 4:13-18 1 Corinthians 15:51-54

Ask me about Speedway Decals

  • Member since
    October 2019
  • From: New Braunfels, Texas
Posted by Tanker-Builder on Wednesday, January 20, 2021 10:59 AM

Builder 2010;

       Hey, is that a model engine you've built? If not, it should be. It looks like your work though !

  • Member since
    March 2012
  • From: Louisville, KY
Posted by Builder 2010 on Wednesday, January 20, 2021 9:29 AM

Thank you! The links worked perfectly! It's hard to believe that all those cylinders and hydraulic tubing rotate with the rotors. The fact that it all holds together is a marvel of engineering. I didn't realize the rotor head was piped, and now that I do, having AMS, I'm compelled to attempt it myself. I also need to get some good reference pics of the engine compartments. I've got a good view of the T700 bare with some of its piping, but I'll need more. You can never have enough reference pics.

  • Member since
    December 2002
  • From: Valrico, FL
Posted by HeavyArty on Tuesday, January 19, 2021 6:39 PM

Good choice.  It is a really nice kit.  It has a few issues w/the directions though.  Here are a few posts that will help out.

https://www.facebook.com/groups/369828906819827/permalink/1042735056195872

https://www.facebook.com/groups/369828906819827/permalink/1042192129583498

https://www.facebook.com/groups/369828906819827/permalink/1042191989583512

Here is a good build article where you can see how it can turn out:  https://forums.kitmaker.net/t/kitty-hawk-sh-60b-build/1762

If the links don't work, let me know and I can send them to you in an email.  I have one as well and hope to get to it soon too.  We shall see.

Gino P. Quintiliani - Field Artillery - The KING of BATTLE!!!

Check out my Gallery: https://app.photobucket.com/u/HeavyArty

"People sleep peaceably in their beds at night only because rough men stand ready to do violence on their behalf." -- George Orwell

JOIN OUR COMMUNITY!

Our community is FREE to join. To participate you must either login or register for an account.

SEARCH FORUMS
FREE NEWSLETTER
By signing up you may also receive reader surveys and occasional special offers. We do not sell, rent or trade our email lists. View our Privacy Policy.