SEARCH FINESCALE.COM

Enter keywords or a search phrase below:

How would you simulate water without specialist materials?

10656 views
20 replies
1 rating 2 rating 3 rating 4 rating 5 rating
  • Member since
    August 2007
  • From: Toronto
How would you simulate water without specialist materials?
Posted by BGuy on Wednesday, November 24, 2010 3:12 PM

I've priced water effect tools at my LHS's and they all want 20+ bucks for products that until recently were priced, it seems, at nearly half that.  Vallejo Still Water comes to mind.  Anyway, I'm doing a simple diorama of a european street experiencing an early first-snowfall (posted pics elsewhere in the forums), and can't afford to just blow that kind of money for a simple water-in-the-gutter effect. 

I've tried Microscale Krystal Klear as well as white glue, and while KK can make small bits of debris look nicely wet, glue fails entirely, and both fail on their own.  Both end up collapsing in size dramatically after application, requiring many, many layers to build anything up, and aren't very convincing once done.

If you wanted to do an effect like this--small quantities of water like puddles, etc.--and didn't have special expensive materials, how would you go about it?  Let's say there's a 5-10 dollar max budget to make this happen. 

Looking forward to hearing from the community. Big Smile

  • Member since
    April 2004
  • From: Boston MA
Posted by vespa boy on Wednesday, November 24, 2010 4:18 PM

Try acrylic gloss medium....Golden makes a good product.

 If that's too expensive Future floor polish may work, but I've found it crazes after a while.

http://public.fotki.com/nkhandekar

This ain't no Mudd Club, or C.B.G.B.,
I ain't got time for that now

  • Member since
    August 2007
  • From: Toronto
Posted by BGuy on Wednesday, November 24, 2010 4:22 PM

Yeah, I find that Future shrinks to nothing when it dries, so it'll make an economical "wet street" covering, but I can't imagine it being any good for actual bodies of water.  I'll look into the acrylic medium product you mentioned.  Does anybody have any further experience with it?

  • Member since
    November 2005
Posted by Anonymous on Wednesday, November 24, 2010 4:28 PM

You can build up the water using clay or celluclay, color it in greens/blues, then use any gloss varnish for the finish and give yourself a respectable illusion of deeper water:
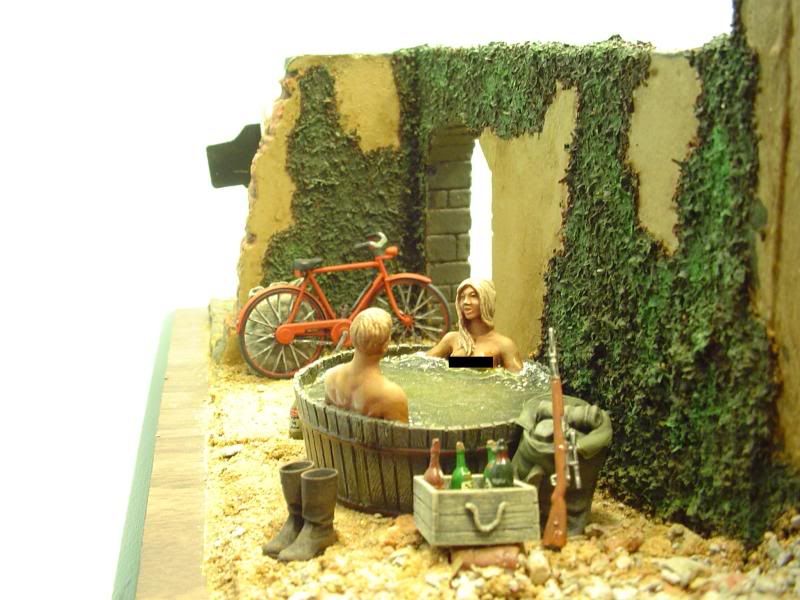
DISCLAIMER: this picture is being used only for educational purposes to help in describing a modeling technique. It is NOT intended to glorify nudity or the human body in any way, hence the black boxes.

  • Member since
    November 2005
Posted by Anonymous on Wednesday, November 24, 2010 4:30 PM

Another technique using a product similar to crystal clear for very shallow pooling of water:

DISCLAIMER: this picture is being used only for educational purposes to help in describing a modeling technique. It is NOT intended to glorify war, death or the color "red" in any way. 

  • Member since
    August 2007
  • From: Toronto
Posted by BGuy on Wednesday, November 24, 2010 4:51 PM

Manstein: LOVE the post-picture disclaimers..."..the color "red" in any way".  lol.

These techniques seem much more feasable and I think I can start experimenting with coloured clay-ish materials, painted and glossed, to see if they do the job.  Probably a combination of these with some thoroughly crunched up tea and maple leaves to simulate clutter will make for convincing gutters. 

Then I get to try simulating a snow-blown street, like this:  http://www.boingboing.net/2010/11/24/cars-sliding-down-a.html

I was thinking of applying various streaks of white glue using some sort of foam roller brush thing, then sprinkling talc liberally and blowing away.  Anybody who wants to comment on THAT idea is also more than welcome to. Big Smile

  • Member since
    November 2005
Posted by Anonymous on Wednesday, November 24, 2010 5:10 PM

BGuy

 Probably a combination of these with some thoroughly crunched up tea and maple leaves to simulate clutter will make for convincing gutters. 

Cool...speaking of crushed tea leaves--that's what is used for the ivy on the wall...sprinkled on tea leaves onto white glue and then painted...

There is another product out there that is natural that looks a lot like dead maple leaves. You can see them in the ditch here:

DISCLAIMER: this picture is being used only for educational purposes to help in describing a modeling technique. It is NOT intended to glorify smoking  or being out in the cold in any way. 

  • Member since
    May 2009
  • From: Hobart, Tasmania
Posted by Konigwolf13 on Wednesday, November 24, 2010 5:26 PM

Thanks for the tips Manny.

PS, your've been quoted (again)

Andrew

  • Member since
    December 2002
  • From: Massachusetts
Posted by ajlafleche on Wednesday, November 24, 2010 6:42 PM

Five minute epoxy from the hardware store.

Remember, if the women don't find you handsome, they should at least find you handy.

  • Member since
    April 2003
  • From: 41 Degrees 52.4 minutes North; 72 Degrees 7.3 minutes West
Posted by bbrowniii on Wednesday, November 24, 2010 6:52 PM

PolyArcryl by Minwax.  $5 for a quart.  Apply in thin layers.  Color with acrylics.

'All that is necessary for the triumph of evil is for good men to do nothing' - Edmund Burke (1770 ??)


  • Member since
    March 2005
  • From: West Virginia, USA
Posted by mfsob on Wednesday, November 24, 2010 8:19 PM

I'm primarily a ship modeler, and second the motion for acrylic gloss gel medium. You can get a small squeeze tube or small container at any art or craft supply store for a few dollars. Just make sure you get the gloss gel medium, NOT matt gel medium. It goes on opaque but dries clear and picks up whatever your base color(s) is, giving a great illusion of depth. Shrinkage is minimal. Best of all, if you mess up, it cleans up with water, and being acrylic, drying time is quick. Here is a stormy North Atlantic scene I did for a Liberty ship, with scale 25-foot waves built up with layers of gel medium. Note the different tonal variations in the water, picked up from the base undercoating and diffused by the gel medium:

  • Member since
    January 2007
Posted by the doog on Thursday, November 25, 2010 5:28 PM

Manstein's revenge

You can build up the water using clay or celluclay, color it in greens/blues, then use any gloss varnish for the finish and give yourself a respectable illusion of deeper water:

http://i210.photobucket.com/albums/bb110/dblvisions2001/Dioramas/t-34009Cens-1.jpg

DISCLAIMER: this picture is being used only for educational purposes to help in describing a modeling technique. It is NOT intended to glorify nudity or the human body in any way, hence the black boxes.

Holy cow Manny--that looks amazingly convincing! Yes

You can use 5-minute epoxy--it's the way people "used to do it" before al these new-fangled products.

  • Member since
    August 2007
  • From: Toronto
Posted by BGuy on Thursday, November 25, 2010 6:56 PM

Bit of an update for you guys.  Last night I put some carpenter's glue in a soda cap to see how a nice thick gob of it would dry out--clear and while holding its original dimensions, I'd hoped.  I've used it in rocketry applications and remembered it drying VERY clear.  Nearyly 24 hours later though and it's still drying, still yellow and rubbery.  We'll see how it ends up, ultimately.

Today I hit the art supply store and picked up some Golden brand medium--its "Soft Gel (gloss)" specifically.  The display had all kinds of this stuff, each with a swatch of dried product to let you know how much "peak" it would hold (i.e. how much it would level or allow for sculpting).  Much better price than 20-30 bucks for modeling water products, and it's likely something very similar anyway--possibly just a repackaged similar product.

I'll keep you guys updated as testing proceeds.Toast

  • Member since
    November 2005
Posted by Anonymous on Thursday, November 25, 2010 7:10 PM

the doog

 Manstein's revenge:

You can build up the water using clay or celluclay, color it in greens/blues, then use any gloss varnish for the finish and give yourself a respectable illusion of deeper water:

http://i210.photobucket.com/albums/bb110/dblvisions2001/Dioramas/t-34009Cens-1.jpg

DISCLAIMER: this picture is being used only for educational purposes to help in describing a modeling technique. It is NOT intended to glorify nudity or the human body in any way, hence the black boxes.


Holy cow Manny--that looks amazingly convincing! Yes

If I could show it w/o the black box it would look even more convincing! Yeah

  • Member since
    May 2008
  • From: Wherever the hunt takes me
Posted by Boba Fett on Thursday, November 25, 2010 7:23 PM

another thing I found to work is clear silicone caulk. It is flexible after drying, but cheap and it really works well for agitated water. I can't wait to try it on a waterfall...

  • Member since
    March 2005
  • From: West Virginia, USA
Posted by mfsob on Saturday, November 27, 2010 7:53 AM

I've tried silicone caulk as well, but don't like it as well as acrylic gel medium. Caulk, at least for me, had an annoying tendency to leave a lot of iittle sharp "peaks" as I was trying to form it, which when dry looked silly, whereas the gel was much easier to sculpt into natural shapes. My primary tools for shaping are a large, broad-bristle disposable paintbrush, a toothpick and a wet fingertip.

  • Member since
    August 2007
  • From: Toronto
Posted by BGuy on Saturday, November 27, 2010 2:37 PM

While testing out the gel I encountered the problem of little 'peaks' too, but I didn't use any tools, and it was my first use of the stuff.  I'll have to try what you've done to see if I get better results.

  • Member since
    March 2005
  • From: West Virginia, USA
Posted by mfsob on Sunday, November 28, 2010 7:24 AM

BGuy, one thing I left off (sorry!) - when applying the gel, you can use a wet brush to shape/sculpt it. That can really help smooth out the final look of the water as well when using the gel medium. You can safely let small amounts of water evaporate from the surface of the gel, I have not had any adverse effects from doing so, and using a wet paintbrush or tool keeps the gel from clinging to said implement. It does increase the gel's drying time, however.

I think the main advantage of using the "pourable" kinds of water effects is that they would enable you to get dead flat water. IF I were doing a pond or something that I wanted to be absolutely flat, I would probably go that route, but since water, in real life, is almost never, ever absolutely flat and ripple free ...

  • Member since
    August 2007
  • From: Toronto
Posted by BGuy on Sunday, November 28, 2010 3:45 PM

Gotcha.  That's a good tip.  How much do you think the drying time is exacerbated with extra water usage?  This stuff--I've looked it up on the Golden website--can take weeks or months in sufficient quantities, even if a day or two was enough to clear up and dry most of the small quantities I used.  The tiny gutters/puddles I plan for my 1/48 diorama will easily clear up within the better part of a week.

  • Member since
    March 2005
  • From: West Virginia, USA
Posted by mfsob on Monday, November 29, 2010 11:09 AM

The answer is - it depends. Usually on how thick the application is. In most cases I've had it dry completely in less than a week, even if I left little pools of water on the surface from trying to smooth it down. You can also try wicking up excess water 9carefully) with a paper towel.

  • Member since
    November 2003
  • From: New Mexico
Posted by johncpo on Monday, November 29, 2010 7:27 PM

Polycrylic Water Sealer is what I use for all my dioramas and HO rr layout. I also use it over layers of acrylic caulking that are built up to simulate large bodies of water.  It is by far the best as it cleans up with water as all acrylics do. Look up my facebook pages with dioramas, etc.

The best,

johncpo

JOIN OUR COMMUNITY!

Our community is FREE to join. To participate you must either login or register for an account.

SEARCH FORUMS
FREE NEWSLETTER
By signing up you may also receive reader surveys and occasional special offers. We do not sell, rent or trade our email lists. View our Privacy Policy.