SEARCH FINESCALE.COM

Enter keywords or a search phrase below:

Battle for Kharkov dio (painfully slow) WIP 1/11/13

20334 views
42 replies
1 rating 2 rating 3 rating 4 rating 5 rating
  • Member since
    June 2006
  • From: AusTx, Live Music Capitol of the World
Posted by SteveM on Friday, January 11, 2013 8:43 PM

Wow, so by "soon" i spoze I mean "almost a year".... So long I think this forum underwent TWO revamps. Not sure I can even post correctly.

Trying to get back in the swing after almost 1.5 years. Started painting the figs's faces, using Vallejos, really all thumbs with the shading technique. With so many figures in this dio, I'm gonna go for speed over super-ultra detail, or I'll lose interest again:

I'll see where tomorrow takes me.

Steve M.

On the workbench: ginormous Kharkov dio


  • Member since
    June 2006
  • From: AusTx, Live Music Capitol of the World
Posted by SteveM on Monday, January 23, 2012 2:19 PM

Coming back to this soon. Overloaded last few months by work and music stuffs.

Steve M.

On the workbench: ginormous Kharkov dio


  • Member since
    November 2005
Posted by Anonymous on Tuesday, January 10, 2012 7:03 AM

Huh????

  • Member since
    November 2005
Posted by Anonymous on Friday, September 23, 2011 7:24 AM

I love your tarp and want to crawl under it and go to sleep after a hard day's campaigning in the Ukraine...

  • Member since
    June 2006
  • From: AusTx, Live Music Capitol of the World
Posted by SteveM on Friday, September 23, 2011 7:14 AM

Bless ya, Andy! This will be my first real time off since Labor Day weekend 2010 so, yeah, it will be great.

I appreciate your support in here!

Steve M.

On the workbench: ginormous Kharkov dio


  • Member since
    April 2009
  • From: Carmel, IN
Posted by deafpanzer on Thursday, September 22, 2011 10:13 PM

Yes Yes Jeez, your stash keeps looking better and better every time you post an update.  Can't wait to see them painted soon.

Have a great long vacation and try not to think of us! Beer

Andy

  • Member since
    June 2006
  • From: AusTx, Live Music Capitol of the World
Posted by SteveM on Thursday, September 22, 2011 9:25 PM

OK, so, anyway...

Decided to stop thinking about it, and moved on with creating the tarp for the rear stowage. After researching the different preferred methods for this, I went with a water-based, acrylic silicone caulk mixed 50/50 with H2O. I cut the tissue (nose-blowin') down on a piece of wax paper, coated one side with a paint brush. Flipped it over, and coated the next side.

Laid it down on the stowage, and gently placed the stored items on top of it. Tucked where I could, left some natural drapes and folds. I will work on getting the items planted down more convincingly. When fully dried and cured, this'll be very durable.

Goin' down to the Texas coast for a long awaited, much much needed 9-day vacation. Gonna be a beach bum. When I return, I will write my own manifesto.


Steve M.

On the workbench: ginormous Kharkov dio


  • Member since
    June 2006
  • From: AusTx, Live Music Capitol of the World
Posted by SteveM on Sunday, September 18, 2011 10:34 PM

bye, jaundice1980


Steve M.

On the workbench: ginormous Kharkov dio


  • Member since
    December 2008
  • From: Northern Va
Posted by psstoff995's lbro on Sunday, September 18, 2011 9:20 PM

Awesome work! YesYes Looking forward to the next update for sure!

-Will young modeler Test fit master
  • Member since
    September 2007
  • From: Relocating
Posted by Mobious on Sunday, September 18, 2011 7:02 PM

Cool Stuff!

"It's a problem of applied physics" Roy Brown

  • Member since
    June 2006
Posted by Tankluver on Sunday, September 18, 2011 10:59 AM

Looking good

  • Member since
    November 2005
Posted by Anonymous on Saturday, September 17, 2011 9:11 PM

SteveM

Hey, thnx for the vote of confidence, Manny. I love the crazy, ornate accents of those Ukraine homes. Got me scourin' Hobby Lobby et al for the tiniest of stuff.

Well my local store has tons of wood products and the perfect artists' acrylic paints to be had---and all very cheap...I still remember the barn you were building right before you "cashed your chips in last time"...it was incredible.  Hope you stick around and see this one through...

  • Member since
    June 2006
  • From: AusTx, Live Music Capitol of the World
Posted by SteveM on Saturday, September 17, 2011 7:48 PM

Hey, thnx for the vote of confidence, Manny. I love the crazy, ornate accents of those Ukraine homes. Got me scourin' Hobby Lobby et al for the tiniest of stuff.

Steve M.

On the workbench: ginormous Kharkov dio


  • Member since
    November 2005
Posted by Anonymous on Saturday, September 17, 2011 3:39 PM

I'm liking the StuG and if you can replicate one of those Ukranian houses (and if anyone can its you) this dio will be "the bomb"...

  • Member since
    June 2006
  • From: AusTx, Live Music Capitol of the World
Posted by SteveM on Saturday, September 17, 2011 3:27 PM

Lame, but not dead.

Update to the StuG, mostly OVE

The towing cables nearly did me in. Stepped away from the Hobby Room for about a month after finishing those.

Ugh. I Forgot how much I hate PE. I mean, I love it but, y'know, I hate it.

Next steps: detail work on them jerry cans. Then, the tarp goes up. When it feels finished and ready to paint, I will attach the muzzle brake. Fruils.

Then the fun project begins. Something along the lines of this:

or this:

Steve M.

On the workbench: ginormous Kharkov dio


  • Member since
    January 2010
Posted by CrashTestDummy on Tuesday, July 19, 2011 3:28 PM

I'll usually use glue-soaked tissue (yes, the Kleenex(R) type) if I'm making something I want to look like canvas (canvas top, or retracted and covered canvas top, etc.) that's a single thin sheet or wrapped up in the stuff.  If it's just a drape, I'd try lead foil.  But that's just me.  Nice work on the junk on the trunk.  :-)

Gene Beaird,
Pearland, Texas


G. Beaird,

Pearland, Texas

  • Member since
    March 2003
  • From: Rain USA, Vancouver WA
Posted by tigerman on Thursday, July 14, 2011 2:28 AM

Looking good. Nice job on the stowage.

   http://i7.photobucket.com/albums/y269/wing_nut_5o/PANZERJAGERGB.jpg

 Eric 

  • Member since
    June 2006
  • From: AusTx, Live Music Capitol of the World
Posted by SteveM on Wednesday, July 13, 2011 9:20 PM

Thanks, Bill. I hadn't considered using foil... have you had luck with that?

Thanks for checking it out, p38jl- lurk all you wanna Smile

Tonight's progress includes field-mod spare wheel brackets against the hull side, using brass strip, adding weld beads with Apoxie Sculpt. While I had some out and mixed, I cleaned up some of spots of the glacis.

Not very interesting just yet, so I didn't bother with images. More work tomorrow after the putty is cured.

Steve M.

On the workbench: ginormous Kharkov dio


  • Member since
    January 2003
  • From: Hancock, Me USA
Posted by p38jl on Tuesday, July 12, 2011 12:44 PM

Lurking.. and Liking..Yes

[Photobucket]

  • Member since
    February 2003
  • From: Allentown, PA
Posted by BaBill212 on Tuesday, July 12, 2011 12:34 PM

Great work Steve....

Did you consider lead foil for the tarp?

Just a thought................

Enjoy the ride!


  • Member since
    June 2006
  • From: AusTx, Live Music Capitol of the World
Posted by SteveM on Tuesday, July 12, 2011 11:21 AM

Come over and make your own indentation.

Steve M.

On the workbench: ginormous Kharkov dio


  • Member since
    November 2005
Posted by Anonymous on Tuesday, July 12, 2011 10:08 AM

I love your stowage and want to hide under your tarp...

  • Member since
    June 2006
  • From: AusTx, Live Music Capitol of the World
Posted by SteveM on Monday, July 11, 2011 8:02 PM

Noted, thanks Manny.

Hey Bill, thanks for the encouragement!

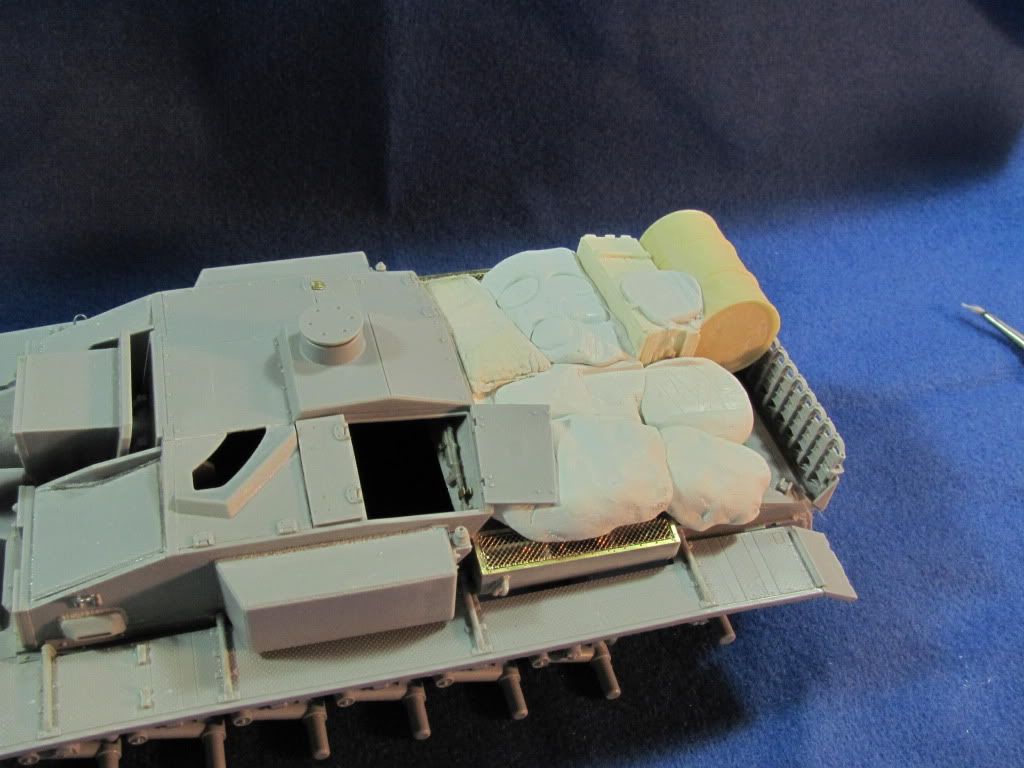
I moved on to creating the rear deck stowage, using a mix of resin pieces, tissue paper, and Milliput. I started with covering the engine deck with clear plastic wrap, for protection. Then, I layed down masking tape, sticky side up, to grab hold of the stowage pieces.

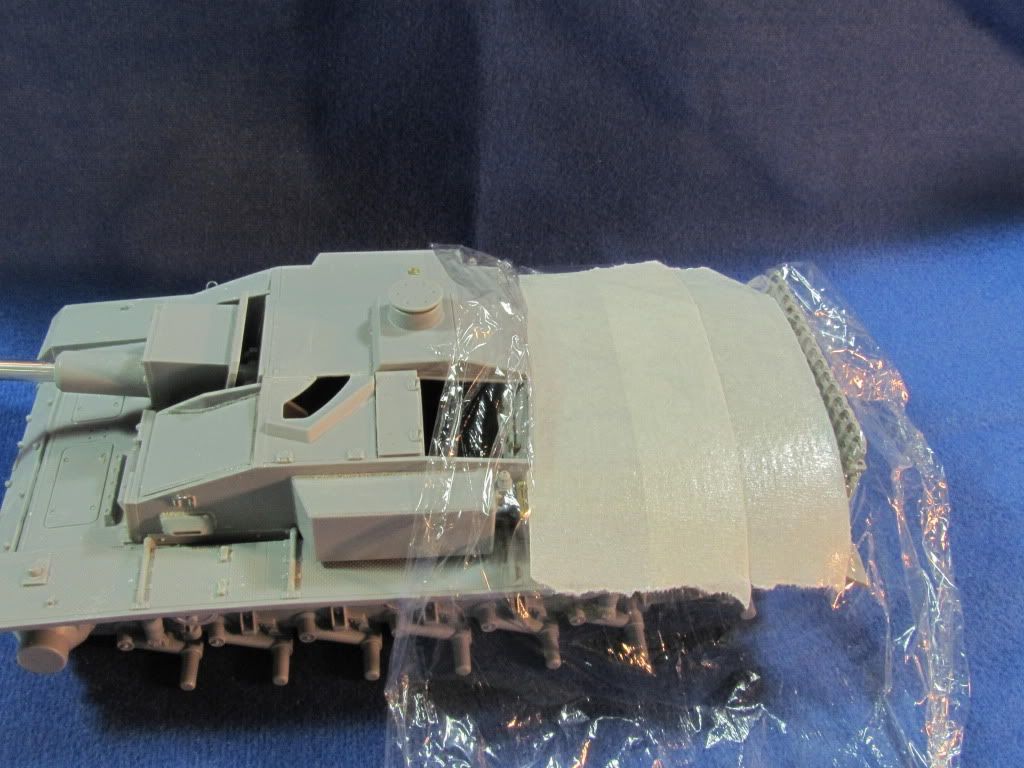
I placed the fuel pieces: resin Jerry cans from TAHK, and a fuel drum (from unknown manufacturer). I assembled these items against the spare track run, along the back of the deck. Then, I rolled pieces of Milliput and mashed them down on to the deck, molding them around the shapes of the in-take covers. I'm not getting too specific with the folds and contours for these pieces... the general idea is to create shapes representing personal gear, to be be covered by a tarp (or blanket). Last week, during some experimentation, I had made a bedroll out of tissue paper (the gift box type) soaked in Scenic Glue, and I added this to the pile."Cause I'm lazy like that.

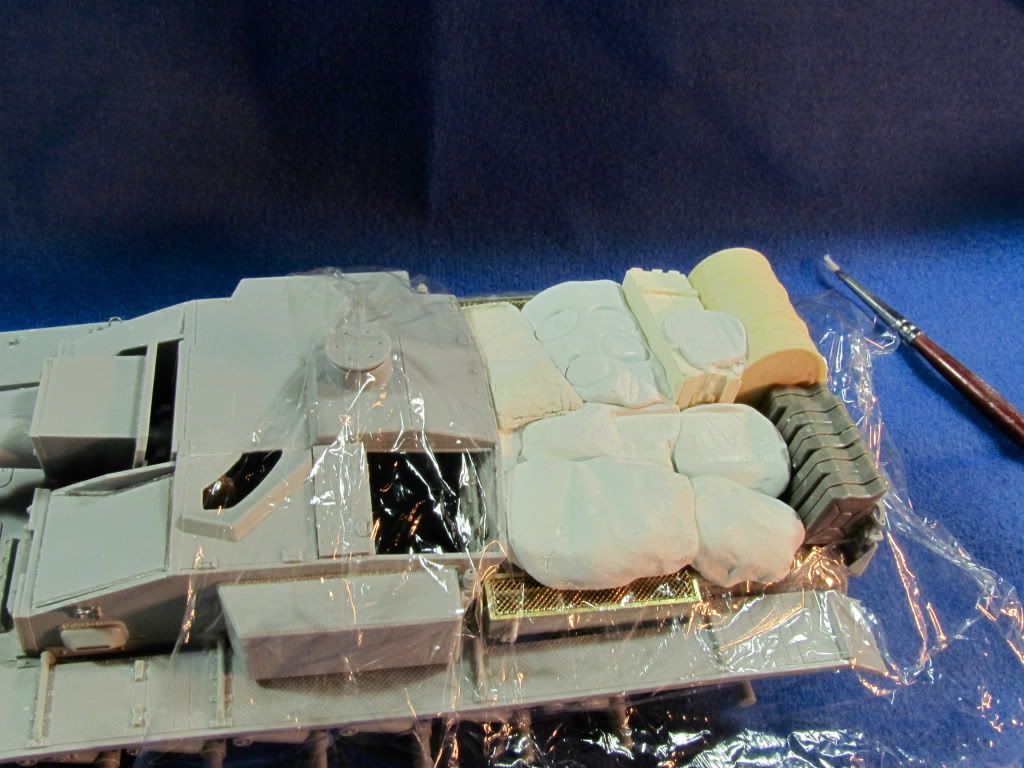
I created indentations for 4 helmets, and a couple of other small items. When the tarp covers the stowage, the helmets will flt nicely into these indentations, giving the appearance of weight. At this point, I also marked the spot on one of the bedrolls were the commander's hatch will be resting. I've kept the hatch off for this purpose. This hatch will receive some scratch (locking lever).

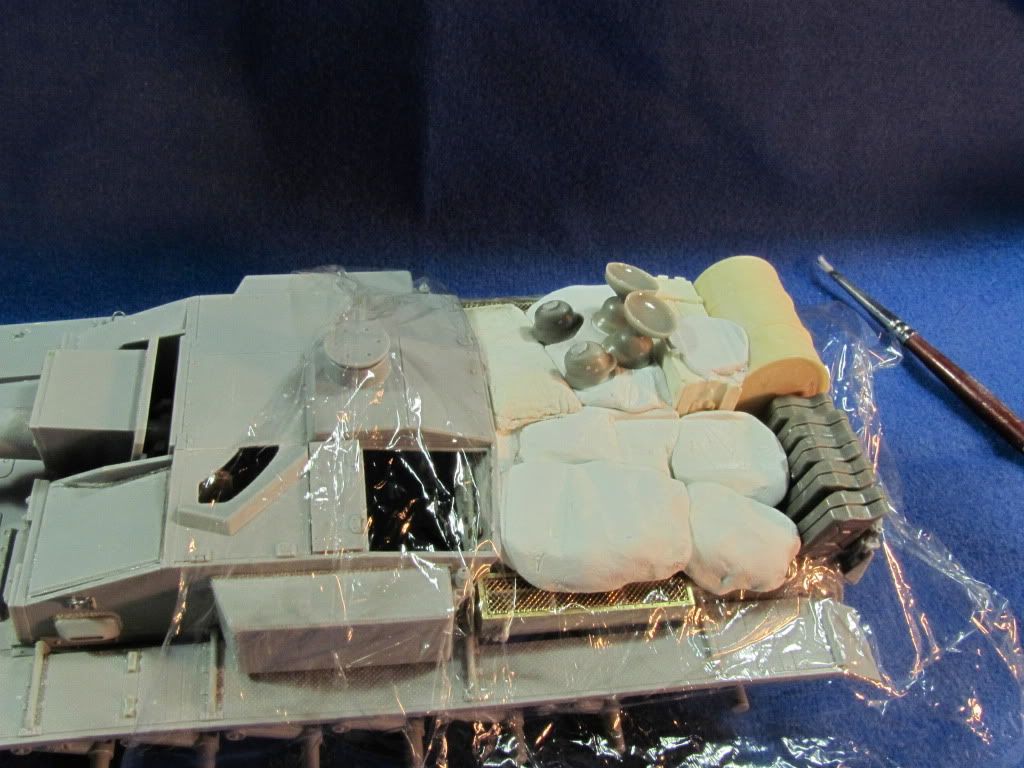
You get fingerprints all over the Milliput pieces. Best advice, to relieve the most stress, is *not* worry about any of that until you have all your pieces formed to your liking. You have about 3 hours to work with this stuff so, when you are happy with your pile, go back over it with water and a paint brush. You can smooth out fingerprints, create folds and contour and, if you are really gonna go for it, you can add texture to the "fabric". Since my pile will be mostly covered (mostly...), I did not concern myself with texture and contour. I did, however, smooth out my fingerprints.

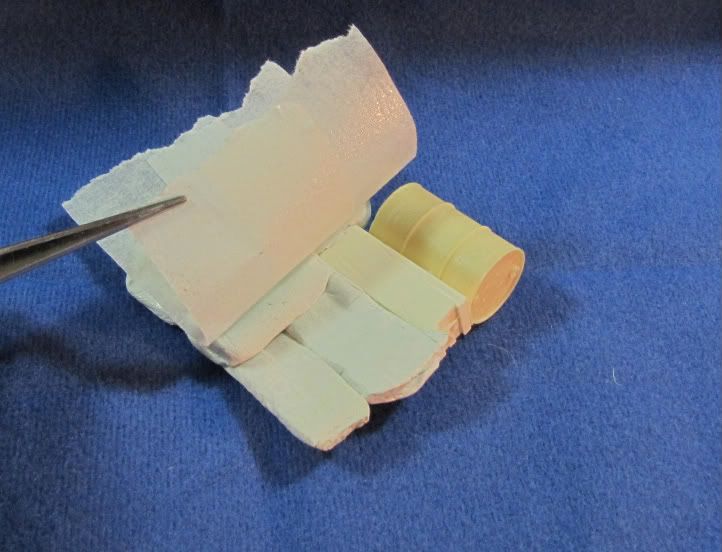
After 24 hours or so, the stowage piece is rock (well, resin actually) solid. I removed it from the deck, and then removed the tape from the bottom.

Back to the model, my pile of crap sits nicely on the engine deck.

I'm still trying to decide on whether to make the tarp from a thin thin thin layer of Milliput or Apoxie Sculpt, or a glue-soaked piece of tissue paper (the nose-blowin' type). If I can get it thin enough, without ripping, breaking, or cracking, I'd prefer to use putty.

From there, I will work on arranging some tie downs. I can file grooves into the putty for the rope, straps, chain, whatever I decide to go with, to give the appearance of tension (the hugging type). I will secure the Jerry Cans and fuel drum, probably with chain. Very small chain. The Jerry Cans will be painted separately from the rest of the stowage.

That's all I got for now, Thanks for lookin, if you looked in.

Steve M.

On the workbench: ginormous Kharkov dio


  • Member since
    February 2003
  • From: Allentown, PA
Posted by BaBill212 on Monday, July 11, 2011 1:43 PM

Steve,, your dio concept sounds great. I'll be following for sure!

Manny, excellent pics and info!


Bill

Enjoy the ride!


  • Member since
    November 2005
Posted by Anonymous on Monday, July 11, 2011 11:39 AM

Yeah, after a second look it looks like the "mix-and-matching" you did to get the fig combined a couple of different styles but I think you can pull off the parka with no big problem (the heavy seam on the arm looks like the leather pullover type)...Like Fritz Witt figure on far right:

...keep in mind that those used by the Waffen SS at Kharkov were NOT reversible, as they were fur lined on the inside...later models were reversible...the ones accurate to this dio came in all manners of shades, from olive to mouse grey...

Examples:

Note that they did not un-button all the way down the front like later models did...the fur was usually a combination of white, brown and black---I usually paint it white to keep it looking real in scale...


  • Member since
    June 2006
  • From: AusTx, Live Music Capitol of the World
Posted by SteveM on Monday, July 11, 2011 11:27 AM

Hey Manny

Herr Deitrich's (exceptionally painted) jacket has the heavy wool collar. My commander's jacket is hooded; wondering if it might be more along the lines of these:

Aren't these the reversible (white/ camo) winter jackets? Been wondering about this jacket, since the torso is "borrowed" from a grenadier, rather than StuG crew. Might be able to get away with it, through proper painting.

Steve M.

On the workbench: ginormous Kharkov dio


  • Member since
    November 2005
Posted by Anonymous on Sunday, July 10, 2011 1:06 PM

Yeah, my bad---it is a different TAHK kit...not sure which...Looks like your dude is wearing one of those sheepsking jackets of the period, as Deitrich is in this pic:

  • Member since
    June 2006
  • From: AusTx, Live Music Capitol of the World
Posted by SteveM on Sunday, July 10, 2011 12:46 PM

Thanks, Matt!

Manny- which TK kit is that? Looks good. Here's the breakdown of my dude:

Steve M.

On the workbench: ginormous Kharkov dio


  • Member since
    November 2005
Posted by Anonymous on Sunday, July 10, 2011 12:15 PM

Cool...I did that German TC awhile back---used the head it came with:

JOIN OUR COMMUNITY!

Our community is FREE to join. To participate you must either login or register for an account.

SEARCH FORUMS
FREE NEWSLETTER
By signing up you may also receive reader surveys and occasional special offers. We do not sell, rent or trade our email lists. View our Privacy Policy.