SEARCH FINESCALE.COM

Enter keywords or a search phrase below:

Tamiya 1:48 Wildcat F4F-3 Conversion (Complete)

11644 views
104 replies
1 rating 2 rating 3 rating 4 rating 5 rating
  • Member since
    March 2015
  • From: Streetsboro, Ohio
Posted by Toshi on Saturday, February 11, 2017 2:31 AM

Your unique style falls into another genre of modeling, pro modeling.  I'm astounded!

Toshi

On The Bench: Revell 1/48 B-25 Mitchell


Married to the most caring, loving, understanding, and beautiful wife in the world.  Mrs. Toshi


  • Member since
    June 2013
Posted by bvallot on Friday, February 24, 2017 2:33 PM

Thanks Toshi. I am aspiring to do so. =] It seems there's always that one hang up that keeps me from pulling off exactly what I aim to put together, but I suppose that's what keeps me coming back, right.

Progress is slow, but she's coming along. Lately, I've had just enough time to sort out one component and size up how it's going to fit. Here's where I'm at...

 Untitled by Britt Vallot, on Flickr

I plan on thinning out these marked off areas with a dremel so that they will bend a little more easily when I'm poking at them. I've noticed how the panels on Wildcats would bow out along forward top of the wing root. In the past, I've tried my hand at doing this by carving away at the surface, but I've never been able to sand it back down appropriately. So, I've come up with this idea to leave the surface relatively pretty and scrape free while still putting in whatever warping I see fit to include. More to come on how this worked out. I also removed the forward part of the cowl that included the carb scoop since this series of Wildcat didn't have one. The JPS conversion set has included the proper replacement. =]

 Untitled by Britt Vallot, on Flickr

I went ahead and built the landing gear now so I could paint everything together. I corrected the fuel pump found on the center drag link supporting the landing gear. The detail looks a little soft right now with the light glaring off of the white styrene, but after a coat of paint and some weathering, this will work a whole lot better. A hose will come straight from out behind the firewall where the fuel tank is stored and will fit onto this later. I also added some PE fittings that will run the brake lines through this area. I think I will just get all of everything attached now with the gear bay and mask it for painting the fuselage. I don't want to try getting in there late in the game when it's dark and closed up and break something down the road. Some very minor modification was done here and there to various bushings and joints to add a bit more life where it was lacking.

 Untitled by Britt Vallot, on Flickr

Here I built up the armor plating in front of the oil tank and have it attached to the engine mount as well as a mount for a conduit that ran some of the engine's electrical needs.

 Untitled by Britt Vallot, on Flickr

This is how it's going to fit up with the rest of the firewall.

 Untitled by Britt Vallot, on Flickr

The rest of the plumbing with the harness to help with the mounting of all this. The part in the top right frame is the linkage for what is the throttle I believe. I've been getting in the habit of making things easier for myself by leaving a little something to work with like the extra bit of length from the stretched styrene you see. Instead of clipping this part off immediately, I can use the length to grab it with a pair of tweezers to help with fitting where it goes and priming/painting and so forth. Just some piece of mind for those who need it. =] Consequently, following the snapping of that picture...this part shot out from my tweezers and landed behind me without making a sound. Searched for about 5 minutes and gave up. I got lucky when I began picking all this up and found it on the floor. Took one more picture just to show you how tiny it is...from the safety of my hand. =P

That's about how this section is going to break down. Just a few odds and ends to attach in the way of hoses and wiring. Then, prime and paint!

On the bench:  

Tamiya F4U-1  Kenneth Walsh


  • Member since
    June 2013
Posted by bvallot on Saturday, March 11, 2017 7:58 PM

Aaaaand finally! Paint!

I'm happy to get this section wrapped up. There are just a couple of knick knacks to tie up in some later steps, but this is pretty much it here. Next will be the engine ring, intercoolers, and matching up the engine to kit fuselage...then hooking up all those damn wires and hoses! =]

Here's where I'm at.

I made my own Grumman Grey based off of FS36440. After reading around, I've found this to be a close place to start. Here's how I mixed it up.

 Untitled by Britt Vallot, on Flickr

Here's everything dressed up. 

 Untitled by Britt Vallot, on Flickr

This is the actual color of the Bronze Green I mixed. Without brightening the photos, it shows a truer color. The Eduard PE has placards for this area. You may notice the "Grumman" nameplate behind the seat and the Dataplate on the bottom of the firewall. Nice additions.

 Untitled by Britt Vallot, on Flickr

 Untitled by Britt Vallot, on Flickr

Here's the fuel tank fixed to the bottom of the cockpit floor...the glue is even still wet =P

 Untitled by Britt Vallot, on Flickr

And here's how it all fits into the fuselage. I'm actually quite happy with how all this turned out. I wasn't 100% convinced I'd get everything right on the first go around.

Firewall and Cockpit - done.

On the bench:  

Tamiya F4U-1  Kenneth Walsh


  • Member since
    December 2002
  • From: Northern California
Posted by jeaton01 on Saturday, March 11, 2017 8:55 PM

Impressive, Britt!

John

To see build logs for my models:  http://goldeneramodel.com/mymodels/mymodels.html


  • Member since
    June 2014
Posted by BrandonK on Saturday, March 11, 2017 11:40 PM

That work looks SOOO good and that engine.....WOW !!! This is amazing stuff.

BK

On the bench:

A lot !! And I mean A LOT!!

2024 Kits on deck / in process / completed   

                         14 / 5 / 2  

                              Tongue Tied

  • Member since
    June 2013
Posted by bvallot on Tuesday, March 14, 2017 11:15 AM

Thanks guys. The fun part is about to come next with getting these wings on and the engine fitted. Then the PAINT! =]

On the bench:  

Tamiya F4U-1  Kenneth Walsh


  • Member since
    December 2002
Posted by Bossman on Tuesday, March 14, 2017 11:43 AM

Wow - very nice !  A lotta detail in that little package.

Chris

  • Member since
    February 2014
  • From: Michigan
Posted by silentbob33 on Tuesday, March 14, 2017 8:22 PM
Wow...that looks amazing! I had to go and double-check the scale on this

On my bench: Academy 1/35 UH-60L Black Hawk

  • Member since
    June 2013
Posted by bvallot on Monday, April 24, 2017 3:22 PM

Finally back with enough content to actually have a post. The busiest part of my year is finally coming to a close and life begins to become more enjoyable. Still plenty to do...but definitely more enjoyable.

Cranking out an engine!

 Untitled by Britt Vallot, on Flickr

So, I'm finally getting this Wildcat to a point where I can address the Vector Pratt & Whitney engine I'm dropping in. Any time you change the script it usually means the fit is going right out the window without some adjustments. Luckily, for this kit it wasn't so bad. The JPS replacement cowl ring for the -3 series without a carb scoop goes on like a charm. No real surprises with this part.

 Untitled by Britt Vallot, on Flickr

A few touch ups here and there...some CA to fill some gaps..sanded and smoothed...and voila. =] I have sanded the interior of the cowling down very thin so I can make use of "denting" the outside as seen in the warping of these sheets of metal after continous removal and replacement from servicing the engines. This worked out much better versus cutting and sanding on the exterior surface.

 Untitled by Britt Vallot, on Flickr

You can see the lighter colored plastic cowl flaps are from the Hobby Boss kit. I had a small issue with sanding that bit down a little too much and caused me to have to redo them. Since I'm already robbing more than a few parts from this kit, I figured I'd measure it out and give it a shot...wouldn't you know it's a pretty good match. =] A little Tamiya ETC and done. I'm glad I did it too because originally I was going to leave the flaps closed, but that would further limit seeing what little of the exhaust was going to be visible anyhow. So it worked out. The interior cowl flaps were addressed with thin brass sheet. I'll leave it right here for this point as the space for all of this is very tight with the engine just barely squeezing in there. I'll string up these flaps after the fact once I've got  the P&W engine secured. The intercooler scoops went on without too much fuss either. I have the original Tamiya kit part side by side with the updated and corrected version for Butch O'Hare's Wildcat. A definite improvement.

 Untitled by Britt Vallot, on Flickr

Here's an intermediate shot of what's going on underneath the gearbay.

 Untitled by Britt Vallot, on Flickr

And a quick assessment of how all of this is coming together.

 Untitled by Britt Vallot, on Flickr

 I may have a shape issue with regard to the bottom of the fuel tank. I've recently seen some where that this tank slants up to the back of the tank. I suppose I'm fine with what I've got for now. It won't ruin anything about this particular build, but just a little FYI for anybody out there following that ever plans to scratch out this part. =]

The Exhaust Manifold

A quick step by step process of how I went about this. Last time I did it with brass rod and soldered it all together. This time around I tried to do it all in plastic. I started with a plastic rod that I shaped into a curve using a lighter. This was fitted together into a plastic tube using the same process...very slowly heating the tube so I can get the curve just right without having to over work it. I'll double check the sizes for these later on. It was all joined together with Tamiya Extra Thin Cement. A couple of intermediate parts were heated and mashed down to give it extra width and were bent with the mashing to provide the last stage before the kit parts Tamiya molds as the exhaust tips. I drilled these out and sanded them thinner to bring them a little closer to scale. A smaller plastic rod makes up the manifold connecting to the engine. A little sanding brings everything looking a little cleaner...a little Milliput makes it all connect together and makes it a happy exhaust manifold. I love this stuff. All it took was just the tiniest bit to smooth around my edges that were a little fussy. None of this was too bad. Took some patience and a lot of double checking to see that everything matches up. Totally worth it!

 Untitled by Britt Vallot, on Flickr

 Untitled by Britt Vallot, on Flickr

 Untitled by Britt Vallot, on Flickr

Primed and painted with Alclad's Exhaust Manifold and some Tamiya NATO Brown to give it a little more character and lighten up the color.

 Untitled by Britt Vallot, on Flickr

Next up, mounting this P&W engine and figuring out where all these hoses and wires go! =]

Thanks for following. 

On the bench:  

Tamiya F4U-1  Kenneth Walsh


  • Member since
    June 2014
Posted by BrandonK on Monday, April 24, 2017 3:40 PM

Excellent tips and tricks here. I'll be using the exhaust tips for sure on my Kingfisher build. This is just a super build you have here.

BK

On the bench:

A lot !! And I mean A LOT!!

2024 Kits on deck / in process / completed   

                         14 / 5 / 2  

                              Tongue Tied

  • Member since
    August 2013
Posted by Jay Jay on Tuesday, April 25, 2017 9:25 AM

This is truly an amazing build.

I wanted to do this kind of scratch-building with my 1/48 Avenger but don't even know where and how to start. I guess I'll get a book on it for referance and go from there. Something I've never done before .


 I'm finally retired. Now time I got, money I don't.

  • Member since
    June 2013
Posted by bvallot on Wednesday, April 26, 2017 8:22 AM

Thanks BK. That'll be a fun build to see them on for sure. 

Jay Jay, my very first adventure with scratch building my own parts started out with Hobby Boss' 1:48 Avenger actually. My reasoning was no matter how awful it looked, it was going to get closed up anyhow. =] Thinking back on it, it was pretty bad.

Just start at the beginning. Work an area: cockpit, radio set up, etc. and start making shapes that best approximate the scale and gross dimensions of your object. Then refine and detail. And repeat! Before you know it, you're rocking and rolling. You'll learn stuff on the way. One thing I can pass on is to consider sanding or cutting or what have you before releasing a part from the tube or strip etc it's coming from. For instance, I was making dials for the radio setup in a Pacific Mustang I'm still trying to tie up. The dials were too small to grasp and refine. So I worked one end of the plastic tube, sanded them into shape, made my grip notches around the circumference with a dull exacto blade, and with a sharp one I released the part from the plastic tube I was working with. Much easier! Stuff like that you'll pick up on your own. But that one trick helped me to work in much smaller detail than I'd previously been successful at.

 Untitled by Britt Vallot, on Flickr

 Untitled by Britt Vallot, on Flickr

The other thing that sped me along was Tamiya Extra Thin Cement. It's like welding with plastic. I use to be so messy with CA. I'm still not so hot in certain tight spots with delicate parts, but if I can make it with plastic...it's Tamiya ETC all the way. That first Avenger had globs of CA trying to stick to itself in the radio compartment. It wasn't pretty. 

On the bench:  

Tamiya F4U-1  Kenneth Walsh


  • Member since
    August 2013
Posted by Jay Jay on Wednesday, April 26, 2017 10:09 AM

  Thank you BV for the scratch building tips.  I will use this valuable info for sure. What I meant in my post is that I don't know what wires to what or where certain interior parts need to go or even what they look like so I guess that kind of information comes from pictorial books, unless one actually worked maintenance on the real thing.


 I'm finally retired. Now time I got, money I don't.

  • Member since
    June 2013
Posted by bvallot on Wednesday, April 26, 2017 11:38 AM

Aaaaaahh. Sorry I misunderstood. =P Yeah, I always reference books and pictures of the actual aircraft from the day and not the restored aircraft pics. I don't even start a build until I find every picture I can to help me make my build as acurate as possible. But you're right about some of those hoses and wires...it looks like a rat's nest some times.

On the bench:  

Tamiya F4U-1  Kenneth Walsh


  • Member since
    February 2014
  • From: Michigan
Posted by silentbob33 on Thursday, April 27, 2017 8:55 PM

Saying "wow" seems like an understatement...but I can't think of anything else to say.  This is blowing me away.  I can't wait to see more of your amazing work.

On my bench: Academy 1/35 UH-60L Black Hawk

  • Member since
    June 2013
Posted by bvallot on Saturday, April 29, 2017 10:55 AM

Thanks silentbob! You may want to hold your praise till I get the wings put back on. =D I still have some tricky waters to navigate. I have managed to dodge one bullet. Mounting this P&W engine onto the Tamiya kit fuselage...everything went according to plans. How 'bout that!

 Untitled by Britt Vallot, on Flickr

The first thing that had to go was the mounting circle originally meant for the Tamiya engine. This gets in the way and pushes the engine too far forward and prevents the cowl from attaching. I also bevelled it down to ensure it's fit. The four drilled out holes you can see in previous pictures are for the bolts mounting to the rigid brackets around the back casing of the engine. I used brass rod that I bent one end down (like an "L") to lock it in place on the inside of the gearbay. I slid the rod one at a time through the brackets and glued them in place with CA. The mounting ring gave me some trouble. I couldn't keep a perfect circle with the plastic rod I was trying to use. Ultimately, I had to snip it and shorten it to get a proper fit after double checking and I settled for reattaching it by taking a slightly larger rod and carefully drilling a hole through the middle of it. Then, with a little Tamiya ETC I glued them back down and made a tighter fit. I also made use of the "coupler" part to help fix it to the back of the gearbay. A couple of extra drops on the other points of the mount and voila!

 Untitled by Britt Vallot, on Flickr

One small concession I had to make was also in some part a blessing was to spread a little white glue onto the backs of the intake manifold as it had to press up against the kit fuselage in order to properly fit the cowl onto it. This will get covered by the exhaust circling around. The fit and security of all of this was surprising. This bad boy isn't going anywhere. Those brackets are working harder than I gave them credit. Also noteworthy, is all the same brass wire, which is pretty stiff stuff, is also adding to supporting the backside of the engine. It never occurred to me that my wiring would ever actually help support a structure like a resin engine. In the future, I might consider leaving a little bit of extra length and drill out some holes to pass the brass through and lock down on the other side to keep them stuck for sure. So that was curious to learn.

I think the hard part is over now. Firewall is complete...virtually...engine is mounted. Now there is really just the task of connecting all these wires and dropping in a couple of extra wires and hoses that were too delicate to place earlier. Now to touch on what JayJay mentioned earlier, I do have to admit this. There's three wires that I have absolutely no clue where they go. So they will be mysteriously snaked around the top side pretending to belong somewhere. And then there's no way to be 100% sure, but I'm betting there's about a dozen or so smaller leads and wires that the books don't show or mention. And it's not like I've got a Wildcat in my kitchen with me. =]

That's that for now! 

On the bench:  

Tamiya F4U-1  Kenneth Walsh


  • Member since
    December 2010
  • From: Salem, Oregon
Posted by 1943Mike on Saturday, April 29, 2017 11:32 AM

It's really hard for me to believe what I'm seeing here. Some of these images look so real that I'm sure the engine can be started!

What a super detailing/over-all job of craftsmanship/modeling!!

Mike

"Le temps est un grand maître, mais malheureusement, il tue tous ses élèves."

Hector Berlioz

  • Member since
    June 2013
Posted by bvallot on Tuesday, July 18, 2017 11:05 AM

Thanks Mike. Sorry it's been a while. Too many things in front of me right now. I'm afraid I might be slipping into that modeling coma where I wake up 20+ years later and my kids are finally out the house and I come back around to the world of modeling that left me behind. Time will tell I guess.

Did manage to tie up some some critical steps for Butch's Wildcat and I can say that I'm almost over the hump. Pretty soon it'll be going downhill! =]

I finally finished organizing most of the plumbing for the engine. There will be some later add ons once the landing gear goes on. I noticed one thing about the controls for the throttle in this set of pics. This group I took before attaching them to their location on the top side of the back of the engine where the carb would mount. You won't see them from underneath as you can see them hanging down here. These pics are from before that step and I mustn't have taken other pictures before closing this up. I can possibly get in there later to show an updated picture down the road some.

 Untitled by Britt Vallot, on Flickr

The Pratt & Whitney with the wiring harness finally attached. Copper wire makes up the harness. They were painted with Tamiya's Titanium Silver (as I couldn't find my Flat Aluminum) and they received a wash from the Detailer's Rust to give the harness the appropriate color. Finally got to use that stuff! =D There's a clip that holds each set of cables together but I haven't found a solution to approximating that just yet...so I'm holding out for now. The two lines at the bottom of the prop reduction box make up the oil slump line for the oil manifold and oil discharge pipe. I still have the exhaust manifold to attach and I noticed I need to tweek the interior cowl. The cowling ring seam is a bit UN-seamly. ;) Sorry. Had to.

 Untitled by Britt Vallot, on Flickr

I next addressed the wings. I first set the lower wing to maintain the proper dihedral and set my spar with some L brackets I cut up to reinforce this joint. Actually, let me back up one step...before that you can see I cut out the shape of the wing root to piece onto the fuselage and slid some shims in place where I didn't cut quite as neatly when sawing off the original Tamiya lower wing pieces. This was done to help better match up the new HB wings when mating them to the fuselage. This joint along with the L brackets were more effective than I believed them to be originally. I was planning to do a secondary spar that attached lower down on the wing root to sure up the other end, but none of that was necessary. This turned out to be very strong. Happy me!

 Untitled by Britt Vallot, on Flickr

Test fit shows a little bit of work to be done to smooth up these lines from the wing root. So out came the Milliput. Love this stuff.

 Untitled by Britt Vallot, on Flickr

 Untitled by Britt Vallot, on Flickr

Before that the .50s were installed. I sanded down and nipped off the ends to receive 0.8 mm Albion aluminum tubes to better approximate the MGs. I did manage to break off the left inboard barrel after having closed up the wings. I'll deal with that shortly.

 Untitled by Britt Vallot, on Flickr

Wing roots milliputtied and sanded. I still may fool and tweek this some, but for now it's pretty much where I need it to be. We'll see what a coat of primer looks like.

 Untitled by Britt Vallot, on Flickr

Lastly, I took care of the ailerons as I'll be fixing them a little out of neutral. I wanted an extra step to get out of my comfort zone and make this Wildcat a bit more interesting and as I have a great book with great pictures of the Wildcat variants I figured I'd give it a try. Nothing fancy here. Just scratchbuilding what I see. The only step you don't see here is the rod attaching the aileron to the hinges. I'll craft that last.

 Untitled by Britt Vallot, on Flickr

Some of this will still get fiddled with along the way, but next up is fashioning the controls for the elevators, and addressing any issues with the rudder and elevators as well as fuselage touch ups. 

Thanks for stopping by. =] I hope you're itching to go grab a Wildcat.

On the bench:  

Tamiya F4U-1  Kenneth Walsh


  • Member since
    September 2014
Posted by rooster513 on Tuesday, July 18, 2017 11:30 AM

This is pretty darn impressive and you are doing a great job with it! Such great scratchbuilding!

-Andy

  • Member since
    September 2006
  • From: Bethlehem PA
Posted by the Baron on Tuesday, July 18, 2017 11:51 AM

Wow, how have I missed this build?  Beautiful job, and I agree with you about this kit as being the best F4F kit you can find.

bvallot

This is meant for the Hobby Boss kit but in comparing both kit parts (firewall, IP, etc.) the match up is nearly perfect which is better than you'd normally hope for..

That's because the HobbyBoss kit is pretty much a copy of the Tamiya kit, in my opinion. Big Smile

The bigger the government, the smaller the citizen.


  • Member since
    February 2014
  • From: Michigan
Posted by silentbob33 on Tuesday, July 18, 2017 3:11 PM
Well, I'm still blown away, and the wings are on to boot! Keep up the great work

On my bench: Academy 1/35 UH-60L Black Hawk

  • Member since
    June 2013
Posted by bvallot on Wednesday, July 19, 2017 11:32 AM

Thanks guys! It's a lot of fun fashioning all the add ons. That's kinda why we're all here right? =] 

Yup, silentbob. The wings are on! Things get infinitely less cumbersome from here on out.

On the bench:  

Tamiya F4U-1  Kenneth Walsh


  • Member since
    June 2013
Posted by bvallot on Saturday, July 22, 2017 1:09 PM

Back with the last set of corrections/touch ups before putting down a coat of primer.

I wanted to postion the elevators the way they're often seen - hanging down. These came all in one piece from Tamiya which I love but it did take a little bit of time and patience to release them from the horizontal stabilators. I also cut to open up the trim tabs on the elevators as well. I cut out the kit part where the elevators mate to the stablizers that is embossed with detail to put in place something more accurately representing this joint. I carefully cut out the sections with a razor saw and trimmed with a no. 11 blade and dropped in plastic rod to make up the bar that runs the length of the elevator. The PE that Eduards provides accurately describes the actuators but they're a royal PITA to put together. They don't fold together. They are separate parts. =[ What you see is about 2 hours and 45 minutes of work. Not very fun. I think next time I'll just fashion this out of plastic and bond it all together. But It's on there and it's an improvement....so I'm happy about it.

 Untitled by Britt Vallot, on Flickr

 Untitled by Britt Vallot, on Flickr

One correction to the HB wings for the -3 is the addition of an approach light. This is commonly mistaken for a gun camera apparently. I cut out a notch before putting the wings together, and afterwards widened the notch to receive the clear sprue that the Tamiya kit provides. It took some trimming, but it went in without too much fuss. This got close enough into place and was sanded down nice and pretty and brought back to a polish with finer grit sanding sticks. I included the PE parts to dress all this up as well. =] 

 Untitled by Britt Vallot, on Flickr

On a side note...all these tiny pieces get lost at least once for about five minutes after they shoot out of my tweezers. Usually, I give up and decide to just make my own (or another one) and more times than not that is about the exact moment I find what I've lost. Imagine that. I'm sure that resonates with most of you out there. =P

I fixed the MG barrel I broke and finished dressing them up the rest of the way. For the broken barrel, I used the 1.0 mm aluminum slide tube from Albion to find the actual kit part inside the wing. I new where it was weak and where it had snapped once it did break so I just had to poke around and seat it over like a sleeve until snug. VERY carefully trimmed to the appropriate length and dropped in my 0.8 mm barrel to complete. Simple. Freak out fee! =] A shorter sleeve was cut for the right wing to conserve on material. Here's a few pics of that progression.

 Untitled by Britt Vallot, on Flickr

It's not very discernable here but I've rescribed the correct lines back into the wing from the wing root and also put in some rivets that weren't there before. HB does a pretty decent job with the surface detail so I won't be changing much. This detail around the wing root will be better seen later after some paint.

 Untitled by Britt Vallot, on Flickr

I trimmed and sanded down the signal lights. I'll be replacing the light with a clear sprue after painting.

 Untitled by Britt Vallot, on Flickr

Another view of the elevators and the new PE actuators.

 Untitled by Britt Vallot, on Flickr

Here is a view of the rudder being turned. This was accomplished by bending the top lug into place which was pretty forgiving, and cutting the bottom one and placing it at a 45º angle. Pretty simple stuff. Tamiya makes it easy. The rudder is a single piece as well.

 Untitled by Britt Vallot, on Flickr

Here is a view showing the signal light on top removed. It'll get replaced with clear sprue. Also, the nav lights have been cut to remove the front half of the kit molded piece. A little less noticeable here unless you zoom in. The ailerons will be painted separate and attached after. I've also removed the kit balance tab from the HB ailerons. It was okay for the most part but just had a few too many issues for my eyes, so I made a new one out of some plastic strip. Eduard had a PE part for just this issue apparently, but I don't trust something that thin attaching like that to something else equally as thin. I like welding that sucker to plastic. It ain't moving now! =D

 Untitled by Britt Vallot, on Flickr

And that's most of the ends and outs before priming. =]

 Untitled by Britt Vallot, on Flickr

I can't wait to get some paint on this. =]


On the bench:  

Tamiya F4U-1  Kenneth Walsh


  • Member since
    September 2014
Posted by rooster513 on Monday, July 24, 2017 11:35 AM

That's some really nice scratch work Britt! Your work always inspires me to try a little more on my builds. Thanks for sharing this!

-Andy

  • Member since
    December 2002
Posted by 7474 on Monday, July 24, 2017 2:10 PM
What program are you using on your phone for the color mixing?
  • Member since
    June 2013
Posted by bvallot on Monday, July 24, 2017 9:33 PM

Andy, glad to hear it! =] I've been on this forum for a few years now and I'm still pretty impressed with some of the guys and subjects I follow. I feel the same way about it. Even now that I feel I've got a pretty firm grip on how I'd like to to do things, I'm always finding that there is something new to learn around the corner.

7474, the app is called iModelKit. I know it's available for iPhone and it'll cost a couple of bucks but it's well worth the price. The money alone you'll save in paint by not having to waste it to mix certain colors will make it worth it! It does so much more than just matching color schemes and the developers put a lot of math into making everthing quite specific. I can't possibly use everything it does but I wholeheartedly recommend it.

Before getting to what's new with color, I did take my time with this build and worked hard not to rush certain steps concerning construction. I have a bad habit of moving on and having to correct something later down the road when it's not very agreeable. As it happens I caught a few spots that missed my attention when going through my checklist...I mean it's been a couple of months since I was able to jump on this cat. =P

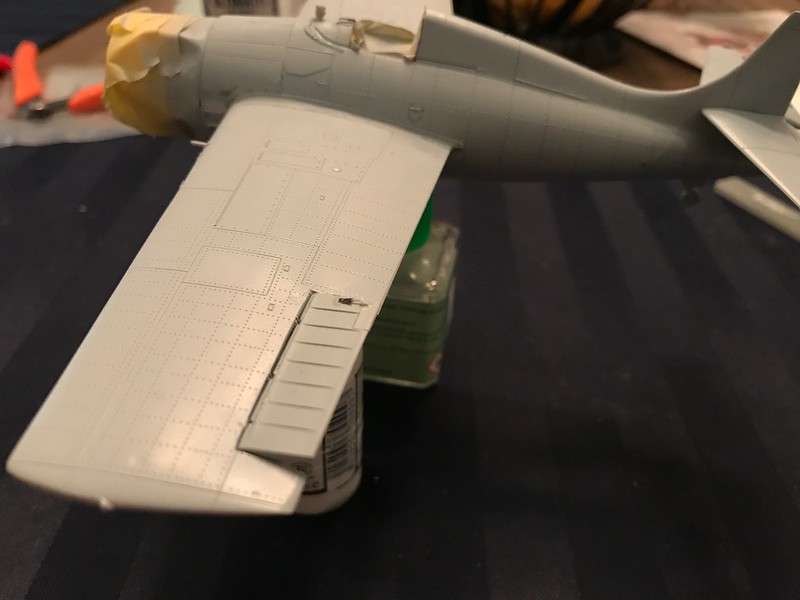
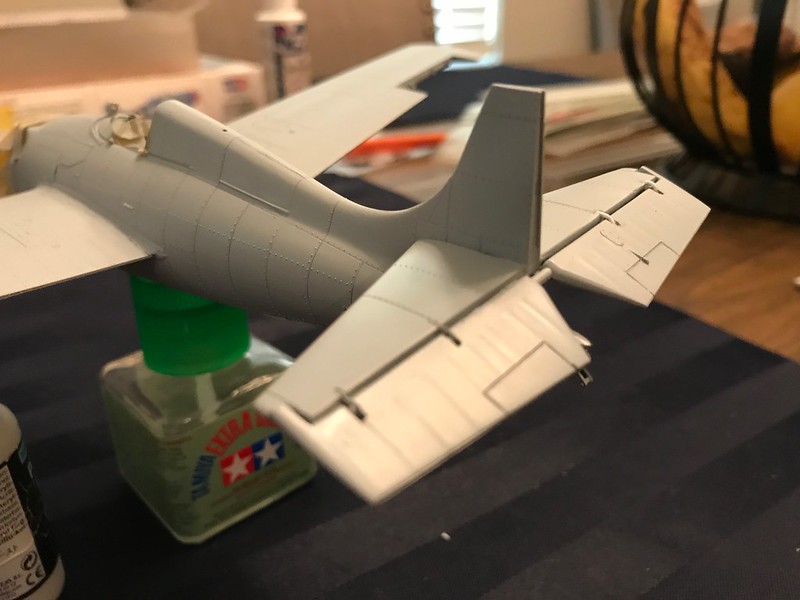
One, I left off the actuator for the trim tab on the left aileron. The HB kit doesn't include it. Two, I needed to scribe in a panel near the wing root just below the cockpit on the side of the fuselage. Tamiya has the first near the front of the wing for the fuel tank but failed to put the one behind it. No problem. You can see those two in the top picture. I also had to replace those damn PE parts for the elevator. I new that was coming. Scratched new ones out of plastic strip. Sanded into shape and welded those bad boys on with Tamiya ETC. BAM!! They'll take a whole lot more abuse now.

 Untitled by Britt Vallot, on Flickr

 Untitled by Britt Vallot, on Flickr

Paint!! And about damn time too. I just noticed I'm about 7 months into this kit. I need to pick up the pace. =]

I've recently been paying more attention to what I can do with my surface weathering in the painting stage since that's really what I find I'm best at. With the last two builds I've been making use of Blackbasing to go about painting my aircraft. I've seen others here on the forum make use of it too, but I've really gotten to see a lot more about it through another modeler Doog who some times pops into Finescale every now and then. For those who don't know it involves beginning with a black base as a painting surface and building up the color through several layers that are put on thinly and in a "marbled" pattern as Doog puts it. Done properly, it does a great deal to show how paint weathers and fades in a non-uniform manner. On actual aircraft it's the subtle variations in the surface, the paint and it's thickness, dirt and debris, oils, etc that all play a part in giving us the weathered looking planes we've enjoyed modeling. If you can control your spray and keep it tight enough, it's quite possible to put several layers of paint down and build up a lot of character before putting down too much paint.

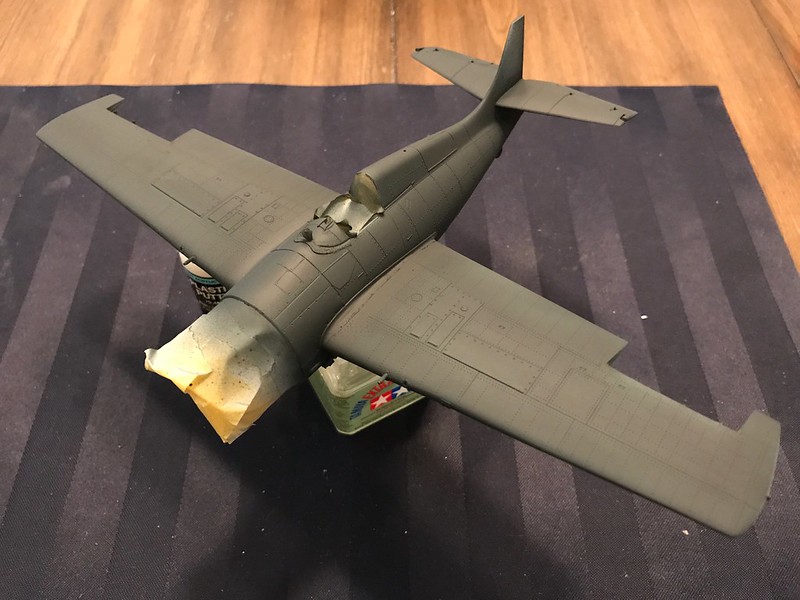
Here, instead of using a black I'm opting for a dark blue color. It's Tamiya's Sea Blue in fact. For the same reason you almost never use black in a real painting, I'm hoping for the dark blue color to help out in a similar way that black does but without having to be black. Since I'm using the Navy's Blue-Grey scheme, I'm hoping the blue works better. If we put the two side by side to make a comparison, I doubt it would be too noticeable but I think opinions would slant towards the blue. =]

 Untitled by Britt Vallot, on Flickr

 Untitled by Britt Vallot, on Flickr

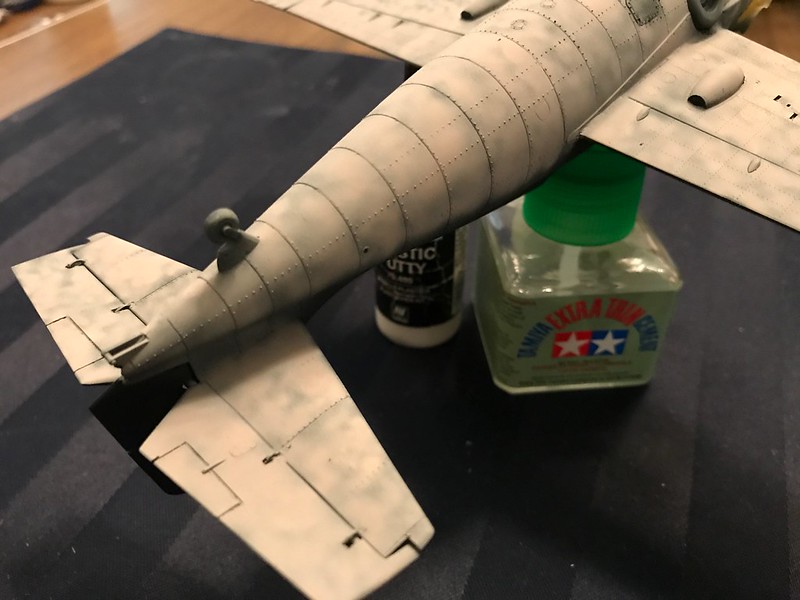
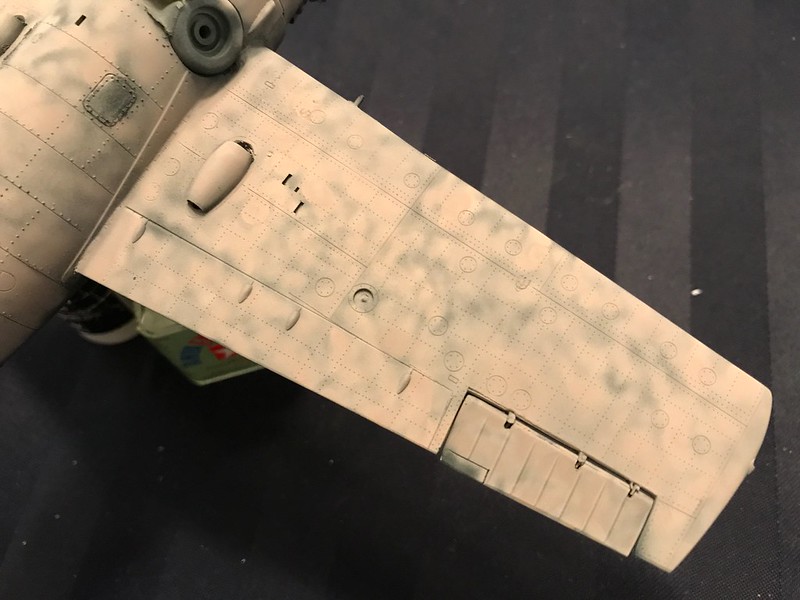
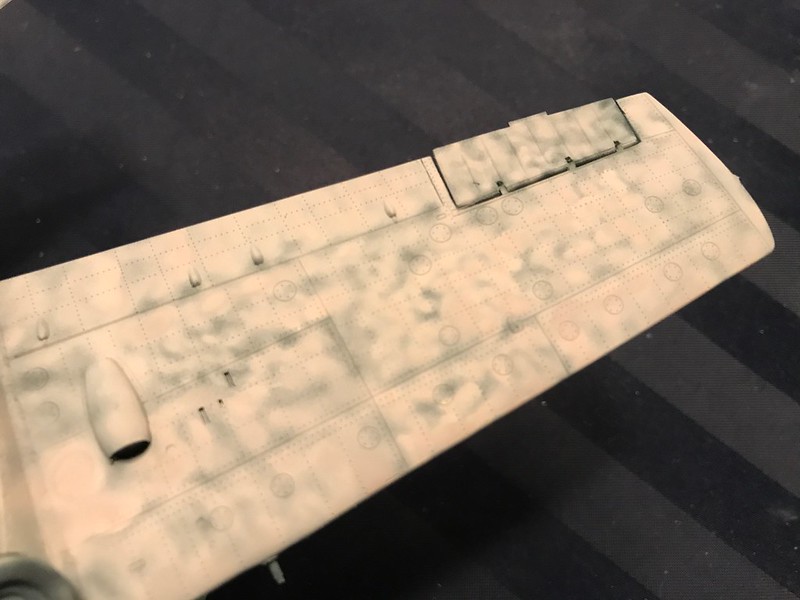
The "marbling" at work. Here I've used Sky Grey and NATO Brown from Tamiya to make the Navy's non specular light grey. This was 7:1 respectively. I'm painting outdoors now which is complicating my airbrush a bit. Humidity sucks and I don't have a water trap. So I didn't quite have the control I normally have while doing this but it wasn't too bad.

 Untitled by Britt Vallot, on Flickr

 Untitled by Britt Vallot, on Flickr

It's best to work a panel at a time and be as non-uniform as possible in your strokes.

 Untitled by Britt Vallot, on Flickr

 Untitled by Britt Vallot, on Flickr

 Untitled by Britt Vallot, on Flickr

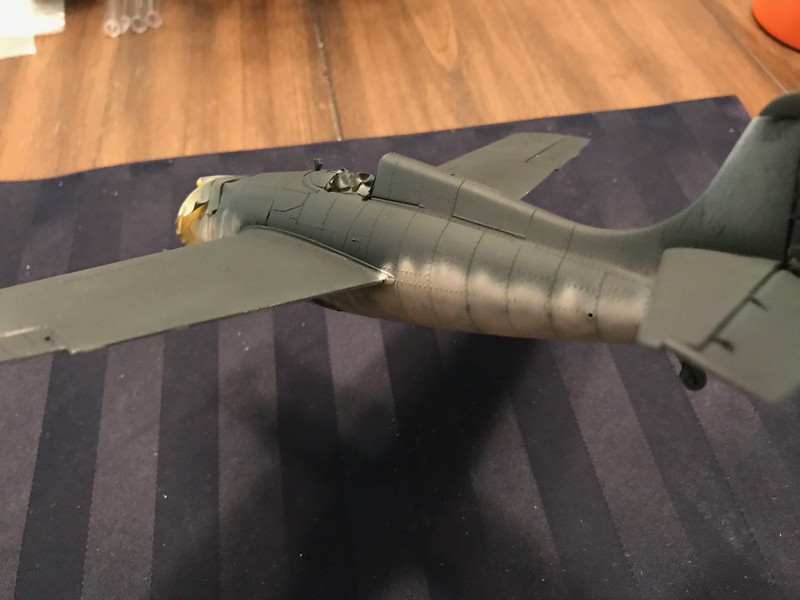
This last picture doesn't really capture what the eye sees. It's a bit washed out. The actual detail is a bit more subtle. I hope to get better pics when it's complete. The blues ought to do better. I won't be doing too much more since I got a little too heavy with the light grey. I'll marble in some dark grey with an actual brush along the wings nearer the engine and then follow up with the blend coat.

That's where it stands for the night. =]

On the bench:  

Tamiya F4U-1  Kenneth Walsh


  • Member since
    February 2012
  • From: Olmsted Township, Ohio
Posted by lawdog114 on Thursday, July 27, 2017 12:41 AM
I'm at a loss for words Britt....downright stunning...

 "Can you fly this plane and land it?...Surely you can't be serious....I am serious, and don't call me Shirley"


  • Member since
    July 2017
  • From: Cadiz - Spain
Posted by Jamie_Graham on Thursday, July 27, 2017 2:58 AM

Ufff ... what amazing work!!! Specially i like this painting work ... i love this "mapping" effects in the low areas. 

I'll stay here for the next steps! 

  • Member since
    March 2015
  • From: Streetsboro, Ohio
Posted by Toshi on Thursday, July 27, 2017 5:22 AM

This is pro modeling at its best, best quality work I've ever seen.  What a pro job.  Absolutely amazing technique and style!!!

Toshi

On The Bench: Revell 1/48 B-25 Mitchell


Married to the most caring, loving, understanding, and beautiful wife in the world.  Mrs. Toshi


  • Member since
    June 2013
Posted by bvallot on Thursday, July 27, 2017 5:49 PM

Thanks guys! It's always very encouraging to hear. That perfect build still eludes me. This cat already has a couple of quirks on her. My dihedral on the right wing got away from me a little bit (isn't noticeable unless you're looking straight on)...I've just removed my masking on the engine to find the prop shaft snapped off...and one of my weathering techniques is getting away from me a little bit but hopefully I can get back on top of that one. I came back from the only IPMS show I've ever been to a couple of years ago a bit dissappointed but it has made a better modeler out of me and I hope that's shining through here. It definitely has tightened up my construction phase which is probably why these are taking so long now! Lol. Joe, it seems like you go through a kit in about a month. I don't know how you do it?!?

Tosh, you are very kind. These pictures fortunately don't show the headache that some times comes before them. I'd imagine pro modelers would have an easier time achieving what they're after. But I appreciate it still.

Jaime, I'm not quite clear on your mapping reference but I'm happy to learn if you care to elaborate. The computer side of things isn't really my forte. I have been following Wiltold Jarworksi's SBD Dauntless though. That guy is really doing it right. =]

I'll be back later tonight to put up a quick post. I managed to get the stripes on the rudder and insignia on the wings, then I'll be putting my attention to the skid strips and numbers before putting on a coat of clear. 

=]

On the bench:  

Tamiya F4U-1  Kenneth Walsh


JOIN OUR COMMUNITY!

Our community is FREE to join. To participate you must either login or register for an account.

SEARCH FORUMS
FREE NEWSLETTER
By signing up you may also receive reader surveys and occasional special offers. We do not sell, rent or trade our email lists. View our Privacy Policy.