SEARCH FINESCALE.COM

Enter keywords or a search phrase below:

Beginnings of a very visible B-17G - new pics 1/19

19276 views
66 replies
1 rating 2 rating 3 rating 4 rating 5 rating
  • Member since
    July 2009
Posted by Axel Smith on Saturday, July 11, 2009 4:27 PM
Nice work!  The scratch built detail is absolutley wicked! I love it! Man, I'm jealous if your abilities.  I wish I could scratch build like that... haha! Whistling [:-^] anyway keep up the good work man. And post more pictures when you can!

- Alex

'Verily, this vichyssoise of verbiage veers most verbose, so let me simply add that it's my very good honor to meet you and you may call me V...'

  • Member since
    January 2007
Posted by Gigatron on Saturday, July 11, 2009 2:24 PM

Hey, thanks for the compliments, guys Cool [8D]

I haven't even touched the build in over a month thanks to a new job.  The next big step is painting and when I'm not flat out exhausted, the humidity is too high to paint.

Don't let my work discourage anyone from building their own.  What I want, is to inspre people to try things they'd never consider trying, whether it's PE, resin or scratchbuilding.  Try to do better than me - it isn't that hard Laugh [(-D].

There are times, when I wish I had just gone the OOB rout and had been done with it.  The PE in the wings have taken me over a month each thanks to the fragile spars.  Making O2 tanks from rod is time consuming, especially in this scale.  Just pick one task and work through it.  Need to make 1 O2 tank - might as well make all of them.  By the time you get to the last few, you'll have a technique that really works.

So get to work and be sure to post some pics.

-Fred


  • Member since
    May 2009
  • From: New Zealand
Posted by Fly57 on Sunday, July 5, 2009 4:31 AM

Fred.....looks awesome so far.

Im trying to track down the same kit here in NZ......Great work, and good luck


Marty

Life is short! Break the rules! Forgive quickly! Kiss slowly! Love truly, Never regret anything that made you smile.
  • Member since
    July 2009
  • From: North Texas
Posted by Woolf Pack on Thursday, July 2, 2009 7:53 PM

I just found this thread:

The agony and the ecstasy. Your work makes me want to trash my own. It also serves to show me a level of excellence to strive for. I'm a novice builder putting together the same model and giving it the markings of my father's B-17, Woolf Pack, tail ID 297206. I thought the Revel model was difficult enough - what a laugh. Your work goes to another universe. Please keep up your postings, I'm still trying to get my model off the dinning room table. Sorry if this slobbering praise offends you old hands.

Pete
  • Member since
    April 2008
  • From: Fox Lake, Il., USA
Posted by spiralcity on Thursday, March 19, 2009 3:24 AM

Hey Gig,

She looks great ! Smile [:)]


  • Member since
    March 2003
  • From: Lafayette, LA
Posted by Melgyver on Wednesday, March 18, 2009 11:27 PM

I know I'm late with these pictures but maybe it will help out future builds of the B-17.  These are some of the ammo bins that went into the Lone Star Flight Museum's "Thunder Bird" and a couple shots of "909's" ball turrent from a couple weeks ago. 


Here are a few shots of my rendition from about 20 years ago.  I'll have to redo the frame to move it inward so I can add the ammo bins. 

I spent over three hours taking pictures, scaning some, and then transferring them to Photo Bucket where I lost them for a while.  I'm calling it a night!

Clear Left!

Mel

  • Member since
    March 2008
  • From: Ohio
Posted by B-17 Guy on Wednesday, March 18, 2009 11:17 PM

Gigatron.....I'd be happy to take those crew figures off your hands if you dont need them. I'm sure I could find a use for them.

 Allen.....That light panel is not a window, it's just another panel, not sure why it's so light in color. The windows dont start till just a bit before the trim tab on the rudder on both the stinger and cheyene tails.

Mel....that bomb bay is beautiful! The life raft storage compartment is a great touch.

  • Member since
    March 2003
  • From: Lafayette, LA
Posted by Melgyver on Wednesday, March 18, 2009 10:59 PM

I dug out my old B-17 and took a few pictures with the wife's digital camera.  The best piece of work was the bomb bay.  Most of it scratch except for the front and rear bulkheads from the kit.  I hadn't installed the center main brace and bomb racks.

In this shot you can see the extra panels I added in front of and behind the bomb bay to hid the indention of the main wing root.  I had to cut back on the tab that locks the wing in position to have clearance for the new bomb bay.  The panel with the lightning holes on top is the compartment for the life rafts.  The birds nest of lines is heavy duty nylon thread to replicate a few of the control lines to the rudder and elevators.


Clear Left!

Mel

  • Member since
    June 2008
  • From: Iowa
Posted by Hans von Hammer on Saturday, March 14, 2009 10:37 AM
 trexx wrote:

I'm pretty sure U.S.A.A.F. crews only got Wrigleys Spearmint... HAAAAAA! Big Smile [:D] He, he, he...

They got plenty of Beeman's..

  • Member since
    June 2007
Posted by joes on Saturday, March 14, 2009 9:05 AM

On Monograms part 22 (the radio room floor), just outside the aft radio room bulkhead, are two projections on either side of the piece. They hold the crosspiece the turret snaps into. The projection to sides of the aircraft are  representations of the actual walkarounds.  Still a good build.


Joe


  • Member since
    October 2004
  • From: NE Oklahoma
Posted by Allen109 on Friday, March 13, 2009 7:10 PM

  I'd be willing to say its the Cheyenne. 

  See that off color panel underneath the rudder? I'm pretty sure there's supposed to be a window there if it was the older one.

  • Member since
    January 2007
Posted by Gigatron on Friday, March 13, 2009 10:01 AM

Thanks, guys Cool [8D]

Brad, I don't know if I'm going to do the figures.  They never come out the way I hope, plus I'd have nowhere to put half of them.

Mel, I say break out the kit and finish her off.  See, I'm purposefully not scalloping the paint job, just so I don't have to sand the seams Laugh [(-D].  As for the ammo cans, I just went with where Eduard says they should be.  Reason being, that there weren't any pictures showing otherwise.  I have the same exact reference material that eduard uses ( a japanese released book on the B-17G).  And from the pictures shown in that book, it looks like the ammo cans mount to the rear face of the vertical strut, meaning they'd be over the rear of the turret and not centered over it.  Had I had other refence that showed otherwise at the time, things may have been constructed differently - oh well....  I was thinking of adding the life rafts and the extra O2 bottles under the cockpit, there just isn't enough physical room.  Had I left out the entrance ramp from the cockpit to the nose section, I most likely would have gotten them to fit.

Hey Joe, the thing with the walkway is pretty much the same with the ball turret ammo cans - the reference didn't really show much.  Especially not in relation to the staggered windows.  I found pictures that showed the walkway on either side of the ball turret and went with the side that was easier to construct.  As far as the kit's concerned, they don't show any walkway.  All they have is the sidewall steps and that's on both sides.

-Fred

  • Member since
    June 2007
Posted by joes on Friday, March 13, 2009 6:40 AM

Great work. You're putting a lot of detail into it. But.... about the walkway around the ball turret.

On B-17's through some of the 'G' production, those B-17's with the waist windows directly opposite each other as the Monogram kit has them, the walkway was as depicted in the kit, that is, on the right side of the aircraft (looking forward). The walkway was moved to the left side of the aircraft, as you show it, when the windows were staggered, and the right one moved forward. The walkway was moved to the left side of the turret to allow the right waist gunner more room to manuver.

The length and shape of the walkway was pretty much as depicted in the kit, on either side.


Joe


  • Member since
    March 2008
  • From: Ohio
Posted by B-17 Guy on Thursday, March 12, 2009 7:11 PM
Nice work gigatron! I love it.......I assure you, no bias as far as the subject goes.
  • Member since
    March 2003
  • From: Lafayette, LA
Posted by Melgyver on Thursday, March 12, 2009 5:44 PM

Fred,

Your build gives me the urge to shake the dust off my old visible B-17 I started back in the 80's.  I scratch built the bomb bay with new roof and side panels to cover the wing root divot.  Also put in the life raft compartment over the bomb bay.  I was going to scalop paint the visible side to leave the most detail areas visible and that way be able to fill, sand and paint the fuselage seams. I was going to build it as a late "F" with chin turrent and open radio compartment and open waist windows.  I got to crawl in the Collin's Foundation B-17 "909" last week.  I took as many pictures as I could.  I should invest in more of Eduard's detail sets.  I have the Color Zoom instrument panel.  Keep up the good work!  The problem with your ammo cans for the ball turrent is that they should be centered over the ball turrent and not to the rear.  The single strut support on each side should be a inverted "V" closer to the turrent.  I'll try and dig out mine and take some pictures next week when I get back home.  I may have some pic's somewhere of one that was at the Lone Star Flight Museum.  You can see this in the excellent picture Hans and Jeaton posted on the first page.

Clear Left!

Mel

  • Member since
    September 2006
  • From: Bethlehem PA
Posted by the Baron on Thursday, March 12, 2009 11:53 AM

Wow, Fred, you're doing a fantastic job!  And it's always nice to see someone build this kit, it is such a great kit, even with the little things here and there that may need correcting.  But I love your details!

Just one thing-have you painted the crew, and could we have a preview of them?  I like Monogram's figures as much as the machines.

Regards,

Brad

The bigger the government, the smaller the citizen.


  • Member since
    July 2008
  • From: USA California
Posted by vetteman42 on Thursday, March 12, 2009 11:14 AM

Just AWESOME Gigatron !!! Can't wait to see more of the build. I will be keeping a close eye on this thread.


Randy So many to build.......So little time

  • Member since
    January 2007
Posted by Gigatron on Thursday, January 22, 2009 10:05 PM

Thanks again, guys Smile [:)]

I've been adding some wiring to the engines, then it's on to exterior detail.  Painting will have to wait until the weather warms up a bit.  My paintbooth is indoors, but vents out a window, and I'd rather not sit in front of an open window in a new york winter Wink [;)]

-Fred


  • Member since
    December 2002
  • From: Northern California
Posted by jeaton01 on Monday, January 19, 2009 9:59 PM
Well done, Fred.  Walkway around the belly turret looks good to me.

John

To see build logs for my models:  http://goldeneramodel.com/mymodels/mymodels.html


  • Member since
    February 2006
  • From: Smithers, BC, Canada
Posted by ruddratt on Monday, January 19, 2009 9:29 PM
Fred, I love interior details on AC, so for me this is the ultimate thrill! Great work so far! Thumbs Up [tup]

Mike

 "We have our own ammunition. It's filled with paint. When we fire it, it makes pretty pictures....scares the hell outta people."


  • Member since
    January 2007
  • From: Northern California
Posted by trexx on Monday, January 19, 2009 8:52 PM

Uhh... the Black Jack chewing gum under the radio operators seat isn't accurate. The USO didn't ship Black Jack gum to the U.K. until late April 1945...

Clown [:o)]

I'm pretty sure U.S.A.A.F. crews only got Wrigleys Spearmint... HAAAAAA! Big Smile [:D] He, he, he...

 LOVE ALL THAT DETAIL, Friend. That's one heck've a job you've done! WONDERFUL STUFF!


  • Member since
    January 2007
Posted by Gigatron on Monday, January 19, 2009 8:39 PM

 BOMBS AWAY!!

Hey gang,

Time for another update.  I have thebomb rack assembled and painted and the cockpit is finally done.

Here is a mockup of the assembled fuselage (minus some guns).  The stations are just placed in, not permanently attached, yet.


Close-up of the office


And a close-up of the bomb rack.  The bomb stripes are all painted on.  I made the bay spotlights, but I'll attach those once the stations are permanently attached.


Enjoy,

Fred


  • Member since
    September 2003
  • From: South Central Wisconsin
Posted by Daywalker on Sunday, January 11, 2009 1:44 PM

Fred-

I cannot believe how much detail you are putting into this bird!  Looking very good indeed, keep at it, your fans are hungry for more pics! Tongue [:P]

Frank 


  • Member since
    January 2007
Posted by Gigatron on Sunday, January 11, 2009 1:38 PM

Thanks, guys Cool [8D]

I've been putting all my spare time into this bird because I'm afraid I'll get tired of looking at it Laugh [(-D].  Today, I installed the pilot's seats and did the detail on co-pilot's side controls.  The one nice thing about doing a visible bird is that you only have to add half as much detail.

Waikong, I've been thinking about how I was going to make the best of the display.  I sprayed the clear half with Future and it seems to have really helped with the optical clarity.  When I finally get to that point, I'll try to post some pics with the clear half on (but not glued) to see how it looks.

-Fred


  • Member since
    February 2007
  • From: Bournemouth UK
Posted by Luftwoller on Sunday, January 11, 2009 7:35 AM

That is sme seriously quality progress being made there. Great photos as well. Keep it coming.

...Guy

..'Your an embarrassment to the human genus, makes me ashamed to call myself Homo'.
  • Member since
    December 2002
  • From: NYC, USA
Posted by waikong on Saturday, January 10, 2009 10:19 PM

Thats a great looking build, I love detailed planes and don't know how I missed this thread. I've done 2 'clear' planes and if I may make a suggestion regarding the warp problem. Have you thought about making it a cut-away model instead. I did that with a Hasegawa kit since the clear kits gives you so much detail, its a shame to obsure it.  I know it's clear, but the plastic still obsure the inside.

What I did was to cut large swaths of the one side out - irregular cuts are fine - so I can clearly show the innards with no obstruction. This will also solve your problem with the fuselage easily, as you can cut it and the paint and putty will hide the seam. People are much more taken by my cutaway than my clear model.

This was exactly what I wanted to do when I saw Revell reissuing the B-17 clear edition. Just a suggestion.

  • Member since
    April 2008
  • From: SE Alabama
Posted by Retired Gunpilot on Saturday, January 10, 2009 9:44 PM

A very beautiful WIP. I can not wait to see more! I've had my B-17 for twenty years now and you are giving me the itch to finally blow the dust off the box and start building it.

Great job and good luck.

Charlie

  • Member since
    October 2007
  • From: Inland Northwest
Posted by Summit on Saturday, January 10, 2009 9:44 PM
Fred -  I am speechless Bow [bow] You have really done a Fantastic job on this. I am amazed at the detail Approve [^]Wow!! [wow] Keep up the Pace and I am Very Much Looking Forward to the next instalment. 
Sean "I've reached nearly fifty years of age with my system." Weekend GB 2008
  • Member since
    January 2007
Posted by Gigatron on Saturday, January 10, 2009 9:16 PM

Well, it's been a while and I've made some progress.  I know there are people who have built entire kits in the time it has taken me to get this far, but I'm hoping this will be the "be all, end all" of visible B-17Gs.

So, on to the pics;

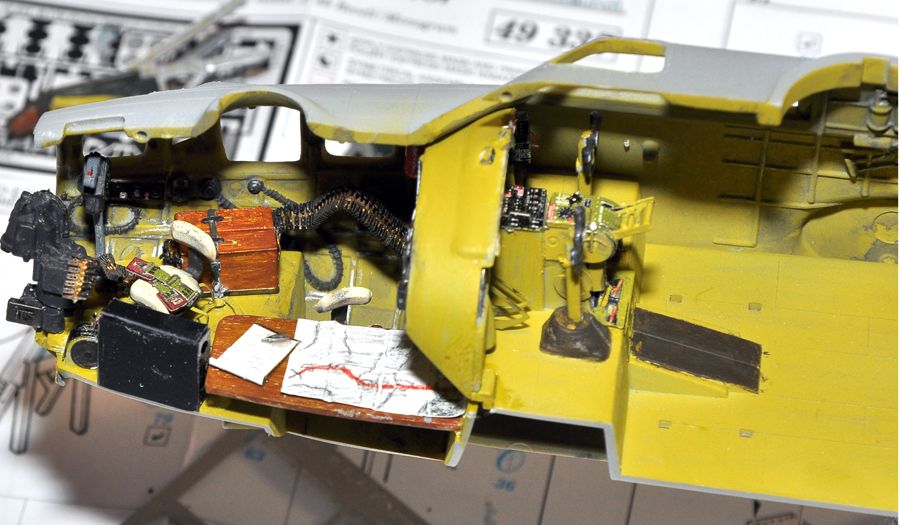
First up, an overall of the fuselage as she stands today

Now, on to the bombadier's and navigator's station.  For the navigator, I added a map, a clipboard and even a compass (the drawing kind, not the navigator kind).  I'm thinking of adding a ruler as well, I just haven't gotten to it, yet.

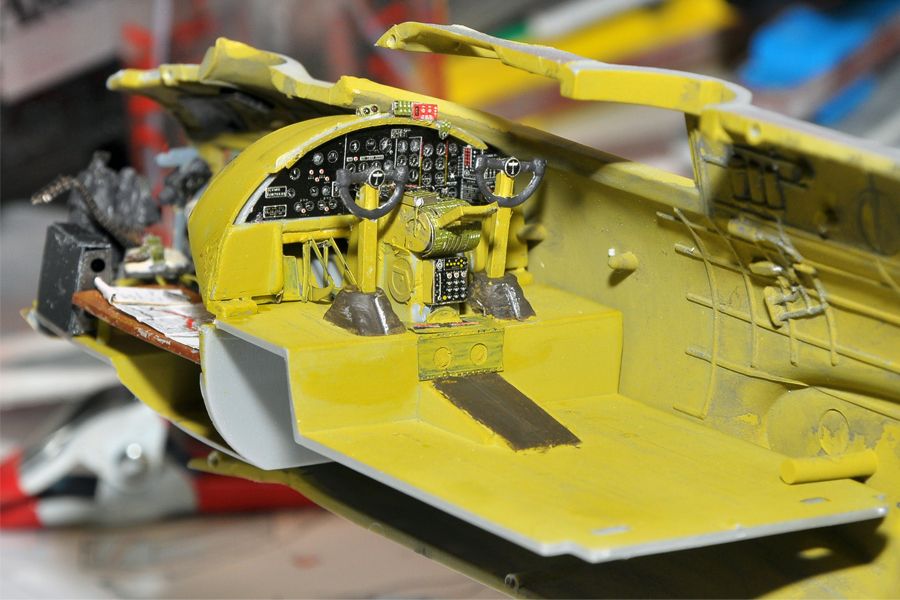
Next, the cockpit.  Not much scratchbuildinggoing on here, as Eduard gives you more than you could possibly ever want.

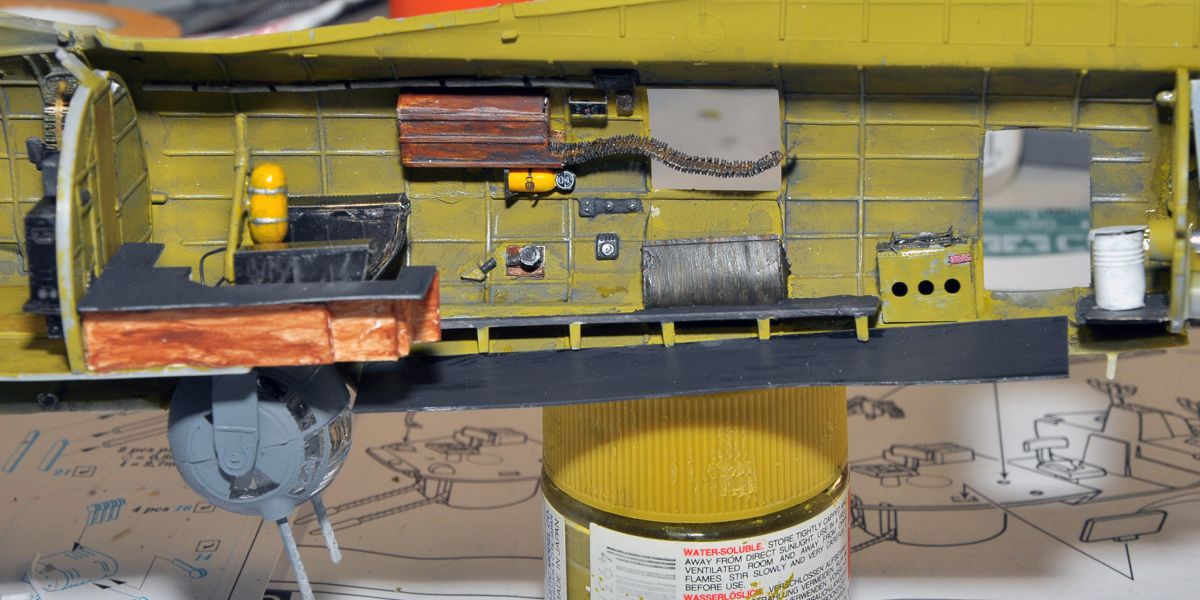
More pics of the radio room

The waist section of the 17.  The scratchbuilt parts include the ball turret walk-around and the center floor.  I've also added some wiring along the wall.

And the tail wheel.  I couldn't find any pictures of what goes on in there, so I added what I could see - the oleo strut and a brace.  The box is scratchbuilt to kinda fudge the connection point since I can't find details of the real deal.  I also added the last bulkhead and the aileron control shaft.


I'm working on installing the seatbelts on the pilot's seats, so those will be next.  I'm also halfway through building the cockpit's rear bulkhead.  After that, it's on to the bom bay Big Smile [:D]

Enjoy.

-Fred


JOIN OUR COMMUNITY!

Our community is FREE to join. To participate you must either login or register for an account.

SEARCH FORUMS
FREE NEWSLETTER
By signing up you may also receive reader surveys and occasional special offers. We do not sell, rent or trade our email lists. View our Privacy Policy.