SEARCH FINESCALE.COM

Enter keywords or a search phrase below:

1/32 Vintage Revell P-40 WIP (lots of Pics)

28134 views
61 replies
1 rating 2 rating 3 rating 4 rating 5 rating
  • Member since
    October 2007
  • From: Inland Northwest
1/32 Vintage Revell P-40 WIP (lots of Pics)
Posted by Summit on Thursday, March 12, 2009 11:33 PM

Another forum (sfcmac) member and I thought it would be fun to build some of the kits we had in our youth.  My kit choice was the P-40 E Warhawk that has been around since 1969 and seen many different box~art versions. This will be my attempt to improve on this kit with the aid of Squadron Reference Books ,scratch~building and a Eduard P/E set.

Box

The kit comes with many working options OOB to keep young minds busy. I will not be using most of them , but I did like the removable panels to show off the V-12 Allison engine. 

Even though most of it will be hidden I scratch built some details to dress up the firewall.

Pepsi 2

Painted with some wire added, the engine mounts in place.

Pepsi 3

 I used styrene to fill in the Gaping holes, along with aluminum tubing and fine copper wire for some extra detail.

Pepsi 4

Eduard P/E makes the radiator grill covers.

Pepsi 16

Next was the "office" here is what Revell supplies with the kit. Not bad, I was quite impressed with this added detail when I was 10 years old.

Revell 2

 But I think we can do better . Using the Eduard P/E set for a starting point, I realized this was not going to look very nice on the shaped fuselage. Taping the fuse sides together and the kit supplied floor and bulkhead I used Post-it-notes to make patterns to box in the office.  Styrene .030" sheet was used for the sides with lots of test fitting and double checking. This worked much better for the P/E ribbing.

Pepsi 9

Starting to busy up the office with P/E seat, the Hydraulic hand pump was scratched out of tubing and wire with a blob of C/A glue for the knob.

Pepsi 10

Sidewall with Eduard parts and scrap wire.

Pepsi 11

I was much happier with this then the kit supplied part.

Pepsi 13

 To be continued.


Sean "I've reached nearly fifty years of age with my system." Weekend GB 2008
  • Member since
    July 2004
  • From: Sonora Desert
Posted by stikpusher on Thursday, March 12, 2009 11:50 PM

Looks great! keep the updates coming as you make progress. That old kit has a special place in my mind...


F is for FIRE, That burns down the whole town!

U is for URANIUM... BOMBS!

N is for NO SURVIVORS...

       - Plankton

LSM


  • Member since
    September 2005
  • From: North Pole, Alaska
Posted by richs26 on Friday, March 13, 2009 1:03 AM
What a great start.   You have done a perfect job on it.  I have the "1941" version that I got off Ebay last year in my waiting-to-do stash.  I have always wanted one since my brother had gotten the Aleutian Tiger for his birthday in 1970.

WIP:  Monogram 1/72 B-26 (Snaptite) as 73rd BS B-26, 40-1408, torpedo bomber attempt on Ryujo

Monogram 1/72 B-26 (Snaptite) as 22nd BG B-26, 7-Mile Drome, New Guinea

Minicraft 1/72 B-24D as LB-30, AL-613, "Tough Boy", 28th Composite Group

  • Member since
    September 2007
  • From: galt, ca.
Posted by dirtball on Friday, March 13, 2009 1:34 AM

  Sean you ol` dog you! And 1/32 even Theres hope for you yet!! Your skills have climed quite abit, my friend. Looks truely amazing so far. Please post more. I like what I see!!..........Harv

  PS, I just scored a 1/32 F80C.

"I once shot an elephant in my pajamas. How he got in my pajamas, I`ll never know!"
  • Member since
    September 2003
  • From: South Central Wisconsin
Posted by Daywalker on Friday, March 13, 2009 7:16 AM
Great looking progress Sean!  The difference between the kit sidewalls and the new and improved PE sure makes a HUUUGE difference.  Your work is impeccable as always.  Have you picked out any markings yet?

Frank 


  • Member since
    February 2003
  • From: A Spartan in the Wolverine State
Posted by rjkplasticmod on Friday, March 13, 2009 8:16 AM

Very nice work on the pit Thumbs Up [tup].  Keep us posted as you progress.

Regards,  Rick

RICK At My Age, I've Seen It All, Done It All, But I Don't Remember It All...
  • Member since
    August 2006
  • From: The Great State of Wyoming
Posted by wyoroy on Friday, March 13, 2009 8:38 AM
Sean, fantastic work there my friend.

Roy (Capt. Wyoroy FAAGB/USNFAWGB)

John 3:16

  • Member since
    February 2007
  • From: Bournemouth UK
Posted by Luftwoller on Friday, March 13, 2009 11:44 AM

Excellent work Sean, that Sarge, sure has a lot to answer to LOL.

...Guy

..'Your an embarrassment to the human genus, makes me ashamed to call myself Homo'.
  • Member since
    July 2007
  • From: Modesto, CA
Posted by gspatton44 on Friday, March 13, 2009 11:58 AM
Great Stuff! I am actually doing the same thing but for the Spitfire Mk I right now. I plan do this with as many of the old revell kits as I have. I will post some pics of my spit build this weekend and we maybe we can share our progress if you don't mind.

"When I want it to stick, I give it to 'em dirty"

  • Member since
    October 2007
  • From: Inland Northwest
Posted by Summit on Friday, March 13, 2009 12:01 PM

stikpusher - Thanks, A lot of us cut our teeth on these type of kits. But I dont remember spending as much time building one back then.

richs26- get that kit out and on the bench, 39 years has been long enough. Thanks for commenting.

Harv- You were not suppose to see this..Whistling [:-^] Thank you my Friend Smile [:)]

Frank -  Im happy you like the sidewalls because I could always still put in the kit supplied ones.Mischief [:-,]  I did decide on the markings as of yesterday. Thanks for looking in and the Great comment. You know how I like playing with P/E Dead [xx(]

rick - Thank You more pics coming up...

Roy -  Thank you Smile [:)] Now about your P-40 ? 

Guy -  Could it be Aarons Fault this Time ? Laugh [(-D]

gspatton44 - Fantastic, these older kits are a blast. I have been having great time on this project as I have rediscovered my modeling skills instead of my assembling skills.


Ok where did I leave off....

Eduard supplied a new IP, to use the kit supplied IP as a backing looked like too much work so once again .030" styrene was used for the upper and lower panel.  I did use the Kit panel to copy the angle.  I test fit this piece many times using Krystal Clear canopy cement to hold it in place.  

Starting to pick out the details on the completed panel. The scrap of sprue was C/A glued on the back for a handle .

Pepsi 15

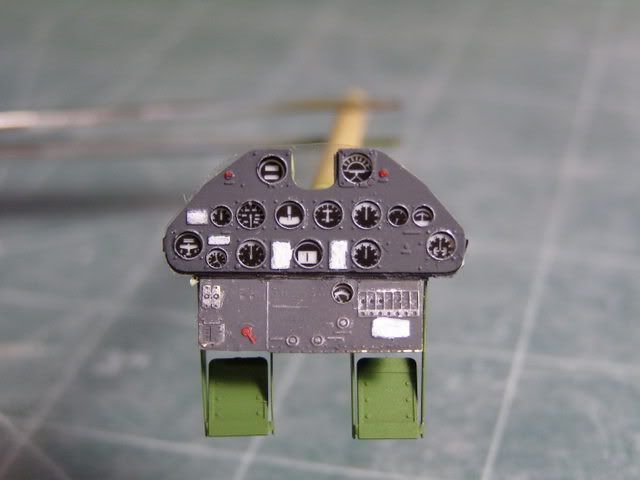
The fit was very good due to all the care taken with test fitting. I sawed the sprue handle off leaving a stub so I could still have a holding spot with the tweezers.  It was still tricky to get in position .

Pepsi 18

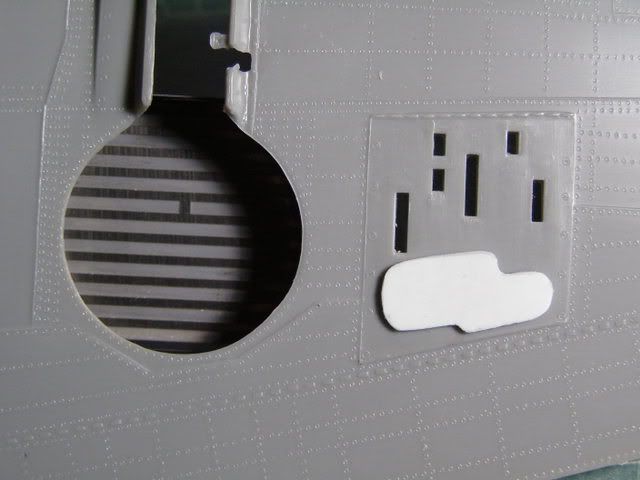
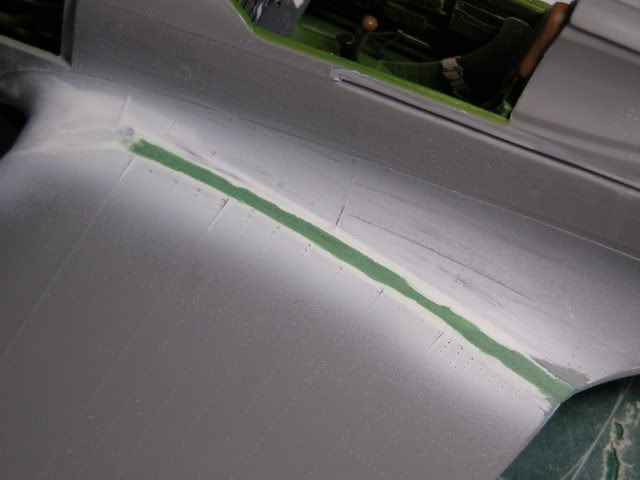
Next up was wings and things, P/E was used for wheel enclosure. Looking at many references I noticed the shell ejector panels was lacking the bulge. Using the Squadron Books as reference I sketched out a pattern on paper then tranfered it to styrene.

Pepsi 17

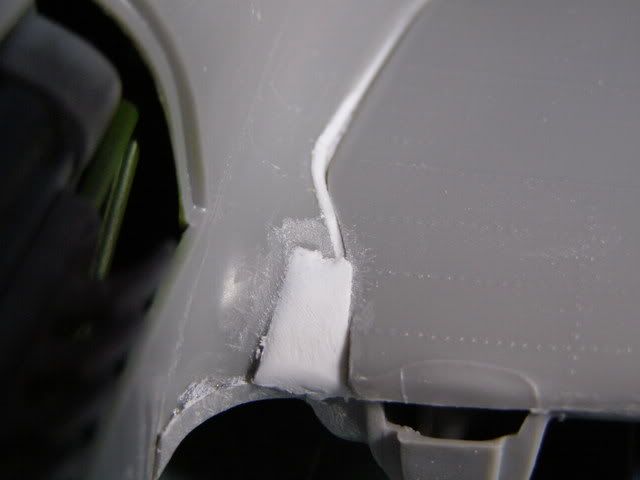
Attaching the wing I discovered there would be gaps unless I wanted some extreme dihedral. Dry fitting using and masking tape to hold the wing I found the best fit was to attach the starboard side and fill the gap on the port. And what a gap it was

Pepsi 18 
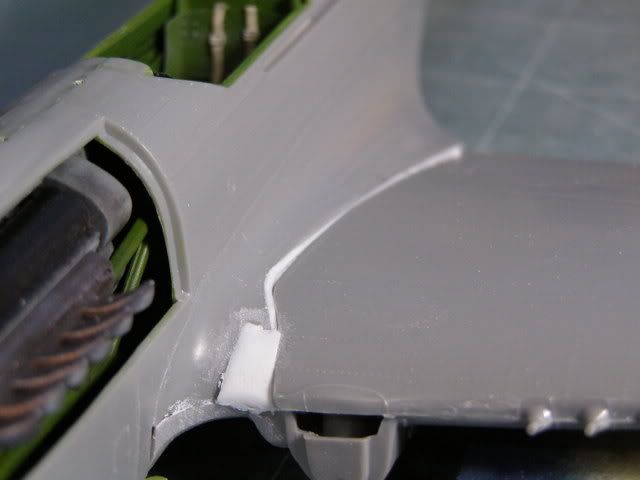
I even addes a styrene shim to  fill in a low area towards the leading edge.

Pepsi 19

After a little filler and shaping Smile [:)] I also closed up the sliding canopy gap with a .020" styrene shim.

Photobucket

The kit featured hinged Ailerons and elevators. I did away with that option and narrowed up the gaps with styrene.

Pepsi 21

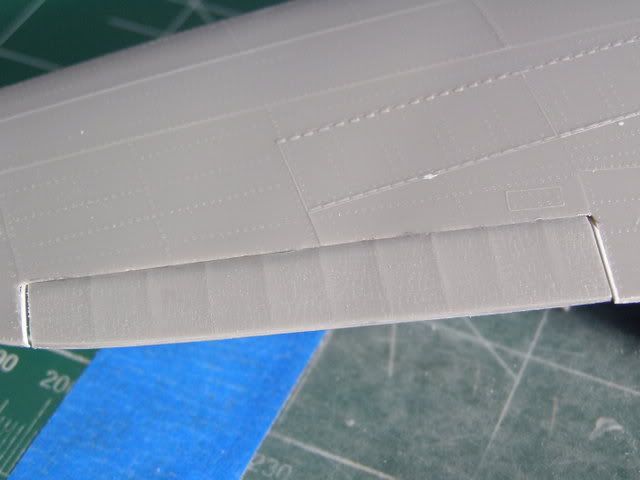
Left side Revell hinge , Right side no more hinge.

Pepsi 22

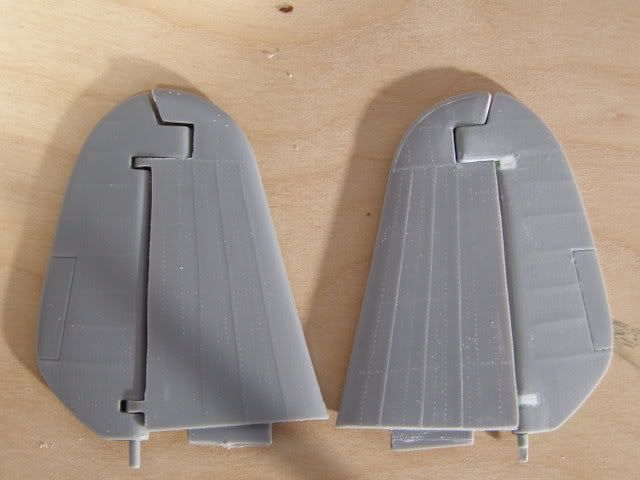
This is a rudder buillt OOB on an earlier 1/32 Revell P-40 E  build

Pepsi 23a

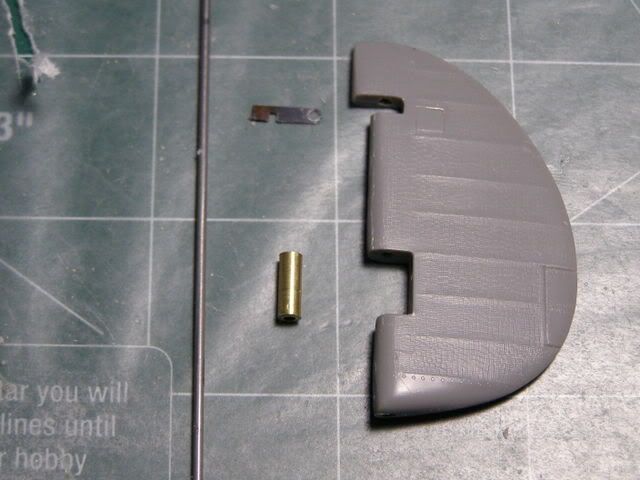
I was not happy with the hinge setup or the gaps. Meet the players for the new Rudder hinge. Yeah It still works as It was really easy to do.

Two pieces of Brass tubing sleeved together, Scrap piece of Music wire, and a leftover hinge from the "dreaded" Trumpeter Corsair. 
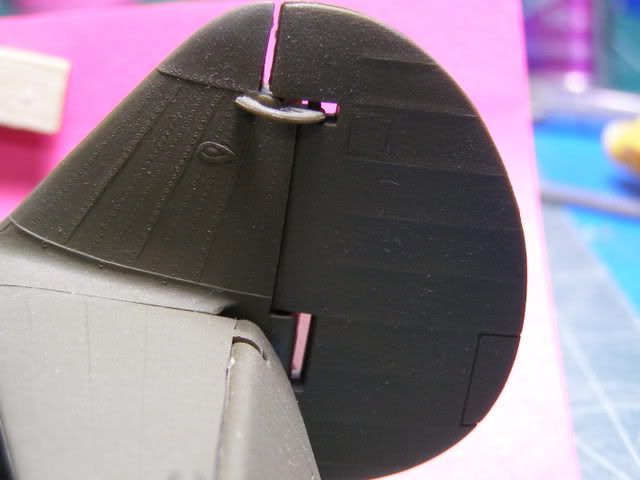
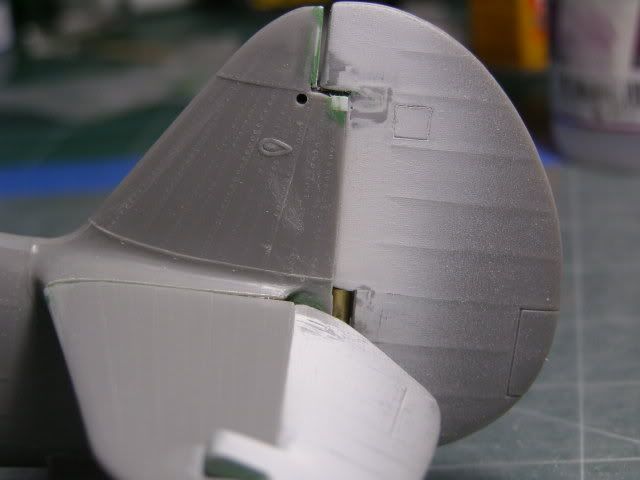
Pepsi 22

 Parts in place

Photobucket

And the rudder attached. The control arm has been left off as I dont want to play the game of knocking it off and searching for it.

Photobucket

Next time around landing gear. 


Sean "I've reached nearly fifty years of age with my system." Weekend GB 2008
  • Member since
    September 2006
  • From: Bethlehem PA
Posted by the Baron on Friday, March 13, 2009 12:13 PM

Wow, great job dressing this kit up!  You're giving it the respect and attention it deserves.

Regards,

Brad

(card-carrying member of the Revell Master Modeller's Club)

The bigger the government, the smaller the citizen.


  • Member since
    July 2007
  • From: Modesto, CA
Posted by gspatton44 on Friday, March 13, 2009 1:22 PM
Great work! You are giving many ideas for my build. By the way are you considering using the kit supplied decals (I am considering painting the roundels and call letters since my decals are on the order of forty years old!) or aftermarket.

"When I want it to stick, I give it to 'em dirty"

  • Member since
    January 2007
  • From: Northern California
Posted by trexx on Friday, March 13, 2009 2:43 PM

Dang sweet improvements there, Summit.

...and your tutorial is top-drawer!

  • Member since
    September 2003
  • From: South Central Wisconsin
Posted by Daywalker on Friday, March 13, 2009 6:06 PM
Now this is getting good!  Lots of great ideas shared here, top shelf work to boot!  Keep those updates pouring in! Tongue [:P]

Frank 


  • Member since
    October 2004
  • From: League City, Texas
Posted by sfcmac on Friday, March 13, 2009 7:19 PM
It has been an absolute joy to watch this kit progress! You have raised the bar my friend!  Looks simply amazing what you have accomplished!  Could be the start of a whole new collection. LOL!  Gotta love those P-40"s! Bow [bow]Bow [bow]Bow [bow]
  • Member since
    October 2007
  • From: Inland Northwest
Posted by Summit on Saturday, March 14, 2009 4:49 PM

Brad - Thank you , Nice to see your a Revell Master Modeler Club Member Thumbs Up [tup]

gspatton44 - I plan on only using the Roundels as they are made by Scale Master for Revell.  I use decals that old all the time. Check them under a bright light for hairline cracks. If cracked spray them with a clear coat and you should be ok. pm me if you want more detail on this process. 

trexx - Thanks for stopping in, everytime I build one of these classics you come to mind. As I believe you have built them all 

Frank - Laugh [(-D] More pics coming up..

Aaron - This has been one of my most " cant wait to work on projects" in a long time. Yeah a whole new collection Whistling [:-^] I had sworn these real estate monsters off and now look Laugh [(-D]


Time for the landing gear -

Revell supplies a pretty decent looking strut and inner wheel. Actually with a little work this has Great Pontential.

PhotobucketI opted not to use this as I like to make more work for myself it seems.  I found a set of white metal legs for the  Trumpeter kit. Not what you would call a drop in replacement but with some modifacation they would work.

The spindle was smaller then the kit supplied wheel so I made some bushings out of Brass tubing .

Photobucket

Bushings were also required for the upper strut also

Pepsi 33

Pepsi 34

And for the fun of it I wanted to shape the tires to a "loaded" look slightly flattened and bulged sidewalls.  Since I had never done this before I got tips from a sfcmac on how to do this with a household Iron. Well that was just too much fun and I had really flat tires. With the help of Squadron Green Putty I was able to re~inflate them.

Pepsi 26

By not using the Revell Strut I had no inner wheel or brake drum. I cut out some styrene disk to replicate these items.

Photobucket

Photobucket

The legs are fragile so they will be added as one of the last steps. To keep the P-40 off its belly I cut two pieces of brass tubing held in place with some white glue. 

The kit featured working landing gear with opening doors.  Again I did away with this option. The hinge valleys were filled with styrene scraps and skimmed over with Green Putty. P/E inserts were added to the inner doors.

Pepsi 37

The tail gear was one of the crudest pieces with the kit.  After looking at reference pics most of them had a canvas boot to keep out the grime. Smile [:)]

I found a piece of tissue paper and tacked it into place with some white glue. Once I was happy with the shape I used thin C/A to wick the tissue and make it solid.

Pepsi 35

With a little trimming, the gear doors added and some paint problem solved.

Pepsi 38 Still needs the P/E linkage and brackets added. Again another last step so I dont have to keep attaching them...

As you seen in the earlier pictures the Cowl Flaps are very crude. I had P/E replacements but was not sure about using them.  Several days I would look at those flaps and chicken out. I finailly grabbed a razor saw and cut them off in one piece. (just in case)  Well after I had the plastic flaps off I took the nippers to them and made plastic confeti out of them. No turning Back now.  The P/E flap directions were vauge to say the least. But after the last of twelve pieces was in place I thought of a much easier method for assembling them. Oh well next time maybe..Sigh [sigh]

Pepsi 39

Pepsi 40

More to come later.


Sean "I've reached nearly fifty years of age with my system." Weekend GB 2008
  • Member since
    August 2006
  • From: The Great State of Wyoming
Posted by wyoroy on Sunday, March 15, 2009 9:05 AM
Sean, looks fantastic my friend.  makes me what to go out and get an old 1/32 Revell kitWink [;)]

Roy (Capt. Wyoroy FAAGB/USNFAWGB)

John 3:16

  • Member since
    September 2003
  • From: South Central Wisconsin
Posted by Daywalker on Sunday, March 15, 2009 11:06 AM

Sean-

This is awesome stuff!  Great idea on the canvas boot, fixes a kit shortcoming, is cheap, and more scale to boot- doesn't get any better than that!  PE flaps look MUCH better than the others, and the LG is shaping up beautifully.  I am really enjoying this thread! Tongue [:P]

Frank 


  • Member since
    July 2004
  • From: Northern KY
Posted by mucker on Sunday, March 15, 2009 11:14 AM
Wow, sean. That's some fine work there. Now that's what I call modeling!

  • Member since
    January 2015
  • From: Katy, TX
Posted by Aggieman on Sunday, March 15, 2009 12:11 PM
Very nice work!
  • Member since
    October 2007
  • From: Inland Northwest
Posted by Summit on Sunday, March 15, 2009 1:50 PM

Roy - Thanks ! Go ahead and get one of these oldies. They sell pretty cheap on eb.  They are just like a Time Machine taking you back to your youth.

Frank - The canvas cover was quick and easy enough for anyone to do. I just dont have the fine soldering like some of the other posters here to have built a whole new set~up. But maybe someday...

mucker - This has been a blast for me, much more fun then just assembling..

Steven - Thank you for Commenting, I have always enjoyed your work. 


One of the things I really like about this P-40 is the removable engine panels. But finding a way to hold them in place has always been a challenge.  Small brass pins are fragile and get bent easily. 

I came up with this Idea yesterday and dove straight in. I had a leftover P/E fret from a Trumpeter kit. It is made of a stainless material I believe, not plated brass like many others. Using this and an advertising magnet of the Refrigerator I put this plan in motion.

Photobucket

I cut a 2mm wide strip off the P/E fret to overlay the inner lip I thinned back with a flat file and a chisel bladed x-acto knife. 

Photobucket

To make the inserts for the magnets I used a 3/32" drill bit. Placing a finger on the opposite side  to feel for the dimple - did not want to go all the way through. I twisted the bit back and forth using my fingers with little pressure. When I felt the plactic bulge I stopped.  I cut a strip off the Magnet and peeled the vinyl advertisment off. That still left a thin white backing. I used a small drop of  C/A in the dimpled out area to attach the magnets.

Photobucket

The green panel was a replacement robbed from another kit as the molded gray one was badly warped. Sigh [sigh]

And the End Results - Sticky enough to hold the Panel in Position. Smile [:)]

Photobucket

Next Up - New Guns

Sean "I've reached nearly fifty years of age with my system." Weekend GB 2008
  • Member since
    October 2004
  • From: League City, Texas
Posted by sfcmac on Sunday, March 15, 2009 2:04 PM
 That is a brilliant solution Sean!  An excellent improvision that I will have to use myself! What a great idea!  You are really showing some unommon talent with that kind of innovation! Bow [bow]
  • Member since
    August 2006
  • From: The Great State of Wyoming
Posted by wyoroy on Sunday, March 15, 2009 4:38 PM
Sean, great idea for the panels.

Roy (Capt. Wyoroy FAAGB/USNFAWGB)

John 3:16

  • Member since
    January 2007
  • From: Northern California
Posted by trexx on Monday, March 16, 2009 8:57 PM
Ah. That's the way. Good thinking!
  • Member since
    June 2008
Posted by lewbud on Monday, March 16, 2009 10:24 PM

Sean,

Nice work on the ol' girl so far.  Looking forward to more pics.

Buddy- Those who say there are no stupid questions have never worked in customer service.

  • Member since
    September 2007
  • From: galt, ca.
Posted by dirtball on Tuesday, March 17, 2009 1:42 AM
  OK, you just passed up "model master I" Sean you are amazing this go around. What a brilliant idea. But one thing...stainless isnt that magnetic!...........Harv
"I once shot an elephant in my pajamas. How he got in my pajamas, I`ll never know!"
  • Member since
    October 2004
  • From: League City, Texas
Posted by sfcmac on Tuesday, March 17, 2009 2:13 AM
 Well I must say I am getting ancy to see this one get some color!  I really can't say enough  praise on the excellent work you have put into it!  Your enthusiasm in the build just adds so much to it and it's showing!
  • Member since
    September 2004
  • From: Vernon, BC, Canada
Posted by razordws on Tuesday, March 17, 2009 1:10 PM
Sean, can't believe how much work you are putting into this old girl!  Shock [:O]  PE, scratch building, metal landing gear... I'm speechless (which is a first)!!!  Thumbs Up [tup]Thumbs Up [tup]Thumbs Up [tup]

Dave

  • Member since
    September 2003
  • From: South Central Wisconsin
Posted by Daywalker on Tuesday, March 17, 2009 3:32 PM
I'm jones'n for more pics... Tongue [:P]

Frank 


  • Member since
    February 2007
  • From: Bournemouth UK
Posted by Luftwoller on Tuesday, March 17, 2009 5:50 PM

 Forget Chucks stuff, we got Sean and Aaron whipping these old monsters marvels into shape.

Sean, your attention to detail is fantastic my friend. You get a by, from homework for...err....3 days. cant be any more generous than that.

...Guy

..'Your an embarrassment to the human genus, makes me ashamed to call myself Homo'.
JOIN OUR COMMUNITY!

Our community is FREE to join. To participate you must either login or register for an account.

SEARCH FORUMS
FREE NEWSLETTER
By signing up you may also receive reader surveys and occasional special offers. We do not sell, rent or trade our email lists. View our Privacy Policy.