SEARCH FINESCALE.COM

Enter keywords or a search phrase below:

scratch 1/32 Horatio Phillips Multiplane WIP *Updated 8/22*

26654 views
78 replies
1 rating 2 rating 3 rating 4 rating 5 rating
  • Member since
    December 2007
  • From: Bridgeview, Illinois
Posted by mg.mikael on Sunday, August 22, 2010 10:41 AM

Fermis- Quietly, hmmmm.....well I guess that is okay. Wink

philo426- Thanks for the comments!Beer

"A good plan executed now is better than a perfect plan next week." - George S. Patton

  Photobucket 

  • Member since
    March 2005
Posted by philo426 on Sunday, August 22, 2010 10:10 AM

Looking good! Very interesting machine!

  • Member since
    January 2009
  • From: hamburg michigan
Posted by fermis on Sunday, August 22, 2010 9:09 AM

We're all just watching quietly!!!

Top notch stuff!!!Yes

  • Member since
    December 2007
  • From: Bridgeview, Illinois
Posted by mg.mikael on Saturday, August 21, 2010 10:39 PM

Well after taping seemingly everything down to prevent movement, I have now taken it all off. The end result was worth it for sure.Yes

While everythign was taped down and what not, I took the lego piece I was using for all the support rods and cut to size. Their about 60% the radius of a standard sprue. After cutting and sanding to fit, I attached the end plates to each support rod. In total their's 6 rods and 10 plates. Once the glue dried, I painted them Floquil Weathered Black. Giving that some time to dry I attached them to their proper places using Elmer's polyurethane glue without using any crazy glue. Once the glue dryed(about 15 hours) I removed all the tape and had a now more complete build.


For what's ahead.......building and staining the wingframe. Thanks for looking, sorry about all the photos if your using dial-up. I know it's slow, but well worth it!Smile Thanks for looking, all comments, questions, and suggestions welcome.  

We gonna get any comments? Haven't had any in 3 or so WIP updates.Confused

"A good plan executed now is better than a perfect plan next week." - George S. Patton

  Photobucket 

  • Member since
    December 2007
  • From: Bridgeview, Illinois
Posted by mg.mikael on Wednesday, August 18, 2010 6:06 PM

As you can see the propeller was finished in my last update and now the work has progressed since then.

After giving the propeller 24 hours to dry it was time to continue the work. I used a little polyurethane glue and super glue to attach it to the propeller shaft. Positioning it the way I saw fit. Then I gave that some time to dry, after waiting I then glued on the end piece which is where the support rods will be attaching. It's simply a lego piece modified to have a angled ends(like a triangle) so the support rods have a place to connect to. With that glued on it was done.

Heck the engine/boiler/ propeller is a model in and of itself, but of course it now has to be connected to the frame I built awhile back....remember?Wink Obviously, connecting the engine piece to the frame was gonna be tricky(especially lining everything up inorder to cut connecting rods.) Well to make it easier I taped everything down as you can see in the pic below.

First, the weightbox had to brought up from the table to be flush with the frame height-wise. I did this by taking "post-it's" and stacking them up to the size needed. Yeah I know strange use, but it worked. Then I took masking tape and taped down the frame over the "post-it's". With that done I took a piece of tape turned it sticky side up and taped that down over the "post-it's". Then after some carefull positioning of the engine, I stuck the engine down on the tape so it wouldn't move. Now it should be a hundred times easier to cut and fit the connecting pieces from the frame to engine.  


 Yikes, looks like I had a visit from the tape monster. The carpet monsters half-brother, who clearly isn't as big a problem......I hope.

"A good plan executed now is better than a perfect plan next week." - George S. Patton

  Photobucket 

  • Member since
    December 2007
  • From: Bridgeview, Illinois
Posted by mg.mikael on Monday, August 16, 2010 6:53 PM

Work had progressed quite steadly since my last update. Proof of that is in the fact the propeller is finished. Yes, it may be only 15 pieces(which doesn't sound like alot), but take into consideration all 15 of those pieces are scratched. Surprise

First I had to cut the reed to size. Having no references on the propeller size, radius, and etc. I had to base it off the photos which leave lots to be desired. I decided to make the total propeller a radius of 6 ft. in 1/32 scale that comes out to 2.25 inches. Then I split the propeller into two halves, 1.125 inches each side. With the propeller(the reed portion) taking up 18mm of that 1.125 length. Thus a piece had to be cut to that size.

 With the reed portion cut to scale, I moved onto making the frame around the propeller(in other words the frame that holds the reed.) After bending the toothpicks in a jig, of which I showed in my last update, I taped them down next to the reed. I then made the cuts at an angle so they are miter joints at the end of the reed. I used no specific angle for the joints so feel free to use whatever you wish.


With the curved ends of the propeller frame done, I had to make the straight sides. This was more luck then anything else, because I had to basically make the joints and test fit to see if they fit. So....alot of toothpicks were made and scrapped in the process untill I made joints that were flush. As for attaching the toothpicks to the reed, I used crazy glue in moderation, and 'microscopic '(emphais on the microscopicWink ) amounts of polyurethane glue.

Now with the two propeller portions completed I had a major part of this build done, but I still had work to do. I had to make the two parts into one complete propeller, that attached to the propeller drive shaft. I used a simple lego piece drilled out one end and sanded the logo and what not off. Then I added two plates(you know, I mentioned how I was using the number plates from the sprues for support plates w/ the rods.) These were added to give the propeller attachement points to the portion that attaches to the shaft.

Though keep in mind that when making this final assembly, the propeller can't be made flat on the surface of your work-bench. Last I checked that wouldn't even be propeller because it wouldn't/couldn't work ever and basically defies reality. So to make the propeller with a sense of realism, I jimmied up the edges with two pieces of sprue I found that were the exact same size. (Long story short they have to same size jimmies or your gonna get a strange propeller.)

All comments, questions, and suggestions welcome as always!Smile

"A good plan executed now is better than a perfect plan next week." - George S. Patton

  Photobucket 

  • Member since
    December 2007
  • From: Bridgeview, Illinois
Posted by mg.mikael on Monday, August 9, 2010 11:09 PM

Thanks for stopping by model geek. Yep, this build was started awhile back and just seemed to get sidelined.......think I can finish it before the 1 year anniversay of that GB's finish date? Eh, probably not with my speed.Wink

"A good plan executed now is better than a perfect plan next week." - George S. Patton

  Photobucket 

  • Member since
    January 2009
  • From: Algonquin, IL
Posted by model geek on Saturday, August 7, 2010 9:44 PM

MG,

Glad to see your back at it. I was following this build when I was doing the Prototype GB.

Keep up the good work.

Tom  


  • Member since
    December 2007
  • From: Bridgeview, Illinois
Posted by mg.mikael on Friday, August 6, 2010 9:53 AM

Since the last update quite a bit of work has happened on the build overall. Painting was started and finished, along with work starting on the fan-like propellers. Soon it will be onto the wingframe itself, which is a model in and of itself. (Considering it has more then 70 pieces I'll have to scratch!Surprise)

As for painting, with the boiler, engine, propeller shaft, rods, muffler, and weight box constructed it was time to paint. The weight box is a simple mix of Testors Steel and Floquil Weathered Black. The weight box to boiler rods are simply weathered black, the boiler is MM acrylic Dark Gray. The box that is seemingly coming out of the boiler is weathered black (for those wondering how it was constructed after the top plate was glued, I simply used Testors Contuor putty to fill in the gaps and made a simple box. Not much to it, just quite a bit of sanding.)

The propeller shaft is just testors steel and the rods are a vary dark mix of Testors Steel and Floquil Weathered Black once again. Lat but not least the muffler was painted in a subtle shade of steel and black.(Obviously it was attached before the putty was applied to the upper portion, but painted afterwards.)

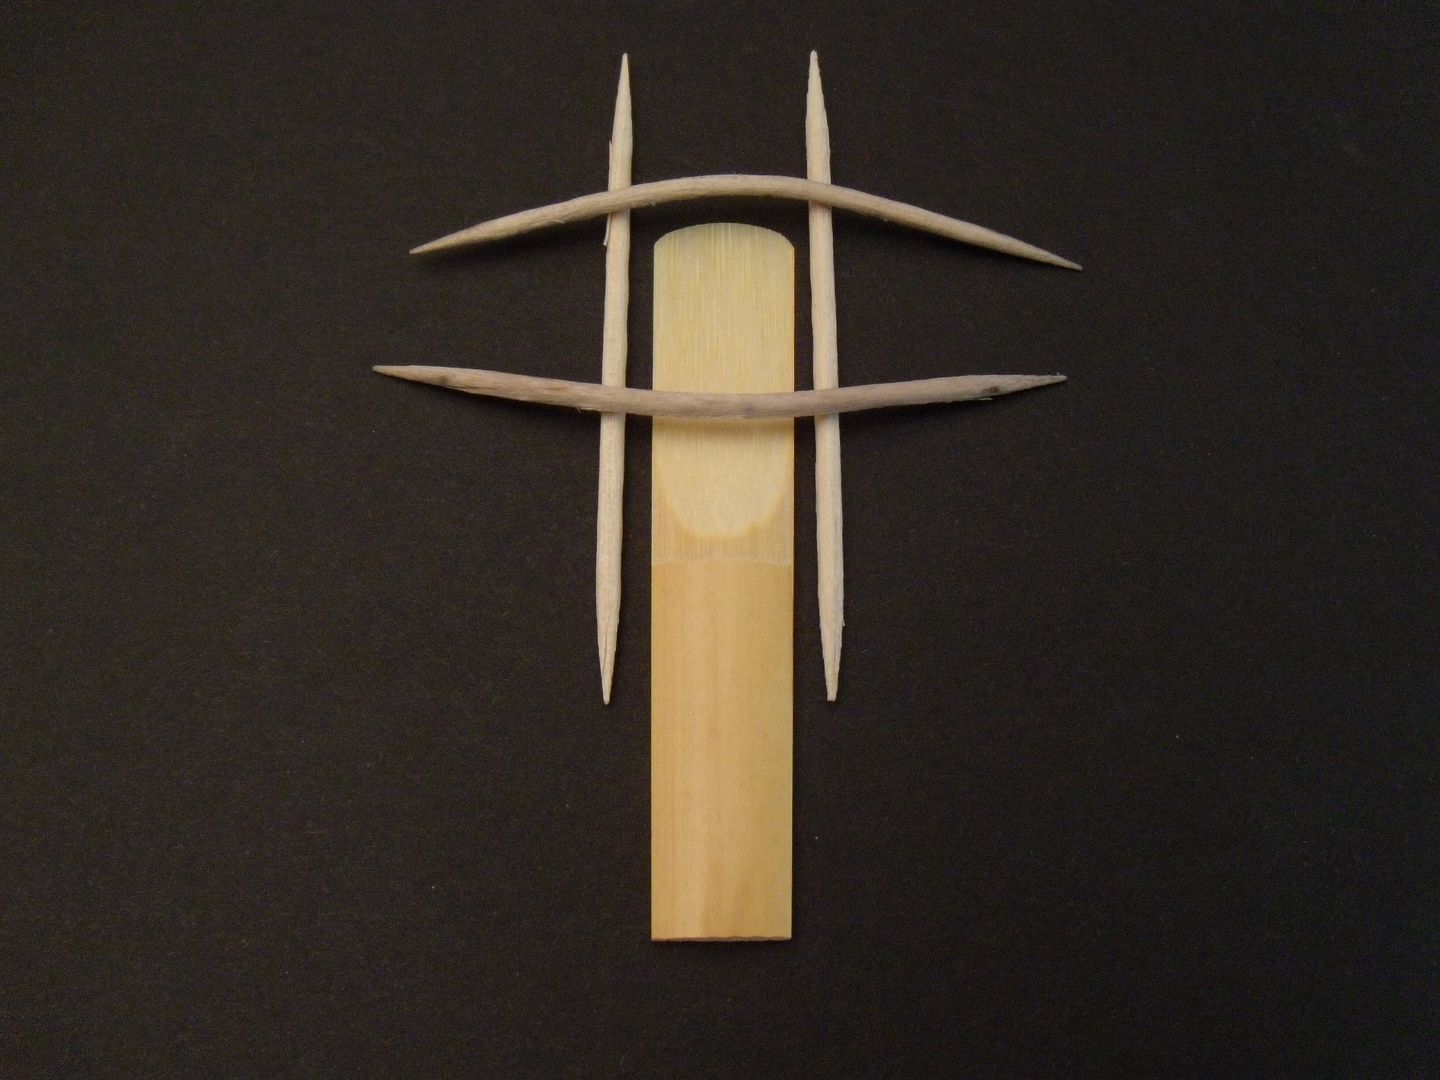
 As for the propeller work, it has so far gone off with out a hitch. The propeller on this aircraft isn't like the standard one you see on aircraft today or even in WWI. It's like a hand-held fan, simply a piece of material held by a brace. So to get started on that I had to create a type of brace, it lead me to use toothpicks. Their curved, hence in a way aerodynamic.Wink Plus their their the right radius for this scale.

So once I decided to use toothpicks, I realized some would have to be bent to create a curve for the ends of the brace. This meant going back to the technique of soaking wood in water. Mine soaked a week, but that's because I didn't have time to work on them earlier, you'd be okay with 24 hours or so.

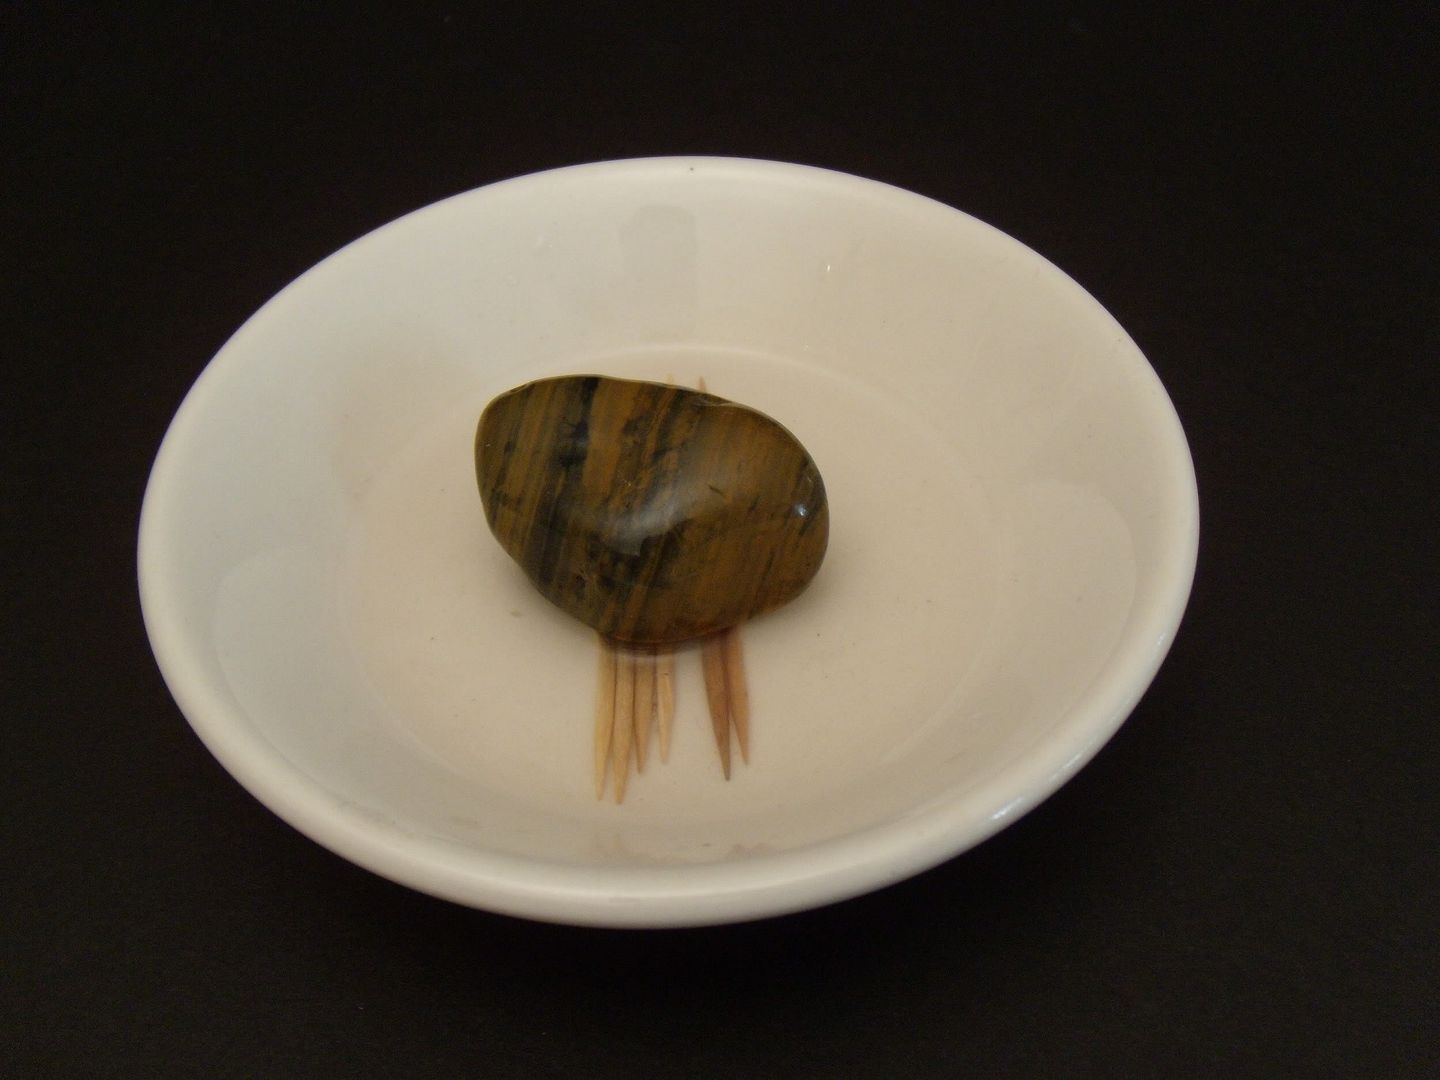
 Once soaked through,  I made a jig (yep, just like I did in the first steps of this build.) I simply nailed in the nails, based off eyeing it. The curve is your preference, so feel free to make it whatever angle you want.

For the propeller itself I'm using a size 3 clarinet reed, yep one from a musical intrument. If your wondering what reed material exactly, it's French grown Arundo Donax Cane.....how exotic.Stick out tongue I will be using the thin end, that's the working end in other words when used with a wood-wind instrument.

Thanks for looking, all comments/questions welcome!!Smile

"A good plan executed now is better than a perfect plan next week." - George S. Patton

  Photobucket 

  • Member since
    December 2007
  • From: Bridgeview, Illinois
Posted by mg.mikael on Wednesday, July 28, 2010 9:06 PM

Engine/ boiler construction has sped along amazingly fast. Thanks in part to having some parts finished months ago, but later collecting dust on the shelf. Stick out tongue

Every combustion engine has to have an exhuast for the fumes and etc. This is no different being that it's a coal-powered engine that powers this primitve aircraft. As for the exhaust pipe I used a simple tie-tag, you know one of things that one finds keeping things tied down in their packages so they don't move around. You see these alot on children's toys. Being that it was a size that worked, I just have to cut to length. As for the end of the exhaust, this involved some searching long and far.

I found the piece needed at the bottom of a Cheerios box. Nah, just kidding it was in the sprues box. The end of a Wurfrahmen 40 rocket to be exact. I simply cut about 3mm off the length, sanded down the edge so it bevels up from the exhaust pipe, and finally drilled it out.

Yep, the piston rods/ whatever you wanna call them are finished. I made the tear-drop shaped ends awhile back, and I talked in depth about them in a past post(so check it out there, because I'm not gonna repeat myselfWink.) The rods are paperclips cut to length, as I previously mentioned in my last post. Glued the ends to the rods with Elmers polyuerthane glue and super glue. Word to the wise their SUPER fragile, and I have to admit to breaking a few once or twice.

Finally how it will look with the propeller shaft and piston rods in place. Note: Nothing has been glued in, as I will be painting everything first since it seems to be easier that way.

Thanks for looking!

"A good plan executed now is better than a perfect plan next week." - George S. Patton

  Photobucket 

  • Member since
    December 2007
  • From: Bridgeview, Illinois
Posted by mg.mikael on Friday, July 23, 2010 9:42 PM

fermis- Draggin' this out.....just wait to I get to the wing frame that looks like a venetian blind with more then 50 separate pieces. Big Smile Nah, I won't drag it out but that area does have more then 50 parts. So....it will take some time knowing me.Wink

jeaton01- Thanks for checking out my build, always appreciate knowing my fellow modelers are following the build.Beer

"A good plan executed now is better than a perfect plan next week." - George S. Patton

  Photobucket 

  • Member since
    December 2002
  • From: Northern California
Posted by jeaton01 on Friday, July 23, 2010 7:48 PM

Good progress there, mg.

John

To see build logs for my models:  http://goldeneramodel.com/mymodels/mymodels.html


  • Member since
    January 2009
  • From: hamburg michigan
Posted by fermis on Friday, July 23, 2010 7:46 PM

Man!!!  How long are ya gonna drag this out????Stick out tongue

Just playin!  Good stuff!!!Toast

  • Member since
    December 2007
  • From: Bridgeview, Illinois
Posted by mg.mikael on Friday, July 23, 2010 6:39 PM

Work is really progressing along nicely. Got some major work done on the engine and boiler in just the past few days.

The piston rods, propeller rods, or whatever you want to call them are nearly done. To make the rods themselves I used paperclips. Their pretty much perfectly straight length wise, so what better to use. I made them 1 inch long, this made calculations simple without too many worries of millmeters and etc. To make the cuts I used a hacksaw and a vice. This made straight cuts, unlike pliers which would leave a rough angled cut.

With the rods nearing completion I moved onto the engine/boiler. Put the boiler caps into place(lego pieces cut to fit) though these aren't 100% finished quite yet, I'll still be adding some rivet detail. The weight box was painted a base coat paint mix of steel and black.  I also added the top plate to the boiler where the rods will go into place. That said you may say it doesn't look quite right, in particular the area where the boiler and weight box meet. You may say how the heck does it connect to each other? Well that means I have to scratch some connecting rods between the boiler and box.

Used the same method to make the connecting rods as I did in the past with the axle support rods. If your interested in how I did those, check back into the earlier posts where I disscussed that in detail.

So.....I scratched up the connecting rods(mostly educated guessesWink) with regards to the cuts.

Thanks for looking, all comments, questions, and suggestions welcome!!Smile

"A good plan executed now is better than a perfect plan next week." - George S. Patton

  Photobucket 

  • Member since
    December 2007
  • From: Bridgeview, Illinois
Posted by mg.mikael on Monday, July 19, 2010 7:47 AM

vetteman42- Glad you remember the build, hope it doesn't disappoint as construction moves more into the finer detail things.

fermis- Thanks for stoppin' by, and for checkin' out the build!

"A good plan executed now is better than a perfect plan next week." - George S. Patton

  Photobucket 

  • Member since
    January 2009
  • From: hamburg michigan
Posted by fermis on Monday, July 19, 2010 5:34 AM

Ditto

  • Member since
    July 2008
  • From: USA California
Posted by vetteman42 on Monday, July 19, 2010 1:41 AM

Oh goodie I am happy to see this build going again and cant wait to see more of it. This project is gonna be awesome when finished

Randy So many to build.......So little time

  • Member since
    December 2007
  • From: Bridgeview, Illinois
Posted by mg.mikael on Sunday, July 18, 2010 11:36 AM

Yep, it's been awhile since this thread has been updated(last December to be exact.Embarrassed) Remember the build?......hope some of you do, because I finally got this one of the shelf and back to the workbench to finish. So with out further ado let's get right back into this.

If you want a reminder of what I was last working on, look in the page 4, if you're too lazy too look back then I'll simply tell you. I was working on the pistons for turning the propeller and the boiler engine. I have some work to do in that area still, but I went onto the weight box. It was a steel box  with 72 lbs. of extra weight. Why it was there I'm not too sure, perhaps it had to do with equilbrium or was part of the testing the lift strength of the primitive aircraft.

Either way, too get started I did some measurements. I had no dimensions for the weight box, so I did some estimated guesses and used the frame of the aircraft as an idea of how big the box should be. Not too big where it looks oversized, but not too small where it's out of porportion with the engine itself. Thus the ideal size came out to a box with a length of 3.1 cm, a width of 2.2 cm, and a height of 1.2 cm. With the size figured out the pieces form some wood venner(the one with paper backing.)

Once the pieces were cut to size, It was time to assemble. I uesd crazy glue to get the instant bond, then used Elmer's polyurethane glue for that strong bond. If you do use wood venner for the box, then make sure you have the paper backing on the outside and wood grain on inside, remember this a steel/iron box not a wooden one so the last thing you want is wood grain showing through the paint.

Once the glue dried I sanded smooth all the edges that may not be flush with the other pieces. Then to add some extra detail, I added some rivet detail. I had some spare pieces of the sprue from a past kit that were connecting points for parts and they were perfect for me. One point was round and just needed a snip with the cutters to have perfectly round rivets. So that's what I did, adding four rivets to the sides on each edge, and four rivets on the top and bottom plate.

Thanks for looking, all comments, questions, and suggestions welcome!

PS: Yes, I know their's now a civil aircraft section in the FSM forums, but this thread was started before that even existed. Plus I don't think it's possible to move five pages of posts and pictures without losing my mind.Wink So that said this thread will remain in this forum section.

"A good plan executed now is better than a perfect plan next week." - George S. Patton

  Photobucket 

  • Member since
    December 2007
  • From: Bridgeview, Illinois
Posted by mg.mikael on Thursday, December 3, 2009 8:15 PM
 Gamera wrote:

I'm glad this got bumped to the top since I hadn't seen it before.

She looks great so far and I'll love to see her when she's done.

 I love the scratch-building stuff, seems I can't even get a kit build and you guys are building stuff from bits and pieces!


Thanks for the comments, Gamera! Glad you like her so far, hoping to post another update relatively soon(that is if I can finally find some time to actually have a build session that's longer then ten minutes.Wink [;)])

"A good plan executed now is better than a perfect plan next week." - George S. Patton

  Photobucket 

  • Member since
    November 2009
  • From: SW Virginia
Posted by Gamera on Thursday, December 3, 2009 10:03 AM

I'm glad this got bumped to the top since I hadn't seen it before.

She looks great so far and I'll love to see her when she's done.

 I love the scratch-building stuff, seems I can't even get a kit build and you guys are building stuff from bits and pieces!


"I dream in fire but work in clay." -Arthur Machen


  • Member since
    December 2007
  • From: Bridgeview, Illinois
Posted by mg.mikael on Wednesday, December 2, 2009 4:45 PM

 santa wrote:
mg. mikael--I envy you for all the rieplies to your post. OH-and my H-18 is on page 4 of this forum.

LOL! You envy me for my replies, I envy you for your amazing scratch-building skills.Wink [;)] Thanks for checking out my build, your H-18 is amazing.

"A good plan executed now is better than a perfect plan next week." - George S. Patton

  Photobucket 

  • Member since
    November 2009
Posted by santa on Tuesday, December 1, 2009 1:09 PM
mg. mikael--I envy you for all the rieplies to your post. OH-and my H-18 is on page 4 of this forum.
  • Member since
    December 2007
  • From: Bridgeview, Illinois
Posted by mg.mikael on Tuesday, September 15, 2009 8:33 PM
 Luftwoller wrote:

Very nice work. I love the improvisations of the Lego piece and other odds and sods from the spares box. You scratchers Scratching have some serious talent, in my eye,

...Guy


Thanks for checkin' in Luftwoller!! Glad you like the improvised parts out of Legos, they suprisingly enough need little clean-up and work perfectly.

"A good plan executed now is better than a perfect plan next week." - George S. Patton

  Photobucket 

  • Member since
    February 2007
  • From: Bournemouth UK
Posted by Luftwoller on Tuesday, September 15, 2009 12:58 PM

Very nice work. I love the improvisations of the Lego piece and other odds and sods from the spares box. You scratchers Scratching have some serious talent, in my eye,

...Guy


..'Your an embarrassment to the human genus, makes me ashamed to call myself Homo'.
  • Member since
    December 2007
  • From: Bridgeview, Illinois
Posted by mg.mikael on Tuesday, September 15, 2009 11:17 AM

No I didn't forget about this build, I just haven't had the time to work on it(I'll blame it my terrible time management and recent schedule changes.) Thus that's why it's been more then a month since my last update. But alas, here is a small update......finally!Big Smile [:D]

I started work on getting together more parts for the engine and propeller. I did find a lego piece that's just about perfect for the propeller shaft and I also started work on preparing the pieces for the piston rods. One of these pieces is the plate that goes on top of the boiler,(where the rods stick out of.) For this piece I used the radiator armor slat piece from my Zvezda M-3 Scout car kit. After preparing the piece, I measured where the six rods will go(making sure they all were evenly spaced apart.) Then I simply drilled out the holes. Note: I still have to make the rods, out of stretched sprue.

I also finished the top of the piston rods where the rod will attach to one side and where the propeller shaft will go through the openings. For this I went back to drilling out some "pancake" cut pieces of sprue. Then I attached a small piece of sprue and sanded it down so the sides were angled. That's how I got the tear-drop shapes of the pieces. Then I simply threw on alot(and I mean alotWink [;)]) of putty to fill in imperfections.

Next work will be moving to making the piston rods, that way I can get the plate attached to the boiler. All comments, questions, and suggestions are appreciated!!Smile [:)]

"A good plan executed now is better than a perfect plan next week." - George S. Patton

  Photobucket 

  • Member since
    December 2007
  • From: Bridgeview, Illinois
Posted by mg.mikael on Friday, July 31, 2009 11:36 AM

 ilovef-4 wrote:
Mg, just found this post and am going to be watching this one with interest. Keep up the brianstroming, i like the Legos idea for pieces in this build. Who said Legos are only for kids. Nice job so far and keep up the good work. Charlie

Glad you found the thread and I'm happy it caught your interest, ilovef-4! Thanks for the comments.Cool [8D]

"A good plan executed now is better than a perfect plan next week." - George S. Patton

  Photobucket 

  • Member since
    March 2007
  • From: Misawa Japan
Posted by ilovef-4 on Friday, July 31, 2009 7:33 AM
Mg, just found this post and am going to be watching this one with interest. Keep up the brianstroming, i like the Legos idea for pieces in this build. Who said Legos are only for kids. Nice job so far and keep up the good work. Charlie
Kick the tires and light the fires. Photo Sharing and Video Hosting at Photobucket
  • Member since
    December 2007
  • From: Bridgeview, Illinois
Posted by mg.mikael on Thursday, July 30, 2009 5:02 PM
 sfcmac wrote:

 It looks as if you are in a zone to me!  The problem solving skills and imagination you are using to visualize in your mind what you want to make and then create it out of lego's extc really impress me. 

Sniff sniff... Shock [:O]Dead [xx(] Still smells funny in here though. What exactly are you boiling in the boiler? Make a Toast [#toast]Laugh [(-D]

 Seiously I am wondering what you will come up with nex and getting anxious to see the results! Thumbs Up [tup]

Thanks for the comments, sfcmac!

That funny smell isn't the boiler.....I think it's coming from the stove. It smells like natural gas, so I guess the gas line must be leaking or something. Somebody light me a candle so I can get a better look.Big Smile [:D]Dunce [D)]

 *Off-topic I just got my September issue of FSM and to my suprise I had another tip published(Fun with Hot Beverages 2)!!!! Yahooooo, man that really made my day.Cool [8D] Now I'm just wondering why FSM didn't tell me or pay me......hmmmm.Confused [%-)]*

"A good plan executed now is better than a perfect plan next week." - George S. Patton

  Photobucket 

  • Member since
    October 2004
  • From: League City, Texas
Posted by sfcmac on Thursday, July 30, 2009 1:43 PM

 It looks as if you are in a zone to me!  The problem solving skills and imagination you are using to visualize in your mind what you want to make and then create it out of lego's extc really impress me. 

Sniff sniff... Shock [:O]Dead [xx(] Still smells funny in here though. What exactly are you boiling in the boiler? Make a Toast [#toast]Laugh [(-D]

 Seiously I am wondering what you will come up with nex and getting anxious to see the results! Thumbs Up [tup]

JOIN OUR COMMUNITY!

Our community is FREE to join. To participate you must either login or register for an account.

SEARCH FORUMS
FREE NEWSLETTER
By signing up you may also receive reader surveys and occasional special offers. We do not sell, rent or trade our email lists. View our Privacy Policy.