SEARCH FINESCALE.COM

Enter keywords or a search phrase below:

scratch 1/32 Horatio Phillips Multiplane WIP *Updated 8/22*

26598 views
78 replies
1 rating 2 rating 3 rating 4 rating 5 rating
  • Member since
    December 2007
  • From: Bridgeview, Illinois
scratch 1/32 Horatio Phillips Multiplane WIP *Updated 8/22*
Posted by mg.mikael on Wednesday, April 8, 2009 11:00 PM

I'm usually on the darkside, building armor, but the quirkiness of this aircraft was just callin' out to me. So long story short, I decided to start building it on a whim and now it's also an entry in the Prototype GB All Era's.  The official name of this primitive aircraft or the Venetian blind looking-thing, is the Horatio Phillips Steam-Powered Multiplane. Now you may be thinking who the heck is Horatio or what is a multiplane, so to better explain here's a quick history lesson.

The Horatio Phillips Steam-Powered Multiplane was built in 1893, by who else, Horatio Frederick Phillips. An early English avaiation pioneer, born in 1845 in Streatham, a suburb of London, England.  He designed a craft in 1893 with 50 slats (hence the name "multiplane"). Presumably, he was hoping all those planes would produce lift in abundance. The wing frame measured 22 feet long and only 1.5 inches wide, the machine was powered by a coal-fired steam engine that turned the propeller at 400 revolutions per minute. He constructed this large device for testing the effective lift of what he termed "sustainers" or in other words airfoils. As a test/prototype vehicle, it was not designed to be manned, but was used to test lift capabilities. Phillips has long since been forgotten to history, but his development of curved surfaces helped advanced the early days of applied aerodynamics. Oh and and for those wondering how far this aircraft flew....it was able to lift its own weight plus 72 pounds (a total of 402 pounds) some three feet at a speed of about 40 mph.

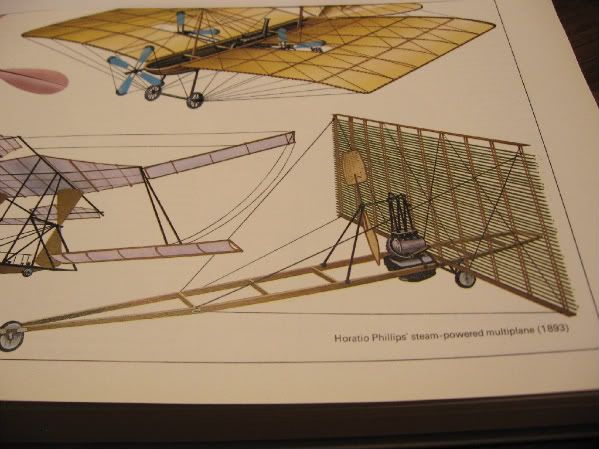
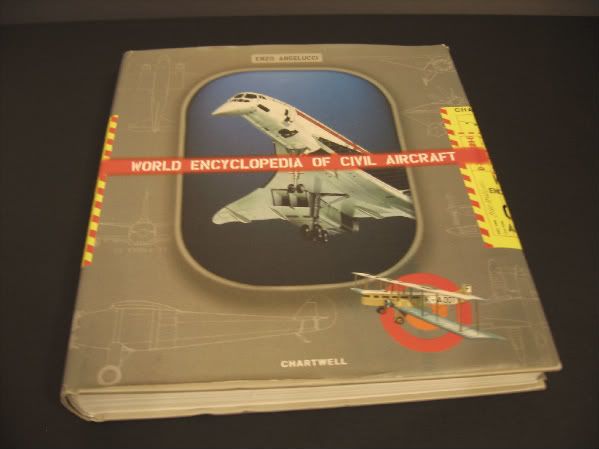
Okay, know that I explained that, I can get on with the thread and WIP. The pic above is one of the reference drawings I have and it best shows the aircraft out of all the pics I have. Which isn't many. For my main reference book I'm using The World Encyclopedia of Civil Aircraft by Enzo Angelucci, that's where the color drawing above came from. As for the rest of my info, it's off the web from random sites.

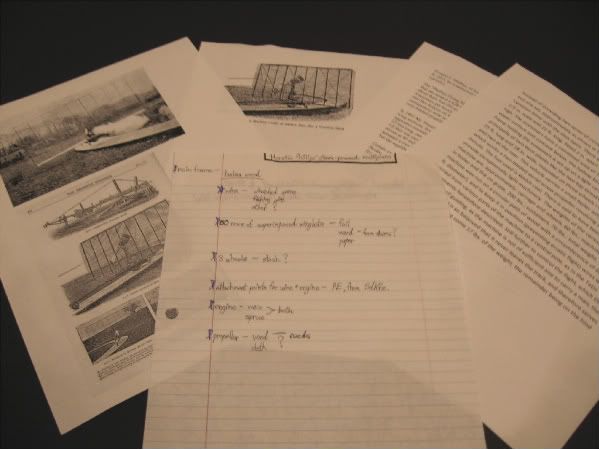
To help with the scratching, since it's my first ever scratch project, I created a little cheat sheet with the various main parts of the aircraft and what I plan to use for each part.

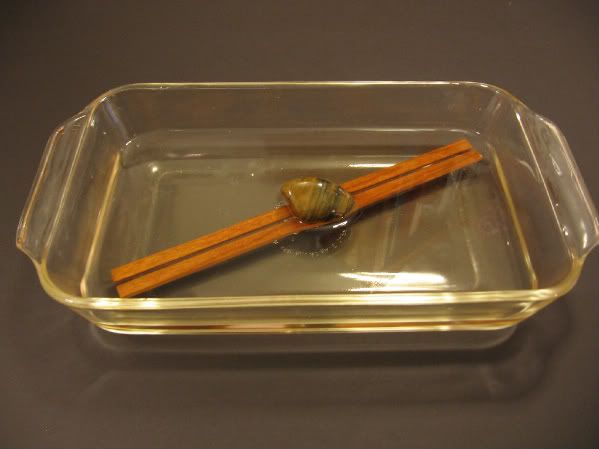
For the main frame I decided to use wood, pretty sure it's cedar. Not 100% sure, since I get alot of the wood from scraps from a nearby architectural wood molding place. How's that for being resourceful. The wood frame "planks" are cut to a size of 0.20 X 0.30 inches at 9.40 inches long(these numbers were scaled down from the original dimensions). However they are too straight and need a curve, so......I just today got around to putting them in the water to soak for a day, they need to be completley wet and soaked through so I can bend them to the correct curvature of the frame.

All comments, questions, and suggestions welcome!

"A good plan executed now is better than a perfect plan next week." - George S. Patton

  Photobucket 

  • Member since
    September 2004
  • From: Utereg
Posted by Borg R3-MC0 on Thursday, April 9, 2009 1:17 AM
An impressive project. Don't forget to post in on the scratch build forum as wel, folks overthere probably would like to see it.

  • Member since
    January 2008
  • From: Woodbine, MD
Posted by 666Irish on Thursday, April 9, 2009 3:56 AM
What a great project! I am really looking forward to seeing this one take shape!

She was only a whiskey maker, but he loved her still.

  • Member since
    December 2007
  • From: Bridgeview, Illinois
Posted by mg.mikael on Thursday, April 9, 2009 9:24 AM
Thanks for the lookin' in and for the supportive comments, Borg R3-MC0 and 666Irish!!!Cool [8D]

"A good plan executed now is better than a perfect plan next week." - George S. Patton

  Photobucket 

  • Member since
    February 2007
  • From: Bournemouth UK
Posted by Luftwoller on Thursday, April 9, 2009 9:28 AM

This should be interesting. Welcome to the 'Friendly side' btw LOL.

...Guy

..'Your an embarrassment to the human genus, makes me ashamed to call myself Homo'.
  • Member since
    September 2003
  • From: South Central Wisconsin
Posted by Daywalker on Thursday, April 9, 2009 9:45 AM
 Luftwoller wrote:

Welcome to the 'Friendly side' btw LOL.

Sign - Ditto [#ditto] Big Smile [:D]

A very ambitious project, and one I have never heard of.  I look forward to your progress on this one. Thumbs Up [tup]

Frank 


  • Member since
    December 2007
  • From: Bridgeview, Illinois
Posted by mg.mikael on Thursday, April 9, 2009 2:46 PM

Thanks for droppin' in and for the welcome, Luftwoller and Daywalker!!!

Anyways, I had time on my hands today and the wood was soft enough to bend today. So......I made the jig to get the curvature in the two main "planks" of the frame. I will have to leave  the wood in the jig untill the wood dries, which is about the same time the wood was in the water, so about 24 hours. If you have any questions don't hesitate to ask.

"A good plan executed now is better than a perfect plan next week." - George S. Patton

  Photobucket 

  • Member since
    April 2008
  • From: Kristiansund, Norway
Posted by Huxy on Friday, April 10, 2009 9:08 AM

oh sweet


That's awsome!

But drying in the same time as it was in the water? Hmm... I threw my jacket into a pit of water once.. I took it up just right away... It took itself 24 hours to dry...  Get your facts straight!! Laugh [(-D]


But really.. Awsome project!!  Wish I had you skills...


But how did you ensure the jig gives the same angels on both pieces of wood??

"Every War Starts And Ends With An Invasion".

  • Member since
    December 2007
  • From: Bridgeview, Illinois
Posted by mg.mikael on Friday, April 10, 2009 1:12 PM

Thanks for checkin' out my build, Huxy!!

And to answer your question, " how to ensure the jig gives the same angles on both pieces of wood?" The answer, find the the center of the board and hammer in a nail. Then take a second nail and hammer it in on the end of the base at a point where their will be a slight curve. Put the board in. Then figure out how curved the board has to be(by test bending) and hammer in a third nail, that gets the desirable curve. If the curve not to your liking simply remove the nails and re-start. Then for the other board, look at the board you just jiged and mirror the positions of the nails. That should get you curves that mirror each other. Hope this explained it.Smile [:)]

"A good plan executed now is better than a perfect plan next week." - George S. Patton

  Photobucket 

  • Member since
    March 2005
Posted by philo426 on Friday, April 10, 2009 6:42 PM
Will the planks retain their shape after the wood dries out?And will it remain stable over the long haul?
  • Member since
    December 2007
  • From: Bridgeview, Illinois
Posted by mg.mikael on Friday, April 10, 2009 8:30 PM

 philo426 wrote:
Will the planks retain their shape after the wood dries out?And will it remain stable over the long haul?

Yes, the wood "planks" do retain their shape once their dry. Before I sumberged these two "planks" you see in the pic, I tested a scrap "plank" in water a few weeks ago. I curved that one with my hands just by applying pressure, which gave it a slight curve and it actually still retains it's curve perfectly. It's just as stable as any other wood, and it will retain it's stability. That is unless your not carfull and splash water on it, which can warp the board. However warping won't occur here, since the wood was all equally submerged. I hope this explains it to you clearly, philo426.

"A good plan executed now is better than a perfect plan next week." - George S. Patton

  Photobucket 

  • Member since
    March 2005
Posted by philo426 on Friday, April 10, 2009 11:03 PM
Yep!Thanks for the explanation!
  • Member since
    August 2008
Posted by tankerbuilder on Wednesday, April 15, 2009 12:15 PM
Hey!! I wanna see that when you are finished . I did a model of LEONARDO,S flyer long before the DA - VINCI files toy and working model came out . I think these old , old early flites of fancy will give all who see them in miniature an idea that not all inventions carry a 20th or 19th century label .   Can,t wait for more pics . If you are worried about using wood DON,T . The wood will work just fine . Make the wood is as fine a grain as you can get or use veneers .   You should put a little vinegar in the water and make sure that water is hot !!!!    tankerbuilder
  • Member since
    August 2008
Posted by tankerbuilder on Wednesday, April 15, 2009 12:23 PM
HEY Philo !  the art of bending planks will ensure that it holds it,s shape . Unlike plastic ,wood doesn,t mind getting bent , It doesn,t like being bent when dry though . Yes, it would hold its shape from now on . Stability isn,t a problem as long as there isn,t too much torque . tankerbuilder
  • Member since
    December 2002
  • From: Northern California
Posted by jeaton01 on Wednesday, April 15, 2009 4:22 PM
Other methods of forming wood are steaming, and soaking in ammonia.  Ammonia works a bit better than water because it softens the cellulose the wood fibers are composed of.  Sometimes it is necessary to make the form with a bit more curve than wanted  for the final shape as a slight spring back happens with some woods.

John

To see build logs for my models:  http://goldeneramodel.com/mymodels/mymodels.html


  • Member since
    December 2007
  • From: Bridgeview, Illinois
Posted by mg.mikael on Wednesday, April 15, 2009 7:54 PM

tankerbuilder- Thanks for lookin' in on my build!! Not to mention thanks for tip about putting vinegar in with the water(never knew that), I gotta try it out some time.Cool [8D]

jeaton01- Thanks for checkin' out my build! Hmmm.....never knew ammonia has that effect on wood. I might try that out some time, but right now the woods bent perfectly, whew! So at least I don't have to worry about wood curving for now.Wink [;)]

"A good plan executed now is better than a perfect plan next week." - George S. Patton

  Photobucket 

  • Member since
    December 2008
  • From: Goffstown, NH
Posted by New Hampshire on Wednesday, April 15, 2009 8:00 PM

Hmmm, this should be rather interesting!  Don't see off the wall stuff like this very often, so should be a nice change of pace!

Brian

  • Member since
    December 2007
  • From: Bridgeview, Illinois
Posted by mg.mikael on Wednesday, April 15, 2009 8:55 PM
Thanks for the interest and comments, New Hampshire!!! Hope to get some major work done tommorrow, since I've been plotting out through my own drawings and mathematics, how and where the main planks are gonna connect(with the support beams.)

"A good plan executed now is better than a perfect plan next week." - George S. Patton

  Photobucket 

  • Member since
    April 2009
Posted by multiplane on Friday, April 17, 2009 11:21 PM

Hello

I am a fan of Horatio Phillips' work. Best of luck with your project.

I hate to throw you a curve ball about what you're modelling, but the various drawings made of the 1893 multiplane are not wholly accurate. That includes the one in the Enzo Angelucci book.

Here is a contemporary photo of the multiplane:

Note the large wings positioned top-and-bottom of the multiplane stack. Below is an engraving done of the multiplane, this appeared in the Engineering journal for May 5th, 1893. At first appearance, it looks as though all of the wings are of uniform size, but the two larger wings are actually there, its just that they are hard to make out given the perspective. I suspect people have misinterpreted those two wings as just being part of the wooden framework that supports the multiplanes.


Also, at this URL, you'll find a 1/72nd (!) model of another Horatio Phillips' multiplane:
http://www.aircraftresourcecenter.com/Gal6/5201-5300/gal5289_HoratioPhilips_Stern/00.shtm

Cheers,
Paul 

  • Member since
    October 2004
  • From: League City, Texas
Posted by sfcmac on Saturday, April 18, 2009 6:01 AM
Very ambitious project!  I cant wait to see how you get it all together! Should make for some gretat ideas!
  • Member since
    December 2007
  • From: Bridgeview, Illinois
Posted by mg.mikael on Saturday, April 18, 2009 4:24 PM

multiplane- First of all, Sign - Welcome [#welcome] to the forums! Secondly, thanks for that contemporary photo of the multiplane. It gives me a much better perspective/angle of what I'm building. Never knew their were large wings on the top and bottom of the wing frame......oh well, I'll react and build accordingly.Smile [:)] Thanks again for the photo, never seen that one when I was researching my build.

sfcmac- Thanks for lookin' in on my build!!Cool [8D]

"A good plan executed now is better than a perfect plan next week." - George S. Patton

  Photobucket 

  • Member since
    December 2007
  • From: Bridgeview, Illinois
Posted by mg.mikael on Saturday, April 18, 2009 5:23 PM

It was just about perfect outside today. 70's, sunny, and with a slight hint of humidty here in the Chicagoland.Cool [8D] Thus this meant I finally was able to go outside to do some sawing of support "planks" for the main frame.

To get the final positioning of the two main "planks" I had to do some simple mathematics....what fun.Dunce [D)] Basically done by doing some measurements of the wing frame and eyeing it. Since there are no dimensions out there of the positioning of the two main "planks." But the overall result I believe was not that bad. (Had to tape down the frame so I wouldn't lose the positioning I wanted.)

To cut the support truss for the main frame, you'll need a miter box and a saw(almost any saw should suffice.) For the support "planks" I used the same wood and same size, 0.20 X 0.30. (In order to save time I cut this piece at the same time I was cutting the wood that I would later use for the two main pieces.)

To make sure you don't get too much splintering of the edges or cracking, you should slightly notch all the sides of the wood you'll be cutting with a razor blade.

Here's all the support "planks" for the main frame cut to about the needed size. (Yeah, I know it looks more like a ship then a plane currently.Big Smile [:D]) Make sure your cuts are a bit bigger then you need. I made sure of that, since I still need to sand down the edges to have a slight curve, in order to fit perfectly in between the two main "planks."

Now I have to get out some sanding paper, might use an electric sander if need be, to get all the support planks to fit. All comments, question, and suggestions welcome!Smile [:)]

"A good plan executed now is better than a perfect plan next week." - George S. Patton

  Photobucket 

  • Member since
    July 2008
  • From: USA California
Posted by vetteman42 on Sunday, April 19, 2009 11:44 PM

Nice start on this build. I will be keeping an eye on this one.


Randy So many to build.......So little time

  • Member since
    April 2009
Posted by multiplane on Monday, April 20, 2009 1:41 AM


Thanks for the welcome. Am looking forward to seeing the model come together! 

Cheers,
Paul

  • Member since
    December 2007
  • From: Bridgeview, Illinois
Posted by mg.mikael on Monday, April 20, 2009 7:10 PM

vetteman42- Thanks for checkin' out my build!Smile [:)]

multiplane- Again thanks for that photo........replied to your PM.Wink [;)]

"A good plan executed now is better than a perfect plan next week." - George S. Patton

  Photobucket 

  • Member since
    December 2007
  • From: Bridgeview, Illinois
Posted by mg.mikael on Saturday, April 25, 2009 1:30 PM

After sanding and timming down the support "planks" to fit in between the two main "planks", I was finally able to get out the glue.(Had to trim the edeges of some pieces to have a curve.) I used Elmer's Probond Interior Wood Glue, it's easy to wash and wipe off if you make a mistake before it dries.Thumbs Up [tup] I guess you could use Elmer's White Glue, but I wasn't gonna take the chance since the two main "planks" are pretty tense and want to pull away.

Here's a pic of the finished frame! It's suprisingly sturdy, and the glue holds perfectly.Cool [8D] After gluing, I sanded down the areas where a bit of excess glue dried and sanded down some areas in the wood that were not perfectly flat.

Now it's one to the axles and wheels in scratching. The wheels look like their gonna have to be scratched, since the parts I planned to use(gears from a computer CPU) were too small. The axles shouldn't be too much of a problem though. Then I have to figure out the wheel supports that connect the axle to the frame. Might use stretched sprue if wood doesn't work well. Oh well, trial and error I guess. Thanks for looking.

"A good plan executed now is better than a perfect plan next week." - George S. Patton

  Photobucket 

  • Member since
    October 2004
  • From: League City, Texas
Posted by sfcmac on Saturday, April 25, 2009 1:43 PM
Looking good MG!  That wood working stuff you are pulling of is very cool. Looks like a lot of work but your results are stunning! Bow [bow]
  • Member since
    December 2007
  • From: Bridgeview, Illinois
Posted by mg.mikael on Saturday, April 25, 2009 9:04 PM

 sfcmac wrote:
Looking good MG!  That wood working stuff you are pulling of is very cool. Looks like a lot of work but your results are stunning! Bow [bow]

Thanks so much for the kind words, sfcmac, it encourages me to go the extra mile when scratching parts.Smile [:)] 

"A good plan executed now is better than a perfect plan next week." - George S. Patton

  Photobucket 

  • Member since
    December 2007
  • From: Bridgeview, Illinois
Posted by mg.mikael on Saturday, May 2, 2009 6:25 PM

So here's my pile of random parts that will be goin' to making the wheels, support truss, and axle. Porbably don't see how or what the parts are gonna be used for, so let me explain.Wink [;)] The gears(from a computer CPU) will go to makin' the three wheels. The stainless steel rod(also from a computer CPU) will go to makin' the rear axle. The white plastic rods(from an old lego set) will be used for the axle support truss holder. The clear green rod(also from an old lego set) will be used for the axle support truss itself since it's the same radius as the steel axle.  

To make the part that connects the support truss coming from the wood frame to the axle I took the end of one of the white plastic rods. Snipped off the round ends, then enlarged the hole on one side, and drilled out the other side in order to slide the steel axle in. It's a perfect fit and probably no glue will be needed. 

Then I made some measurements to how high I want the wood frame off the ground. After getting the height I wanted I put a glob of silly putty on each side of the frame where the axle will be. Then I pushed the axle into the silly putty to get the correct height. Then it was just a matter of taking the green clear rod and snipping it too a much smaller size. Then the work of cutting and sanding to fit the support rods has begun. By the way, I'm still not done yet on that green rod you see in the pic.

All comments, questions, and suggestions welcome!!Smile [:)]

"A good plan executed now is better than a perfect plan next week." - George S. Patton

  Photobucket 

  • Member since
    December 2007
  • From: Bridgeview, Illinois
Posted by mg.mikael on Saturday, May 9, 2009 5:42 PM

I finally got around to cutting and trimming all the axle support braces(aka the clear green plastic). After a bit more sanding the clear green pieces will be glued down to the dark green stryene pieces(you see one of them on the build below), that way the axle support truss looks like it's attached to a small steel plate(will look like steel after painting) on the wood.

Here's a better pic of what I'm actually using to model the support metal plates on the wood, simply the part identification numbers cut off a sprue. Since their the perfect size, just a bit of sanding is needed and your done.Wink [;)]

As always, all comments and questions welcome!!Cool [8D]

"A good plan executed now is better than a perfect plan next week." - George S. Patton

  Photobucket 

JOIN OUR COMMUNITY!

Our community is FREE to join. To participate you must either login or register for an account.

SEARCH FORUMS
FREE NEWSLETTER
By signing up you may also receive reader surveys and occasional special offers. We do not sell, rent or trade our email lists. View our Privacy Policy.