SEARCH FINESCALE.COM

Enter keywords or a search phrase below:

My Next Project Is Going To Be ..... UPDATE 5-JAN-11 ... COMPLETE 27-MAR-11

3548 views
11 replies
1 rating 2 rating 3 rating 4 rating 5 rating
  • Member since
    January 2015
  • From: Katy, TX
My Next Project Is Going To Be ..... UPDATE 5-JAN-11 ... COMPLETE 27-MAR-11
Posted by Aggieman on Wednesday, December 29, 2010 7:54 PM

BIG!

As in Airfix 24th scale Mossie big!

I have spent some of my Christmas vacation starting on this monster.  It is loaded with parts and those parts are loaded with detail I am unaccustomed to seeing in an injection molded kit (I typically build at half this scale).  The instruction book is just that - a book.  And it's printed on what has to be the biggest paper used for a kit instruction manual, at least to my knowledge.

I have two complaints about this expensive kit, and these complaints are not ticky-tacky.  First, the number of injection release points throughout this monster is ridiculous, and given the location of these things, typically in areas where they will be visible, requires a lot of work.  Second, Airfix doesn't seem to include any paint references other than undefined numbers.  Paint this part 33.  WTF does 33 mean?  There is a color sheet indicating how to paint the monstrous pilot figures where some of these numbers are included in a circle of the color call-out, but it's not an exhaustive list and appears to only apply to the pilot figures.  To get around this I have pulled out the instructions for my Tamiya Mossie and am using educated guesses and color pictures I am finding on the net.

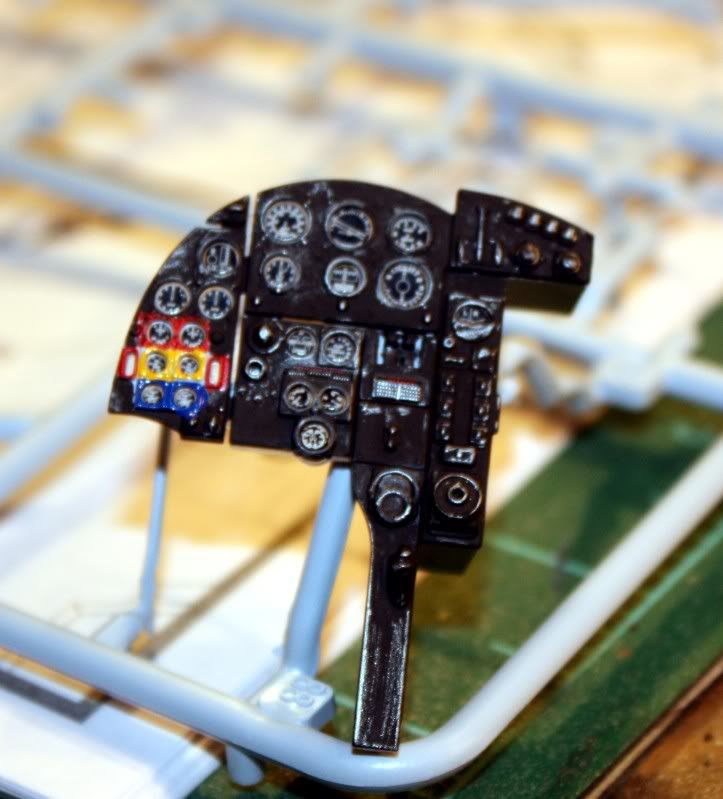
So far the work I've done on this centers around the cockpit.  I have painted the parts - MM British Interior Green with leather, MM aircraft interior black, red, yellow, blue, and medium gray for accents, knobs and dial panels.

Main cockpit floor without the seats and other detail parts installed:

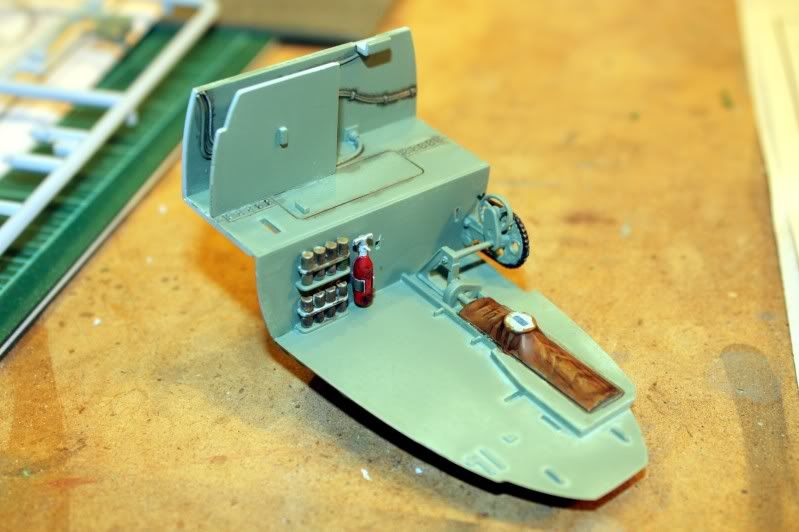
Pilot's seat and rudder pedals/controls:

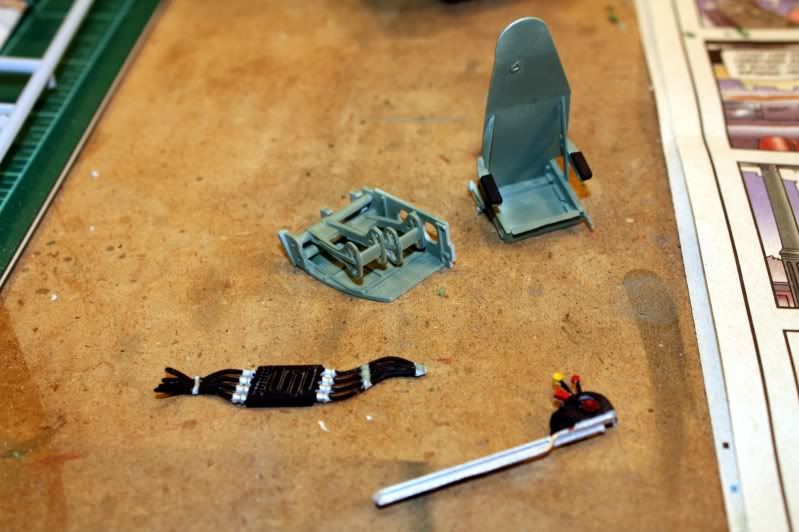
One of the really cool features of the kit is the IP.  The IP itself is a well-detailed piece; the dial faces are pre-applied decals on a clear piece that mates to the back of the IP.

Clear pieces with pre-applied dial face decals:

IP:

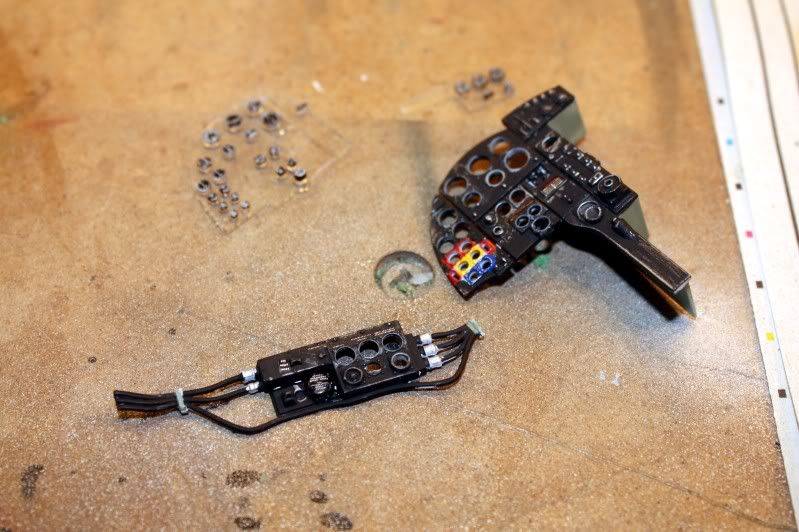
Completed IP panels:

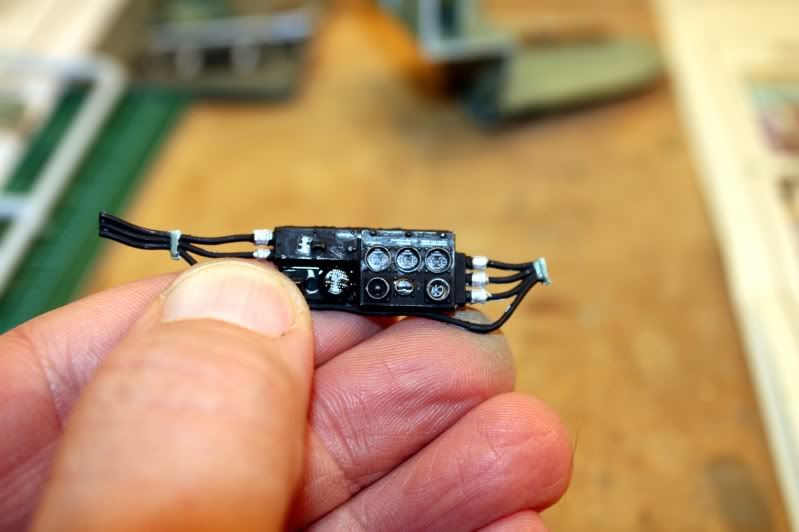
I expect this build to take considerable time to complete.  Lots of mold release points to fill in still (and it seems like that is all I've done).  The fit does not look to be what one would expect of any kit with such a price tag (and I got it for a good bit less than the asking price through ScaleHobbyist.com), as I've test fit the fuselage sections and noticed a sizable gap that may or may not resolve itself once I get all the interior components installed.  Grrr.


  • Member since
    March 2003
  • From: Rain USA, Vancouver WA
Posted by tigerman on Wednesday, December 29, 2010 9:02 PM

Looking great Steven. This is going to be a big boy! Am I correct, that is the only 1/24 kit of the Mossie?

   http://i7.photobucket.com/albums/y269/wing_nut_5o/PANZERJAGERGB.jpg

 Eric 

  • Member since
    September 2003
  • From: South Central Wisconsin
Posted by Daywalker on Wednesday, December 29, 2010 9:09 PM

OMG, that thing is a monster!  Knowing it is 1/24 makes it big, but actually seeing parts like the IP and such in your hands really conveys the sheer size of this beast.  I will enjoy watching this one!

Frank 


  • Member since
    May 2009
  • From: Hobart, Tasmania
Posted by Konigwolf13 on Wednesday, December 29, 2010 9:17 PM

Gonna keep watching this one aggieman. Looks nice so far.

Andrew

  • Member since
    December 2006
  • From: Kennewick, WA
Posted by kbuzz01 on Wednesday, December 29, 2010 11:42 PM

That pit is looking really good!  This thing must be huge - what is the wingspan?  Indifferent

Ken

animation6.gif image by kbuzz_photos
  • Member since
    January 2015
  • From: Katy, TX
Posted by Aggieman on Thursday, December 30, 2010 9:08 AM

Wingspan looks to be ~ 27 inches, which from an eyeball test looks to be bigger than the 48scale B-17 I have hanging in my workshop and just a little smaller than the 72scale B-36.

  • Member since
    December 2010
Posted by TheBomber on Thursday, December 30, 2010 7:20 PM

Wow I've only been doing this for a year. I hope one day i can do detail like that. How do you do detail like that?

  • Member since
    January 2015
  • From: Katy, TX
Posted by Aggieman on Wednesday, January 5, 2011 8:49 PM

Detail like that?  A bit vague but I'll try to answer.  The kit comes out of the box oozing with details, such as the gauge faces.  Other detailing is from my own efforts, such as a dark wash to bring out details (see the leather on the floor of the cockpit) or a silver pencil to highlight the rings around the gauges or to simulate the wear I'd guess we'd see in a well-used cockpit.

I finally got the Eduard photo-etch sheet for 1/24 scale belts.  Turns out per the instructions that this set is only intended as 1 belt set.  Not wanting to spend any more $$ on anything else for this kit, I opted to just use the one set for both seats.  Lots of detail in this larger scale.  Really like it.

  • Member since
    September 2009
  • From: Frisco, TX
Posted by B17Pilot on Thursday, January 6, 2011 8:29 AM

Excellent work!


  • Member since
    January 2015
  • From: Katy, TX
Posted by Aggieman on Sunday, March 27, 2011 9:08 PM

I have finally completed this big monster.  It fought me all the way to completion, and had it not cost what it cost, it would have gone airborne many times over given the irritations the kit caused me.  Still, I stuck with it and have produced a pretty decent looking Mosquito.

Some of the progress pictures I took along the way (I quit taking progress photos especially of parts I knew would not be visible and considering that I just wanted to be done with this kit):

The engines in this kit are kits into themselves, and of course, there are two of them! 

Finished build:

  • Member since
    February 2011
Posted by von Gekko on Sunday, March 27, 2011 9:37 PM

Great work.  I had seen this kit featured in Airfix Model World April issue and was wondering what a real build of it would look like.  Great work on the engines and cockpit!

I've done a couple Airfix kits and I ran into the same problem you did with the painting guide numbers.  For some strange reason the kit instructions only indicate numbers with no key or guide.  I found that you can go to the main Airfix website and when you click on a kit for information, it will list all the optional Humbrol paints you can buy for it.  This is your color key, listing each color code number along with the color description.  Print that screen you've got your reference sheet.  At least you'll be ready for next time!

  • Member since
    December 2002
  • From: Northern California
Posted by jeaton01 on Monday, March 28, 2011 12:57 AM

It does look very nice in the end, Steven.  The detailed kits do take a while, don't they.

John

To see build logs for my models:  http://goldeneramodel.com/mymodels/mymodels.html


JOIN OUR COMMUNITY!

Our community is FREE to join. To participate you must either login or register for an account.

SEARCH FORUMS
FREE NEWSLETTER
By signing up you may also receive reader surveys and occasional special offers. We do not sell, rent or trade our email lists. View our Privacy Policy.