SEARCH FINESCALE.COM

Enter keywords or a search phrase below:

Also making some progress on my B-17

14342 views
41 replies
1 rating 2 rating 3 rating 4 rating 5 rating
  • Member since
    December 2015
Also making some progress on my B-17
Posted by dcaponeII on Tuesday, March 13, 2012 5:44 PM

Here are a couple of shots of my 1/48 scale B-17 build.  This contains True details resin and Eduard photoetch additions.  I've also done a bit of resin casting on my own.  The framing inserts are cast with resin from the inside of the kit fuselage and then sanded to expose the framing itself.  Will eventually look like one of those vintage cutaway drawings (I hope)


  • Member since
    March 2008
  • From: Ohio
Posted by B-17 Guy on Tuesday, March 13, 2012 5:50 PM

Nice!


  • Member since
    December 2015
Posted by dcaponeII on Wednesday, March 14, 2012 8:11 AM

I just keep plugging away at her.  Got the windows in but it was tough to get behind the True Details resin.  Note to others:  If you can, put the cheek windows in before you install the resin side panels.

  • Member since
    February 2007
  • From: Brunswick, Ohio
Posted by Buckeye on Wednesday, March 14, 2012 9:11 AM

Nice work there.Yes

  • Member since
    June 2008
  • From: Iowa
Posted by Hans von Hammer on Wednesday, March 14, 2012 9:12 AM

Talk to me about your refs for the hot air ducts (at least I think that's what they are) and the armor plate on the pilot/co-pilot seats...  Are they one piece each from the detail set or did you add the seat-armor?


  • Member since
    December 2015
Posted by dcaponeII on Wednesday, March 14, 2012 10:30 AM

I think the hot air ducts are on a couple of photos of the Collings aircraft.  Probably an add on.  I'll have to go back and check.  The armor plate was part of the resin cockpit detail set.

  • Member since
    January 2006
  • From: Sarasota, FL
Posted by RedCorvette on Wednesday, March 14, 2012 10:37 AM

Looks good.  Looking forward to seeing more.

Mark

FSM Charter Subscriber

  • Member since
    December 2015
Posted by dcaponeII on Wednesday, March 14, 2012 7:30 PM

Hammer,

That heating duct is shown clearly in a series of beautifully illustrated cutaway drawings on Pg 82 and 83 of Robert Redding's and Bill Yenne's book:  Boeing:  Planemaker to the World.  These are reprints of earlier Boeing drawings so they are not from a restored museum aircraft as I earlier though.  The markings on the duct were so striking I didn't think it wise to leave them off.

  • Member since
    June 2008
  • From: Iowa
Posted by Hans von Hammer on Thursday, March 15, 2012 8:42 AM

Bummer.. Was hoping you found them on-line..

The markings were a nice touch.. They're on there to show airflow direction, in an attempt to make them "Private-proof" during servicing, since any vet will tell you that, if it CAN be installed backwards, it WILL be", lol..

  • Member since
    March 2003
  • From: Lafayette, LA
Posted by Melgyver on Thursday, March 15, 2012 9:34 AM

You have an amazing amount of detail and lots of hard work in the "old girl".   Great job and thanks for sharing.   I've had one started for over 25 years and never got back to it!  I have Peter M. Bowers book "Fortress in the Sky" and it's a great reference.

Clear Left!

Mel

  • Member since
    February 2012
  • From: Olmsted Township, Ohio
Posted by lawdog114 on Thursday, March 15, 2012 10:19 PM

That looks fantastic.....hope to see more soon...

Joe

 "Can you fly this plane and land it?...Surely you can't be serious....I am serious, and don't call me Shirley"


  • Member since
    February 2011
  • From: Bent River, IA
Posted by Reasoned on Thursday, March 15, 2012 11:15 PM

Such detail, make sure you have lots of pics before you close her up, looks great! Yes

Science is the pursiut of knowledge, faith is the pursuit of wisdom.  Peace be with you.

On the Tarmac: 1/48 Revell P-38

In the Hanger: A bunch of kits

  • Member since
    December 2015
Posted by dcaponeII on Friday, March 16, 2012 1:41 PM

I'm hopeful that the large openings in the port fuselage will allow the details to continue to be seen after the fuselage is closed up.  Should be sometime this weekend if I get back to it.  Got to finish grading these gas processing mid-terms first though.

  • Member since
    February 2011
  • From: Bent River, IA
Posted by Reasoned on Friday, March 16, 2012 2:03 PM

I got you now, I can see the port fuselage and the openings in the second pic above (those scratch built?).  So is the port wing going to be omitted too?

Science is the pursiut of knowledge, faith is the pursuit of wisdom.  Peace be with you.

On the Tarmac: 1/48 Revell P-38

In the Hanger: A bunch of kits

  • Member since
    December 2015
Posted by dcaponeII on Saturday, March 17, 2012 9:30 PM

The wings will all be in place when she is finished.  I'll just have to cut off some of the tabs from the wings.  MicroWeld is pretty strong and will keep the wings in place with short tabs.

I've spent the day working on more details.  Seat belts are on.  Ammo belts in the front end are taking shape.


I also scratch built ammo boxes for the ball turret and redesigned the mount a bit to make it more similar to the real mount.  I figured the boxes will hide most of in with the fuselage buttoned up so I didn't worry about exactly duplicating the struts.

Here's an overall shot of the work.  Still much to do but I'm reasonably happy with how it looks with the fuselage closed up.

  • Member since
    June 2008
Posted by lewbud on Saturday, March 17, 2012 10:18 PM

Funny, that doesn't look like a Jordanian F-16!Whistling  Great work as usual Donfather!

Buddy- Those who say there are no stupid questions have never worked in customer service.

  • Member since
    June 2008
  • From: Iowa
Posted by Hans von Hammer on Sunday, March 18, 2012 12:24 AM

dcaponeII

I'm hopeful that the large openings in the port fuselage will allow the details to continue to be seen after the fuselage is closed up.  Should be sometime this weekend if I get back to it. 

Good luck with that cut-away.. I mean it.. It would be a shame if the extra work was too hard to see..

Got to finish grading these gas processing mid-terms first though.

Phart and belch pathways through the listing and explainations of the body's expulsory functions?  Geeked

  • Member since
    June 2008
  • From: Iowa
Posted by Hans von Hammer on Sunday, March 18, 2012 12:40 AM

You sure about the shoulder-harnesses on the pilo/co-pilot seats? None of my refs show anything there, just the lap-belts..

Not a big deal though, just wanted to ask ya if your references match that..

 'Course, this is a restored Fort, and that's easily identified with the modern, red fire extinguisher.. The WW2-era ones were generally un-painted and made of copper or brass...

  • Member since
    June 2008
  • From: Iowa
Posted by Hans von Hammer on Sunday, March 18, 2012 12:51 AM

That's a helliva good job on those ammo-cans..

Are you gonna add the floor-baords in the wait-gunner's positions or leave 'em empty? Alos noticed that you left the armor-plates in ZC.. They were generally painted OD and installed after the interior work was completed, most times at the depot overseas, since they were shipped separately in most case, and installed once the aircraft had arrived in England or wherever... Most of the combat equipment (flex-mounts, guns & ammo, except for the turrets, etc)was left out for the ferry-flight from CONUS to the OCONUS Depot, so more fuel could be carried..

Your call though... Really wanna see this one when you're done!

  • Member since
    December 2015
Posted by dcaponeII on Sunday, March 18, 2012 6:13 AM

Can't say for sure on the harnesses.  The original Monogram seats have them molded in place and the Eduard Seat belt set in the B-17 Big Ed set clearly call for them.  I'll change the armor plate ot OD.  Good piece of information.  Thanks.  I've started placing the floor boards already but they are just sprayed Interior Green at the moment.  I've not found any original photos of their appearance in the field so no detailing has been done yet.  I was surprised that the True Details set for the waist gunner positions didn't come with them in resin.

Yes Buddy I kow..it's not a Jordanian F-16 in ..ugh..1/72 scale.  I did buy the kit yesterday at least.  Interesting enough it was $1 less at Hobbytown than it would have been if I had ordered from Squadron.  Still no 1/72 scale kit is worth $27.

  • Member since
    June 2008
  • From: Iowa
Posted by Hans von Hammer on Sunday, March 18, 2012 9:26 AM

Frankly, I think you can get away with either configuration, although it appears, based on my research, that shoulder harnesses were usually a restoration item, and were not installed on the original aircraft.  This comes from a SWAG though, based on looking at numerous photos of pilots or co-pilots in the cockpits, and a lack of visible shoulder harnesses, yet it's a 50-50 mix on the restored Warbirds.. "Liberty Belle" had them, "Texas Raiders" doesn't, "909" has them, none are installed in "Sentimental Journey", etc..
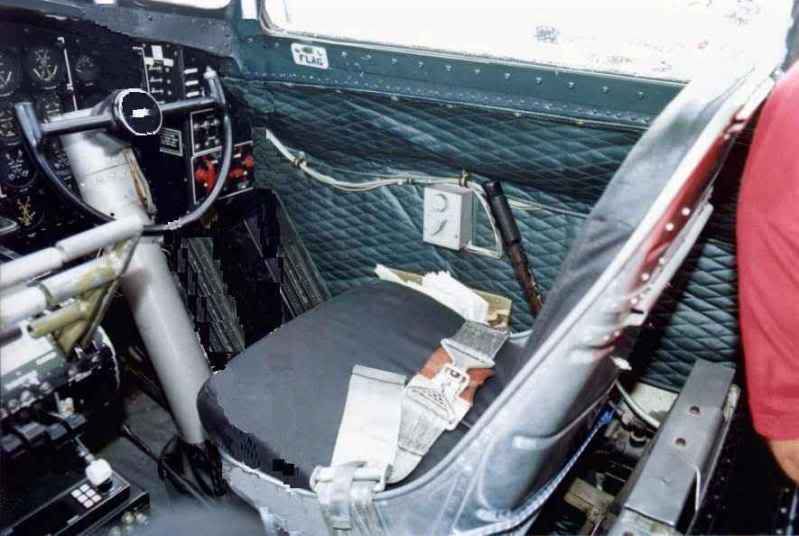
Here is a co-pilot seat without.
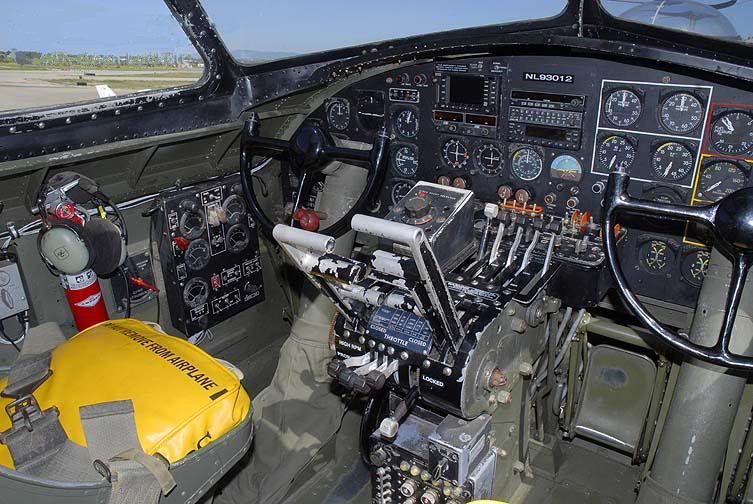
Pilot seat

The co-pilot picture also shows the quilted sound-proofing that was installed in the factory, but often removed after it went into combat, as it was a PITA to reinstall after repairs were made or battle-damaged..

Waist looking forward.
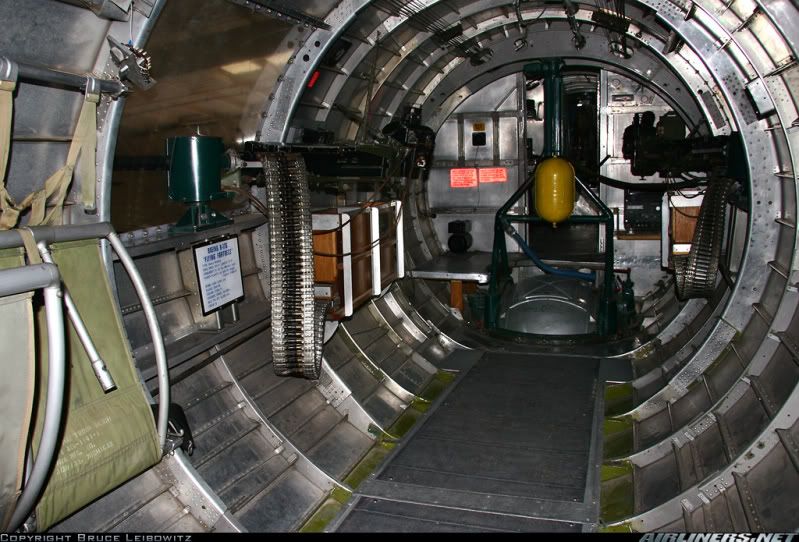
There should also be a firing step about four feet long below and centered on the guns, and that are about eight inches higher than the floor, which should be plywood with non-skid (on late-model Fs and all Gs) surfacing and the floor itself shoud be plywood (rather than the custom-made aluminum one shown here for location purposes only) and it also has a non-skid surface applied as well...

The kinda gruesome but practical purpose of the non-skid was to give better footing on a blood-covered floor..(we're talking about the reality of combat here).  Same thing was applied to the floor of the radio compartment in places..


  • Member since
    June 2008
  • From: Iowa
Posted by Hans von Hammer on Sunday, March 18, 2012 9:39 AM

Here's a better restoration of the waist position, as it's installed on "909"... 

The vertical pieces of plywood are are to allow the gunners to have more floor area, and a place to lay out and treat wounded crewmates..  It also shows the step and floor as it goes around the ball turret to gain access to the radio compartment...

  • Member since
    June 2008
  • From: Iowa
Posted by Hans von Hammer on Sunday, March 18, 2012 9:43 AM

Forgot to add that the extra floor panels might not fit on your model, since the waist on "909" is the staggered-window type..

  • Member since
    December 2015
Posted by dcaponeII on Sunday, March 18, 2012 9:48 AM

Here is why you don't see the shoulder harness in many photos.  When they are flipped to the back there isn't anything visible from the front.

  • Member since
    June 2008
  • From: Iowa
Posted by Hans von Hammer on Sunday, March 18, 2012 9:57 AM

They aren't flipped behind the seat here, though..

Like I said, I think you can get away with either configuration...  However, the armor plate would preclude flipping them behind the seats, which is why I think you see them more often on restored Warbirds, and they don't appear to be installed in operation Forts..

  • Member since
    December 2015
Posted by dcaponeII on Sunday, March 18, 2012 10:21 AM

Either way looks like the part.  I try and find period photos when I can but for the B-17 the internet is swamped by restoration photos (including the one with the shoulder harnesses flipped I hasten to add.  I've got some sandpaper with adhesive backing that ought to work well to finish off the floor boards.

  • Member since
    June 2008
  • From: Iowa
Posted by Hans von Hammer on Sunday, March 18, 2012 11:15 AM

I think "909" is one of the "truer" restored B-17s... If you can't find period-photos, you really can't go wrong using "909" for refs, IMHO.. And being in the CAF, I kinda hate to admit that, lol..

  • Member since
    December 2011
  • From: AZ
Posted by Luft Modeler on Sunday, March 18, 2012 11:47 AM

Only issue with 909 is that it is using a "newer" B-17 vs the original 909. The original 909 was not the staggered waste gun setup and it was also an early G model that had the cheek guns installed in the field which then the panels were painted sa slightly darker olive drab color. Interior color should be a natural metal finish on a WWII B-17 vs restored one. Just adding some info to that. Nice work though as it looks like a good representation of a restored 17! Atleast you will get to see all the hard work put in on the interior of doing a cutaway!

  • Member since
    March 2008
  • From: Ohio
Posted by B-17 Guy on Sunday, March 18, 2012 9:47 PM

Agreed on NMF for the interior.

  • Member since
    December 2015
Posted by dcaponeII on Monday, March 19, 2012 12:16 PM

I find original photos that seem to run the gammut of colors for the interior.  B-17B and C with nothing but aluminum.  B-17Fs with darler colors (B&E photos) presumably Interior Green and/or Zinc Chromate Green.  I even found one that looks like a combination of green on the skin with aluminum formers.  As the aircraft switched to all NMF later in the war then I supect that the interiors went that way too but I'll keep it green for this early G with non-staggered waist gun positions.

JOIN OUR COMMUNITY!

Our community is FREE to join. To participate you must either login or register for an account.

SEARCH FORUMS
FREE NEWSLETTER
By signing up you may also receive reader surveys and occasional special offers. We do not sell, rent or trade our email lists. View our Privacy Policy.