SEARCH FINESCALE.COM

Enter keywords or a search phrase below:

BIG Russian Jet Groupie GB

186318 views
1790 replies
1 rating 2 rating 3 rating 4 rating 5 rating
  • Member since
    June 2007
Posted by Porkbits on Wednesday, March 12, 2014 10:43 AM

Agreed...! I've been meaning to post on your build thread about the awesome work you're doing so far on the Su-33. I like reading about builds, but I think they're even more helpful when there are screw-ups and the builder shows how s/he fixed them. So...great recovery there. Reminds me that we all make mistakes, but you can work through them. There is hope!

Dre
  • Member since
    June 2007
  • From: here, not over there
Posted by Dre on Wednesday, March 12, 2014 8:19 AM

A plastic scrub pad... I hadn't even thought of that, but that should get that nasty tape goop out of the paint quick enough.   Thanks for the ideas, guys.   I appreciate it!

T3chDad- whatever it is that sets you back seems to motivate you to a higher effort- keep it up!!Wink

  • Member since
    February 2014
Posted by T3chDad® on Tuesday, March 11, 2014 6:49 AM

I can vouch for nail polish as a paint remover.  The incorrect use of it on my Su-33 build set me back a week.  Embarrassed


  On the bench: Between Builds...

  • Member since
    September 2013
Posted by Dean30 on Monday, March 10, 2014 6:12 PM

Not coarse enough to damage the plastic I mean.

  • Member since
    September 2013
Posted by Dean30 on Monday, March 10, 2014 6:04 PM

I actually prefer the look of the twin seat versions, nail polish remover cleans basically everything off any surface so thats always worth a shot, in fact it's designed to remove dry nail polish off nails which is usually enamel based so if you happen to have any of that in the house it would be a cheaper way to remove the paint and not quite as quick, but definitely a way which means no sanding. use a green brillo pad whats normally used for washing dishes, it's coarse but not enough to damage the paint.

Dre
  • Member since
    June 2007
  • From: here, not over there
Posted by Dre on Monday, March 10, 2014 5:22 PM

I swear I once read something about using brake fluid or brake dust cleaner to remove enamel/lacquer paints, but the search function here is less than useful in that regard...  I think that I'll dig around the house tonight and see what nasty solvents I have at hand before I go to the LHS for a Tamiya spray can...

BTW, it will be a Su-27UB C that gets the Black-Out treatment.  

  • Member since
    June 2007
Posted by Porkbits on Monday, March 10, 2014 5:22 PM

Bring on the black Flanker! :-)

  • Member since
    September 2013
Posted by Dean30 on Monday, March 10, 2014 4:08 PM

But obviously if you paint the plastic with the over spray it will actually paint the surface again, but spraying humbrol over tamiya also rips up the paint.

  • Member since
    September 2013
Posted by Dean30 on Monday, March 10, 2014 4:06 PM

Seems any colour will work, though I know humbrol spray cans work as well.

Dre
  • Member since
    June 2007
  • From: here, not over there
Posted by Dre on Monday, March 10, 2014 4:02 PM

Any old Tamiya spray can?     I'll have to give this a try as all I really need to do is get the tape residue out of the paint and off the plastic- I can cover the remaining paints with an overspray, but I'd ideally like to start fresh on those engine panels after seeing what everyone else has done with theirs.

  • Member since
    September 2013
Posted by Dean30 on Monday, March 10, 2014 3:54 PM

Well there is one way that works well. If the model is old and you don't mind I have done this before, get a Tamiya spray can, any colour and spray it onto enamel paint and within minutes it will destroy the paint and you can literally wipe it off with your hand. it's how I stripped the paint on my 1/32 Flanker before I converted it. Must be the mix of chemicals, I mean spray it on the enamel paint as if you're painting it. and you will see cracks in the paint form, don't leave it too long, but after a few mins of drying and wipe it off with your hand.

Dre
  • Member since
    June 2007
  • From: here, not over there
Posted by Dre on Monday, March 10, 2014 3:12 PM

Eh... "started it" is a bit strong, more like a 2-year-old, left-over project that is getting a new lease on life.  It's been so long that I've forgotten if it is a single-seater or two-up!

Anyone got any good ways to remove enamel and lacquer paints that won't dissolve the plastic?

  • Member since
    September 2013
Posted by Dean30 on Monday, March 10, 2014 1:09 PM

You've already started the Black Flanker? I'm not sure when I'll get to start mine, so for now I'm gathering bits and pieces for it.

Dre
  • Member since
    June 2007
  • From: here, not over there
Posted by Dre on Monday, March 10, 2014 11:47 AM

Lol, you ain't joking!  Look at the bright side- that's the same number of road wheels on a panzer!

One more week isn't too long- I just have to get through it!  The NASCAR circus comes to Bristol this week and guess who has to be there, rain or shine?   Luckily, the black Flanker is 90% built and I just need to clean off the tape and old paint from the engine panels (the tape melted into the enamel and lacquer paints!) and then I can begin to mess it up anew.

  • Member since
    June 2007
Posted by Porkbits on Monday, March 10, 2014 11:03 AM

Thanks, Dre! LOL, man, you nailed it...those fins were NOT fun. At all. Let's see....four Alamos @ four fins per so 16 fins total @ two sides per fin so....32 total sides to mask and paint. Not to mention the question of "Do I mask white and paint gray or mask gray and paint white?" Oy. No wonder some guys prefer armor modeling. :-)

One more week? That's not too long, fortunately.

Dre
  • Member since
    June 2007
  • From: here, not over there
Posted by Dre on Monday, March 10, 2014 10:51 AM

Those missiles look great, PB.   Very nice and clean- how much fun was in masking the forward fins?

Begemot decals are crazy thin and kind of difficult to work with because of it, but if you can them to work they look great and lay down super-smoooth.

For panel washes, I use acrylic Payne's Grey- it looks black in the tube but dries to a chalky medium grey.  Used in the right places it really does look like the typical staining and streaking found on most aircraft without the starkness of a black wash.

About 7 days to go before I can even think of returning to the bench..  

  • Member since
    September 2013
Posted by Dean30 on Sunday, March 9, 2014 11:42 AM

I agree the panel lines on Flankers are nearly impossible to see, so not sure if I'll even do all of them, but I'll probably use it around the aft end of the aircraft. On the Decal sheet I have there are a few options including Ukraine and a host of others its the Bergemot BT4804 decal set, I hope its decent as I remember a long time ago I bought after market decals for a mig 29 and the things literally fell apart on me in the water so I am not sure but I hope it wasn't Bergemot either way I'll find out!

  • Member since
    June 2007
Posted by Porkbits on Sunday, March 9, 2014 10:34 AM

Awesome! Yeah, panel lines are tough, although someone here pointed out in a photo that you really can't see any, so....not sure if I'll do mine or not. Guess I'll see after painting--if the overall appearance looks too toy-like, I might.

But, yeah, that seat is awful. Most kit seats are afterthoughts, it seems.

  • Member since
    September 2013
Posted by Dean30 on Sunday, March 9, 2014 9:36 AM

Okay just purchased the Decals, and Flory Models concrete wash there were three colours so I am guessing its the closest for panel lines, I still after years I cant seem to ever get the lines right, anyway so far thats the Quickboost Nose, Seat, Decals and flory wash for the Flanker. I am going to have the canopy closed so I think the kit supplied cockpit will suffice but the seat is awful lol, it's like the guy designing that part of the kit had 10mins of work left on a Friday and was told to design the kit seat lol.

  • Member since
    September 2013
Posted by Dean30 on Sunday, March 9, 2014 9:28 AM

Lol nps man, I have made these mistakes myself lol, I am gonna choose some decals I think for my Flanker, I actually like the Cobra Option that is in your kit, I have seen it and it looks great! Youre doing Ukrainian s I think I'll stick with the Russian option so I can have the all over paint scheme as it's pretty unique to see a flanker with a wrap around camouflage scheme.

  • Member since
    June 2007
Posted by Porkbits on Saturday, March 8, 2014 5:26 PM

Dean, you da' man!!!! Worked like a charm (used my son's really bright little LED flashlight and can see all the location holes). I have a mini pin vise hand drill so I'll just mark where the holes are and drill 'em out.

Thanks!

  • Member since
    September 2013
Posted by Dean30 on Saturday, March 8, 2014 4:27 PM

PB hold the wing against a strong light as I looked at my kit and you will see the holes are moulded inside the lower wing halves and if you have a sharp scalpel you will be able to open the holes for the pylons just be careful. I did this to open the location holes on the Vigorous Dragon.

  • Member since
    September 2013
Posted by Dean30 on Saturday, March 8, 2014 2:51 PM

Well I would start from the outside wing tips and work inwards, I think measuring each weapon against the last one placed from the outside would be the most accurate, other than actually draw on locations with pencil after measuring I would guess that simply and carefully doing it by eye would work, I've done it before.

  • Member since
    June 2007
Posted by Porkbits on Saturday, March 8, 2014 2:22 PM

Thanks!

U.S. news, biased?? Never! ;-)

The kit doesn't come with replacement gear (but I bought Eduard's replacement wheels). What it does provide is a couple of PE bits--including thinner scissor links and some hydraulic lines. As far as I can tell, there isn't anything particularly bad about the Academy gear, including the wheels. But then again, I'm not expert, so......

My next problem--either the Academy mold didn't include locating holes for the pylons on the bottom of the wings, or I forgot to drill them out. Regardless, I'm going to have to figure out the approximate locations of all the pylons, and make sure they're in line and at the same distance from each other on both wings. What a pain.....any suggestions on how I can do this without screwing up too much?

Thanks!

  • Member since
    September 2013
Posted by Dean30 on Saturday, March 8, 2014 2:05 PM

Also PB did the kit you have come with the Brassin landing gear? If so what's the opinion over the Academy landing gear?

  • Member since
    September 2013
Posted by Dean30 on Saturday, March 8, 2014 1:49 PM

Looks great I hate building weapons myself but love the look of them on board, I ordered the correct nose for my Flanker and a decent seat from quickboost. Also I am toying with the idea of getting a new decal sheet. Plus don't worry Russia didn't invade Ukraine, Russia has an agreement and has not exceeded the allocated number of troops etc, I get a feeling that U.S. news is biased from what I have heard.

  • Member since
    June 2007
Posted by Porkbits on Saturday, March 8, 2014 1:38 PM

Hey, guys:

Remember the Alamo(es)!

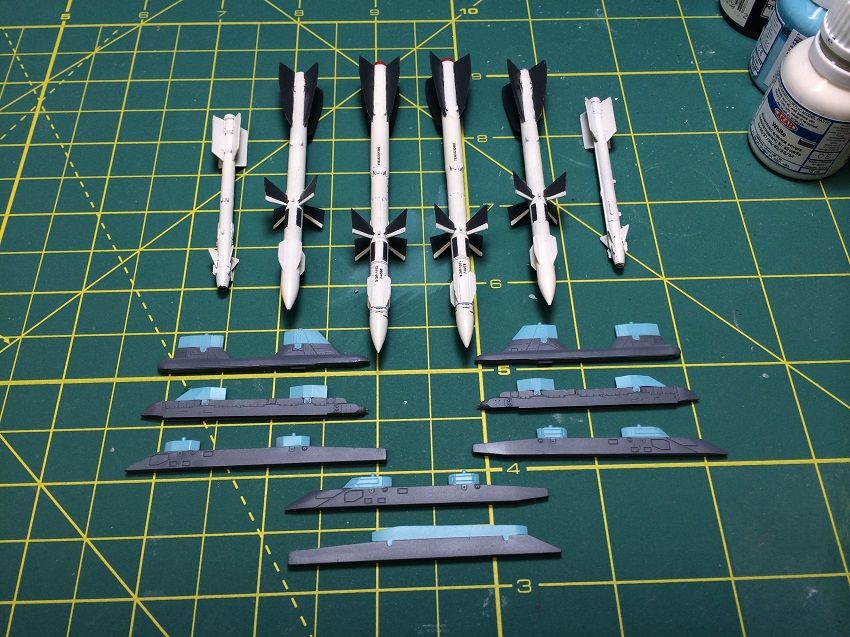
Quick update--finished Eduard's excellent Alamo A and Cs, and also Archers....and all the pylons. I love my ac dripping with weapons, but, man, they're a pain to build. 

In any event, after this I'll go over the airframe with a fine-toothed comb then start laying down some Flanker Blue. :-)

Oh, and my friend sent me this last week:

Link

With the mess in the Ukraine, makes me wonder what my build (Blue 56) is up to these days....

Hope everyone is well. Finally some warmth on the East Coast of the States. 50 deg!

PB

  • Member since
    June 2007
Posted by Porkbits on Thursday, February 27, 2014 11:44 AM

Wicked scheme. :-)

(Give me a good FPS any day--I just wanna blow stuff up)

Dre
  • Member since
    June 2007
  • From: here, not over there
Posted by Dre on Thursday, February 27, 2014 11:20 AM

Interesting paint...

I'm more of a Gran Turismo player myself.

  • Member since
    September 2013
Posted by Dean30 on Thursday, February 27, 2014 2:27 AM

I had myself thought of doing an Ace Combat fighter, it was literally the only game I really got into.

JOIN OUR COMMUNITY!

Our community is FREE to join. To participate you must either login or register for an account.

SEARCH FORUMS
FREE NEWSLETTER
By signing up you may also receive reader surveys and occasional special offers. We do not sell, rent or trade our email lists. View our Privacy Policy.