SEARCH FINESCALE.COM

Enter keywords or a search phrase below:

1/48 Hasegawa Hurricane MK I (Work in Progress)

20043 views
43 replies
1 rating 2 rating 3 rating 4 rating 5 rating
  • Member since
    February 2012
  • From: Olmsted Township, Ohio
Posted by lawdog114 on Saturday, December 1, 2012 9:52 PM

Hello folks, I'm in for a little update here.  I decided on Carl Davis' 601 Tangmere mount from the Fall of 1940.  Davis was one of the few pilots of American decent to participate in the Battle of Britain and was unfortunately KIA in Septemberof 1940.  I was inspired and decided to homage to this hero.  The markings were from the Aeromaster sheet 48-577 "Yanks in the RAF".  It calls for a bare metal panel on the nose and no underwing roundels.  I decided I would exercise artistic licensing and just build it as a standard Hurricane, by omitting this panel and I may even add the roundels.  Reference the latter, the Aeromaster sheet seems to unclear whether these were present or not.  Heck, I may even go back and throw in the NMF nose panel.   

I used Blue Tac rolled out in the pattern for application of the XF-81 RAF Dark Green.  It was sprayed down then Xf-57 Buff was added for streaking to weather it.  The clear coat has been added and I'm almost ready for the decals. 

Joe


 "Can you fly this plane and land it?...Surely you can't be serious....I am serious, and don't call me Shirley"


  • Member since
    February 2007
  • From: Brunswick, Ohio
Posted by Buckeye on Wednesday, November 28, 2012 9:09 AM

Looks great!  I really love how you do the shading.  Will have to give that a try myself.

  • Member since
    February 2003
  • From: Rothesay, NB Canada
Posted by VanceCrozier on Wednesday, November 28, 2012 8:20 AM

Wow, Joe, glad you posted outside the "Forces..." GB thread as I hadn't seen your Hurricane until now. Some great work going on here.

On the bench: Airfix 1/72 Wildcat; Airfix 1/72 Vampire T11; Airfix 1/72 Fouga Magister

  • Member since
    August 2009
  • From: Borlando Fla home of the rat
Posted by TREYZX10R on Tuesday, November 27, 2012 7:00 PM

Awesome preshading Joe!

  • Member since
    December 2006
  • From: N. Georgia
Posted by Jester75 on Tuesday, November 27, 2012 6:56 PM

Absolutely love your preshading and how you put your paints down. Looks great!

Eric


  • Member since
    February 2012
  • From: Olmsted Township, Ohio
Posted by lawdog114 on Tuesday, November 27, 2012 4:25 AM

Thanks for the compliment Jack.  Reference the Sky color, I actually have an old bottle of Model Master Sky Type "something" that I used as a reference for the mixture I used on my Spitfire (I no longer use Model Master enamels..I now prefer Tamiya Acrylics).  I just took a dab from the MM bottle and put it on a mixing palete, then commenced to mixing Tamiya paints till it matched, at least to my eye.  I messed around with it until I came up with this formula, XF-21 Sky with a touch of XF-3 Flat Yellow.  The control surfaces are the above formula lightened with XF-2 white.  Truth be told, I've seen built models on the net and in books done up in the above hue and thought they look better than the bluish-green duck egg blue sometimes used.  Of course this is just my personal preference and may be completely wrong....oh well.  

Thats a sweet FS color chart.  Interestingly, neither my mixture or Model Master's version looked anything like the picture above.  The above Sky S looks more like neutral grey to my untrained eye.  At least my Dark Earth mixture is close to the above version.  

Joe

 "Can you fly this plane and land it?...Surely you can't be serious....I am serious, and don't call me Shirley"


  • Member since
    April 2006
  • From: ON, Canada
Posted by jgeratic on Tuesday, November 27, 2012 3:06 AM

Joe, looks great and have to say your technical skills at laying down paint  appears flawless.

I'm curious to know what reference source(s) you are using to base your underside  colours on, as I may need to update my library on this.   To me the lighter shade you applied on the control surfaces seems very close to the proper Sky Type S while the remainder of the undersides would be more of a match to Duck egg green.

Anyways, here is a comparison breakdown of the closest FS matches  from researcher Paul Lucas (published about a dozen years ago).

regards,

Jack

  • Member since
    February 2012
  • From: Olmsted Township, Ohio
Posted by lawdog114 on Tuesday, November 27, 2012 1:36 AM

In for an update.  Thanks for the tips folks.  That's the beautiful thing about this forum.  Jester, I almost went with the Tamiya version, but I found this one fairly cheap on E-bay.  I still would like to give that one a whirl eventually.  How about a Work in Progress on that Tami-talieri 'Cane?  Anyways, I added the "headlights" (landing lights?) and then the wing tip lights.  On Nathan's advice, I dryfitted them and they seemed to fit ok with some minor gaps as reported  I painted them, taped off the frame (bezel?) then super glued them in.  I then filled any resulting gaps with white glue.  It looks good enough.  It was pre-shaded the usual XF-1 Flat Black to await the Sky color underneath.

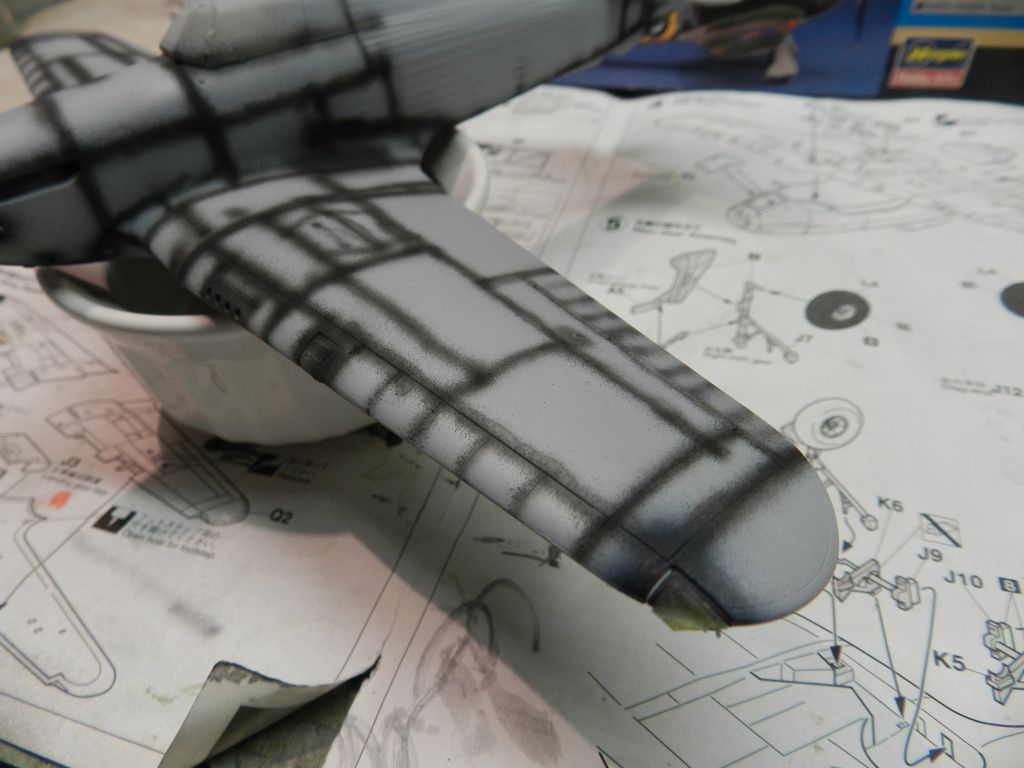
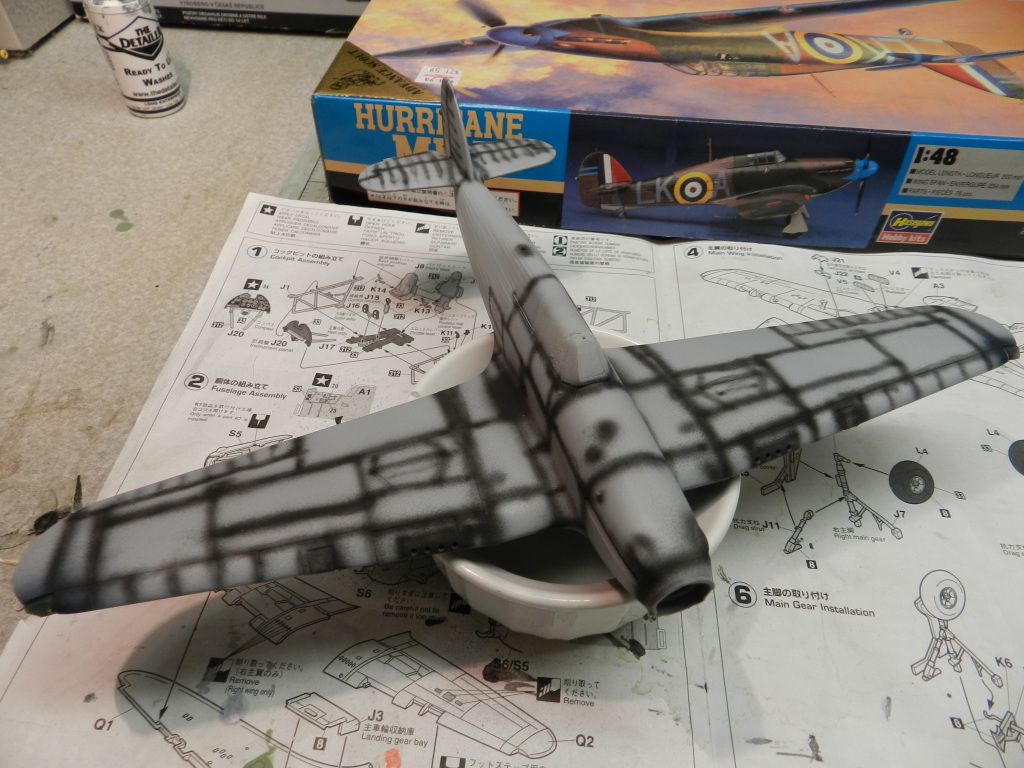
I suspect my airbrush needle is in need of replacement since my lines keep getting fatter and fatter (and Leo is getting larrrrrrrrger!).  "Airplane!" reference aside, I made the same mixture I did for my Spitfire MK I with Tamiya XF-21 Sky and a dash of XF-3 Flat Yellow.  This seems to match the Sky Type S perfectly (I rarely paint straight from the bottle).  At about 15 psi (I prefer lower pressures), the paint was sprayed to where the flat black was just slightly visible. The paint was then lightened with XF-2 Flat White.  I then streaked the lower surface with the airflow.  Once done, I used a diluted mixture of XF-69 NATO black and XF-64 Red Brown (I keep a glass bottle pre-mixed for convenience) on areas subject to grime, mostly around the engine, intakes, flaps and wheel wells.  To my eye, it adds an extra dimension to the overall look.  If anyone should try it, be careful because its easy to overdo.  I think this here (below)is about right. 

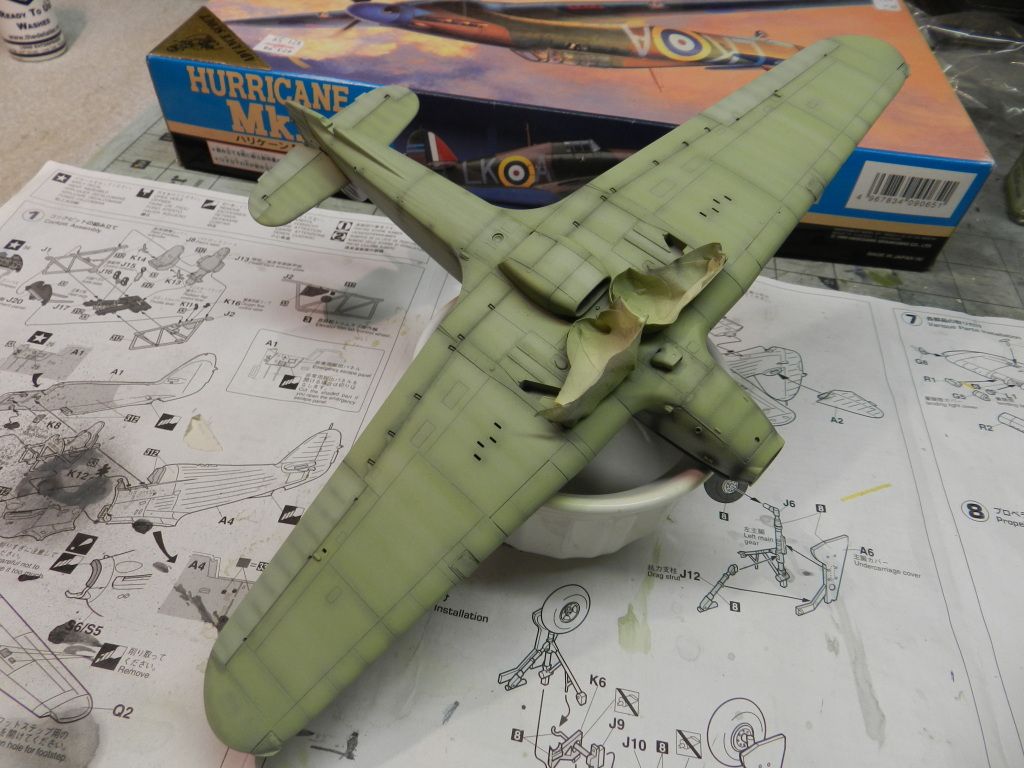
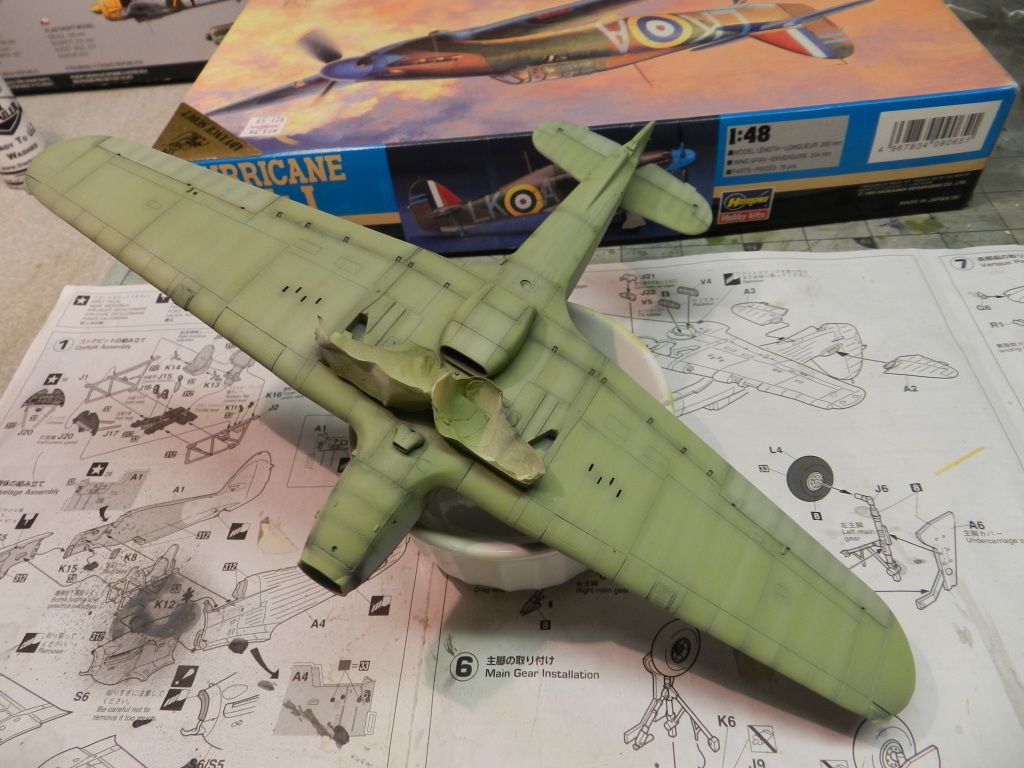
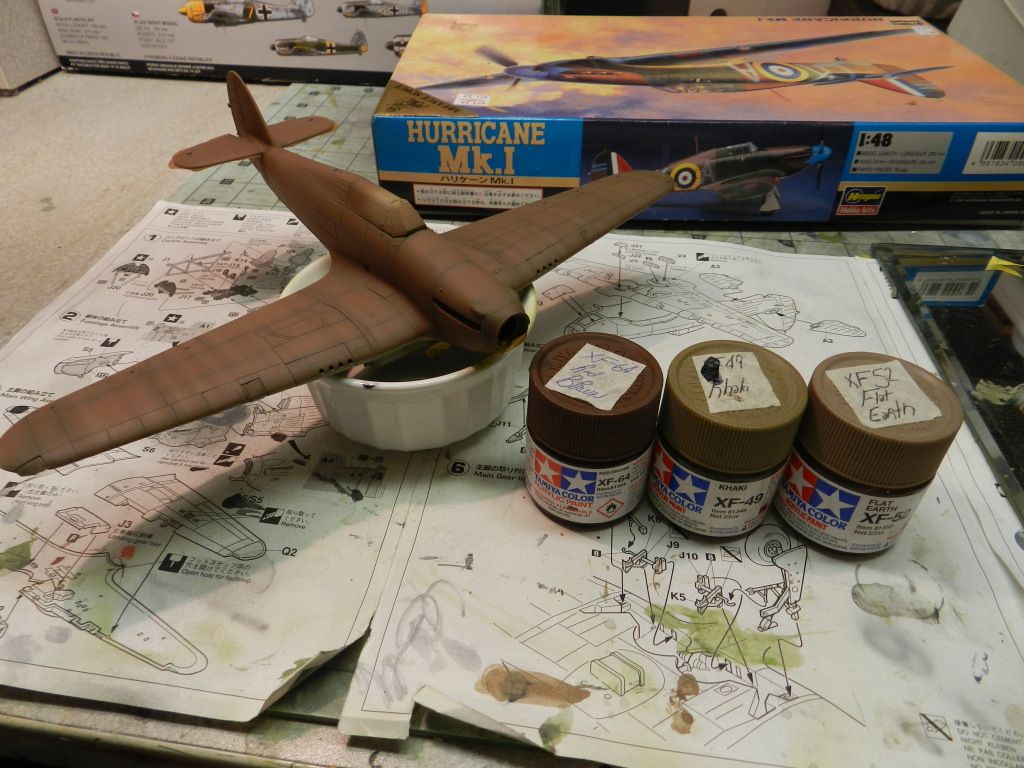
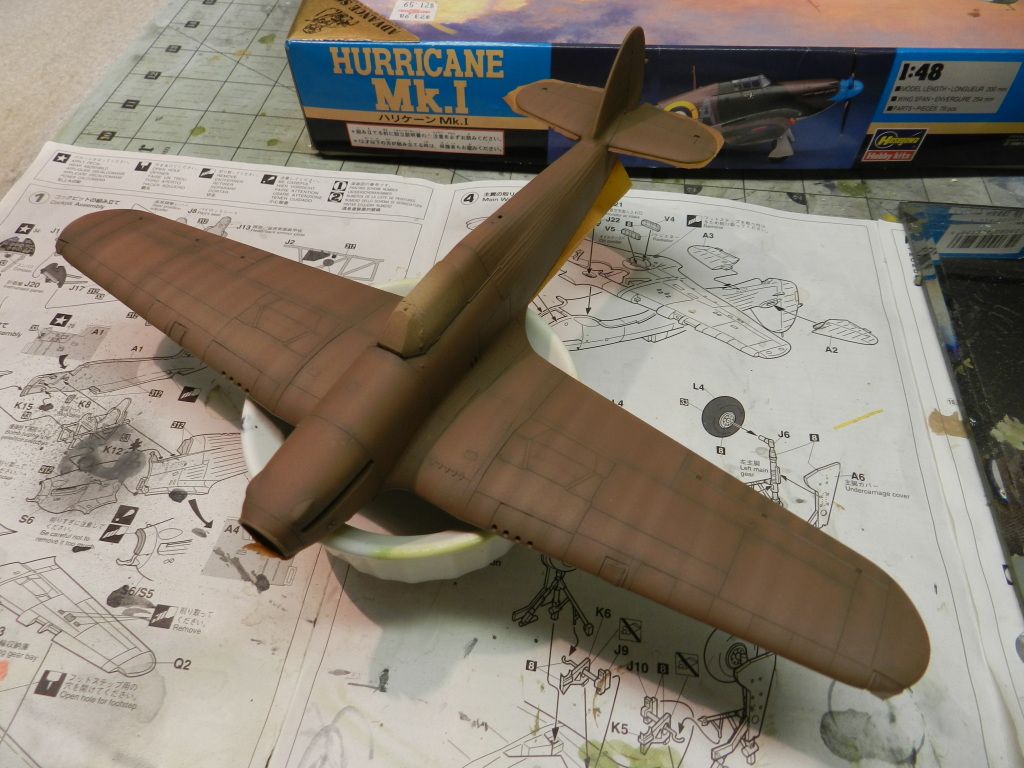
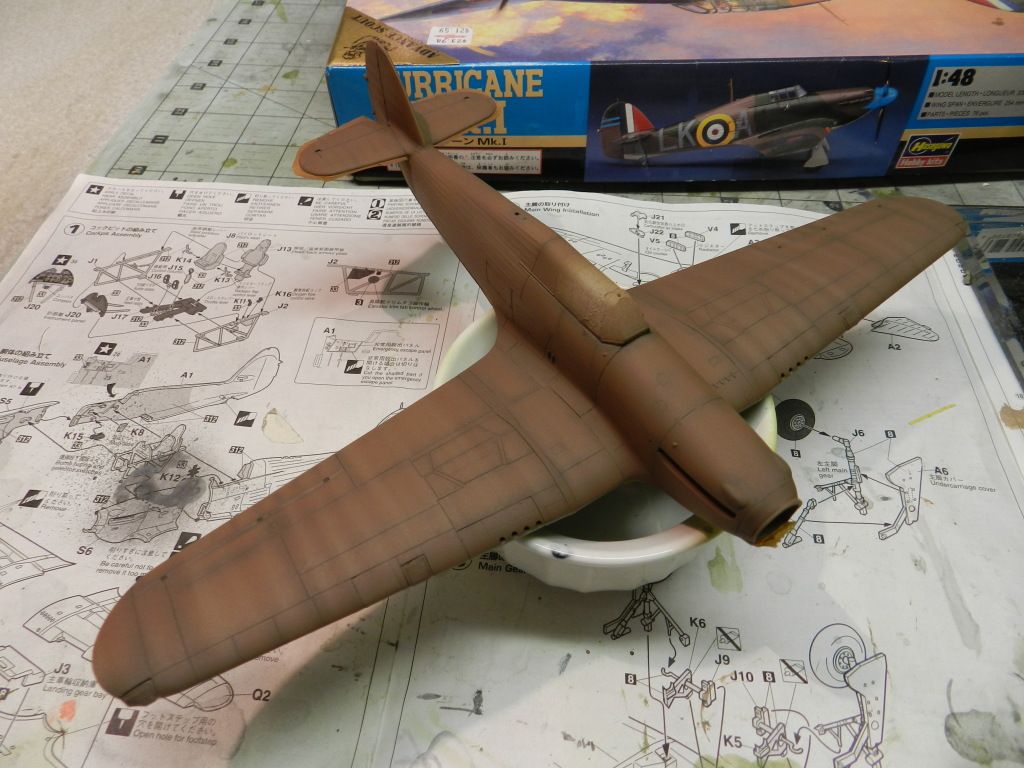
I then sprayed the RAF Dark Earth with a the Tamiya recommended mixture of XF-64 Red Brown and XF-52 Flat Earth.  The last time I mixed this shade for the Spitfire MK I, I thought it seemed too red, so I decided to mix some XF-49 Khaki into it until it turned more brown.  Once satisfied, it was sprayed in the same manner as the Sky.  I made sure some of the distinctive tail plane and rudder ribbing showed through.  This was then lightened with XF-57 Buff.  The wings were then streaked rather heavily.  .

I ordered the Xtradecal sheet 70th Anniversary of the Battle of Britain (#48-086) off E-bay (my go to for decals).  It has several Spits and Canes to choose from.  When it does arrive, I'll decide on which Hurricane to build.  Since I don't know whether it will be an A or B pattern, I decided to hold off on the RAF Dark Green until it gets here. 

Stay tuned...

Joe     


 "Can you fly this plane and land it?...Surely you can't be serious....I am serious, and don't call me Shirley"


  • Member since
    December 2006
  • From: N. Georgia
Posted by Jester75 on Friday, November 23, 2012 1:32 PM

Nice work. I've got the Tamiya reboxing of the Italeri version in the decal stages now. It fought me every step of the way during construction. Have you decided on markings yet?

Eric


  • Member since
    August 2009
  • From: Borlando Fla home of the rat
Posted by TREYZX10R on Wednesday, November 21, 2012 9:39 PM

Joe, great looking build so far and the office detail is awesome.

  • Member since
    March 2010
  • From: MN
Posted by Nathan T on Wednesday, November 21, 2012 9:33 PM

looks good Lawdog, just beware, the nav lights on the wing tips fit like sss.....they need to be superglued, sanded, then painted the appropriate clears, might wanna check this before the main color goes one. Or maybe that was just my model...


  • Member since
    February 2012
  • From: Olmsted Township, Ohio
Posted by lawdog114 on Wednesday, November 21, 2012 9:08 PM

Thanks for the compliments and the areas to look out for.  I got her together and primed.  Maybe I'm spoiled by Tamiya kits, but this turkey has been fighting me pretty good so far, albeit some has been operator error.  First, the outboard wing plugs did not match the wing chord.  I had to do a lot of twisting and spot gluing with Tenax to make them look halfway decent.  Surprisingly, the 8 Browning 303 inserts fit good. 

Thanks for the warning on the lower wing to fuselage joint that went right through the nice ribbing detail, however, it did no good.  This area was a bear and I struggled .  All I could do was super glue the joint and sand obsessively, all while shaking my head as I wondered why Hasegawa would do this, especially when there was a nice panel line just north of the area?  I was having alot of trouble getting this area presentable, so I ultimately said to myself "Self....if you can't beat 'em...join 'em".  I decided to sand the whole panel, to include the ribbing, which did blend the joint and once done, it left a faint impression of the ribbing detail.  Since I've heard this kit has overemphasised ribbing in the first place, I suppose I sort of came up with a solution. I suppose we need this type of thing to pop up once in a while to keep us honest. 

I tried to cut apart the canopy with the intent of using the front windscreen and a vacuform for the sliding part.  I unfortunately slipped with the razor saw and gouged the front part.  I then decided to use the damaged part as a makeshift canopy mask.  Now I suppose I have to use the whole Squadron canopy...oh well....hope it fits well (I hate cutting these out).  She's primed and almost ready for paint.  Stay tuned....

Joe   


 "Can you fly this plane and land it?...Surely you can't be serious....I am serious, and don't call me Shirley"


  • Member since
    April 2006
  • From: ON, Canada
Posted by jgeratic on Saturday, November 17, 2012 3:11 PM

Joe, looks like you're off to another great start - man that cockpit detail pops!

I built this one many moons ago, and I don't recall fit problems with the gun port blocks - just test fit and some sanding.  The Italeri version though seems really bad in that respect, and Quickboost has made a replacement set.

Most fans of the Hurricane are quite satisfied with the Hasegawa version.  Main gripe was the overly done fabric  on the fuselage and of course the fuselage joint on the bottom end runs right across fabric detail instead of at a panel line.

There has been mention of a slight inaccuracy in nose shape, and hubs on the tires are too small making them look like donuts.  The last bit is incorrect fabric detail for the access panel which should run continuously.  (compliments to Troy Smith for pointing this out).

regards,

Jack

  • Member since
    March 2010
  • From: MN
Posted by Nathan T on Saturday, November 17, 2012 10:46 AM

Nice work. This kit is a beauty right outa the box. I built the Mk IID awhile back. Yes, the wing plugs and landing lights kinda suck, as well as the lower wing to fuselage joint. But isn't a deal breaker. Looking forward to more.


  • Member since
    February 2012
  • From: Olmsted Township, Ohio
1/48 Hasegawa Hurricane MK I (Work in Progress)
Posted by lawdog114 on Saturday, November 17, 2012 12:25 AM

Hello all, since I just finished a MK I Spitfire, and find myself still in Battle of Britain mode (I'm the type of modeler that needs to be inspired), I decided to have a go at the 1/48 Hasegawa Hurricane MK I.  I'm building this for the Force of Nature Group Build, but since not everyone follows the group build threads, I decided to post it here for those interested in the Hurricane MK I.  With the exception of a Squadron canopy which is needed to expose the cockpit and a PE seatbelt harness, I'm going to go out of the box.  There really doesn't appear to be anything to add. I haven't decided on a Squadron but it will be a Battle of Britain bird for sure. 

I started with the cockpit.  Very impressive for out of the box.  With the cage-like tubing design, I can see where the Hurricane evolved from the string bags of the previous generation.  I guess it just shows how the Spitfire was extremely innovative for the time period.  I used Tamiya XF-71 mixed with a bit of grey for the cockpit color.  I know its supposed to be for Japanese planes but it looked close to my eye.  I used the Instrument panel decal and added drops of 5 minute epoxy to the dial to simulate glass.  I prefer this over future.  I used a left over Spitfire PE seatbelt harness, added a dark Detailer wash to grunge it up, then called it done.

This thing is going together beautifully.  I've gotten the fuselage halves sealed up around the cockpit and the wing assembly together.  I was surprised to see that the Hurricane had an almost flat wing dihedral.  A test fit shows there should be minimal issues at the wing root (famous last words...lol), but we shall see how the infamous Hasegawa plugs fit on the wing leading edges.  Also, I have read there are issues at the wing/fuselage joint, specifically that it doesn't meet on a panel line and fixing it is difficult due to the ribbing detail.   I have a feeling its going to be a awhile before I get there due to the aforementioned plug work. 

I hope I'm not breaching some type of etiquette by posting the same subject in two different threads.  As always, comments are welcome by all.

Joe

 "Can you fly this plane and land it?...Surely you can't be serious....I am serious, and don't call me Shirley"


JOIN OUR COMMUNITY!

Our community is FREE to join. To participate you must either login or register for an account.

SEARCH FORUMS
FREE NEWSLETTER
By signing up you may also receive reader surveys and occasional special offers. We do not sell, rent or trade our email lists. View our Privacy Policy.