SEARCH FINESCALE.COM

Enter keywords or a search phrase below:

Revell/Monogram 1:48 P-40B Flying Tiger AVG (Complete)

39405 views
123 replies
1 rating 2 rating 3 rating 4 rating 5 rating
  • Member since
    June 2013
Posted by bvallot on Tuesday, August 19, 2014 8:46 PM

Thanks Ray! She is finally coming around. Certainly was stubborn about it.  I still need to fix the prop...if anybody noticed one of the damned blades popped off as I was applying the mask to paint it.  Sure didn't take much either.  I'll definitely revisit this kit again too.  I'd like to build it as a Pearl Harbor P-40 and maybe even an XP-40 in NMF as an early pre-war plane.  Aside from all the extra stuff I've made more complicated in pursuing, it is a relatively quick build.

Have you decided on a type of base for yours?  It looked like you were making a little diorama for it.

On the bench:  

Tamiya F4U-1  Kenneth Walsh


  • Member since
    May 2006
  • From: Chapin, South Carolina
Posted by Shipwreck on Wednesday, August 20, 2014 7:41 AM

Bvallot, the plastic on those old birds is a bit fragile. It might be easier just to purchase another kit or two in order to replace that prop. I had two when I started my George Welsh version. After I dry fitted the nose piece, it popped off and I could not find it. Then I noticed my dog was munching on something really good! It took me two kits to build it, but it only costs about $8 each.

On the Bench:

Revell 1/96 USS Constitution - rigging

Kinetic 1/48 YF-104A 5-2957

Trumpeter 1/350 USS Hornet CV-8

Revell 1/48 B-1B Lancer Prep & Reasearch


  • Member since
    June 2013
Posted by bvallot on Wednesday, August 20, 2014 2:10 PM

Shipwreck, that's not a bad idea.  I was going to try to salvage it.  I planned on carving out a little hole for a small brass rod to insert and glueing the rod/prop back onto the spinner.  I'm not even sure how it's going to workout, but at least I don't feel worried about it. =]  That's a good thing, no? lol  Confidence outta get me somewhere.

On the bench:  

Tamiya F4U-1  Kenneth Walsh


GAF
  • Member since
    June 2012
  • From: Anniston, AL
Posted by GAF on Wednesday, August 20, 2014 4:00 PM

An extra kit for the prop is not a bad idea.  You not only get the prop, but an extra set of decals too!  And if you go to Hobby Lobby with a 40 percent off coupon, it's cheaper than buying a decal set. Guess that's one good thing about the Revell kits.  I needed decals for one of my P-47 builds and the cheapest way to get them was to buy another kit!

She's a fine looking P-40!

Gary

cb1
  • Member since
    December 2009
  • From: D/FW Texas
Posted by cb1 on Thursday, August 21, 2014 4:31 AM

holy cow! that is awesome dude!

  • Member since
    June 2013
Posted by bvallot on Sunday, August 24, 2014 11:44 PM

Thanks CB1.  It's been a bit of a love-hate relationship with this Hawk.  

A quick update.  I've addressed a few things that I put on hold for a while and continued to work on the weathering.  I had previously assembled the covers to the landing gear since in my test fit it appeared that I would be able to sneak them in underneath.  Well,  of course that wouldn't be the case at all.  I suppose I should've known better.  So, I cut the covers off (carefully) and set them aside.  I have weathered the tires a bit more to show more mud and dried dirt that it would've have sat in at some point briefly.

Here's that:

 image by brittvallot, on Flickr

You can see in the photo above I had to cut a very small slice off the length of the rod that accepts the tire. After adding the strips of plasitcard, it's now raised the tire a smidge higher.  This allowed the cover to set down a little neater where it belongs. The photo below shows the better fit.

 image by brittvallot, on Flickr

Tires:

 image by brittvallot, on Flickr

Here are the landing gear now assembled.

 image by brittvallot, on Flickr

If you look closely here, you can see where I've set the eyelet pin piece (help with that term?) that seems to hold the tire in place.  It's a very tiny brass rod that I've bent into a circle.  Worked fairly well.  =]

 image by brittvallot, on Flickr

Here's a quick top view of what's generally going on here with the weathering.

 image by brittvallot, on Flickr

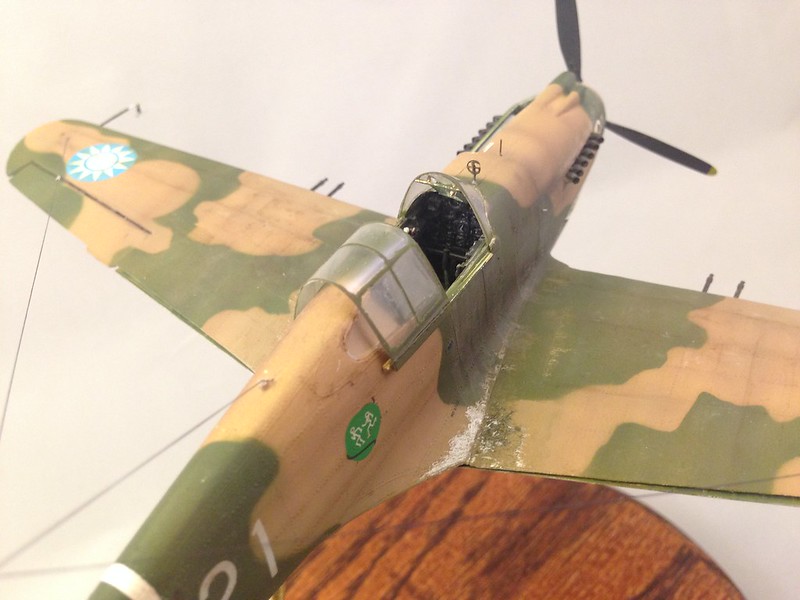
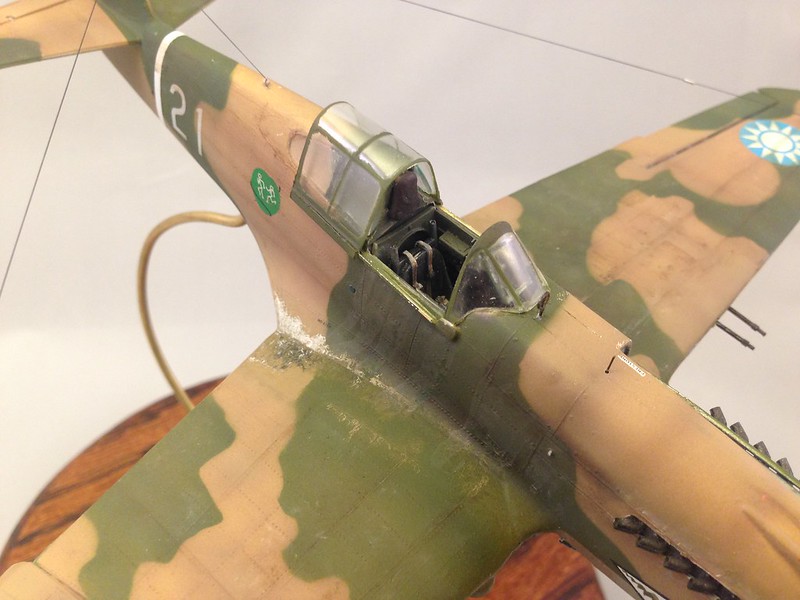
The chalky markings on the paint surface are Tamiya Weathering compounds A.  They work rather well, but it did take a little learning of how I wanted to go about it.  I didn't have the kind of luck I wanted with adding some fuel stains.  I started with MiG Rain Streaks.  It went down a little poorly.  I wasn't patient enough with allowing it to set up, so it became overdone.  Then as I tried to fix it, naturally it got away from me a little more.  After some more effort I finally got it to come back to where I wanted.  This terribly overworked area is a combination of the Tamiya Compounds, light washes of the Tamiya acrylic paints to bring colors back to where I wanted them, and following up again with the weathering compounds.  I made this more work for myself than was needed, but it's coming together.  It's not entirely what I was looking for.  I don't feel I had the kind of control I normally have when it comes to painting and weathering.  However, I don't think it turned out too bad.  I'd like to tone this down some next time.  =/

 image by brittvallot, on Flickr

 image by brittvallot, on Flickr

Here's a view again showing some of the Rain Effects applied.  I'd recommend it.  Just take your time with it.

 image by brittvallot, on Flickr

That's where I'm at for now. =]

On the bench:  

Tamiya F4U-1  Kenneth Walsh


  • Member since
    December 2013
  • From: Greenville, TX.
Posted by Raymond G on Monday, August 25, 2014 3:17 PM

Dang it Britt, I'm sorry I just saw this!  Check your messages about the prop!  I've got an extra!!!  Raymond

On the Bench:

U.S.S. Arizona (Revell)

P-51D Tribute (Revell)

57 Chevy Bel Air


  • Member since
    June 2013
Posted by bvallot on Monday, August 25, 2014 3:35 PM

Ha! That's nice of you. =]  I forgot to mention it during the post as it was late when I got to it.  I actually managed to fix it.  Since it was a simple clean break, there was a slight tooth to a small part on the most forward aspect of the blade and it happened to fit very neat into the depression it left on the spinner.  So I left that alone and with my No. 11 exacto blade I carefully drilled a tiny hole into the widest part of the blade.  I matched that up to the corresponding place on the spinner except on the spinner I drilled all the way through.  I fit a small brass rod thru it and bent it to about 80 degrees or so in order to lock it down on the inside wall of the spinner....something for the CA to bite on.  =]  Glued the blade back onto the spinner while noting the pitch and voila!  Back to new!!

So no worries. =]  Crisis averted.  I did however notice that a small triangular, bracket from the engine popped off and that'll need to be replaced.  Always something with this damn Hawk.  =]  But thanks for thinking of me.

On the bench:  

Tamiya F4U-1  Kenneth Walsh


  • Member since
    November 2003
  • From: State of Mississippi. State motto: Virtute et armis (By valor and arms)
Posted by mississippivol on Monday, August 25, 2014 10:08 PM

It must be right, cuz it needs a serious run through a car wash!

  • Member since
    June 2013
Posted by bvallot on Wednesday, September 17, 2014 3:19 PM

Aaaaaaaand I'm back.  =]  Last update.  The next post I make will be at the finish line.  Just some odds and ends to address.  

Completed the cowl flaps and added the rods and gearing to make them "work."

 image by brittvallot, on Flickr

 image by brittvallot, on Flickr

One thing I noticed happening with the landing gear is that the struts still appear in the loaded position.  It didn't occur to me at first as I was more concerned with making them fit.  I suppose it's a small concession to make.

Master Model .30 gun barrels in place. Ultracast exhausts, and a Squadron wind screen/canopy in the works (not glued down yet).  And I finally got one of my magnets back in place for the bottom panel.

 image by brittvallot, on Flickr

 image by brittvallot, on Flickr

A closer look reveals something going awry here with my cowl panel.  It seems that this damn thing is bending itself straighter as the fit is somehow different now.  Hopefully when I add the magnet at the other end this will resolve itself.  My prop is acting funny now too.  I think it's more an issue of the makeshift shaft I have inside the engine.  It seems to have shifted while handling.

 image by brittvallot, on Flickr

Other exhaust stack

 image by brittvallot, on Flickr

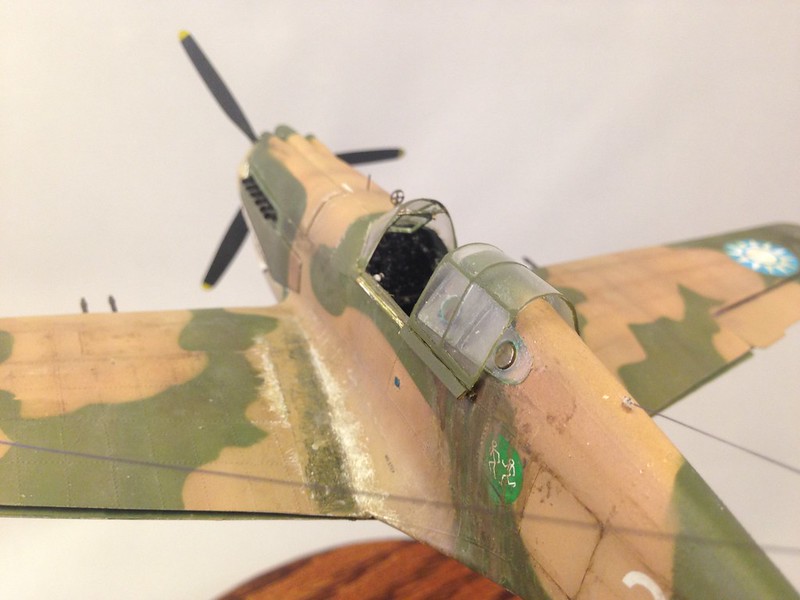
And here with the Squadron Canopy something else weird is happening.  This is the second one I put together.  The first one came out great.  Fit was perfect.  Paint was perfect.  Then I tried to dirty the windows up a bit and I started melting through the damn plastic.  Made the one you see now and I managed to screw with the fit of the canopy butting up against the windscreen.  Everything else about the fit of the slide rails grooving with the canopy is fine.  Hopefully, I can beat this into submission before the end of the week.  There's a IMPS event nearby where I live and I was considering throwing this one in it.  I've never been to one before and don't really know what to expect, but I do want to make sure I clean up all these little issues before then.

 image by brittvallot, on Flickr

Anyone out there who's dealt with similar issues with the squadron canopy and has a grip on fixing it, by all means please throw me a bone.  =]  This is the first one I wholeheartedly attempted.  That's a wrap on that.

If you've got any input, I'd love to hear from ya.  =] 

On the bench:  

Tamiya F4U-1  Kenneth Walsh


  • Member since
    February 2012
  • From: Olmsted Township, Ohio
Posted by lawdog114 on Wednesday, September 17, 2014 8:08 PM

Hey Britt, I just picked up the latest incarnation of this kit at a local drug store as a "sacrificial lamb" for my next project.  Last night, for Censored and giggles, I taped together the main airfame (and nosepiece)  to see how it would go together.  Oh my....absolutely horrendous!  This mold has certainly run its course.  With that, I had to give you a shout out.  Congratulations on turning this pig into a beautiful work of art, and making it look easy at that.

Joe   

 "Can you fly this plane and land it?...Surely you can't be serious....I am serious, and don't call me Shirley"


  • Member since
    June 2013
Posted by bvallot on Sunday, September 28, 2014 10:09 PM

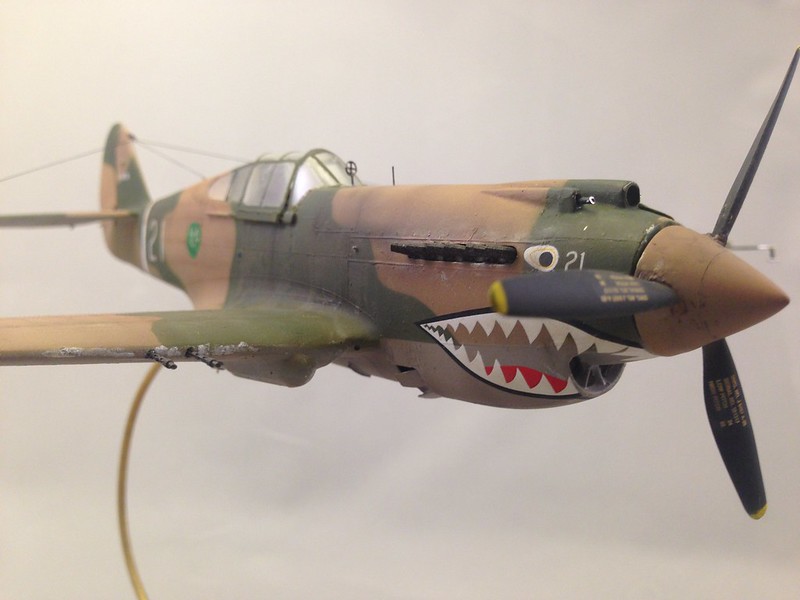
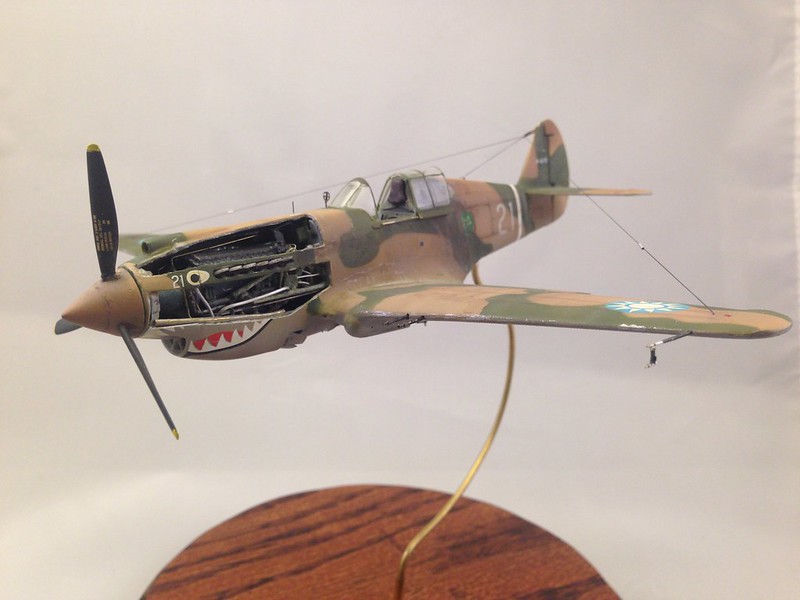
Okay guys here it is! I've finally washed my hands of this one. This Hawk kept finding new ways to challenge me along the way, but now it's complete. =D

So here we go: (Lot's of pics. Sorry. =] )
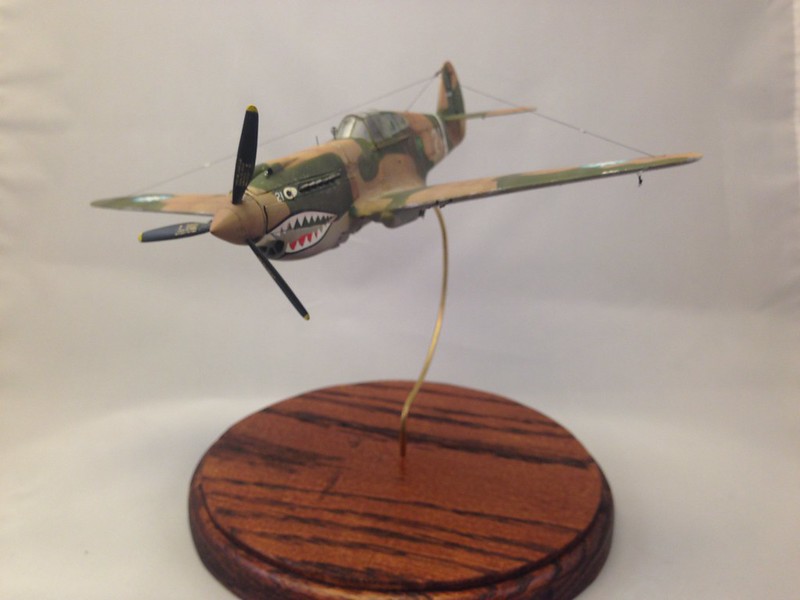
 image by brittvallot, on Flickr

 image by brittvallot, on Flickr
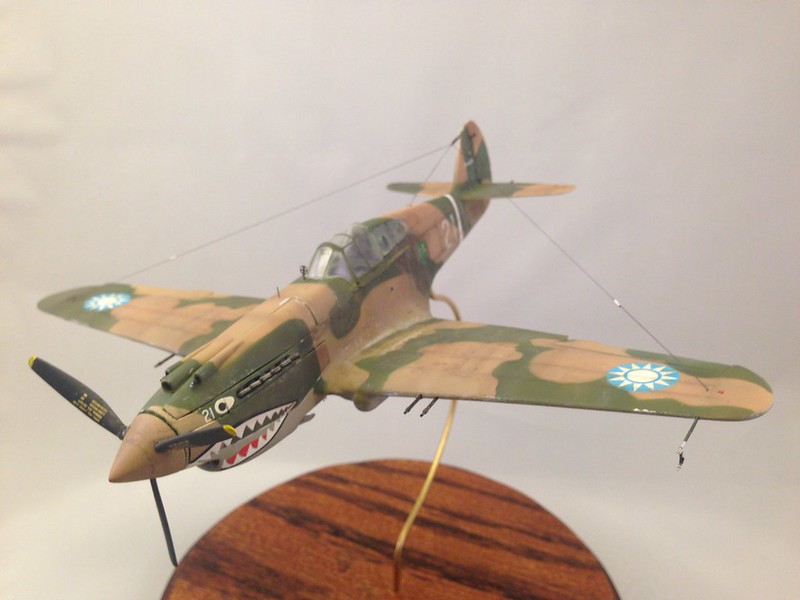
 image by brittvallot, on Flickr

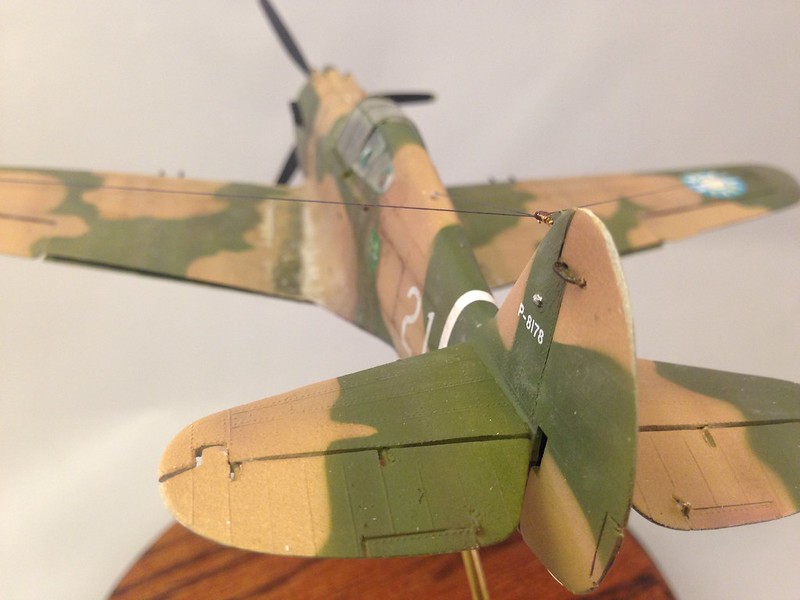
Close up of rudder horn and aerial hook up.

 image by brittvallot, on Flickr

 image by brittvallot, on Flickr

For the cross hairs...I literally spent about two and a half hours trying to do something that would've been really nice.   But they were just too tiny for me to grip and put together.  Ugh! But still I took the kit part to see what I could do with it and ended up filing it down as thin as I could and used a sharp No. 11 blade to trim up the insides.  I'm mostly content with it.  

Detail of the exhaust and what's either a static pitot tube or some exhaust vent that protrudes from the cowl.

 image by brittvallot, on Flickr

 image by brittvallot, on Flickr

 image by brittvallot, on Flickr

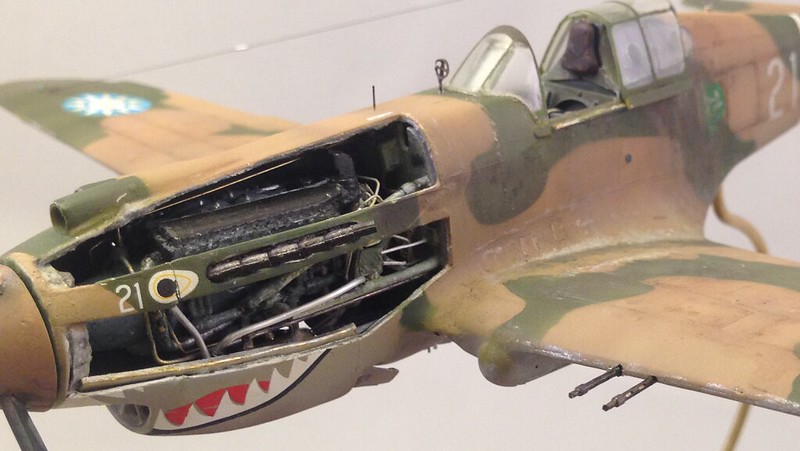
Detail of the engine.  I've included the fuel drain here and that really tiny hole on the landing gear housing is what they used to grease the gear parts for turning the landing gear. (This is also seemingly the only picture I have where the crosshairs look less than nice. =[ ) 

 image by brittvallot, on Flickr

 image by brittvallot, on Flickr

 image by brittvallot, on Flickr

 image by brittvallot, on Flickr
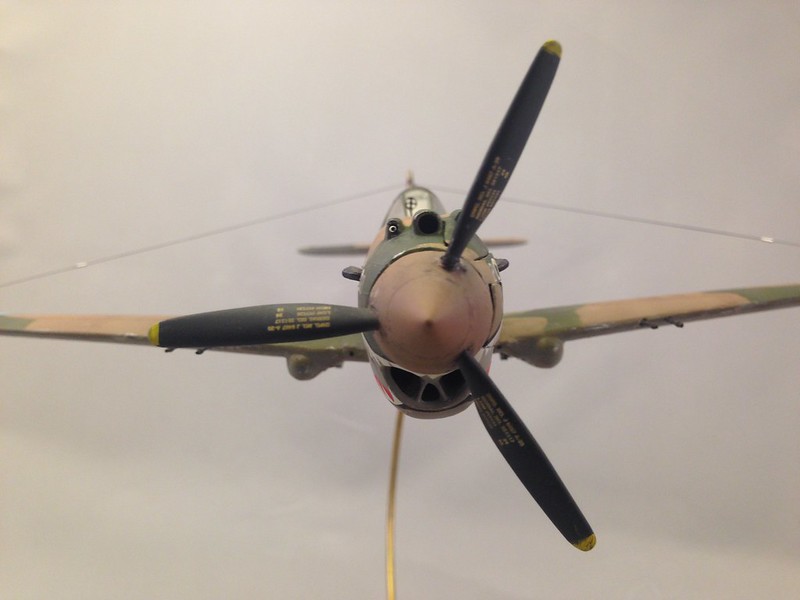
Detail of scratch built British pitot tube.

 image by brittvallot, on Flickr

 image by brittvallot, on Flickr
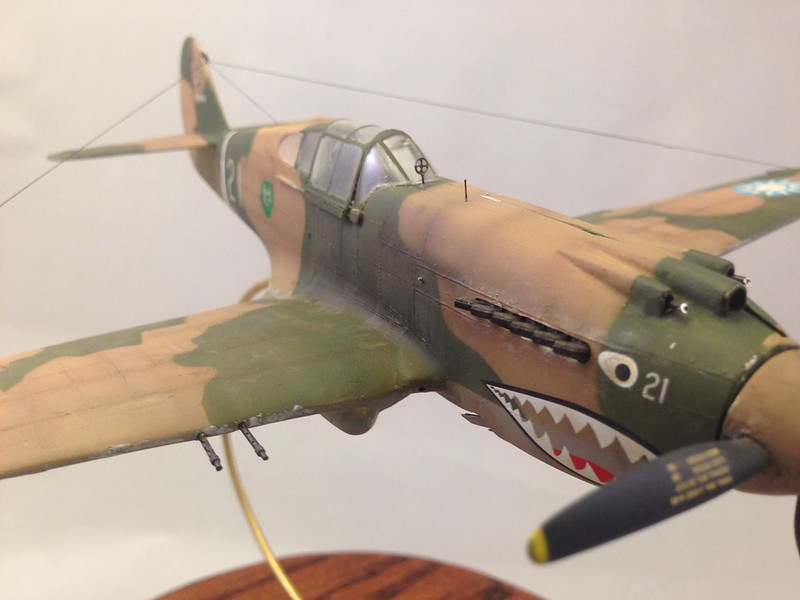
 image by brittvallot, on Flickr
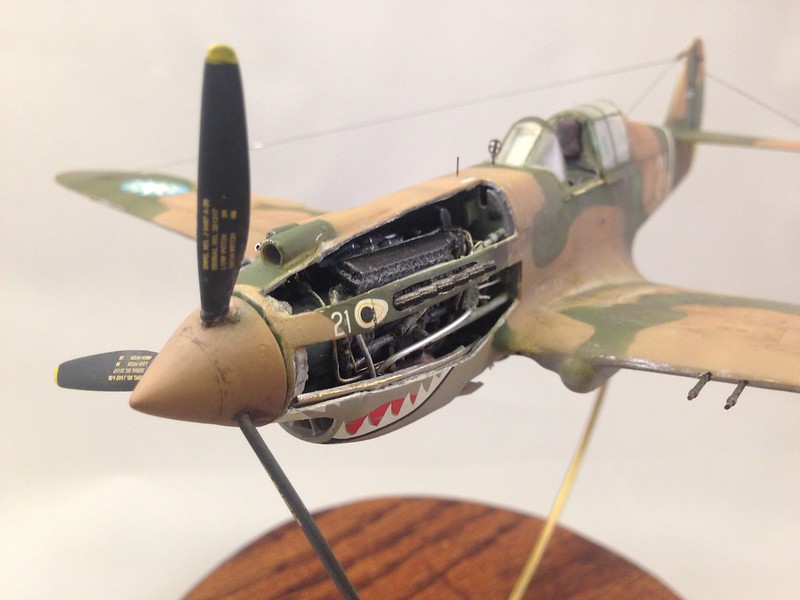
 image by brittvallot, on Flickr
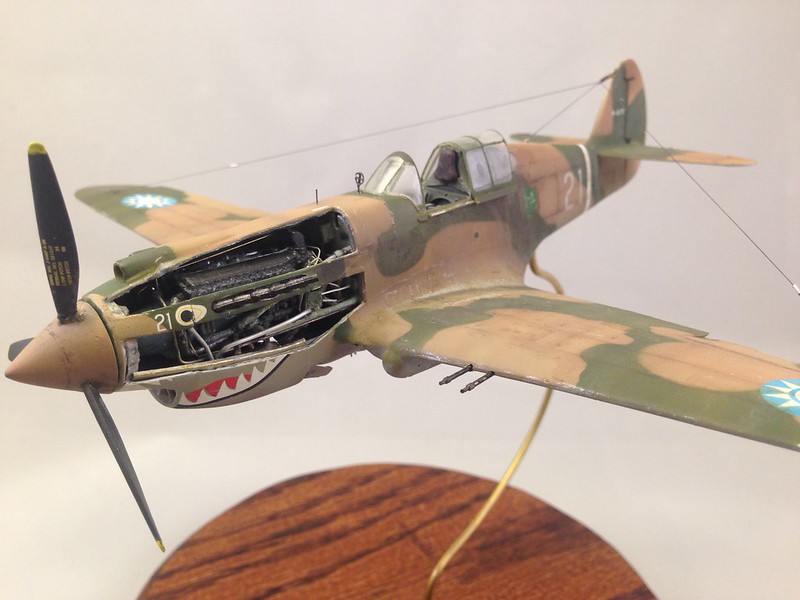
 image by brittvallot, on Flickr
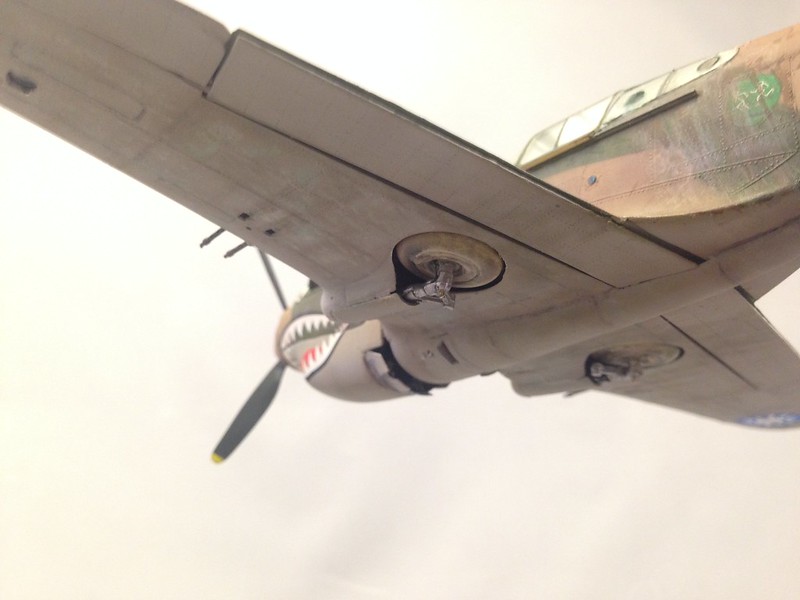
 image by brittvallot, on Flickr
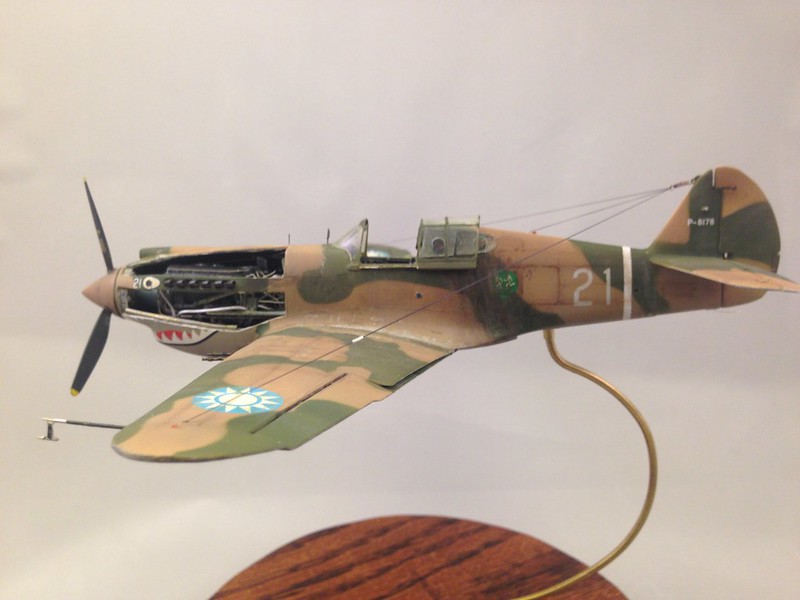
 image by brittvallot, on Flickr
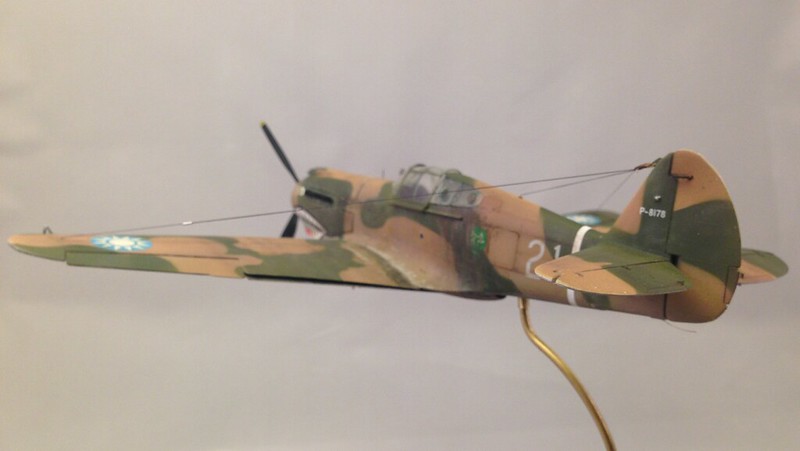
 image by brittvallot, on Flickr
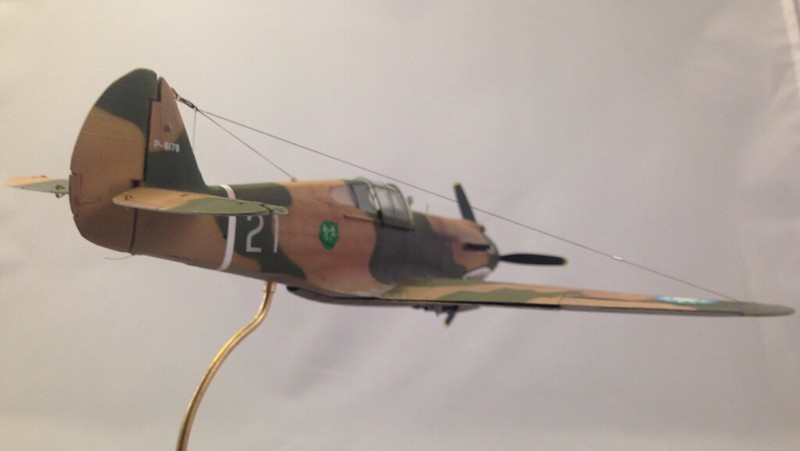
 image by brittvallot, on Flickr

Deflector made from plastic strips and a thin sheet of acetate. Hangs from a brass rod scratched out.

 image by brittvallot, on Flickr

That's a wrap.  Of course I don't mind hearing what the jury out there has to say.  This Hawk is far from perfect.  There's a couple of spots I've had to live with considering the add ons I did. But she's still purty to me. =]  There's a Saints game on now and I think my boys need me.  Gotta run!!

On the bench:  

Tamiya F4U-1  Kenneth Walsh


  • Member since
    December 2013
  • From: Greenville, TX.
Posted by Raymond G on Sunday, September 28, 2014 11:36 PM

Absolutely beautiful Britt!  You went way above and beyond the call on this one, especially knowing what you had to work with!  I've got this kit on my want to do again list, but not for a while ;-)  Congrats, mate...  She's a beaut for sure, Raymond

On the Bench:

U.S.S. Arizona (Revell)

P-51D Tribute (Revell)

57 Chevy Bel Air


  • Member since
    February 2012
  • From: Olmsted Township, Ohio
Posted by lawdog114 on Monday, September 29, 2014 1:46 AM

Gorgeous Britt.  I hope my Frankenstein P-40 turns out half this well.  Nice job on the rigging too.  I must say I'm a fan of your in-flight displays.  

Joe

 "Can you fly this plane and land it?...Surely you can't be serious....I am serious, and don't call me Shirley"


  • Member since
    February 2003
  • From: Cameron, Texas
Posted by Texgunner on Monday, September 29, 2014 8:46 AM

That's some mighty fine work Britt!   She looks cool "in-flight" too.  Great job on a difficult project!Bow Down

Gary


"All you mugs need to get busy building, and post pics!"

  • Member since
    June 2014
Posted by BrandonK on Monday, September 29, 2014 9:03 AM

That really is a super nice build. What an amazing amount of work you did in modifying that kit in to something it was never meant to be. Success!!! I love it.

On the bench:

A lot !! And I mean A LOT!!

2024 Kits on deck / in process / completed   

                         14 / 5 / 2  

                              Tongue Tied

  • Member since
    June 2013
Posted by bvallot on Monday, September 29, 2014 9:07 AM

Thanks guys!

Ray: I will say that for the most part I didn't find the kit to be too awful...maybe I got a lucky one.  It did have some nasty spots to correct which I was adequately prepared for (this time).  I did just pick up another one for the P-40B in OD Green scheme.  I saw a lot of nice photos that showed some subtle variation in the color of the OD due to weathering and such.  And all the kit's quirks are still fresh in my mind so I might work it a little on the side as I do my next one that I've been putting off for a while.  Should be a quicker build without all the extras.  And of the Curtiss P-40s, the -B is my favorite shape. =]

Joe: I'm such a fan of that EZ Line!  I don't dread rigging up the aerials anymore.  What used to take 2 or 3 hours of fooling with is now wrapped up in about 20 minutes.  I think it comes out so much nicer too.  Much more straight forward for me especially.  And thanks.  I'll still do some in-flight planes, but I'm getting eager to have some on the ground.  There's a part of me that cringes when it comes to the moment where I have to drill a hole for that rod that it gets mounted too.  There will come a point where I'll want to display certain features of the aircraft that will dictate it stays on the ground.  And now that our house is in order and the busyness of post-wedding on-goings is over, I'll have my attention on that special item for you.  The nature of it being flat has been tricky for making a mold that won't get destroyed when opening. It's comin' though.  I promise!!

On the bench:  

Tamiya F4U-1  Kenneth Walsh


  • Member since
    February 2007
  • From: Brunswick, Ohio
Posted by Buckeye on Monday, September 29, 2014 11:26 AM

Beautiful build!  Love the weathering you did on the tires.Drinks

Mike

  • Member since
    December 2013
  • From: Greenville, TX.
Posted by Raymond G on Tuesday, September 30, 2014 6:22 AM

I hear you Britt... My chief complaint with the kit is the awful gaps, the horrid cockpit set up, and the intentional misses on the landing gear doors.  Not a huge fan of the wheels either, though yours ended up looking awesome.  Honestly, I'm not sure you can't look at this kit from two angles: First, being that it's a great beginner level kit, and it is what it is.  Second, that it's an experienced builders dream because there's so many modifications that can be done to improve a fifty year old mold.  Like I said, I'll probably do it again, once I've got a little more experience under my belt.  I'm actually seriously considering doing a diorama of Boyington's bird being repaired on top of the mountain top Chinese cemetery he crash landed on.... Complete with him getting his butt chewed on by a peeved crew chief ;-)  But, you got to admit... going from a modern Tamiya mold to this is enough to strip anyone's gears :-)   Raymond

On the Bench:

U.S.S. Arizona (Revell)

P-51D Tribute (Revell)

57 Chevy Bel Air


  • Member since
    May 2006
  • From: Chapin, South Carolina
Posted by Shipwreck on Tuesday, September 30, 2014 9:11 AM

Bvallot, you certainly raised the bar on us. That is a plus fine P-40B. I noticed that you attached the canopy so that it could be moved back - nice touch! Have you ever used pilots? I bet you could get one to drop right in there. They help fly the plane!

On the Bench:

Revell 1/96 USS Constitution - rigging

Kinetic 1/48 YF-104A 5-2957

Trumpeter 1/350 USS Hornet CV-8

Revell 1/48 B-1B Lancer Prep & Reasearch


  • Member since
    June 2013
Posted by bvallot on Tuesday, September 30, 2014 9:37 AM

No doubt about the gaps Ray! =D I'll tell you like anybody else about this kit...if I had one thing that got me through this it was--well, two things--a positive mental attitude and my secret weapon: Milliput.

One thing that kept me up was that I didn't have any expectations from this kit and I wasn't worried about ruining some part. I just did what I was going to do and I was going to make it work.  As for the Milliput, that stuff made this kit happen! Can't say enough about it.  I used it for the leading edge of the wings, the fairing in front of the landing gear, the gun barrel fairings on the cowl, and a few spots along the wing root.  That stuff absolutely helped me keep the shape right without having to make a mess.  CA just wasn't an option for me in some of those tight spaces.  I just couldn't sand it all properly.  That Milliput went on like silk too and it was fairly forgiving.

I think you should go for it on the diorama! Beat that plane up too. =] So long as you're taking care of the important things, i.e. seams etc., I think it would be more fun not worrying about making it perfect. Do you have a picture of that event at all?  All I can picture is a steep hilltop cluttered with tombstones without the first notion of being able to land much less take off again.  And looking forward to seeing that Spit when you get around to it. ;)

Shipwreck: Thanks for the assist with the canopy rails heads up. =] That little addition was all cause of you right there.  I may make this a thing I do with certain builds from now on.  It's a little big to scale, but...it's functional.  And it works like a charm!!  If I can find one smaller, I might try that out too, but for now I'll make this work.

I still may try dropping a pilot in there.  The seatbelts may get in the way.  I'll give it a try.  I've developed this "ghost pilot" means of display for these WW2 birds so as to allow the cockpit to be viewed.  For more modern jets I do plan to include a pilot.

And I appreciate the kind words from all of you.

On the bench:  

Tamiya F4U-1  Kenneth Walsh


  • Member since
    December 2013
  • From: Greenville, TX.
Posted by Raymond G on Tuesday, September 30, 2014 12:43 PM

No, I got that event out of his book...  Wouldn't surprise me if it happened though.  That was around the start of the end of the love affair between him and Chennault.  He described it as being at the top of a mountain, and being very rocky...  The graves, if I remember correctly, were piled up rocks.  I'm sure I could do a google search and get an idea of similar cemeteries, and extrapolate the rest.  I'm thinking about having the plane sitting on makeshift supports while a mechanic works on the Landing Gear and another mechanic beating the heck out of a bent prop blade, while the other chews on Boyington.  I know they flew in to the spot.  I'll have to go back and check and see what in.  If I can, I may see if I can build that bird to go with it.  

I'll have to check into some of that milliput.  I used putty and did a lot of sanding.  It did fairly well, but there are areas I'm still not 100% happy with.  You're right though, attitude as a big part of the kit.  At least we have something that's fairly accurate.  I'm still flattened that there's just not a better kit for such an important plane...  Raymond

On the Bench:

U.S.S. Arizona (Revell)

P-51D Tribute (Revell)

57 Chevy Bel Air


  • Member since
    June 2013
Posted by bvallot on Tuesday, September 30, 2014 7:09 PM

Definitely get some and practice with it beforehand.  A little goes a long way.  A couple of tools to help push and carve with will be of some use as well.  Use your imagination! =]

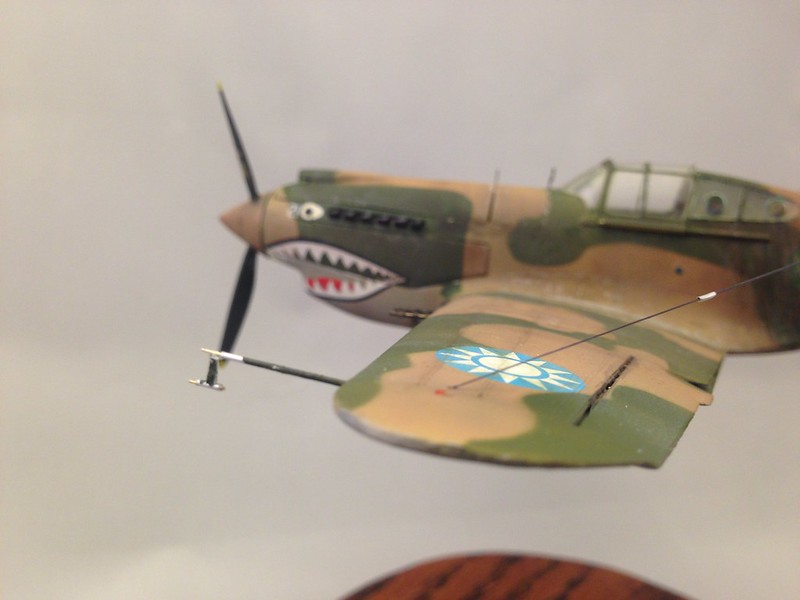
In my rush to get those pictures posted and done with, I forgot to show that prop blur! =[  I put in all that work to make it fit nice and pretty so as make it spin and I plum didn't even film it.  So here's a few fun ones and i noticed I left out a detail of the insignia.  I thought they were pretty damn good and with a little help I think they worked out nicely. So here's that as well.

A little extra weathering on top goes a long way for a convincing decal.  This was done with a very light wash of the green I used and Tamiya Weathering Compounds.

 image by brittvallot, on Flickr

 image by brittvallot, on Flickr
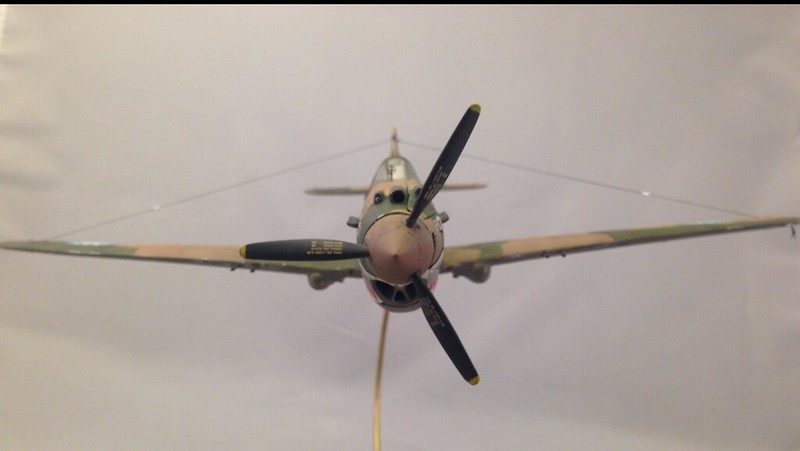
Fuel drain and cowl flaps

 image by brittvallot, on Flickr

 image by brittvallot, on Flickr
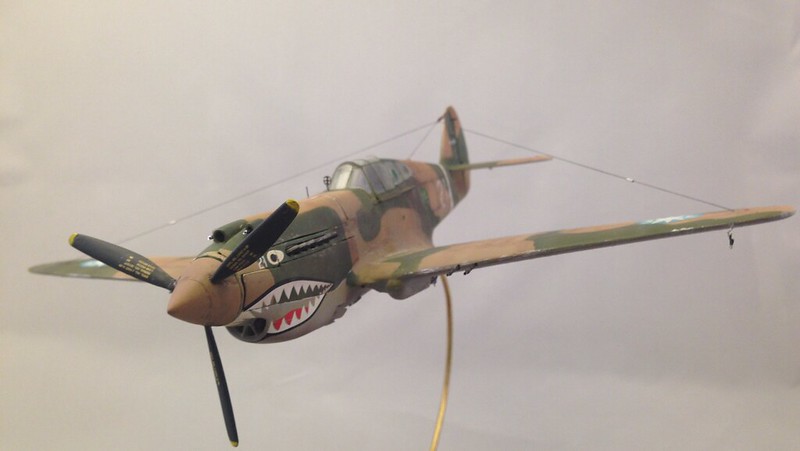
I just really love the shape the -B makes.  =]  I could stare at this for hours.

 image by brittvallot, on Flickr

 image by brittvallot, on Flickr
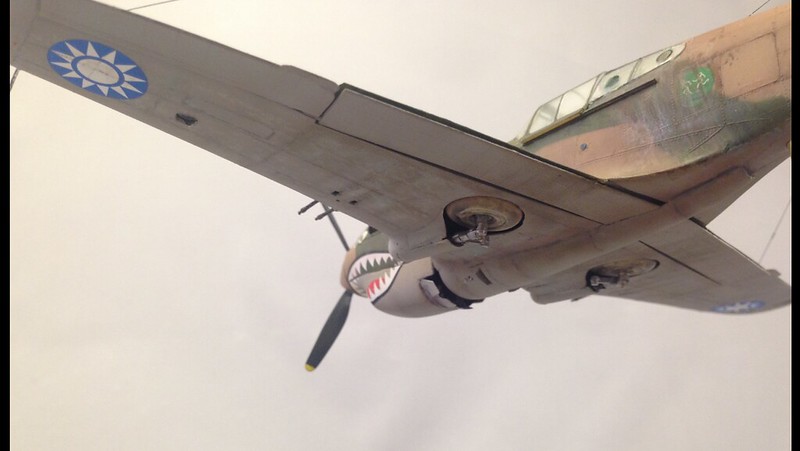
That's that.  =]

On the bench:  

Tamiya F4U-1  Kenneth Walsh


  • Member since
    November 2009
  • From: SW Virginia
Posted by Gamera on Tuesday, September 30, 2014 10:33 PM

Wow, somehow I missed this, beautiful work and I love the prop blur!

"I dream in fire but work in clay." -Arthur Machen


  • Member since
    December 2013
  • From: Greenville, TX.
Posted by Raymond G on Wednesday, October 1, 2014 4:03 AM

Hey Britt... Just for... grins and giggles, why don't you convert the second from last to black and white...  I bet it looks pretty !@#$ spot on...  Raymond

On the Bench:

U.S.S. Arizona (Revell)

P-51D Tribute (Revell)

57 Chevy Bel Air


  • Member since
    October 2013
Posted by Big Blue on Wednesday, October 1, 2014 9:15 AM

I just caught up.. nice job BV, that's one sweet looking P-40!  I'd love to build one myself, but don't think I'd have the same appetite for wrestling with a kit.  Way to go!

  • Member since
    February 2012
  • From: Olmsted Township, Ohio
Posted by lawdog114 on Wednesday, October 1, 2014 9:08 PM

bvallot


 I'll have my attention on that special item for you.  The nature of it being flat has been tricky for making a mold that won't get destroyed when opening. It's comin' though.  I promise!!

Thanks Britt!  Theres no hurry believe me.  I'm eyeing that Accurate Minitures P-39 in my stash right now.  Its one that I've always wanted to do...

Joe

 "Can you fly this plane and land it?...Surely you can't be serious....I am serious, and don't call me Shirley"


  • Member since
    December 2013
  • From: Greenville, TX.
Posted by Raymond G on Thursday, October 2, 2014 12:50 PM

Hey Britt...  I hope you don't mind, but I did the honors...  Wow, you did a good job!  Even my wife is impressed.

On the Bench:

U.S.S. Arizona (Revell)

P-51D Tribute (Revell)

57 Chevy Bel Air


  • Member since
    June 2013
Posted by bvallot on Thursday, October 2, 2014 1:59 PM

=D Ha!! That's nice.  You even photoshopped the brass out.  That's pretty sweet.  I've been wanting to do that very same thing with all the pics I've ever dressed up...just never got around to it.  I did start one.  I'll try to get it up here tonight some time.

Nicely done.  =]

On the bench:  

Tamiya F4U-1  Kenneth Walsh


  • Member since
    February 2003
  • From: Cameron, Texas
Posted by Texgunner on Thursday, October 2, 2014 2:07 PM

Raymond G

Hey Britt...  I hope you don't mind, but I did the honors...  Wow, you did a good job!  Even my wife is impressed.

Raymond, well done man!   That's a great job!  Very cool too.

Gary


"All you mugs need to get busy building, and post pics!"

JOIN OUR COMMUNITY!

Our community is FREE to join. To participate you must either login or register for an account.

SEARCH FORUMS
FREE NEWSLETTER
By signing up you may also receive reader surveys and occasional special offers. We do not sell, rent or trade our email lists. View our Privacy Policy.