SEARCH FINESCALE.COM

Enter keywords or a search phrase below:

Finished WnW Snipe (Late)

2851 views
19 replies
1 rating 2 rating 3 rating 4 rating 5 rating
  • Member since
    October 2013
Finished WnW Snipe (Late)
Posted by Big Blue on Wednesday, June 18, 2014 10:13 PM

I've mentioned this build over on the 100th Anniversary of WWI GB (while waiting for it to start).  Having seen all the beautiful work being done on the Wingnut kits, I got the bug, and wanted to try one out for myself.  I will tell anyone who is tempted by one of these aircraft to dive in and give it a shot; you will not regret it.  

The rigging is a mix of mono fishing line (5x & 7x tippet material) and Prym knit-in elastic for the flat wires.  I cut all my connector sleeves from Albion Alloy .5mm x .3mm (i.d.) nickel silver tubing, and made my eyelets from small silver Ultra Wire (my fly tying supplies paid off for this build).  I also used turnbuckles from Gaspatch.  As a first time biplane builder, I'll admit that the rigging was daunting, and my hesitation slowed me down until I got my courage up.  I have to say... it really wasn't bad.  Tedious, sure.  Time-consuming...most definitely, but really pretty easy.  Get yourself a good pair of tweezers, decent lighting, and (in my case at least) some magnifying glasses, and you'll figure it out.  If fear of rigging is what is keeping you from trying that Wingnut model you've had your eye on, don't let it (seriously, if I can do it...).

I don't really have a full set of pics documenting the build, but there are a few on my Photobucket site which you can see by clicking any of the pictures above if you are interested.  Fortunately, wing_nut has a great WIP thread going for this same model (x2!), and his work is inspiring.

I really enjoyed building this, and can't wait to dig into my next WnW offering.  Great kit with amazing detail and thoughtful design.  The instruction book alone will change how you look at other manufacturers' products.  I did have a few hiccups (some can be seen in the pictures), but they were most certainly my fault rather than the crew in New Zealand's.  

Thanks for looking; hope it inspires someone to join the upcoming 100th Anniversary of WWI GB.

Blue

  • Member since
    June 2013
Posted by bvallot on Wednesday, June 18, 2014 11:22 PM

Blue...this is gorgeous.  I think that bug's going around.  I may be coming down with it too.  =]

On the bench:  

Tamiya F4U-1  Kenneth Walsh


  • Member since
    February 2006
  • From: Smithers, BC, Canada
Posted by ruddratt on Thursday, June 19, 2014 1:28 AM

Hey Blue, I gotta say that for your first bipe, that is superb!  The rigging looks flawless, nice & tight like it should be.  I'm really impressed with the weathering - for someone who's never built one of these, you nailed not only how, but WHERE it should be weathered.  Good stuff!  The ribs are highlighted nicely as well.  If I may make one suggestion - a mild setting solution, especially around the rib detail.  There seem to be some areas there where the decals didn't settle down completely (the white areas in the roundels show it the most).  That's some really good work man - can't wait to see how you do with the Roland for the GB!  Yes

Mike

 "We have our own ammunition. It's filled with paint. When we fire it, it makes pretty pictures....scares the hell outta people."


  • Member since
    November 2009
  • From: Twin Cities of Minnesota
Posted by Don Stauffer on Thursday, June 19, 2014 9:02 AM

Very nice!  Love shots with low camera angle!

Don Stauffer in Minnesota

  • Member since
    November 2009
  • From: SW Virginia
Posted by Gamera on Thursday, June 19, 2014 9:16 AM

Wow she's beautiful! I'd almost swear from your photos that she was the real thing.

And great to know about the rigging, that's the major thing that's always scared me off from biplanes. Maybe one day I'll work up the courage...

"I dream in fire but work in clay." -Arthur Machen


  • Member since
    December 2006
  • From: Phoenix, AZ
Posted by Fly-n-hi on Thursday, June 19, 2014 9:30 AM

Looks great!

  • Member since
    February 2010
  • From: Maine
Posted by Stage_Left on Thursday, June 19, 2014 9:43 AM

Very nice work Blue! I'll second ruddratt about the decals not settling down properly on the rib detail- the roundels on the wings and the rudder decal- but as mentioned a setting solution should take care of that in the future. That's a minor point and otherwise, this is exceptional! Yes

Dave  

  • Member since
    April 2006
  • From: ON, Canada
Posted by jgeratic on Thursday, June 19, 2014 10:19 AM

Now that is a very handsome build. Yes

I don't find the decals that distracting, I actually thought it was conveying some form of translucent effect, or something similar, as in this flying replica photo:

http://www.airliners.net/photo/Sopwith-Snipe-%28replica%29/2077227/L/

regards,

Jack

  • Member since
    March 2013
Posted by sheptr on Thursday, June 19, 2014 10:37 AM

Can you describe your techniques for weathering?  The whole build is fantastic, but the weathering is just sublime.


On the bench:

1/48 Eduard Albatros D.V

1/48 Eduard Sopwith Camel

  • Member since
    October 2013
Posted by Big Blue on Thursday, June 19, 2014 3:46 PM

Thanks all for the comments, they are much appreciated.

bvallot: finish up that lovely P-38 and get involved!  You will love the level of detail in these kits.  Gamera: as I said before, I'd be happy if this thread helps ease your concerns about rigging.  Jump in and do it, and I'm sure you will be pleasantly surprised.  I actually found rigging satisfying in that it is one of those modeling tasks where you can see your work have a real impact before and after.  Each completed wire brings the machine a bit more to life. 

Mike & Dave, thanks for the feedback, pointers and suggestions are always welcome.  I think that the lack of detail in the roundels is a photography issue as the decals are quite snuggly settled in in person:
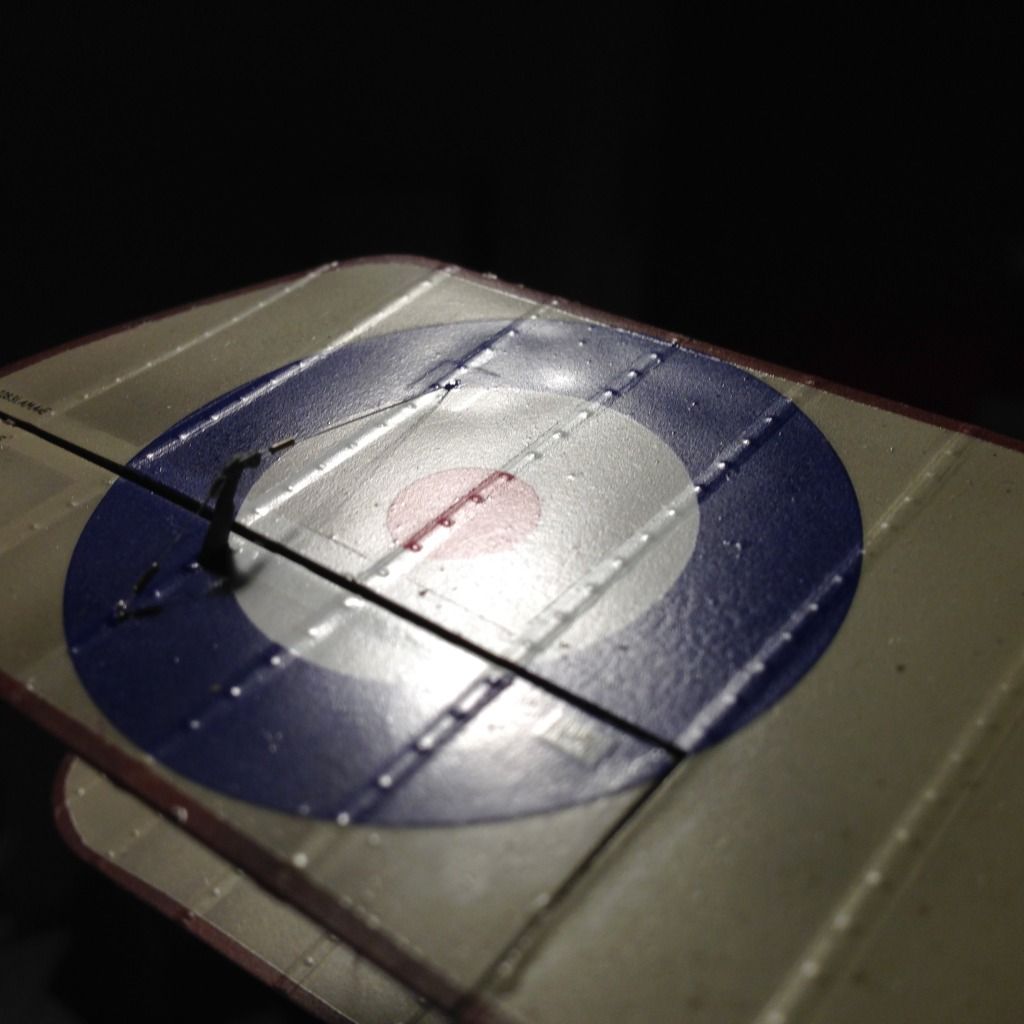
As you can see in this rather unflattering shot, the decals show every pimple, wart, speck of dust, and surface irregularity in my paint job.  Even in this picture, the glare (and out of focus areas) makes certain areas look like they are not fully settled in, but this is not how it appears in hand.  I did use both Micro Set & Sol, but I'm not sure I needed them, as the decals really grabbed hard (you can see where I tore off the small lettering on one of the tires while trying to re-position the decal).  

All this said, you are both correct that the detail is lost somewhat in the white areas, so perhaps a light wash to accentuate them a bit would be worthwhile.

Sheptr (and Mike): Thanks for the comments on the weathering.  My technique relied heavily on Tamiya Smoke for everything from shading to castor oil streaks and stains.  For the wing surfaces, I put down the base color (following WnW's suggestions), masked off the ribs and structural elements, and spray a thinned coat along the ribs to accentuate the shading.  Based on reference photos (many of which came from WnW's instructions & website, as well as that of their sister company, The Vintage Aviator) I went a little heavier in some areas than others.

I also used thinned Smoke to simulate the streaks of castor oil.  For this I dipped an old stubby brush in my mixture, cranked the pressure up on my airbrush, and holding the saturated brush in front of the fuselage, I blasted the mixture onto the plane with short blasts of air.  I also used the air pressure to cause the resultant splatters to run in the direction of the airflow.  Thin paint helpful here.  Finally, I took a fine brush and painted additional  streaks.

For the heavy staining along the underside, I masked out the dark areas with some blu-tack, and sprayed a black/brown dirty mix with my airbrush.  Over this, I painted AK Interactive enamel Fuel Stains with a brush, kind of free handing based on the shape of the dark areas.  It is a bit browner than I would have liked, but looks oily, and was easy to work with.

Other than that, some pigments and oil washes to dirty things up a bit, and a few touches of silver pencil on rivet heads, metal edges etc., was pretty much the process.  Hope this helps

Thanks again to all who took the time to comment (and to those who just stopped by to look.)

Blue

  • Member since
    April 2005
  • From: Piscataway, NJ!
Posted by wing_nut on Thursday, June 19, 2014 5:21 PM

JEEZ LOUISE BLUE!!!!!   That's a pure joy to look at.  First biplane?  What do you think?  I just fell off the turnip truck?  You probably have a dozen of 'em hanging from your ceiling.   Nicely done my friend.

And thanks for the nod on mine.

Marc  

  • Member since
    January 2003
  • From: Washington State
Posted by leemitcheltree on Friday, June 20, 2014 1:05 AM

Blue...that's one very lovely build.  You sure nailed that one...rigging and all!

I've got a couple WNW bipes in my stash....I gotta get at them.

I got an Eduard 1/48 Fokker DVll (Alb) and the WNW version....I want to do them in the same scheme - "MIMMI".....blue cowls and white/black checkering on the fuse.....should be good.

Cheers, LeeTree
Remember, Safety Fast!!!

  • Member since
    October 2013
Posted by Big Blue on Friday, June 20, 2014 8:12 AM

Marc:  LOL and thanks!  As I have said before, it is the first, but won't be the last.  

Lee: Thank you as well.  I hope you'll share your dual build when you get to it... that is an awesome paint scheme.  I have a Fokker E II/II in the queue for the WWI GB, but after that, I have been planning on a D.VII.  Boy, those Great War Germans sure gave us some spectacular aircraft and liveries to recreate!

  • Member since
    April 2014
Posted by r13b20 on Friday, June 20, 2014 3:07 PM

WOW! Just WOW! Trying to find something wrong with this model... ( to feel better about my skill) :) No results... CRAP! That is beautiful. Now, where is my "fly boys" dvd? Bob

P.S. Do you have a shot of the cockpit?

  • Member since
    November 2008
  • From: Central Florida
Posted by plasticjunkie on Friday, June 20, 2014 4:40 PM

First time bipe builder? That is some mighty fine rigging and detailing on a fantastic kit. Toast :clap2:

 GIFMaker.org_jy_Ayj_O


Too many models to build, not enough time in a lifetime!!

  • Member since
    June 2010
  • From: Berwyn!
Posted by Beans on Friday, June 20, 2014 5:21 PM

Outstanding job. Inspirational.

  • Member since
    February 2010
  • From: Maine
Posted by Stage_Left on Friday, June 20, 2014 9:56 PM

Thanks for the clarification Blue. As you've said this is your first biplane, you're off to an absolute 'flying' start! Looking forward to more of your work Beer

Dave

  • Member since
    November 2011
Posted by Newtothis on Saturday, June 21, 2014 4:55 AM

I agree, really outstanding.  Makes me feel like doing a biplane.

  • Member since
    October 2013
Posted by Big Blue on Saturday, June 21, 2014 8:57 AM

r13b20Plastic, Beans, and Dave, thank you for your kind words.  Newtothis, thank you as well, and grab a kit and join the WWI anniversary group build starting next month!  I'm trying to figure out how I am going to wait that long to start my next one!

r13b20,  the only shots of the cockpit are from the few I took with my phone while building it.  

The only thing you see that didn't come with the kit is the rigging.  I managed to break off a piece of the photo-etch belt buckle, and cleverly installed the compass decal upside down.  

Thanks again to everyone for the comments,

Blue

  • Member since
    April 2014
Posted by r13b20 on Saturday, June 21, 2014 2:16 PM

Thanks Blue. I like to see details. Still fantastic! Bob

JOIN OUR COMMUNITY!

Our community is FREE to join. To participate you must either login or register for an account.

SEARCH FORUMS
FREE NEWSLETTER
By signing up you may also receive reader surveys and occasional special offers. We do not sell, rent or trade our email lists. View our Privacy Policy.