SEARCH FINESCALE.COM

Enter keywords or a search phrase below:

Hobbycraft 1/48 Hawker Hurricane Mk. IIc

12343 views
32 replies
1 rating 2 rating 3 rating 4 rating 5 rating
  • Member since
    October 2013
Hobbycraft 1/48 Hawker Hurricane Mk. IIc
Posted by ajd3530 on Friday, March 13, 2015 3:12 AM
Hello all. I have been a member of this fine site for roughly a year and a half now. I have come in contact with some wonderful people, seen some awesome models, and learned more than I could have imagined. In my time here, I've completed around 10 models, and am in certain stages of construction on 6 or 7 others, all for group builds. And to tell the truth, I am alittle burned out. Don't get me wrong, I've WANTED to build every single one of them, but the idea of each one wasn't exactly 100% original thought on my part. So I have decided I want to do something I haven't done in over 18 months. I'm going to build something just because I want to, no tie in to anything. And you want to know something? I am a closet Hawker Hurricane fan. I think it is a beautiful airframe. As one test pilot said "The aircraft is simple, easy to fly, and has no apparent vices." She was rugged and dependable. And the Hurricane, I feel, is vastly under appreciated. And oddly enough, I don't have one finished up on the shelf. Well, lets change that.

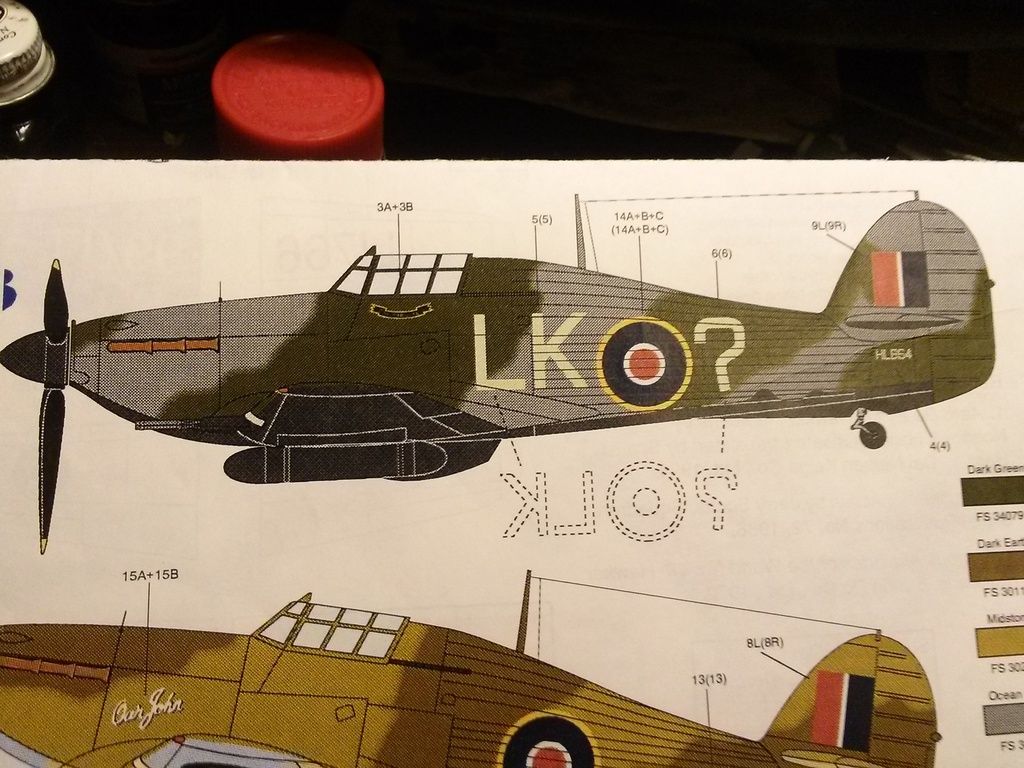
I have 3 Hurricanes in the stash, a Hasegawa and 2 Hobbycrafts. Since I want this to just be a nice, simple, relaxing build, I decided to do the Hobbycraft. Say what you want about them, but Hobbycraft models usually fit together pretty darn good. I wanted to do something alittle different than a run of the mill RAF scheme, so I decided to do a Mk. IIc night intruder. For those of you not familiar, the mission of night intruders was to loiter in the area of enemy airfields (at night, of course) and wait for enemy aircraft to take off/land. They would attack them then, when they were most vulnerable. I happen to have Aeromaster 48-194 handy, and this is the plane I'll be modeling. Everything else aside, who wouldn't want to make and airplane with a great big question mark on it??


I cut the major parts from the trees and did a test dry fit.


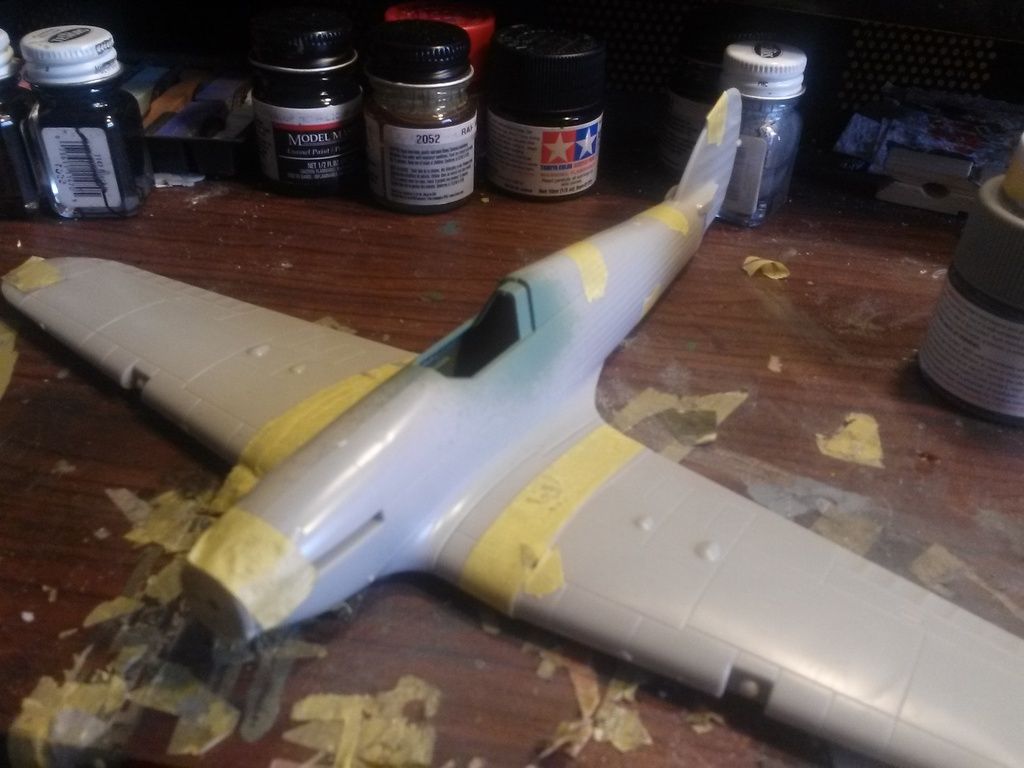
Everything looks pretty darn good, except that dihedral might need some tinkering with.
  • Member since
    November 2003
  • From: Naples, FL
Posted by tempestjohnny on Friday, March 13, 2015 5:49 AM

Nice start. I just picked up a Hasegawa Mk.I


  • Member since
    March 2010
  • From: MN
Posted by Nathan T on Friday, March 13, 2015 7:45 AM

Nice work on assembly. Just remember, the Hurricane didn't have hardly any dihedral at all. The Hobbycraft kit looks pretty nice. I've built the Hase hurricand Mk. II and thought it was one of their better WWII prop kits.


  • Member since
    April 2005
  • From: Piscataway, NJ!
Posted by wing_nut on Friday, March 13, 2015 8:06 AM

A solid start on a venerable old bird.

Marc  

  • Member since
    October 2013
Posted by ajd3530 on Friday, March 13, 2015 4:25 PM
What I was getting at about the dihedral is that the cockpit floor/wheel well box piece, once mated with the botton wing makes it pretty rigid and hard to bend.


And when I attach the top wing halves to the fuselage, the natural angle the wings take (which looks correct to me) doesn't match up with the rigid bottom wing.


  • Member since
    June 2013
Posted by RobGroot4 on Friday, March 13, 2015 6:43 PM

I think if you score a little bit on the upper part of the bottom wing at both of the roots it should bend for you.  I've also heard mention of something involving boiling water, but I'm not completely certain of the process.  

Groot

"Firing flares while dumping fuel may ruin your day" SH-60B NATOPS

  • Member since
    October 2013
Posted by ajd3530 on Friday, March 13, 2015 6:57 PM
I have actually used the boiling (well NEARLY boiling) water trick a hand full of times, and it work petty well. But I believe that might not work this time since the flat wheel bays are the source of the problem. Although I may try putting a bkiw drier to the area of the wing directly after the edge of the wheel wells.
  • Member since
    October 2013
Posted by ajd3530 on Friday, March 13, 2015 7:00 PM
Or I might also to find a way to not glue on the wheel well until after the wings are together, and just shim the gap the curvature of the wing will cause at the joint of the top surface of the bottom of the wing and the wheel well box.
  • Member since
    March 2010
  • From: MN
Posted by Nathan T on Friday, March 13, 2015 7:23 PM

Just checked my Hasegawa Hurricane kit. Looks like Hobbycraft molded the bottom wing flat for the whole length. This is wrong. The hurricane's wing bottom is completely flat at the wheel wells, then tapers up slightly from the gear attach point out to the tip. The top of the wings are then completely flat across from root to tip. The only fix I see is to cut the bottom wing off at the end of the gear well, then glue it back on with a slight dihedral.


  • Member since
    November 2014
Posted by STX440 on Friday, March 13, 2015 7:59 PM
Nice start.Looks like you are off to a good start.
  • Member since
    July 2004
  • From: Sonora Desert
Posted by stikpusher on Sunday, March 15, 2015 5:24 PM

This kit builds up nice and easy with no speed bumps or fit issues. I built one, the solid black Night Intruder, for a weekend madness here two years ago here. With plenty of time to spare. It will look like a Hurricane when built, and that is what counts.


F is for FIRE, That burns down the whole town!

U is for URANIUM... BOMBS!

N is for NO SURVIVORS...

       - Plankton

LSM


  • Member since
    October 2013
Posted by ajd3530 on Sunday, March 15, 2015 10:27 PM
Now maybe you RAF enthusiasts can help me on this, but I have read the English painted the exausts on their night Hurricanes/Spits many thick layers of red paint, to help cut down on the exausts glowing in the dark. Anyone care to comment?
  • Member since
    February 2012
  • From: Olmsted Township, Ohio
Posted by lawdog114 on Monday, March 16, 2015 2:49 AM

I'm a Hurricane fan too and also think it was absolutely beautiful.  Furthermore, it was more important than the Spitfire in those dark days of 1940 and was responsible for sending the most NAZI bombers down in flames.

I've built the Hasegawa version, but I never knew Hobbycraft made one.  I'll be watching your progress.  So far it looks great I love the subject matter.  

Your dihedral looks fine to me.  I concur with Nathan, it really didn't have any.  I'm glad you decided to build for you on this one.  Thats what I do.....alot less stress...lol.

Interesting on the exhausts, but I would imagine any paint, no matter how thick, would eventually burn off.  I usually just spray my exhausts XF-64 Red Brown then lightly dry brush them silver to simulate the metal...

Joe

 "Can you fly this plane and land it?...Surely you can't be serious....I am serious, and don't call me Shirley"


  • Member since
    January 2012
  • From: Barrie, Ontario
Posted by Cdn Colin on Monday, March 16, 2015 6:43 AM

I think that paint on the exhaust is more likely to ignite than hide glowing metal.  I know they put special exhausts on nightfighting beaufighters and mosquitos.  They looked like long spiky tails.  Other night aircraft had sheilds over the exhausts.  Look at pictures of Merlins on Lancasters.

I build 1/48 scale WW2 fighters.

Have fun.

  • Member since
    July 2004
  • From: Sonora Desert
Posted by stikpusher on Monday, March 16, 2015 4:28 PM

I dont know of paint on the exhausts on the night intruder Hurricanes, but I do know that a glare shield strip of metal was installed to block them from the pilot's line of sight. I used some strip styrene to make them on mine


F is for FIRE, That burns down the whole town!

U is for URANIUM... BOMBS!

N is for NO SURVIVORS...

       - Plankton

LSM


  • Member since
    October 2005
  • From: UK
Posted by antoni on Monday, March 16, 2015 6:33 PM

The special  'paint' was a mixture of clay and red lead.

  • Member since
    October 2013
Posted by ajd3530 on Wednesday, March 18, 2015 11:30 AM
So, anyone who works on the same GBs with me much probably knows how much I HATE filling work of gaps/joints. Its the drywall work of modeling (coincidentally, I hate drywall work more than any other home repair work, other than live plumbing of course.) So what I usually end up doing is having a back-log of models stack up once I get them to the filling stage until a day comes that I feel up for it, and then I usually do a group of models at one time.

This Hobbycraft (with alot of dry fitting and careful sanding, of course) fit together very well and only NEEDED filling in one spot. I say needed because I tried to cut out some ejector chutes myself, and it ended up very bad, so I needed to patch those back up. Here is the a shot of the rear wung/fuselage joint work and patched up ejector chutes. With a Spitfire on deck, and a 109E in the hole.


And there were also two tiny sink marks forward of the cockpit. Theses are the only to blemishes I have found in the molding so far.

  • Member since
    October 2013
Posted by ajd3530 on Friday, March 27, 2015 1:43 AM
With the weather finally cooperating and baseball season now underway here in Northeast TN, work on the Hurricane (and everything else for that matter) has slowed to a crawl. Here is where she stands now.


Shot a light coat of primer on the trouble areas to see what i missed. Hopefully will get to shoot some paint on her this weekend.
  • Member since
    October 2009
  • From: Turkey
Posted by Clausewitz on Friday, March 27, 2015 2:38 AM

I love watching such a build filled with explanations and illustrated with many in-progress pics. Getting along very well, Can't wait to see more.

_

  • Member since
    October 2013
Posted by ajd3530 on Friday, June 5, 2015 1:48 AM
Golly, its been a while. Baseball has really taken up my whole spring. Slowing down alot now, so that means more bench time. When I left off, she was pretty much ready for paint, aside from getting the under wing fuel tanks on and alittle seem work. Here she is all primed up


Tamiya XF 54 was used for the dark sea gray, and Model Master acryl RAF dark green was shot on top of that. Some minor touch ups are needed, but this might be the most satisfied I have been with a camo scheme I've done to date. Still undecided about what I'm going to do with the "night" lower surfaces.


As you can see, it was a BUSY day with the airbrush!


  • Member since
    July 2004
  • From: Sonora Desert
Posted by stikpusher on Friday, June 5, 2015 1:57 AM

Very nice work on the upper camo scheme! Those Hobbycraft Hurricanes do build up nicely! I used Tamiya Semi Gloss Black on mine for the "Night", but mine was in the overall Night scheme.


F is for FIRE, That burns down the whole town!

U is for URANIUM... BOMBS!

N is for NO SURVIVORS...

       - Plankton

LSM


  • Member since
    March 2003
  • From: Towson MD
Posted by gregbale on Friday, June 5, 2015 3:55 PM

Very nice build! The camouflage is very convincing.

Greg

George Lewis:

"Every time you correct me on my grammar I love you a little fewer."
 
  • Member since
    March 2015
  • From: Streetsboro, Ohio
Posted by Toshi on Friday, June 5, 2015 4:42 PM

You did justice to this build, especially the camo.  Fantastic.

Toshi

On The Bench: Revell 1/48 B-25 Mitchell


Married to the most caring, loving, understanding, and beautiful wife in the world.  Mrs. Toshi


  • Member since
    June 2013
Posted by RobGroot4 on Friday, June 5, 2015 4:52 PM

Looking great, I am really looking forward to seeing how it looks with the dark bottom.

Groot

"Firing flares while dumping fuel may ruin your day" SH-60B NATOPS

  • Member since
    January 2015
Posted by BrandonD on Saturday, June 6, 2015 12:59 AM

I love it!

The Hurricane gets so little love compared to other aircraft, and I really like seeing these come together.

-BD-

  • Member since
    October 2013
Posted by ajd3530 on Monday, June 8, 2015 9:00 PM
After doing alittle reading, I decided to mix my own night color. Made a mixture of roughly 10 parts Tamiya XF-1 flat black to roughly 1 part Tamiya XF-8 flat blue, with a few drops of XF-19 sky gray. It passed the eye test, so I shot a coat on. We'll see how it turns out in a bit.
  • Member since
    October 2013
Posted by ajd3530 on Tuesday, June 9, 2015 1:51 AM
And here is the end result. The sample sprue is normal XF-1 flat black, and the underside of the wing obviously my home made "night" brew. While I would have liked it to look maybe just a tad bit more sooty, it is pretty dang close to what I had in mind.
  • Member since
    October 2013
Posted by ajd3530 on Saturday, June 27, 2015 9:47 PM
Decals on. Believe it or not, this is the first time I have used Aeromaster decals. I have many sets, but by chance, I've just never used them until now. I have used Eagle Strike and Superscale many times, and I have to say these Aeromasters went on better than either of those brands. VERY impressed.


JOIN OUR COMMUNITY!

Our community is FREE to join. To participate you must either login or register for an account.

SEARCH FORUMS
FREE NEWSLETTER
By signing up you may also receive reader surveys and occasional special offers. We do not sell, rent or trade our email lists. View our Privacy Policy.