SEARCH FINESCALE.COM

Enter keywords or a search phrase below:

Completed! 1/48 Eduard Bf-109 E-7 Tropical

2533 views
26 replies
1 rating 2 rating 3 rating 4 rating 5 rating
  • Member since
    April 2015
  • From: New Hampshire, USA
Posted by UKguyInUSA on Friday, October 2, 2015 10:23 AM

BrandonD
 
UKguyInUSA
Beautiful job, Brandon, looks da bomb! I'd love to do this scheme but in a 1/32 scale. How did the engine fit on the 1/48 scale? Did you have any issues like I did with the 1/32 scale? Cheers, Martin!


Thanks, Martin!

The engine fit was 90 percent good. The left bank of exhaust ports didn't line up exactly with the opening, but you can't tell (I installed exhaust pipes at the end of the build for masking ease).

What kit are you going to use in 1/32?

-BD-


Hey Brandon,


Glad to hear you didn't have the problems I did with my Eduard 1/32 BF109E-3 which I post on here over a month ago...but, aftr all the heartache, she turned out nicely in the end!


Cheers Big Smile

  • Member since
    January 2015
Posted by BrandonD on Monday, September 28, 2015 9:23 PM

plasticjunkie

Great job BD, love the scheme and weathering. The tail wheel broke in my Revell Gustav and I pinned it with a piece of metal which makes it stronger than it originally was.


Thanks, Plasticjunkie! THat's good info on the Revell. I have their 1/32 G-10, so maybe I should just plan on doing that from the beginning.

-BD-

  • Member since
    January 2015
Posted by BrandonD on Monday, September 28, 2015 9:22 PM

UKguyInUSA
Beautiful job, Brandon, looks da bomb! I'd love to do this scheme but in a 1/32 scale. How did the engine fit on the 1/48 scale? Did you have any issues like I did with the 1/32 scale? Cheers, Martin!
 

Thanks, Martin!

The engine fit was 90 percent good. The left bank of exhaust ports didn't line up exactly with the opening, but you can't tell (I installed exhaust pipes at the end of the build for masking ease).

What kit are you going to use in 1/32?

-BD-

  • Member since
    April 2015
  • From: New Hampshire, USA
Posted by UKguyInUSA on Monday, September 28, 2015 9:06 PM
Beautiful job, Brandon, looks da bomb! I'd love to do this scheme but in a 1/32 scale. How did the engine fit on the 1/48 scale? Did you have any issues like I did with the 1/32 scale? Cheers, Martin!
  • Member since
    November 2008
  • From: Central Florida
Posted by plasticjunkie on Monday, September 28, 2015 8:29 PM

Great job BD, love the scheme and weathering. The tail wheel broke in my Revell Gustav and I pinned it with a piece of metal which makes it stronger than it originally was.

 GIFMaker.org_jy_Ayj_O


Too many models to build, not enough time in a lifetime!!

  • Member since
    January 2015
Posted by BrandonD on Monday, September 28, 2015 8:00 PM

So I was going to post finish pics last night, but when I set it down to photograph it, the rear wheel collapsed (I broke it several times during construction). So I drilled out both ends and super-glued in a piece of steel wire for support. It now holds, and I'm done messing with it, so hopefully it stays that way now!

Ok, on to the real reason you're reading this, the pics:

I finished it in largely Model Master colors, but I did paint the fuselage band with Tamiya, and I used a really thin misting coat of Tamiya Buff after it was painted and decaled to tone down the starkness. The interior colors and engine colors are Tamiya as well. The gunpowder streaks and exhaust staining are Tamiya smoke, and then I used some ground up pastels to accentuate them and blend them a bit. The underside weathering is a little bit of streaking with Tamiya Buff and pastels.

I didn't rust the exhaust stacks because a color reference photo of this one shows no rusting, and the desert air likely helped with that.

I really enjoyed this kit. For $25 plus $5 or $8 (I can't remember) for the PE set, it finished up nicely. I really like the surface detail with the rivets. My only gripes are with the tailwheel needing to be inserted when uselage halves are closed (hence my breaking it repeatedly) and the same thing for the wing guns (which I installed at the end to make it easier to sand the leading edges, mask and not break them off).

Thanks for looking. I still have some work to do when it comes to rescribing panel lines, and I need to pay more attention to the little bits like gear legs and wheels.

-BD-

  • Member since
    January 2015
Posted by BrandonD on Monday, September 28, 2015 7:45 PM

Bvallot - thanks for the tip. I mottled my Bf-109 E-4 at about 8 psi, so I thought I'd try it differently this time. I think I like your way better, as some of the mottling on this one ended up a bit heavy probably due to the air pressure.

Thanks again!

-BD-

  • Member since
    June 2013
Posted by bvallot on Monday, September 28, 2015 1:26 PM

I'm sorry to just catch up to this post Brandon.  I have a suggestion that I suppose you could still use if you had a hard-on enough to try it...concerning the mottling. If you back of the psi just a little bit more and thin your paints down considerably, you'll be able to have a lot of control over how much paint builds up on whatever surface you're working.  This way you can build up the color more slowly and with more control.  =]  After you put down a flat coat, you'll be able to repeat the mottling if desired.  I think what you have currently is just fine. ;)  But for future reference you'll find it better suits you I believe.

Excellent job so far.  Excellent pick with those colors! =]

On the bench:  

Tamiya F4U-1  Kenneth Walsh


  • Member since
    January 2015
Posted by BrandonD on Sunday, September 27, 2015 3:57 PM

Toshi

Does it look ok is an understatement, with the background graphics, it looks like the real thing!


Toshi


Thanks, Toshi, but I'm not at all that good with either modeling or graphics - that's actually a color photo from WWII of the plane I'm building :)

-BD-

  • Member since
    March 2015
  • From: Streetsboro, Ohio
Posted by Toshi on Sunday, September 27, 2015 6:25 AM

Does it look ok is an understatement, with the background graphics, it looks like the real thing!


Toshi

On The Bench: Revell 1/48 B-25 Mitchell


Married to the most caring, loving, understanding, and beautiful wife in the world.  Mrs. Toshi


  • Member since
    January 2015
Posted by BrandonD on Sunday, September 27, 2015 1:38 AM

Ok, well I ended up finishing it just now and decided to pose it in flight.

Does it look ok?

-BD-

  • Member since
    January 2015
Posted by BrandonD on Sunday, September 27, 2015 1:34 AM

Thanks for the kind words, everyone. Jay Jay - that's high praise, and I think I have a long way to go before I'll be at Lawdog's level for cockpits, but thank you :)

I have lagged with the WIP photos here lately, but am hoping for completion tomorrow (Sunday). I would finish it right now, but can't fire up the air compressor for the flat clear, as it's nearing midnight.

Here are a few in-progress shots to show where it's headed.

Decals on on the underside, clear-coated with AlcladII Klear Kote and a Flory dark dirt panel line wash applied:

And here is the topside with decals applied, but pre-wash:

And finally, since Eduard went ahead and molded grooves in the fuselage and nubs on the rudder, I stretched some sprue and made the rudder cables. Sorry the pic is out of focus - my phone was fighting me:

So, hopefully I can finish it tomorrow morning and get the completion shots up. Otherwise, I'll shoot it Monday after work.

Thanks again!

-BD-

  • Member since
    August 2013
Posted by Jay Jay on Saturday, September 26, 2015 8:47 AM

OH MAN that looks good !  Your mottling is spot on and your pit looks like it was done by Lawdog. Thanks for posting your GB here too.


 I'm finally retired. Now time I got, money I don't.

  • Member since
    February 2012
  • From: Olmsted Township, Ohio
Posted by lawdog114 on Friday, September 25, 2015 9:33 PM
that looks great Brandon..and nice job on that mottling..

 "Can you fly this plane and land it?...Surely you can't be serious....I am serious, and don't call me Shirley"


  • Member since
    February 2007
  • From: Brunswick, Ohio
Posted by Buckeye on Friday, September 25, 2015 11:23 AM

Looks great!  Nice job on that mottling.

Mike

  • Member since
    August 2015
  • From: the redlands Fl
Posted by crown r n7 on Friday, September 25, 2015 9:22 AM

btw I have used white chalk on decals for that sun bleached look Whistling


 Nick.

  • Member since
    March 2015
  • From: Streetsboro, Ohio
Posted by Toshi on Friday, September 25, 2015 7:04 AM

Very nice AB handi work, what a great build!

Toshi

On The Bench: Revell 1/48 B-25 Mitchell


Married to the most caring, loving, understanding, and beautiful wife in the world.  Mrs. Toshi


  • Member since
    August 2015
  • From: the redlands Fl
Posted by crown r n7 on Friday, September 25, 2015 6:07 AM

looks real good. hey no guts no glory. I agree with your plan Yes


 Nick.

  • Member since
    June 2003
  • From: Cavite, Philippines
Posted by allan on Monday, September 21, 2015 1:15 AM

Interesting point you made on the mottling nullifying the shading.  I will never build anything with a speckled camo.  haha

No bucks, no Buck Rogers

  • Member since
    January 2015
Posted by BrandonD on Monday, September 21, 2015 1:01 AM

Thanks, guys! I appreciate the suggestions on getting rid of/hiding the seam. I don't have a touch-n-go, but I do have the Testors cement with the needle applicator, so maybe I'll do that and re-spray it. I like the oil streak. Will have to see if I can find some reference.

I got the mottling done tonight. This is Tamiya Dark Green (not the RAF one). I freehanded it with the SOTAR 20/20 at 22 psi with a 1:1 ratio of paint and Tamiya Lacquer Thinner. It worked well. Only a little tip dry.

And look how that tonal crush totally nullified the shading work I spent so much time doing :/

Next up is masking for the white fuselage band. After that, I'll gloss it, decal it, gloss it, panel line wash, then probably spray a mist coat of Tamiya Buff to tone down the contrast and lighten the whole thing for that sun-bleached desert look.

I have a new technique I want to try on the decals, too. We will see if I can work up the nerve, haha.

-BD-

  • Member since
    June 2014
Posted by BrandonK on Sunday, September 20, 2015 12:32 PM

Your paint work really impresses me I gotta say. Looking really good BD.

BK

On the bench:

A lot !! And I mean A LOT!!

2024 Kits on deck / in process / completed   

                         14 / 5 / 2  

                              Tongue Tied

  • Member since
    November 2008
  • From: Central Florida
Posted by plasticjunkie on Saturday, September 19, 2015 8:06 PM

BD

If you have the Touch N Flow applicator, run some Tenax or Plast I Weld along the seam. The liquid glue will melt the plastic and the paint will soften helping to seal or hide the seam as it dries. I have used this method many times and it has worked in just about each use.

 GIFMaker.org_jy_Ayj_O


Too many models to build, not enough time in a lifetime!!

  • Member since
    August 2015
  • From: the redlands Fl
Posted by crown r n7 on Saturday, September 19, 2015 7:58 PM

oil stains will care of that seam under the chin Yes


 Nick.

  • Member since
    March 2015
  • From: Streetsboro, Ohio
Posted by Toshi on Saturday, September 19, 2015 7:38 PM

Nice cockpit, looking forward to this build!

Toshi

On The Bench: Revell 1/48 B-25 Mitchell


Married to the most caring, loving, understanding, and beautiful wife in the world.  Mrs. Toshi


  • Member since
    November 2008
  • From: Central Florida
Posted by plasticjunkie on Saturday, September 19, 2015 6:55 PM

Great work BD. Love the color variation and the pre shading.

 GIFMaker.org_jy_Ayj_O


Too many models to build, not enough time in a lifetime!!

  • Member since
    August 2015
  • From: the redlands Fl
Posted by crown r n7 on Saturday, September 19, 2015 6:36 PM
Beautiful keep going


 Nick.

  • Member since
    January 2015
Completed! 1/48 Eduard Bf-109 E-7 Tropical
Posted by BrandonD on Saturday, September 19, 2015 5:15 PM

I have this one going in the Bf-109 group build, but thought I'd share here, too.

I don't really like the tropical paint schemes, but when the weekend edition kit showed up at my local hobby shop, I had to have it (they actually will open up kits forus in the store and let us poke around. It gets me almost every time).

Anyway, I decided to build this as a JG27 Black 8 (one oftwo marking options in the kit). Originally, I planned to build it closed up since I like the nose insignia and the tropical filter, and I noticed a glaring error on Eduard's part - the plastic piece for the tropical intake is meant to take a PE screen that came with the Profipack kit. But there is no alternate piece for the Weekend Edition boxing. I was annoyed, but I got the PE fret for $8 on eBay and went with it.

Then, of course, I decided to build it opened up, and I won't even use the cowling or tropical intake. Confused

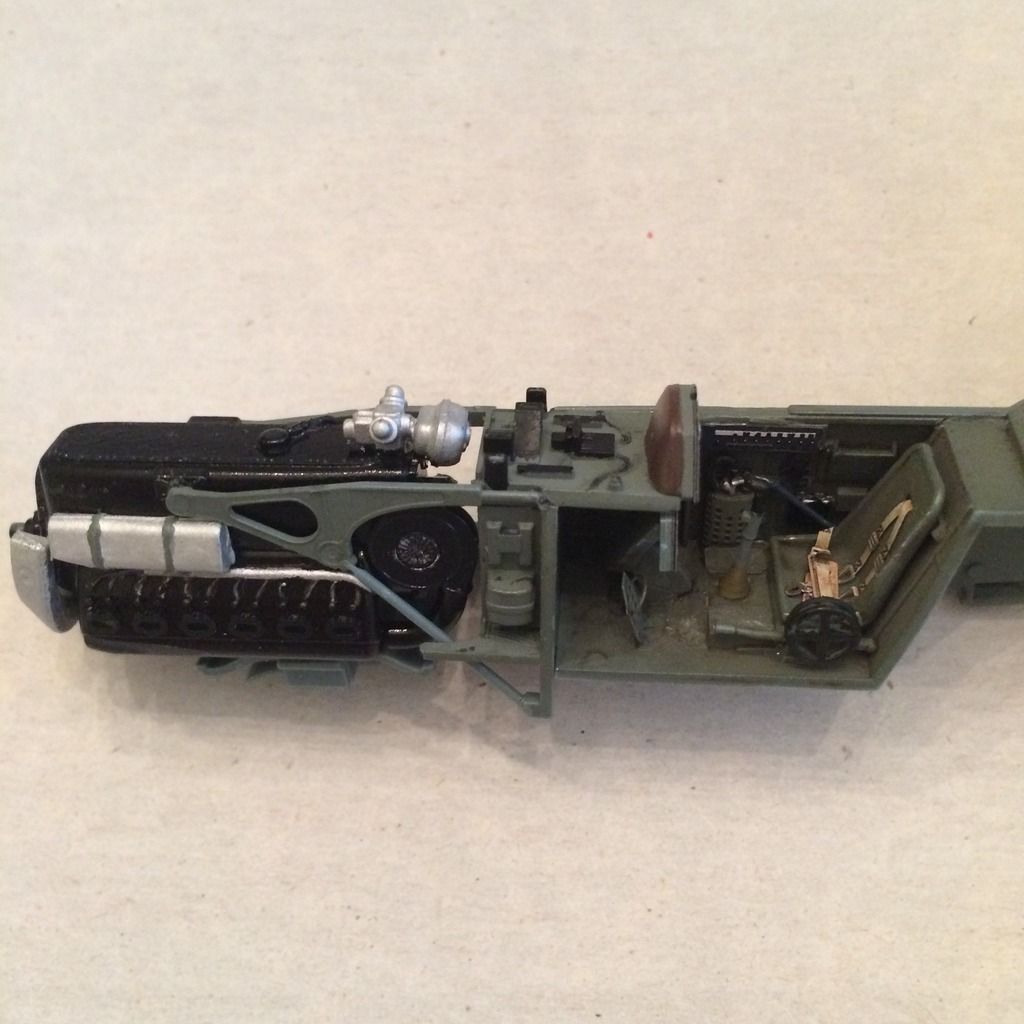
Anyway, here are some photos. Yes, I will touch up and weather the engine, but I'll wait till the end.
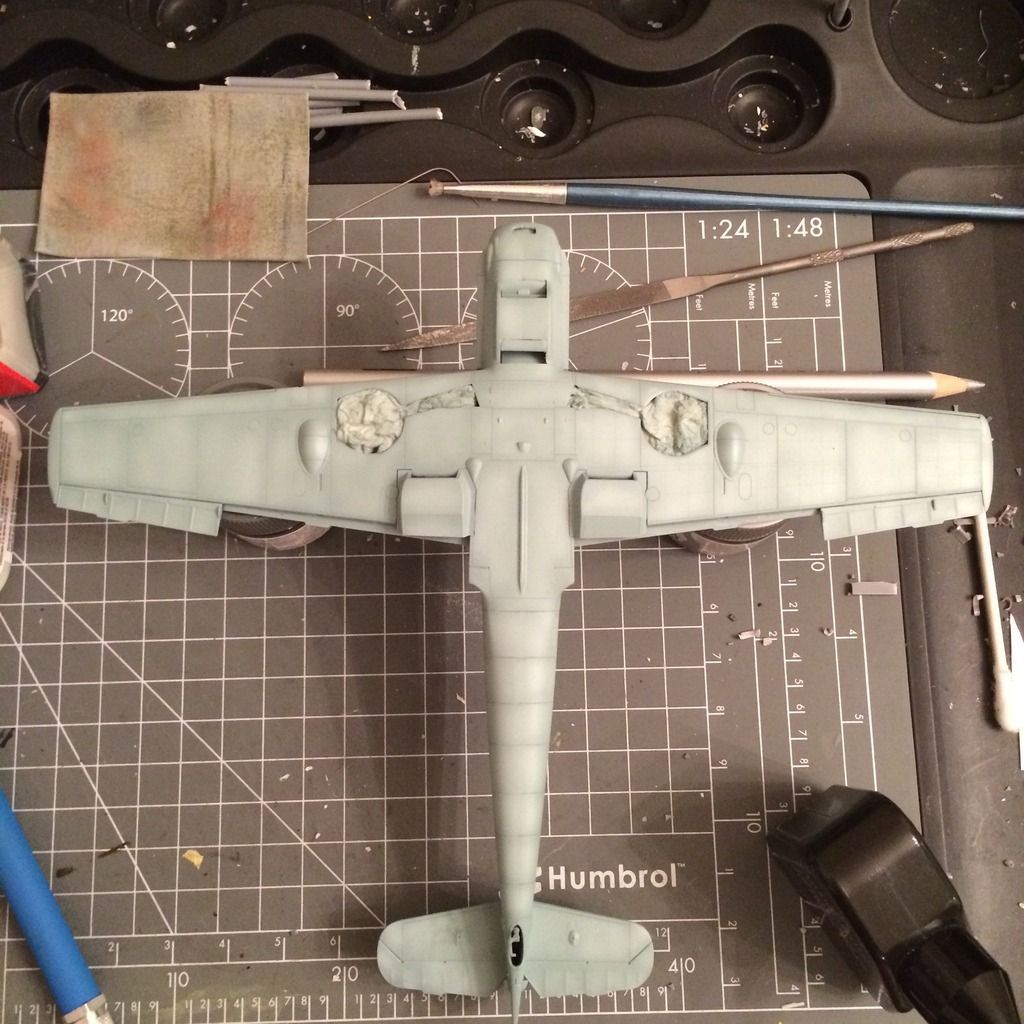
I painted the underside Model Master RLM 80 Hellblau. Looking at the photo, it looks like I didn't get all of the seam on the chin. Damn.
I then masked and painted the topside RLM 79 Sandgelb. I did both painting sessions without any primer or base coat, and I used the three-layer blend technique.
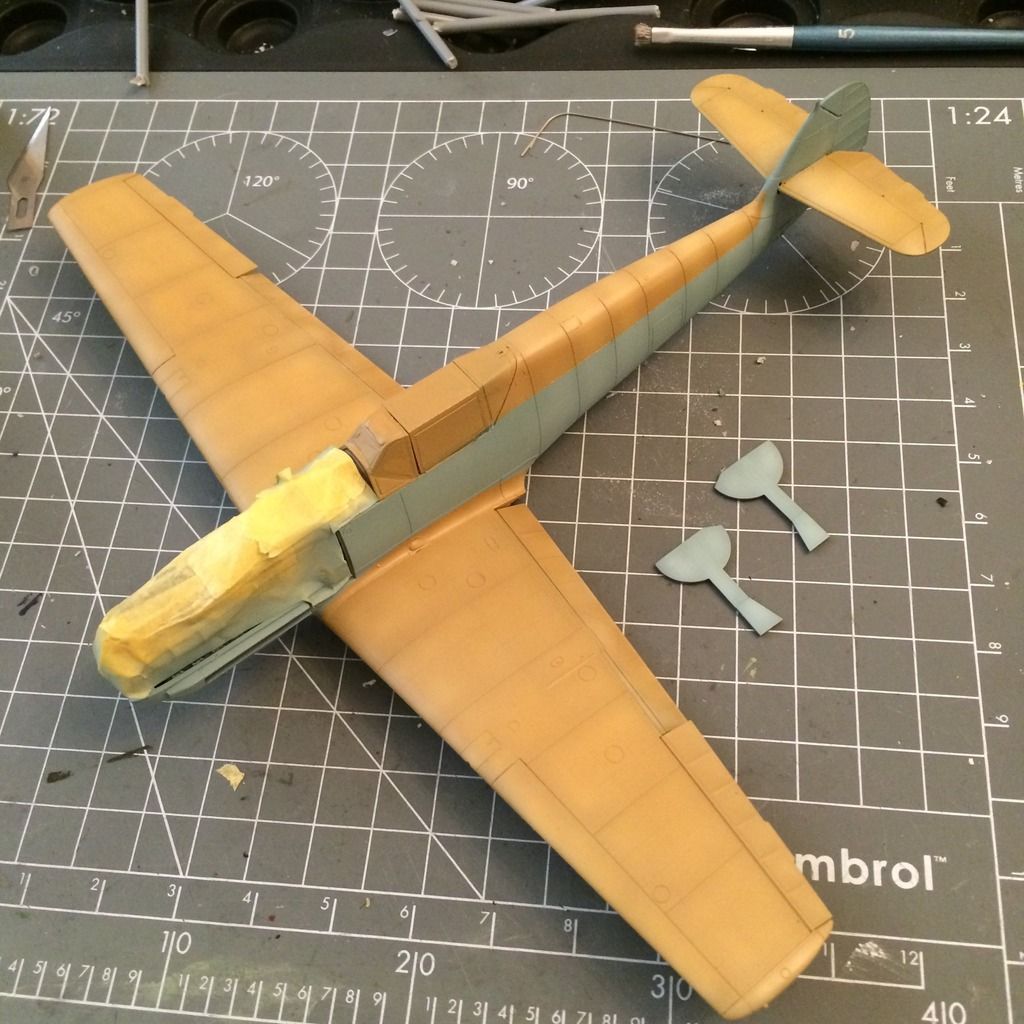
Anyway, that's how it looks now. Next step is the dark green mottling all over the plane. Then I'll do the white fuselage band I probably should have started with.

-BD-


JOIN OUR COMMUNITY!

Our community is FREE to join. To participate you must either login or register for an account.

SEARCH FORUMS
FREE NEWSLETTER
By signing up you may also receive reader surveys and occasional special offers. We do not sell, rent or trade our email lists. View our Privacy Policy.