SEARCH FINESCALE.COM

Enter keywords or a search phrase below:

1/32 Trumpeter P-40B..Going Dark

9862 views
159 replies
1 rating 2 rating 3 rating 4 rating 5 rating
  • Member since
    September 2011
Posted by fightnjoe on Saturday, April 16, 2016 11:47 AM

Ok folks I have reached a point where it would be advisable to start the paint work.  


All the prep work is done, I think.  Bulkheads are installed, with the exception of the forward most as they need to be removable yet.  The little bits and pieces are prepped for paint.  The tail wheel assembly is in place.


Paint was sprayed starting with a flat black base.  I wanted to try something a bit different and changed midstream to putting a coat of Model Master Aluminium Plate on then I sprayed the interior colors.  I did however forget to take pictures of that.  I wanted to see if the Aluminium changed the Interior Green and the Yellow Zinc Chromate.  It did but not so much as you would really see it.  


I also began to paint and detail paint the interior pieces.


That is where it stands at the moment.  Now the challenge will be to work on the firewall more and on to the engine work.  I am choosing to not install the bits and pieces as of yet as they could break free during the process and I do not want to lose them.


All comments, critiques, and criticism are encouraged.


Joe

Veterans,

Thank You For Your Sacrifices,

Never To Be Forgotten

Where you can find me:

Workbench on FaceBook  Google Plus  YouTube

  • Member since
    September 2011
Posted by fightnjoe on Sunday, April 10, 2016 7:34 AM

You are both very kind.  Thank you.


I am glad I could provide some inspiration.  


Joe

Veterans,

Thank You For Your Sacrifices,

Never To Be Forgotten

Where you can find me:

Workbench on FaceBook  Google Plus  YouTube

  • Member since
    June 2014
Posted by BrandonK on Saturday, April 9, 2016 10:26 AM

This is really cool. I love watching you scratch this thing up. I gotta get back on my p-40. Keep it coming.

BK

On the bench:

A lot !! And I mean A LOT!!

2024 Kits on deck / in process / completed   

                         14 / 5 / 2  

                              Tongue Tied

  • Member since
    December 2002
Posted by 7474 on Friday, April 8, 2016 10:24 PM

Woooooooow. I'm so amazed at your work and craftmanship, I've enjoyed seeing this being built. I'm inspired to attempt this, one day.

  • Member since
    September 2011
Posted by fightnjoe on Friday, April 8, 2016 8:18 PM

The final phase of construction is to work on the firewall and the engine area.  The engine will be an entirely separate thing and will be covered while I install it permanently. 


The firewall included a couple of tanks as well as a base for some plumbing and the throttle linkages.


And with it inplace in the fuselage.


Now I have also added just a few stringers for detail on the interior of the fuselage.  Next for me will be to begin to paint.  


All comments, critiques, and criticism are encouraged.


Joe

Veterans,

Thank You For Your Sacrifices,

Never To Be Forgotten

Where you can find me:

Workbench on FaceBook  Google Plus  YouTube

  • Member since
    September 2011
Posted by fightnjoe on Friday, April 8, 2016 7:50 AM

Mike you are very kind.  Many thanks.


Greg to be honest I have no doubt you could do this, most likely you would do it much better than I.  I encourage all to give this type of thing a go.  You never know how it will turn out without giving it a shot.


Joe

Veterans,

Thank You For Your Sacrifices,

Never To Be Forgotten

Where you can find me:

Workbench on FaceBook  Google Plus  YouTube

  • Member since
    May 2013
  • From: Indiana, USA
Posted by Greg on Monday, April 4, 2016 1:56 PM

Thank you for that explanation! Bow Down

I overcomplicate tasks in my own mind. Now that you explained how you did it, I might even be able to pull such a thing off in some fashion. Geeked

  • Member since
    February 2007
  • From: Brunswick, Ohio
Posted by Buckeye on Monday, April 4, 2016 11:15 AM

That is just awesome work!  I wish I had half your ambition.Bow Down

Mike

  • Member since
    September 2011
Posted by fightnjoe on Monday, April 4, 2016 10:39 AM

Greg to be honest it is all pretty easy.  For the wings I laid out tape on the panels I wanted to keep and then used the backside of an old exacto blade I worked next to the tape.  Scoring until I was nearly through and then sliced with a new blade.


Glad you are liking this so far.


Joe

Veterans,

Thank You For Your Sacrifices,

Never To Be Forgotten

Where you can find me:

Workbench on FaceBook  Google Plus  YouTube

  • Member since
    May 2013
  • From: Indiana, USA
Posted by Greg on Monday, April 4, 2016 9:42 AM

I am SO glad I discovered this thread this morning.

This is really something, and to be able to watch it come together in real time is a true treat, Joe.

If I might time travel back to Jan 1, how did you accomplish those wing cutouts so neatly? (and btw, thank you for explaining how you scratched those bulkheads a month or so ago. Who whould thunk...)

  • Member since
    September 2011
Posted by fightnjoe on Monday, April 4, 2016 8:53 AM

You are both very very kind.  Many thanks.


Joe

Veterans,

Thank You For Your Sacrifices,

Never To Be Forgotten

Where you can find me:

Workbench on FaceBook  Google Plus  YouTube

  • Member since
    November 2003
  • From: Naples, FL
Posted by tempestjohnny on Sunday, April 3, 2016 5:36 AM
This has and is one of the coolest tutorials on research and adding extras to a kit. I don't know about you but I think I'm going to buy stock in Evergreen plastics. This build should bump up the price.


  • Member since
    June 2014
Posted by BrandonK on Saturday, April 2, 2016 5:28 PM

I think I am seeing another FSM article coming to life here.

BK

On the bench:

A lot !! And I mean A LOT!!

2024 Kits on deck / in process / completed   

                         14 / 5 / 2  

                              Tongue Tied

  • Member since
    September 2011
Posted by fightnjoe on Saturday, April 2, 2016 5:14 PM

fermis

What can I say?!!!YesYes


I believe that spoke volumes,  Many thanks.


My friends most of the cockpit is now ready for paint.


There are a few things that I have not worked yet but they can be done at paint.  


I added a box on the starboard side, reworked the frame a bit, reworked the instrument panel to add some detail that was lacking, and added just a couple of things to the floor/top of the wing.


This section is now far enough that I can move on.  


Next up will be the firewall and the engine compartment moving into the engine.  


Many thanks all for sticking around this long.


All comments, critiques, and criticism are encouraged.


Joe

Veterans,

Thank You For Your Sacrifices,

Never To Be Forgotten

Where you can find me:

Workbench on FaceBook  Google Plus  YouTube

  • Member since
    January 2009
  • From: hamburg michigan
Posted by fermis on Friday, April 1, 2016 11:56 PM

What can I say?!!!YesYes

  • Member since
    September 2011
Posted by fightnjoe on Friday, April 1, 2016 10:47 PM

On to the Starboard side of the cockpit.  A little of detail but to be honest I missed a couple of things that I will have in the next update.


Radio boxes, a light, and the canopy handle dominate this side.  


Now let me back up a bit, playing with different camera settings.  Here are a couple of shots of the Port side using a different background and different settings.


Next up will be the top of the wing/floor of the cockpit.


All comments, critiques, and criticism are encouraged.


Joe

Veterans,

Thank You For Your Sacrifices,

Never To Be Forgotten

Where you can find me:

Workbench on FaceBook  Google Plus  YouTube

  • Member since
    September 2011
Posted by fightnjoe on Thursday, March 31, 2016 9:40 AM

Very kind, thank you.


lawdog114
One Joe to another.................speechless. You are the master of the cut away my friend.
 

My friend I thank you for the very kind comment, in my mind though Dan Jayne was the master.  I fall far short of his level.


Joe

Veterans,

Thank You For Your Sacrifices,

Never To Be Forgotten

Where you can find me:

Workbench on FaceBook  Google Plus  YouTube

  • Member since
    June 2014
Posted by BrandonK on Wednesday, March 30, 2016 10:47 PM

Truly impressive to say the least.

BK

On the bench:

A lot !! And I mean A LOT!!

2024 Kits on deck / in process / completed   

                         14 / 5 / 2  

                              Tongue Tied

  • Member since
    February 2012
  • From: Olmsted Township, Ohio
Posted by lawdog114 on Wednesday, March 30, 2016 8:55 PM
One Joe to another.................speechless. You are the master of the cut away my friend.

 "Can you fly this plane and land it?...Surely you can't be serious....I am serious, and don't call me Shirley"


  • Member since
    September 2011
Posted by fightnjoe on Tuesday, March 29, 2016 9:50 PM

How about a long overdue, a month since the last one, update????


When last we saw our hero the framing for the cockpit had been readied and installed.  We had prepared to begin to start detailing.


This update is all about the seat frame and the port side.  


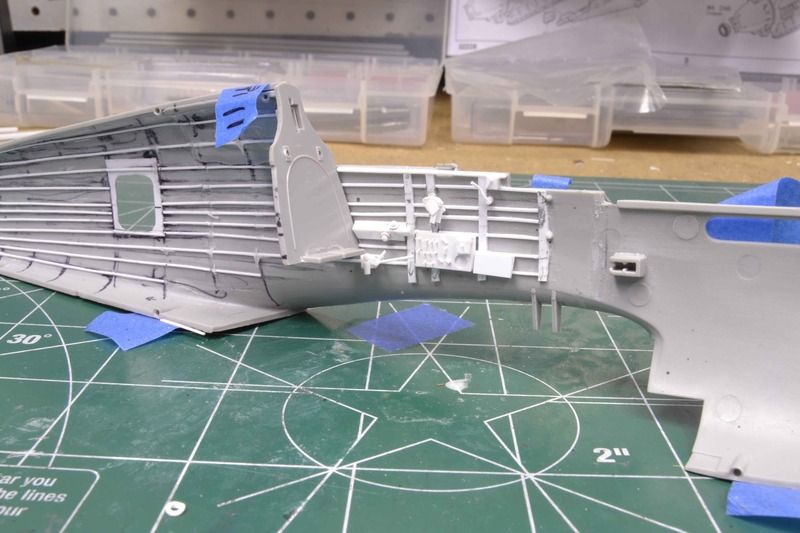
Working off of several pictures work began with the electrical panels and the throttle control.  Using strip, rod, tube, and scrap plastic the panels were fashioned.  After they were ready some little odds and ends on the port side were fashioned to match the pictures.  


The port side.


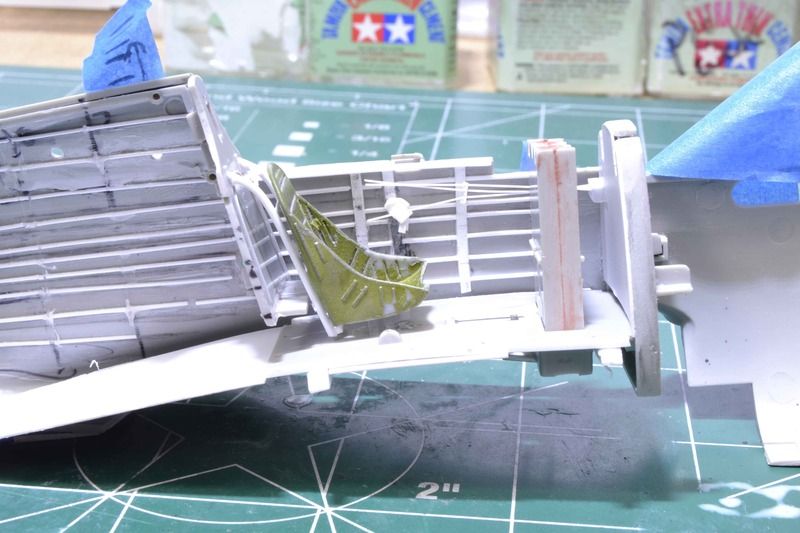
I also worked on the seat framing.  This is not 100% accurate but needed to have a bit more strength than what I could see for a plastic frame.  I canibalized a seat from the parts box and have it in place temp.


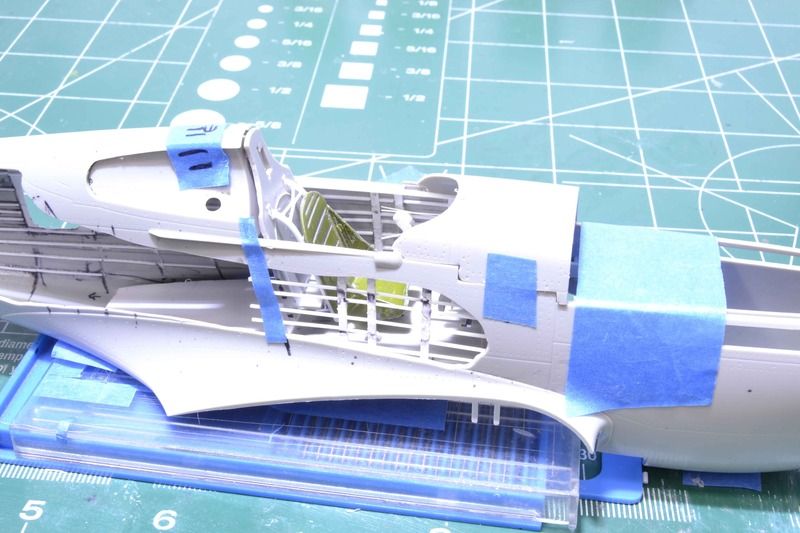
And finally just a glimpse of what this looks like, minus the port detail, with the fuselage together.


That is about all the detail seen in my pictures for the Port side.  Next up will be to work on the Starboard side.


All comments, critiques, and criticism are encouraged.


Joe

Veterans,

Thank You For Your Sacrifices,

Never To Be Forgotten

Where you can find me:

Workbench on FaceBook  Google Plus  YouTube

  • Member since
    September 2011
Posted by fightnjoe on Saturday, March 26, 2016 10:15 PM

Its back......on the bench that is.


Joe

Veterans,

Thank You For Your Sacrifices,

Never To Be Forgotten

Where you can find me:

Workbench on FaceBook  Google Plus  YouTube

  • Member since
    September 2011
Posted by fightnjoe on Monday, February 22, 2016 11:39 PM

I am most humbled by all of the kind words.  


The parts are small yes but in this scale they are needed.  In a smaller scale they may not.  My stock of styrene at the moment is being reduced a bit (obviously) but I store it in a larger tupperware type of container.  I will get a picture of it next round to show it to you.


Joe

Veterans,

Thank You For Your Sacrifices,

Never To Be Forgotten

Where you can find me:

Workbench on FaceBook  Google Plus  YouTube

  • Member since
    March 2015
Posted by qlabs on Monday, February 22, 2016 11:22 AM

What an amazing build! I can't wait to see more.

I'm curious to see the stockpile of styrene you have?
I'm picturing either a librairy of highly organized plastic of every variety or a big box of searching Wink

  • Member since
    June 2013
Posted by bvallot on Monday, February 22, 2016 11:10 AM

She's starting to come together Joe. =]  Some of these parts are so tiny, I have my doubts that I'm ready to tackle that at 1:48.

Coming along nicely!

On the bench:  

Tamiya F4U-1  Kenneth Walsh


  • Member since
    September 2011
Posted by fightnjoe on Monday, February 22, 2016 9:30 AM

Many many thanks all.  


Rich I will remember that.


Joe

Veterans,

Thank You For Your Sacrifices,

Never To Be Forgotten

Where you can find me:

Workbench on FaceBook  Google Plus  YouTube

  • Member since
    June 2014
Posted by BrandonK on Monday, February 22, 2016 9:16 AM

You are really pouring your soul into this one. The detail is already quite impressive.

BK

On the bench:

A lot !! And I mean A LOT!!

2024 Kits on deck / in process / completed   

                         14 / 5 / 2  

                              Tongue Tied

  • Member since
    September 2005
  • From: North Pole, Alaska
Posted by richs26 on Sunday, February 21, 2016 10:25 PM

The NAVAIR Museum's P-40B's black leather head cushion is wrong as Curtiss used brown leather as evidenced in the many LIFE color photos of the assembly line.

WIP:  Monogram 1/72 B-26 (Snaptite) as 73rd BS B-26, 40-1408, torpedo bomber attempt on Ryujo

Monogram 1/72 B-26 (Snaptite) as 22nd BG B-26, 7-Mile Drome, New Guinea

Minicraft 1/72 B-24D as LB-30, AL-613, "Tough Boy", 28th Composite Group

  • Member since
    November 2003
  • From: Naples, FL
Posted by tempestjohnny on Sunday, February 21, 2016 7:31 PM
Awesome!!!


  • Member since
    September 2011
Posted by fightnjoe on Sunday, February 21, 2016 6:05 PM

The next major construction stage is to work on the cockpit.  


This begins with framing in the pit.  Bulheads and frames.  After putting in the bulkheads each stringer was cut to fit.  I used .020 by .040 strip for the bulkhead.  I used .020 square strip for the stringers.  


And how it looks all together.  Taped of course.


Now there are a couple of major flaws in the pictures.  One I have fixed the other I will live with.  


Moving right along and actually kind of quick with this part so far.  


All comments, critiques, and criticism are encouraged.


Joe

Veterans,

Thank You For Your Sacrifices,

Never To Be Forgotten

Where you can find me:

Workbench on FaceBook  Google Plus  YouTube

  • Member since
    September 2011
Posted by fightnjoe on Saturday, February 20, 2016 10:34 AM

Many many thanks.


GAF appreciated.  I have actually been looking for that link.  I had it but it was lost somewhere.  


Joe

Veterans,

Thank You For Your Sacrifices,

Never To Be Forgotten

Where you can find me:

Workbench on FaceBook  Google Plus  YouTube

JOIN OUR COMMUNITY!

Our community is FREE to join. To participate you must either login or register for an account.

SEARCH FORUMS
FREE NEWSLETTER
By signing up you may also receive reader surveys and occasional special offers. We do not sell, rent or trade our email lists. View our Privacy Policy.