SEARCH FINESCALE.COM

Enter keywords or a search phrase below:

Completed! 1/72 Airfix Fw-190 A-8

2134 views
25 replies
1 rating 2 rating 3 rating 4 rating 5 rating
  • Member since
    April 2005
  • From: Piscataway, NJ!
Posted by wing_nut on Tuesday, January 5, 2016 8:02 AM
Really great job. You really captured that multi toned look from the back basing. Nice. And +1 on that primer. Great stuff.

Marc  

  • Member since
    January 2015
Posted by BrandonD on Monday, January 4, 2016 11:47 PM

Thanks, Johnny! I may just have to do that.

  • Member since
    November 2003
  • From: Naples, FL
Posted by tempestjohnny on Sunday, January 3, 2016 5:55 AM
BD really well done. You did great on the paint and the mottling. Time to add a 72nd scale shelf in the display case


  • Member since
    January 2015
Posted by BrandonD on Saturday, January 2, 2016 1:57 AM

BrandonK - Thank you!

MoparMadness - Yeah, my eye strain is a testament to that :)

Jack - Thanks!

Patrick - Thank you. I think this is my best so far, so hopefully I can manage to reproduce it on the next build.

-BD-

  • Member since
    March 2013
Posted by patrick206 on Friday, January 1, 2016 12:48 PM

BD - It just looks perfect, the camo finish is among the best I've seen. I'd say you nailed this one, always a pleasure to follow one of your builds. Thanks.

Patrick

  • Member since
    March 2015
  • From: Streetsboro, Ohio
Posted by Toshi on Friday, January 1, 2016 8:23 AM

Everything looks absolutely beautiful, I love the way You did the weathering!

Toshi

On The Bench: Revell 1/48 B-25 Mitchell


Married to the most caring, loving, understanding, and beautiful wife in the world.  Mrs. Toshi


  • Member since
    April 2006
  • From: ON, Canada
Posted by jgeratic on Friday, January 1, 2016 12:35 AM

A fine example of the Butcher Bird, and I like how you handled the undersides. Yes

Yeah, a lot of these new 72nd kits are amazing with their finer details, making it a worthwhile to consider as a regular go to scale.

regards,

Jack

  • Member since
    April 2015
Posted by Mopar Madness on Thursday, December 31, 2015 11:32 PM

You sure that's 1/72!  Well done!

Chad

God, Family, Models...

At the plate: 1/48 Airfix Bf109 & 1/35 Tamiya Famo

On deck: Who knows!

  • Member since
    June 2014
Posted by BrandonK on Thursday, December 31, 2015 3:33 PM

That kit looks much larger than 1/72, you did a bang up job, again. I really like the scheme too. Nice !!

BK

On the bench:

A lot !! And I mean A LOT!!

2024 Kits on deck / in process / completed   

                         14 / 5 / 2  

                              Tongue Tied

  • Member since
    January 2015
Posted by BrandonD on Thursday, December 31, 2015 3:23 PM

Thanks, Bish! I have mostly 1/48 and still prefer that overall, but I will definitely be adding some 1/72 kits to the mix. This build was nothing but fun, and the mottling was a nice challenge with the airbrush. And it sure beats 1/48 on price.

-BD-

  • Member since
    December 2002
  • From: Bury St Edmunds, Suffolk, England
Posted by Bish on Thursday, December 31, 2015 3:05 PM

That is a sweet build BD, really nice finish and love that scheme. I have a 32nd 190 with the same markings, now i want to build it even more.

And i am glad you are so happy with building a 72nd kit. I hate when people say it has no detail and i am pleased you were pleasantly surprised.

I am a Norfolk man and i glory in being so


On the bench: Airfix 1/72nd Harrier GR.3/Fujimi 1/72nd Ju 87D-3

  • Member since
    January 2015
Posted by BrandonD on Thursday, December 31, 2015 3:02 PM

Well, this is officially my last build of 2015. It's also the first 1/72 aircraft I've built in about 20 years.

I have to say that this was definitely a surprise to me - both because it was a gift and because I was totally blown away by the amount of detail. I knew Airfix is doing great stuff in 1/48 these days, having built their Hurricane earlier this year, but I had no idea 1/72 could pack so much in.

The plane is out of the box except for the harness, which I made from Tamiya tape, and the inboard cannon, which I replaced with Albion Alloys brass tubing. I also filled in the tail access panel on the starboard side, as it shouldn't be there.

Paints are Tamiya on the underside (in the mix for RLM 76 of 7 parts white, 2 parts light gray and 1 part light blue) and Gunze Mr. Color RLM 74 and 75 on the topside. Primer was Gunze Mr. Surfacer 1500 black. Washes are Flory Grime on the underside and Flory Dark Dirt on the topside, with post-flat clear weathering with Flory Dark Dirt to stain some areas.

Thanks everyone for looking, and have a happy new year! I can't wait to get started on my Lublin R.XIII ter Hydro for the floats and boats group build hosted by BrandonK. Hope to see all your builds throughout the year!

-BD-

  • Member since
    June 2014
Posted by BrandonK on Tuesday, December 29, 2015 8:55 AM

It looks great. That kit has some really nice detail.

BK

On the bench:

A lot !! And I mean A LOT!!

2024 Kits on deck / in process / completed   

                         14 / 5 / 2  

                              Tongue Tied

  • Member since
    August 2013
Posted by Jay Jay on Tuesday, December 29, 2015 8:44 AM

Geez that looks great !  I may hafta break down and get the Flory washes everyone's so keen on and figure out how to use them as well as you have.  Your pastel technique is very convincing as well.


 I'm finally retired. Now time I got, money I don't.

  • Member since
    January 2015
Posted by BrandonD on Tuesday, December 29, 2015 2:16 AM

Ok, I got the decals applied, and they went down really nice. Airfix uses Cartograf, and despite the waviness in the snakes, there weren't any issues getting them on, and they're tough enough to stand up to movement when I aligned them. I used spare Tamiya decals for the swastikas, as Airfix doesn't provide them. After decals came Flory washes (Grime for the underside/sides, and Dark Dirt for the wings/top). Here it is with the gloss coat applied and the washes on.

Tonight I sprayed the flat coat (Tamiya flat clear). Then I started weathering. The ejection port and exhaust streaking were done by using pointed Q-tips (sold in the makeup aisle) with ground up Yarka Sauce pastel chalks. Other weathering came with Flory Dark Dirt wash applied and wiped off right away, as it stains the flat coat slightly for some decent variation.

The inboard cannon are meant to be installed before closing the wings, but I knew that would create a pain for wing root sanding and for masking, so I chopped off the barrels and just installed the receivers. Tonight, I went to add them in, but I broke one of them trying to push it through the hole in the wing, so I just cut them both out of a length of Albion Alloys brass tubing, and that solved that.

Now I need to add a few more bits like the pilot's step, paint the engine, cooling fan and prop, and then paint the spinner, which has a spiral on it that Airfix didn't provide a decal for. Well, I knew that would happen someday, so why not now?

Thanks for looking!

-BD-

  • Member since
    January 2015
Posted by BrandonD on Tuesday, December 29, 2015 2:08 AM

Mike, Bish - thank you!

MoparMadness - Thanks! I hope to see the results posted on here. I'm sure that it will come out really nice.

-BD-

  • Member since
    April 2015
Posted by Mopar Madness on Monday, December 28, 2015 9:51 AM

Looking good!  Since mottling was predominately a field applied modification specific to the theatre and didn't have much in the way of an RLM specification to size, color, etc... different sizes and hues of mottles make the overall effect more believable.  Yours is looking great so far and looks quite real.  I'm quite the opposite with my current build.  I've only done 1/72 but am going to attempt to mottle a 1/48 Eduard A-8.  I'd like to use Gunze but a respritory issue keeps me well away from them.  I've had great luck with Model Master but I'm going to attempt to use Vallejo Model Air.  Can't wait to see the end result of yours!

Chad

God, Family, Models...

At the plate: 1/48 Airfix Bf109 & 1/35 Tamiya Famo

On deck: Who knows!

  • Member since
    November 2015
Posted by The Migrant on Monday, December 28, 2015 8:01 AM

Looking really good Brandon, some very subtle paint shading effects that should look great under the final flat coat.

Mike G

Western Canada

  • Member since
    December 2002
  • From: Bury St Edmunds, Suffolk, England
Posted by Bish on Monday, December 28, 2015 2:29 AM
Really nice work on that scheme, I think the mottling is looking good, its certainly daunting the first time you do it, especially in 72nd.

I am a Norfolk man and i glory in being so


On the bench: Airfix 1/72nd Harrier GR.3/Fujimi 1/72nd Ju 87D-3

  • Member since
    January 2015
Posted by BrandonD on Monday, December 28, 2015 12:34 AM

Ok, time for an update with this one. Holidays have been busy, but I've managed to get some work in on this, and have it painted now.

I used Gunze Mr. Surfacer 1500 BLack for the first time, and all I can say is I am hooked. This is my new go-to primer, and I can't say enough good things about it.
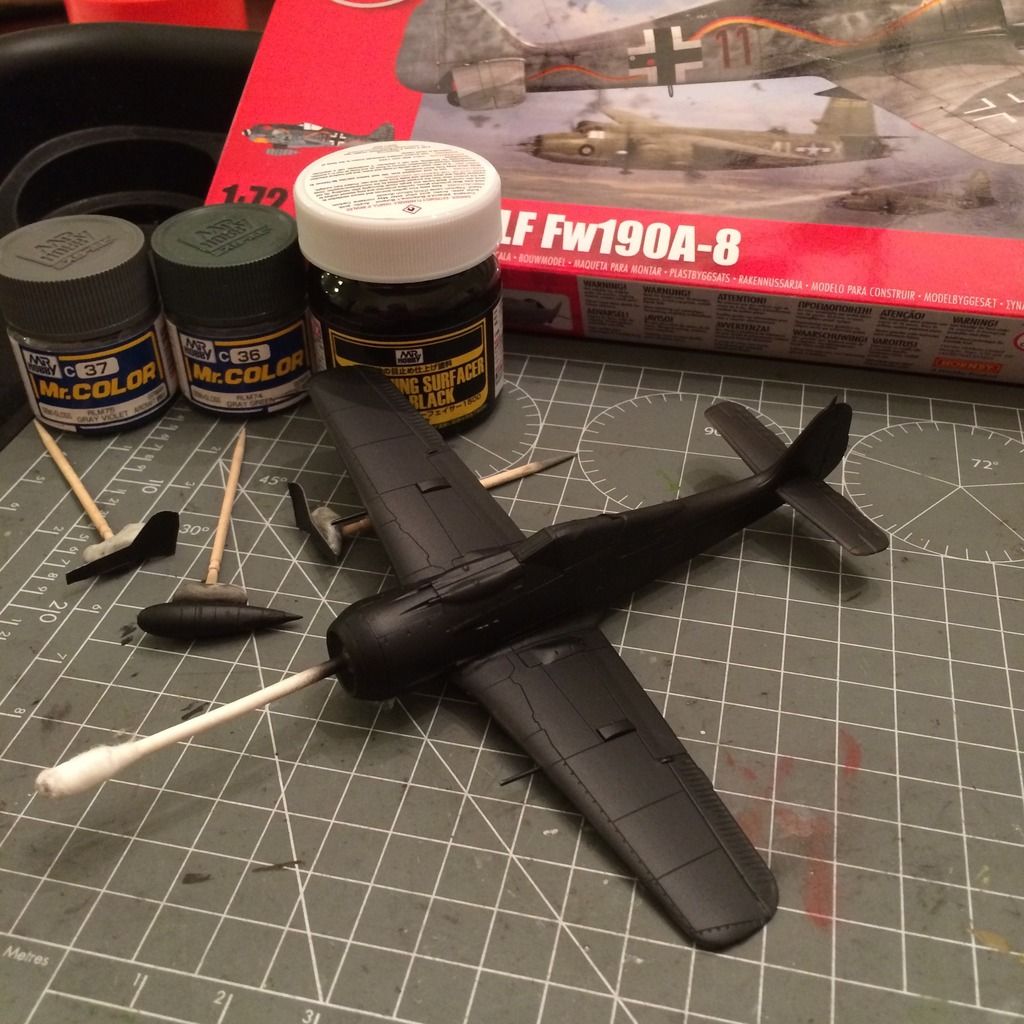
Once the whole thing was blacked, I got on to the yellow theater marking under the cowl.
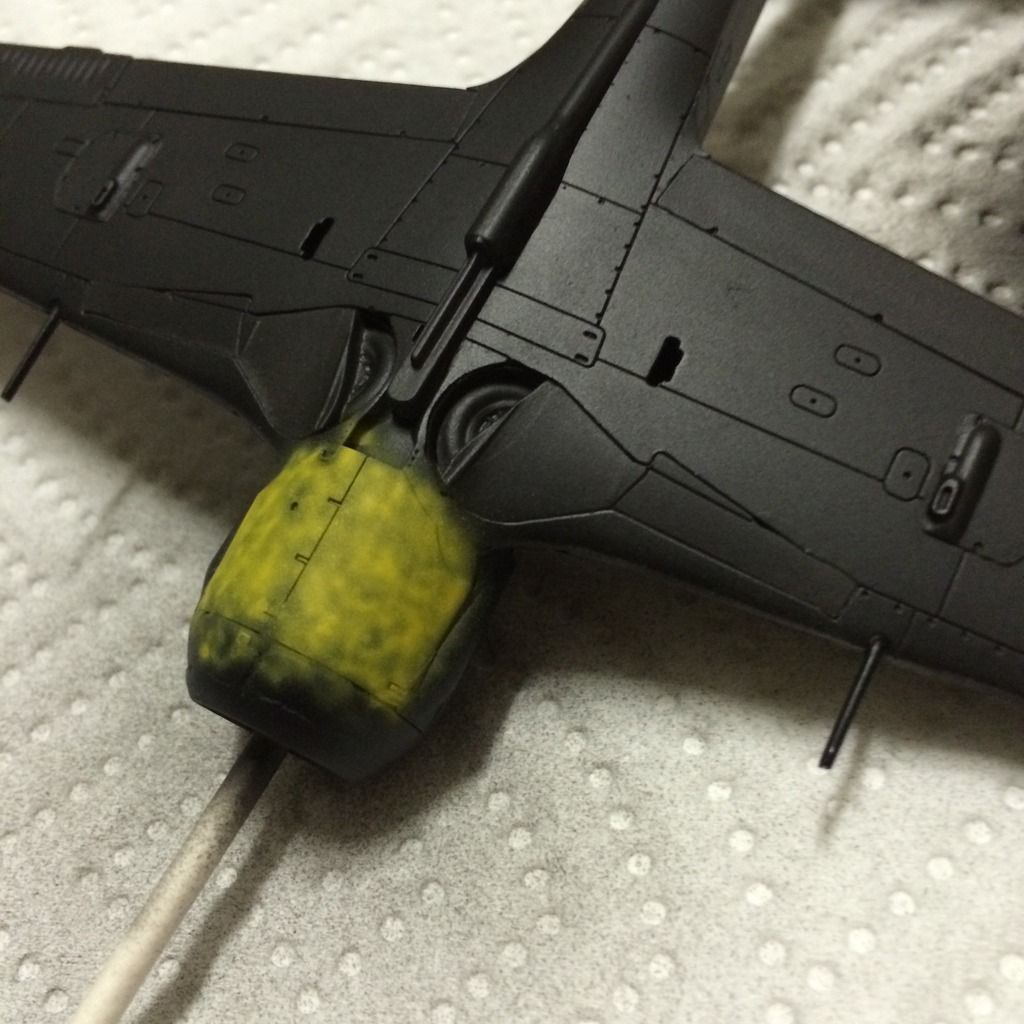
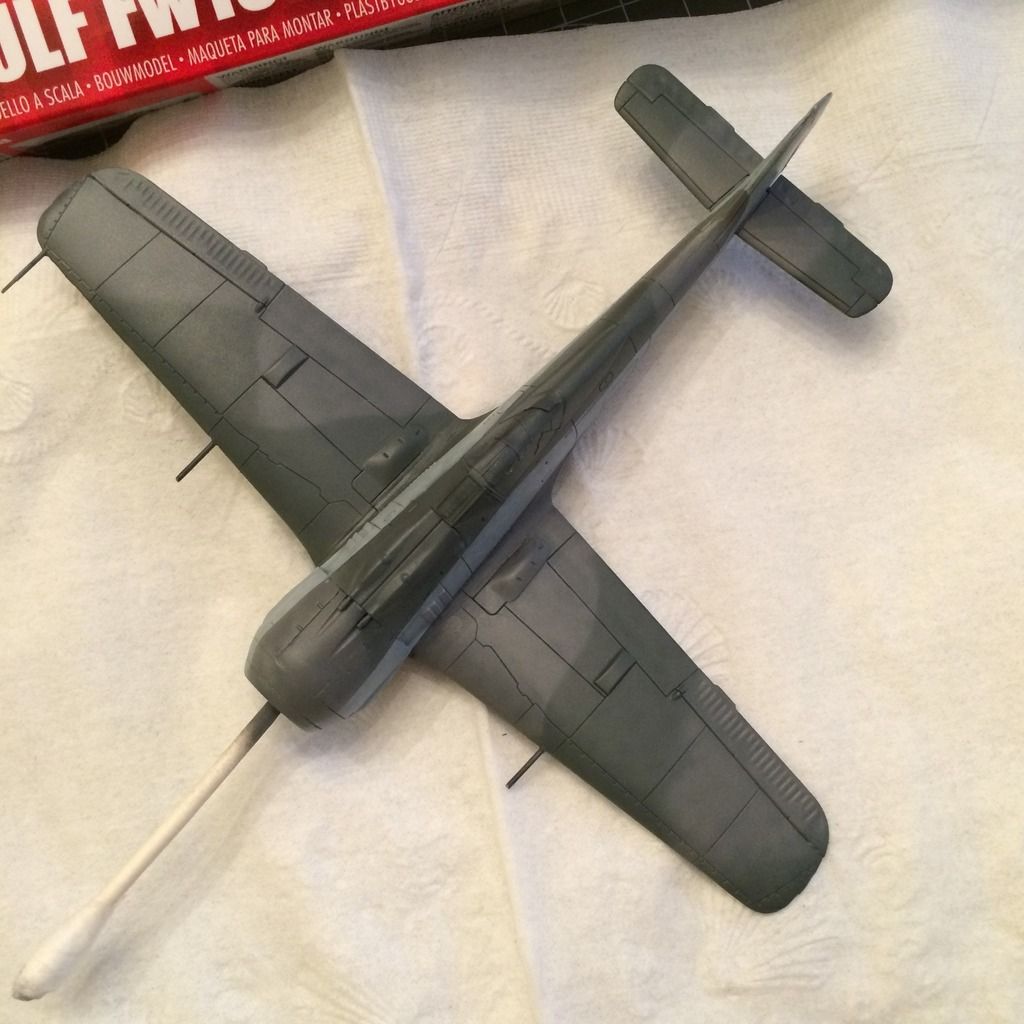
After the mottling undercoat, I sprayed the blend coat.
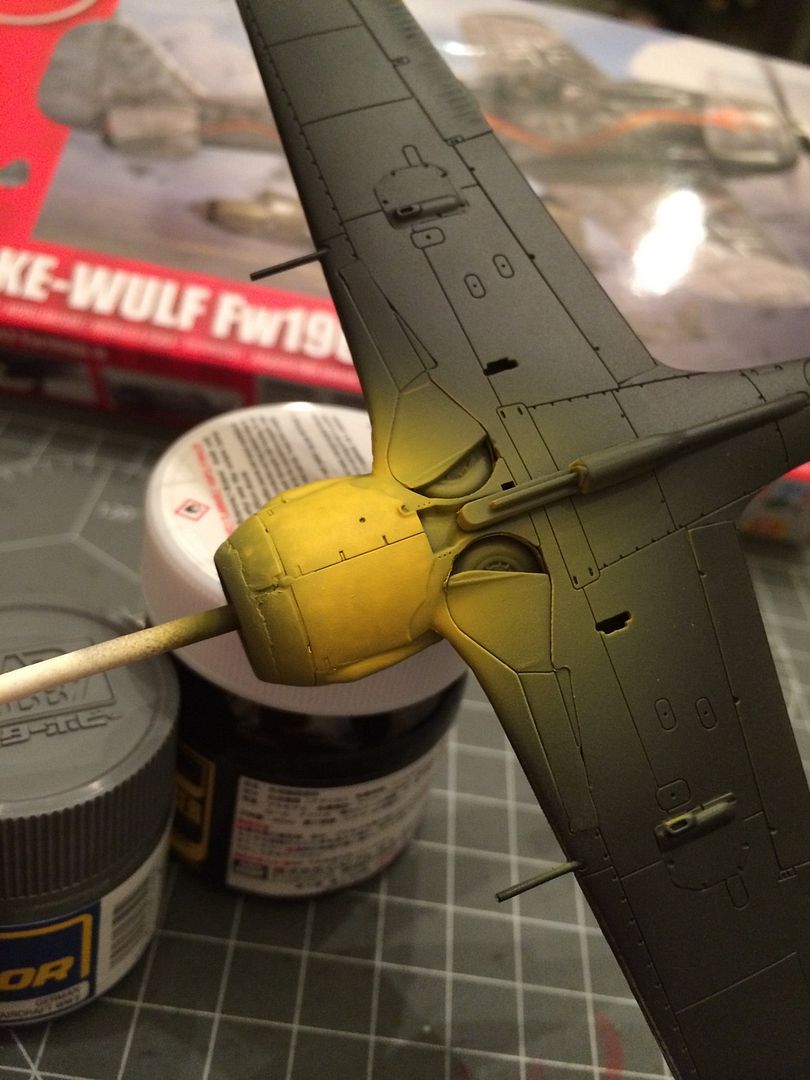
Next up was the RLM 76, which I used Tamiya paints for with the mix ratio of 7 parts white, 1 part light blue and 2 parts light grey. I followed the same mottling/blending treatment there.
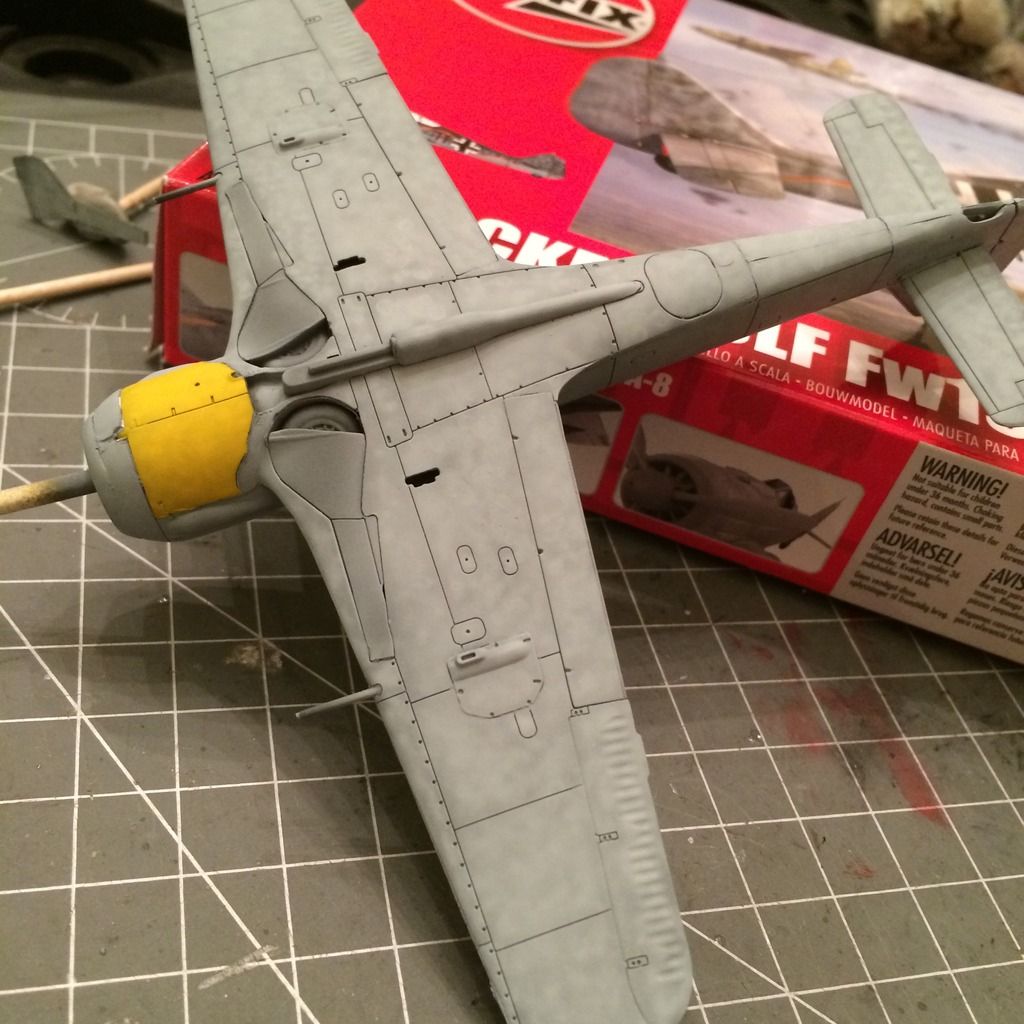
After that, I shot the topside with RLM 74 and 75. These were Gunze colors straight from the jar with no mixing. I think I need to play with thinning ratios a bit more, as I found them more tempermental than the Tamiya colors I am used to, but when they were flowing nicely, they were flowing very nicely.

The soft masking was achieved by using thin rolls of tape to hold the masks off the plastic about 1mm and just being careful with the airbrush.
Then came the mottling. I'd been both dreading and anticipating this, given that it's 1/72, and I normally work in 1/48. I used the Gunze Grey Violet, and I eventually got the ratio right (3 drops paint to 14 drops thinner at 12 PSI).
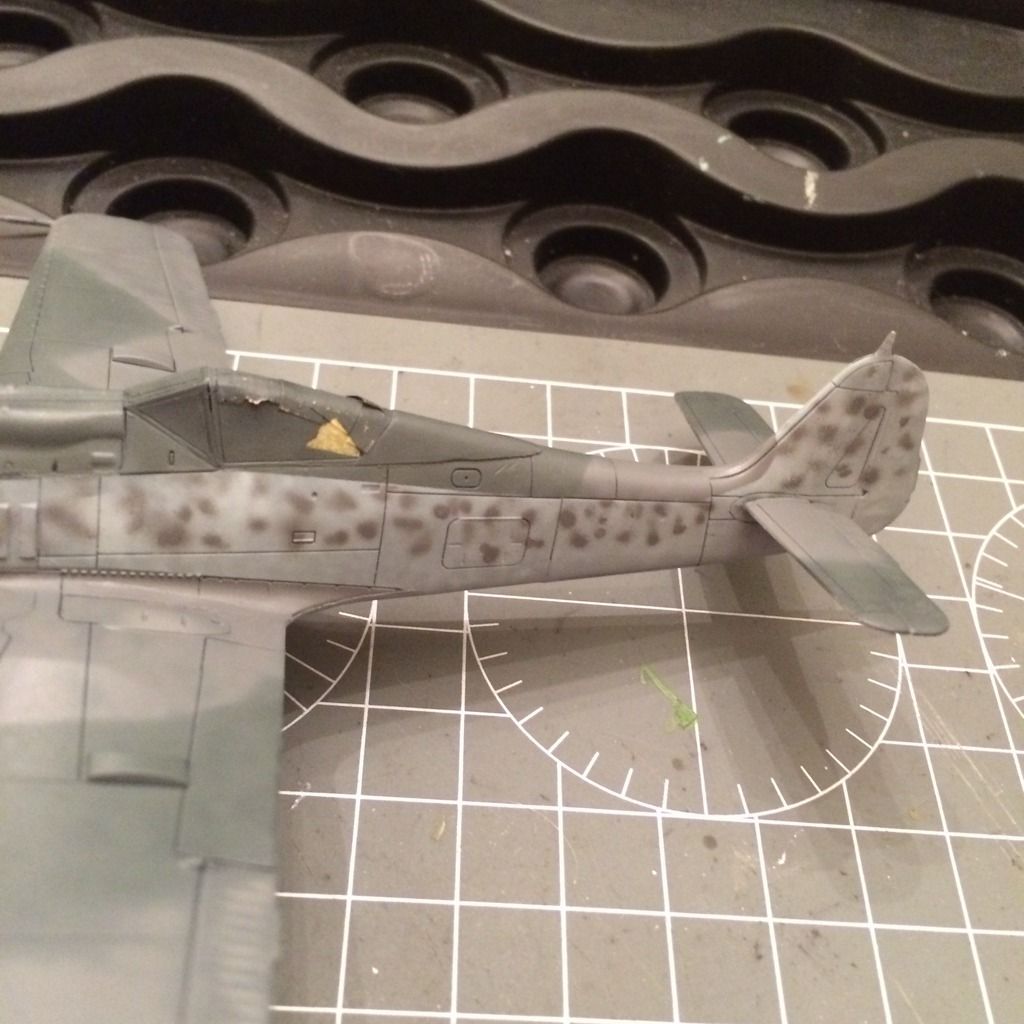
I messed up the mottling on the left side and had to go back and fix it by spraying in a bit of the light blue. It was nerve-wracking, but I'm glad I did it rather than have overscale blobs of paint, even though it's slightly lighter in a couple of areas (which will hopefully blend with decals and weathering). I guess that's the downside of freehanding it.

Anyway, that's all for now. Decals to come soon!

-BD-

  • Member since
    January 2015
Posted by BrandonD on Wednesday, December 16, 2015 12:46 AM

Thanks, all! Yeah, the detail is really nice. The panel lines are pretty restrained, too. The aileron and elevator surface texture is a bit exaggerated, but I plan to leave it as-is, since I don't think it detracts from the model.

Mopar - Thanks for the heads-up. I didn't run into that problem, but rather ran into it on the other end. I had to trim a bit off the instrument panel sides so the coaming would come together. After I got it where I could close the top of the cockpit coaming, I test-fitted the windscreen, and it was perfect. I actually have small gaps at the wing roots to the fuselage, but I got putty on them tonight, and it looks like it should require very little sanding.

In anticipating the wing root seams, I actually cut the barrels off the inboard cannon and just installed the receivers into the wheel wells. I'm glad I did, or else I'm sure I would have knocked them off by now. As it is, I'm keeping my fingers crossed for that pitot tube's survival.

I'm not used to working on kits this small, and it's ratcheting up the fun level.

-BD-

  • Member since
    November 2015
Posted by The Migrant on Tuesday, December 15, 2015 3:47 PM

I haven't actually seen this kit 'in the flesh', looks like there's a lot of detail in the cockpit and wheel wells. I'm really impressed with what Airfix are doing these days. Great work so far, Brandon.

Mike G

Western Canada

  • Member since
    April 2015
Posted by Mopar Madness on Tuesday, December 15, 2015 1:15 PM

Man, she's a beauty for sure.  Nice progress!  I made mention on one of your 'gram posts about the fit issue I had with the cockpit tub and my need to to sand it down.  Did you happen to encounter that too?  Looks like your the fuselage came together really well!  

Chad

God, Family, Models...

At the plate: 1/48 Airfix Bf109 & 1/35 Tamiya Famo

On deck: Who knows!

  • Member since
    June 2014
Posted by BrandonK on Tuesday, December 15, 2015 12:15 PM

Nice work. Curious to see how this looks overall. I am always impressed with how good some of these smaller kits look when done.

BK

On the bench:

A lot !! And I mean A LOT!!

2024 Kits on deck / in process / completed   

                         14 / 5 / 2  

                              Tongue Tied

  • Member since
    November 2003
  • From: Naples, FL
Posted by tempestjohnny on Tuesday, December 15, 2015 11:37 AM
Looking good. I too have heard good things about the Mr Color. I have used the Mr Hobby Color the aqueous line and it is awesome


  • Member since
    January 2015
Completed! 1/72 Airfix Fw-190 A-8
Posted by BrandonD on Tuesday, December 15, 2015 1:14 AM

Hi all,

I was given the new-tool 1/72 Airfix FW-190 A-8 by a friend, and I have to say, it's been a while since I built a 1/72 plane (20+ years) and I am amazed at the amount of detail in this.

I started, of course, with the cockpit, which I primed in black, then followed up with a splotchy pattern of Tamiya German Gray and RLM Gray, then oversprayed with German Gray. THe photo doesn't show much of the tonal variation, and frankly, it's hard to see at this size in person, but it is sort of there, haha.

I made the belts with Tamiya tape painted Khaki, and after looking at the above photo, I realized I had done them wrong, so I added pieces to connect to the rear deck, then painted the buckles, closed the fuselage and went to work on the wheel bays (painting them Model Master RLM 02).

The kit is coming together nicely, with just a few minor fixes fit-wise, and I filled in the panel line for the access hatch on the right side of the tail, as only the port side actually had them. My lower wing piece was a bit warped, but clamping it with rubber bands for the assembly solved the issue, and it's getting closer to full priming stage.

Next up is more assembly, then adding the canopy, masking and priming. I ordered Mr. Color RLM 74 and RLM 75 for the topside colors, and I'll mix up some Tamiya paints for the RLM 76 on the underside (mainly since Sprue Brothers was out of the Mr. Color bottle). I've never used Mr. Color before but am looking forward to trying it out, as I've heard great things.

Thanks for looking!

-BD-

JOIN OUR COMMUNITY!

Our community is FREE to join. To participate you must either login or register for an account.

SEARCH FORUMS
FREE NEWSLETTER
By signing up you may also receive reader surveys and occasional special offers. We do not sell, rent or trade our email lists. View our Privacy Policy.